

Go to modelshipwrights.com for the current dynamic site!


Hosted by Jim Starkweather
1/350 FINE MOLDs IJN AYANAMI

Quincannon

Joined: June 22, 2018
KitMaker: 275 posts
Model Shipwrights: 273 posts

Posted: Saturday, September 08, 2018 - 06:52 AM UTC
Want to correct the record here. Amatsukaze was built by Maizuru Naval Arsenal, and not by Uraga. Whitley's "Destroyers of World War II is incorrect in this instance

TimReynaga
Joined: May 03, 2006
KitMaker: 2,500 posts
Model Shipwrights: 1,830 posts

Posted: Tuesday, September 11, 2018 - 01:38 AM UTC
Quoted Text
So with this change, you have gone from the paint selection frying pan into the fire, and right beside me. Move over
Your's, and my about to be started Amatsukaze, were both built in private yards so what color paint is the question?
As for the painting question, Ayanami underwent maintenance at Kure in April/May 1942 after some significant war service. My bet is that she also would have been repainted then, so she probably still wore Kure Grey when she was lost that November.

Quincannon
Joined: June 22, 2018
KitMaker: 275 posts
Model Shipwrights: 273 posts
Posted: Tuesday, September 11, 2018 - 05:30 AM UTC
That is probably a pretty good bet Tim, especially if she was dry docked during her refit.
I tend to use Kure in the absence of firm data anyway, because it is an in between color, not too dark, and not too light.
I tend to use Kure in the absence of firm data anyway, because it is an in between color, not too dark, and not too light.

rolltide31

#377
Joined: June 27, 2010
KitMaker: 1,481 posts
Model Shipwrights: 1,332 posts

Posted: Thursday, October 11, 2018 - 11:18 AM UTC
Gents,
Sorry for the long delay. I was focused on moving the Shokaku forward, now that I have some color on her I am focusing on the Ayanami. I have a club contest in December and I plan to enter with this build.
Anyway, so far the fit is pretty decent. The stern has a little gap that will need some filling. There are some flash issues but nothing that is so bad that it requires extensive removal and repair.
The one issue with the kit is that the hull is not molded with the Degaussing cable, so I had to procure an aftermarket set. Fine Molds does have a PE set for the cable but I was unable to find it. I went a head and acquired the Alliance Modelworks set. Unfortunately it is not exactly historically accurate but I am happy with it so far.
In the last picture you can se the Shokaku. I dry fitted the flight deck with a few of the aircraft. I'm pretty happy with it right now.
Anyway, you can also see in the last two pictures that I sanded off the port brows and added Eduard IJN portholes. It is mighty tedious but I wanted to take this build the extra mile.
Does anyone know which portholes would have been covered (not remembering the correct term)?
Anyway, the degaussing cable and the new portholes are complete on the starboard side, now to move onto the port side.
I also started on the bridge. So far there is plenty of PE from the Infini Kagero kit that fits the Ayanami.
You can also see that I removed the molded bollards and replaced them with Alliance Modelworks Destroyer Bollards. Another modification was removing the molded vents and replacing them with Hasegawa vents from one of the accessory kits
I will keep working the hull and look to have some color on it before the end of the weekend. We will see.
I will have a more steady update now that I am focusing on the Ayanami.
Thanks for stopping in and as always, comments, suggestions and criticism are always welcome.
thanks
Dave

d6mst0
#453
Joined: August 28, 2016
KitMaker: 1,925 posts
Model Shipwrights: 1,298 posts

Posted: Thursday, October 11, 2018 - 11:55 AM UTC
David,
Fine start you have made with her so far. I use the Tamiya's Degaussing cable set as it seems to be the most accurate for the larger ships. I have not built a Japanese destroyer yet so I have not investigated how many cables are in the bundle going around the ship to determine if the Tamiya would work. I didn't see in your photos where the cables started and ended. Interested what the cover plate look like.
As for the porthole covers that would depend on status of the ship at that time. I sure if they were expecting combat they would all be covered were in port they would all be open. Some portholes could stay covered all of the time. I think this area should be based on the modellers opinion and artistic mood.
Mark
rolltide31
#377
Joined: June 27, 2010
KitMaker: 1,481 posts
Model Shipwrights: 1,332 posts
Posted: Thursday, October 11, 2018 - 01:11 PM UTC
Mark,
The inaccuracy of the degaussing cable is the layout. The photos I have been able to find of the IJN Ayanami show that it was equipped with the covered degaussing cable, so that part is accurate. The Alliance Modelworks degaussing cable did not have rounded bends in the cable so I had to adjust.
As far as the porthole covers, guess I will need to add them, my intent is to mount the ship in a dynamic diorama with the ship launching torpedoes during the second naval battle of Guadalcanal where she was sunk by the USS Washington, but not before the Ayanami sunk two US destroyers.
Thanks for the input, really appreciate the comments
Dave
Quincannon
Joined: June 22, 2018
KitMaker: 275 posts
Model Shipwrights: 273 posts
Posted: Thursday, October 11, 2018 - 03:27 PM UTC
Splendid work David. Following closely.
rolltide31
#377
Joined: June 27, 2010
KitMaker: 1,481 posts
Model Shipwrights: 1,332 posts
Posted: Thursday, October 11, 2018 - 11:41 PM UTC
Thanks Chuck
Quincannon
Joined: June 22, 2018
KitMaker: 275 posts
Model Shipwrights: 273 posts
Posted: Friday, October 12, 2018 - 04:32 AM UTC
David: I am just curious. Does your Ayanami have the lino decks in the usual places for IJN DD's?? After posting to you last night I pulled my Aysnami (Tamiya 1/700) out that I had built many moons ago, and noticed her decks were all steel, with no lino at all. I file away the painting instructions as well on the back of the boxes, and they showed no lino too. So I am curious if these are correct as Ayanami by Tamiya is an old kit.
rolltide31
#377
Joined: June 27, 2010
KitMaker: 1,481 posts
Model Shipwrights: 1,332 posts
Posted: Friday, October 12, 2018 - 07:23 AM UTC
Chuck,
The Fine Molds kit does have the linoleum decking with the brass strip molded to the deck.
What is interesting is that the Kagero 3D book on the Fubuki Class Destroyers do not indicate brass strip but shows the decking all non slip with sections painted linoleum brown.
I am going to go with the linoleum decking and brass strips since that is what most IJN ships used for decking.
Dave
d6mst0
#453
Joined: August 28, 2016
KitMaker: 1,925 posts
Model Shipwrights: 1,298 posts
Posted: Friday, October 12, 2018 - 11:18 AM UTC
Quoted Text
Chuck,
The Fine Molds kit does have the linoleum decking with the brass strip molded to the deck.
What is interesting is that the Kagero 3D book on the Fubuki Class Destroyers do not indicate brass strip but shows the decking all non slip with sections painted linoleum brown.
I am going to go with the linoleum decking and brass strips since that is what most IJN ships used for decking.
Dave
The strips were used to hold down the linoleum so maybe the deck of a destroyer due to its smaller and narrower size didn't require them. Have you see photos of Ayanami with the strips?
I was reading that the correct width of the strip for 1/350 would have to be between .0034 to .0055mm. That is really a thin strip of brass to handle. I could see myself bending the darn thing during install. Let us know how well the installation went.
Mark
TimReynaga
Joined: May 03, 2006
KitMaker: 2,500 posts
Model Shipwrights: 1,830 posts
Posted: Friday, October 12, 2018 - 12:10 PM UTC
Quoted Text
I am going to go with the linoleum decking and brass strips since that is what most IJN ships used for decking.
Dave
Dave,
Your decision is, IMHO, the correct one. All Japanese destroyers and cruisers carried linoleum held in place with the brass strips on their weather decks. Although it is true that there was a systemic removal of linoleum decks from IJN ships during the war due to their flammability, this appears to have applied only to interior decks. In the few surviving photos clearly showing IJN DD decks, the linoleum/brass coverings appear in every one. It makes sense - wet bare steel decks are SLIPPERY! The postwar Japanese Maritime Self-Defense Force has since adopted the USN practice of using traction-textured walkways on weather decks.
Quincannon
Joined: June 22, 2018
KitMaker: 275 posts
Model Shipwrights: 273 posts
Posted: Friday, October 12, 2018 - 04:18 PM UTC
I agree on the lino as well.
I suppose I could refine my question a little and ask if anyone knows when the lino was first applied on the weather decks. Ayanami dates from 1930, so perhaps the model I have shows her original configuration,and the lino decks a later add on.
I suppose I could refine my question a little and ask if anyone knows when the lino was first applied on the weather decks. Ayanami dates from 1930, so perhaps the model I have shows her original configuration,and the lino decks a later add on.
rolltide31
#377
Joined: June 27, 2010
KitMaker: 1,481 posts
Model Shipwrights: 1,332 posts
Posted: Saturday, October 13, 2018 - 04:38 AM UTC
Mark - I have not found any photos of the Ayanami from the top view but looking at sister ships there does appear to be brass stripping along the decks.
Chuck / Tim - I agree, all evidence shows that the linoleum route is the correct one so that is what I will do.
The other aspect is that the Ayanami was sunk in 1942, still relatively early in the war and probably before they started looking at removing any linoleum decking.
As an update, the hull and deck have been primed. I am looking to paint the bottom hull and the linoleum decking later this afternoon.
Photos to follow
Dave

RussellE
#306

Joined: June 27, 2010
KitMaker: 3,959 posts
Model Shipwrights: 2,777 posts
Posted: Monday, October 15, 2018 - 10:31 PM UTC
Dave, great to see you moving this one forward 


RedDuster

Joined: March 01, 2010
KitMaker: 7,078 posts
Model Shipwrights: 6,649 posts

Posted: Monday, October 15, 2018 - 10:42 PM UTC
Nice work Dave,
Doo like the brass bits, very neat indeed, Tidy job in the degaussing coil too, they can be tricksy things to fit.
Cheers
Si
Doo like the brass bits, very neat indeed, Tidy job in the degaussing coil too, they can be tricksy things to fit.
Cheers
Si
rolltide31
#377
Joined: June 27, 2010
KitMaker: 1,481 posts
Model Shipwrights: 1,332 posts
Posted: Monday, October 15, 2018 - 11:32 PM UTC
Russell / Si,
Great to have you along for the ride and thanks for the kind words.
The degaussing cable was a bit tricky, especially along the stern and the bow.
She has been masked and painted so she is sporting her go to war colors. Will have some updated photos this afternoon.
Dave
Great to have you along for the ride and thanks for the kind words.
The degaussing cable was a bit tricky, especially along the stern and the bow.
She has been masked and painted so she is sporting her go to war colors. Will have some updated photos this afternoon.
Dave
rolltide31
#377
Joined: June 27, 2010
KitMaker: 1,481 posts
Model Shipwrights: 1,332 posts
Posted: Monday, October 22, 2018 - 01:06 PM UTC
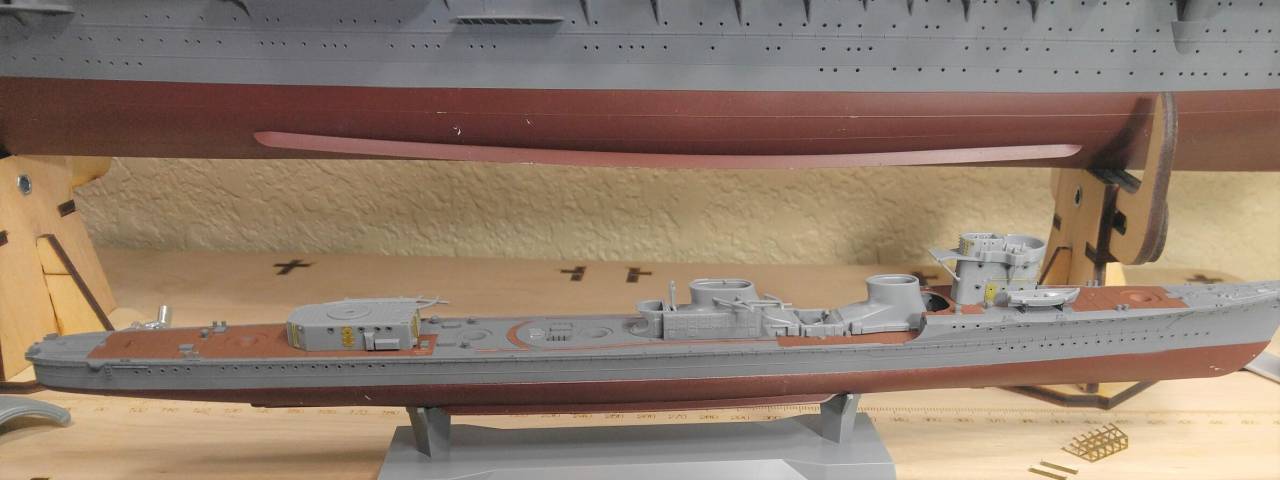
Hey Everyone,
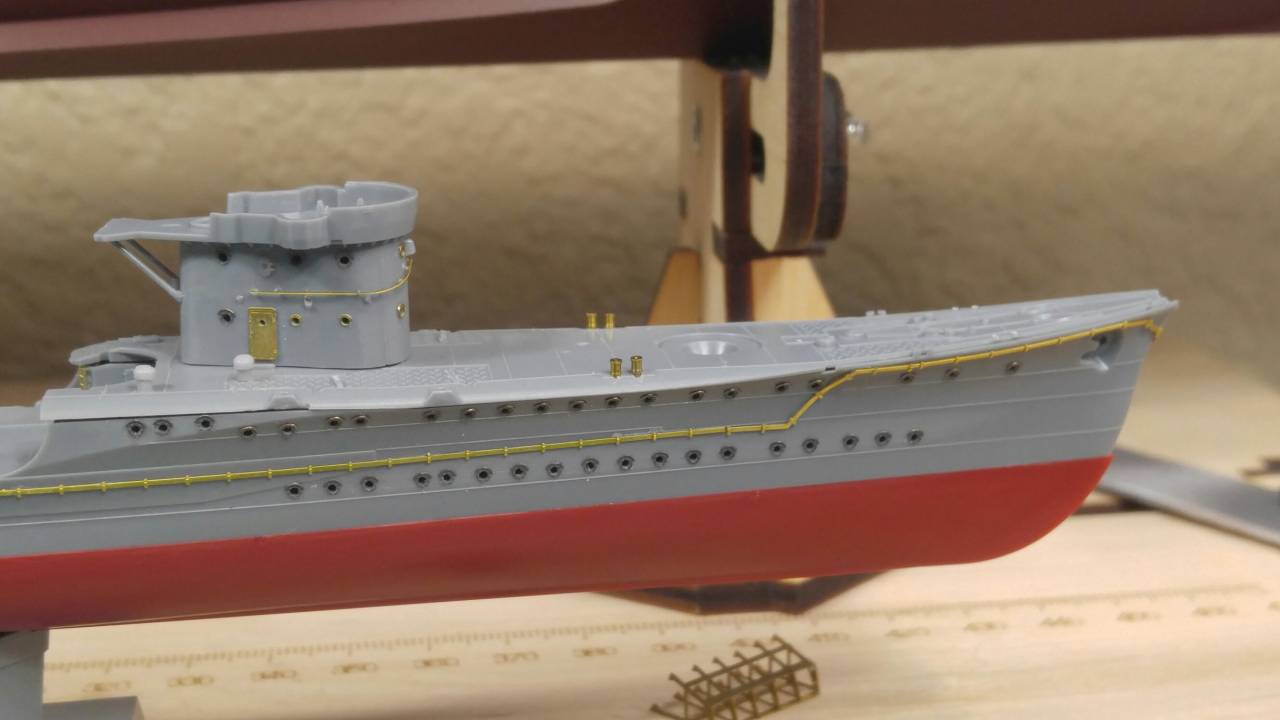
A little update on the Ayanami. I have primed and painted the hull and the decking. Had a little difficulty determining where the linoleum decking ended in certain areas, but I fixed it.
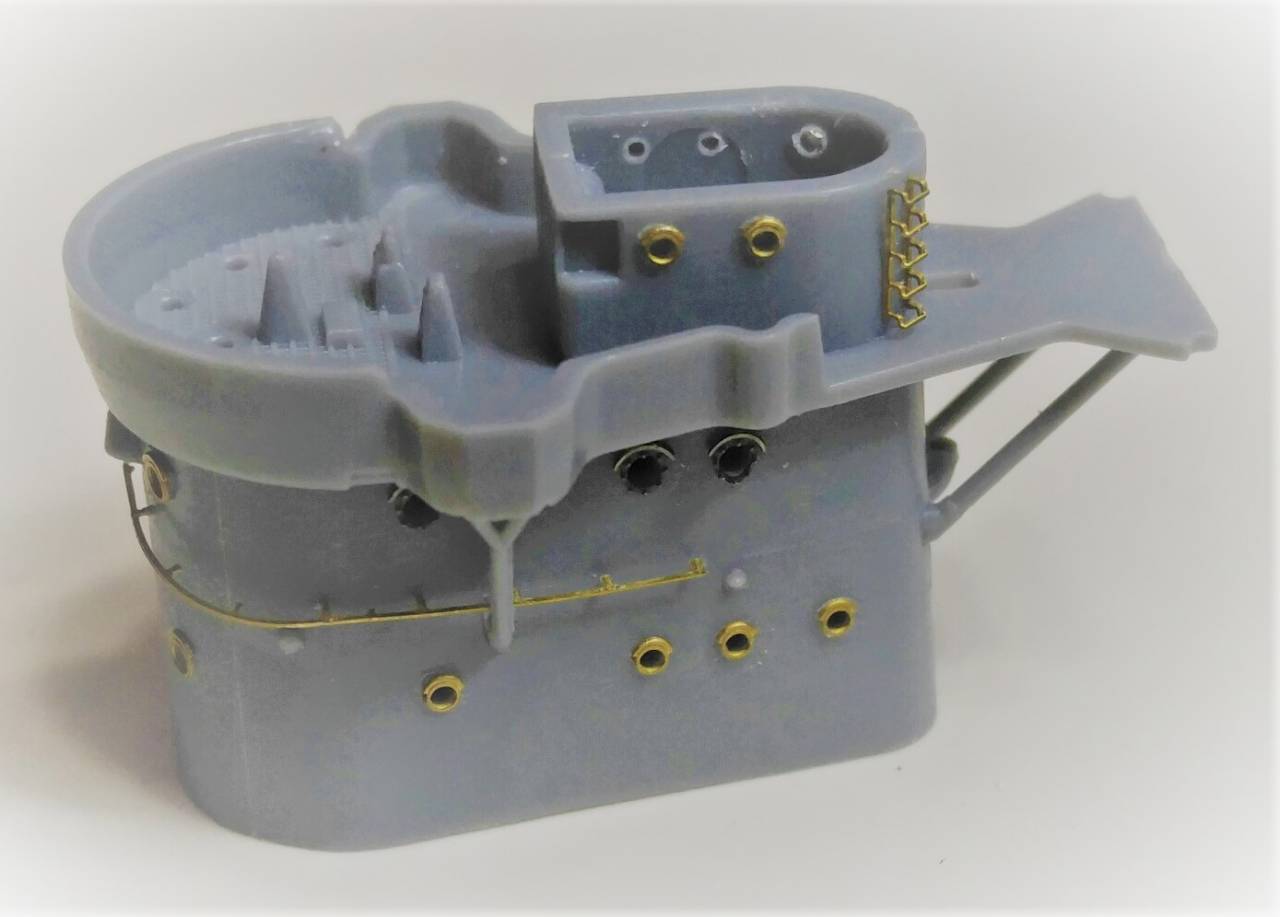
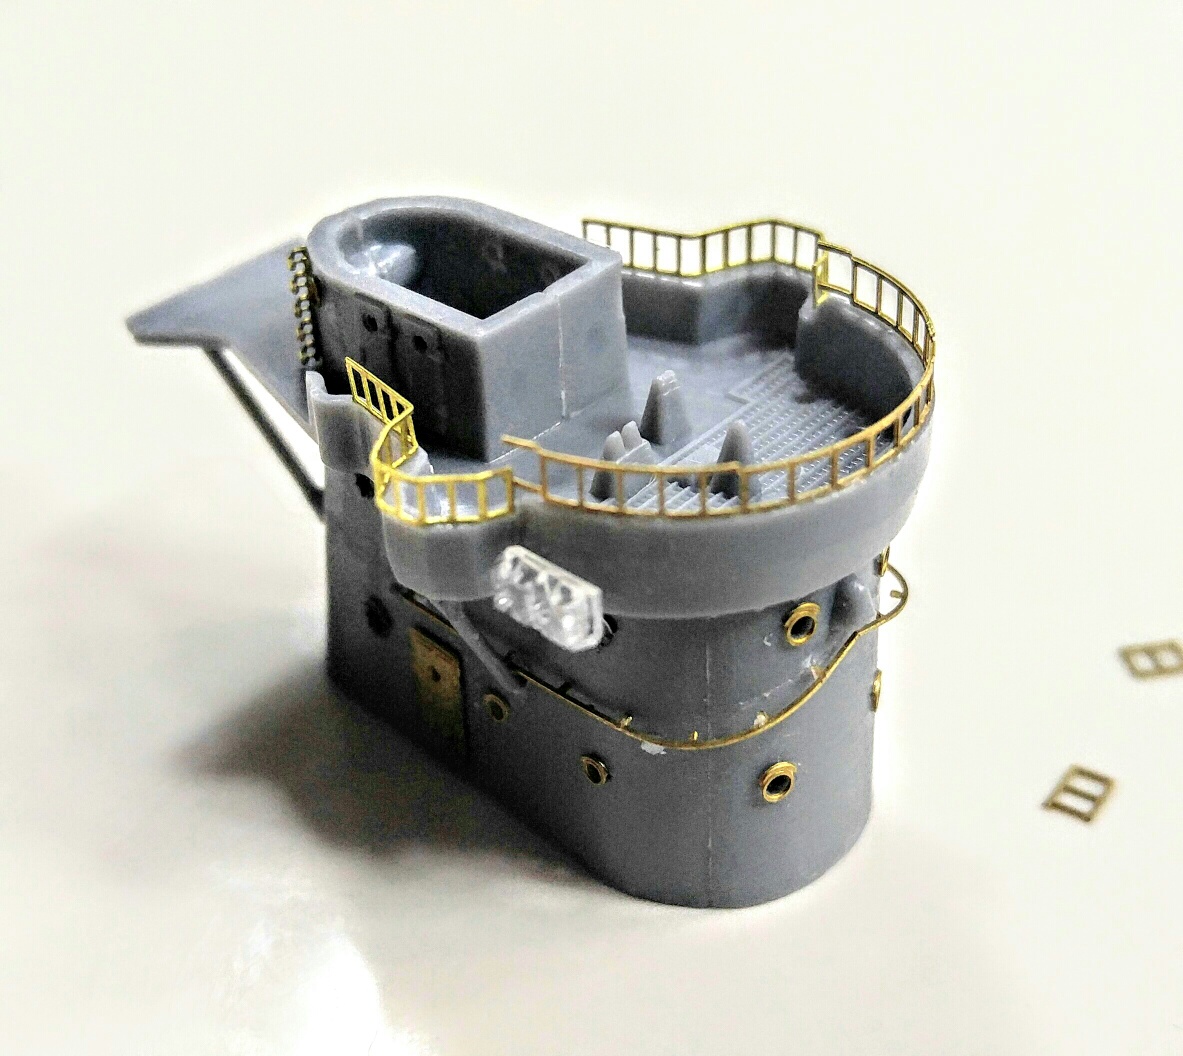
I upgraded the bridge with PE from the Infini Models Kagero Upgrade set.
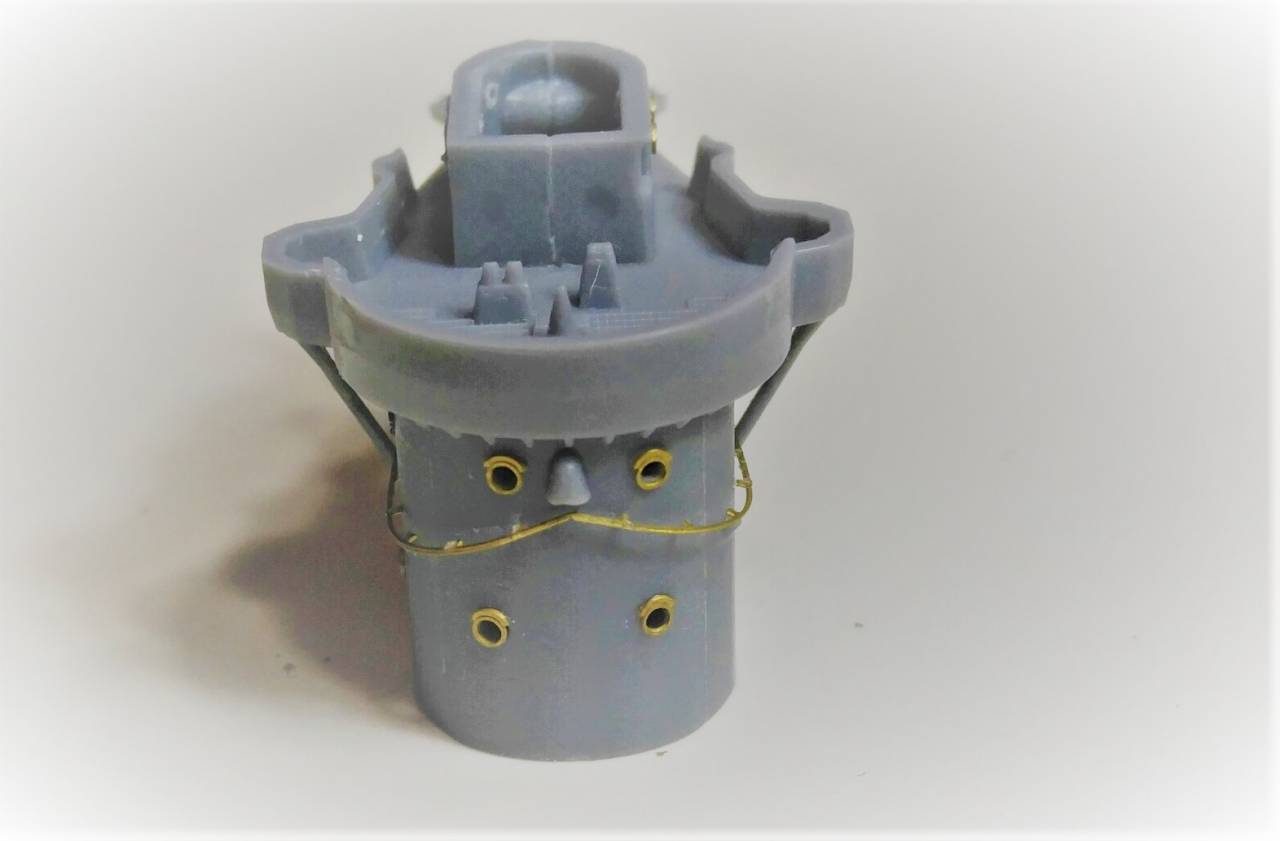
I had to fiddle with the bridge windows. The bridge for the Type II Fubuki Class Destroyer I a little bigger than the bridge for the Kagero.
I think it works, the test will be once I add the roof onto the bridge.
I then worked on the aft torpedo storage.
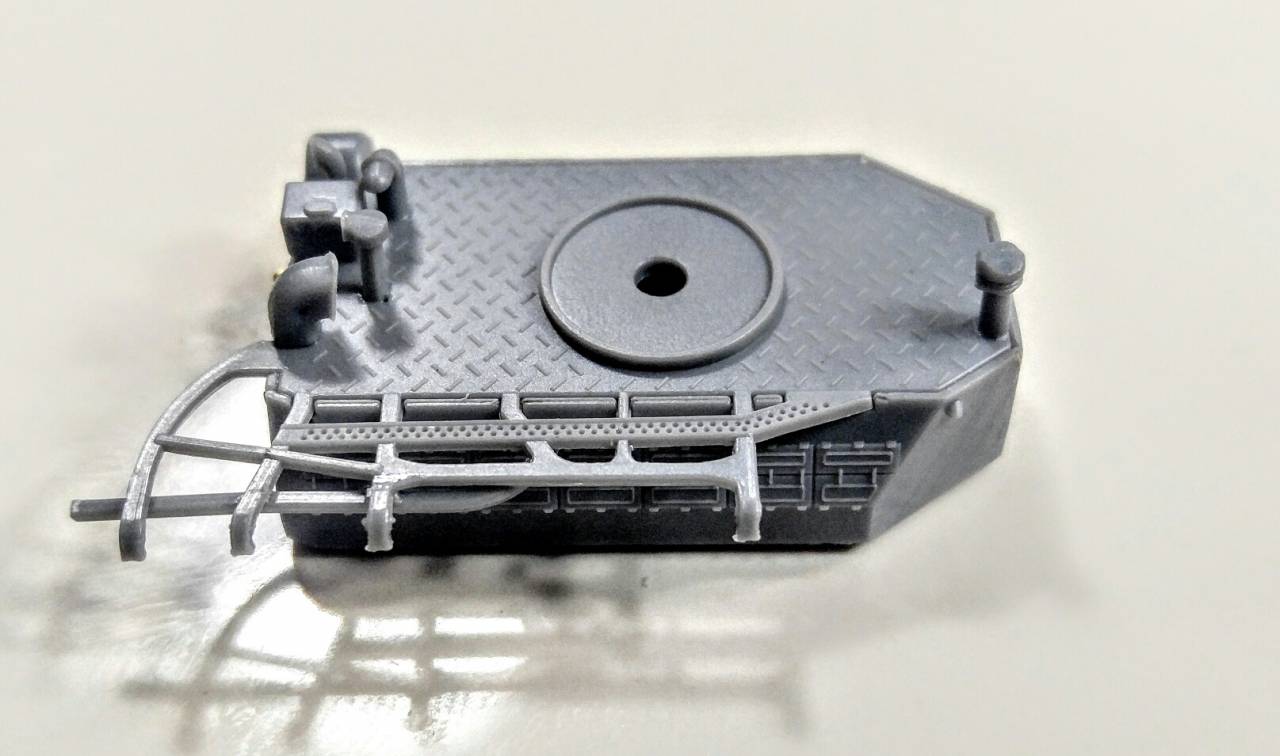
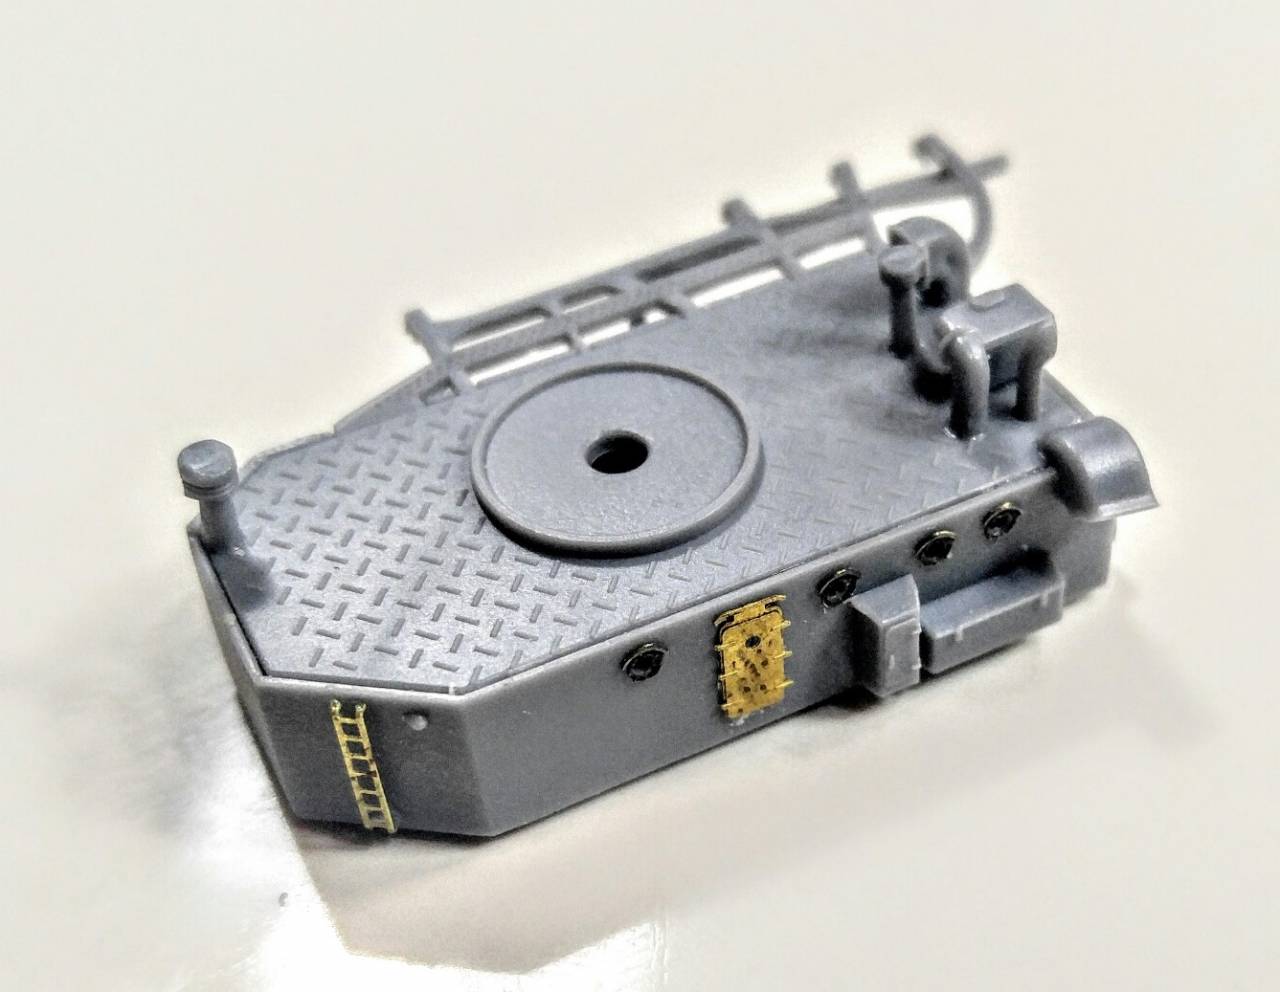
I used a few parts from the Kagero Upgrade set but not much.
I also started on the forward and aft funnel bases. The molded water tight doors look pretty good so I am not replacing them all with PE.
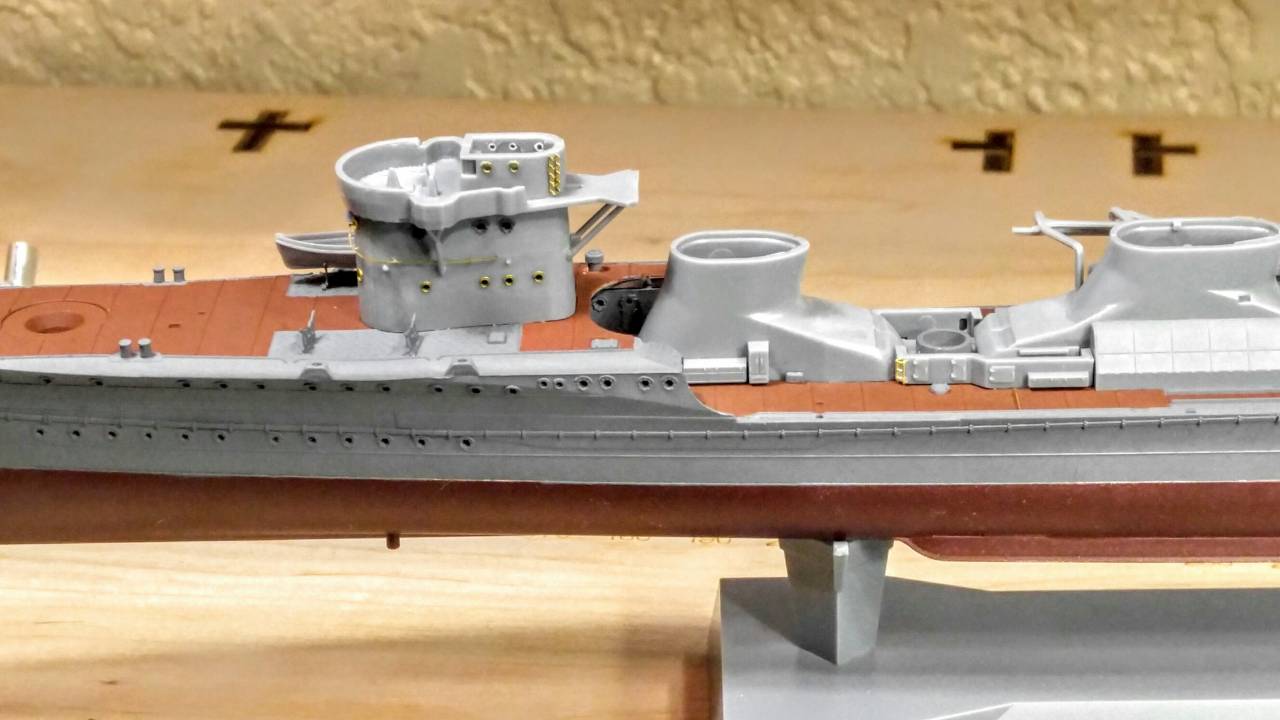
So here is an overall shot
I have since added some more parts to the mid deck housing. More photos later.
Apologize for the sporadic updates but I am under a time crunch with this build.
Ill have another update this weekend.
Thanks for stopping in and as always any comments, suggestions or criticism is always welcome.
Dave
A little update on the Ayanami. I have primed and painted the hull and the decking. Had a little difficulty determining where the linoleum decking ended in certain areas, but I fixed it.
I upgraded the bridge with PE from the Infini Models Kagero Upgrade set.
I had to fiddle with the bridge windows. The bridge for the Type II Fubuki Class Destroyer I a little bigger than the bridge for the Kagero.
I think it works, the test will be once I add the roof onto the bridge.
I then worked on the aft torpedo storage.
I used a few parts from the Kagero Upgrade set but not much.
I also started on the forward and aft funnel bases. The molded water tight doors look pretty good so I am not replacing them all with PE.
So here is an overall shot
I have since added some more parts to the mid deck housing. More photos later.
Apologize for the sporadic updates but I am under a time crunch with this build.
Ill have another update this weekend.
Thanks for stopping in and as always any comments, suggestions or criticism is always welcome.
Dave
Quincannon
Joined: June 22, 2018
KitMaker: 275 posts
Model Shipwrights: 273 posts
Posted: Monday, October 22, 2018 - 04:18 PM UTC
Looks like the area covered by the lino is much more extensive than that of the Kagero Class. Looking at all the areas covered that area also looks far more practical too.
It may be the photo but your lino color seems much lighter than the Tamiya Lino that I have used. In fact I like your color far better. Would you mind sharing the color and manufacturer?
Great work so far and I am anxious to see the completed diorama. The Guadalcanal Campaign, in fact the first year of the war, when the odds were even, or possibly slightly in the IJN's favor is of particular interest to me as an "sort of" historian. You really find out what your made of as a person or a nation when your back is against the wall.
RedDuster
Joined: March 01, 2010
KitMaker: 7,078 posts
Model Shipwrights: 6,649 posts
Posted: Monday, October 22, 2018 - 07:01 PM UTC
Very nice work Dave,
The Infini details really add to the already high level of detail in the kit.
Cheers
Si
The Infini details really add to the already high level of detail in the kit.
Cheers
Si
rolltide31
#377
Joined: June 27, 2010
KitMaker: 1,481 posts
Model Shipwrights: 1,332 posts
Posted: Tuesday, October 23, 2018 - 02:49 AM UTC
Chuck,
Yes, the linoleum is definitely more extensive. I am going to have to use the Flyhawk Brass Strip along with the Infini Kit to complete all the brass strip.
As far as the linoleum color, it is the Tamiya Linoleum paint, might be a little faded cause it is a little old but I did no add any white, it is pretty much straight from the bottle.
Si - thanks, the Kagero kit is helping a bit but it is also a bit of a challenge as I have to make some modification to get some of it to fit.
Will explain more when I cover the funnels.
thanks gents for stopping in, more updates later today
Dave
d6mst0
#453
Joined: August 28, 2016
KitMaker: 1,925 posts
Model Shipwrights: 1,298 posts
Posted: Tuesday, October 23, 2018 - 09:37 AM UTC
David,
Nice progress really like the style of ladder that's on the bridge. I don't think I seen that style before. Looking forward to your next post.
Mark
Nice progress really like the style of ladder that's on the bridge. I don't think I seen that style before. Looking forward to your next post.
Mark
TimReynaga
Joined: May 03, 2006
KitMaker: 2,500 posts
Model Shipwrights: 1,830 posts
Posted: Wednesday, October 24, 2018 - 01:31 AM UTC
Quoted Text
...really like the style of ladder that's on the bridge...
I agree with Mark; those individual welded style handgrabs are frequently seen on real ships, not so often on models. How do you make them?
rolltide31
#377
Joined: June 27, 2010
KitMaker: 1,481 posts
Model Shipwrights: 1,332 posts
Posted: Wednesday, October 24, 2018 - 02:46 AM UTC
Mark / Tim,
Thanks for the king comments.
The welded ladders are part of the Infini Models Kagero Upgrade set. Its a simple bend of both sides and the ladders form.
Absolutely love them, a lot easier than trying to measure and attach individual ladder rings.
Dave
Thanks for the king comments.
The welded ladders are part of the Infini Models Kagero Upgrade set. Its a simple bend of both sides and the ladders form.
Absolutely love them, a lot easier than trying to measure and attach individual ladder rings.
Dave
RussellE
#306
Joined: June 27, 2010
KitMaker: 3,959 posts
Model Shipwrights: 2,777 posts
Posted: Wednesday, October 24, 2018 - 09:28 PM UTC
Very tidy progress David 
 |

WEB HOSTING BY


Copyright ©2021 Model Shipwrights and Kitmaker Network, a subsidiary of Silver Star Enterprises
All Rights Reserved. Please read our Conditions of Use and Privacy Policy.
All Rights Reserved. Please read our Conditions of Use and Privacy Policy.