

Go to modelshipwrights.com for the current dynamic site!


Hosted by Jim Starkweather
1/350 Aoshima IJN Light Cruiser Tama - 1942

Quincannon

Joined: June 22, 2018
KitMaker: 275 posts
Model Shipwrights: 273 posts

Posted: Sunday, November 17, 2019 - 05:46 AM UTC
Best advice I can give you David is to get in contact with Dan Kaplan and pose all your questions to him.Don't know if he is here, but I do know he is on Steel Navy, and is very prompt with his answers.

rolltide31

#377
Joined: June 27, 2010
KitMaker: 1,481 posts
Model Shipwrights: 1,332 posts

Posted: Sunday, November 17, 2019 - 05:52 AM UTC
Chuck,
Thanks for the recommendation. I did some more research and found that he IJN Tama Tabular Record of Movement (combinedfleet.com) answers the question for me. The Aoshima picture is correct. I should have known considering the Profile Morskie pictures has a boot stripe on the hull. The IJN did not apply boot stripes to their ships, at least not from what I have found.
Thanks for the recommendation. I did some more research and found that he IJN Tama Tabular Record of Movement (combinedfleet.com) answers the question for me. The Aoshima picture is correct. I should have known considering the Profile Morskie pictures has a boot stripe on the hull. The IJN did not apply boot stripes to their ships, at least not from what I have found.
Quincannon
Joined: June 22, 2018
KitMaker: 275 posts
Model Shipwrights: 273 posts
Posted: Sunday, November 17, 2019 - 06:22 AM UTC
The Japanese companies usually do the research on their own navy's ships quite well.
No, no boot tops. That's why I do so many Japanese ships. I hate to paint boot tops
No, no boot tops. That's why I do so many Japanese ships. I hate to paint boot tops
rolltide31
#377
Joined: June 27, 2010
KitMaker: 1,481 posts
Model Shipwrights: 1,332 posts
Posted: Sunday, November 17, 2019 - 06:30 AM UTC
Chuck,
I agree, hate the boot tops!! Also agree that the companies do a pretty good job of their research.
I agree, hate the boot tops!! Also agree that the companies do a pretty good job of their research.

RedDuster

Joined: March 01, 2010
KitMaker: 7,078 posts
Model Shipwrights: 6,649 posts

Posted: Sunday, November 17, 2019 - 06:50 AM UTC
Nice start Dave,
Always quite a bit of destruction with these fancy upgrade sets. Brass bits are always worth the effort.
Cheers, Si
Always quite a bit of destruction with these fancy upgrade sets. Brass bits are always worth the effort.
Cheers, Si
rolltide31
#377
Joined: June 27, 2010
KitMaker: 1,481 posts
Model Shipwrights: 1,332 posts
Posted: Wednesday, November 20, 2019 - 03:34 AM UTC
Si - You are right but this one is more extensive than any previous build. That being said it is also a bit easier since almost everything is being removed which makes the sanding and removal a bit less complicated.
With that here is a small update regarding the destruction. Started moving towards the stern of the ship one deck at a time. Here is the bridge deck (not sure of appropriate name).
Before destruction

After destruction
Not too pleased with the bollards but they are smaller than the ones on the forward deck. Might look at replacing with destroyer sized bollards . We will see.
Next was moving towards the mid deck.
Before desturction

After initial destruction using sprue cutters

I did get a chance to begin removing the damage with a more refined knife but those pictures will follow during a later update.
More to come soon
Thanks for stopping by!!
With that here is a small update regarding the destruction. Started moving towards the stern of the ship one deck at a time. Here is the bridge deck (not sure of appropriate name).
Before destruction
After destruction
Not too pleased with the bollards but they are smaller than the ones on the forward deck. Might look at replacing with destroyer sized bollards . We will see.
Next was moving towards the mid deck.
Before desturction
After initial destruction using sprue cutters
I did get a chance to begin removing the damage with a more refined knife but those pictures will follow during a later update.
More to come soon
Thanks for stopping by!!

RussellE
#306

Joined: June 27, 2010
KitMaker: 3,959 posts
Model Shipwrights: 2,777 posts

Posted: Wednesday, November 20, 2019 - 10:23 PM UTC
This is the good kind of destruction, Dave 

RedDuster
Joined: March 01, 2010
KitMaker: 7,078 posts
Model Shipwrights: 6,649 posts
Posted: Wednesday, November 20, 2019 - 10:33 PM UTC
What Russ said,
looking forward to seeing the clean up pics,
Cheers
Si
looking forward to seeing the clean up pics,
Cheers
Si
Choowy
Joined: April 17, 2015
KitMaker: 125 posts
Model Shipwrights: 125 posts

Posted: Thursday, November 21, 2019 - 08:11 AM UTC
Well you're right into it now Dave, nice clear images too. Look forward to the next stages.

JJ1973
#345

Joined: August 22, 2011
KitMaker: 1,835 posts
Model Shipwrights: 1,832 posts
Posted: Sunday, November 24, 2019 - 12:55 AM UTC
Hi Dave,
I'm on board, too! Very nice start, looks very promising!
Cheers
Jan
I'm on board, too! Very nice start, looks very promising!
Cheers
Jan
rolltide31
#377
Joined: June 27, 2010
KitMaker: 1,481 posts
Model Shipwrights: 1,332 posts
Posted: Sunday, November 24, 2019 - 02:58 AM UTC
Russell - definitely the most involved destruction I have undertaken. The stern deck is even more daunting.
Si - Stay tuned, update to follow!!
Ned - Thank you, I have learned quite a bit about taking better pictures over the past few years. Thank goodness for an Iphone!!
Jan - So glad to have you aboard for this journey!! The going is slow but that is by design.
Si - Stay tuned, update to follow!!
Ned - Thank you, I have learned quite a bit about taking better pictures over the past few years. Thank goodness for an Iphone!!
Jan - So glad to have you aboard for this journey!! The going is slow but that is by design.
rolltide31
#377
Joined: June 27, 2010
KitMaker: 1,481 posts
Model Shipwrights: 1,332 posts
Posted: Sunday, November 24, 2019 - 03:44 AM UTC
Hey everyone,
I got some quality bench time this weekend and was able to move the Tama along a bit.
Here is the mid-deck after destruction
As you can see there are a few gouges that I need to try and clean up.
After this I got a little anxious to try out the Rainbow photo etch, so I decided to take a small part and see how easy or how hard the photo etch was going to be to work with.
Here is one of the mid-ship targeting system platforms.
The instructions:

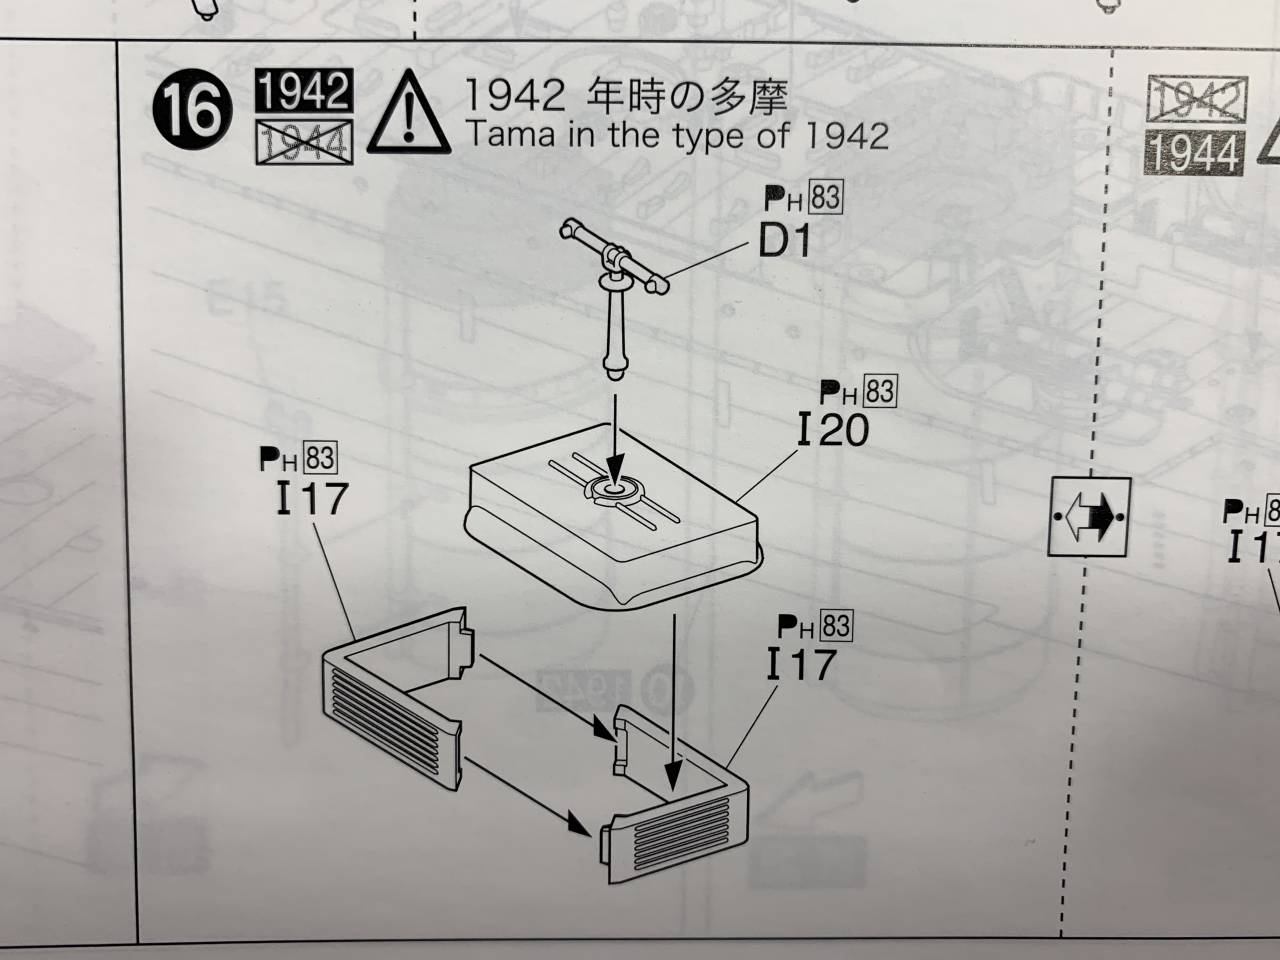
There are two platforms on the ship, hence the two different pictures of instructions.
Here are the Rainbow instructions for those platforms.
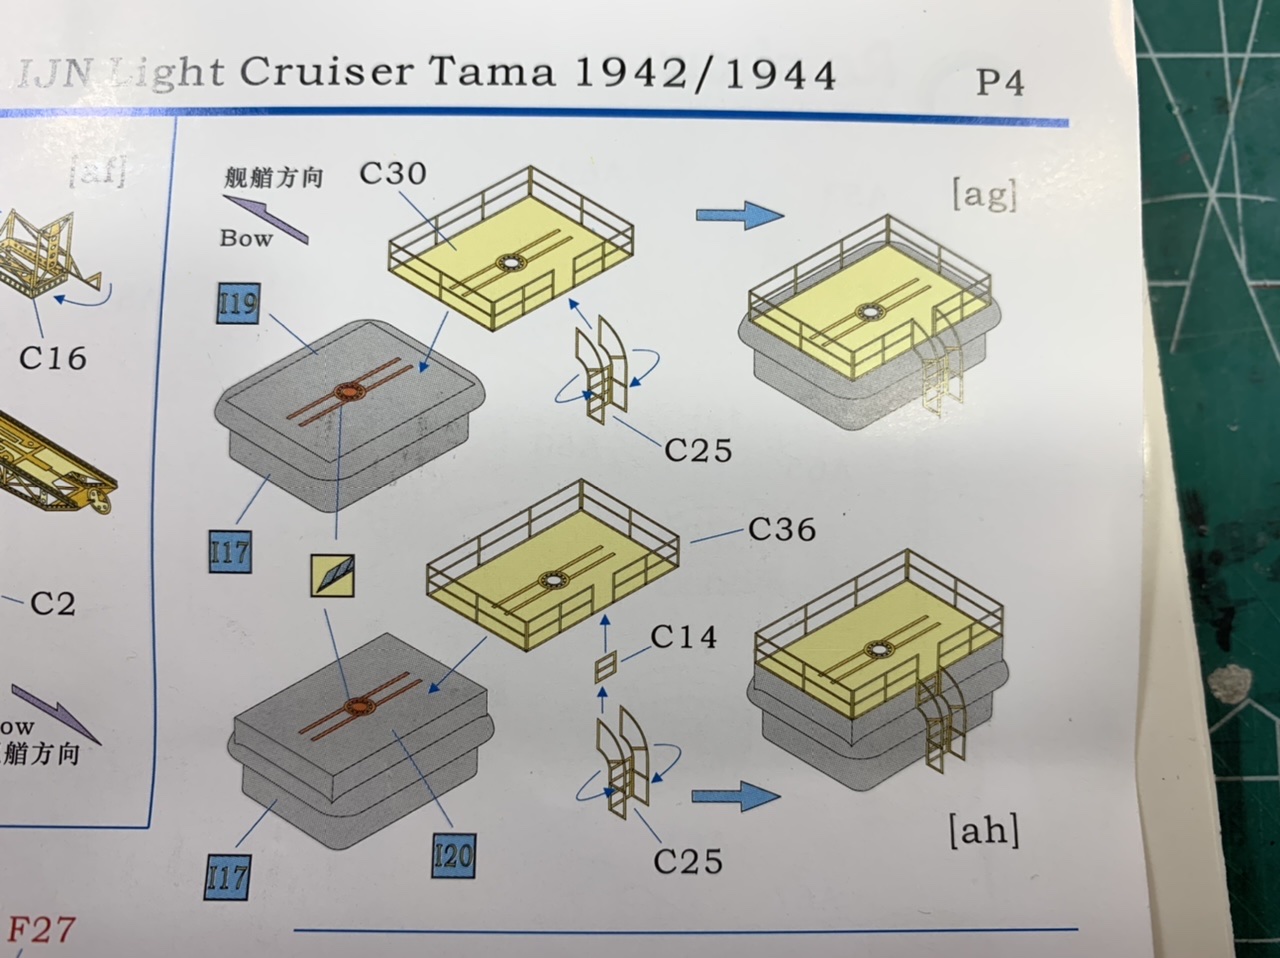
Pretty simple - only draw back is the upper ladder lays flat against the part verse having a little bit of separation.
So here are the kit parts:

Put together
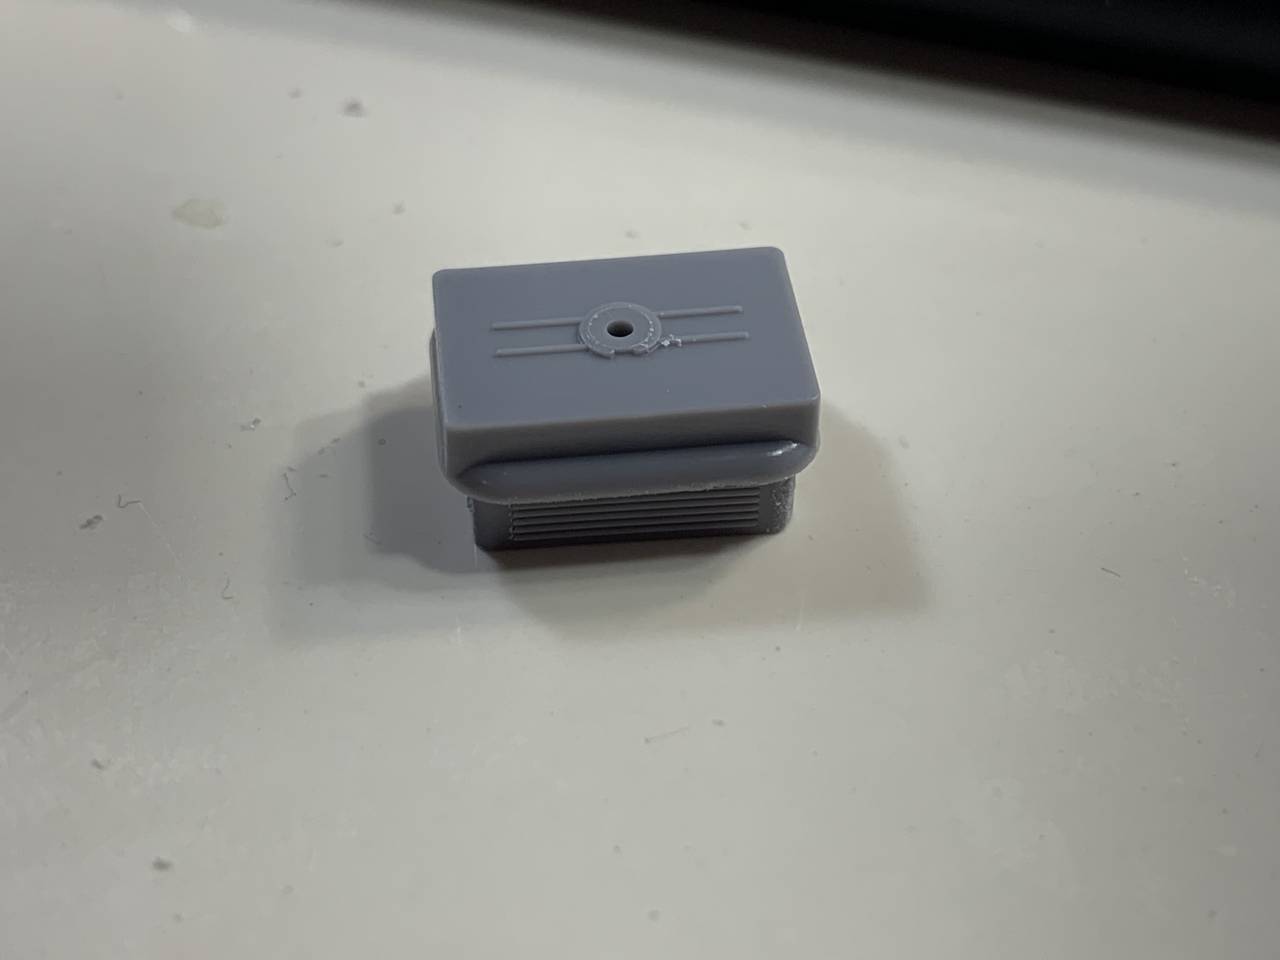
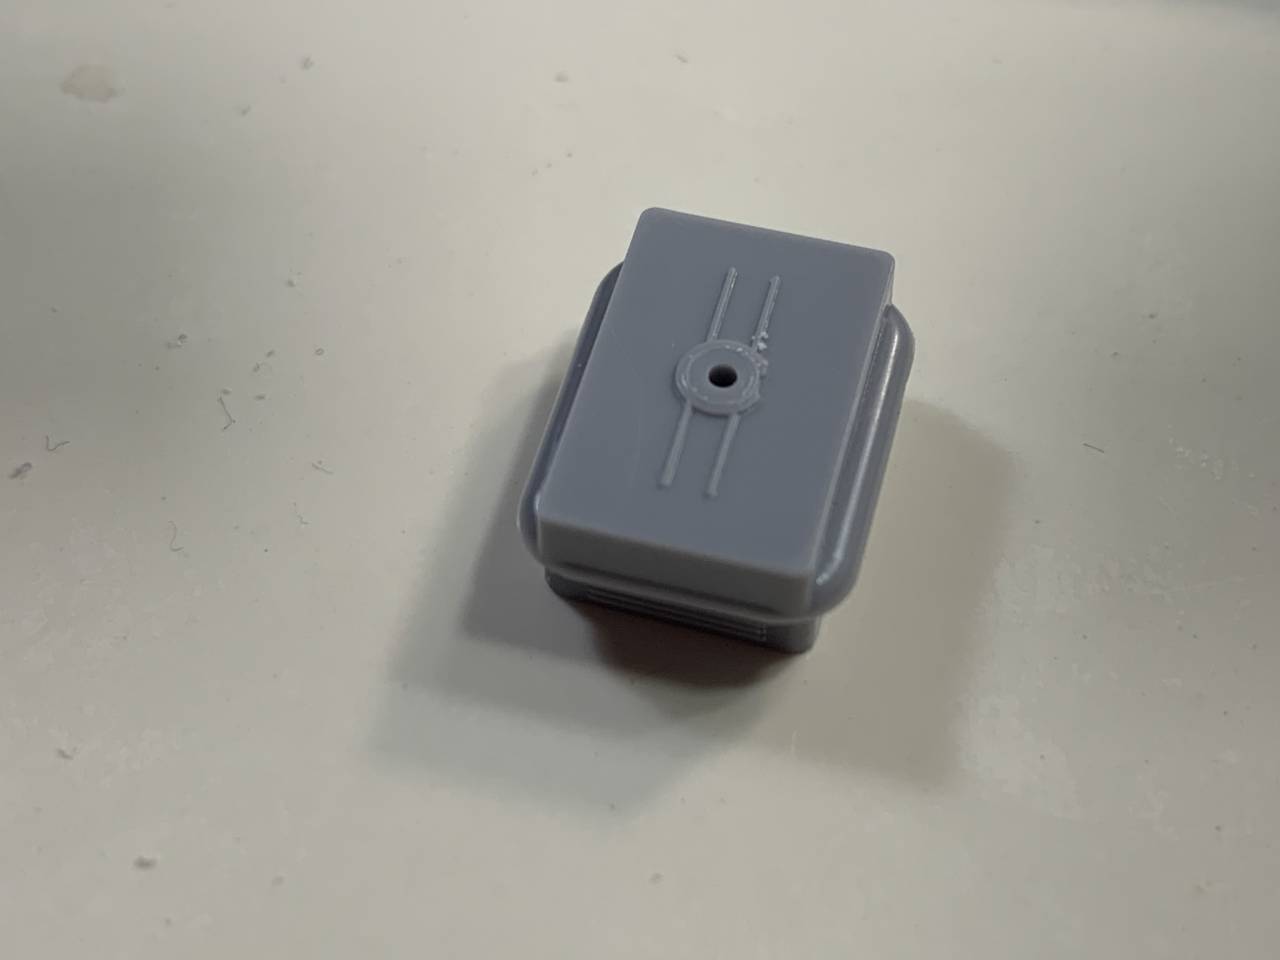
Cleaned up
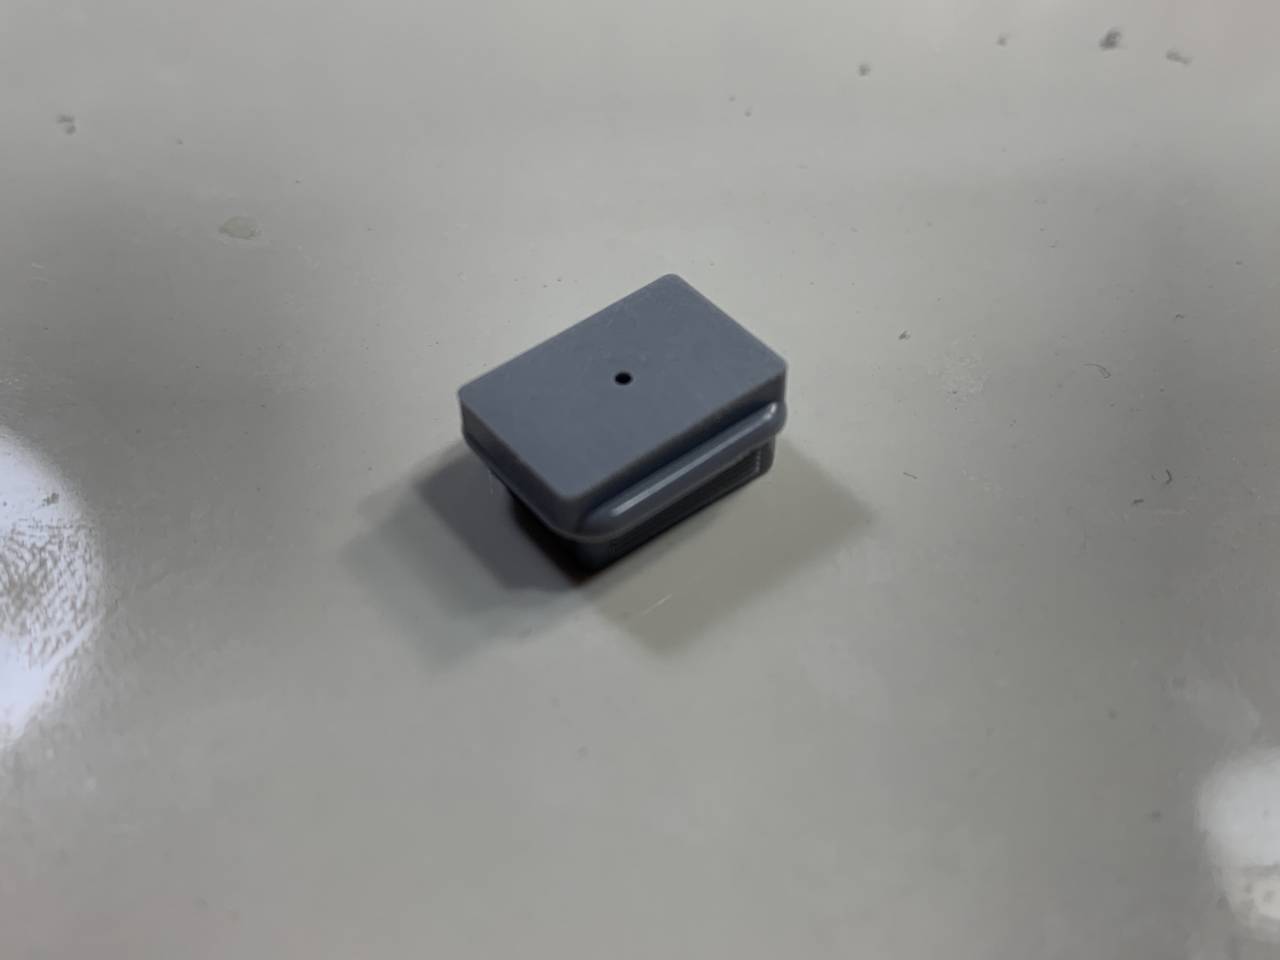
Photo Etch top platform folded
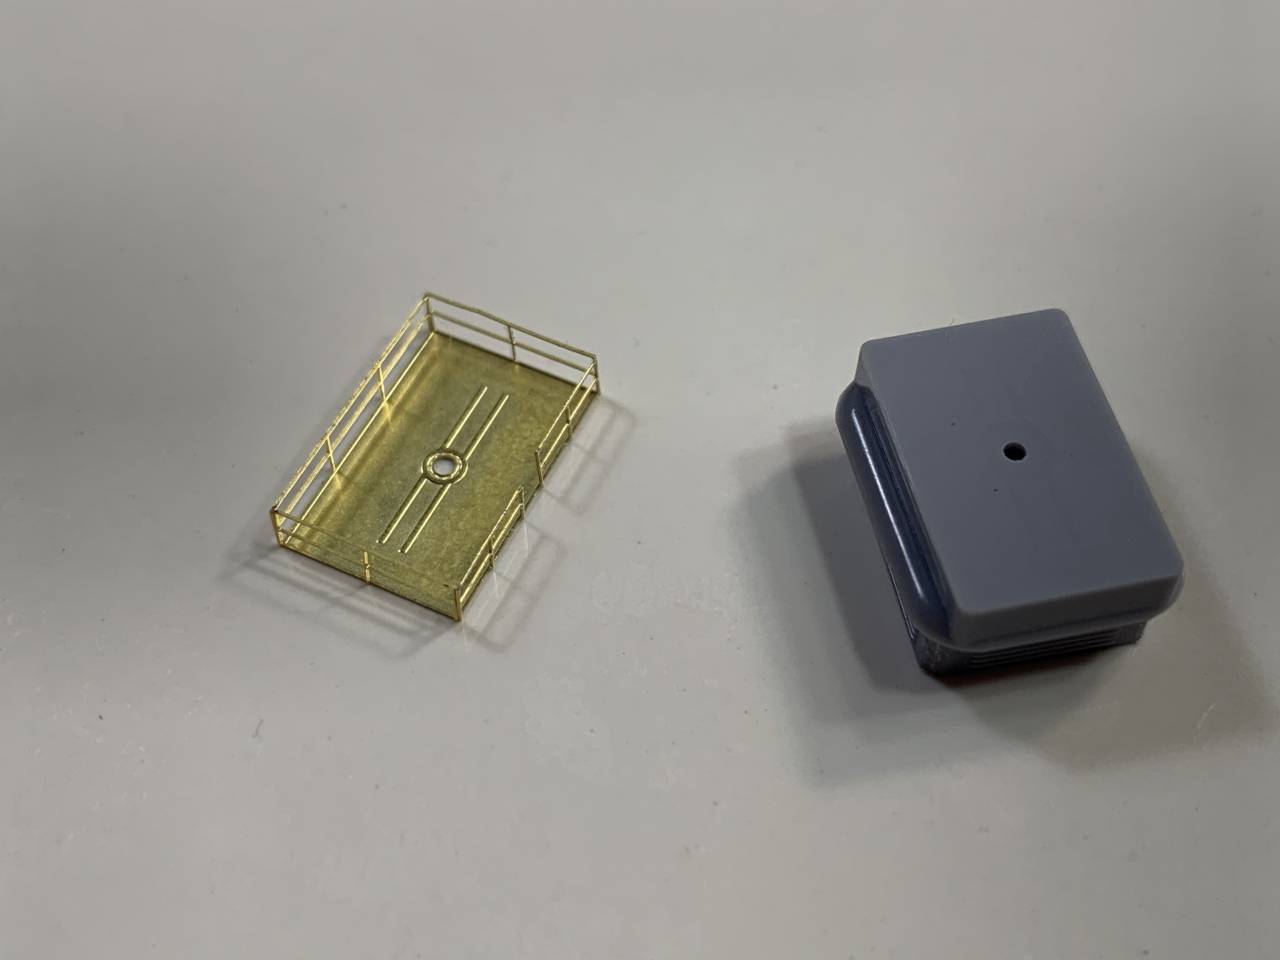
I missed taking a pcitre of the ladders before mounting but here it the part all dressed up
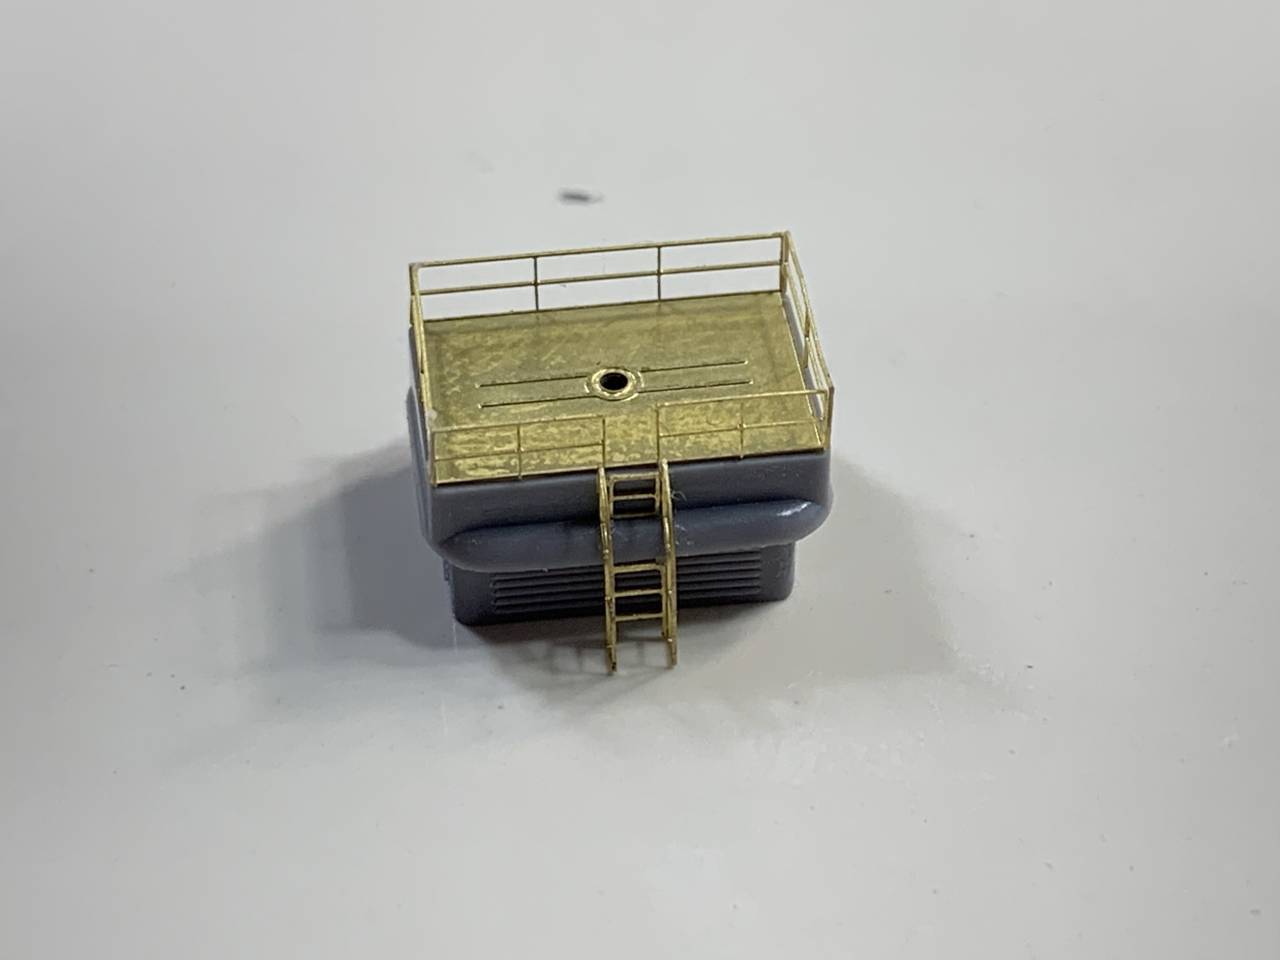

My only concern after finishing this piece was with the ladder. It looked as if the bottom of the ladder was even with the base of the platform. Taking the depression on the deck I figured that as soon as I mounted the platform the ladder would pop off and sure enough, when I dry fit the piece the ladder popped off.
So the lesson learned was to not mount the ladder until I mount the platform.
After that fun and excitement I went back to cleaning up deck parts.
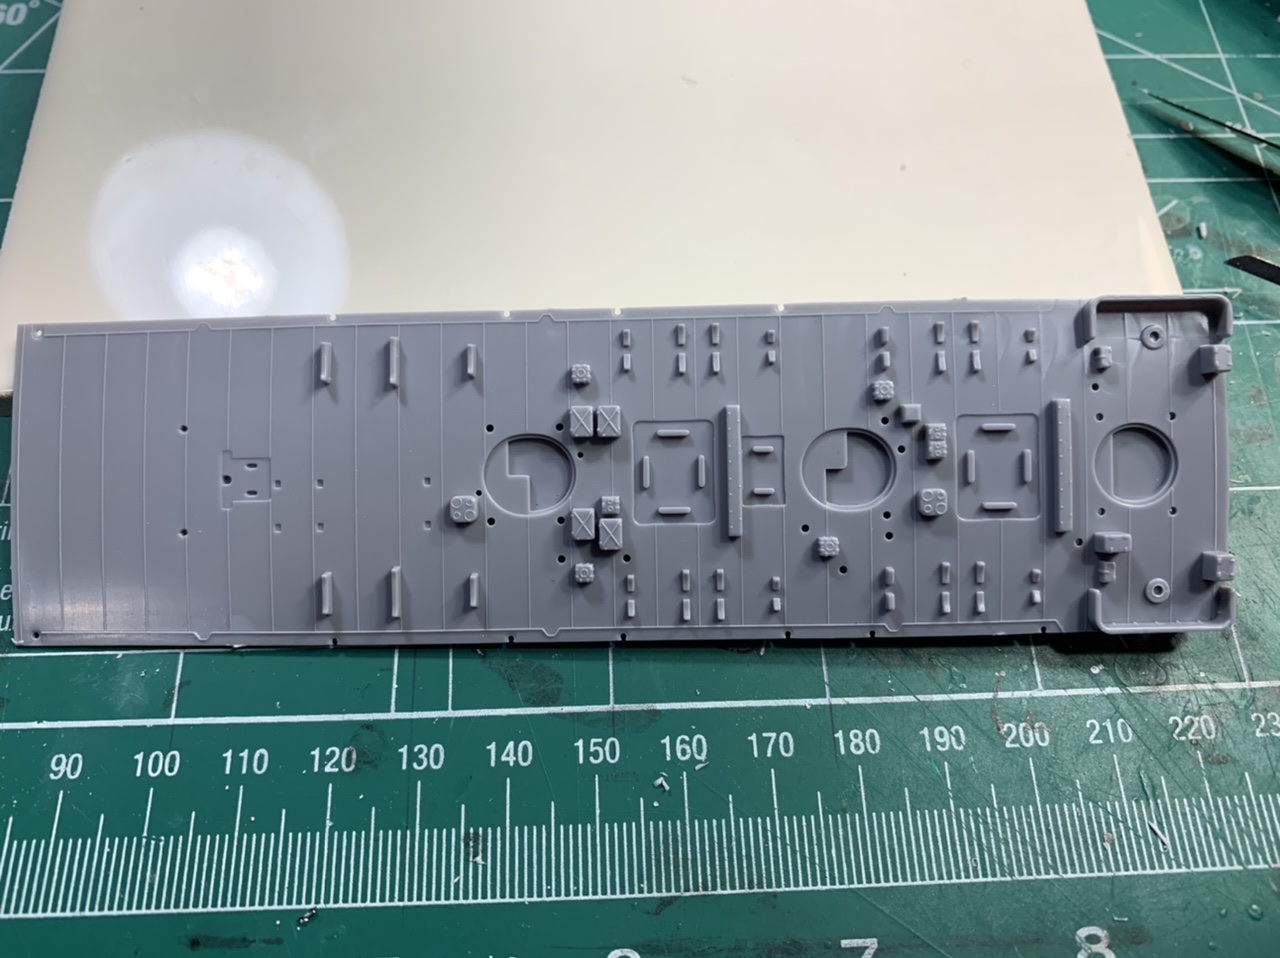
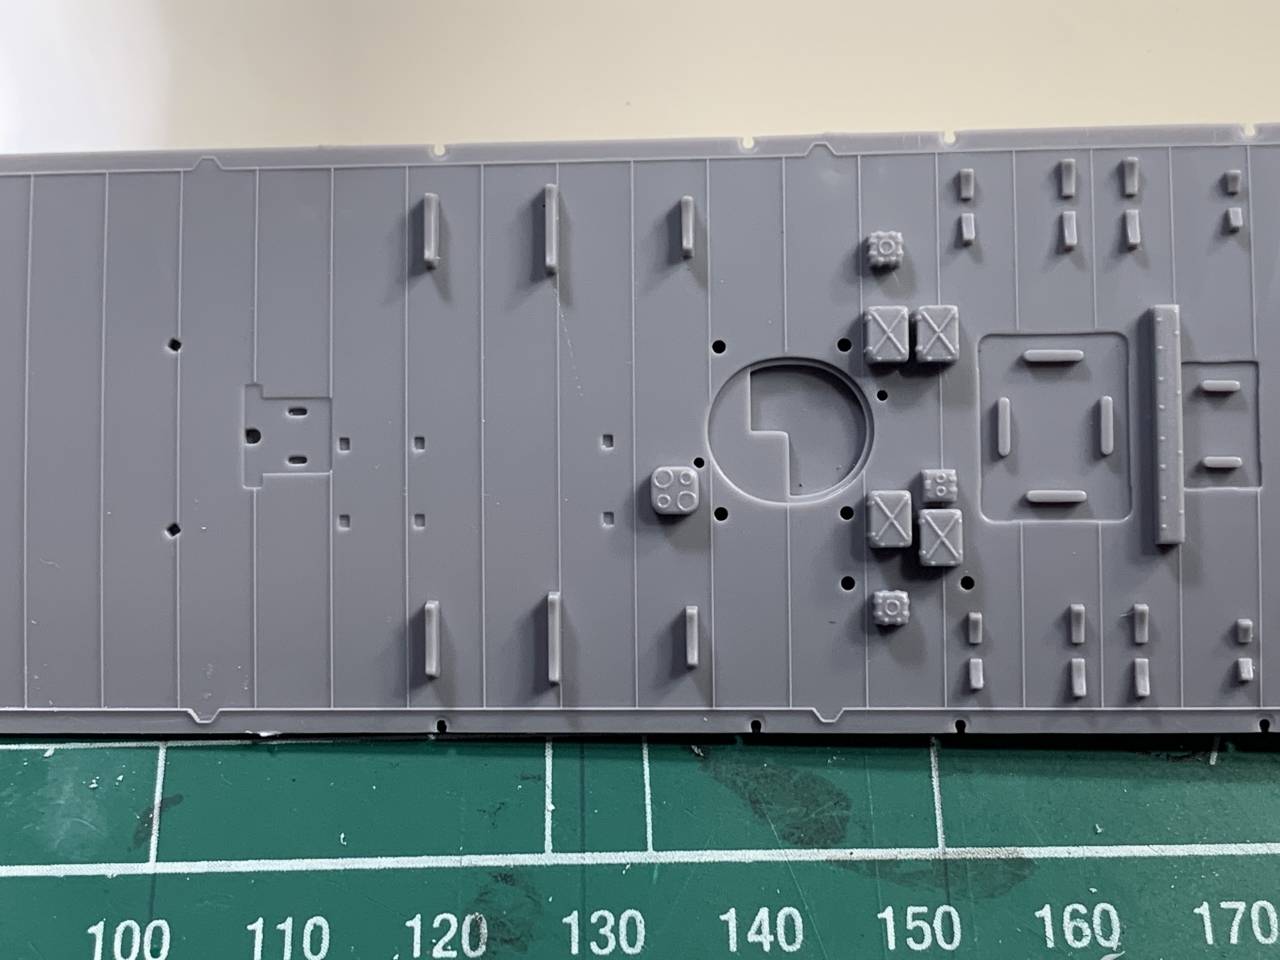
Here is the catapult deck.
Before
After

The box that was left on the deck is causing some confusion. The Rainbow P/E instructions do not indicate removal - it just has a call out for attention. There is no P/E for that box so no idea what I am supposed to do. I do have some photos of Profile Morskie plans which do not show anything being in that area so not sure if I am supposed to remove or not.
Thinking of leaving it there for now.
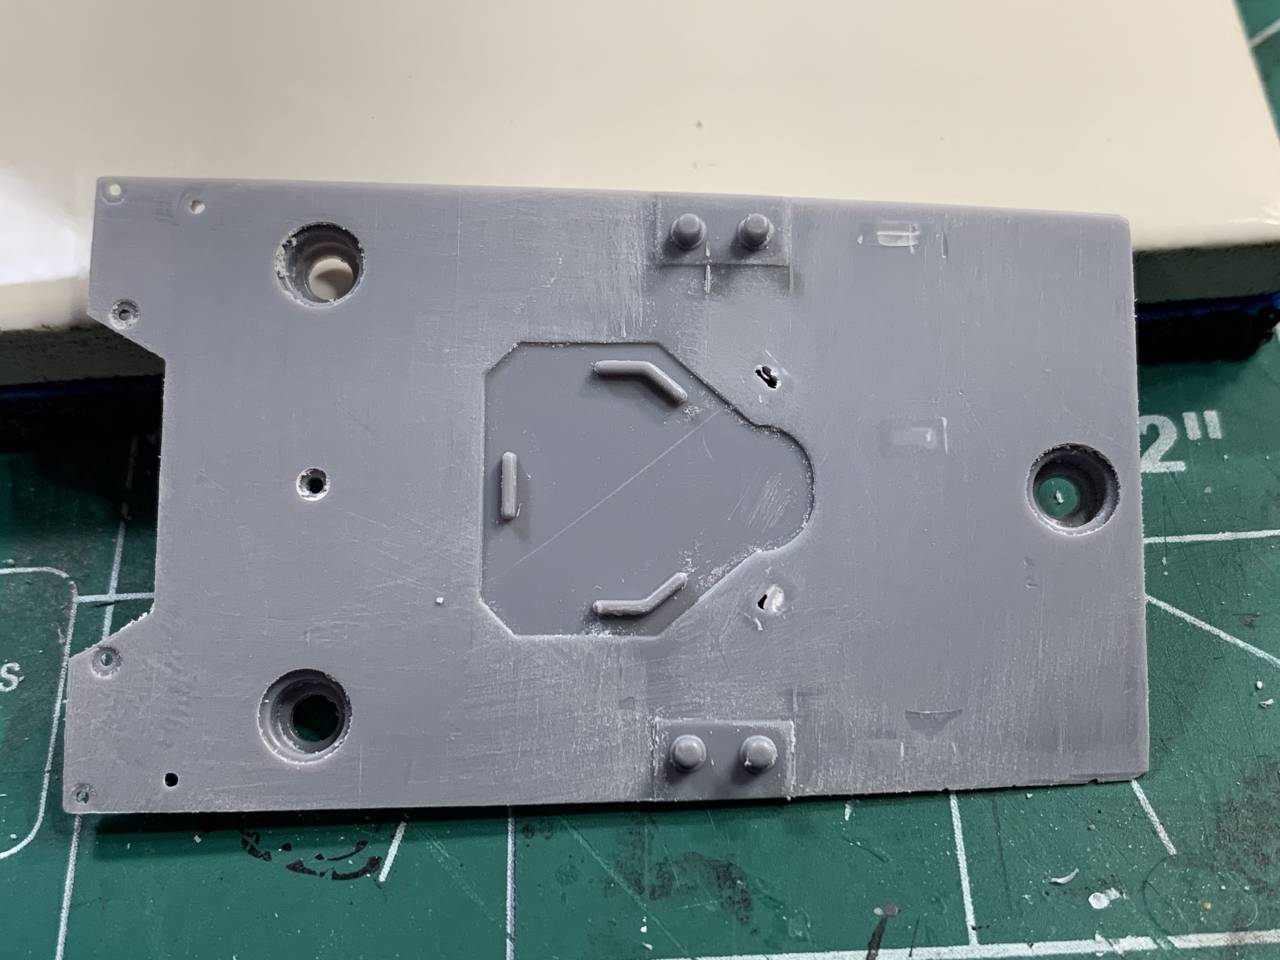
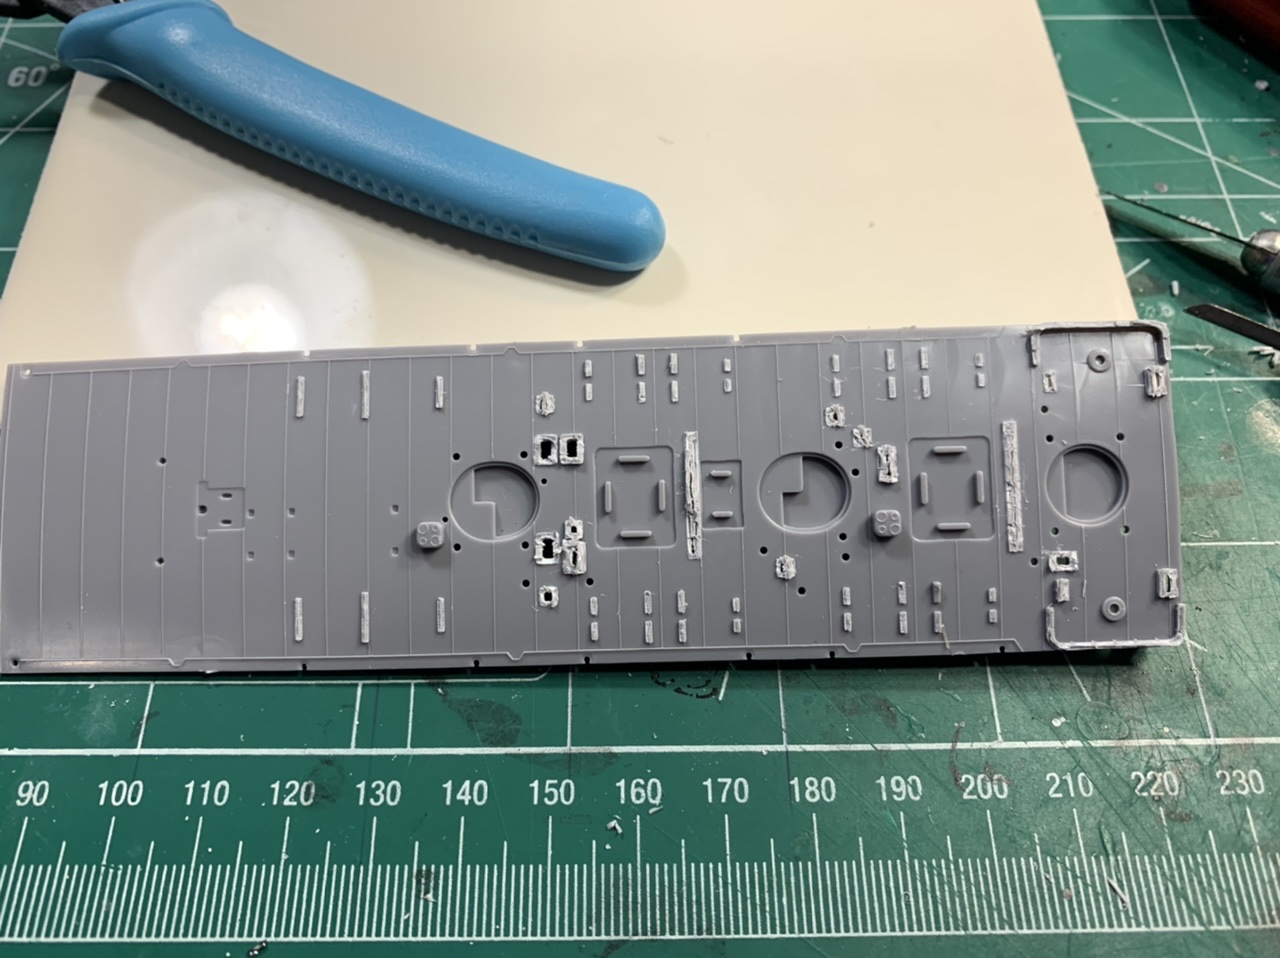
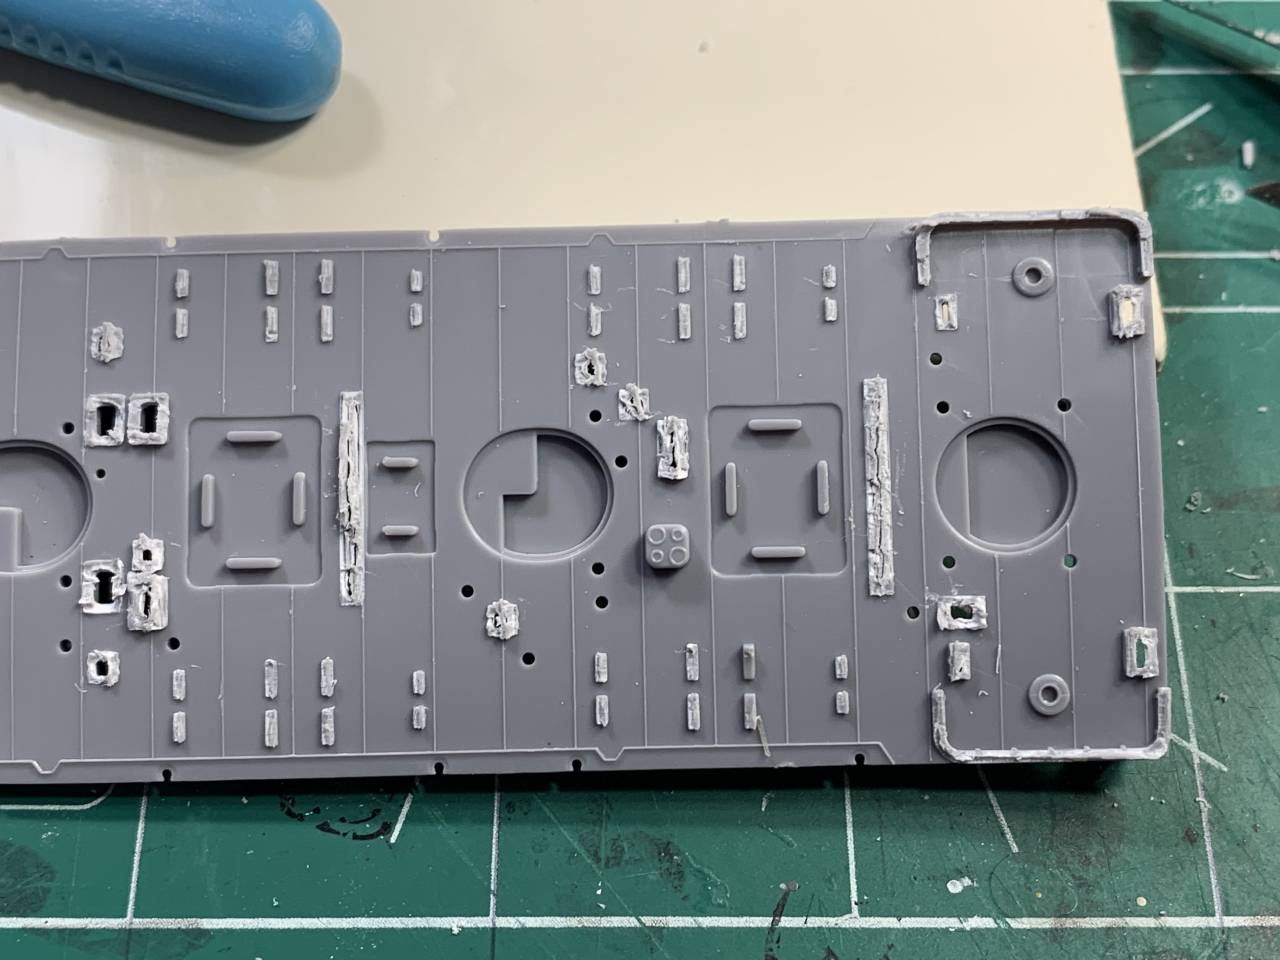
Now on to the most daunting deck, the stern deck with the sea mine rails.
Before

After
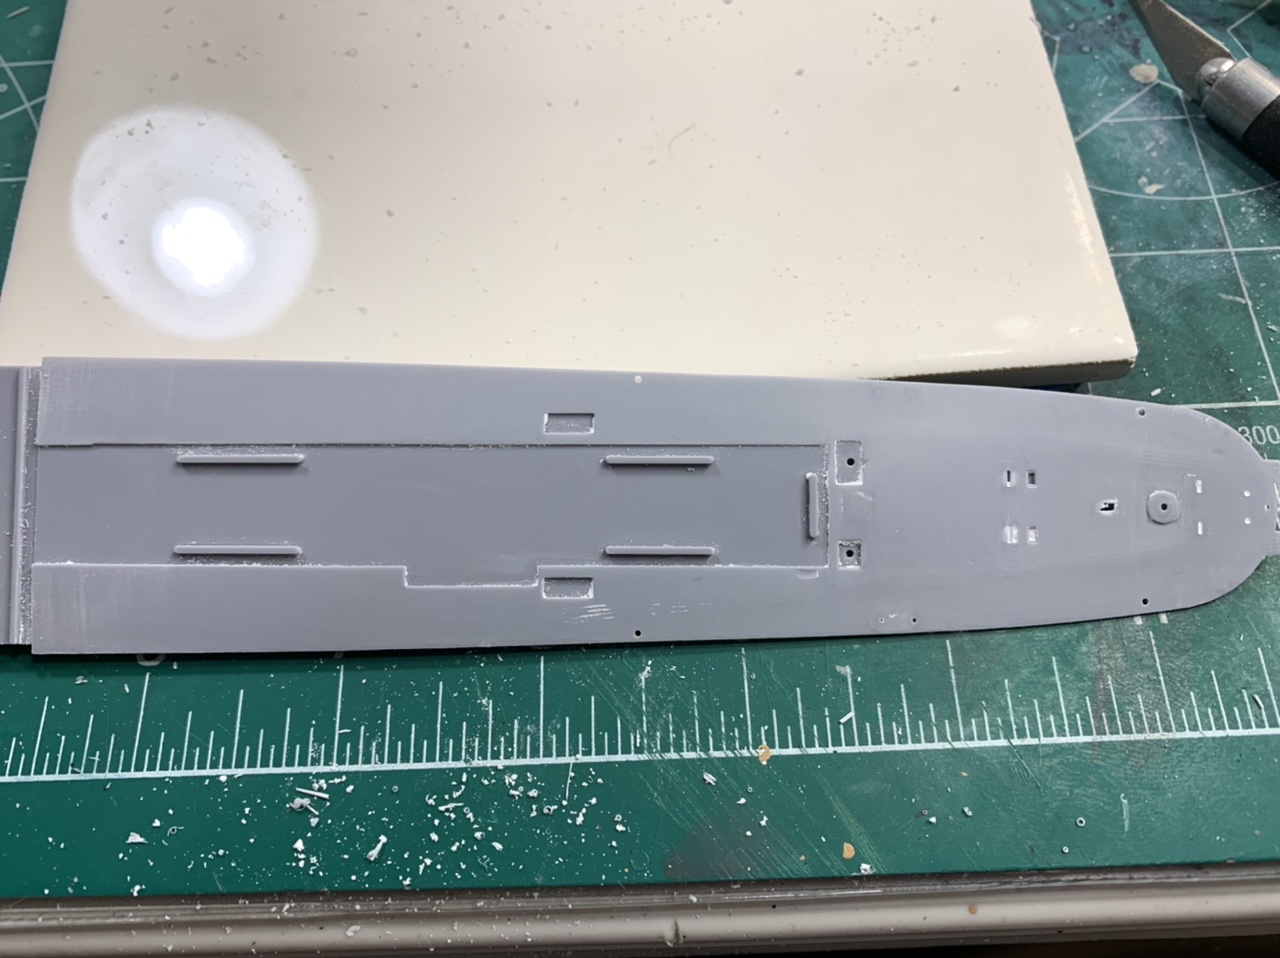

I removed all the bollards and will use the Alliance Model Works turned brass to replace them. Have to order a smaller set but the vendor is here in the states so it wont take too long.
In either case it wont slow things down.
Now to finish drilling out the port holes and I will move on to painting the hull and decking so I can add the brass strip.
Some painting challenges coming up so I am working out plans on how to best approach.
Well that's it for now, more to come soon.
Thanks for stopping in and as always comments, suggestions, and criticism are always welcome.
I got some quality bench time this weekend and was able to move the Tama along a bit.
Here is the mid-deck after destruction
As you can see there are a few gouges that I need to try and clean up.
After this I got a little anxious to try out the Rainbow photo etch, so I decided to take a small part and see how easy or how hard the photo etch was going to be to work with.
Here is one of the mid-ship targeting system platforms.
The instructions:
There are two platforms on the ship, hence the two different pictures of instructions.
Here are the Rainbow instructions for those platforms.
Pretty simple - only draw back is the upper ladder lays flat against the part verse having a little bit of separation.
So here are the kit parts:
Put together
Cleaned up
Photo Etch top platform folded
I missed taking a pcitre of the ladders before mounting but here it the part all dressed up
My only concern after finishing this piece was with the ladder. It looked as if the bottom of the ladder was even with the base of the platform. Taking the depression on the deck I figured that as soon as I mounted the platform the ladder would pop off and sure enough, when I dry fit the piece the ladder popped off.
So the lesson learned was to not mount the ladder until I mount the platform.
After that fun and excitement I went back to cleaning up deck parts.
Here is the catapult deck.
Before
After
The box that was left on the deck is causing some confusion. The Rainbow P/E instructions do not indicate removal - it just has a call out for attention. There is no P/E for that box so no idea what I am supposed to do. I do have some photos of Profile Morskie plans which do not show anything being in that area so not sure if I am supposed to remove or not.
Thinking of leaving it there for now.
Now on to the most daunting deck, the stern deck with the sea mine rails.
Before
After
I removed all the bollards and will use the Alliance Model Works turned brass to replace them. Have to order a smaller set but the vendor is here in the states so it wont take too long.
In either case it wont slow things down.
Now to finish drilling out the port holes and I will move on to painting the hull and decking so I can add the brass strip.
Some painting challenges coming up so I am working out plans on how to best approach.
Well that's it for now, more to come soon.
Thanks for stopping in and as always comments, suggestions, and criticism are always welcome.

Black_sheep
Joined: December 11, 2009
KitMaker: 823 posts
Model Shipwrights: 551 posts

Posted: Sunday, November 24, 2019 - 04:20 AM UTC
You are a brave man 
rolltide31
#377
Joined: June 27, 2010
KitMaker: 1,481 posts
Model Shipwrights: 1,332 posts
Posted: Sunday, November 24, 2019 - 05:19 AM UTC
Thomas - not sure about that but I am all in on this build one way or the other!!!
Choowy
Joined: April 17, 2015
KitMaker: 125 posts
Model Shipwrights: 125 posts
Posted: Sunday, November 24, 2019 - 07:09 AM UTC
I wouldn't be too worried about the ladder Dave, at that scale and once painted I think it will disappear. Looks good.
So much destruction on the deck but it will be worth it once the upgrade details go on.
So much destruction on the deck but it will be worth it once the upgrade details go on.
rolltide31
#377
Joined: June 27, 2010
KitMaker: 1,481 posts
Model Shipwrights: 1,332 posts
Posted: Sunday, November 24, 2019 - 07:25 AM UTC
Ned - I guess your right about the ladder, will need to make sure that I use a pin wash around it so that it doesn't disappear completely. Would look odd if there was no way for the sailors to reach the top!!
Dave
Dave

d6mst0
#453
Joined: August 28, 2016
KitMaker: 1,925 posts
Model Shipwrights: 1,298 posts

Posted: Sunday, November 24, 2019 - 08:50 AM UTC
David,
Agree with everyone's thoughts on the removal of the kit details. Looking forward to seeing how the PE replacements work out for you.
Mark
Agree with everyone's thoughts on the removal of the kit details. Looking forward to seeing how the PE replacements work out for you.
Mark
RussellE
#306
Joined: June 27, 2010
KitMaker: 3,959 posts
Model Shipwrights: 2,777 posts
Posted: Sunday, November 24, 2019 - 09:30 AM UTC
Good to see the destruction continue, Dave 
Always my favorite part of a build
Always my favorite part of a build
rolltide31
#377
Joined: June 27, 2010
KitMaker: 1,481 posts
Model Shipwrights: 1,332 posts
Posted: Sunday, November 24, 2019 - 09:31 AM UTC
Mark - Thanks, looking forward to moving forward. This kit has quite a few P/E replacement parts that you don't find in the bigger named kits. Will be interesting to see how they come together.
Dave
Dave

Littorio
Joined: September 15, 2004
KitMaker: 4,728 posts
Model Shipwrights: 1,080 posts

Posted: Sunday, November 24, 2019 - 12:38 PM UTC
Nice one Dave, I have this kit and the same Rainbow sets as you so I'm watching with interest.
Always wanted to do the Tama in 1/350 as one of my first ships when I got back into ship modelling was the Tamiya 1/700 version so I have fond memories.
Always wanted to do the Tama in 1/350 as one of my first ships when I got back into ship modelling was the Tamiya 1/700 version so I have fond memories.

rolltide31
#377
Joined: June 27, 2010
KitMaker: 1,481 posts
Model Shipwrights: 1,332 posts
Posted: Monday, November 25, 2019 - 03:43 AM UTC
Luciano - Glad to have you aboard for the journey!! I will try and do this the justice it deserves.
RedDuster
Joined: March 01, 2010
KitMaker: 7,078 posts
Model Shipwrights: 6,649 posts
Posted: Monday, November 25, 2019 - 06:35 AM UTC
Nice progress on the destruction Dave, good to see some construction too.
I reckon Luciano is right regarding the ladder.
Keep up the great work.
Cheers
Si
I reckon Luciano is right regarding the ladder.
Keep up the great work.
Cheers
Si
rolltide31
#377
Joined: June 27, 2010
KitMaker: 1,481 posts
Model Shipwrights: 1,332 posts
Posted: Monday, November 25, 2019 - 11:01 AM UTC
Russell - Thanks, I will admit it is the most nerve wracking part of the build for me. Always worried that I might over due it.
Si - Thanks, will try and get a lot more construction going. Was trying to hold out a bit for the Profile Morskie plans to arrive but there seems to be a disconnect. Will see what happens.
Should have another update this weekend!!
Si - Thanks, will try and get a lot more construction going. Was trying to hold out a bit for the Profile Morskie plans to arrive but there seems to be a disconnect. Will see what happens.
Should have another update this weekend!!
rolltide31
#377
Joined: June 27, 2010
KitMaker: 1,481 posts
Model Shipwrights: 1,332 posts
Posted: Sunday, December 08, 2019 - 05:26 AM UTC
Hey everyone,
A small update today. I have been primarily working on the triple Type 97's for the Shokaku.
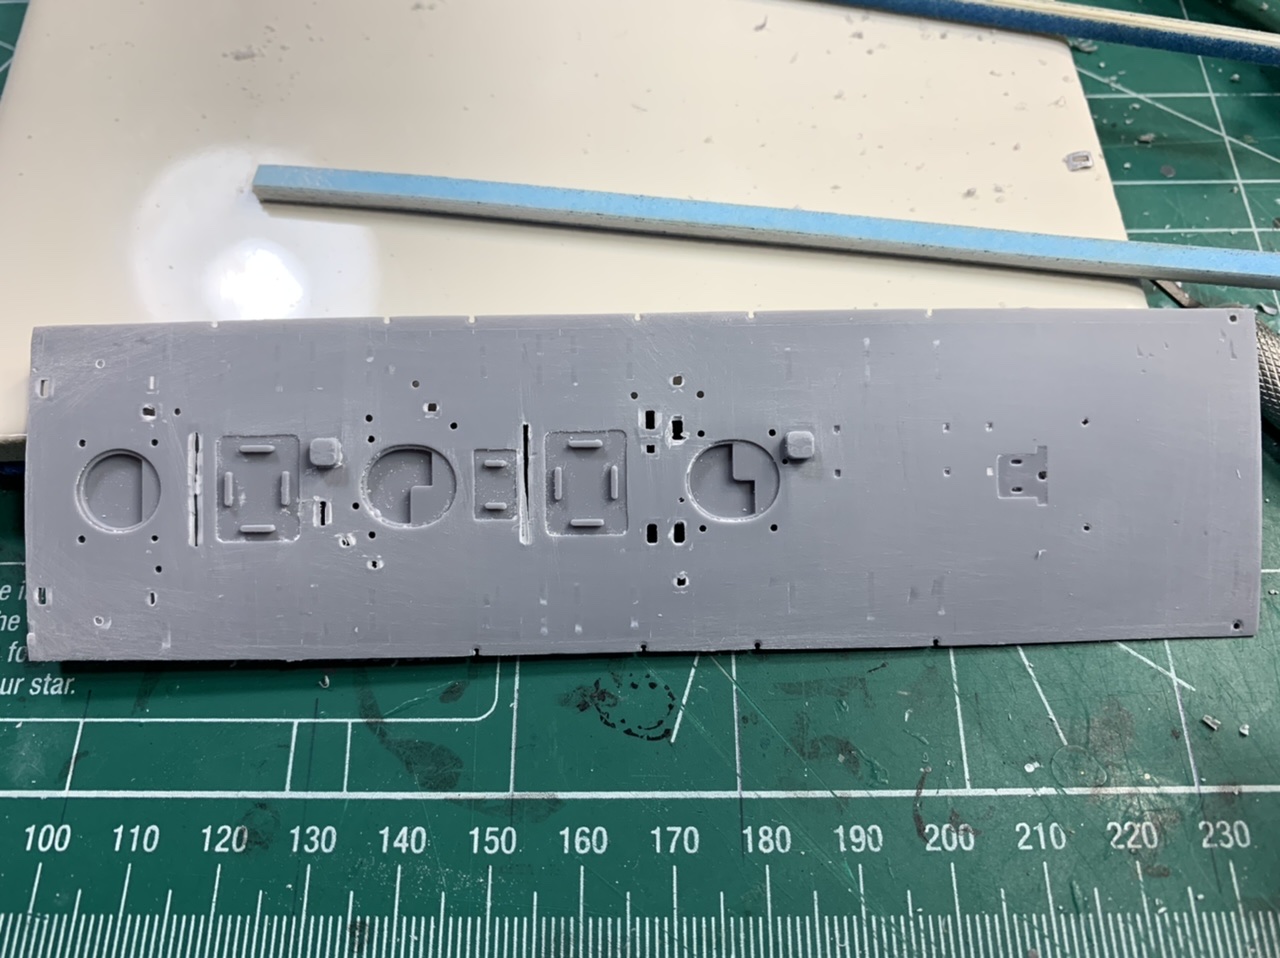
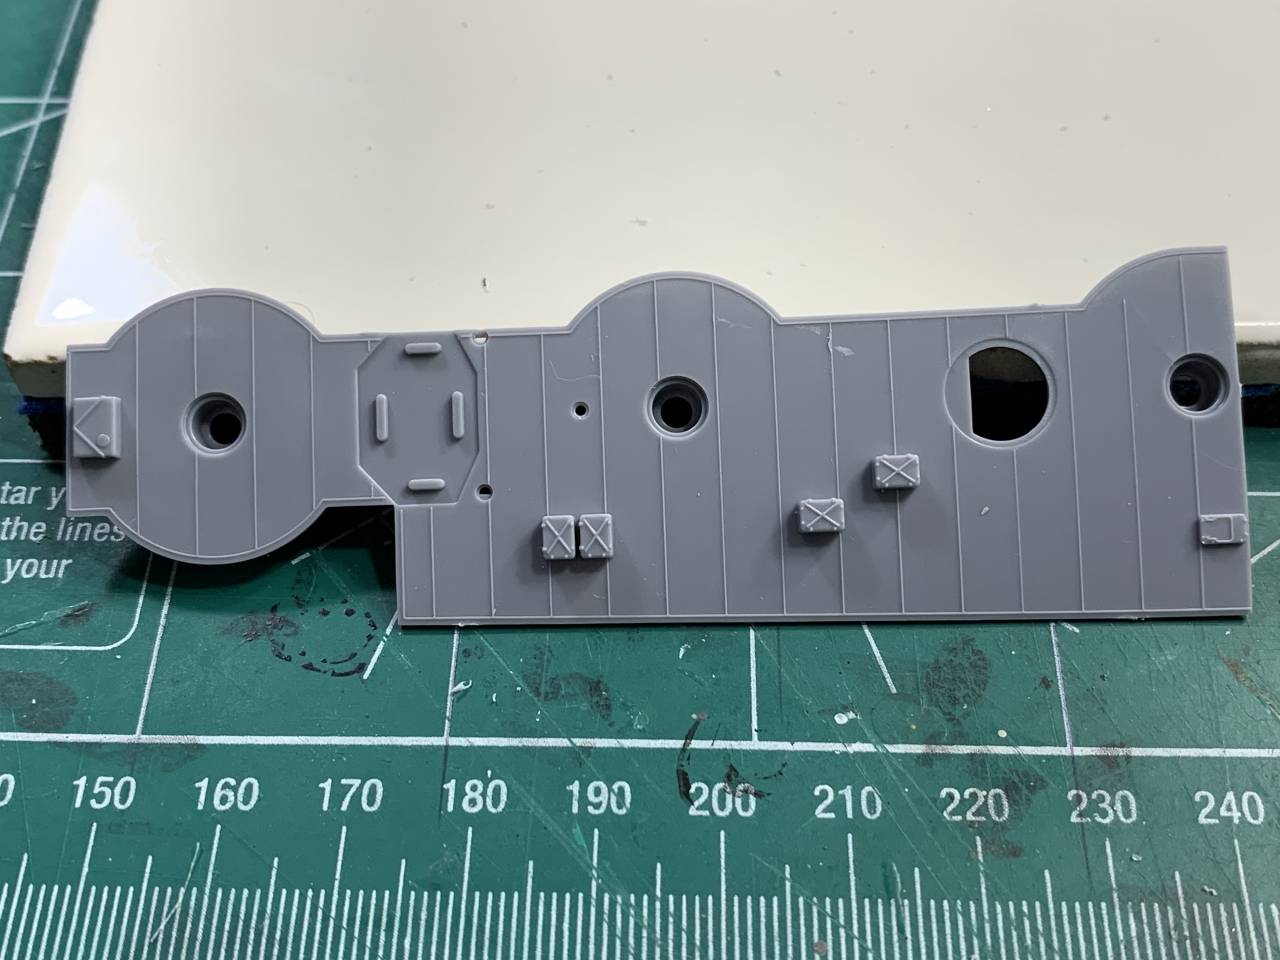
For the Tama, now that the decks are all cleaned I am starting to move on to some of the other parts. The first section I worked on was the Float Plane section of the ship. A lot of cleaning to do here as well.
Here are the parts still on the sprue.
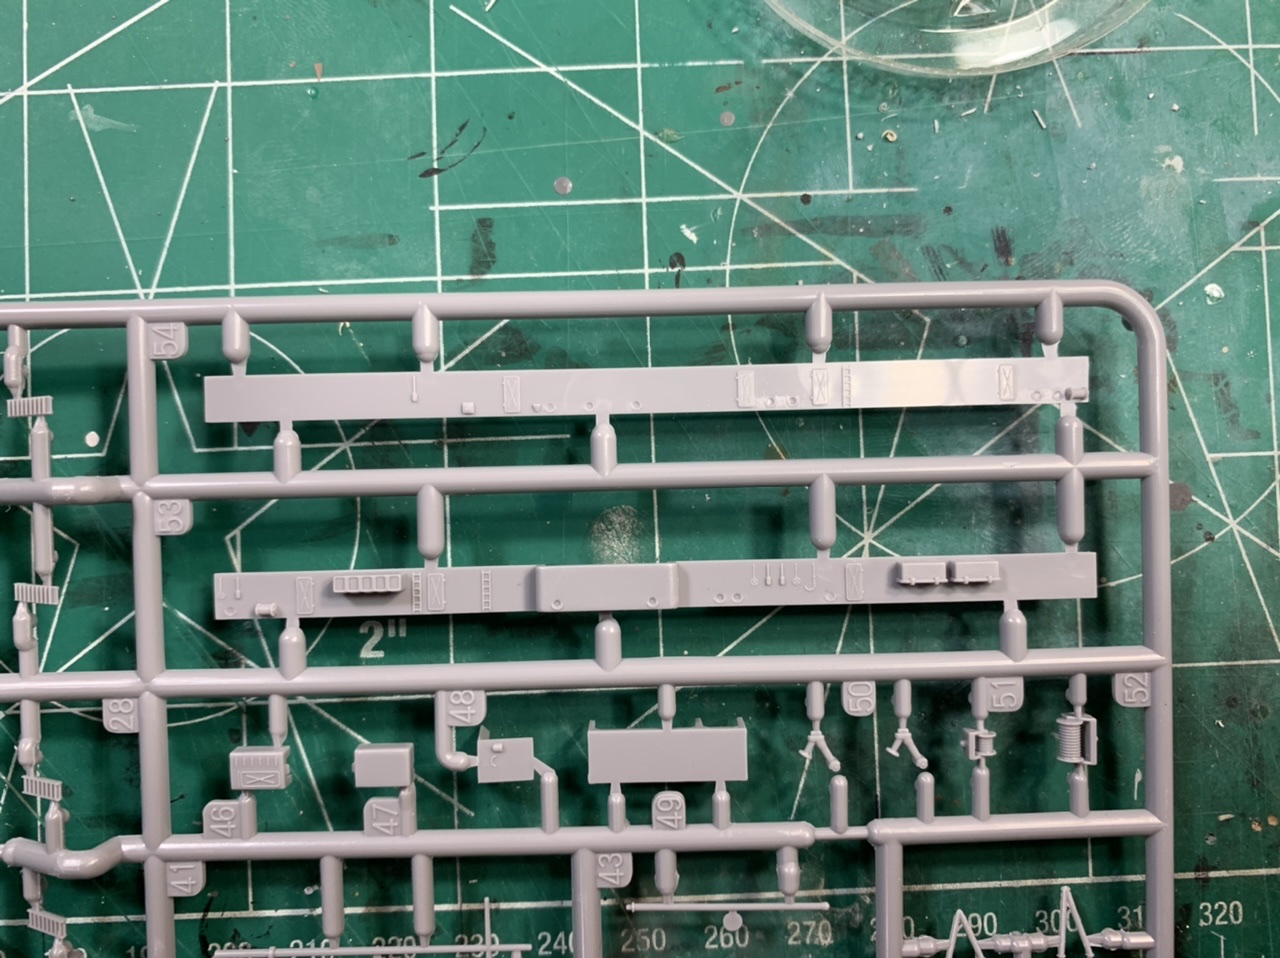
Removed and ready to clean / destroy.

I had bought a new sprue cutter which worked wonders on the thick molded detail. Nice clean cuts which made sanding easier.

Now ready to apply some of the P/E but alas, I am still waiting on the plans from Profile Morskie - seems he does not want to email me the PDF plans that I ordered.
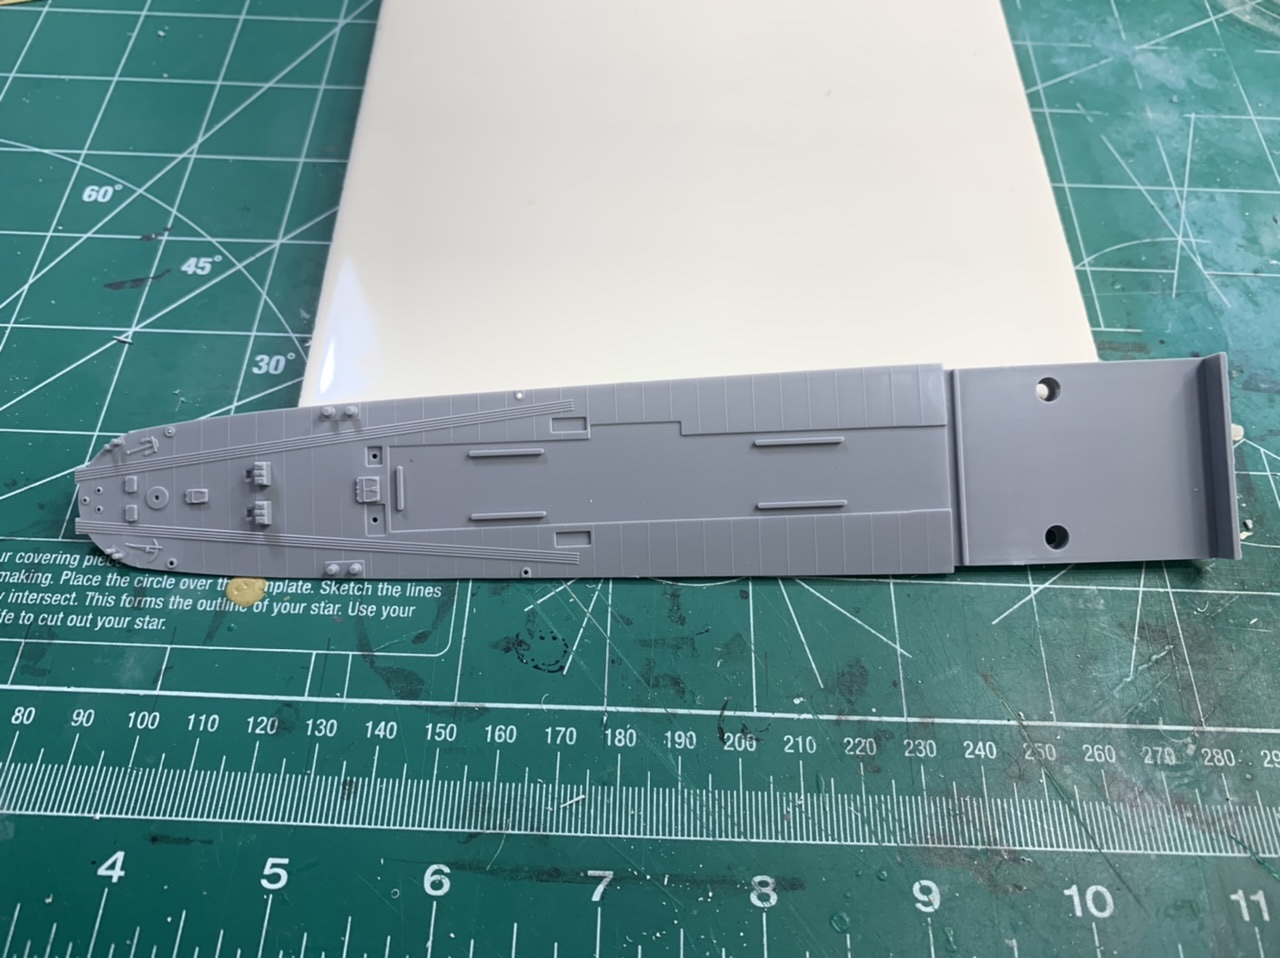
Anyway, I am anxious to begin working on the deck so I primed and painted the forward torpedo deck.
Here she is with primer
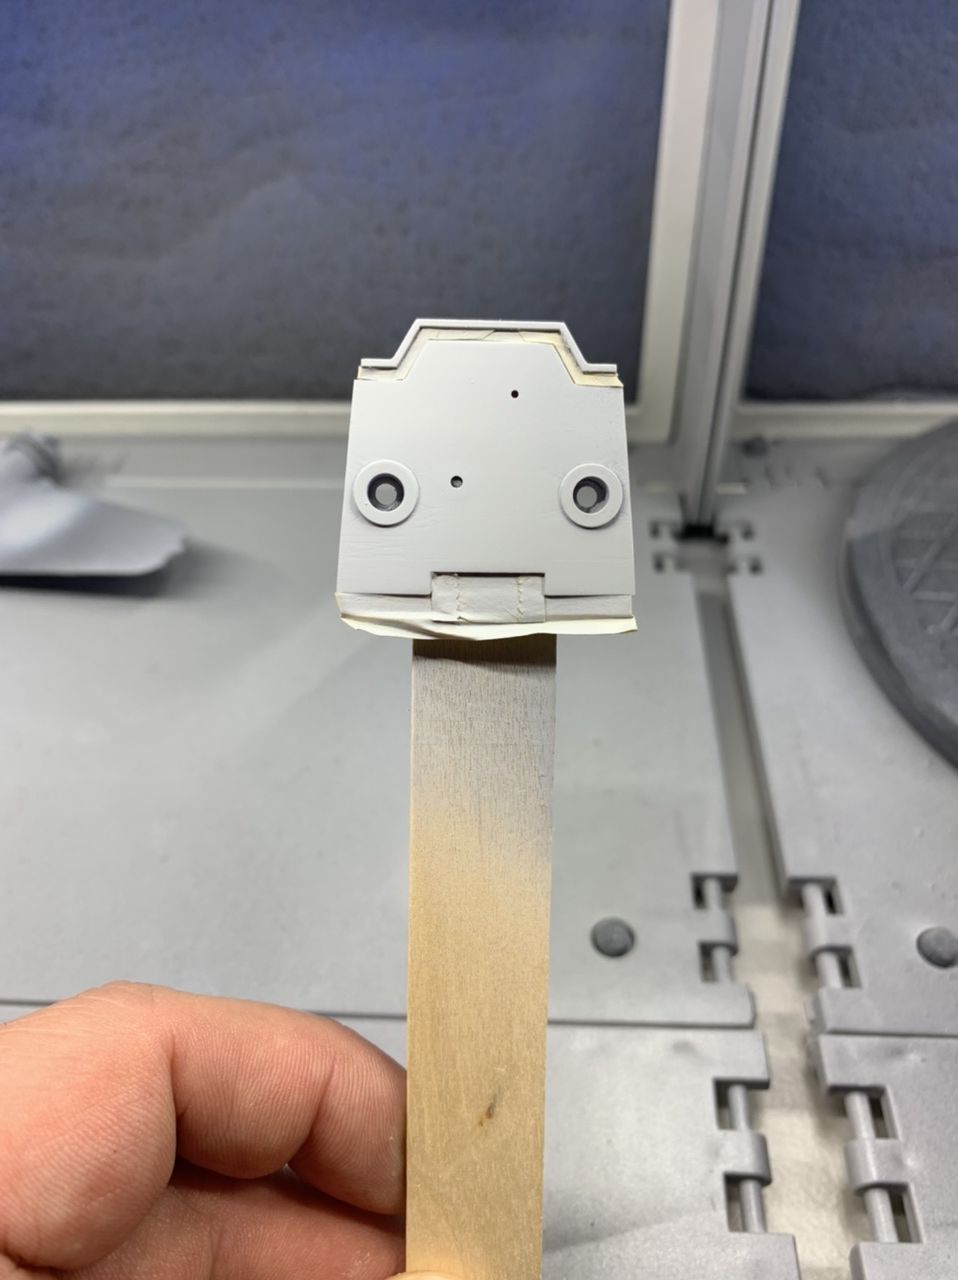
Here is the deck with the initial layer of Linoleum brown

I say initial cause I am going to lay another coat but lighten the color so that it appears to be older linoleum decking which faded due to sun exposure.
I am using for the first time colors from Scale Colors (scalecolors.com) The paint sprayed extremely well using very little thinner and it dries to a slight sheen.
So far I am impressed with the paint, especially based on their range of IJN colors. I plan on using nothing but Scale Colors for this build so there will be more to see soon.
I have a long weekend coming up so hopefully I will get some more bench time this week. Look for a larger update soon.
Thanks for stopping in and as always comments, suggestions and criticism are always welcome.
A small update today. I have been primarily working on the triple Type 97's for the Shokaku.
For the Tama, now that the decks are all cleaned I am starting to move on to some of the other parts. The first section I worked on was the Float Plane section of the ship. A lot of cleaning to do here as well.
Here are the parts still on the sprue.
Removed and ready to clean / destroy.
I had bought a new sprue cutter which worked wonders on the thick molded detail. Nice clean cuts which made sanding easier.
Now ready to apply some of the P/E but alas, I am still waiting on the plans from Profile Morskie - seems he does not want to email me the PDF plans that I ordered.
Anyway, I am anxious to begin working on the deck so I primed and painted the forward torpedo deck.
Here she is with primer
Here is the deck with the initial layer of Linoleum brown
I say initial cause I am going to lay another coat but lighten the color so that it appears to be older linoleum decking which faded due to sun exposure.
I am using for the first time colors from Scale Colors (scalecolors.com) The paint sprayed extremely well using very little thinner and it dries to a slight sheen.
So far I am impressed with the paint, especially based on their range of IJN colors. I plan on using nothing but Scale Colors for this build so there will be more to see soon.
I have a long weekend coming up so hopefully I will get some more bench time this week. Look for a larger update soon.
Thanks for stopping in and as always comments, suggestions and criticism are always welcome.
RedDuster
Joined: March 01, 2010
KitMaker: 7,078 posts
Model Shipwrights: 6,649 posts
Posted: Sunday, December 08, 2019 - 08:45 AM UTC
Quoted Text
Guess I should have done my research a little more before I posted the last update.
According to the Combinedfleet.com Tabular of Movements:
2 December 1941: Akkeshi, Hokkaido Island. TAMA and KISO are camouflaged. White patches are added to their superstructures and their bows and sterns are painted white. The remainder of the ships' superstructures and hulls retain their original colors: Yokosuka Naval Arsenal dark gray for TAMA and Maizuru Naval Arsenal dark gray for KISO.
As I read this it appears that the camouflage pattern is a combination of both pictures. Anyone else read it that way?
Hi Dave,
I reckon you are right, my take would be the white stern from the Morskie colour scheme, and the rest pretty much from the kit.
The Brass bits are a great improvement over the moulded on blobs. Coming on well mate.
Cheers
Si
 |

WEB HOSTING BY


Copyright ©2021 Model Shipwrights and Kitmaker Network, a subsidiary of Silver Star Enterprises
All Rights Reserved. Please read our Conditions of Use and Privacy Policy.
All Rights Reserved. Please read our Conditions of Use and Privacy Policy.