135
Modelling U-625

hull assembly

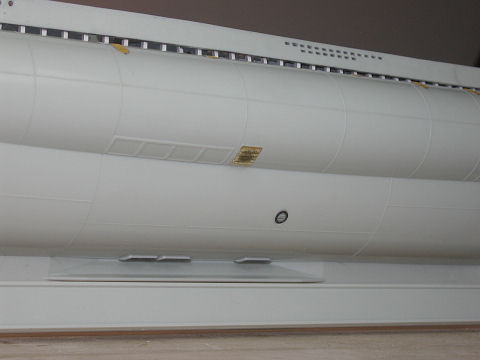
Armed with all the parts I needed for the build (or so I thought at the time), the first order of business was the assembly of the main hull. I first opened up all the flooding holes in the hull; to do this I carefully used a Dremel tool with a #114 High-speed Cutter (round head) to thin out the plastic from behind, then cut out the holes with a sharp #11 Xacto knife. I reinforced the insides of the long flooding channels (atop the ballast tanks) with strips of 0.060” styrene aligned with the vertical rows of rivets on the hull.
The 2 reinforcing bulkheads were cemented to the starboard half of the hull, and were used for mounting the upper pressure hull pieces. Bow and stern vertical baffle plates (painted dark grey) were added from thin sheet styrene, and positioned in the hull centerline behind the opened lower flooding holes.

The Yankee Modelworks Upper Pressure Hull set seemed like a good idea at the time, as some internal components would be visible with the flooding holes opened up. The casting of the resin pressure hull pieces was fairly good, with little warpage or bubbles. When I started working with the 3 pressure hull sections, I found that some of the molded components (conduits, piping, diesel exhaust outlets, etc.) did not quite line up when the sections were installed in the hull. The curvature of the middle pressure hull section is also noticeably different (flatter) than the curvature of the bow and stern sections. I added styrene shelves to the bulkheads inside the hull to support the ends of the resin pressure hull sections; careful shimming was required to get the pressure hull pieces to align well. When mounted, the difference in curvature of the middle section is noticeable.

  I painted the upper pressure hull sections using medium grey enamel paint, and then used heavy washes and drybrushing to bring out the detail. The results were fairly good. It’s a shame that all the effort will be lost once I install the deck! The inside of the hull and the vertical baffle plates received a coat of dark grey. The resin pressure hull pieces were then glued in place on their shelves using epoxy glue. Joining the outer hull halves was very easy, as there is very little warpage in the kit and everything aligns well; I used Tenax-7R liquid model cement for this, bound the hull with masking tape, and left it to dry for a few days.

(In hindsight, I should have filled up the inside of the keel area with epoxy putty, so that I would have the option of making a custom stand with brass posts.)

After the cemented hull had dried and cured, I added thin sheet styrene decks at the bow and stern tips; the Nautilus wooden decks do not include these front and rear deck sections since they are steel on the real boat, not wood. To these styrene decks I cemented the PE decks from Eduard; these have very good detail on them, include safety tread relief patterns. After the PE decks were I place, I had to do a bit of filing on the rear section so the edges of the PE deck would not overhang the hull. After that, I test fit the wooden deck again and added a few horizontal braces between the hull halves to support the deck.

The rear propeller shafts were replaced with turned brass items from Steve Nuttall’s Model Barrels, and were left in their native brass finish (instead of being painted anti-foul grey) to stand out a bit more… a bit of artistic license applied here. I retained the kit’s plastic propellers instead of using brass propellers, though I thinned the blade edges and airbrushed them with Modelmaster Metalizer Stainless Steel (stainless steel being the most probable prop material used at that time… early U-boats used brass propellers). Numerous other PE details were added to the lower hull from the various PE detail sets.
  • 002 - U625
  • 003 - U625
  • 004 - U625
  • 005 - U625
  • 006 - U625
  • 007 - U625
  • 008 - U625
  • 009 - U625
  • 010 - U625

About the Author

About Glenn Cauley (GlennCauley)
FROM: ONTARIO, CANADA

My name is Glenn Cauley. I am an IT Business Analyst and professional Technical Writer living just outside Ottawa, Ontario, Canada. In my spare time (ha ha), I enjoy building models, riding motorcycles (and doing some instructing), spending time with friends & family along with a good bott...


Comments

Hi Glenn, Excellent piece of work. Really enjoyed it, thanks for sharing. I'll look forward to the next one. Cheers Al
JAN 16, 2007 - 01:12 AM
Hello madwolf, I purchased the thread from a fabric store called Bou Clair, where they have a large selection of threads. I got 5 spindles of thread... one of them is even a 'metallic effect' thread! If you have trouble getting any, let me know and I could get a spindle for you and mail it. [/quote] Yes, I was wondering about the metallic thread. I'll check my local crafts stores to see if they have any, otherwise I will let you know. By the way, is that an SV in your signature? I have an SV1000S.
JAN 16, 2007 - 02:03 AM
Okie dokie, let me know. I doubt I'll ever use the metallic effect thread on a sub... it's much too shiny and bluish. The thread I used for the siderail ropes on U-625 is not metallic, but has a grey/purplish tone to it... looks quite nice. Close about the bike... it's a 1998 TL1000R. Now that I've ridden a V-twin, I'll never go back to an inline. I picked it up used in August 2005. The pic is from a Track Day at Shannonville Motorsport Park in September 2006... ahhh... going back to my glory days of roadracing...
JAN 16, 2007 - 02:10 AM
One of the fine folks I got help from is Wink Grisé in Australia. He has a really good site, and also documents the building of his own U-557 in 1:72 scale. The work he is doing is really wild ! Here is the link: LINK He is co-designer of a fabulous PE set for correct drainage holes on the 1:72 U-boat. The other co-designers also produced some very helpful documentation for the U-boat modeller: LINK Enjoy!
JAN 17, 2007 - 01:32 AM
Very well done Glenn !!! Looks like she is ready to roam the Atlantic again, amazing detail and realism ! Cheers for sharing mate Herr
FEB 26, 2007 - 09:25 AM
UPDATE: We had our bi-annual CAPCON model contest today (hosted by IPMS Ottawa), and I was fortunate enough to win the Submarine category, and also won the Best Ship award! That was all very nice... and my father was thrilled!! And to top it all off, I finally got to meet Joe "Grauwolf" Passaseo in person! Joe, you are a fantastic modeller and super-nice guy... it was indeed a pleasure to meet you Glenn
SEP 16, 2007 - 12:18 AM
Congrats Glenn And I must say that it has been always a pleasure to meet other members from the ship modeling community Thanks for this small, but important update Skipper
SEP 16, 2007 - 12:51 AM
2007 tally for U-625: 3 shows... 6 awards! CAPCON 2007 1st place - submarines Best Ship Gryffon 27 1st place - submarines Best Ship Ajax 2007 1st place - submarines Best in Show -- People's Choice
NOV 25, 2007 - 12:51 PM
Great stuff Glenn Well deserved indeed. Cheers Sean
NOV 26, 2007 - 05:30 AM
Top notch build!
NOV 26, 2007 - 06:26 AM