Campaigns
Want to be part of a group build? This is where to start, plan, and meet about them.
MSW Build Contest- Leipzig, 1/400, Full Build
Tailor
Visit this Community
Nordrhein-Westfalen, Germany
Joined: May 26, 2008
KitMaker: 1,168 posts
Model Shipwrights: 676 posts
Posted: Saturday, July 19, 2008 - 05:08 PM UTC
Good day, gentlemen!
A bit of a progress update as we go along.
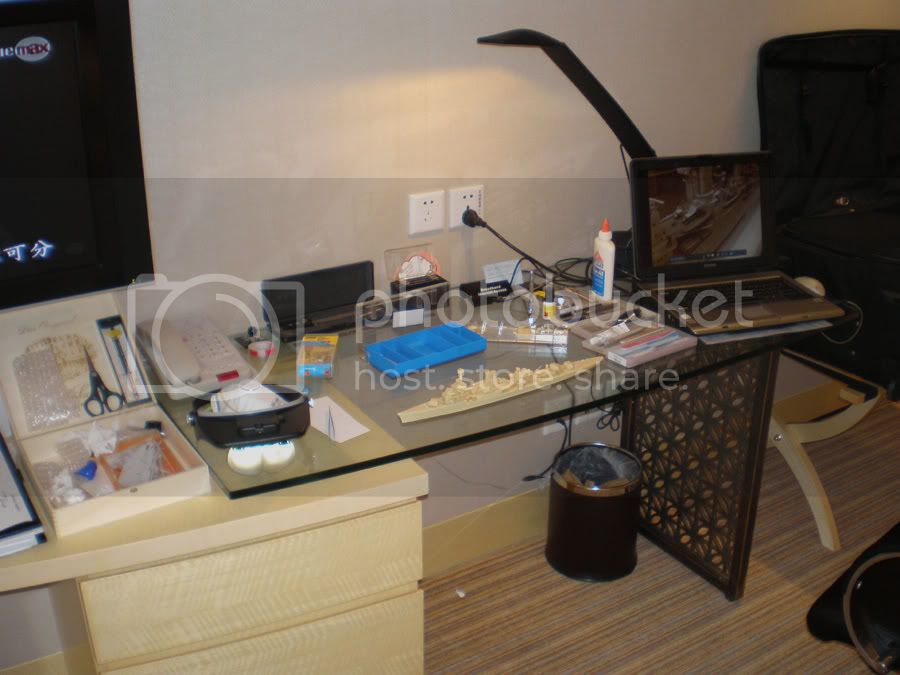
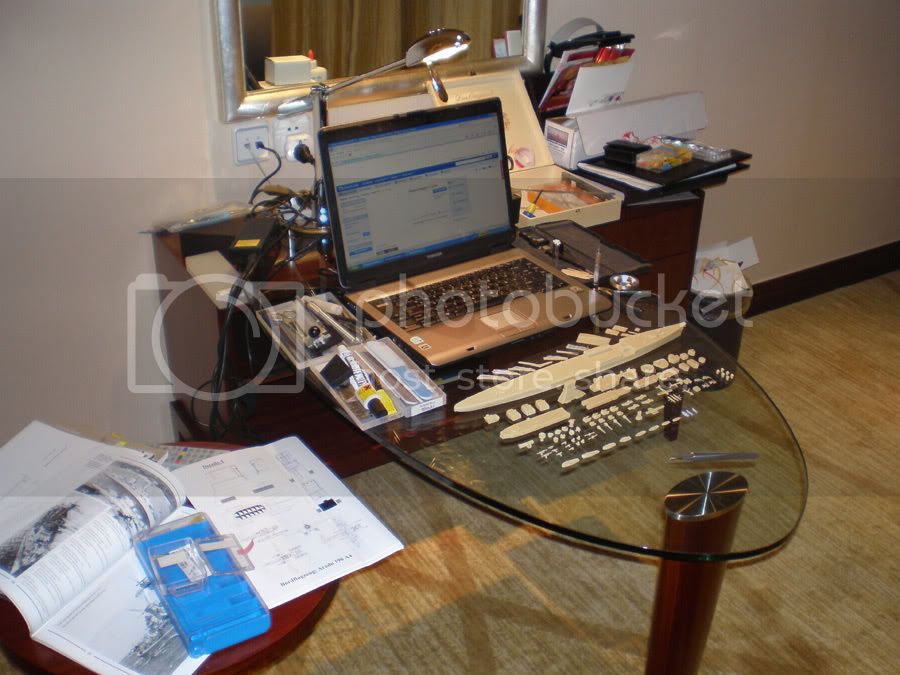
I had to decide on a change of scenery: My job took me on one of the frequent trips to mainland China. I am now sitting in Zhuji, Zhejiang province some 300km west of Shanghai.
I am scheduled to be here until 29th, but it may turn out longer. Zhuji is mostly an industrial city with some nice corners, but I had seen them all on previous trips, so I am spending my time in my hotel. What better chance to build a model?
I am not certain, when I will have a chance to post these pictures, so I will take the chance to post whenever the omnipresent governmental censorship let me enter Modelshipswrights during the next days. Out here in the provinces I have a better chance than in the big cities like Shanghai to where I will proceed in a couple of days, as censorship isn’t as tight here.

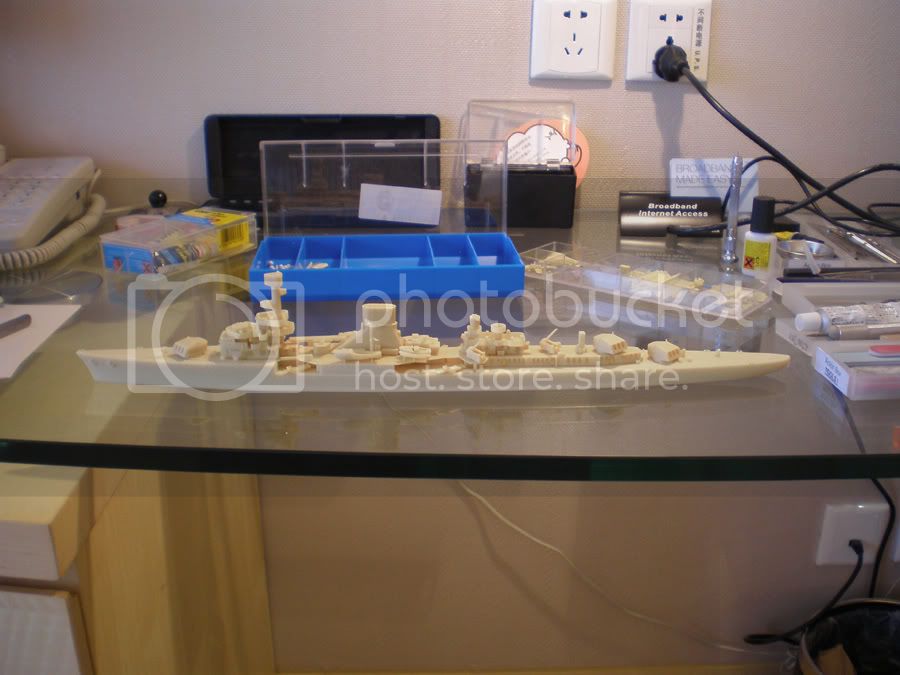
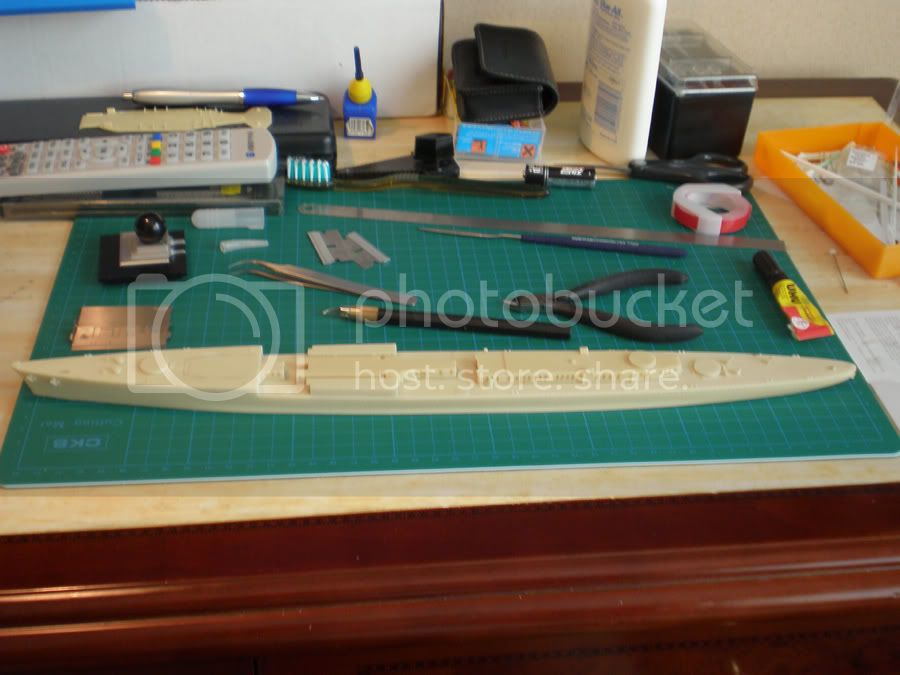
I have set up my workbench on my hotel room desk as best as I could and I should be able to do some damage. I took the essential tools set and references with me. Of cause some styrene sheets and rod and the better part of the PE collection are travelling with me.


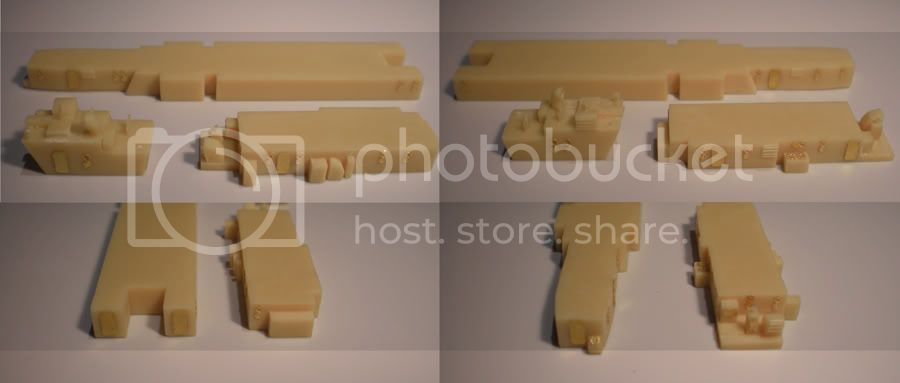
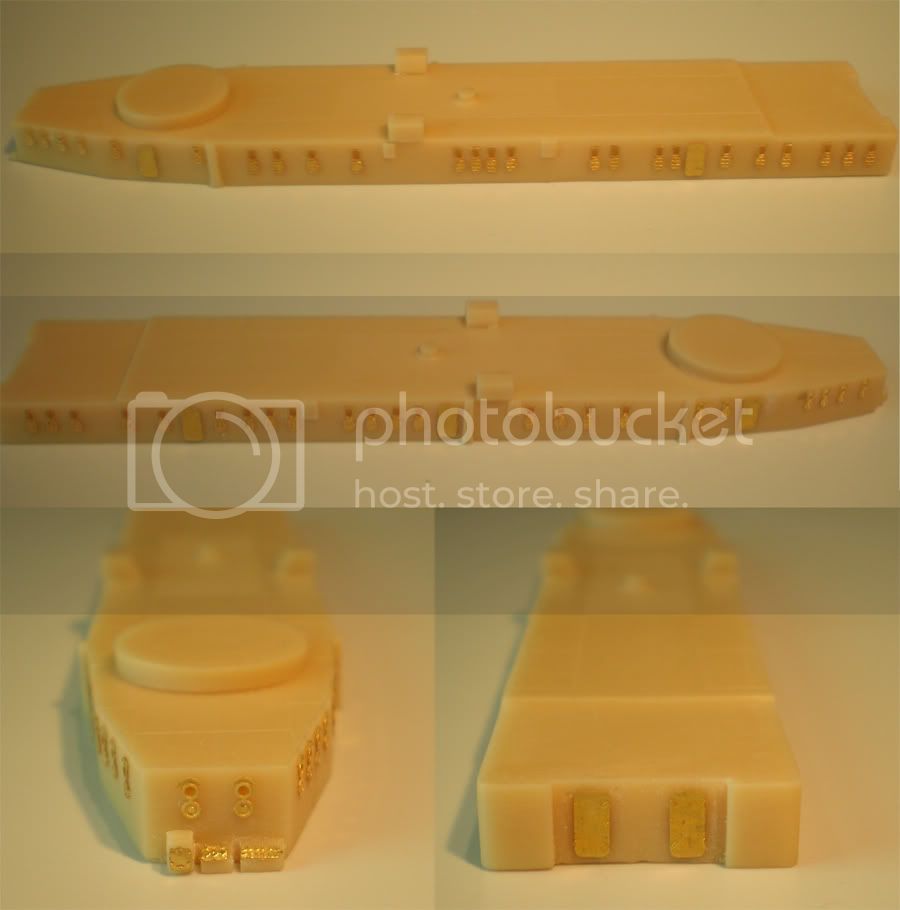
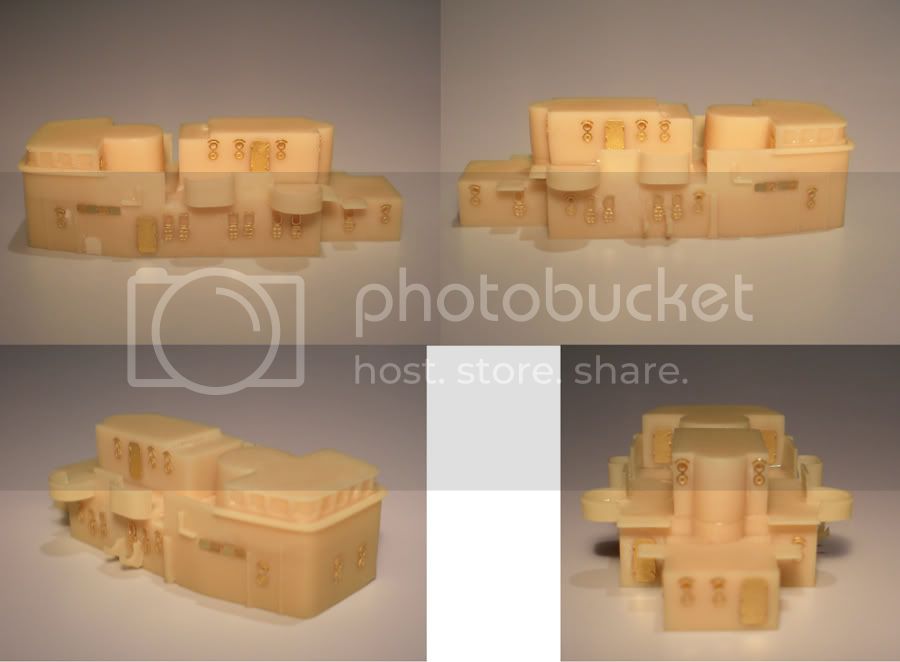
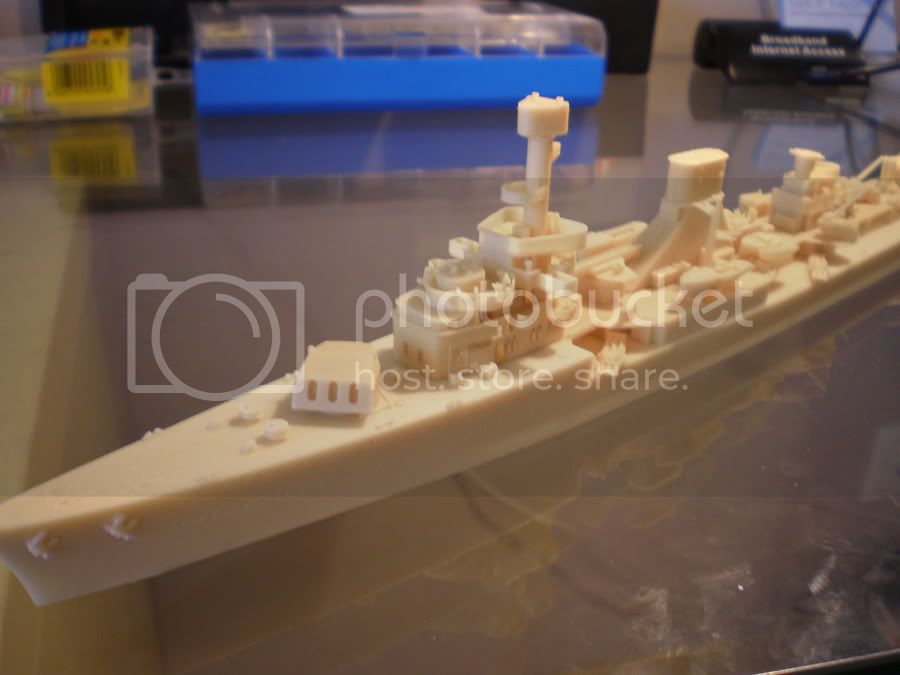
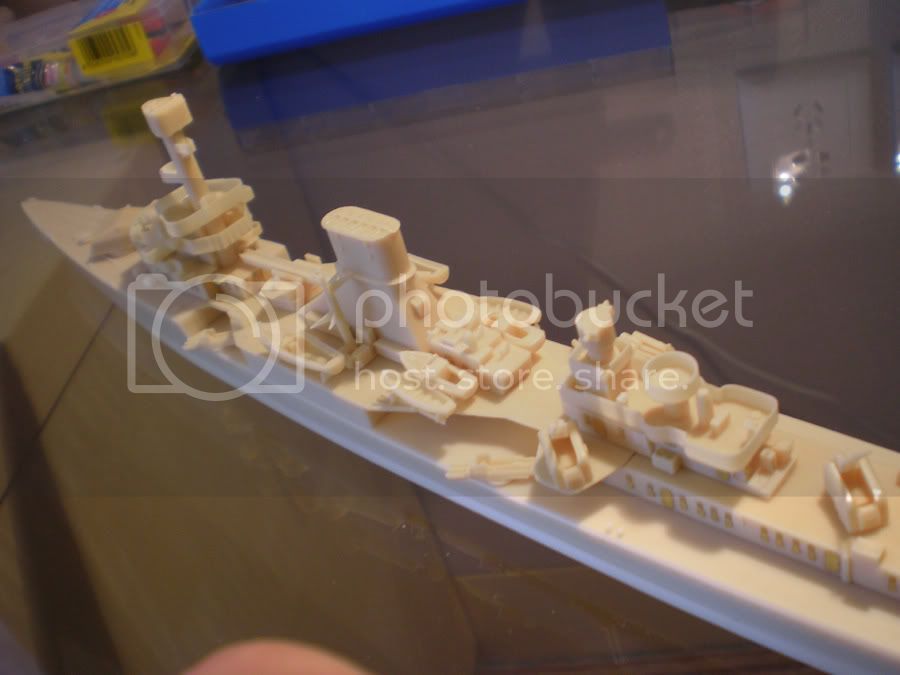
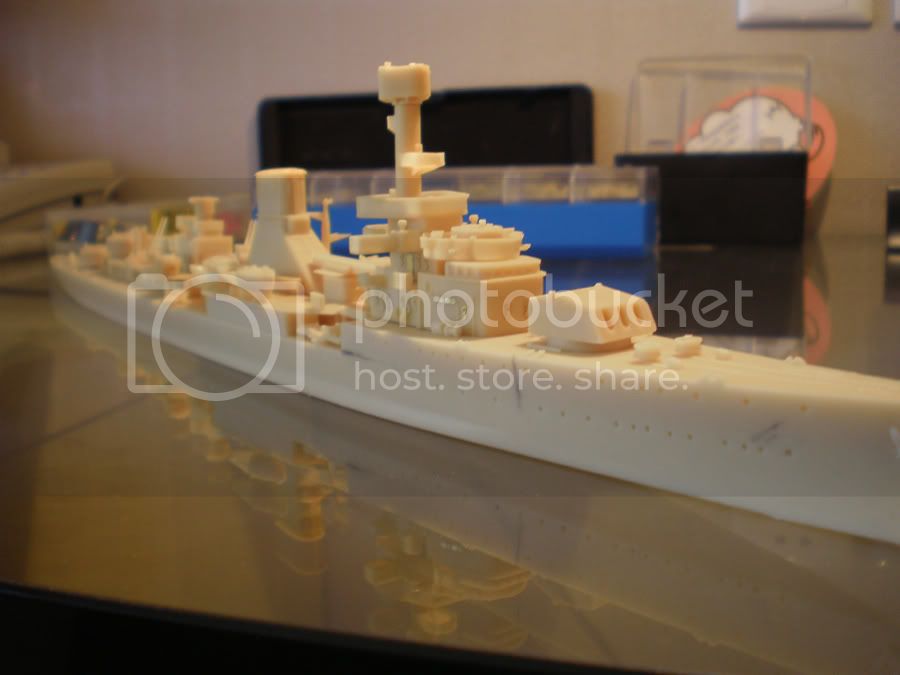
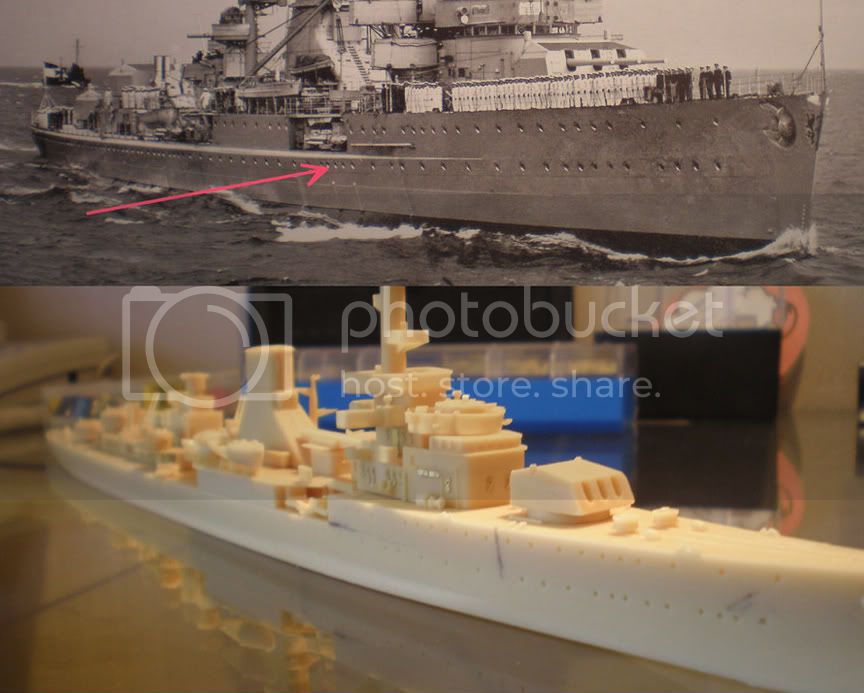
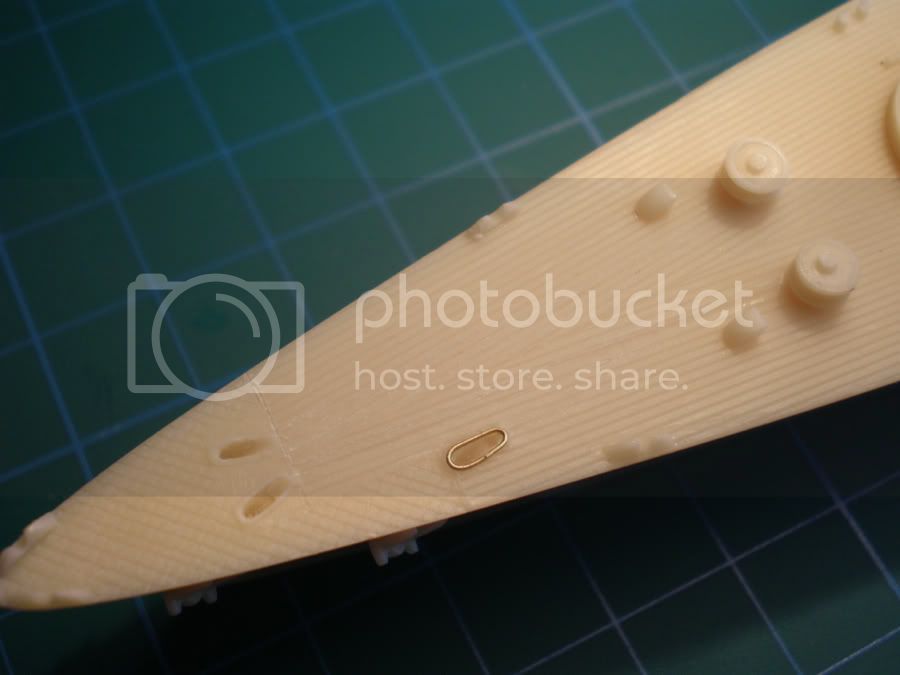
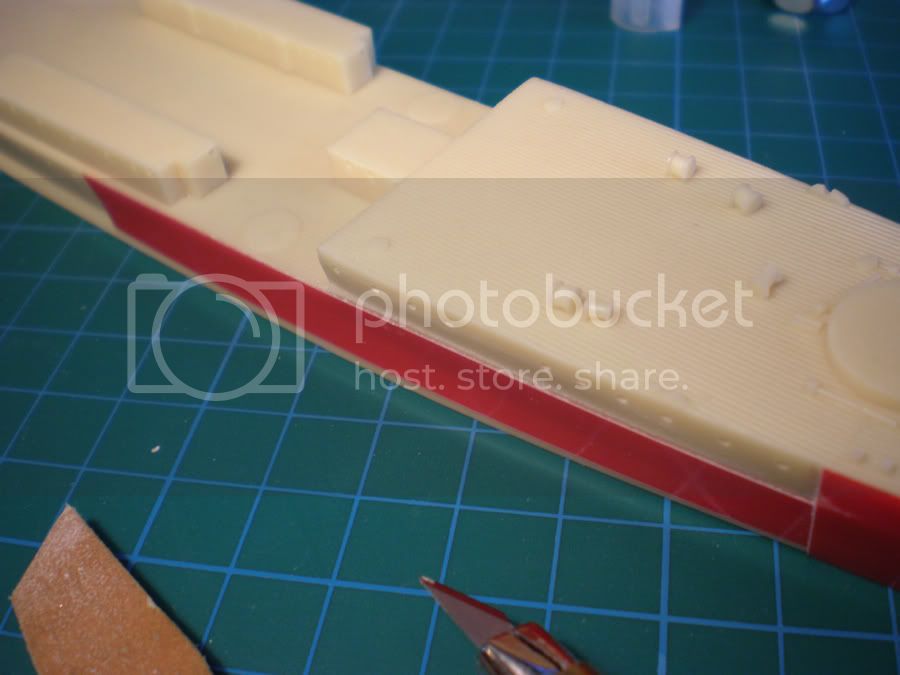
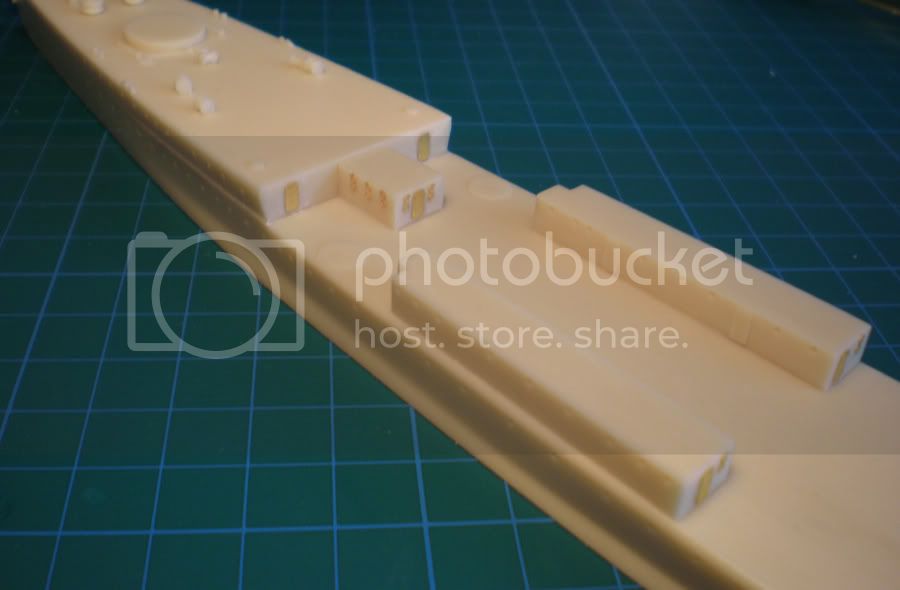
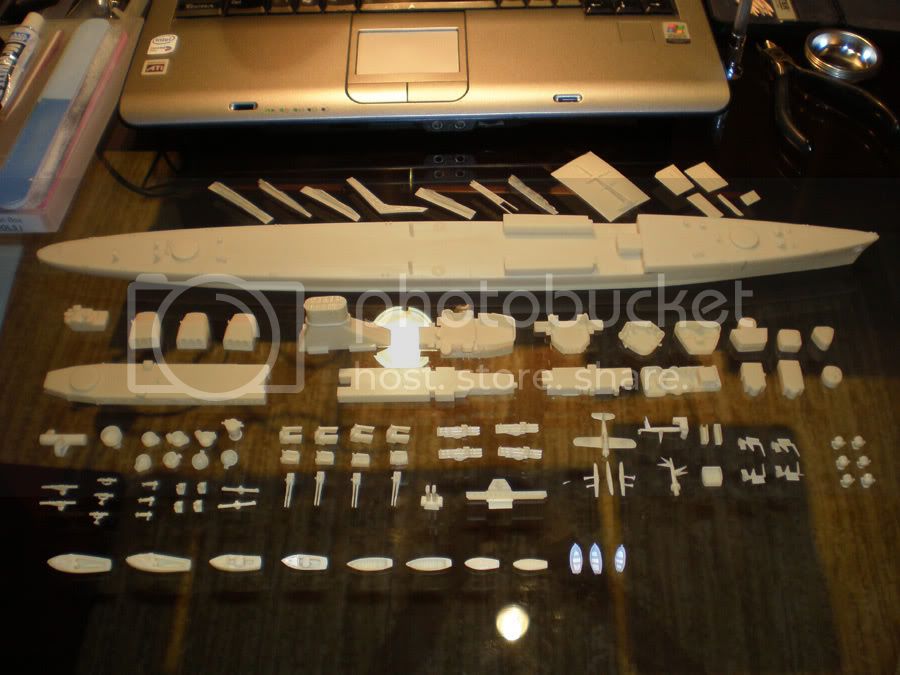
I have cleaned up all the parts except those too fragile to survive without the waver (see top of the picture). These parts will most likely be replaced by styrene or brass rod later. Next to the over pour I have now removed about 90% of the cast surface detail such as porthole covers, doors, vents and reels as they will all be replaced by PE.


Now I got some 6-7 hours of modelling time before me. Lets see what I can do…
Tailor
Visit this Community
Nordrhein-Westfalen, Germany
Joined: May 26, 2008
KitMaker: 1,168 posts
Model Shipwrights: 676 posts
Posted: Sunday, July 20, 2008 - 02:30 AM UTC
Hello, again!

8 hours later I indeed have done a bit this afternoon.

8 round portholes (WEM) and 5 doors (GMM) were added to the midship level 1 superstructure.
11 round portholes (WEM), 3 doors (GMM) and 2 hatches (Tom’s) were added to the aft level 2 superstructure and another 3 portholes and one door went onto the level 2 superstructure to be placed behind the funnel. (I think it is the plane/boats workshop.)


35 square and 12 round portholes from WEM, 5 doors from GMM and 3 hatches from Tom’s were added to the after level 1 superstructure.


Finally, I fused 2 parts of the bridge level 2 to their base using 2 minute epoxi-glue. The gaps around the fusing lines were closed using white glue for seamless connection of the parts. Furthermore some filling had to be done where mould on reels had to be removed. Onto it I put on 19 round,12 square portholes, 4 sliding hatches (WEM), and 7 GMM doors.


So 130 PE and 3 resin parts in an afternoon. Not too bad! I used up 3 Olfa blades in due process cutting up all that PE as most parts had 4 connecting points.

Let’s see what the next days have in store!

Good night from China!
skipper
Visit this Community
Lisboa, Portugal
Joined: February 28, 2002
KitMaker: 5,182 posts
Model Shipwrights: 4,070 posts
Posted: Sunday, July 20, 2008 - 03:34 AM UTC
Hallo Guido!!

Looks good - steady work and flawless PE attachment on you Leipzig!
Keep up and keep us posted


Rui
DrDull
Visit this Community
Illinois, United States
Joined: February 23, 2006
KitMaker: 133 posts
Model Shipwrights: 128 posts
Posted: Sunday, July 20, 2008 - 03:51 AM UTC
Wow! Great work Guido. I'm especially impressed with you being able to set up a traveling workshop and to find time for building while on assignment. The PE looks fantastic. Barry
Tailor
Visit this Community
Nordrhein-Westfalen, Germany
Joined: May 26, 2008
KitMaker: 1,168 posts
Model Shipwrights: 676 posts
Posted: Sunday, July 20, 2008 - 03:55 AM UTC

Quoted Text

Wow! Great work Guido. I'm especially impressed with you being able to set up a traveling workshop and to find time for building while on assignment. The PE looks fantastic. Barry


Hi!
Well, I got free Sundays like today and due to jet lack I hardly sleep more than 5 or 6 hours. That leaves me with plenty of time!
Guido
Tailor
Visit this Community
Nordrhein-Westfalen, Germany
Joined: May 26, 2008
KitMaker: 1,168 posts
Model Shipwrights: 676 posts
Posted: Tuesday, July 22, 2008 - 09:14 PM UTC
Hello, friends and folks!

I have put up my tents in Shanghai. I arrived in the opening hours of today and after a good sleep I had a free morning. It's hot and humid outside like the swamps of the Everglades so I did decide against going out shopping, so I set up my bench after breakfast...


... and the first over-all dry-fit. So here's a bit of eye Candy for y'all...


So that's what’s coming.

For some time I have been eyeing a major issue on the hull of the kit.
First I thought it was minor, but the more I look at it, the more I know that I will need to address the issue to be satisfied with the final build. As you can see from the Montage below there is a significant line, where the focsle is set onto the armour-belt of the hull. For this line the hull sheers upward and outward to the maximum width of the focsle. See arrow. This undercut extends about to the mid of the forward barbette.
In the kit this undercut or "lip" is missing.


As it looks like a bit of surgery is necessary to dissolve the obvious mistake in the kit.
I have not yet figured out how to do it, but it'll come to me...
Something to look forward to for both you and me!
skipper
Visit this Community
Lisboa, Portugal
Joined: February 28, 2002
KitMaker: 5,182 posts
Model Shipwrights: 4,070 posts
Posted: Wednesday, July 23, 2008 - 02:05 AM UTC
Hi Guido

The dry fit looks good, but as for the hull problem here's my advise/solution (?)...
since the hull also has some relevant plating, I would like to suggest the following procedure:
- use tamiya tape to full length of the hull, where it is supposed to be the lower plating;
- on the red arrow area, use evergreen strip and putty to make the lip area;
- give several coats of primer to make the raised plating and blend the lip area;
- remove tape and give 1200 sand paper where needed;
- drill portholes where needed

I hope your staying on the other side of the world goes smooth


Rui
Tailor
Visit this Community
Nordrhein-Westfalen, Germany
Joined: May 26, 2008
KitMaker: 1,168 posts
Model Shipwrights: 676 posts
Posted: Wednesday, July 23, 2008 - 03:33 AM UTC
Hi, Rui!
Thanks for the advise.
Recreating the plating using primer build -up was the plan, alright.
However, the build up of that "lip" fading forward with strip don't work like that! I considered that as a first solution, but discarded the idea after a while.
Check the pictures above the montage: The lip already exists on the mid-ship structure (aft of the forward T-tube set). This lip-line needs to be continued forward form there cutting right into the focsle. The lip is almost 1mm wide at the midship structure. If I add another 1mm to the beam of the ship the "lip" will be about 2mm (80scale cm or 31,5'') wide midships. That as wide as standard doorway and won't look right. It might even distort the shape of the hull.
For now I plan to carve it out.
MartinJQuinn
Visit this Community
New Jersey, United States
Joined: January 19, 2005
KitMaker: 574 posts
Model Shipwrights: 530 posts
Posted: Wednesday, July 23, 2008 - 03:37 AM UTC
Love what you've done with her so far, Guido, especially the WEM photo-etch additions. One of the things I actually detest is removing the parts from those resin cast wafers - it's so tedious!!!
skipper
Visit this Community
Lisboa, Portugal
Joined: February 28, 2002
KitMaker: 5,182 posts
Model Shipwrights: 4,070 posts
Posted: Wednesday, July 23, 2008 - 03:59 AM UTC

Quoted Text

Hi, Rui!
Thanks for the advise.
Recreating the plating using primer build -up was the plan, alright.
However, the build up of that "lip" fading forward with strip don't work like that! I considered that as a first solution, but discarded the idea after a while.
Check the pictures above the montage: The lip already exists on the mid-ship structure (aft of the forward T-tube set). This lip-line needs to be continued forward form there cutting right into the focsle. The lip is almost 1mm wide at the midship structure. If I add another 1mm to the beam of the ship the "lip" will be about 2mm (80scale cm or 31,5'') wide midships. That as wide as standard doorway and won't look right. It might even distort the shape of the hull.
For now I plan to carve it out.


Hi Guido,

You can use 0.25 mm thick evergreen strip - even if it would turn a little out of scale, it would mark the hull feature.
Compromises, compromises


Rui
Tailor
Visit this Community
Nordrhein-Westfalen, Germany
Joined: May 26, 2008
KitMaker: 1,168 posts
Model Shipwrights: 676 posts
Posted: Monday, July 28, 2008 - 08:06 PM UTC
Hallo, Gentlemen!

2 more days ‘til our next progress evaluation and I am still in China. After skipping about the Chinese landscape, I had to add another week and will be staying here until Sunday. I had short evenings, but still got something done.
I had added the last portholes/covers and doors to the final superstructure parts, which was minor work. Then I removed the anchor chain. Unfortunately I broke off a bit of the chain lead rim, so I replaced it with .2mm brass. The other will receive the same treatment to achieve even looks. After shaving off the anchor chain I rescribed he planking. The chain I will add from my spares box.


Addressing the “lip” where the forecastle meets the main hull was up next. After considering Ruis good advise, I decided against adding styrene, but make the gutsy move and reshape the hull. First I marked down the lines using plastic tape. Then I used a rough sanding stick scraped a “v” grove into the hull that tapers of towards the deck and towards the bow. I was actually a bit shaky doing that but it was easier than I had anticipated.


In the next picture you can see the “lip” I created quite clearly. Of cause I will stick to recreating the hull plating using primer. In the same picture you can see a handful of doors and portholes added, too.


That’s it for today!


beefy66
Visit this Community
England - North East, United Kingdom
Joined: October 22, 2007
KitMaker: 971 posts
Model Shipwrights: 645 posts
Posted: Monday, July 28, 2008 - 10:18 PM UTC
WoW A lot of great stuff going on to that ship.Guido I hate your work area it,s soo clean not a speck of dust my wife would think there was something wrong with me if i was that tidy.
skipper
Visit this Community
Lisboa, Portugal
Joined: February 28, 2002
KitMaker: 5,182 posts
Model Shipwrights: 4,070 posts
Posted: Tuesday, July 29, 2008 - 12:40 AM UTC
Excellent Guido!
A good way of correcting a major flaw! And it looks good
Keep up


Rui
#027
Visit this Community
Louisiana, United States
Joined: April 13, 2005
KitMaker: 5,422 posts
Model Shipwrights: 5,079 posts
Posted: Tuesday, July 29, 2008 - 06:48 AM UTC
Nice fix for a tricky problem.

Kenny
DrDull
Visit this Community
Illinois, United States
Joined: February 23, 2006
KitMaker: 133 posts
Model Shipwrights: 128 posts
Posted: Tuesday, July 29, 2008 - 10:27 AM UTC
Guido - really nice work on correcting the 'lip.' I have to admit that I wasn't too clear on what the problem was by looking at the comparison photos you posted, but now I understand your concern. Great solution - I always thought that some of thw fun of modeling is figuring out how to deal with thins like this. Enjoy the rest of your stay. Barry
Clanky44
Visit this Community
Ontario, Canada
Joined: September 15, 2005
KitMaker: 1,901 posts
Model Shipwrights: 934 posts
Posted: Wednesday, July 30, 2008 - 03:24 PM UTC
Great progress Guido, spotless resin clean up and photo-etch work... and all in a hotel room. Being a fellow hotel room modeller, I will attest that hotel room lighting stinks! I try and pack a good portable light source with me when I travel, and if I don't have the packing room, I'll buy a desk top lamp upon reaching my destination. I can't begin to count the amount of lamps I've purchased over the years!

Frank
Nanond
Visit this Community
Thailand / ไทย
Joined: May 03, 2008
KitMaker: 16 posts
Model Shipwrights: 13 posts
Posted: Wednesday, July 30, 2008 - 04:50 PM UTC
Hi Guido,

Clean build and out of the box solution! Leipzig is too cool. So do all the german WWII light cruisers. It's too bad that there are only a few choices to choose in 1/700 and none in injection kit.

Nanond
Gunny
Visit this Community
Pennsylvania, United States
Joined: July 13, 2004
KitMaker: 6,705 posts
Model Shipwrights: 4,704 posts
Posted: Thursday, July 31, 2008 - 09:48 PM UTC
Second Build Session Closed-Keep Modeling!
Tailor
Visit this Community
Nordrhein-Westfalen, Germany
Joined: May 26, 2008
KitMaker: 1,168 posts
Model Shipwrights: 676 posts
Posted: Friday, August 01, 2008 - 12:29 AM UTC
Gentlemen!

Just a few minutes late due to internet problem in the Chinese province. Anyway these will be good for next months progress evaluation, too.

Thank you for the friendly comments and your visit to my blog.
Indeed the lighting situation is below par in most hotels, especially when working with Opti-Visors, but one learns to make do. Like Frank I carry a light source - two LED flashlights (torches) – with me. Until today I could avoid buying lamps. Usually I get desk top lights set up upon request.

As I progressed, the moulded on cable reels on the quarterdeck and focsle were removed. They are actually intended to help placing the superstructure so one wants to mark down the positions of those parts before making the cuts. Before fixing the level 1 structure mid ships and aft using 2min epoxy, I re-scribed the deck planking lines in the places marred by removal of the reels. I glue the level structure in place and closed the inevitable gaps between the structures and the deck with good ole’ Elmers.


I spiced up the stern and quarterdeck with photo etch: Doors and hatches from Tom’s and that cute eagle from WEM. It was an obnoxious little sucker, continuously refusing to conform to the surface below. Anyway nothing you couldn’t fix with a sledgehammer and colour language. Taking these close ups is a good way to control your work: Now that wing on the port side still needs some straightening, as it seems.


After all that, I started playing with some WEM photo etch intended to replace the catapults of the 400th scale Heller pocket battle ships. I used a couple of parts such as the console on the launch pad and the pressure bottles from the HP kit part. A bit of styrene rod is now representing the cat’s rails for the sled.


That’s it for today!

Karybdis
Visit this Community
Maryland, United States
Joined: December 27, 2006
KitMaker: 846 posts
Model Shipwrights: 740 posts
Posted: Friday, August 01, 2008 - 04:51 AM UTC
Guido, your work just blows me away! Excellent clean up and the PE is looking good. I'm really impressed with the eagle!
DrDull
Visit this Community
Illinois, United States
Joined: February 23, 2006
KitMaker: 133 posts
Model Shipwrights: 128 posts
Posted: Friday, August 01, 2008 - 07:18 AM UTC
Fantastic, Guido. Beautiful work on the PE. Barry
Clanky44
Visit this Community
Ontario, Canada
Joined: September 15, 2005
KitMaker: 1,901 posts
Model Shipwrights: 934 posts
Posted: Friday, August 01, 2008 - 09:13 AM UTC
Well done Guido, very clean and well photographed.

Frank
DrDull
Visit this Community
Illinois, United States
Joined: February 23, 2006
KitMaker: 133 posts
Model Shipwrights: 128 posts
Posted: Monday, August 04, 2008 - 03:57 AM UTC
Hi Guido! I saw the pictures of you with the R/C sailboat over on the modelwarships site. Did you pack that boat to China along with your portable workshop? Nothing like traveling light, eh? Looks like everyone was having a great time! Barry
Tailor
Visit this Community
Nordrhein-Westfalen, Germany
Joined: May 26, 2008
KitMaker: 1,168 posts
Model Shipwrights: 676 posts
Posted: Monday, August 04, 2008 - 12:34 PM UTC
Hi, Barry!
Naw! The ships are being in store at "Hermil" Chuck Miller. I just helped setting them up. These Sailing weekends are a lot of fun, indeed!
Guido
JMartine
Visit this Community
New Jersey, United States
Joined: October 18, 2007
KitMaker: 1,698 posts
Model Shipwrights: 1,514 posts
Posted: Monday, August 04, 2008 - 12:37 PM UTC
That is gorgeous work...cheers!