

Go to modelshipwrights.com for the current dynamic site!


General Ship Modeling
Discuss modeling techniques, experiences, and ship modeling in general.
Discuss modeling techniques, experiences, and ship modeling in general.
Hosted by Jim Starkweather
1/350 Fujimi IJN Kongo Build Log/ Review

DrDull

Joined: February 23, 2006
KitMaker: 133 posts
Model Shipwrights: 128 posts

Posted: Monday, September 22, 2008 - 10:46 AM UTC
I'd say "my word!" if I had any words to express my admiration and amazement. I'm running out of superlatives. I'm enjoying every picture, Dade. Great work. Barry

Clanky44

Joined: September 15, 2005
KitMaker: 1,901 posts
Model Shipwrights: 934 posts

Posted: Monday, September 22, 2008 - 11:09 AM UTC
That's an insane amount of productivity for one weekend!... in my world that's a good two months worth of aggrevation ! Fantastic work Dade.
Frank
Frank

gator
Vendor

#027
Joined: April 13, 2005
KitMaker: 5,422 posts
Model Shipwrights: 5,079 posts

Posted: Monday, September 22, 2008 - 11:22 AM UTC
Awesome work Dade! Very nice.
Kenny
Kenny


Karybdis
Joined: December 27, 2006
KitMaker: 846 posts
Model Shipwrights: 740 posts

Posted: Monday, September 22, 2008 - 03:33 PM UTC
Wow, thanks guys! The next update will take a little longer as I have to start priming everything, and I'm gonna take a short break before painting to work on the Hiryu for this month's deadline. 
I'm also gonna have to make a trip to JoAnne Fabric to buy a nice size piece of material for a photo back drop when I take the finished shots...
I'm also gonna have to make a trip to JoAnne Fabric to buy a nice size piece of material for a photo back drop when I take the finished shots...


Dr_Who2

Joined: September 17, 2008
KitMaker: 90 posts
Model Shipwrights: 89 posts

Posted: Monday, September 22, 2008 - 07:41 PM UTC
Hi Dade,
I am sure you are going to save a million model builders life with this building process.
Your explains and photos make everything clear and sound.
I wonder when Fujimi will consider to have you prebuild one of their kits+PE so their instruction gets flawless.
Mr. Fujimi please listen up: Pay Dade to produce a photo line instruction for future kits!
Very well done indeed Dade.
Karybdis
Joined: December 27, 2006
KitMaker: 846 posts
Model Shipwrights: 740 posts
Posted: Tuesday, September 23, 2008 - 04:59 AM UTC
Thanks, D.T.! I wouldn't mind redoing Fujimi's instructions for them for the right price.  I make Admiralty Model Works' instructions, and people seem happy with those. I think one of the major problems with the Fujimi PE instructions is that they often don't show what a part is supposed to look like after folding. That is a big no-no because it's possible for someone without references to maybe bend a piece into the wrong position and make an expensive mistake.
I make Admiralty Model Works' instructions, and people seem happy with those. I think one of the major problems with the Fujimi PE instructions is that they often don't show what a part is supposed to look like after folding. That is a big no-no because it's possible for someone without references to maybe bend a piece into the wrong position and make an expensive mistake. Clanky44
Joined: September 15, 2005
KitMaker: 1,901 posts
Model Shipwrights: 934 posts
Posted: Tuesday, September 23, 2008 - 10:17 AM UTC
... it doesn't help that there's no English in Fujimi's instructions, that alone would be half the battle.
Frank
Frank

skipper

Joined: February 28, 2002
KitMaker: 5,182 posts
Model Shipwrights: 4,070 posts
Posted: Tuesday, September 23, 2008 - 10:31 AM UTC
MASSIVE!
Dade, very impressive work you are doing here!
This is a joy and also a lesson while having fun
I echo everybody words on the congratulations
Keep up (after a well deserved break time)
Rui
Dade, very impressive work you are doing here!
This is a joy and also a lesson while having fun
I echo everybody words on the congratulations
Keep up (after a well deserved break time)
Rui


treadhead1952
Joined: June 12, 2008
KitMaker: 552 posts
Model Shipwrights: 493 posts

Posted: Tuesday, September 23, 2008 - 12:54 PM UTC
I can only echo all the congratulatory remarks from everyone, this is truly a wonder to watch coming together. You make it look so easy and simple, but from years of tweaking and bending stuff, I know better. Looking forward to the next installment sensei.
Karybdis
Joined: December 27, 2006
KitMaker: 846 posts
Model Shipwrights: 740 posts
Posted: Tuesday, September 23, 2008 - 04:26 PM UTC
Wow, thanks again, guys! These nice comments really do mean a lot to me and help keep my speed up on this project.
I did a lot of priming today and should be finished the process tomorrow. Then a few days for the primer to set while I take my break/ work on the Hiryu.
I did a lot of priming today and should be finished the process tomorrow. Then a few days for the primer to set while I take my break/ work on the Hiryu.
Dr_Who2
Joined: September 17, 2008
KitMaker: 90 posts
Model Shipwrights: 89 posts
Posted: Wednesday, September 24, 2008 - 12:45 AM UTC
Dade, if you don´t mind the question:
Were there no replacement propellers for the Petes with the PE?
I am aware you provided nice close ups of the 1/350 planes yet I don´t feel they look right as shown.
Just wondering.
Were there no replacement propellers for the Petes with the PE?
I am aware you provided nice close ups of the 1/350 planes yet I don´t feel they look right as shown.
Just wondering.
Karybdis
Joined: December 27, 2006
KitMaker: 846 posts
Model Shipwrights: 740 posts
Posted: Wednesday, September 24, 2008 - 06:13 AM UTC
D.T., unfortunately, there are no PE propellers included in the Deluxe PE set. Still, the blades are pretty close to the proper length and width. They're only too thick. But I think after painting, this effect will not be so bad. Also, these photos show the Petes much larger than they actually are, and in real life, the props look better.
This is another annoying issue with transparent plastic, though. It's too brittle and will easily snap. One of the blades snapped off the hub while I was cleaning it up and I had to glue it back on. I was lucky to find the blade. But it made me scared to try to thin the blades down for fear of them snapping off and losing them...
This is another annoying issue with transparent plastic, though. It's too brittle and will easily snap. One of the blades snapped off the hub while I was cleaning it up and I had to glue it back on. I was lucky to find the blade. But it made me scared to try to thin the blades down for fear of them snapping off and losing them...
Karybdis
Joined: December 27, 2006
KitMaker: 846 posts
Model Shipwrights: 740 posts
Posted: Wednesday, September 24, 2008 - 01:05 PM UTC
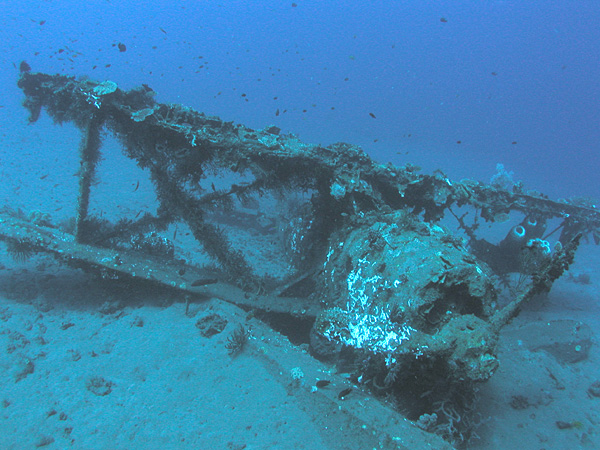
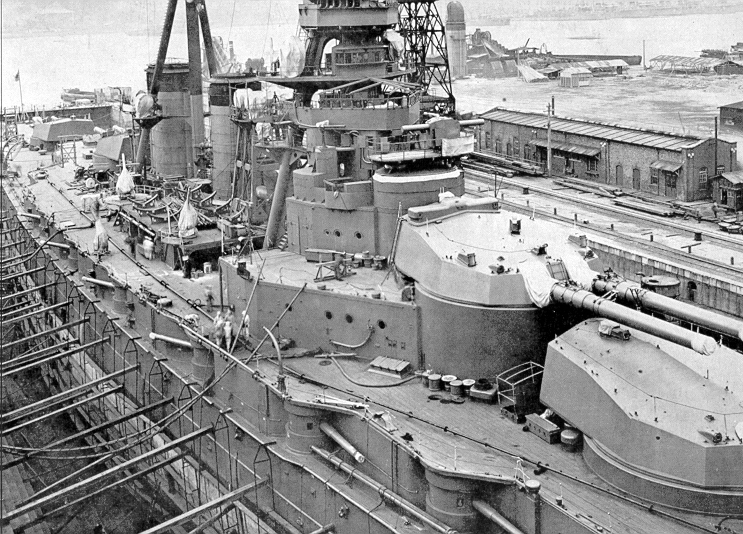
I've been meaning to talk about this since I first started this build, but it has slipped my mind until now. There have been rumblings about the shape of the Kongo's casemates. There is talk that Fujimi's are wrong. The idea is that the casemates should be more vertical and that on Fujimi's there is too much of an angle.
Here is Fujimi's from earlier in the build:

Now, according to some pretty reliable sources, not the least of which is Dan Kaplan, who I believe is the best IJN modeler in the English language, those casemates are wrong and should be vertical. OTOH, Dan and some other reputable sources say that Aoshima's is correct.
For comparison, here's a photo of the real thing.
Discuss amongst yourselves... I'll give my opinion after I get some more references consolidated and I come back from my short break from this kit.
Here is Fujimi's from earlier in the build:
Now, according to some pretty reliable sources, not the least of which is Dan Kaplan, who I believe is the best IJN modeler in the English language, those casemates are wrong and should be vertical. OTOH, Dan and some other reputable sources say that Aoshima's is correct.
For comparison, here's a photo of the real thing.
Discuss amongst yourselves...
I'll give my opinion after I get some more references consolidated and I come back from my short break from this kit.Dr_Who2
Joined: September 17, 2008
KitMaker: 90 posts
Model Shipwrights: 89 posts
Posted: Wednesday, September 24, 2008 - 11:07 PM UTC
Nice obeservation Dade,
The Fujimi kit states to provide the IJN Kongô in her 1944 configuration.
According to Maru Special No. 9 (p. 55) the photo you included shows the IJN Kongô right after the start of her first reconstruction at Yokusaka, Dec. 24th 1928.
I have only few resources about the Kongô in her 1944 configuration and some of them are conflicting, e.g. Combined Fleet TROM states CombinedFleet Kongô TROM :
whereas Fujimi provides the "Pete" as floatplane.
Regarding the IJN Kongô 1944 configuration I found it impossible to find any contemporary detailed photo after her massive second reconstruction.
If someone was lucky enough to catch the GAKKEN Pacific War No. 21 ( GAKKEN Kongô Review ) there may be something to work with.
All I can say while looking at the 1/100 built of the IJN Kongô within GAKKEN "IJN Fleet Scale Model Photo Book" (ISBN: 978-4-05-605089-9; Gakken Fleet Scale at HLJ ) is, that the casemates do not match with the Fujimi kit.
If the 1/100 model is right on spot the angels provided by Fujimi are indeed wrong.
(Sorry I won´t provide a scan since I don´t want to conflict with GAKKEN copyright)
I doublechecked by opening my own kit.
The last resource I have - Imperial Japanese Navy Battleships 1941 - 45 by Mark Stille, Osprey/New Vanguard Publishing IJN Battleships, Stille at Amazon - was a no help.
As a conclusion I would only suspect Fujimi provides a wrong shape of the casemates since I found no true evidence about the angels as chosen on the kit. Practically speaking I doupt a shipyard would change the casemates shape giving it an angle other than the provided 90° - yet little is known about what changes had to be applied fitting the new engines.
For this, there is enough room to admit Fujimi some sort of creativity/guessing space and leave the casemates as they are.
Last but not least you caught me scratching my head as I noticed the deck above the casemates don´t have the Shinsengumi Wood planking at some points?
Hope this helps some.
Dr_Who2
The Fujimi kit states to provide the IJN Kongô in her 1944 configuration.
According to Maru Special No. 9 (p. 55) the photo you included shows the IJN Kongô right after the start of her first reconstruction at Yokusaka, Dec. 24th 1928.
I have only few resources about the Kongô in her 1944 configuration and some of them are conflicting, e.g. Combined Fleet TROM states CombinedFleet Kongô TROM :
Quoted Text
1 June 1935: Second reconstruction:
Transferred from Yokosuka Naval Station to Sasebo Naval Station. Reconstruction started at Yokosuka. Unfettered by the former Washington and London Treaty restrictions, KONGO is reconstructed to transform her into a fast battleship, capable of escorting the IJN's fleet carriers. Her stern is lengthened by 25-feet. Her bridge is rebuilt pagoda style. All boilers are are removed and replaced with eight oil-fired Kampon boilers and she receives new Parsons geared turbines. Her speed is increased to 30 knots. A catapult and rails for three floatplanes are installed aft and to port of her No. 3 turret. The aircraft she now carries are Nakajima E8N1 Type 95 ("Dave") and Kawanishi E7K1 Type 94 ("Alf") floatplanes. Elevation of main armament increased from 33 degrees to 43 degrees. Secondary armament increased from 15 degrees to 30 degrees. 40-mm MGs removed and ten twin 25-mm MGs installed. Torpedo tubes removed. 10-m base rangefinder fitted on top of pagoda.
whereas Fujimi provides the "Pete" as floatplane.
Regarding the IJN Kongô 1944 configuration I found it impossible to find any contemporary detailed photo after her massive second reconstruction.
If someone was lucky enough to catch the GAKKEN Pacific War No. 21 ( GAKKEN Kongô Review ) there may be something to work with.
All I can say while looking at the 1/100 built of the IJN Kongô within GAKKEN "IJN Fleet Scale Model Photo Book" (ISBN: 978-4-05-605089-9; Gakken Fleet Scale at HLJ ) is, that the casemates do not match with the Fujimi kit.
If the 1/100 model is right on spot the angels provided by Fujimi are indeed wrong.
(Sorry I won´t provide a scan since I don´t want to conflict with GAKKEN copyright)
I doublechecked by opening my own kit.
The last resource I have - Imperial Japanese Navy Battleships 1941 - 45 by Mark Stille, Osprey/New Vanguard Publishing IJN Battleships, Stille at Amazon - was a no help.
As a conclusion I would only suspect Fujimi provides a wrong shape of the casemates since I found no true evidence about the angels as chosen on the kit. Practically speaking I doupt a shipyard would change the casemates shape giving it an angle other than the provided 90° - yet little is known about what changes had to be applied fitting the new engines.
For this, there is enough room to admit Fujimi some sort of creativity/guessing space and leave the casemates as they are.
Last but not least you caught me scratching my head as I noticed the deck above the casemates don´t have the Shinsengumi Wood planking at some points?
Hope this helps some.
Dr_Who2
Karybdis
Joined: December 27, 2006
KitMaker: 846 posts
Model Shipwrights: 740 posts
Posted: Thursday, September 25, 2008 - 05:39 AM UTC
The casemate shapes were some of the few things that were NOT changed during the Kongo's reconstruction, so that's why the picture I put up can still be useful despite the time frame.
I don't have the Gakken Kongo book either (however, Gakken 65 is supposed to cover the Kongo also), but I also have Gakken books that show the large scale Kongo model. The casemate photos in there seem to be more vertical than Fujimi's kit as well. I'll put up some shots in a few days or so.
I don't understand what you mean about the Shinsengumi decking. I haven't mounted the Shinsengumi decks and any shots I show with it are only dry fit. Therefore, some shots have some of the deck, some don't. The decks will be mounted in full, after the rest of the ship is painted. The set itself is complete.
Dr_Who2
Joined: September 17, 2008
KitMaker: 90 posts
Model Shipwrights: 89 posts
Posted: Thursday, September 25, 2008 - 06:41 AM UTC
Oops, didn´t mean to come across the wrong way.
The information I mentioned didn´t tell of any modification of the casemates either, so I am right with you and assume the Fujimi kit is wrong.
Also, I misunderstood the shot off the Aoshima model as one of yours. There is that grey field above the one casemate. My fault. Sorry for that.
Seems I got too excited about the superb building report you provide.
Karybdis
Joined: December 27, 2006
KitMaker: 846 posts
Model Shipwrights: 740 posts
Posted: Thursday, September 25, 2008 - 07:16 AM UTC
Hi D.T.,
No problem and no need to apologize, I just figured it was a weird communication- your English is much better than my German! So no complaints from me!
Yes, that area on the Aoshima model is strange... I've seen it off and on in many different pictures so I don't know what the issue is with it. It may end up being an even bigger than mystery than the shape of the casemates! We'll have to wait and see how it pans out...
No problem and no need to apologize, I just figured it was a weird communication- your English is much better than my German!
So no complaints from me!Yes, that area on the Aoshima model is strange... I've seen it off and on in many different pictures so I don't know what the issue is with it. It may end up being an even bigger than mystery than the shape of the casemates!
We'll have to wait and see how it pans out...Karybdis
Joined: December 27, 2006
KitMaker: 846 posts
Model Shipwrights: 740 posts
Posted: Saturday, October 18, 2008 - 11:27 AM UTC
Howdy gang,
Whew, it's been a while, but I've been hard at work the past couple weeks with the painting process. With any luck, I'll have some pictures up on Monday. The painting prep time on this bad boy ended up taking a little longer than I thought and it didn't help that I ran out of Gunze #37 (Wood Brown) for the linoleum and had to find more. So anyway, sorry for the wait- we'll be back on course soon!
Whew, it's been a while, but I've been hard at work the past couple weeks with the painting process. With any luck, I'll have some pictures up on Monday. The painting prep time on this bad boy ended up taking a little longer than I thought and it didn't help that I ran out of Gunze #37 (Wood Brown) for the linoleum and had to find more.
So anyway, sorry for the wait- we'll be back on course soon! 
Gunny
Joined: July 13, 2004
KitMaker: 6,705 posts
Model Shipwrights: 4,704 posts
Posted: Saturday, October 18, 2008 - 12:36 PM UTC
Quoted Text
Howdy gang,
Whew, it's been a while, but I've been hard at work the past couple weeks with the painting process. With any luck, I'll have some pictures up on Monday. The painting prep time on this bad boy ended up taking a little longer than I thought and it didn't help that I ran out of Gunze #37 (Wood Brown) for the linoleum and had to find more.
Think I can speak for us all, Mr. Bell, and say that we're all very anxious to see that first paint!
Looking forward to your next update, my friend...
Karybdis
Joined: December 27, 2006
KitMaker: 846 posts
Model Shipwrights: 740 posts
Posted: Saturday, October 18, 2008 - 07:09 PM UTC
Howdy Mark,
Ah, you twisted my arm.
First up, here's my airbrush that I use for about 85% of my work. It's an Iwata Hi-Line HP-BH and I bought one the week after they were first released- all of my best works comes courtesy of this trusty gun. The trigger has been modified with a wood dowel epoxied on to raise the height and capped with a rounded Pasche button. This is to cut down on strain on my finger during long periods of use. It results in a straighter neutral position for my finger. The next time you hold your airbrush look at the angle of your finger. Most airbrush triggers sit so low that your finger has to curl down, resulting in a lot of painful strain after long use. Try a modification like this and see how you like it.

The hull is primed and I spray some lines on at edges, weld lines, etc. to do some pre-shading. This adds more depth to the color. The color I use is a mixture of red brown and black. There are two points of note here:
1.) My airbrush can spray much smaller lines, but it doesn't really matter in an application like this. Messy chaos is preferred and realistic.
2.) The pre-shading is kind of hard to see in "work photography" and without washes to help draw the eye. It'll be more visible in the completion photos.
The gray is Gunze H83 Dark Gray 2, the anti-fouling is Gunze H17 Cocoa Brown. These are the colors listed in the instructions. I prefer Gunze because most of their colors are gloss or semi gloss and the paint is very tough. This makes decal and wash application go much more smoothly.


And with the deck dry fit... The deck still has to be sealed and a wash added, but it looks pretty nice already.


Now to spray the linoleum areas and then to get to work on the washes.
Ah, you twisted my arm.
First up, here's my airbrush that I use for about 85% of my work. It's an Iwata Hi-Line HP-BH and I bought one the week after they were first released- all of my best works comes courtesy of this trusty gun. The trigger has been modified with a wood dowel epoxied on to raise the height and capped with a rounded Pasche button. This is to cut down on strain on my finger during long periods of use. It results in a straighter neutral position for my finger. The next time you hold your airbrush look at the angle of your finger. Most airbrush triggers sit so low that your finger has to curl down, resulting in a lot of painful strain after long use. Try a modification like this and see how you like it.
The hull is primed and I spray some lines on at edges, weld lines, etc. to do some pre-shading. This adds more depth to the color. The color I use is a mixture of red brown and black. There are two points of note here:
1.) My airbrush can spray much smaller lines, but it doesn't really matter in an application like this. Messy chaos is preferred and realistic.
2.) The pre-shading is kind of hard to see in "work photography" and without washes to help draw the eye. It'll be more visible in the completion photos.
The gray is Gunze H83 Dark Gray 2, the anti-fouling is Gunze H17 Cocoa Brown. These are the colors listed in the instructions. I prefer Gunze because most of their colors are gloss or semi gloss and the paint is very tough. This makes decal and wash application go much more smoothly.
And with the deck dry fit... The deck still has to be sealed and a wash added, but it looks pretty nice already.
Now to spray the linoleum areas and then to get to work on the washes.
Gunny
Joined: July 13, 2004
KitMaker: 6,705 posts
Model Shipwrights: 4,704 posts
Posted: Sunday, October 19, 2008 - 12:02 AM UTC
My-Oh-My, Dade, looking F.I.N.E., FINE, my friend!
Love the "modification" of the airbrush too, mate....this model's gonna be a beauty, Mr. Bell, thanks for the update, and as always. counting down til the next!
Cheers,
~Gunny

Love the "modification" of the airbrush too, mate....this model's gonna be a beauty, Mr. Bell, thanks for the update, and as always. counting down til the next!
Cheers,
~Gunny
skipper
Joined: February 28, 2002
KitMaker: 5,182 posts
Model Shipwrights: 4,070 posts
Posted: Sunday, October 19, 2008 - 03:35 AM UTC
Excellent Dade!
Keep up the excellent work and the excellent report on your updates!
Rui
Keep up the excellent work and the excellent report on your updates!
Rui

blaster76
Joined: September 15, 2002
KitMaker: 8,985 posts
Model Shipwrights: 3,509 posts

Posted: Sunday, October 19, 2008 - 03:38 AM UTC
What are yu sealing the wooden deck with. I showed mine to the Lowe's folks who said unless I wanted glossy not to seal it. Besides, I only plan to do the one deck and I really wasn't up to $5 or so for a big tin of the sealant.

gator
Vendor
#027
Joined: April 13, 2005
KitMaker: 5,422 posts
Model Shipwrights: 5,079 posts
Posted: Sunday, October 19, 2008 - 06:01 AM UTC
Very nice Dade. I like the modification to the airbrush. That may be just what my old arthritic hands need.
Kenny
Kenny
Dr_Who2
Joined: September 17, 2008
KitMaker: 90 posts
Model Shipwrights: 89 posts
Posted: Sunday, October 19, 2008 - 06:06 AM UTC
Hi Dade,
You nailed the problem with any airbrush and found a really nice solution for yourself.
I wonder why the manufacturer of those airbrush guns never considered that the hands of their customers have different sizes - therefore different angel ratio to the trigger.
There is no one glove that fits all hence there should´nt be one airbrush to fit every hand size; yet the problem is not recognized appropriately.
Other than that, you got a costly but excellent airbrush there.
Your paintwork looks fabulous and the preshading is right on spot.
Very well done indeed!
 |

WEB HOSTING BY


Copyright ©2021 Model Shipwrights and Kitmaker Network, a subsidiary of Silver Star Enterprises
All Rights Reserved. Please read our Conditions of Use and Privacy Policy.
All Rights Reserved. Please read our Conditions of Use and Privacy Policy.