New Brunswick, Canada
Joined: March 17, 2011
KitMaker: 137 posts
Model Shipwrights: 135 posts
Posted: Thursday, March 17, 2011 - 11:49 AM UTC
Zimbabwe
Joined: July 03, 2007
KitMaker: 3,529 posts
Model Shipwrights: 2,419 posts
Posted: Thursday, March 17, 2011 - 01:37 PM UTC
Tim,
Welcome to MSW. I think you are doing a great job so far. Looking forward to seeing more!


#068
Zuid-Holland, Netherlands
Joined: April 09, 2003
KitMaker: 1,144 posts
Model Shipwrights: 172 posts
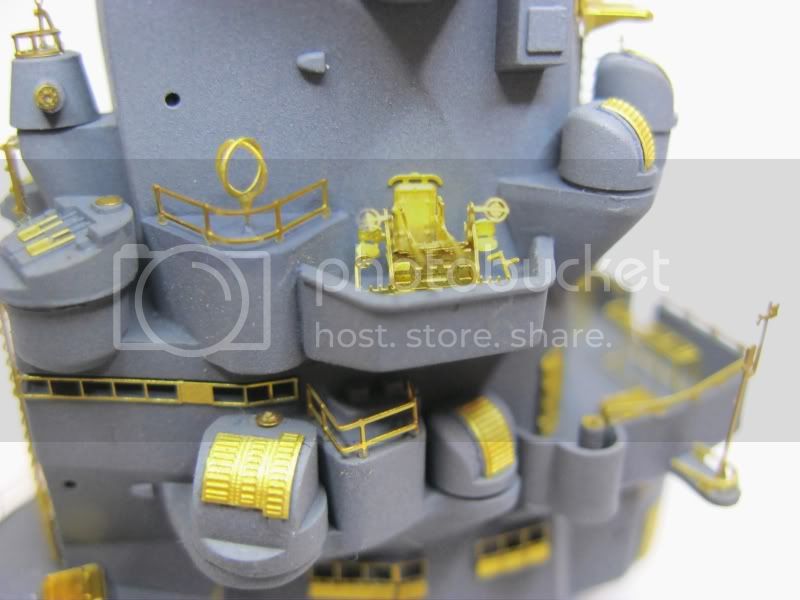
Posted: Thursday, March 17, 2011 - 05:56 PM UTC
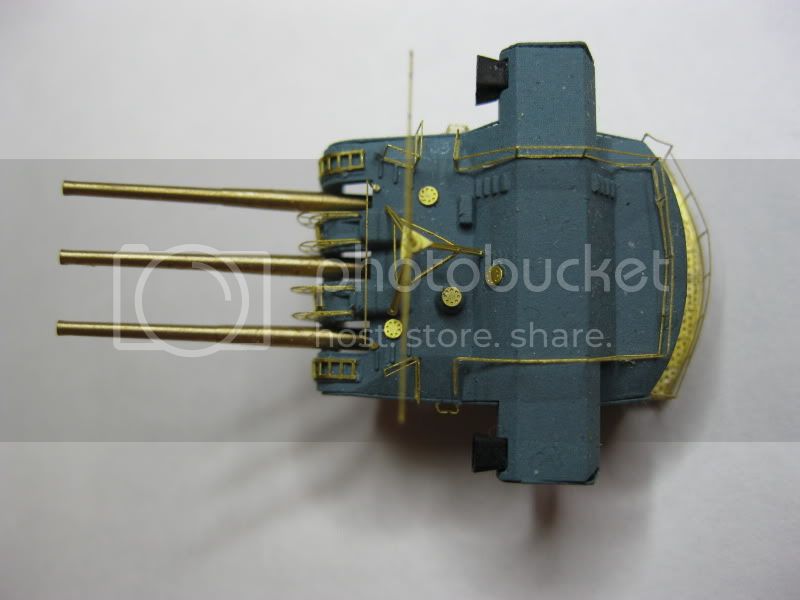
Looks good... very nice and clean.
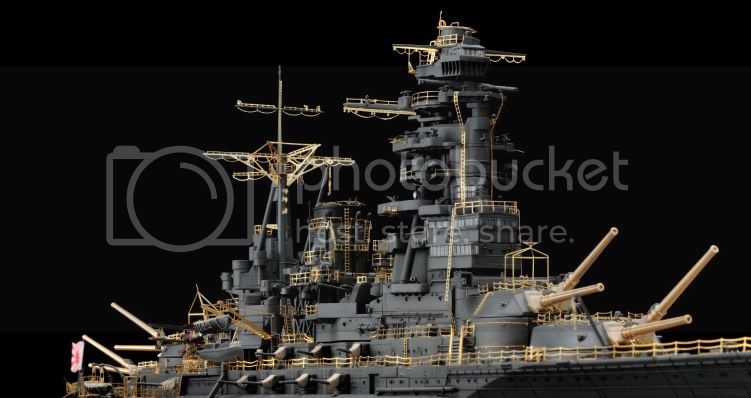
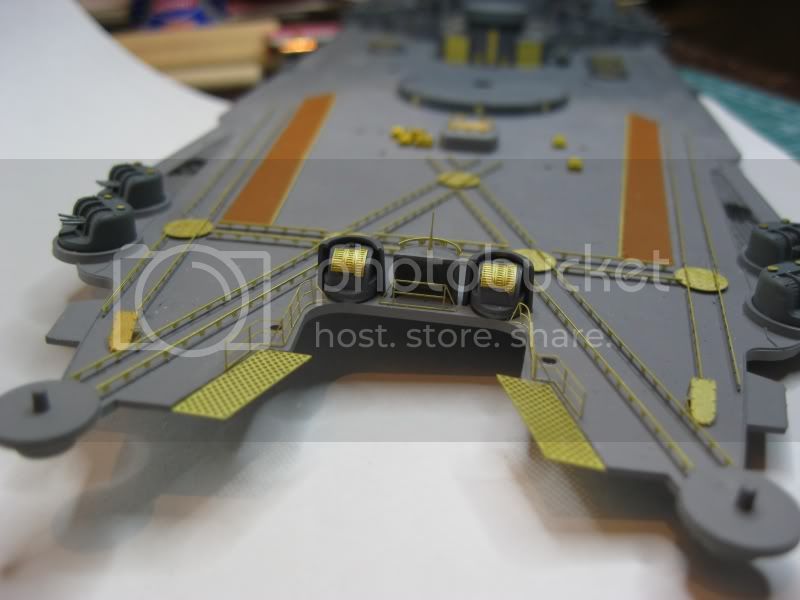
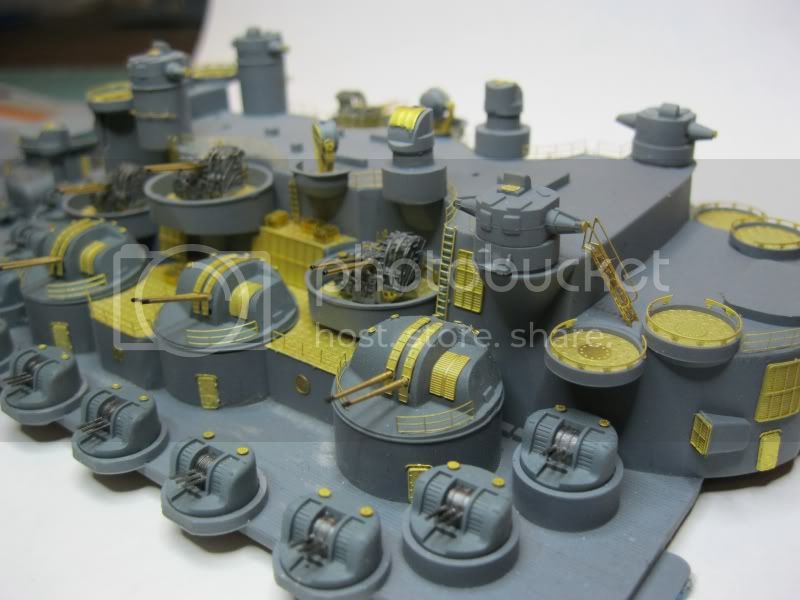
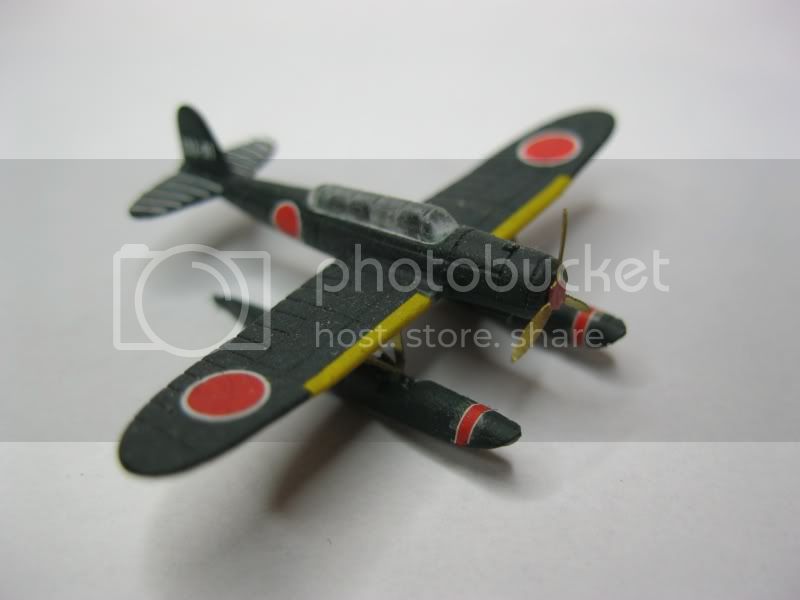
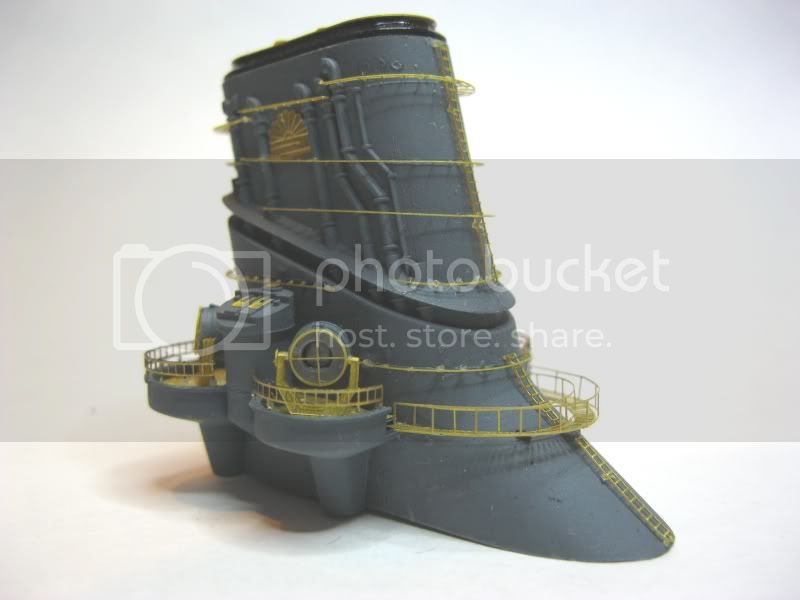
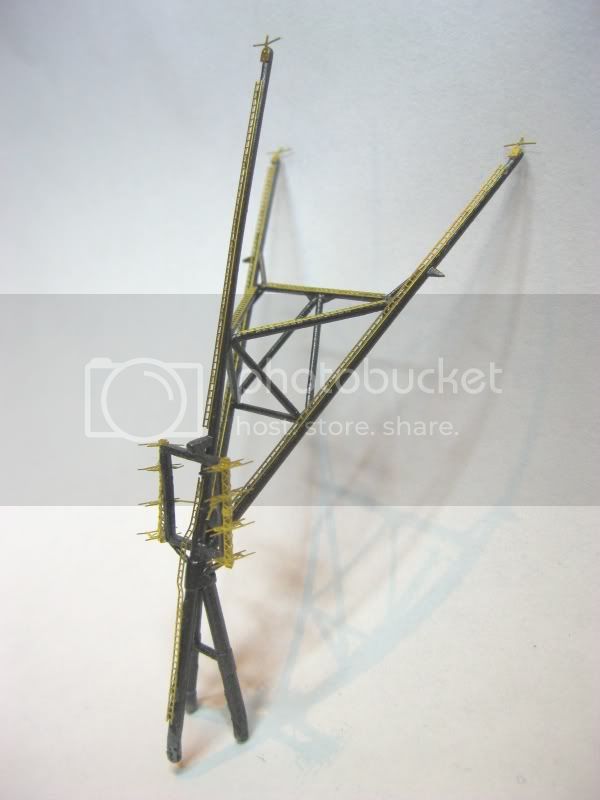
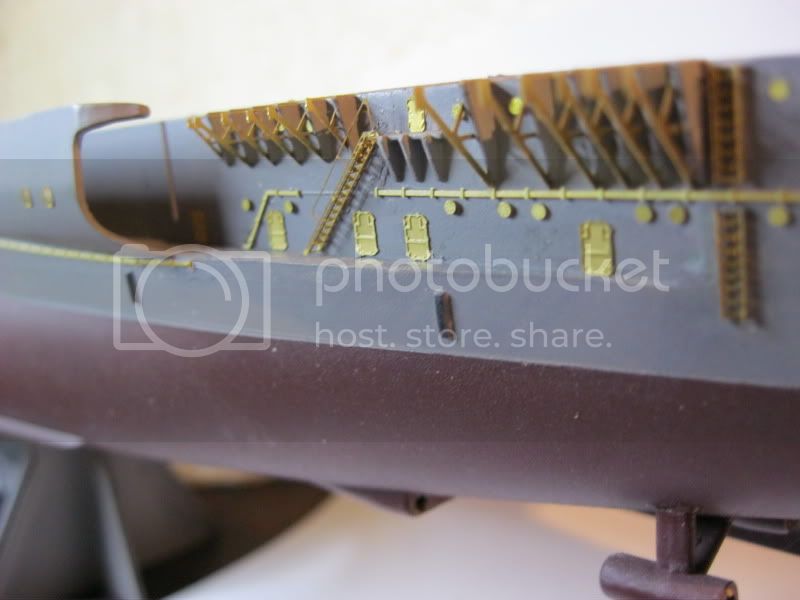
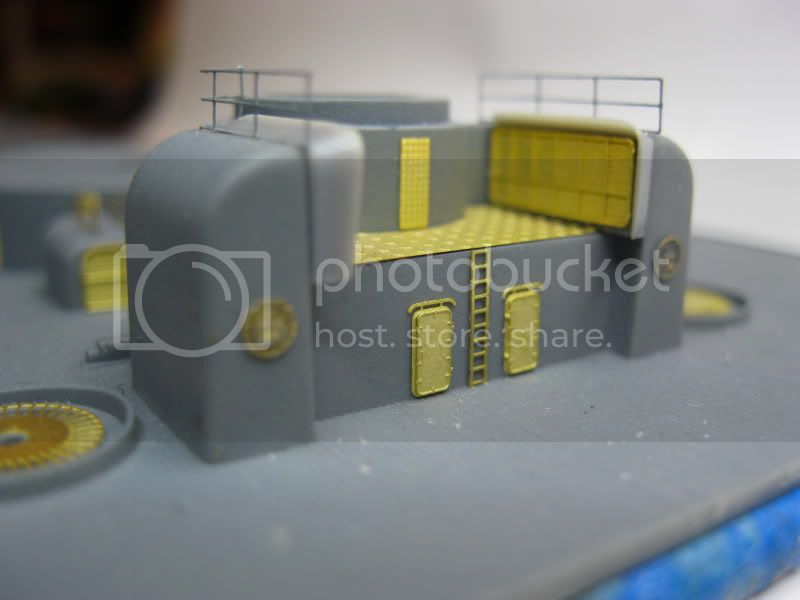
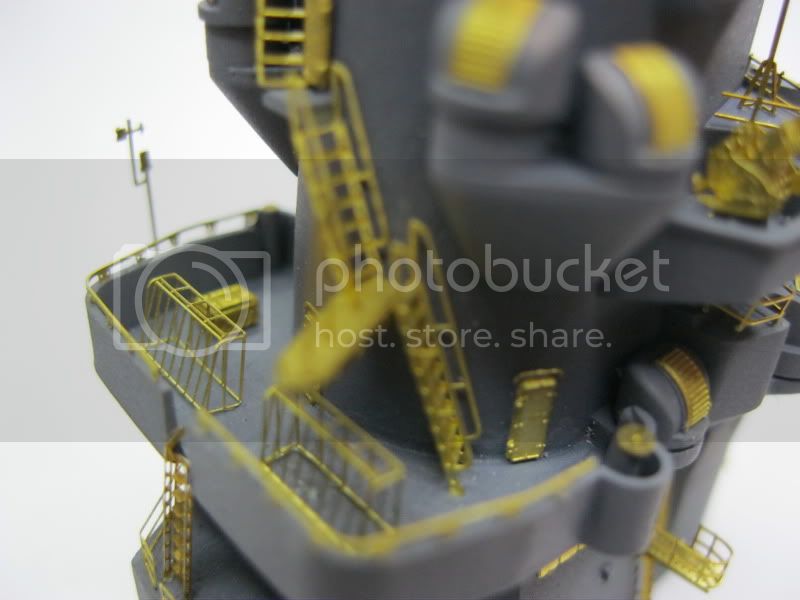
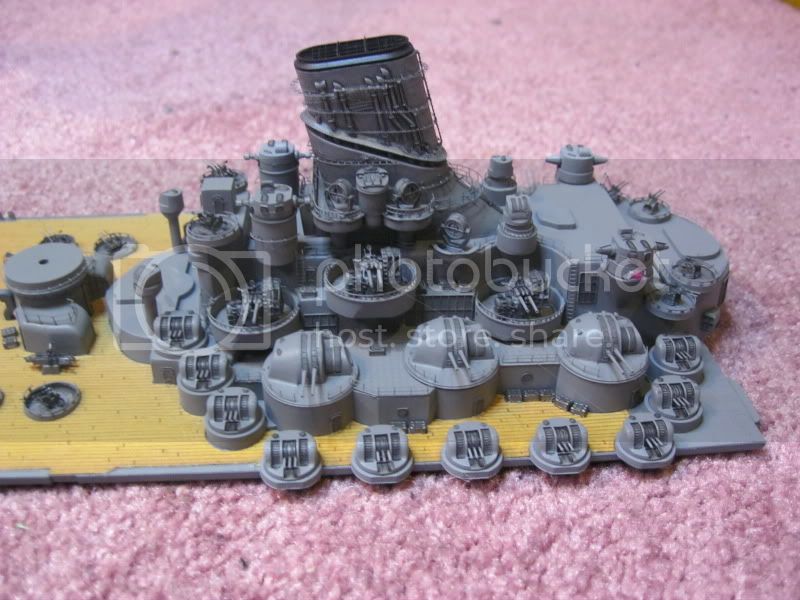
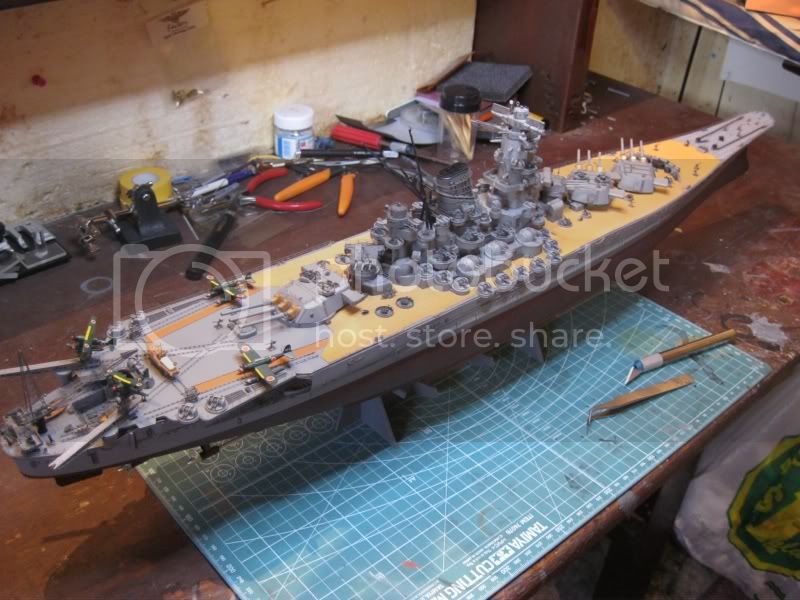
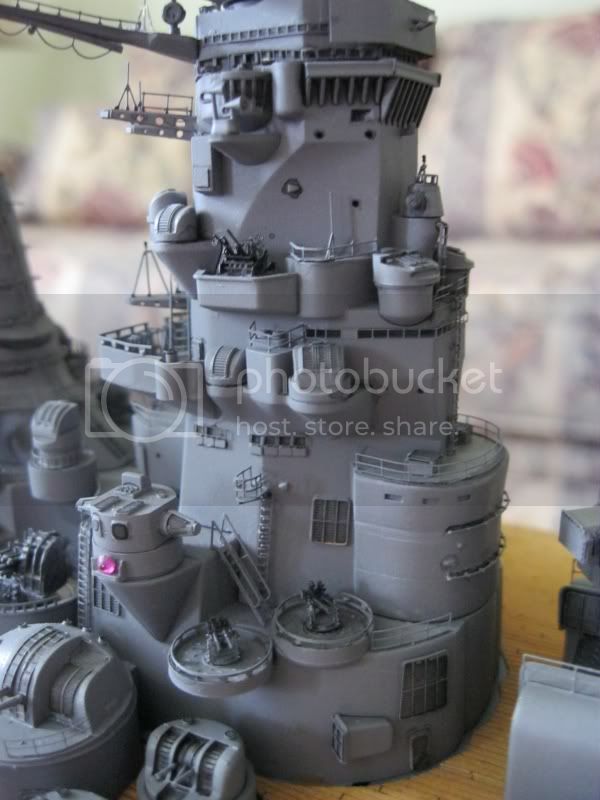
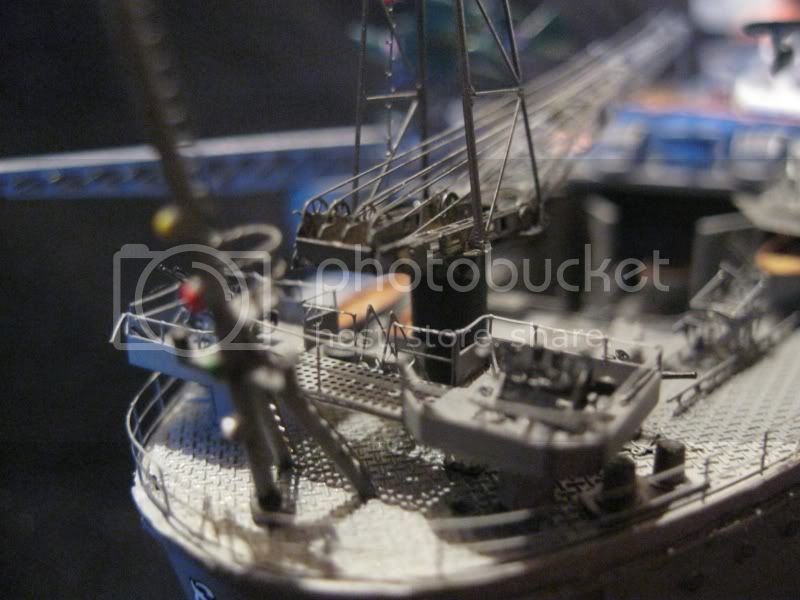
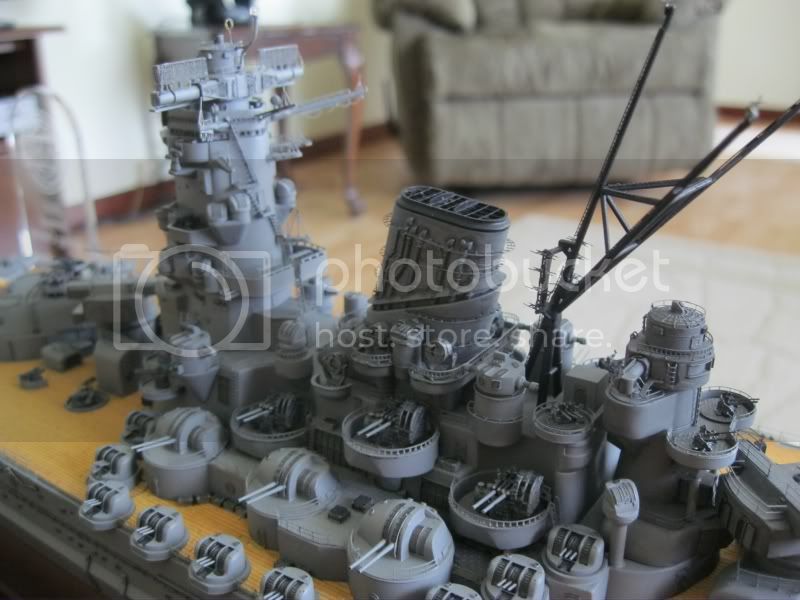
Just wondering if there is any way to fix the left end (facing bow) of the top-rear window on the pagoda (see first image)? Because of how well and neat the rest has been done, it being twisted truly stands out...

Harm
Joined: October 30, 2005
KitMaker: 3,897 posts
Model Shipwrights: 3,301 posts
Posted: Thursday, March 17, 2011 - 06:21 PM UTC
Very impressive work ! Please post some photo's when you paint this beauty

Julian
New Brunswick, Canada
Joined: March 17, 2011
KitMaker: 137 posts
Model Shipwrights: 135 posts
Posted: Thursday, March 17, 2011 - 08:36 PM UTC
Texas, United States
Joined: September 15, 2002
KitMaker: 8,985 posts
Model Shipwrights: 3,509 posts
Posted: Sunday, March 20, 2011 - 04:48 AM UTC
I think that if you apply a spot of glue and use a toothpick or similar small device to push that bent frame part in it will work.
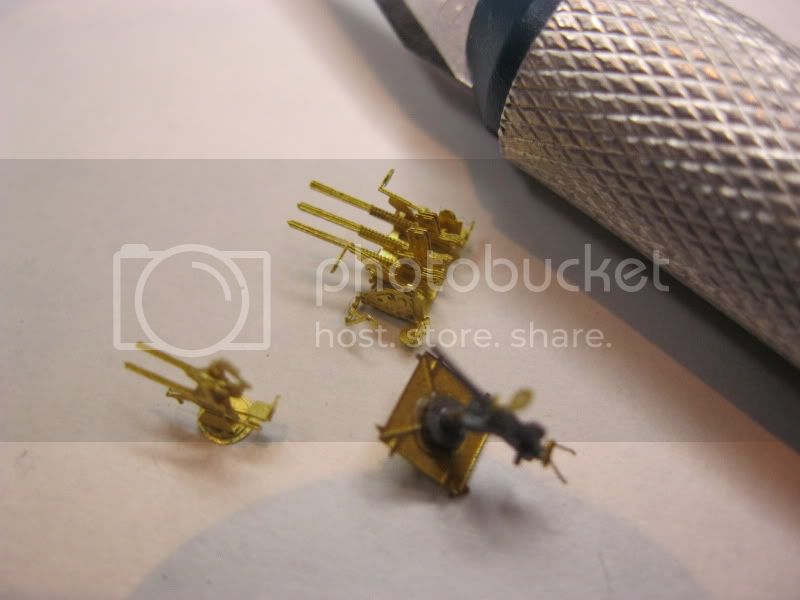
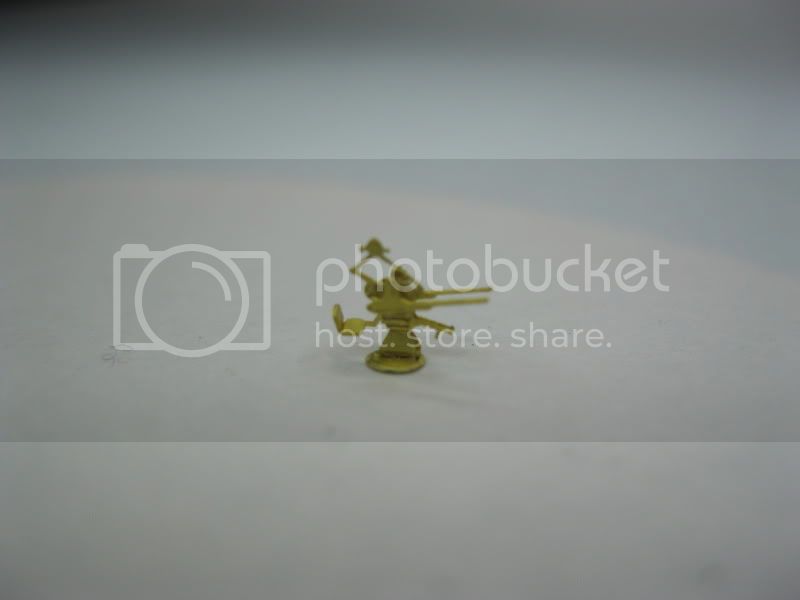
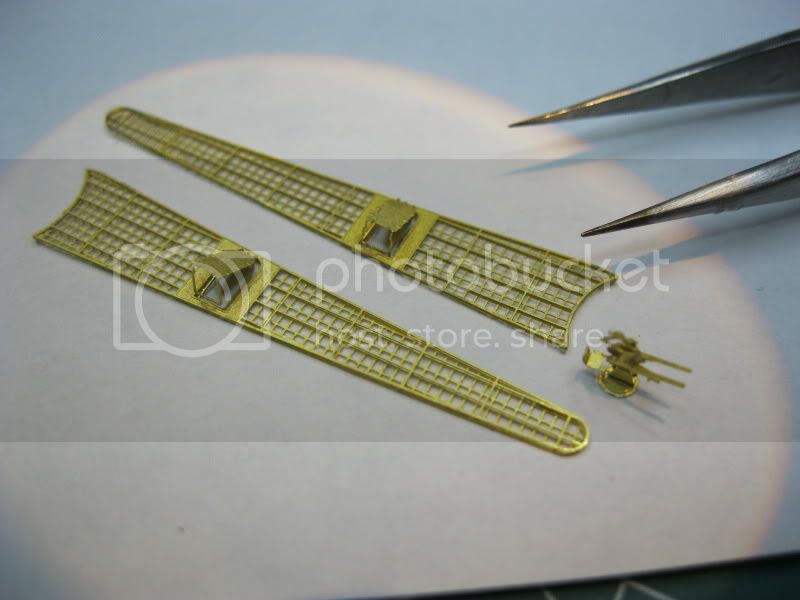
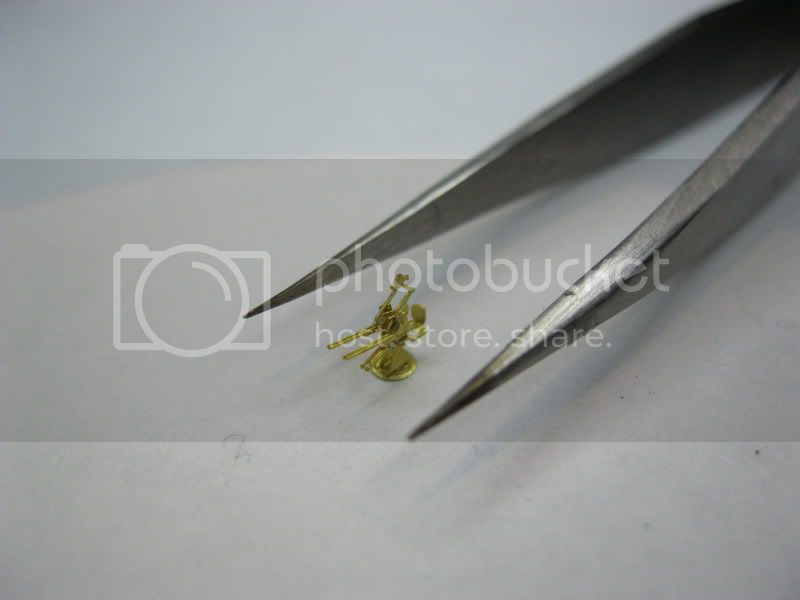
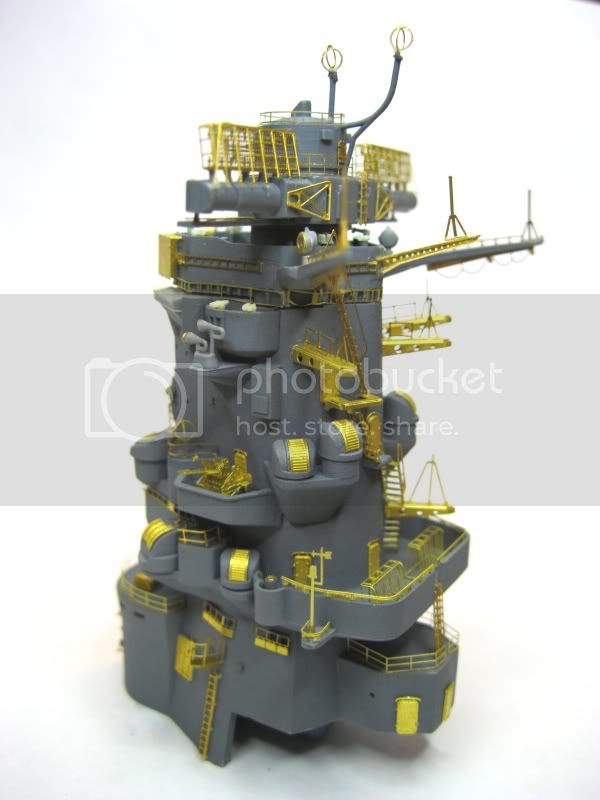
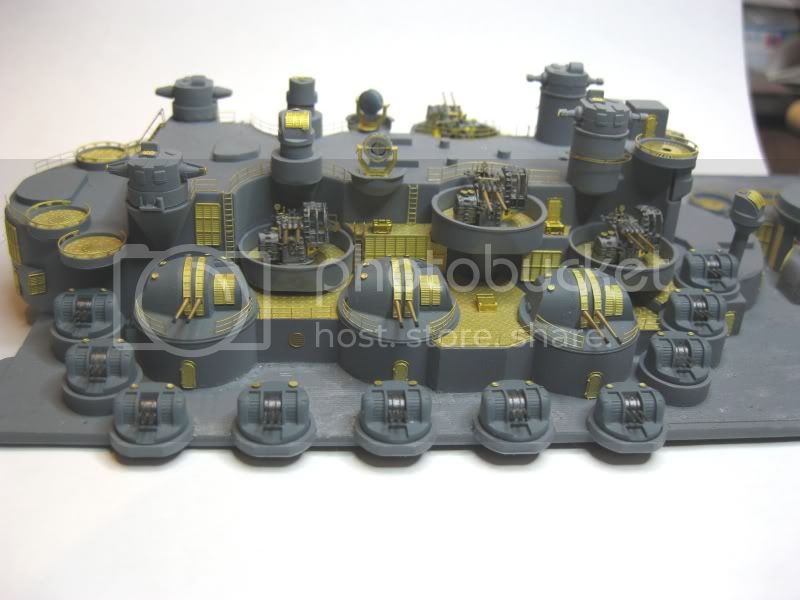
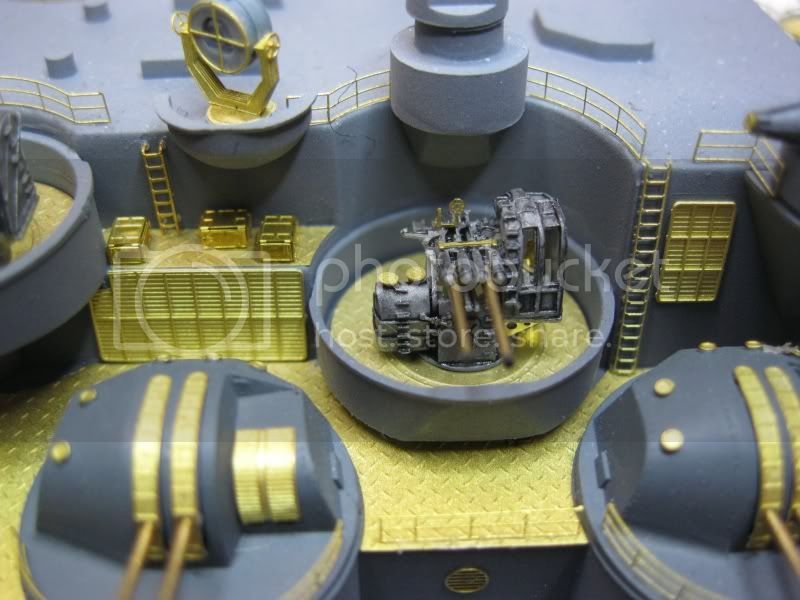
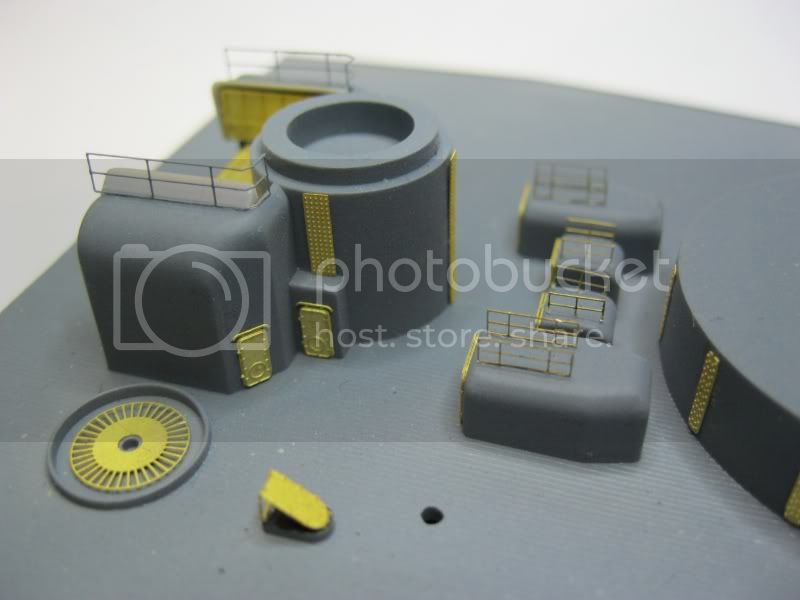
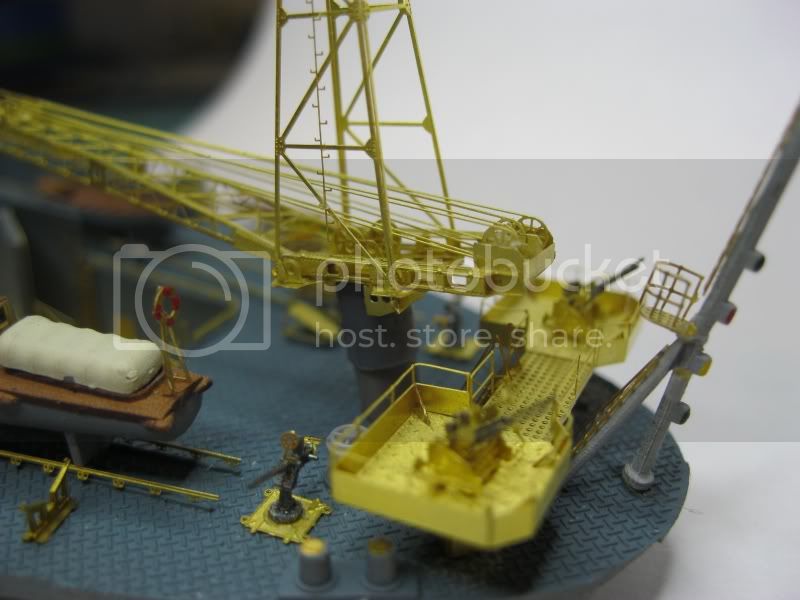
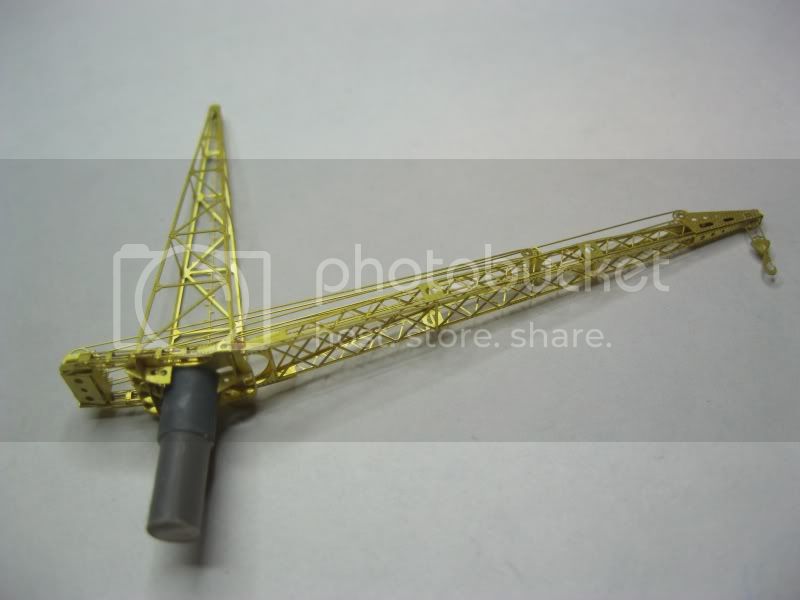
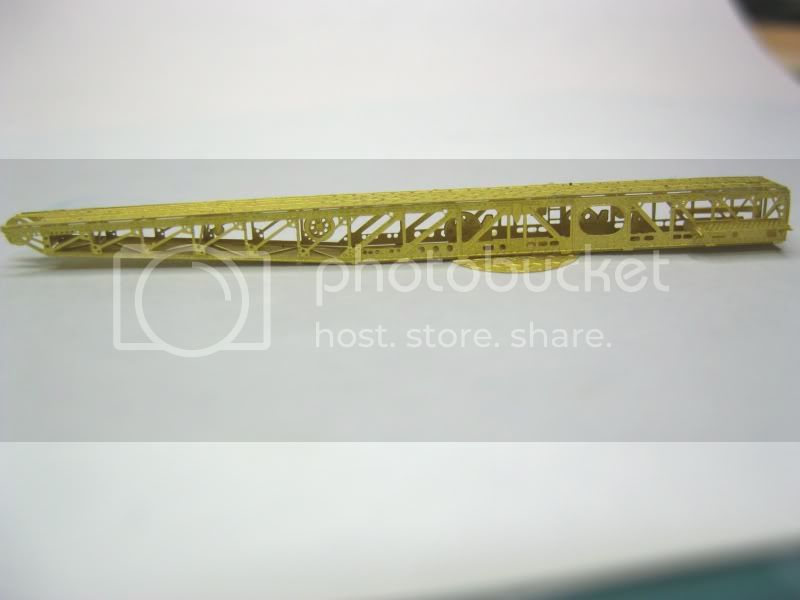
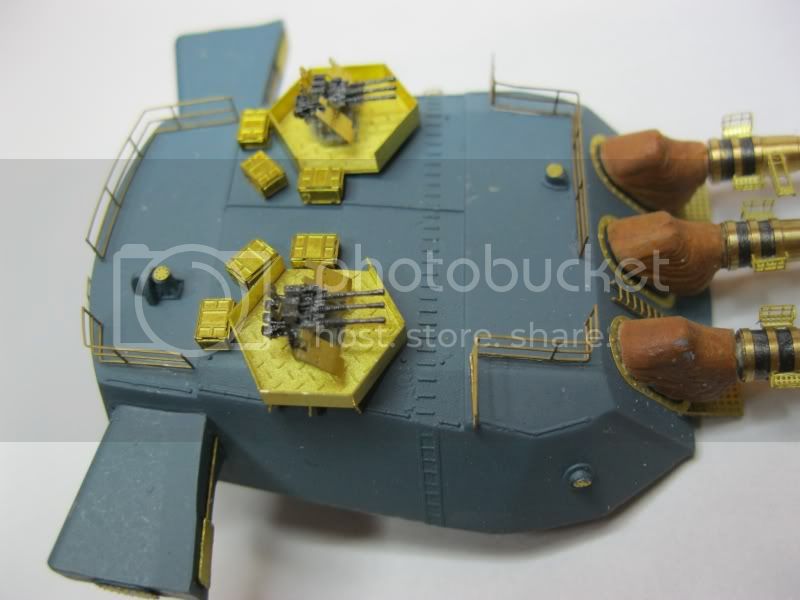
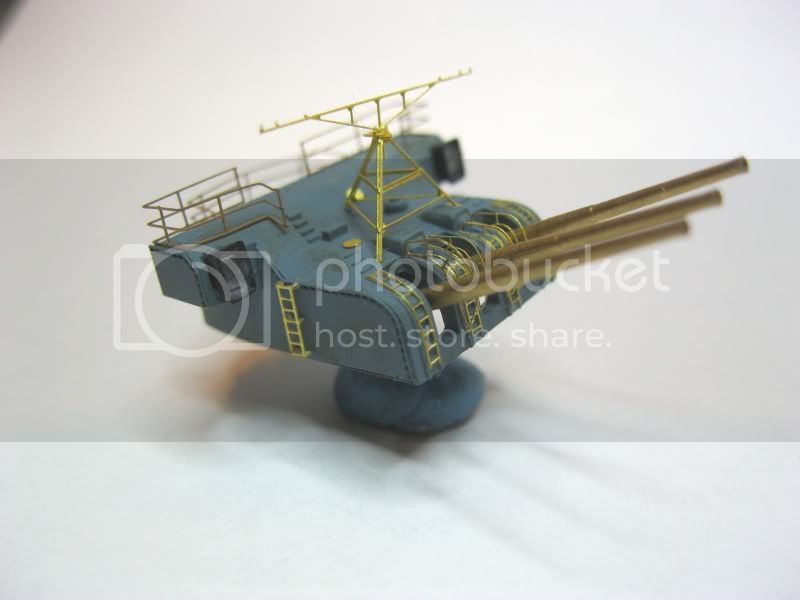
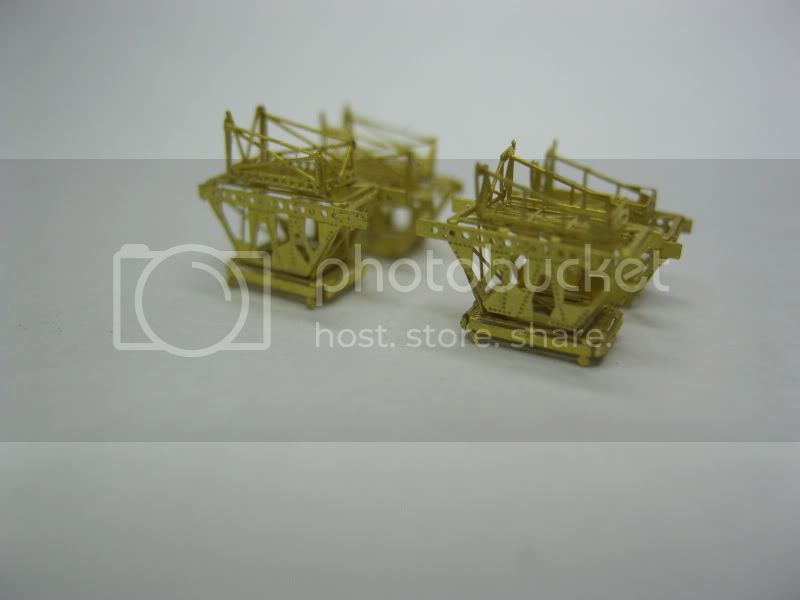
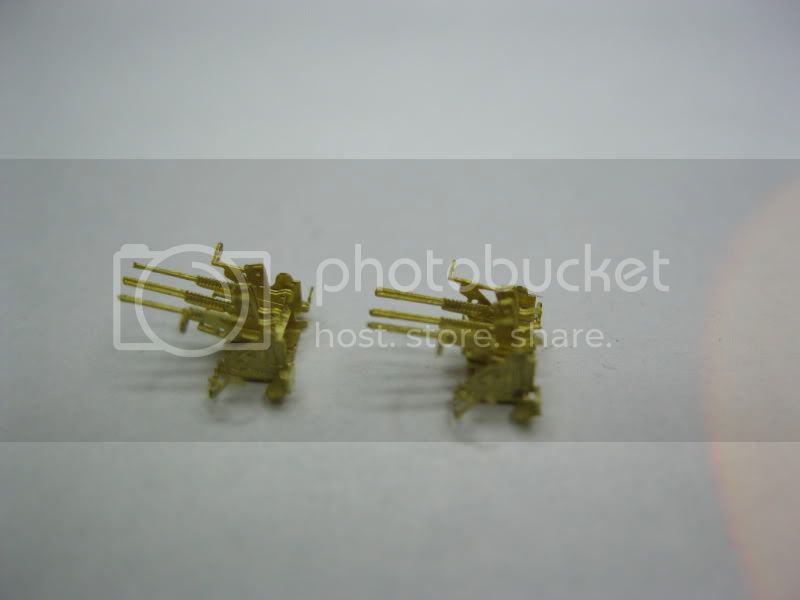
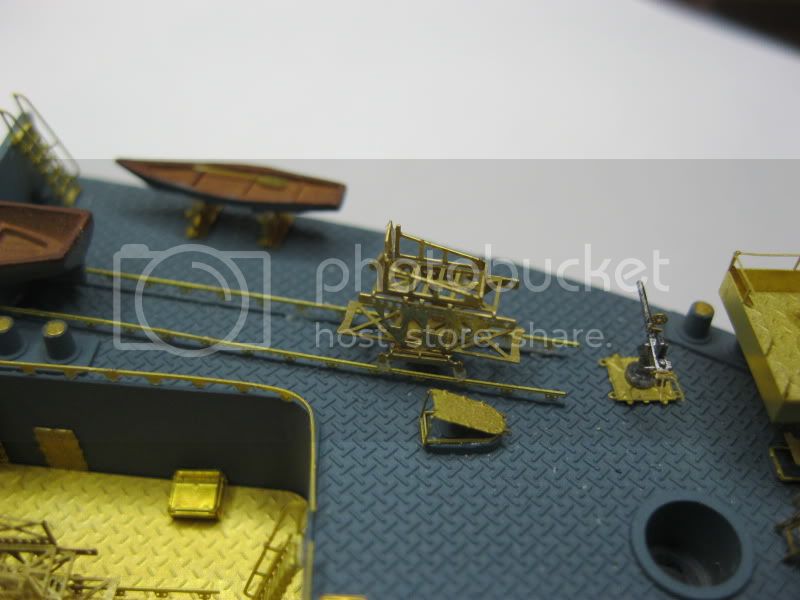
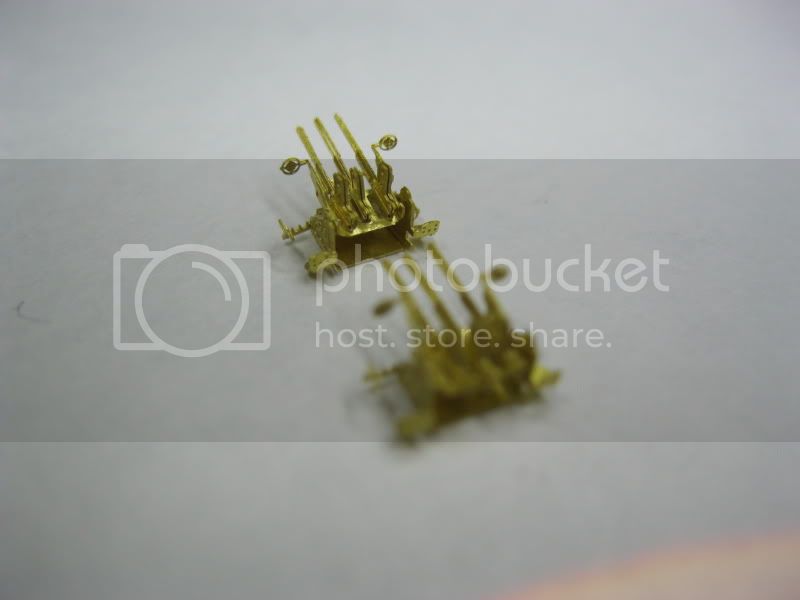
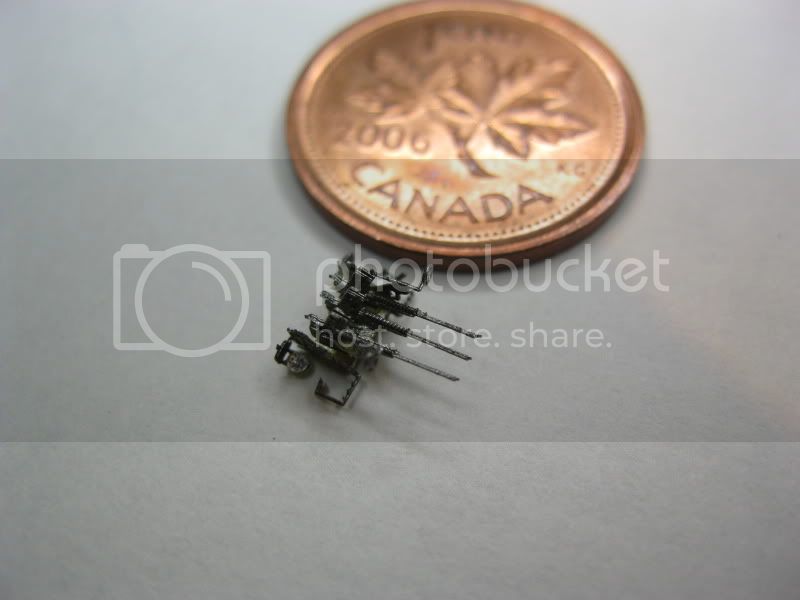
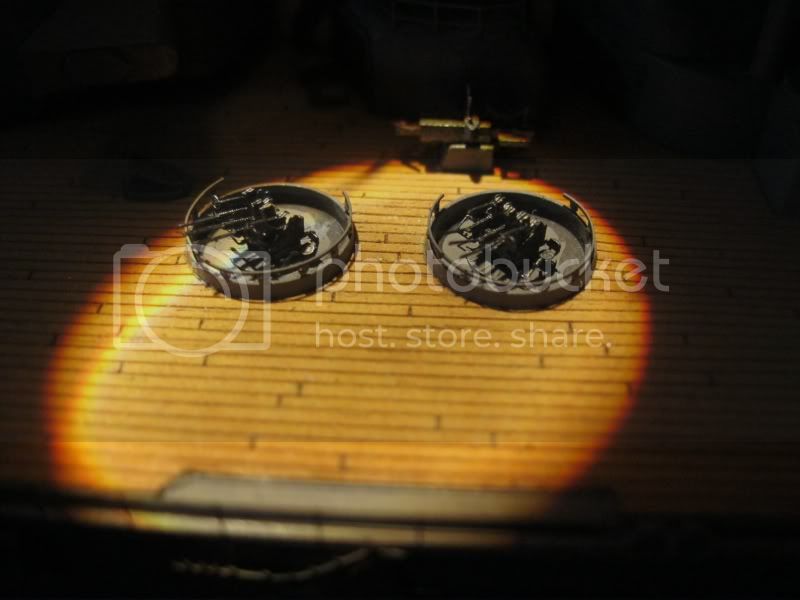
I am amazed at how intricate and how much brass there is in that Lionroar set. I can see now why it is so expensive......it has everything but the kitchen sink. i am assuming it includes the gun barrels, but I heard not the props.
It almost makes me want to run out and get it until reality sets in....i am not that great with PE to get something like that
Those who don't learn from history are doomed to repeat it
VMI "76
Order of the Red Nose Plug
Blue Volute Bumper Spring Award
North Carolina, United States
Joined: June 06, 2006
KitMaker: 4,691 posts
Model Shipwrights: 258 posts
Posted: Sunday, March 20, 2011 - 07:31 AM UTC
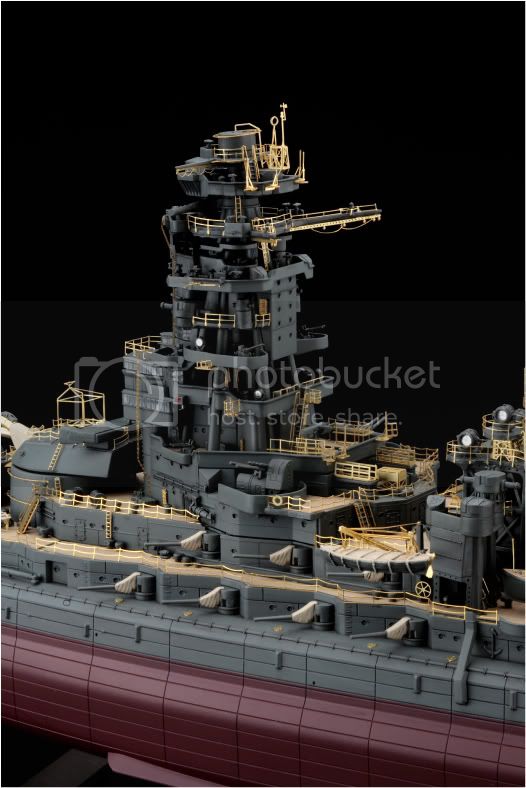
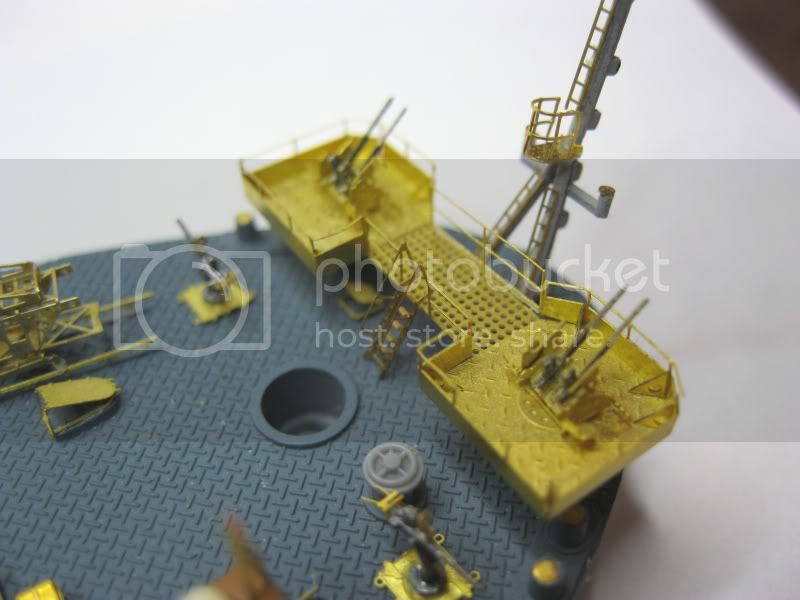
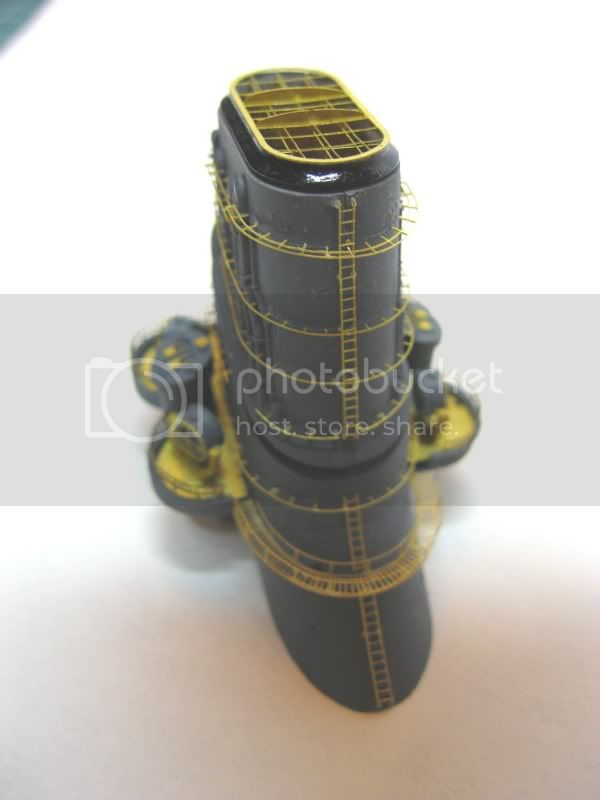
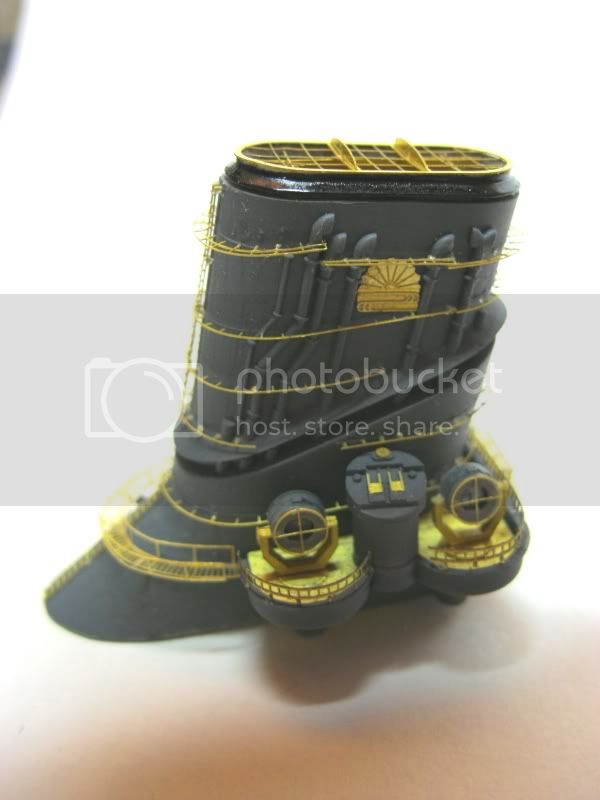
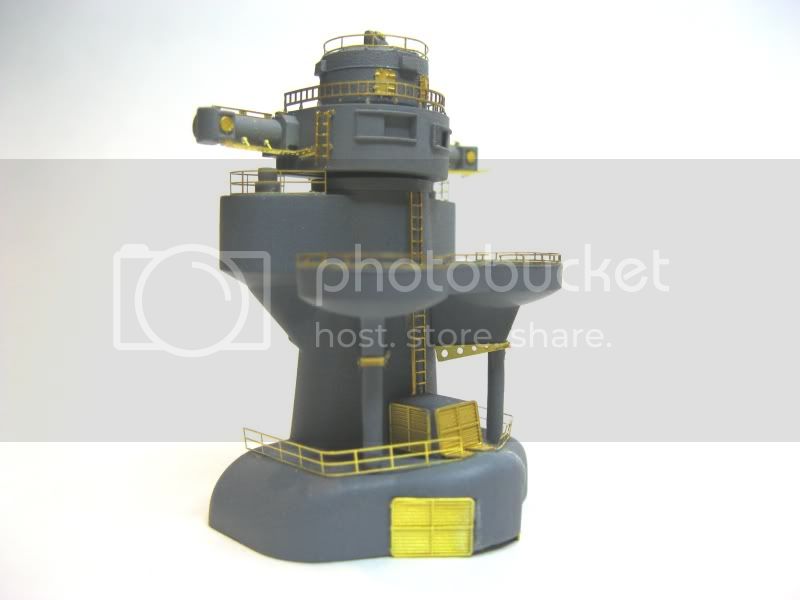
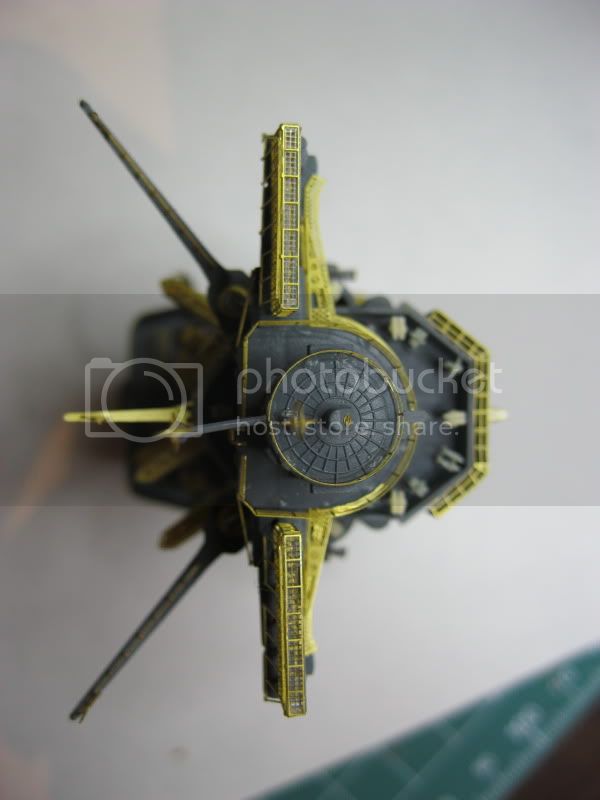
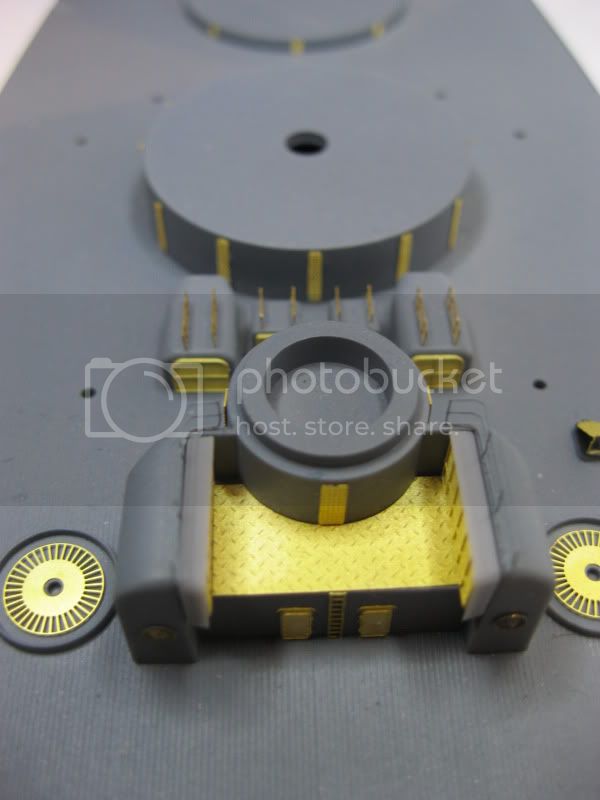
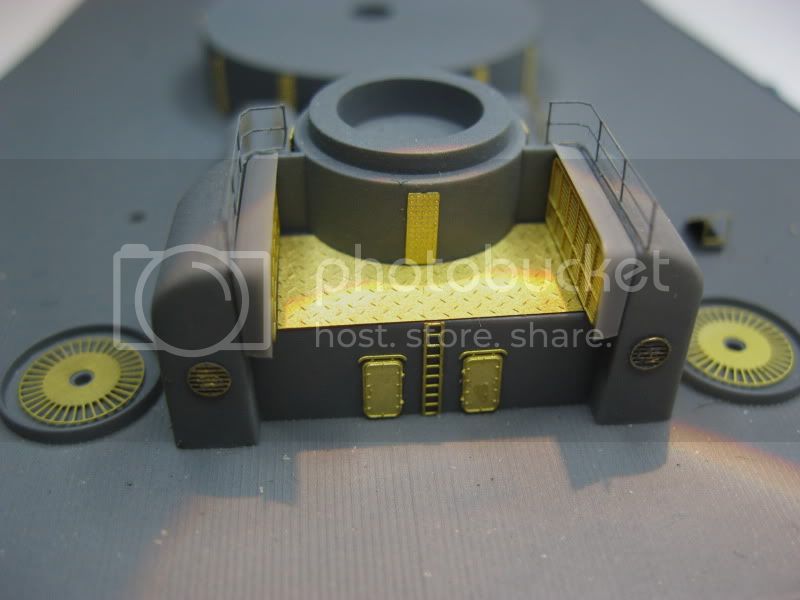
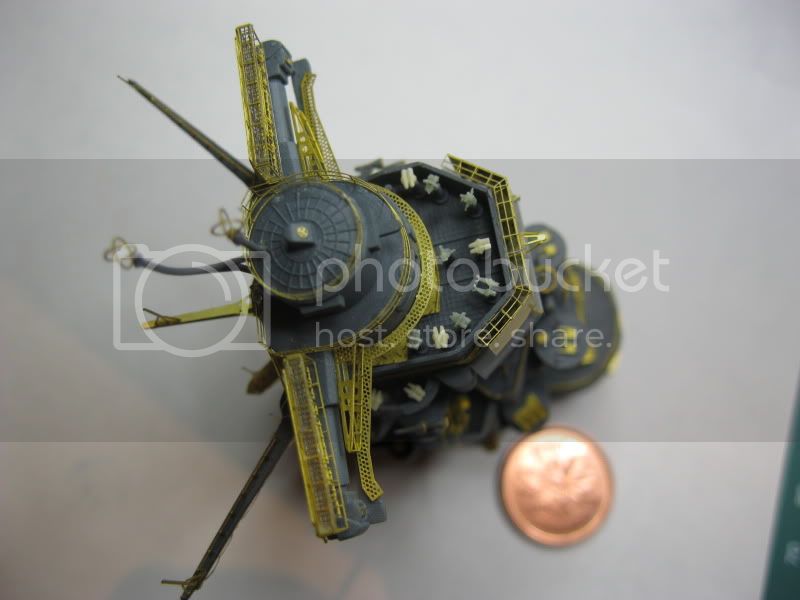
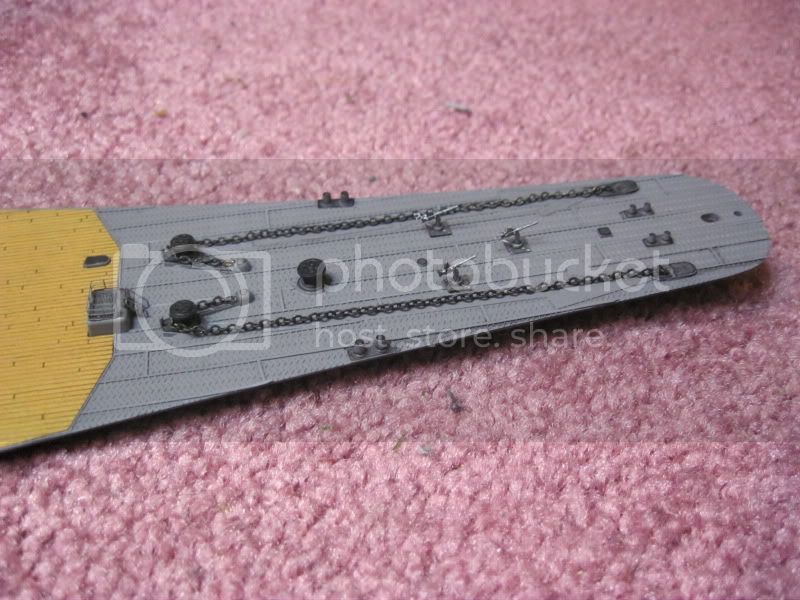
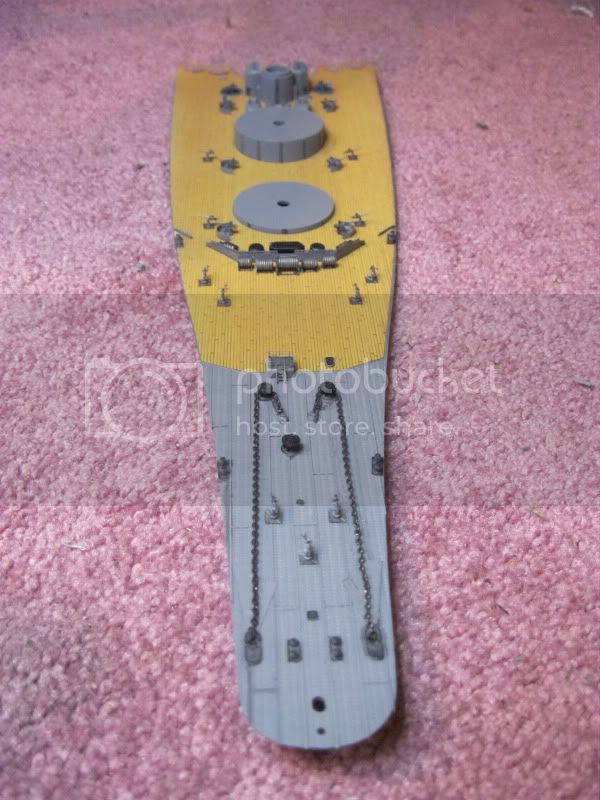
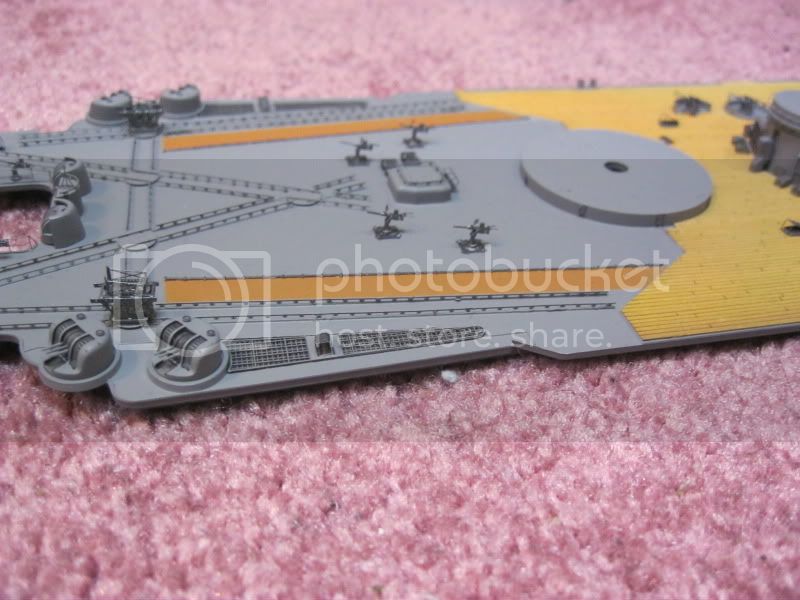
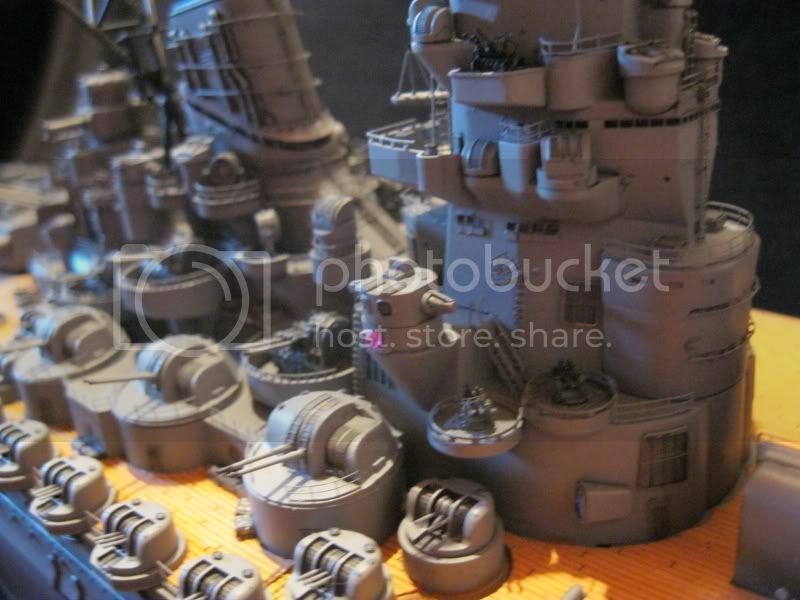
Tim,Totally impressed by your PE work,so detailed.
Anthony2779-FSM
New Brunswick, Canada
Joined: March 17, 2011
KitMaker: 137 posts
Model Shipwrights: 135 posts
Posted: Sunday, March 20, 2011 - 07:26 PM UTC
Thanks Tony!
And Steve...yes the lionroar has just about everything including all the barrels and many resin parts ...amd i think if i looked hard enough, there prolly IS a kitchen sink or two in there . I can also confirm that brass props and anchor chain are not included in this edition (I think they were in previous ones)
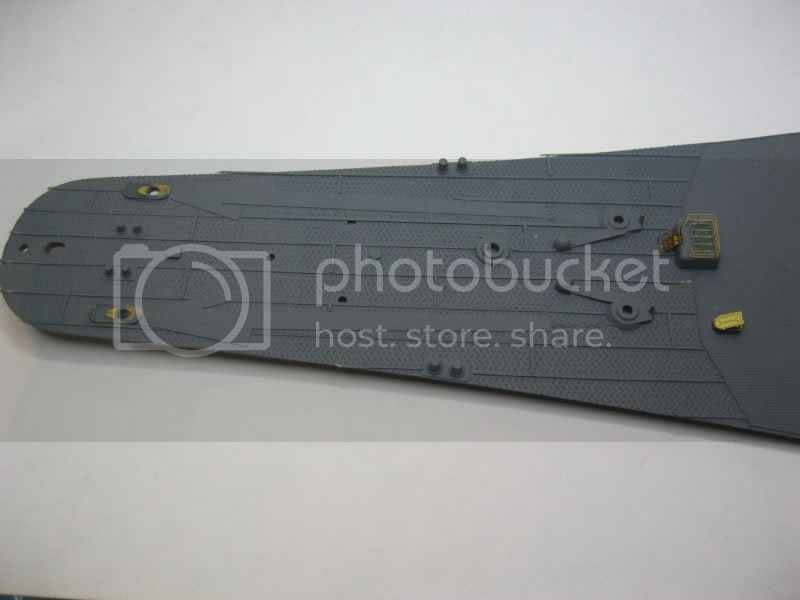
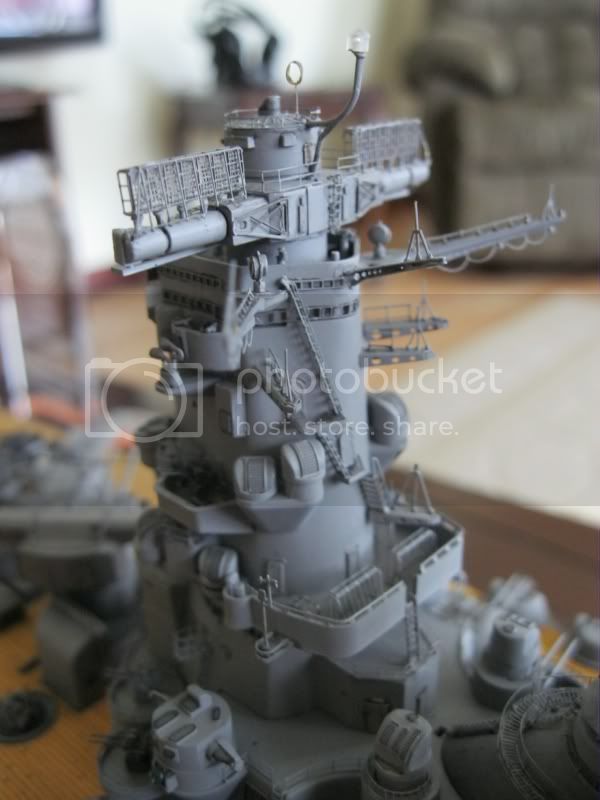
And a strange omission - there was no railing provided for the top superstructure walkway (the main one above the observation deck with the binoculars) I see this custom railing is included in the WEM set for instance. Weird omission but anyway...
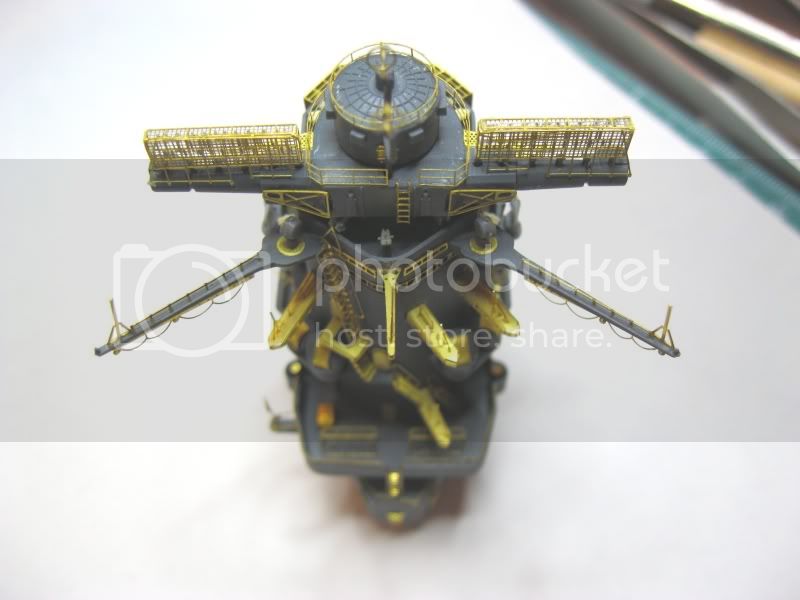
otherwise, i'd say the fit, and especially the surface etching detail, is top notch
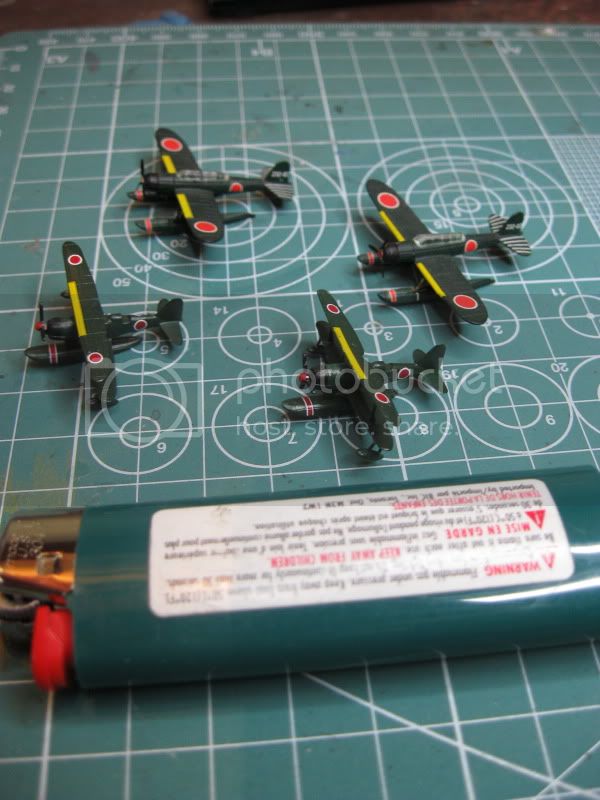
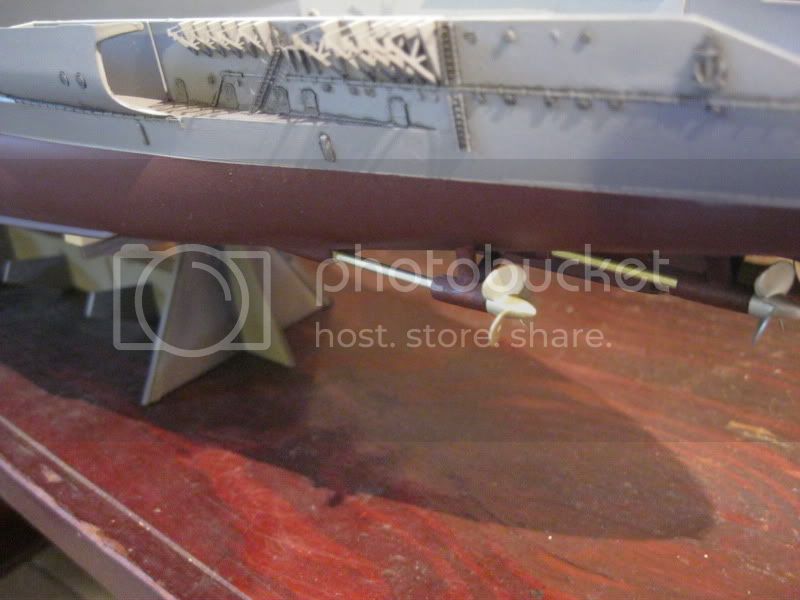
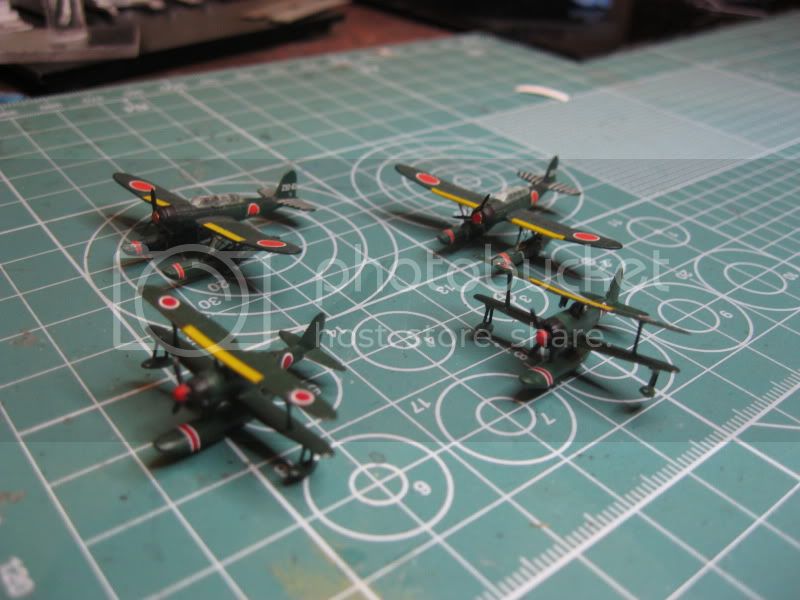
Hada couple hours on the w.e. to do a couple more things:
Thanks for viewing my post!
New Brunswick, Canada
Joined: March 17, 2011
KitMaker: 137 posts
Model Shipwrights: 135 posts
Posted: Wednesday, May 25, 2011 - 04:16 AM UTC
Texas, United States
Joined: September 15, 2002
KitMaker: 8,985 posts
Model Shipwrights: 3,509 posts
Posted: Wednesday, May 25, 2011 - 04:28 AM UTC
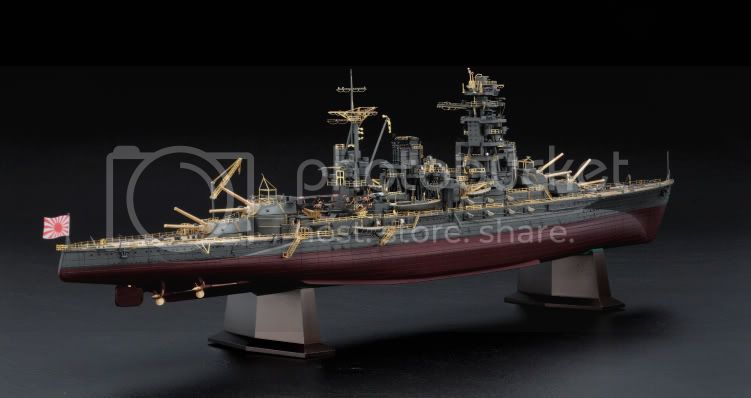
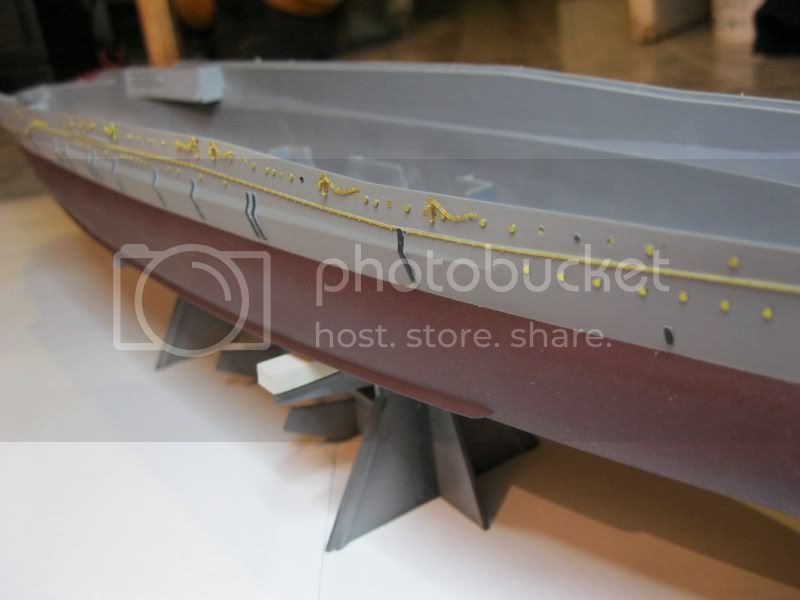
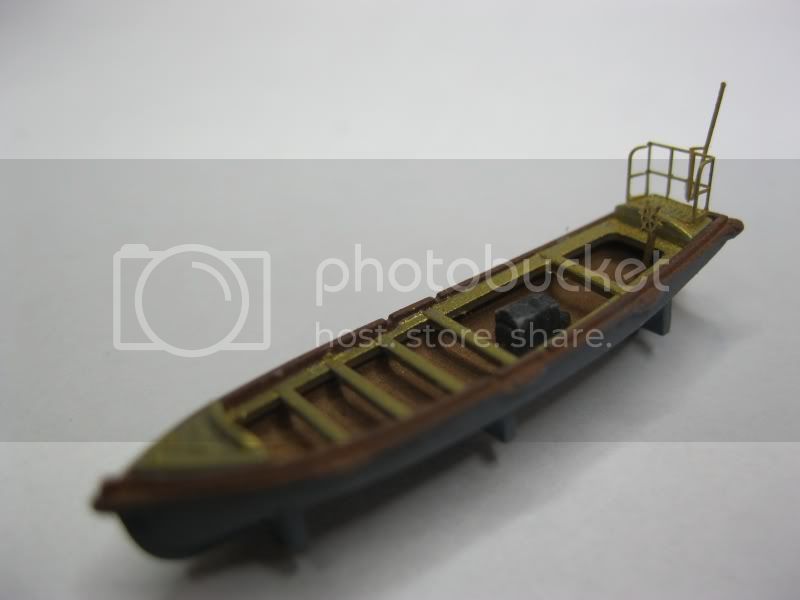
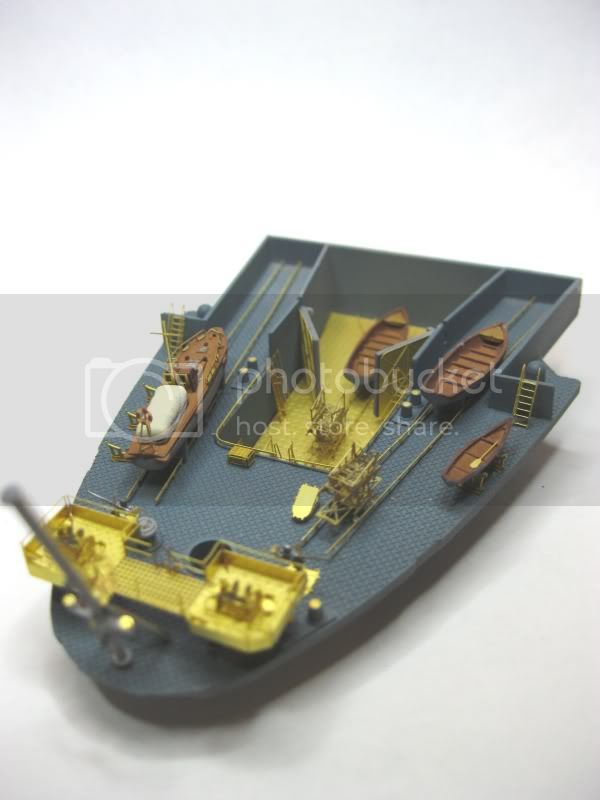
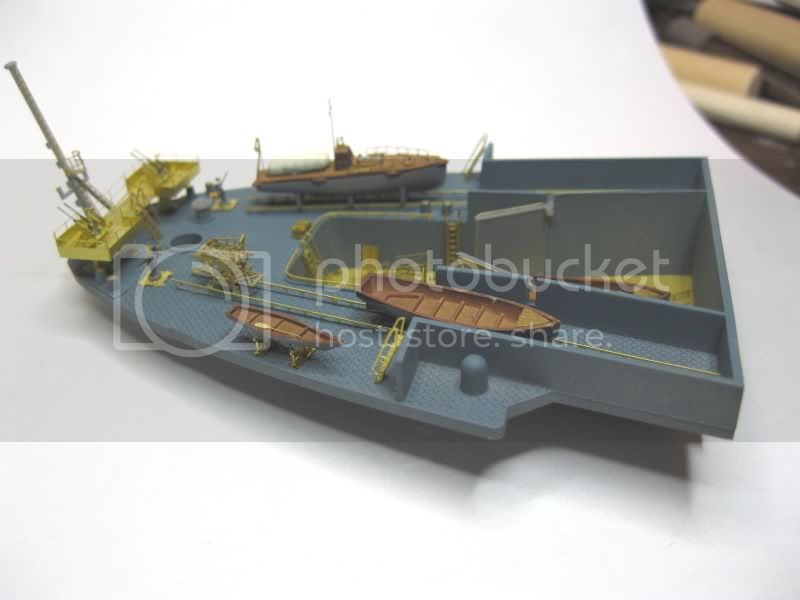
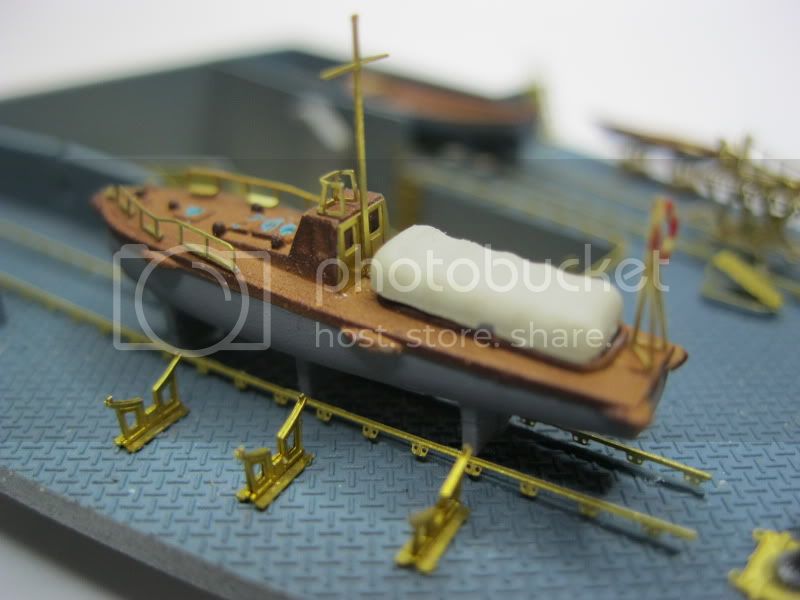
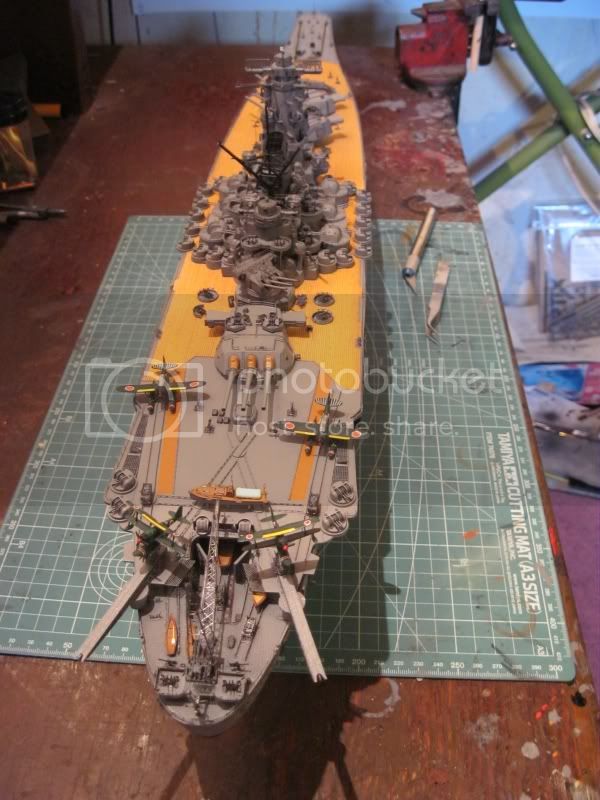
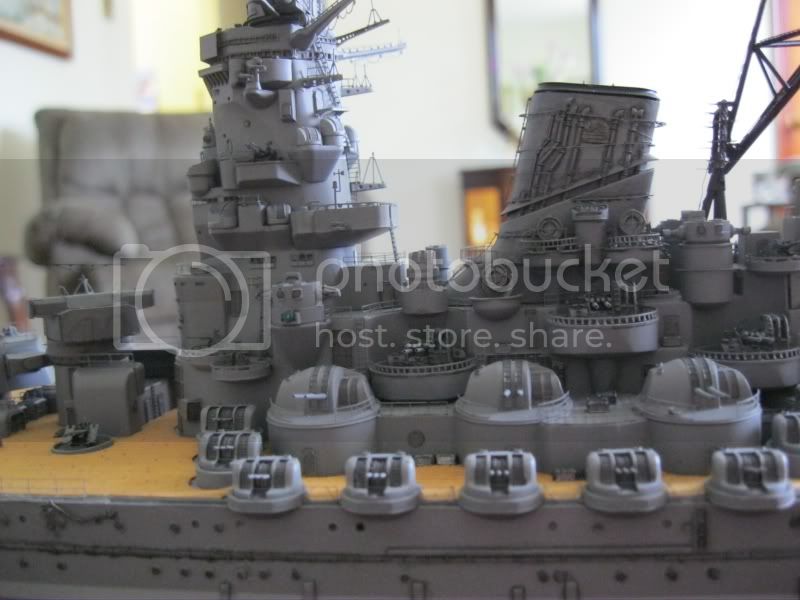
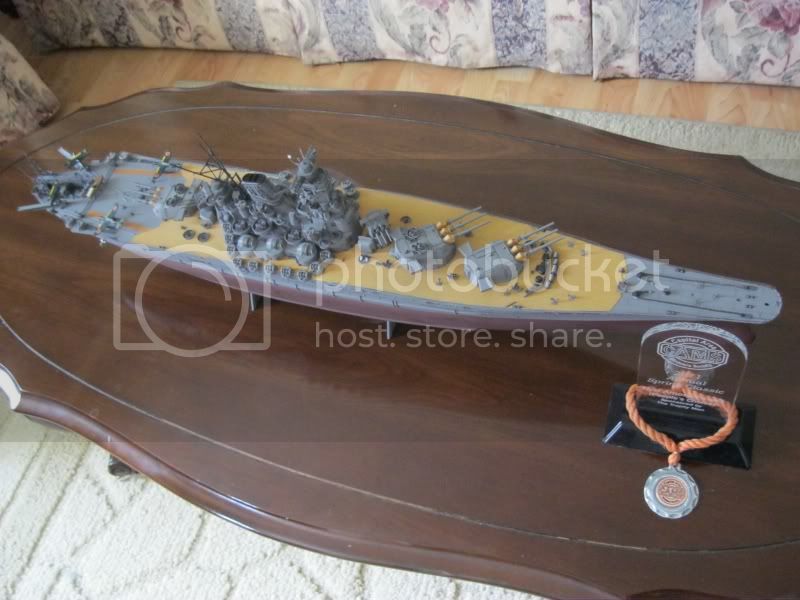
truely stunning. I am glad you used the wooden deck for this masterpiece
Those who don't learn from history are doomed to repeat it
VMI "76
Order of the Red Nose Plug
Blue Volute Bumper Spring Award
Kentucky, United States
Joined: October 05, 2010
KitMaker: 205 posts
Model Shipwrights: 163 posts
Posted: Wednesday, May 25, 2011 - 04:51 AM UTC
Tim, that is some really impressive PE work. I can't see a spot of glue anywhere. About as clean as any I've ever seen.
I've sometimes thought about doing a build and simply leaving the PE unpainted. Might make an interesting display piece.
Congratulations on your fantastic work. I'll look forward to more update photos.
Bob
Building: Revell 1/72 S-100 Schnelboot
Dragon 1/350 U.S.S. Laffey
Just Launched: Hasegawa IJN Yakakuze (1940)
New Brunswick, Canada
Joined: March 17, 2011
KitMaker: 137 posts
Model Shipwrights: 135 posts
Posted: Wednesday, May 25, 2011 - 10:22 AM UTC
Quoted Text
I've sometimes thought about doing a build and simply leaving the PE unpainted. Might make an interesting display piece.
Bob
Hi Bob! Well, isn't that interesting that you mention that idea! My next project is Hasegawa's 1/350 Nagato -Leyte Gulf with the Lionroar Super Set and that is exactly what I am thinking of doing! These promo's shots give you feeling I am going to strive for:
I think if done properly, such a display could be interesting.
In the meantime, found this pic of a nice battleship diorama model that was well done and thought I would share:

Anyway, thanks all for the nice comments, I will have finished photo's of the Yamato done by Monday. Cheers to all shipbuilders!
#068
Zuid-Holland, Netherlands
Joined: April 09, 2003
KitMaker: 1,144 posts
Model Shipwrights: 172 posts
Posted: Wednesday, May 25, 2011 - 06:52 PM UTC
Look's very good Tim...
Just one question:
Do you know whether the Excel-sheet plating for the Nagato is actually correct - something which I and many others doubt, since it makes no sense at all, and to my knowledge is structurally weaker.
If it is incorrect, are you going to try and fix it, and if so, how?
Cheers,
Harm
New Brunswick, Canada
Joined: March 17, 2011
KitMaker: 137 posts
Model Shipwrights: 135 posts
Posted: Monday, May 30, 2011 - 05:08 AM UTC
Hi Harm!
Yes, what a mess Hasegawa made of the hull...to make matters worse, they reissued the sister ship a yr later with the same excel look, weird.
The rest of the kit I think makes up for the extra work to correct the hull..it looks VERY detailed and molded well, but yeah, those indents for plating are reversed and need to be filled in.
I have seen a couple of different methodolgies used, one using styrene rod to fill in the horizontal lines and filling in the verticals with putty or autobody filler. This has the advantage of adding some (more proper) hull surface detail when done right, but I may just fill in the whole hull with fine autobody filler and sand, but I havent made up my mind yet to tell you the truth.
I will decide soon...my Yamato project is done after 14 months and shown now @ CAMS -won People's Choice Best in Show. (that east german judge had it in for me i think, so I came in 2nd in judging). I will post pics of the finished Yammie later today.
Cheers!
#068
Zuid-Holland, Netherlands
Joined: April 09, 2003
KitMaker: 1,144 posts
Model Shipwrights: 172 posts
Posted: Monday, May 30, 2011 - 06:30 AM UTC
Quoted Text
Hi Harm!
Yes, what a mess Hasegawa made of the hull...to make matters worse, they reissued the sister ship a yr later with the same excel look, weird.
The rest of the kit I think makes up for the extra work to correct the hull..it looks VERY detailed and molded well, but yeah, those indents for plating are reversed and need to be filled in.
I have seen a couple of different methodolgies used, one using styrene rod to fill in the horizontal lines and filling in the verticals with putty or autobody filler. This has the advantage of adding some (more proper) hull surface detail when done right, but I may just fill in the whole hull with fine autobody filler and sand, but I havent made up my mind yet to tell you the truth.
I will decide soon...my Yamato project is done after 14 months and shown now @ CAMS -won People's Choice Best in Show. (that east german judge had it in for me i think, so I came in 2nd in judging). I will post pics of the finished Yammie later today.
Cheers!
I have the 1941 kit in the stash...
I have indeed been thinking that when I eventually get to building this ship - there are a few others that I have to finish/build first - I would opt for the first method: styrene and filler, and try to recreate the plating that way...
Look forward to your pictures...
Cheers,
Harm
Kentucky, United States
Joined: October 05, 2010
KitMaker: 205 posts
Model Shipwrights: 163 posts
Posted: Monday, May 30, 2011 - 08:24 AM UTC
Tim, that is quite a coincidence, isn't' it! I think something like that would make an extremely eye catching display. It would take a lot of very painstaking work, since paint can cover up a multitude of sins when it comes to PE, but it would be impressive. Actually, the idea wasn't originally mine, but my wife's. She was looking at my work one night after a long PE session and observed that she thought it was a shame to cover that up with paint and that it would make a nice display with the unpainted brass. I've thought about doing it several times, but always ended up getting out the airbrush. But, there's always the next build (great thing about our hobby).
Bob
Building: Revell 1/72 S-100 Schnelboot
Dragon 1/350 U.S.S. Laffey
Just Launched: Hasegawa IJN Yakakuze (1940)
New Brunswick, Canada
Joined: March 17, 2011
KitMaker: 137 posts
Model Shipwrights: 135 posts
Posted: Monday, May 30, 2011 - 08:57 AM UTC
Texas, United States
Joined: September 15, 2002
KitMaker: 8,985 posts
Model Shipwrights: 3,509 posts
Posted: Tuesday, May 31, 2011 - 07:30 AM UTC
Going back to the Nagato....i saw where someone had gotten a spray can of Mr Surfacre 1000 and sprayed it on the hull then sanded down a bit to even it out. That is the method i plan to try
On the Yamato kit, did the Lionroar provide those marker lights (Green on port red on starboard)?
Those who don't learn from history are doomed to repeat it
VMI "76
Order of the Red Nose Plug
Blue Volute Bumper Spring Award
Joined: October 30, 2005
KitMaker: 3,897 posts
Model Shipwrights: 3,301 posts
Posted: Tuesday, May 31, 2011 - 07:39 AM UTC
Noticed the funky navigation lights too but apart from that it is a really magnificent piece of work. A build to be really proud of.
Julian

New Brunswick, Canada
Joined: March 17, 2011
KitMaker: 137 posts
Model Shipwrights: 135 posts
Posted: Tuesday, May 31, 2011 - 10:59 PM UTC
No, the "funky" nav lights were not supplied by Lionroar. I should have gone with dabs of green and red paint instead maybe...but I liked the reflective nature of what was used. but as in all things subjective gentlemen... your mileage may vary
re Nagato hull -The Mr Surfacer solution is good one too i think. I will look at that as well. Maybe it would be easier to apply/finish than fine autobody fill. Does Mr Surfacer absorb paint over a large surface (uniformly to plastic) like auto fill does? If so, I will use that too I think.
Texas, United States
Joined: September 15, 2002
KitMaker: 8,985 posts
Model Shipwrights: 3,509 posts
Posted: Wednesday, June 01, 2011 - 06:30 AM UTC
Mr Surfacer (bottle) is my filler of choice now days. It comes in 2 grades that i use 500 and 1000. It sands down easy and there is no color differentiatin when painted. It fills in small seams beautifully. Larger gaps may require the old stand by Squadron putty or plastic strips
Those who don't learn from history are doomed to repeat it
VMI "76
Order of the Red Nose Plug
Blue Volute Bumper Spring Award
New Brunswick, Canada
Joined: March 17, 2011
KitMaker: 137 posts
Model Shipwrights: 135 posts
Posted: Wednesday, June 01, 2011 - 09:18 PM UTC
Thanks for that, Steve. I think you just made up my mind for me
I used Mr S. 500 (bottle) on the Yamato and it is nice to work with. (those fumes ok to breathe for long periods? I think I was gettin a nice lil buzz going there for awhile when i was using it before lol)
I think I will also go with styrene rod for 3 of the offending horizontal indents on each side. I saw this done in one of the hobby magazines in build feature on Nagato....so a spray application of Ms. Surfacer would probably be the prefered method.
Two other questions...can Mr Surfacer be used in an airbrush? I would think it would tend to clog badly, but I have no idea (and yes, I'm too lazy to go test it myself)
and...would the coarser or finer grit Surfacer be your first choice for this app?
Texas, United States
Joined: September 15, 2002
KitMaker: 8,985 posts
Model Shipwrights: 3,509 posts
Posted: Thursday, June 02, 2011 - 08:01 AM UTC
i have a rattle can of the Mr Surfacer 1000. No way I'ld run that stuff thru my airbrush. What i read said use the 1000
Those who don't learn from history are doomed to repeat it
VMI "76
Order of the Red Nose Plug
Blue Volute Bumper Spring Award
Australia
Joined: August 19, 2008
KitMaker: 85 posts
Model Shipwrights: 67 posts
Posted: Thursday, June 02, 2011 - 02:09 PM UTC
The groves might be a tad deep/thick for surfacer. Surfacer is nice for small scratches but anything bigger - side of the hull, gets hard because it doesn't bond to itself that well - difficult to create even and large surface.
I'd recommand any type of expoxy putty, but when applying:
Tape both edges of the ditch so you get minimal 'overrun' of putty
Sand mostly flat with the tape in place - protects other bits too - then finally sand level.
You might have to do quite a bit of taping with the spreadsheet, but I think it's neater this way.
United States
Joined: May 23, 2008
KitMaker: 93 posts
Model Shipwrights: 90 posts
Posted: Friday, June 03, 2011 - 05:01 AM UTC
Dear Tim: Great work; super-duper...esp. the glue-work. What was your technique? Jealous as all get out, I admit! Stephen


