_GOTOBOTTOM
Ships by Class/Type: Carriers
Topics on all types of carriers from the early 20th century to today.
Hasegawa USS Gambier Bay CVE-73
warreni
Visit this Community
South Australia, Australia
Joined: August 14, 2007
KitMaker: 5,926 posts
Model Shipwrights: 2,624 posts
Posted: Friday, January 13, 2012 - 02:04 PM UTC
Ahoy me hearties!!
Time to start another adventure on the high seas of Model Shipwrights.
This time around it is going to be the Hasegawa 1/350 USS Gambier Bay that is going to be subject to my close attention, and to fuel my current PE fetish I have the Hasegawa Basic and Super DetIal Up Etching Sets.
And in a first for Warren I will be using the Wooden deck Set from Hasegawa as well.
And if I could access the photo server I would upload a couple of photos of the contents of the four sets. Ah there we go!
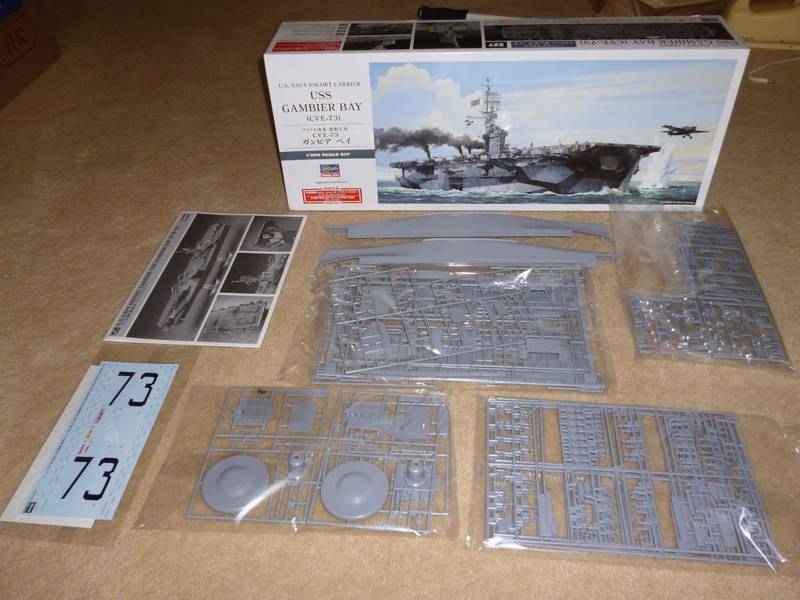
Here is the contents of the kit. The only thing not in the picture is the poster of the box illustration that came with this kit. I like the picture and will be framing it one day.

And here are the extras. The etching looks fantastic but I will let you know if the quality lives up to the looks and if it is as good as the Eduard Showboat PE I just used.
Cheers
Warren
TracyWhite
Visit this Community
Washington, United States
Joined: January 18, 2005
KitMaker: 527 posts
Model Shipwrights: 464 posts
Posted: Friday, January 13, 2012 - 06:20 PM UTC
It's a nice kit; mine is well underway. Fit of the stern transom piece was the worst of the lot, but not bad.
Gremlin56
Joined: October 30, 2005
KitMaker: 3,897 posts
Model Shipwrights: 3,301 posts
Posted: Friday, January 13, 2012 - 06:41 PM UTC
Nice one Warren, be interesting to compare the build with Stefan's Independence.
Let us know how the PE is, becoming a bit of a PE connoisseur myself
cheers,
Julian
Gremlin56
Joined: October 30, 2005
KitMaker: 3,897 posts
Model Shipwrights: 3,301 posts
Posted: Friday, January 13, 2012 - 06:41 PM UTC

Quoted Text

It's a nice kit; mine is well underway. Fit of the stern transom piece was the worst of the lot, but not bad.


Looking good Tracy,
cheers,
Julian
warreni
Visit this Community
South Australia, Australia
Joined: August 14, 2007
KitMaker: 5,926 posts
Model Shipwrights: 2,624 posts
Posted: Friday, January 13, 2012 - 07:26 PM UTC
Greetings Tracy and Julian.
Up until that pesky transom, which wasn't very hard to get in place, just needed a few clamps.
Image Hosted by ImageShack.usBy warreni at 2012-01-13
I was looking over the packaging for "Snap-Tite Kit" or something similar. The fit of the hull halves is so good I only needed a tiny amount of Mr Surfacer 500 at the top of the bow.
Image Hosted by ImageShack.usBy warreni at 2012-01-13
I caved in and used ImageShack for this set of photos until the server is back up online.
Some other observations..
Image Hosted by ImageShack.usBy warreni at 2012-01-13
- The hose reels are so good I am not going to worry about PE ones, especially when they will be mostly hidden in the end anyway.
- It would be nice to have a Navy Colour to Gunze cross-reference included.
- I was a bit disappointed by the colour guide. I kept reading about a full scale colour guide but couldn't find one. Then the penny dropped and I had a look in the bonus painting and low and behold there was the painting guide, and joy-of-joys a full size rigging guide as well!! WOOHOO!!
- The picture included in the kit is not the box art but a fantastic painting showing the GB under attack by the IJN. Will definitely be getting framed.
Image Hosted by ImageShack.usBy warreni at 2012-01-13
Here is the hull under construction.

My two hulls had been broken away from the sprues in transit but luckily this was the only damage that resulted.
Image Hosted by ImageShack.usBy warreni at 2012-01-13
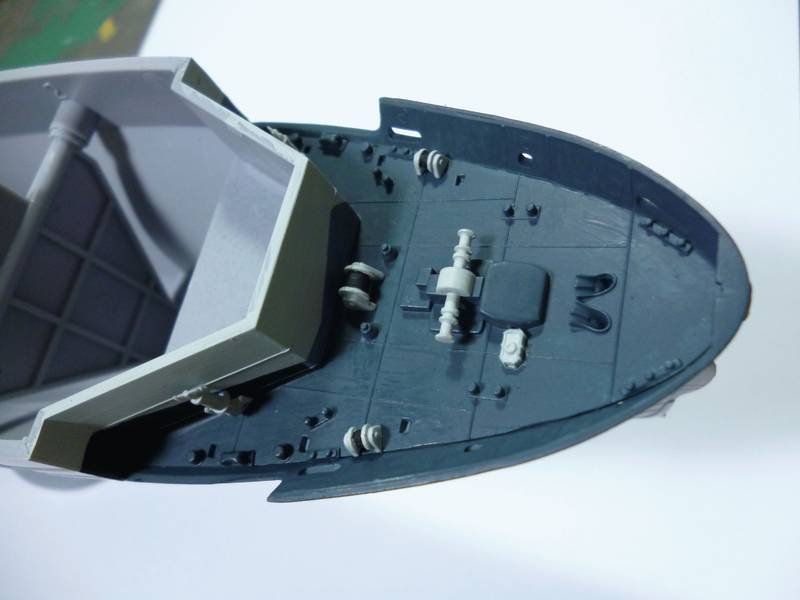
Here is the bow area before any other item is installed. There is anchor chain included.
Image Hosted by ImageShack.usBy warreni at 2012-01-13
Where there is a will there is a way.. This is the only seam I found on the hull and it is so insignificant and hidden I am not touching it.
Will hopefully be able to upload some photos later.
Until then, bye for now.
Gremlin56
Joined: October 30, 2005
KitMaker: 3,897 posts
Model Shipwrights: 3,301 posts
Posted: Friday, January 13, 2012 - 07:50 PM UTC
A good rigging guide should be mandatory for 1/350 and bigger kits.
The seam is very reminiscent of the seams on the IJN Haruna I built. With a medium and fine sanding stick I removed them with hardly any bother.
Cheers,
Julian
warreni
Visit this Community
South Australia, Australia
Joined: August 14, 2007
KitMaker: 5,926 posts
Model Shipwrights: 2,624 posts
Posted: Friday, January 13, 2012 - 07:55 PM UTC
OK Julian. I will get rid of the seam..
Dangeroo
#023
Visit this Community
Zurich, Switzerland
Joined: March 13, 2009
KitMaker: 2,058 posts
Model Shipwrights: 163 posts
Posted: Saturday, January 14, 2012 - 01:53 AM UTC
Wow, that was fast Warren! Looking good so far. Good to see you back building. You'll probably be done with her before I finish my Indy... Looking forward to that wooden deck!

Cheers!
Stefan
warreni
Visit this Community
South Australia, Australia
Joined: August 14, 2007
KitMaker: 5,926 posts
Model Shipwrights: 2,624 posts
Posted: Saturday, January 14, 2012 - 04:01 AM UTC

Quoted Text

Wow, that was fast Warren! Looking good so far. Good to see you back building. You'll probably be done with her before I finish my Indy... Looking forward to that wooden deck!

Cheers!
Stefan


Hi Stefan.
I jumped in and bought the whole set when it first came out, ship, two PE sets and the wooden deck for a good price. It will be interesting to see if the wood adds anything to the realism when it is all painted deck blue.
Cheers
Warren
Gremlin56
Joined: October 30, 2005
KitMaker: 3,897 posts
Model Shipwrights: 3,301 posts
Posted: Saturday, January 14, 2012 - 04:05 AM UTC
Argh!!!!!!........................................
I forgot that the decks were painted blue. What an Olympic bummer
Julian
warreni
Visit this Community
South Australia, Australia
Joined: August 14, 2007
KitMaker: 5,926 posts
Model Shipwrights: 2,624 posts
Posted: Saturday, January 14, 2012 - 04:15 AM UTC
Hello Julian.
A few minutes with the tip of my Exacto knife turned the almost invisible seams to invisible.
At least I won't have to paint the deck.. But you do have to remove many of the fittings and use PE ones to replace them. Will be interesting..
#027
Visit this Community
Louisiana, United States
Joined: April 13, 2005
KitMaker: 5,422 posts
Model Shipwrights: 5,079 posts
Posted: Saturday, January 14, 2012 - 07:31 AM UTC
Very nice work Warren.

You can get the paint masks for the camouflage here.

Kenny
warreni
Visit this Community
South Australia, Australia
Joined: August 14, 2007
KitMaker: 5,926 posts
Model Shipwrights: 2,624 posts
Posted: Saturday, January 14, 2012 - 07:54 AM UTC
Very subtle Kenny..

I also need them for the USS Alabama, Ticonderoga, Yorktown and Livermore, and the DKM Tirpitz,

You want me to review some for you?

On another note..
The first PE skirmish has occured
Image Hosted by ImageShack.usBy warreni at 2012-01-14
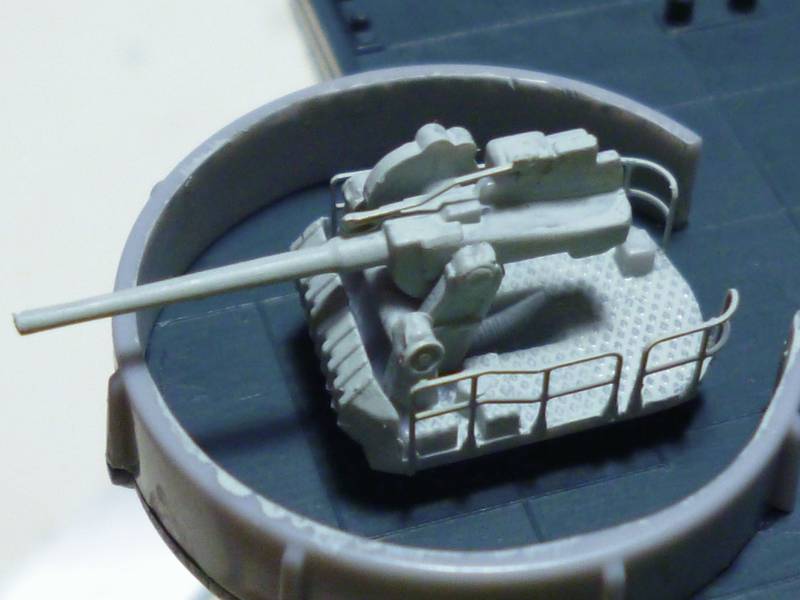
Hasegawa supplies four parts for the 5in gun, then you add another nine PE parts to detail it a bit more.. The drill is what I used to curve the PE which is very nice to work with and not at all fragile.. so far...

On yet another note, I ma still not impressed trying to spray Life Color paints. I tried with Tamiya thinners but I think I had it too thin. Either way Gunze and Tamiya paints are dead easy to spray compared with the Life Color paints, BUT Tamiya and Gunze don't have Deck Blue.. So it's out with the paint brush again. Lucky the Life Color paints cover well when brushed.
TracyWhite
Visit this Community
Washington, United States
Joined: January 18, 2005
KitMaker: 527 posts
Model Shipwrights: 464 posts
Posted: Saturday, January 14, 2012 - 08:03 PM UTC
Be aware that the Hasegawa paint templates are incorrect as they don't actually take the shape of the ship into account. Additionally, they are a copy of the Measure 32, Pattern 15A design sheets, but when you look at photos of the actual ship, the crew took some liberties and some of the shapes are different in subtle ways. Whether or not this is worth worrying about is up to you, but I wanted to throw it out there.

The worst area of fit I had was the forecastle (bow) deck piece, which had a sizable gap around most of it's joint with the hull sides. I was not looking forward to working on that, but when I test-fitted the deck and catwalks on to the hull, I noticed I could not see that gap at all, so I've been very happy to not have to worry about it!
warreni
Visit this Community
South Australia, Australia
Joined: August 14, 2007
KitMaker: 5,926 posts
Model Shipwrights: 2,624 posts
Posted: Saturday, January 14, 2012 - 08:18 PM UTC
Ahoy Shipmates,,,
Some more progress on the G Bay.

First up I went up yjr dhops and bought a large cork board to pin my painting guide to. Lovely isn't it! Worth framing itself.

Then I got back to work and finished off the pre-PE foredeck.

Then the transom area....
Had a couple of small gaps that needed filling. I used PVA glue to do it and wiped the excess before it dried. Instant gap filler.
Oh dear.. Server fell over again..

And here is a close-up of the PE'd 5 incher on the fantail. The exterior of the splinter shield has not been painted as yet.
@Tracy, thanks for the heads up. I had no troubles in that area either. I am doing mine a different way paint wise. I am finishing of the two ends of the hull, except for PE, then I am going to mask it over and do the rest of the hull. After that is done and has dried for a while I will mask the hull as well and leave it masked to prevent any damage to the paint job while the flight deck is being worked on. Although it may not be necessary to mask the hull as hopefullt I can have the flight deck mostly finished BEFORE I attach it to the rest of the hull.
We will see what we will see.
Now to go back to eating my Garlic Prawn pasta now my Wife made last night. It was too hot a few minutes ago but should be fine and dandy now. Better second time round!
Gremlin56
Joined: October 30, 2005
KitMaker: 3,897 posts
Model Shipwrights: 3,301 posts
Posted: Saturday, January 14, 2012 - 08:25 PM UTC
I have never tried spraying prawn pasta Warren so you will have to work out how to thin it yourself Lifecolour paint is difficult to thin I must admit. I used to use Lifecolour thinner but I think that it is tap water in a plastic container. Best results for me have been using distilled water and putting on several thin coats, ( did this on the Arizona build).
Great progress you are making and the colour scheme does deserve framing.
Cheers,
Julian
Dangeroo
#023
Visit this Community
Zurich, Switzerland
Joined: March 13, 2009
KitMaker: 2,058 posts
Model Shipwrights: 163 posts
Posted: Saturday, January 14, 2012 - 08:41 PM UTC
Great and speedy progress, Warren!

Try windex as a thinner. Just be sure to put a lid on the cup, the bubbles drive you mad... Had another go with it yesterday.

How many coats do you add with the brush? It takes at least 3 for me...

Cheers!
S
warreni
Visit this Community
South Australia, Australia
Joined: August 14, 2007
KitMaker: 5,926 posts
Model Shipwrights: 2,624 posts
Posted: Saturday, January 14, 2012 - 09:13 PM UTC

Quoted Text

Great and speedy progress, Warren!

Try windex as a thinner. Just be sure to put a lid on the cup, the bubbles drive you mad... Had another go with it yesterday.

How many coats do you add with the brush? It takes at least 3 for me...

Cheers!
S


Hi Stefan.
Thanks for dropping by again.
I use Windex for cleaning the airbrush and the bubbles can be annoying.. I will give it a try as a thinner.
It depends on what colour I am painting as to how many coats it takes. The light grey needs at least three coats, the deck blue at least two, but the blue gray only appears to need one coat.
Then again with Tamiya paints it all depends on the colour as well.

surfsup
Visit this Community
Queensland, Australia
Joined: May 20, 2010
KitMaker: 1,230 posts
Model Shipwrights: 1,212 posts
Posted: Sunday, January 15, 2012 - 09:40 PM UTC
Will watch your build with interest Warren. My good mate Dave did one and got a 2nd at QMHE last Year so here is a Pic for you to look at while you build.....Cheers Mark

warreni
Visit this Community
South Australia, Australia
Joined: August 14, 2007
KitMaker: 5,926 posts
Model Shipwrights: 2,624 posts
Posted: Sunday, January 15, 2012 - 09:44 PM UTC
I recognise the plaque on the base.

Thanks for dropping in Mark.

All I got done tonight was one of the small boats. But four Loin Roar detail sets turned up today..
Gremlin56
Joined: October 30, 2005
KitMaker: 3,897 posts
Model Shipwrights: 3,301 posts
Posted: Monday, January 16, 2012 - 06:47 AM UTC
That must have made your "Loins roar"
Sorry Warren, childish of me but I couldn't resist this one.
Cheers,
Julian
warreni
Visit this Community
South Australia, Australia
Joined: August 14, 2007
KitMaker: 5,926 posts
Model Shipwrights: 2,624 posts
Posted: Monday, January 16, 2012 - 08:56 AM UTC

Quoted Text

That must have made your "Loins roar"
Sorry Warren, childish of me but I couldn't resist this one.
Cheers,
Julian


Don't give up your day job Julian too become a comedian..
The sets were for the Bismark (Revell), Repulse, Scharnhorst and Prinz Eugen. Two problems there,
1. I forgot I already had the WEM set for the Scharnhorst. But now I have the barrels and resin parts, and
2. I don't even have a kit of the Repulse yet..

But two for one was just too much of an attraction!
#027
Visit this Community
Louisiana, United States
Joined: April 13, 2005
KitMaker: 5,422 posts
Model Shipwrights: 5,079 posts
Posted: Monday, January 16, 2012 - 09:36 AM UTC

Quoted Text

Very subtle Kenny..

I also need them for the USS Alabama, Ticonderoga, Yorktown and Livermore, and the DKM Tirpitz,

You want me to review some for you?


Not necessary Warren. After 7 years, there are some fit issues in the bow area that can't be corrected by me. I can't figure it out.

I would stick with Tracy's blog.

Kenny
warreni
Visit this Community
South Australia, Australia
Joined: August 14, 2007
KitMaker: 5,926 posts
Model Shipwrights: 2,624 posts
Posted: Monday, January 16, 2012 - 11:24 AM UTC
I got around it quite easily with the USS Buchanan mask I got from you long ago. I find it easy to extrapolate where the camo should go..
Could you PM me with a cost estimate on those ones I mentioned to you. Tirpitz should be the July-Sep 1942 version.
Thanks in advance.
Warren
robtmelvin
Visit this Community
Kentucky, United States
Joined: October 05, 2010
KitMaker: 205 posts
Model Shipwrights: 163 posts
Posted: Tuesday, January 17, 2012 - 08:28 AM UTC
Warren, you not only build good, you build fast! Interesting coincidence, I also have Gambier Bay in the stash, with the same PE and most of the rest of the after market! Great minds, I suppose. I think you are just determined to make the rest of us feel bad about our modeling inadequacies! LOL. I sent you an e-mail to see if you'd gotten the rigging diagrams I sent for Showboat.

I'm watching this build with interest. It looks challenging but very rewarding. Love what you've done with her so far. Keep up the great work and let me know about the diagrams.

Bob
 _GOTOTOP