


Go to modelshipwrights.com for the current dynamic site!
Hosted by Jim Starkweather
Building Trumpeter's CV-14

RussellE

#306

Joined: June 27, 2010
KitMaker: 3,959 posts
Model Shipwrights: 2,777 posts

Posted: Wednesday, April 10, 2013 - 11:31 PM UTC
That's quite a production line of Bofors there Warren! Very Impressive!!


warreni
Joined: August 14, 2007
KitMaker: 5,926 posts
Model Shipwrights: 2,624 posts

Posted: Saturday, April 13, 2013 - 09:36 AM UTC
Thanks Russell. Wait til you see the 20mm production.. 
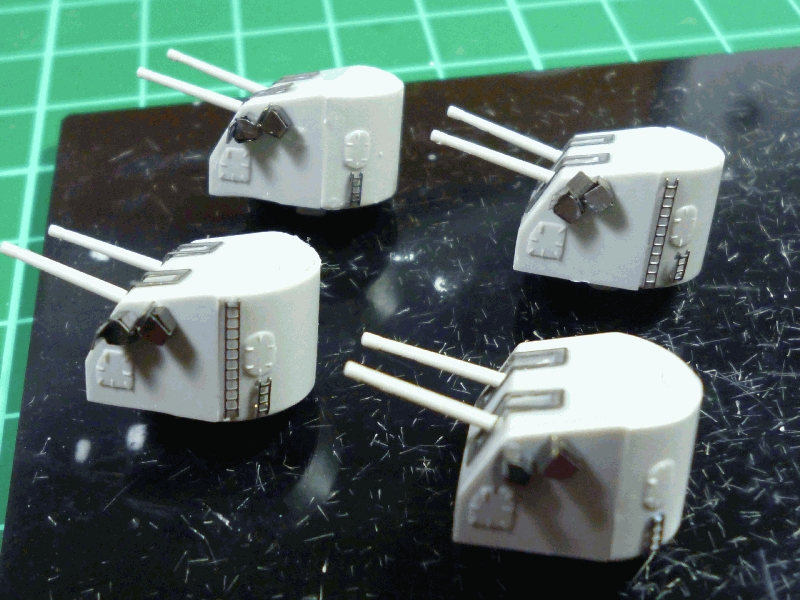
But first up we have he unpainted 5 in turrets..

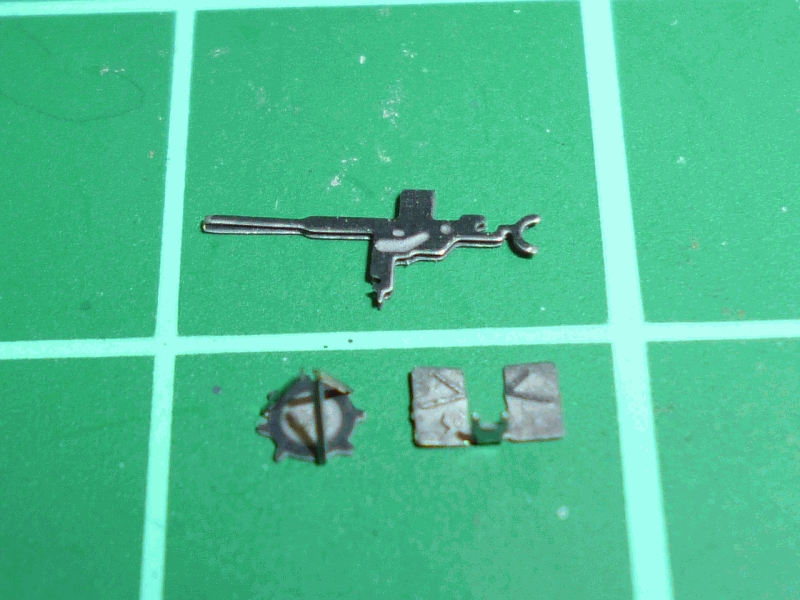
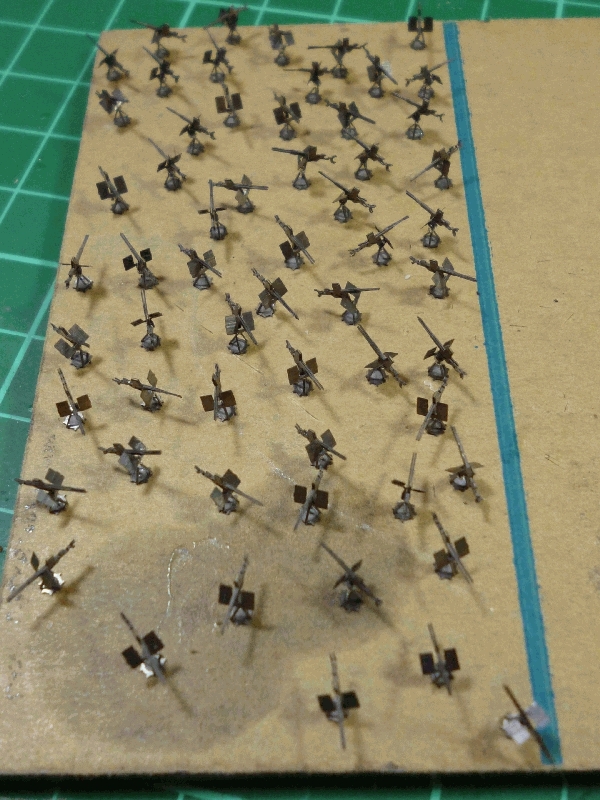
Then the fun/madness begins.. I counted 56 of the 20mm guns that need to be assembled. The kit ones are far too crude so I am using the ones supplied with the Eduard set. These are also on the correct tripod mount, not the solid mount of earlier 30mm guns.
Each of the little guns are made up of three parts.
Then they get folded like so..
(Don't worry about the seams as they disappear under a few coats of paint)
And then when assembled end up looking like this..
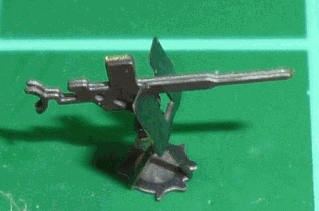

The ones in the kit did not even have shields. And finally the stack of folded guns..

See what I mean about madness...
Going will be slow now as I start my new job tomorrow and I have done something to my back which stops me sitting at the hobby bench for any great length of time.
Thanks for looking.
Cheers all
Warren
But first up we have he unpainted 5 in turrets..
Then the fun/madness begins.. I counted 56 of the 20mm guns that need to be assembled. The kit ones are far too crude so I am using the ones supplied with the Eduard set. These are also on the correct tripod mount, not the solid mount of earlier 30mm guns.
Each of the little guns are made up of three parts.
Then they get folded like so..
(Don't worry about the seams as they disappear under a few coats of paint)
And then when assembled end up looking like this..
The ones in the kit did not even have shields. And finally the stack of folded guns..
See what I mean about madness...
Going will be slow now as I start my new job tomorrow and I have done something to my back which stops me sitting at the hobby bench for any great length of time.
Thanks for looking.
Cheers all
Warren

surfsup
Joined: May 20, 2010
KitMaker: 1,230 posts
Model Shipwrights: 1,212 posts

Posted: Saturday, April 13, 2013 - 11:11 AM UTC
You are being a very busy Boy Warren and they are looking good.....Cheers mark

DanielMoscatelli

Joined: August 22, 2011
KitMaker: 998 posts
Model Shipwrights: 941 posts

Posted: Saturday, April 13, 2013 - 02:41 PM UTC
Friend Warren ... it is a great work the fact that taking these, but me it can only with desire of seeing the paint of hull!! This Camo is fantastic!!!Regards Daniel.


warreni
Joined: August 14, 2007
KitMaker: 5,926 posts
Model Shipwrights: 2,624 posts
Posted: Saturday, April 13, 2013 - 08:36 PM UTC
@ Thanks mate. I fear my production rate will come crashing down after I start my new job tomorrow... 
@ Daniel, we will see what happens after the last coat is finished. You never know what disasters are awaiting you until you peel away the masking tape etc.
Cheers all
Warren
@ Daniel, we will see what happens after the last coat is finished. You never know what disasters are awaiting you until you peel away the masking tape etc.
Cheers all
Warren

Gremlin56
Joined: October 30, 2005
KitMaker: 3,897 posts
Model Shipwrights: 3,301 posts
KitMaker: 3,897 posts
Model Shipwrights: 3,301 posts
Posted: Saturday, April 13, 2013 - 10:13 PM UTC
Hi Warren,
nice to see you making progress on the CV-14, looking very sharp mate.
Sorry to hear about your back, maybe time to bin the "Illustrated guide to the Kama Sutra"

Good luck with the new job,
cheers,
Julian
nice to see you making progress on the CV-14, looking very sharp mate.
Sorry to hear about your back, maybe time to bin the "Illustrated guide to the Kama Sutra"
Good luck with the new job,
cheers,
Julian
warreni
Joined: August 14, 2007
KitMaker: 5,926 posts
Model Shipwrights: 2,624 posts
Posted: Sunday, April 14, 2013 - 04:40 AM UTC
Quoted Text
Hi Warren,
nice to see you making progress on the CV-14, looking very sharp mate.
Sorry to hear about your back, maybe time to bin the "Illustrated guide to the Kama Sutra"
Good luck with the new job,
cheers,
Julian
 Thanks for the advise Julian.
 warreni
Joined: August 14, 2007
KitMaker: 5,926 posts
Model Shipwrights: 2,624 posts
Posted: Wednesday, April 17, 2013 - 08:50 AM UTC
It either feast or famine at the moment for the CV-14. The 5in/38 single mounts I ordered from two different places all arrived yesterday as did the Lifecolor paint I had ordered. So now all I need is some time to utilise these newly delivered resources.
Cheers
Warren
Cheers
Warren
warreni
Joined: August 14, 2007
KitMaker: 5,926 posts
Model Shipwrights: 2,624 posts
Posted: Friday, April 19, 2013 - 06:25 PM UTC
Only a small update but it took a day to do the step!
And you don't want to know how long it took to stand them all up!!
That is accelerator, not oil on the paper backing.
I also finished painting the hull today and will remove the masking tape after a final inspection.
Cheers shipmates
Warren
And you don't want to know how long it took to stand them all up!!
That is accelerator, not oil on the paper backing.
I also finished painting the hull today and will remove the masking tape after a final inspection.
Cheers shipmates
Warren
surfsup
Joined: May 20, 2010
KitMaker: 1,230 posts
Model Shipwrights: 1,212 posts
Posted: Saturday, April 20, 2013 - 12:06 PM UTC
You have been a very busy Boy my Friend and they are looking very nice indeed.....Cheers mark
RussellE
#306
Joined: June 27, 2010
KitMaker: 3,959 posts
Model Shipwrights: 2,777 posts
Posted: Saturday, April 20, 2013 - 10:34 PM UTC
OMG, Warren!

RedDuster

Joined: March 01, 2010
KitMaker: 7,078 posts
Model Shipwrights: 6,649 posts

Posted: Sunday, April 21, 2013 - 05:07 AM UTC
Great stuff Warren, how many single 20mm?
Following with interest.
Si
Following with interest.
Si
warreni
Joined: August 14, 2007
KitMaker: 5,926 posts
Model Shipwrights: 2,624 posts
Posted: Sunday, April 21, 2013 - 05:20 AM UTC
Thank you Mark, Russell and Simon.
I think I have made about 60 of them as I am unsure of how many are actually used on the ship I made a few extra. I am sure they will get used one day.
To get rid of the seam on the barrels (between the folded PE) I painted the barrels with Mr Surfacer 500. Will see what happens.
The painting of the hull is finished for the moment and I will be removing the tape etc this afternoon with any luck.
I almost forgot, during the week three boxes of Veteran Models 5in/38 twin mounts turned up from two different hobby places. I will open one up soon and have a look at them. Not sure if I will use them on this build or not yet.
That's it for now.
Cheers
Warren
Over and out.

AussieReg

#007
Joined: June 09, 2009
KitMaker: 8,156 posts
Model Shipwrights: 154 posts
Posted: Sunday, April 21, 2013 - 11:44 PM UTC
G'day Warren. I mentioned a deep dark place in the contest thread, and looking at your work here you are doing nothing to convince me otherwise my friend!
Have you considered dipping the guns in Future to fill the gaps and seams?
Cheers, D
Have you considered dipping the guns in Future to fill the gaps and seams?
Cheers, D

warreni
Joined: August 14, 2007
KitMaker: 5,926 posts
Model Shipwrights: 2,624 posts
Posted: Monday, April 22, 2013 - 10:53 AM UTC
Another good idea Mr Rigby! I hadn't thought of that at all. We will see how the Mr Surfacer goes but I may do it anyway to build the barrels up a bit more.
Thanks mate!
Thanks mate!
warreni
Joined: August 14, 2007
KitMaker: 5,926 posts
Model Shipwrights: 2,624 posts
Posted: Monday, April 22, 2013 - 09:02 PM UTC
Well I removed the tape today. Mask and masking tape performed well and left no residue. A few little runs under the mask as it is a little stiff to get down tightly over some detail.


And that is how she came out/ Too big for closeups for the moment.
Cheers n beers
Warren
And that is how she came out/ Too big for closeups for the moment.
Cheers n beers
Warren

Kevin_H

Joined: March 21, 2013
KitMaker: 10 posts
Model Shipwrights: 10 posts
Posted: Tuesday, April 23, 2013 - 03:52 AM UTC
Looking outstanding.
Gremlin56
Joined: October 30, 2005
KitMaker: 3,897 posts
Model Shipwrights: 3,301 posts
KitMaker: 3,897 posts
Model Shipwrights: 3,301 posts
Posted: Tuesday, April 23, 2013 - 06:43 AM UTC
Nifty masking and painting Mr. Inman, very flashy camo immaculately executed. 

Julian
Julian
surfsup
Joined: May 20, 2010
KitMaker: 1,230 posts
Model Shipwrights: 1,212 posts
Posted: Tuesday, April 23, 2013 - 08:08 PM UTC
She has come out looking very good Warren. You should be happy with the results.....Cheers mark

Dangeroo
#023

Joined: March 13, 2009
KitMaker: 2,058 posts
Model Shipwrights: 163 posts

Posted: Tuesday, April 23, 2013 - 09:46 PM UTC
Looking very good! Keep calm, carry on!
warreni
Joined: August 14, 2007
KitMaker: 5,926 posts
Model Shipwrights: 2,624 posts
Posted: Wednesday, April 24, 2013 - 05:20 AM UTC
Kevin, Julian, Mark and Stefan,
Thank you for all the compliments.
I have started on PEing various platforms etc around the hull sides, lots of ladders and catwalks to be installed.


This Eduard set seems to be a bit softer than the one I used for BB-55.
I put together one of the Veteran models 5in single mounts yesterday.


Will be interesting to see how it looks after painting.
That's it for now,
Cheers
Warren
Thank you for all the compliments.
I have started on PEing various platforms etc around the hull sides, lots of ladders and catwalks to be installed.
This Eduard set seems to be a bit softer than the one I used for BB-55.
I put together one of the Veteran models 5in single mounts yesterday.
Will be interesting to see how it looks after painting.
That's it for now,
Cheers
Warren
warreni
Joined: August 14, 2007
KitMaker: 5,926 posts
Model Shipwrights: 2,624 posts
Posted: Wednesday, April 24, 2013 - 05:10 PM UTC
Greetings to one and all and hope you all had a great ANZAC Day.
I mainly worked on the stern today.
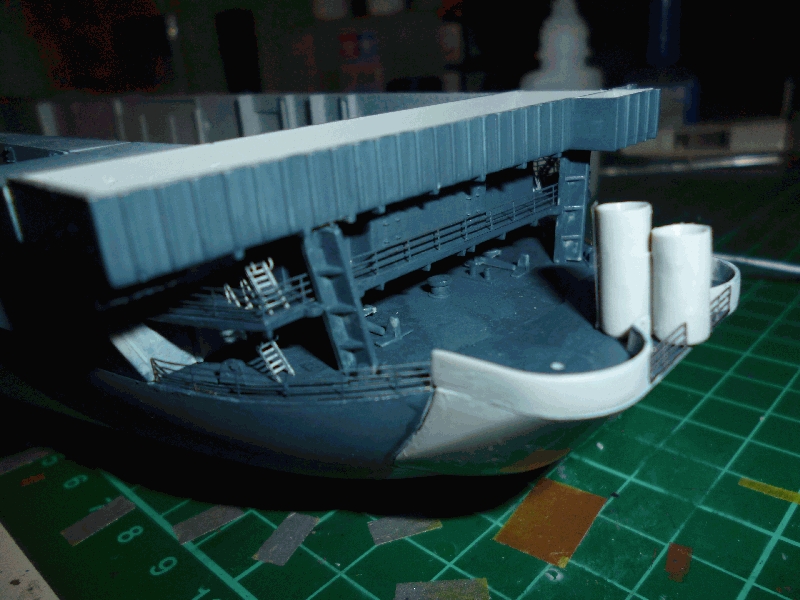
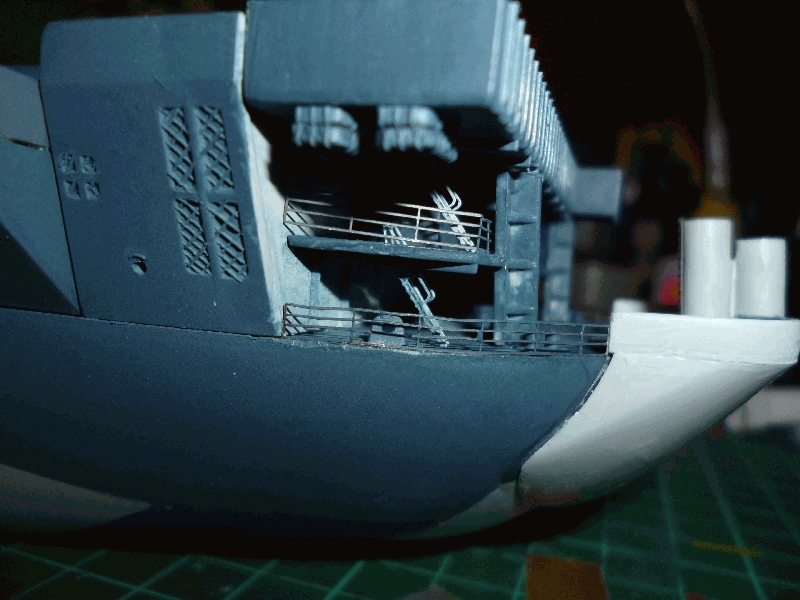
Please excuse the dodgy current finish as I have not done any touchups yet.
That piece below the stern guntub was a real pain to get attached. After gluing the assembly to the stern deck and waiting for it to dry I had to use superglue to attach the lower parts of the fairing securely to the hull. I would have had to wait for hours with any other glue, but CA and some accelerator worked a treat. At least the seam will be invisible.
I also attached some masking tape to a piece of wood and attached all those 20mm cannons to it ready for painting. Painting them by hand would take hours! I wonder if they will all survive the experience intact?...
Cheers everyone,
Warren
LEST WE FORGET
I mainly worked on the stern today.
Please excuse the dodgy current finish as I have not done any touchups yet.
That piece below the stern guntub was a real pain to get attached. After gluing the assembly to the stern deck and waiting for it to dry I had to use superglue to attach the lower parts of the fairing securely to the hull. I would have had to wait for hours with any other glue, but CA and some accelerator worked a treat. At least the seam will be invisible.
I also attached some masking tape to a piece of wood and attached all those 20mm cannons to it ready for painting. Painting them by hand would take hours! I wonder if they will all survive the experience intact?...
Cheers everyone,
Warren
LEST WE FORGET
warreni
Joined: August 14, 2007
KitMaker: 5,926 posts
Model Shipwrights: 2,624 posts
Posted: Thursday, April 25, 2013 - 07:56 PM UTC
Hello again.
Managed to get quite a bit done today but the ship doesn't really show it.
First up I got to PEing the bow deck area and installing the flight deck supports.
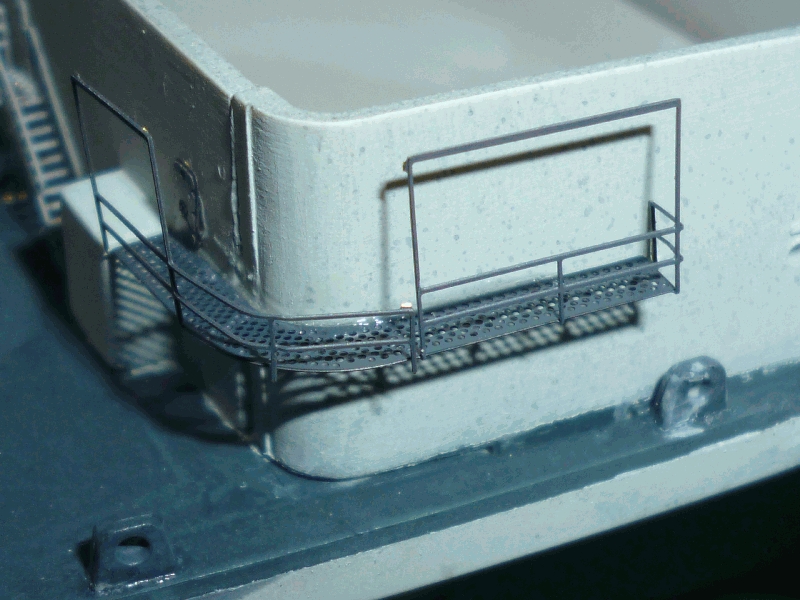

That catwalk is on the other side as well.
I also managed to spray all the guns either Navy Blue (4in singles, quad 40s and 20mm) or Grey (the 5in twin mounts).
I used a slightly greyer Navy Blue from Gunze for a bit of contrast.
I also painted the Eduard PE frets Navy Blue as I think the majority of it will need to be that colour eventually.
More news one day...
Cheers
Warren
Managed to get quite a bit done today but the ship doesn't really show it.
First up I got to PEing the bow deck area and installing the flight deck supports.
That catwalk is on the other side as well.
I also managed to spray all the guns either Navy Blue (4in singles, quad 40s and 20mm) or Grey (the 5in twin mounts).
I used a slightly greyer Navy Blue from Gunze for a bit of contrast.
I also painted the Eduard PE frets Navy Blue as I think the majority of it will need to be that colour eventually.
More news one day...
Cheers
Warren
surfsup
Joined: May 20, 2010
KitMaker: 1,230 posts
Model Shipwrights: 1,212 posts
Posted: Thursday, April 25, 2013 - 09:24 PM UTC
You have been a busy boy Warren and she is looking very good indeed.....Cheers mark
warreni
Joined: August 14, 2007
KitMaker: 5,926 posts
Model Shipwrights: 2,624 posts
Posted: Saturday, April 27, 2013 - 01:02 PM UTC
Thanks for that Mark. Much appreciated.
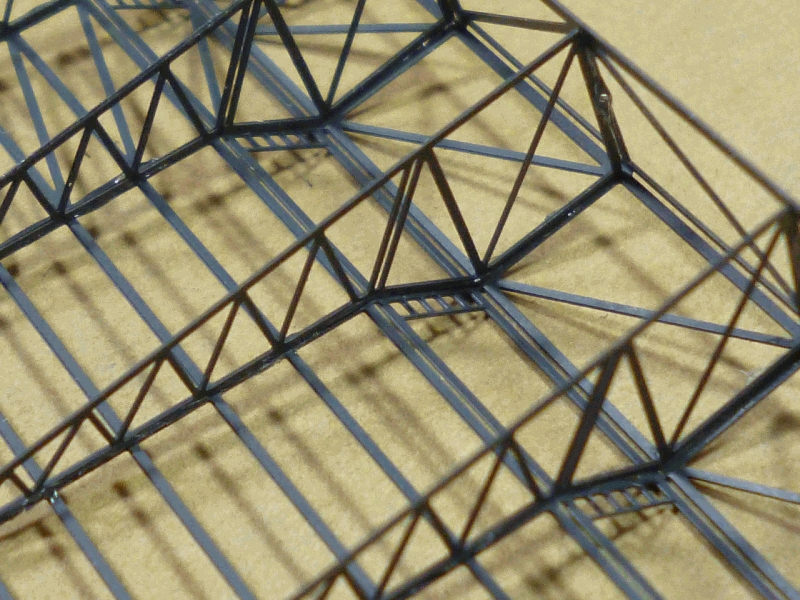
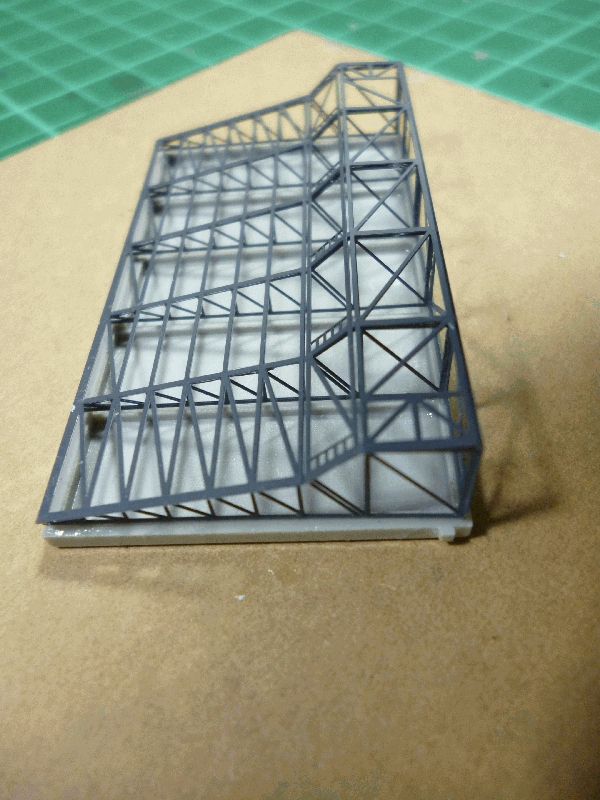
The hull is basically finished as far as construction is concerned. All the railings, walkways and sponsons have been attached. Final part for the hull was the deck-edge elevator. Trumpeter just gives you the top with no detail for the underside which just isn't good enough for this little black duck, so...

And with the deck part in place...

I will paint the while assembly Navy Blue when I go to spray the flight deck assemblies which are next.
After that it is the island then all those little aircraft. Trumpeter made a mistake and included Dauntless' but by the time the Ticonderoga was in operations the Dauntless was no longer in front line use on the fleet carriers.
That's it for now.
Cheers all and thanks for looking,
Warren
The hull is basically finished as far as construction is concerned. All the railings, walkways and sponsons have been attached. Final part for the hull was the deck-edge elevator. Trumpeter just gives you the top with no detail for the underside which just isn't good enough for this little black duck, so...
And with the deck part in place...
I will paint the while assembly Navy Blue when I go to spray the flight deck assemblies which are next.
After that it is the island then all those little aircraft. Trumpeter made a mistake and included Dauntless' but by the time the Ticonderoga was in operations the Dauntless was no longer in front line use on the fleet carriers.
That's it for now.
Cheers all and thanks for looking,
Warren
 |

WEB HOSTING BY


Copyright ©2021 Model Shipwrights and Kitmaker Network, a subsidiary of Silver Star Enterprises
All Rights Reserved. Please read our Conditions of Use and Privacy Policy.
All Rights Reserved. Please read our Conditions of Use and Privacy Policy.