_GOTOBOTTOM
Ships by Class/Type: Battleships
Topics from the Dreadnaught era to modern day.
Hosted by Steve Joyce
1/350 Musashi
melonhead
Visit this Community
Wisconsin, United States
Joined: July 29, 2010
KitMaker: 662 posts
Model Shipwrights: 67 posts
Posted: Saturday, April 20, 2013 - 02:00 PM UTC
Ive started this kit a while back, but I am not even halfway through yet. i figured i should do a build log (first build log) with what i have so far.

The kit is the old Tamiya kit (78016). I really wanted to make this kit PE intensive. problem that you can imaging that i ran into is that there are very few PE kits for this. There is the Eduard kit, but to be quite honest, its an OK PE set and isnt what my thoughts of "intensive". So, i had a couple thoughts of what to use. i wanted to use the Lion Roar set for the Yamato, but had a hard time finding one that was reasonably priced. I did find the Flyhawk set online that was for the newly tooled Yamato. over much debate with myself, i decided to take the risk on using that kit even though it is for the newer kit. I was just hoping that dimensions and whatnot did not drastically change. So far, so good. I have had to make modifications, but nothing extensive.
I also got the Eduard set because it offered some things that the Flyhawk kit did not. Recently, i also received the last of what i needed to be able to be able to get on with the major work. (blue star admiral wood deck set). i bought this wood deck set for the PE landing deck, fore deck PE, etc. I obviously cannot use the Yamato wood deck, but had already purchased the Musashi wood deck previously as well as Brass props.

many of the pics below, still have minor work to do before final cleanup. i have a tendency to get the majority of things done, then move onto the next and do the smaller detail later.

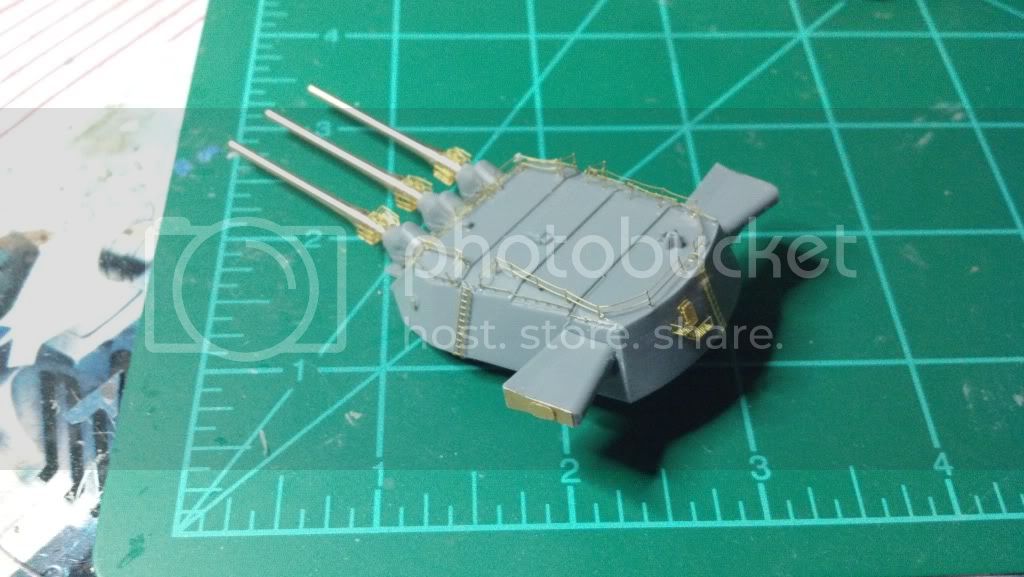
Below, is one of the three turrets that i have completed. For the sake of saving time, i wont post all of them since they are really the same.


tower-


secondary turret


AA guns-


unfinished stack-


rear deck.


catapults/crane


comments/suggestions are always welcome as this is the first ship that i will be completing....im an armor guy!
Gremlin56
Joined: October 30, 2005
KitMaker: 3,897 posts
Model Shipwrights: 3,301 posts
Posted: Saturday, April 20, 2013 - 07:55 PM UTC
Nice choice Jesse, it's usually the Yamato that modellers go for. Nice work on the PE too,
cheers,
Julian
melonhead
Visit this Community
Wisconsin, United States
Joined: July 29, 2010
KitMaker: 662 posts
Model Shipwrights: 67 posts
Posted: Sunday, April 21, 2013 - 06:31 AM UTC
bow plate added.

melonhead
Visit this Community
Wisconsin, United States
Joined: July 29, 2010
KitMaker: 662 posts
Model Shipwrights: 67 posts
Posted: Sunday, April 21, 2013 - 03:08 PM UTC
not necessarily any time in the near future, but at some point, i have to start thinking about applying the wood deck and painting. what is the best way to go about doing it with a wood deck?
my thoughts on the sequence is to think about priming the hull and deck first, then go to paint the red for the bottom half of the waterline, and then apply the wooden deck.Mask the red portion of the hull and the wood deck, then apply final paint.
or, would it be easiest to finish the hull and deck components, then apply the deck? and finish up with the things such as cable reels that need to go on top of the wood deck.

The reason i ask is because i will also have to think about doing the railings as well, but i am all about the easiest and best way. unfortunately, i dont know what that would be.

Should i shave off of raised detail on the plastic deck before applying the wood deck? or does it not effect how well it sticks?

Like i said, im an armor modeler for the most part, so applying such things as wood decks really dont come into play for me much.
TimReynaga
Staff MemberAssociate Editor
MODEL SHIPWRIGHTS
Visit this Community
California, United States
Joined: May 03, 2006
KitMaker: 2,500 posts
Model Shipwrights: 1,830 posts
Posted: Monday, April 22, 2013 - 01:12 AM UTC
Jesse,

I have only used one wood deck so far, so maybe you should take my advice in the light of my relative inexperience, but my recommendation is to apply the decks as late as possible after most of the painting so to avoid any wayward paint getting on your wood deck. Wood is porous and will absorb paint, making it difficult to remove mistakes without damaging the wood detail.

As for removing plastic details, it would seem to be a good idea so to give the adhesive on the wood a more consistent surface to grab onto.

Good luck with it - your Musashi is looking great so far!

Tim
surfsup
Visit this Community
Queensland, Australia
Joined: May 20, 2010
KitMaker: 1,230 posts
Model Shipwrights: 1,212 posts
Posted: Tuesday, April 23, 2013 - 08:16 PM UTC
That is some beautiful work you have done. Interesting to see a Yamato and a Musashi on the slips at the same time.....Cheers mark
melonhead
Visit this Community
Wisconsin, United States
Joined: July 29, 2010
KitMaker: 662 posts
Model Shipwrights: 67 posts
Posted: Wednesday, April 24, 2013 - 05:09 AM UTC

Quoted Text

That is some beautiful work you have done. Interesting to see a Yamato and a Musashi on the slips at the same time.....Cheers mark


Its the resurection of the Japanese fleet!

Looks like we may be on schedule to finish at roughly the same time. Not sure how much work you do, but i get a decent amount of work in a week. been going a couple months as it is. so far, i have a couple months work invested and at least 300$ USD invested for parts and supplies. I, as well as the girlfriend, are looking forward to seeing the finished product. Dont know if i can handle doing anymore ships though. they take too much time, money, and space. However, the fun of building is definately there.
melonhead
Visit this Community
Wisconsin, United States
Joined: July 29, 2010
KitMaker: 662 posts
Model Shipwrights: 67 posts
Posted: Thursday, April 25, 2013 - 04:14 PM UTC
With the rear deck being for the newly tooled yamato, there is going to be some modifications that need to be done to the rear AA turrets.


i will be using the brass sheet as is instead of modifying it to fit around the moulding. so, i will be removing the raised mold that the AA would sit in and "scratchbuilt" something to create what i would be removing. really, i just took some styrene strips and wrapped it around the gun.
surfsup
Visit this Community
Queensland, Australia
Joined: May 20, 2010
KitMaker: 1,230 posts
Model Shipwrights: 1,212 posts
Posted: Thursday, April 25, 2013 - 09:25 PM UTC
Looks like you got yourself a bit of fun to deal with. Watching with interest.....Cheers mark
melonhead
Visit this Community
Wisconsin, United States
Joined: July 29, 2010
KitMaker: 662 posts
Model Shipwrights: 67 posts
Posted: Saturday, April 27, 2013 - 11:34 AM UTC
Raised detail removed.


rear deck applied


gun placement

melonhead
Visit this Community
Wisconsin, United States
Joined: July 29, 2010
KitMaker: 662 posts
Model Shipwrights: 67 posts
Posted: Wednesday, May 29, 2013 - 04:40 PM UTC
Little more work done. very little. i have started to stall on my work. its getting to the point where i need to apply paint, but i want to make sure i have everything done that will be needed before i do.


surfsup
Visit this Community
Queensland, Australia
Joined: May 20, 2010
KitMaker: 1,230 posts
Model Shipwrights: 1,212 posts
Posted: Friday, May 31, 2013 - 04:42 PM UTC
Nice work so far. Looks like you are roughly where I am up to.....Cheers mark
warreni
Visit this Community
South Australia, Australia
Joined: August 14, 2007
KitMaker: 5,926 posts
Model Shipwrights: 2,624 posts
Posted: Friday, May 31, 2013 - 08:50 PM UTC
Looking very nice Sir!
As a wooden deck veteran (done more than 10 now!) I would advise the same as Tim and apply it as late as possible. Paint your deck first, don't try applying it to bare plastic, and then the deck BEFORE you place any superstructure as some decking may go under the superstructure. If there is no decking like that still install at least the first level of the superstructure and make sure it is painted first.
And for some encouragement, here is one I prepared earlier..


Complete with wooden deck!
Cheers mate!
Warren
surfsup
Visit this Community
Queensland, Australia
Joined: May 20, 2010
KitMaker: 1,230 posts
Model Shipwrights: 1,212 posts
Posted: Monday, June 03, 2013 - 10:37 PM UTC
Nice build Warren and some very good and sound Advice.....Cheers mark
melonhead
Visit this Community
Wisconsin, United States
Joined: July 29, 2010
KitMaker: 662 posts
Model Shipwrights: 67 posts
Posted: Monday, June 17, 2013 - 11:46 AM UTC
More guns completed.


coming along very slowly, but surely.
surfsup
Visit this Community
Queensland, Australia
Joined: May 20, 2010
KitMaker: 1,230 posts
Model Shipwrights: 1,212 posts
Posted: Monday, June 17, 2013 - 07:03 PM UTC
Looking very nice indeed.....Cheers mark
melonhead
Visit this Community
Wisconsin, United States
Joined: July 29, 2010
KitMaker: 662 posts
Model Shipwrights: 67 posts
Posted: Sunday, July 21, 2013 - 10:19 AM UTC
ive mainly been busy with doing the small AA guns. So, i dont have much progress to show, but i decided to get the bottom of the hull painted so that i could give it time to set/dry while i am working on other things. then, i can mask it and paint the rest of the hull/deck, once i am ready.


since the old kits lack blast bags, i have also created some of my own with miliput. a little bit of finishing is needed on them, but the pic gives you the idea\
surfsup
Visit this Community
Queensland, Australia
Joined: May 20, 2010
KitMaker: 1,230 posts
Model Shipwrights: 1,212 posts
Posted: Sunday, July 21, 2013 - 08:56 PM UTC
Very nice work my Friend.....Cheers mark
melonhead
Visit this Community
Wisconsin, United States
Joined: July 29, 2010
KitMaker: 662 posts
Model Shipwrights: 67 posts
Posted: Thursday, July 25, 2013 - 05:58 AM UTC
HURRAY! I am so excited. I finally completed the triple AA guns...from my count anyway (20 of them). what a pain! 7 pieces each for somethign that is the fractional size of a penny, for the full size of the gun itself once completed!

Now, onto the single guns. Hopefully, they are a bit easier! ( i am not counting on it!)
melonhead
Visit this Community
Wisconsin, United States
Joined: July 29, 2010
KitMaker: 662 posts
Model Shipwrights: 67 posts
Posted: Tuesday, August 06, 2013 - 05:18 PM UTC
More work done. Much of it is the tedious stuff, but the tedious stuff is practically done.


I did some post shading/highlighting, but doesnt look prominent enough for me, so i may add more. I did a couple things to see how it would turn out. The pictures dont show it much, but it gives an idea.


surfsup
Visit this Community
Queensland, Australia
Joined: May 20, 2010
KitMaker: 1,230 posts
Model Shipwrights: 1,212 posts
Posted: Tuesday, August 06, 2013 - 06:06 PM UTC
Looking very nice. To highlight mine, I painted her a little darker then required and drybrushed her to bring out the details.....Cheers mark
melonhead
Visit this Community
Wisconsin, United States
Joined: July 29, 2010
KitMaker: 662 posts
Model Shipwrights: 67 posts
Posted: Wednesday, August 07, 2013 - 01:48 AM UTC
i still have to do the drybrushing as well. that will be done at the end. it will probably make the post shading more prominent when i do it
melonhead
Visit this Community
Wisconsin, United States
Joined: July 29, 2010
KitMaker: 662 posts
Model Shipwrights: 67 posts
Posted: Thursday, August 08, 2013 - 04:21 PM UTC
crane completed and primed


The main turrets are completed and primed.

scratchmod
Visit this Community
Massachusetts, United States
Joined: November 07, 2008
KitMaker: 796 posts
Model Shipwrights: 13 posts
Posted: Friday, August 09, 2013 - 02:58 AM UTC
wow, I can't believe the amount of detail that is going into this model. The PE all looks awesome, and tiny too.
melonhead
Visit this Community
Wisconsin, United States
Joined: July 29, 2010
KitMaker: 662 posts
Model Shipwrights: 67 posts
Posted: Friday, August 09, 2013 - 06:03 AM UTC
by the time i am done, it will be about 200$ usd worth of PE. 90% of it being a flyhawk set for the new tool yamato, but surprisingly, it is fitting pretty well. the flyhawk set doesnt have enough single AA guns for the deck, so i gotta buy more of those at a later point. i will probably do those very last since i wont need them for a while
 _GOTOTOP