

Hangar bay curtain wall doors are neither water tite nor air tite. They simply keep out inclemant weather when required. Watertite integrity refers to everything from the main deck and below.
EJ
Served aboard USS ESSEX CVS-9


Go to modelshipwrights.com for the current dynamic site!
Hosted by Jim Starkweather
Enterprise vs.Kamikaze!

ejhammer

Joined: June 10, 2008
KitMaker: 230 posts
Model Shipwrights: 136 posts

Posted: Friday, December 20, 2013 - 03:16 AM UTC

TimReynaga
Joined: May 03, 2006
KitMaker: 2,500 posts
Model Shipwrights: 1,830 posts

Posted: Saturday, December 21, 2013 - 09:58 AM UTC
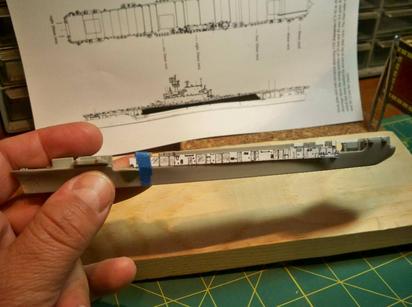
So now that I knew the hangar doors needed to be open I had to do something about those plain solid sides. My first thought was to simply paint the locations of the openings black to suggest open doors, but even in this small scale that would not be very convincing; the doors had to be opened up. To get an idea of the location and size of the doors, I cut out a section of Enterprise plans I had reduced to 1/1200 scale and taped it over the side.
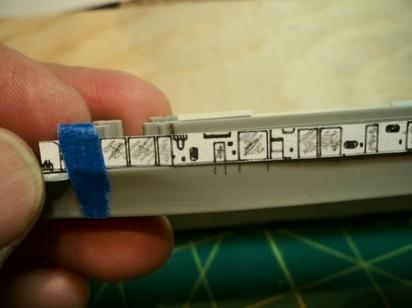
After marking off the locations according to the plans, I cut them out with a hobby knife. Trimming the soft plastic away was easy, the only challenge being to make the openings square and even.
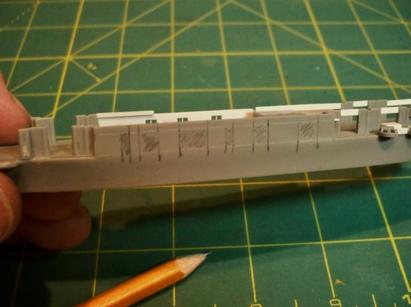
A few of the completed openings were divided off with Evergreen .010 X .020 inch plastic strips to suggest frames for the narrower double roll doors.

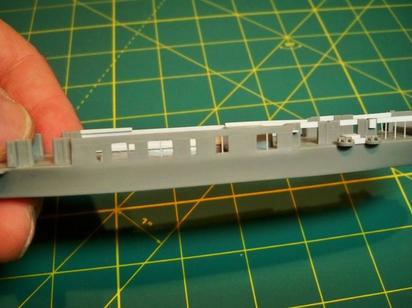
The doors open up into a blank hangar space with no detail, not even a deck but I figure that it is small enough that if I paint the inside flat black nothing much will be visible in there anyway.

After marking off the locations according to the plans, I cut them out with a hobby knife. Trimming the soft plastic away was easy, the only challenge being to make the openings square and even.
A few of the completed openings were divided off with Evergreen .010 X .020 inch plastic strips to suggest frames for the narrower double roll doors.
The doors open up into a blank hangar space with no detail, not even a deck but I figure that it is small enough that if I paint the inside flat black nothing much will be visible in there anyway.

ejhammer
Joined: June 10, 2008
KitMaker: 230 posts
Model Shipwrights: 136 posts
Posted: Saturday, December 21, 2013 - 01:58 PM UTC
When I did my 1/700 ESSEX hasegawa, it too had no hangar deck so I scratchbuilt one. That way I could park a few planes near some of the open doors. I also lighted the interior with grain of rice size bulbs. Took some time, but the extra effort was worth it. I used some styrene sheets that looked like mini corrugated roofing to fabricate some of the doors with, as many times some doors were closed, some open and some in various positions in between. Mostly for ventilation, as the hangar bay gets very nasty when they test fire those gasoline engines on the old aircraft in there. Just some ideas.


EJ


EJ
TimReynaga
Joined: May 03, 2006
KitMaker: 2,500 posts
Model Shipwrights: 1,830 posts
Posted: Saturday, December 21, 2013 - 03:33 PM UTC
Nice work, EJ! Ive never seen an illuminated hangar on a 1/700 carrier before. Have to try that some time, but this go around I dont have time hoping to finish by Jan 1st for the Enterprise Campaign!
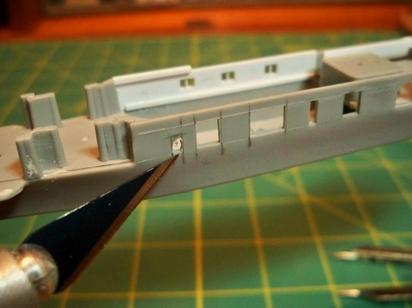
Continuing with my more humble hangar... a nice aspect of this kit is that the aft hangar deck is shown open. The kit detailing around the doors is a little rough, but it was easy enough to dress up the outside a little with sheet plastic.
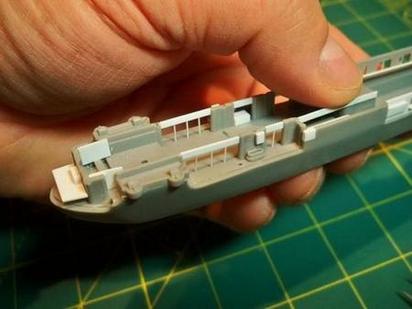
This area was filled with stowed TBM Avenger aircraft at the time of the May 14, 1945 Kamikaze strike. Maybe Ill put some planes in there before I seal things up, although the view inside will be pretty dim once the flight deck is in place.
Continuing with my more humble hangar... a nice aspect of this kit is that the aft hangar deck is shown open. The kit detailing around the doors is a little rough, but it was easy enough to dress up the outside a little with sheet plastic.
This area was filled with stowed TBM Avenger aircraft at the time of the May 14, 1945 Kamikaze strike. Maybe Ill put some planes in there before I seal things up, although the view inside will be pretty dim once the flight deck is in place.

CaptSonghouse
Joined: August 08, 2008
KitMaker: 1,274 posts
Model Shipwrights: 1,236 posts

Posted: Tuesday, December 24, 2013 - 07:50 AM UTC
That's marvelous work on that Essex, EJ, and you are really making the tiny Revell look like the Enterprise, Tim!
--Karl
--Karl
ejhammer
Joined: June 10, 2008
KitMaker: 230 posts
Model Shipwrights: 136 posts
Posted: Tuesday, December 24, 2013 - 09:00 AM UTC
That teeny bird farm is coming together nicely.
At 72 years old, 1/700 is my limit. I'm graduating up to my first 1/350 next, another ESSEX of course.
EJ
At 72 years old, 1/700 is my limit. I'm graduating up to my first 1/350 next, another ESSEX of course.
EJ
TimReynaga
Joined: May 03, 2006
KitMaker: 2,500 posts
Model Shipwrights: 1,830 posts
Posted: Tuesday, December 31, 2013 - 12:07 PM UTC
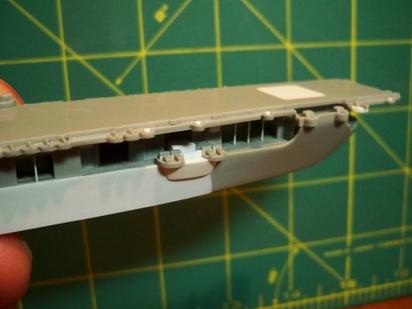
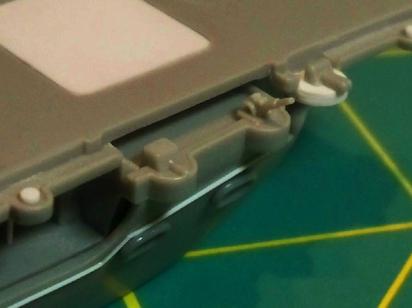
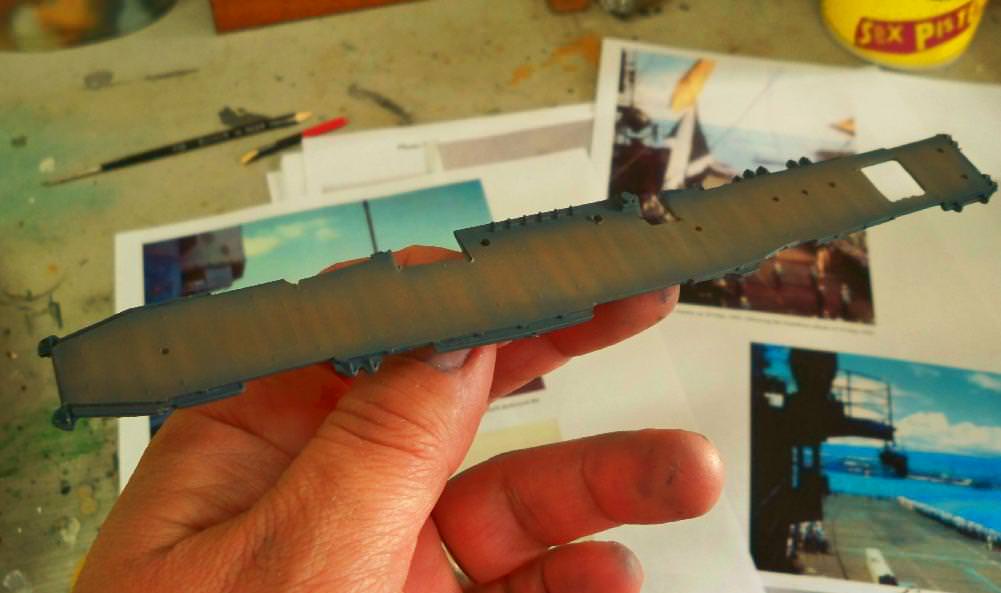
Among the features distinctive to Enterprise among her sisters were the anti-torpedo bulges added during her July-October 1943 refit. These must have been a huge project for the shipyard, but both sisters Yorktown and Hornet had been sunk by Japanese torpedoes the previous year, so it was no wonder that the Navy felt the need to beef up the torpedo defenses on Enterprise!
The bulges extended from nearly the keel through the hangar deck level on both sides. I simulated these on the model using .010 inch Evergreen plastic sheet. The stark white sections seem pretty conspicuous at the moment, but they should blend more smoothly into the hull once I get her painted up.
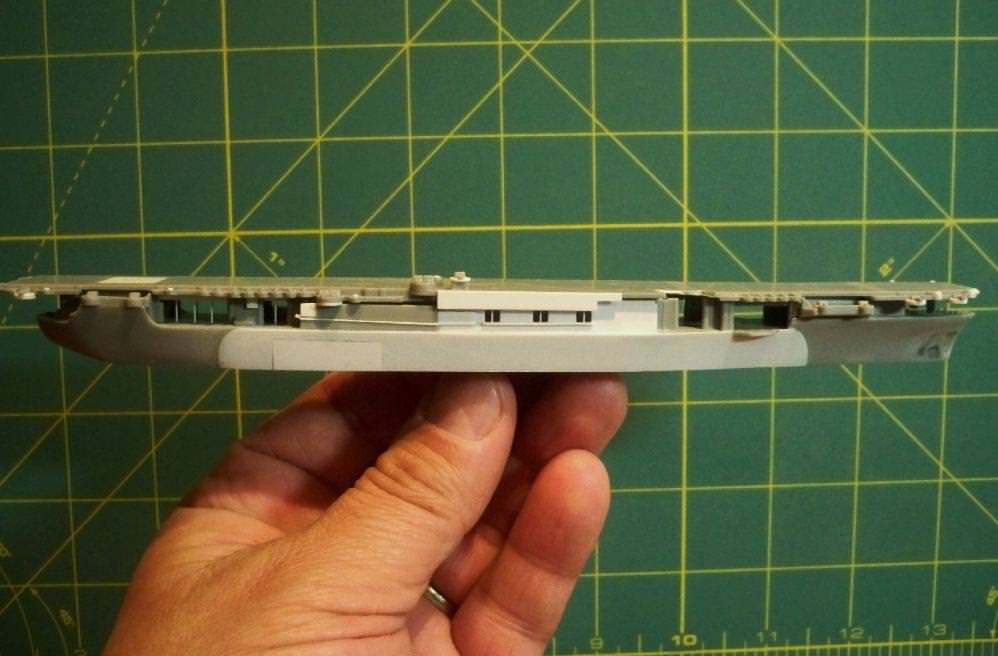
By the way, the little rectangular section on the port quarter in the photograph that looks like a patch is, in fact, a patch. I made a basic modeling mistake by applying too much cement in bonding the thin plastic to the hull, and after a few hours that spot started to melt from the excess cement underneath eating through! This was really irritating, especially as I have made this mistake before on other projects. I carved out the collapsing section and applied the patch. Lesson re-learned!
I also added the distinctive fairing underneath the port quarter 40mm quads (installed during the 1943 refit) and the small clipping room behind them on the main deck level.
Being New Year's Eve already, it looks like I won't be making the January 1 completion deadline for the Enterprise campaign. Still having fun with it though, hope to get some more done before the drinking starts tonight!
The bulges extended from nearly the keel through the hangar deck level on both sides. I simulated these on the model using .010 inch Evergreen plastic sheet. The stark white sections seem pretty conspicuous at the moment, but they should blend more smoothly into the hull once I get her painted up.
By the way, the little rectangular section on the port quarter in the photograph that looks like a patch is, in fact, a patch. I made a basic modeling mistake by applying too much cement in bonding the thin plastic to the hull, and after a few hours that spot started to melt from the excess cement underneath eating through! This was really irritating, especially as I have made this mistake before on other projects. I carved out the collapsing section and applied the patch. Lesson re-learned!
I also added the distinctive fairing underneath the port quarter 40mm quads (installed during the 1943 refit) and the small clipping room behind them on the main deck level.
Being New Year's Eve already, it looks like I won't be making the January 1 completion deadline for the Enterprise campaign. Still having fun with it though, hope to get some more done before the drinking starts tonight!

vonHengest
Joined: June 29, 2010
KitMaker: 5,854 posts
Model Shipwrights: 350 posts

Posted: Tuesday, December 31, 2013 - 03:04 PM UTC
Nice work Tim, you guys are reminding me why I love flattops 
Although I think I'm staying away from 1/700 for a while...
Although I think I'm staying away from 1/700 for a while...
TimReynaga
Joined: May 03, 2006
KitMaker: 2,500 posts
Model Shipwrights: 1,830 posts
Posted: Wednesday, January 01, 2014 - 07:01 AM UTC
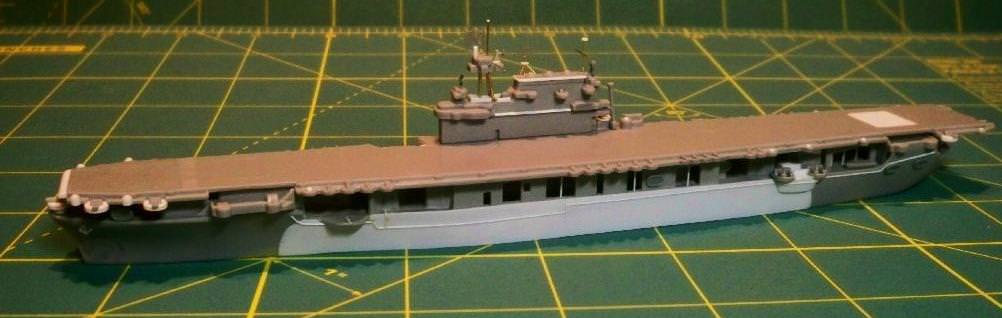
After the anti-torpedo blisters were complete I added exterior aviation gasoline (avgas) lines from .010 inch round rod (Plastruct #90850). The large liferafts were, appropriately, scavenged from an old 1970s 1/700 scale Tamiya Enterprise. They were originally intended to represent in 1/700 scale the smaller type rafts carried by the ship earlier in the war.

The rafts are slightly oversized for 1/1200 and should really be the more rectangular type, but they actually stand in pretty well for the extra large units carried by the Big E in 1945.

The rafts are slightly oversized for 1/1200 and should really be the more rectangular type, but they actually stand in pretty well for the extra large units carried by the Big E in 1945.
TimReynaga
Joined: May 03, 2006
KitMaker: 2,500 posts
Model Shipwrights: 1,830 posts
Posted: Friday, January 03, 2014 - 02:06 AM UTC
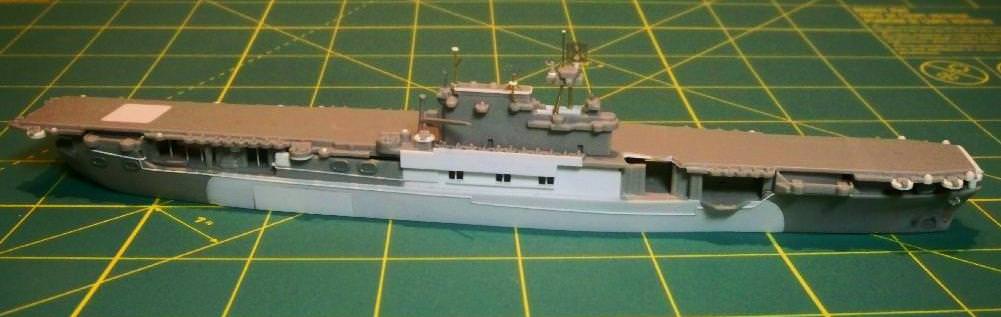
The bow twin 40mm mount and director were built up like the others with Evergreen plastic tubs and guns adapted from the kit 40mm quads. I initially mounted the gun squarely amidships, but later corrected it as I realized from photos that the gun mounting was actually offset slightly left of the centerline with the Mk. 51 director alongside. The anchors were cruiser or destroyer size parts from Pit Roads 1/700 scale Equipment for Japan Navy ShipWW2 (III) set.

As with the 40mm guns, the eight larger 5 inch guns supplied in the kit are very simplified. Molded integrally with the hangar decks, the open 5 inch/38cal mounts are represented as tiny square turrets with undersized barrels not very convincing, even in this small scale! So I upgraded them a bit by shaving the turrets down to the splinter shield level (to form the gun mount bases) and replacing the guns themselves with 1/700 scale 20mm Oerlikons left over from a Pit Road Cleveland class cruiser I built a while back.
The improved 5 inchers are still very basic and not all that accurate, but at least they now look a little more like guns!
TimReynaga
Joined: May 03, 2006
KitMaker: 2,500 posts
Model Shipwrights: 1,830 posts
Posted: Saturday, January 04, 2014 - 05:05 PM UTC
The island received new brass masts, yards, and tripod supports for the tower. Stainless steel photoetch radars were adapted from an older Gold Medal Models 1/700 scale USN Cruiser/Destroyer set. Although excellent, older (in this case early 1990s) photoetch sets were not quite as finely etched as they are today, which actually works better alongside the clunky detail on this very basic Enterprise.
A 1/700 scale cruiser SC radar stands in for the larger SK unit atop the tower, a 1/700 scale SC was trimmed down to represent Enterprises SC-2, and the Mk. 12 control radars atop the Mk. 37 directors were cut down from spare photoetch mesh.
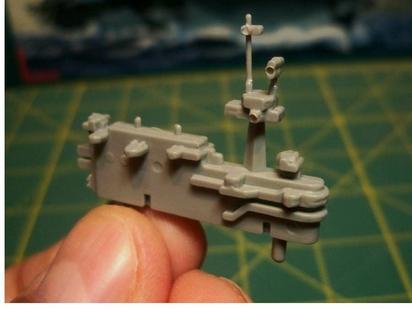

Though not precisely correct in size, the radars from the smaller ship types in 1/700 scale still work well for a 1/1200 scale carrier.

A 1/700 scale cruiser SC radar stands in for the larger SK unit atop the tower, a 1/700 scale SC was trimmed down to represent Enterprises SC-2, and the Mk. 12 control radars atop the Mk. 37 directors were cut down from spare photoetch mesh.
Though not precisely correct in size, the radars from the smaller ship types in 1/700 scale still work well for a 1/1200 scale carrier.

Gremlin56
Joined: October 30, 2005
KitMaker: 3,897 posts
Model Shipwrights: 3,301 posts
KitMaker: 3,897 posts
Model Shipwrights: 3,301 posts
Posted: Saturday, January 04, 2014 - 08:14 PM UTC
That is turning into another amazing build Tim,great work on the hull and hanger openings. Have you considered replacing the gun barrels with brass rod? Albion Alloys makes extremely fine rod and tubes that could be used.
Cheers,
Julian
Nice banner too by the way
Cheers,
Julian
Nice banner too by the way
TimReynaga
Joined: May 03, 2006
KitMaker: 2,500 posts
Model Shipwrights: 1,830 posts
Posted: Monday, January 06, 2014 - 01:28 AM UTC
Thanks, Julian. You know, being the compulsive modeler that I am, I actually did consider replacing the barrels on the 5 inchers with brass (and I have some Albion tubes on hand too!), but I had resolved to keep the kit alterations on this project to a minimum. Also, at about 3mm in length the barrels would be barely visible anyway! Although now that you mention it, I could just hollow out the muzzle ends...
Aside from that, the model is ready for paint!
Aside from that, the model is ready for paint!

RussellE

#306

Joined: June 27, 2010
KitMaker: 3,959 posts
Model Shipwrights: 2,777 posts
Posted: Friday, January 10, 2014 - 07:10 PM UTC
Wow Tim! Great work as always!
This really is miniature, and way beyond what i'd cope with... 1/350 is my minimum, 1/700 is a true struggle for me and i think 1/1200 would just about tip me over the edge (or is that, etch? )
)
This really is miniature, and way beyond what i'd cope with... 1/350 is my minimum, 1/700 is a true struggle for me and i think 1/1200 would just about tip me over the edge (or is that, etch?
)
TimReynaga
Joined: May 03, 2006
KitMaker: 2,500 posts
Model Shipwrights: 1,830 posts
Posted: Sunday, January 12, 2014 - 03:41 AM UTC
Thanks, Russell, but this little bird farm is no smaller than, say, a 1/700 scale destroyer. It isnt very big, but I find that the larger the scale, the more detail is needed for the same impact so 1/1200 scale build can actually in some ways be easier than 1/350!
The last detail to build before painting was the shattered forward elevator at the top of the explosion plume. I made this from.010 inch plastic sheet following the shape in the photograph. The underside of the piece was adorned with a simple support girder framework made from .010 X .010 inch strip.

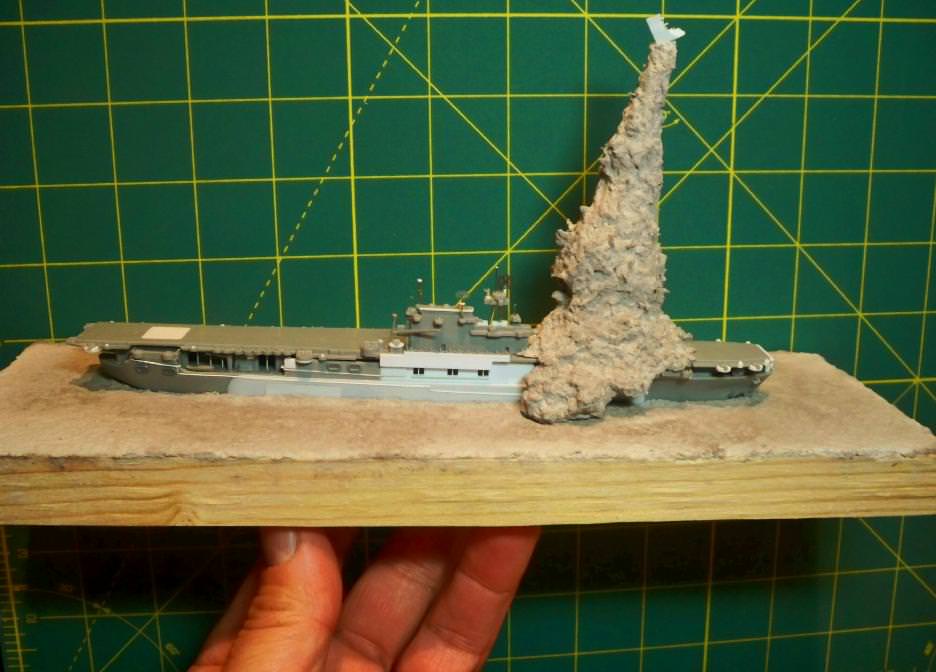
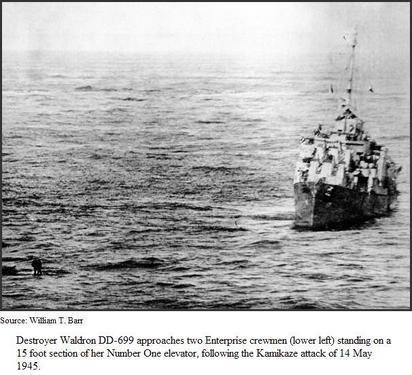
The force of the explosion blew several crewmen off the ship and tore the elevator apart, sending it an amazing 400 feet in the air. More amazing still is that the Enterprises forward elevator still had one final function to perform after it fell into the sea:
Pretty cool!
The last detail to build before painting was the shattered forward elevator at the top of the explosion plume. I made this from.010 inch plastic sheet following the shape in the photograph. The underside of the piece was adorned with a simple support girder framework made from .010 X .010 inch strip.
The force of the explosion blew several crewmen off the ship and tore the elevator apart, sending it an amazing 400 feet in the air. More amazing still is that the Enterprises forward elevator still had one final function to perform after it fell into the sea:
Pretty cool!
CaptSonghouse
Joined: August 08, 2008
KitMaker: 1,274 posts
Model Shipwrights: 1,236 posts
Posted: Tuesday, January 14, 2014 - 11:06 AM UTC
This project's really taking shape, Tim! I can't wait to see how the coloring works! 
--Karl
--Karl

Aurora-7
#360
Joined: June 18, 2003
KitMaker: 1,020 posts
Model Shipwrights: 630 posts

Posted: Friday, January 17, 2014 - 03:27 AM UTC
What you've done so far is outstanding.
love the smoke plume work.
love the smoke plume work.

TimReynaga
Joined: May 03, 2006
KitMaker: 2,500 posts
Model Shipwrights: 1,830 posts
Posted: Saturday, January 18, 2014 - 08:05 AM UTC
Thanks guys. Now to get those colors on... at least as soon as I figure out just what they were..!
Enterprises paint scheme when she was hit on 14 May 1945 was the U.S. Navys so-called Measure 21 which, according to Ships-2 Rev. 2 issued June 1942, consisted of:
Navy Blue 5-N on all vertical surfaces
Deck Blue 20-B on horizontal surfaces
Flight Deck Stain 21 for wood decks on carriers
This seems pretty straightforward, right? Well...
On 26 February 1945 the Navy Bureau of Ships in Washington D.C. issued a revised Camouflage Instructions - Carriers, Cruisers, Destroyers, Destroyer Escorts, Assigned to the Pacific Fleet. C-S19-7(631) which changed this Measure 21 Navy Blue System to the Measure 21 (1945 Revision) Navy Gray System:
"Vertical Surfaces: #7 Navy Gray (5-N) to all vertical surfaces without exception.
Horizontal Surfaces: Deck Gray (20B) to all deck and other horizontal surfaces.
Notes: It should be noted that #7 Navy Gray has been substituted for Navy Blue retaining the same designation (5-N), and Deck Gray (20) has been substituted for Deck Blue (20-B). Countershading is no longer authorized."
The change was apparently not intended as any new concept in camouflage but reflected a shortage at the time of the 5-TM blue-black tinting material required for the Measure 21 navy blue system the new colors were basically very similar to the existing Measure 21 but more gray. Nor did the Navy seem in any particular rush to make the changeover; the instructions provided for, the application of camouflage as outlined above subject to the approval of the authority granting availability for vessels in service, and for application to new construction where no delay in completion will be involved."
At the time when the instructions were issued 26 Feb 1945, Enterprise was mostly at sea, deeply involved in the intense operations leading up to the anticipated final invasion of Japan. Reviewing the Enterprises yard record around this time, she spent two days at the advance base at Ulithi Atoll in early March 1945, 10 days at Ulithi in late March/Early April to repair extensive 20 March friendly fire damage, and 3 weeks at Ulithi to repair damage from two 11 April Kamikazes. She sortied again on 3 May 1945 and was at sea until the 14 May Kamikaze hit that put her out of the war for good.
So as I prepare to paint the model the question is: was Enterprise completely repainted during those emergency repair periods in the new Measure 21 Navy Gray System, or did she still retain the old Navy Blue Measure 21?
RussellE
#306
Joined: June 27, 2010
KitMaker: 3,959 posts
Model Shipwrights: 2,777 posts
Posted: Saturday, January 18, 2014 - 03:27 PM UTC
Quoted Text
Thanks, Russell, but this little bird farm is no smaller than, say, a 1/700 scale destroyer. It isnt very big, but I find that the larger the scale, the more detail is needed for the same impact so 1/1200 scale build can actually in some ways be easier than 1/350!
I see what you mean, Tim: The larger the scale, the more detail required... no wonder we modelers are all a little on the bonkers side
Gremlin56
Joined: October 30, 2005
KitMaker: 3,897 posts
Model Shipwrights: 3,301 posts
KitMaker: 3,897 posts
Model Shipwrights: 3,301 posts
Posted: Sunday, January 19, 2014 - 12:05 AM UTC
Stunning job in this scale Tim, I am expecting Tracy to come out of his "Holding pattern"to give some advice on the paint scheme any time now

1.90E_31
Joined: December 24, 2004
KitMaker: 252 posts
Model Shipwrights: 89 posts

Posted: Sunday, January 19, 2014 - 07:38 AM UTC
Tim,
Enterprise returned to Pearl Harbor on 6 DEC 44 to be refitted into a night carrier. That was when Measure 33/4AB was painted out with Measure 21. She left 24 DEC 44 and didn't see a yard period until after the kamikaze strike. Her Measure 21 would most likely have used the standard 5-N of the time of the refit. That October 1945 picture more than likely shows the new 5-n color.
Jon
TimReynaga
Joined: May 03, 2006
KitMaker: 2,500 posts
Model Shipwrights: 1,830 posts
Posted: Friday, January 24, 2014 - 05:34 PM UTC
Quoted Text
Tim,
Enterprise returned to Pearl Harbor on 6 DEC 44 to be refitted into a night carrier. That was when Measure 33/4AB was painted out with Measure 21. She left 24 DEC 44 and didn't see a yard period until after the kamikaze strike. Her Measure 21 would most likely have used the standard 5-N of the time of the refit. That October 1945 picture more than likely shows the new 5-n color.
Jon
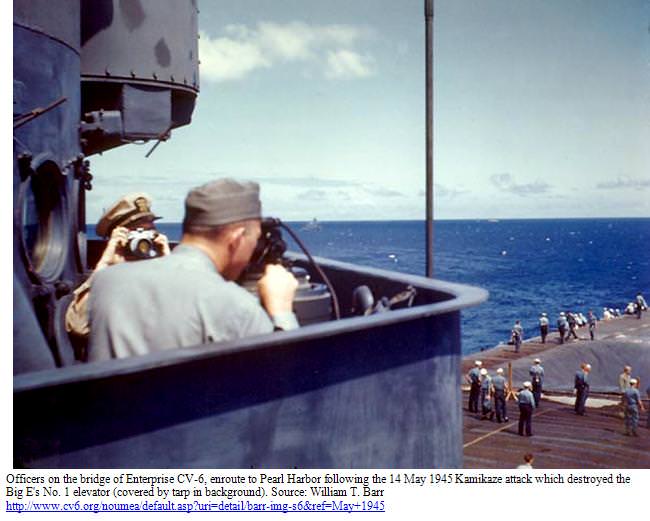
I agree, Jon; Enterprises paintwork looks pretty patchy in the few existing photographs from around May 1945. In the color photo below, Enterprises bridge appears to be in 5-N Navy Blue, and the chalked appearance of the paintwork shows that it was not a fresh application certainly applied before the 26 February 1945 revised camouflage instructions that were issued less than a month before, anyway. Ill go with the idea that the guys at Ulithi were in a hurry to get the Big E back in action and didnt take the extra time to repaint her in the newly released 1945 Revision Measure 21 Navy Gray System. So the model will be painted up in a weathered Navy Blue 5-N.
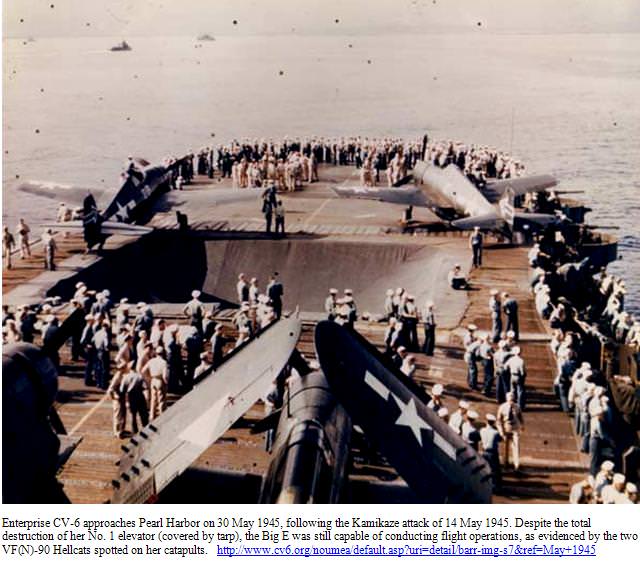
Now a second question: what color was the flight deck? Officially the wooden flight deck should have been Flight Deck Stain 21, a shade close to the 5-N of the hull and superstructure. However, in keeping with the idea that her busy combat schedule had precluded careful maintenance, how weathered was it? The following photographs, taken in the days and weeks after the attack, seem to show the blue stain almost completely weathered away:


Heres another image, this one a capture from a movie that was shot moments after the 14 May attack showing sailors evacuating a casualty:

It is hard to know how much to trust reproductions of old color photographs or movie captures, but comparison of the deck color with the dark blue denim trousers and the lighter blue shambray shirts on the sailors suggests that the originally blue-stained deck had weathered to a mostly brown color.
Based on the photographic evidence, I decided to experiment with a weathered wood look. Rather than a sharp line where the wood ends and the steel decks begin, I wanted to try for a more splotchy, worn appearance. Making use of the spare flight deck I had previously scavenged for 20mm gallery parts, I airbrushed a pattern of Model Master French Earth Brown enamel over White Ensign Models blue. I shot it in a light, uneven cloud pattern to simulate large areas where the stain has worn down.
I need to mess with it a bit more before trying it on the model, but it looks promising!
1.90E_31
Joined: December 24, 2004
KitMaker: 252 posts
Model Shipwrights: 89 posts
Posted: Saturday, January 25, 2014 - 05:05 AM UTC
It definitely was Stain 21, but since it's on wood, it should wear away after six months of operations to what you have there. My dad's photos of Essex in 1952-53 show the flight deck well worn with the tie down strip looking more Stain 21 while the wood looking more of a grey-brown tint. These photos are scanned from the original 35mm slide, so the color shifting should be a lot less than the commercial scans you found (especially the blue shift in the first two):


Douglas Fir weathers more to the grey side than the warm brown you're using. My suggestion would be less brown and more grey.
Jon
Douglas Fir weathers more to the grey side than the warm brown you're using. My suggestion would be less brown and more grey.
Jon
TimReynaga
Joined: May 03, 2006
KitMaker: 2,500 posts
Model Shipwrights: 1,830 posts
Posted: Sunday, January 26, 2014 - 04:08 AM UTC
Quoted Text
...Douglas Fir weathers more to the grey side than the warm brown you're using. My suggestion would be less brown and more grey.
Jon
Thanks for the advice, Jon, and thanks for the great pics! You are probably right about a more greyish brown being closer to the mark. I'll give it a try this weekend.

RussellE
#306
Joined: June 27, 2010
KitMaker: 3,959 posts
Model Shipwrights: 2,777 posts
Posted: Thursday, April 24, 2014 - 11:23 PM UTC
Hi Tim!
any progress on your build of late?
any progress on your build of late?
 |

WEB HOSTING BY


Copyright ©2021 Model Shipwrights and Kitmaker Network, a subsidiary of Silver Star Enterprises
All Rights Reserved. Please read our Conditions of Use and Privacy Policy.
All Rights Reserved. Please read our Conditions of Use and Privacy Policy.