

I still can not believe it' stour finger under the aircraft....what you are doing to this little things is just amazing, absolutely fantastic!!
Great work on the flight deck and the lines as well - I always need to force myself into believing that tis is 1/1250 scale!!
Jan


Go to modelshipwrights.com for the current dynamic site!
Hosted by Jim Starkweather
Enterprise vs.Kamikaze!

JJ1973

#345

Joined: August 22, 2011
KitMaker: 1,835 posts
Model Shipwrights: 1,832 posts

Posted: Wednesday, June 04, 2014 - 04:35 PM UTC

TimReynaga

Joined: May 03, 2006
KitMaker: 2,500 posts
Model Shipwrights: 1,830 posts
Posted: Friday, June 06, 2014 - 01:30 AM UTC
Thanks, Jan! You're right, these things are so small they are a bit hard to handle, but I liked the look of the airplanes in the hangar so much I ended up adding a fourth. This plane (the angled one forward) is an HR Products TBM in 1/1200 scale. I had done it as a test piece before completing the nicer, more expensive Neptun planes.
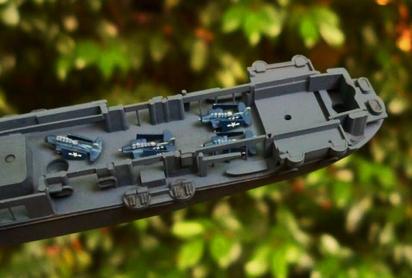
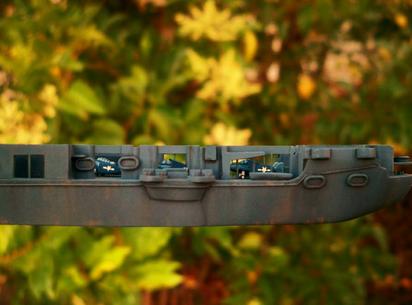
The HR Products planes are not nearly as good as Neptun, but painted up and placed in a dark corner of the hangar it is hard to see the difference!

The HR Products planes are not nearly as good as Neptun, but painted up and placed in a dark corner of the hangar it is hard to see the difference!

TimReynaga
Joined: May 03, 2006
KitMaker: 2,500 posts
Model Shipwrights: 1,830 posts
Posted: Wednesday, June 11, 2014 - 03:49 AM UTC
Ive been striving to keep this project simple (especially after the diversion of all those stowed aircraft), but theres one further element I thought would be worthwhile to add to the ship a national ensign. The flag is a decal from an old 1/700 Skywave subchaser kit.
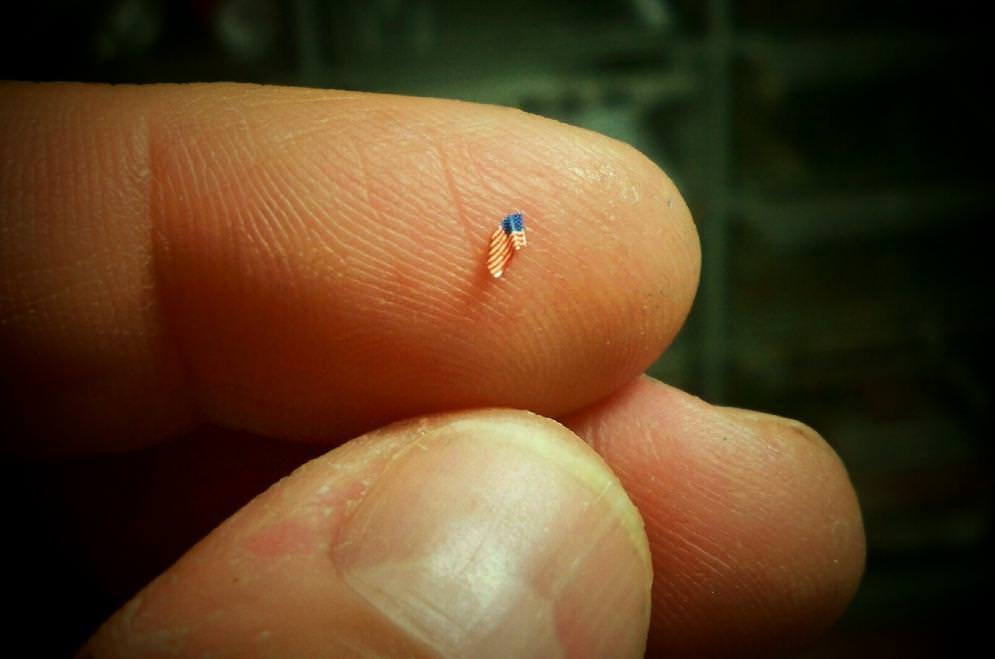
To form the waving flag, I first fixed the decal around a piece of aluminum kitchen foil with polyvinyl acetate (Elmers) white glue thinned with water. After a couple of minutes, when the glue was secure but still flexible, the excess foil was trimmed away to leave a tiny decal/foil/decal sandwich. I then set the waving in the wind pattern of undulations on the flag by carefully rolling a bit of wire over it. The ensign was mounted to a line on the angled yard abaft the funnel, and the exposed silver foil edges were touched up with red and blue paint.
Unfortunately my initial attempt above, although attractive, looked too placid; Enterprise was running for her life at high speed when the Kamikaze caught up with her, and the flag would have been snapping smartly astern so I took it off and re-formed it to reflect this.

Remounted on the mainmast, the tiny 2 X 3 millimeter ensign isnt all that prominent, but I hope it will help in its small way to forward the dramatic action of the scene.
To form the waving flag, I first fixed the decal around a piece of aluminum kitchen foil with polyvinyl acetate (Elmers) white glue thinned with water. After a couple of minutes, when the glue was secure but still flexible, the excess foil was trimmed away to leave a tiny decal/foil/decal sandwich. I then set the waving in the wind pattern of undulations on the flag by carefully rolling a bit of wire over it. The ensign was mounted to a line on the angled yard abaft the funnel, and the exposed silver foil edges were touched up with red and blue paint.
Unfortunately my initial attempt above, although attractive, looked too placid; Enterprise was running for her life at high speed when the Kamikaze caught up with her, and the flag would have been snapping smartly astern so I took it off and re-formed it to reflect this.
Remounted on the mainmast, the tiny 2 X 3 millimeter ensign isnt all that prominent, but I hope it will help in its small way to forward the dramatic action of the scene.
TimReynaga
Joined: May 03, 2006
KitMaker: 2,500 posts
Model Shipwrights: 1,830 posts
Posted: Wednesday, June 18, 2014 - 01:10 PM UTC
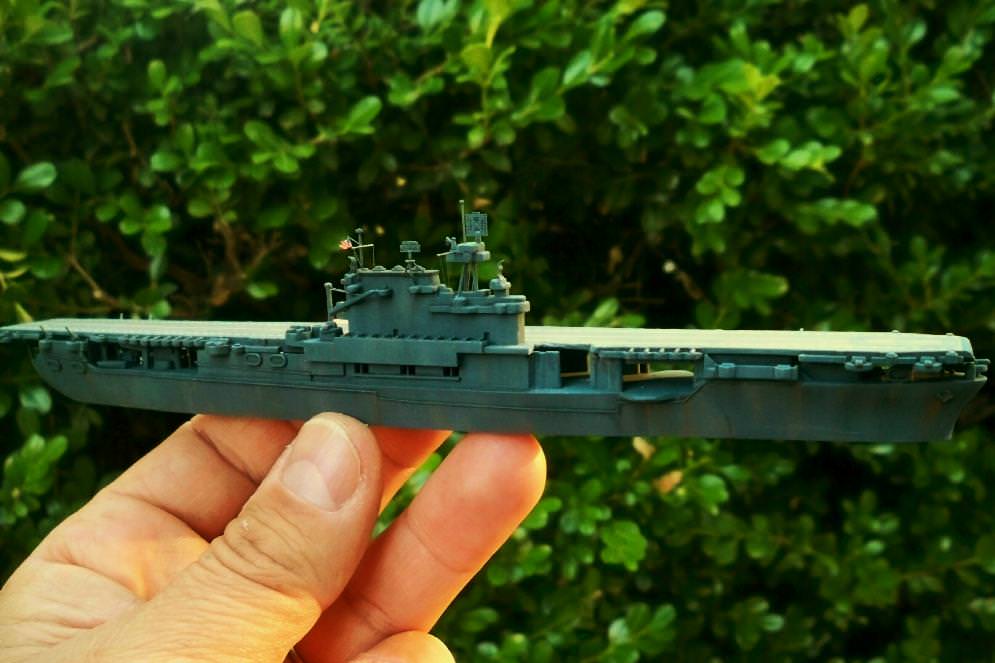
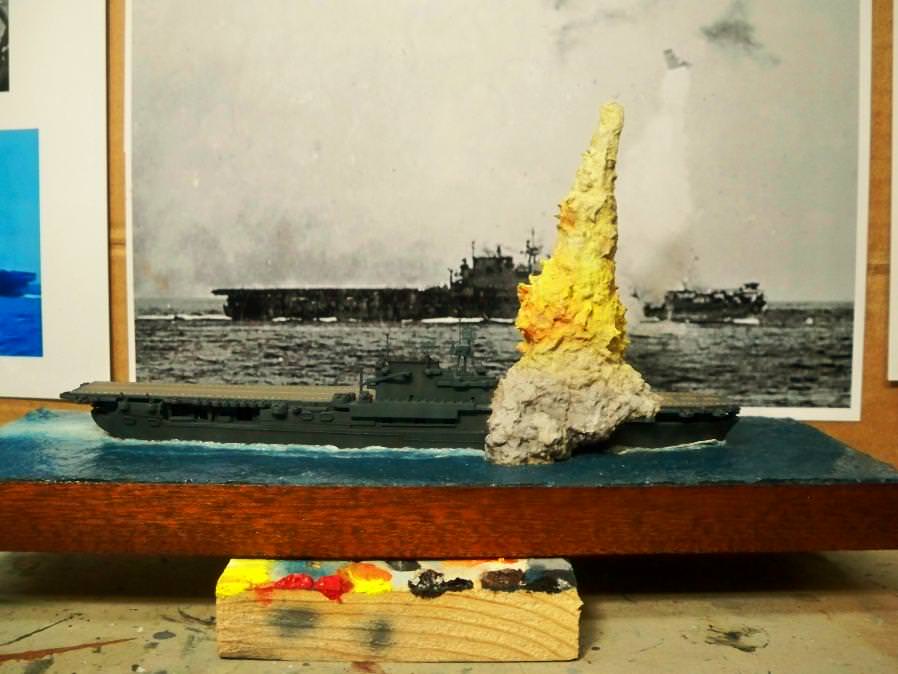
With the TBMs secured in the hangar and the flag and some basic rigging taken care of, I attached the flight deck, island, crane, and the 5 inch guns. The ship is now more or less complete and ready to be placed in its Celluclay sea.

RussellE
#306

Joined: June 27, 2010
KitMaker: 3,959 posts
Model Shipwrights: 2,777 posts
Posted: Wednesday, June 18, 2014 - 11:12 PM UTC
Good stuff Tim.
Looking forward to see how the diorama comes together...
Looking forward to see how the diorama comes together...

TimReynaga
Joined: May 03, 2006
KitMaker: 2,500 posts
Model Shipwrights: 1,830 posts
Posted: Friday, June 20, 2014 - 01:08 AM UTC
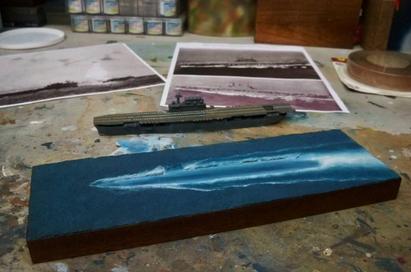
Getting ready to paint up the ocean, I took another look at my references. According to Enterprise's 3-16 May 1945 Action Report, the weather off Kyushu on 14 May 1945 was, Partly cloudy with two to three tenths cumulus at 3000 feet, and four to five tenths high clouds above 14,000 feet. Ceiling 3000 to unlimited in breaks. Visibility 8 to 12 miles. Surface winds southwesterly to southerly 15 knots. The 15 knot (17.3 MPH) winds might be expected to have caused some sea turbulence, but photos taken at the time of the actual explosion and in the minutes after show a rather calm sea with only a gentle swell and no visible whitecaps. Perhaps the official report recorded conditions at some other point in the day? I decided to follow the pictures and tried to depict the sea state they showed, starting with a mix of Model Master Blue Angel Blue (FS 15950) with a little Testors 1171 Beret Green added.
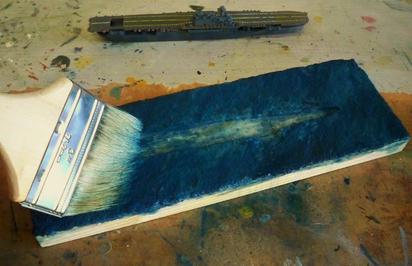
I then blended some white into the still drying blue to make a start on the wake. The ship was entering a port turn when she was hit, so I curved the wake and heeled the ship slightly to reflect this. Heres how it looks so far (with my trusty test hulk standing in for Enterprise):

I then blended some white into the still drying blue to make a start on the wake. The ship was entering a port turn when she was hit, so I curved the wake and heeled the ship slightly to reflect this. Heres how it looks so far (with my trusty test hulk standing in for Enterprise):
TimReynaga
Joined: May 03, 2006
KitMaker: 2,500 posts
Model Shipwrights: 1,830 posts
Posted: Saturday, June 21, 2014 - 12:38 AM UTC
Before continuing with the wake, I wanted to improve the edges of the wood base. The piece of old pine board I had used was pretty ugly (and the spillover of blue paint didnt help!), so I applied some iron-on mahogany wood veneer edging to neaten things up. The veneer comes pre-glued and bonds to the wood with the heat from a clothing iron. I love this stuff; it literally takes just seconds to transform a rough chunk of scrap into a nice looking display board.
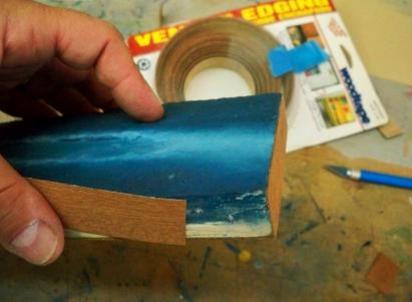
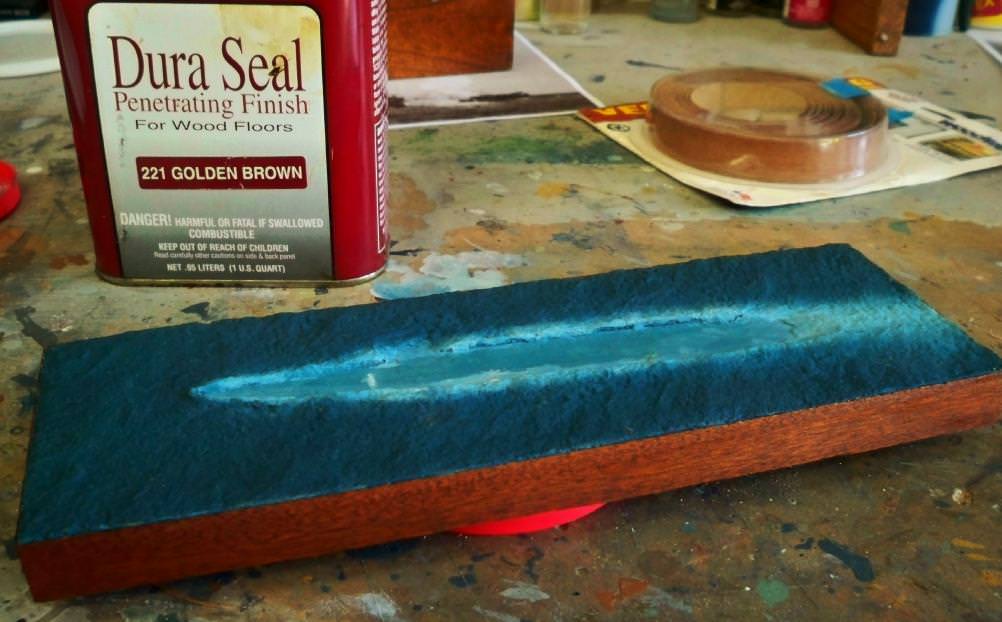
Stained and varnished, the veneer makes things look much better.
Stained and varnished, the veneer makes things look much better.
TimReynaga
Joined: May 03, 2006
KitMaker: 2,500 posts
Model Shipwrights: 1,830 posts
Posted: Tuesday, July 01, 2014 - 02:03 PM UTC
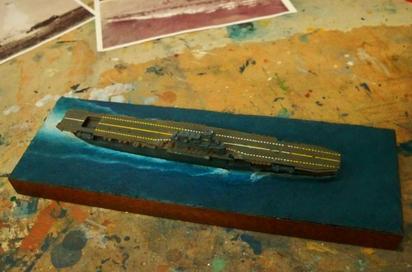
With a little more work done on the wake, the ocean base is now just about ready for the ship.
TimReynaga
Joined: May 03, 2006
KitMaker: 2,500 posts
Model Shipwrights: 1,830 posts
Posted: Friday, July 04, 2014 - 08:40 AM UTC
After adding some more white to the wake, I applied a couple of coats of Varathane water-based polyurethane high gloss varnish to the sea. Then the model was attached to it using Liquitex Gloss Heavy Gel Medium.
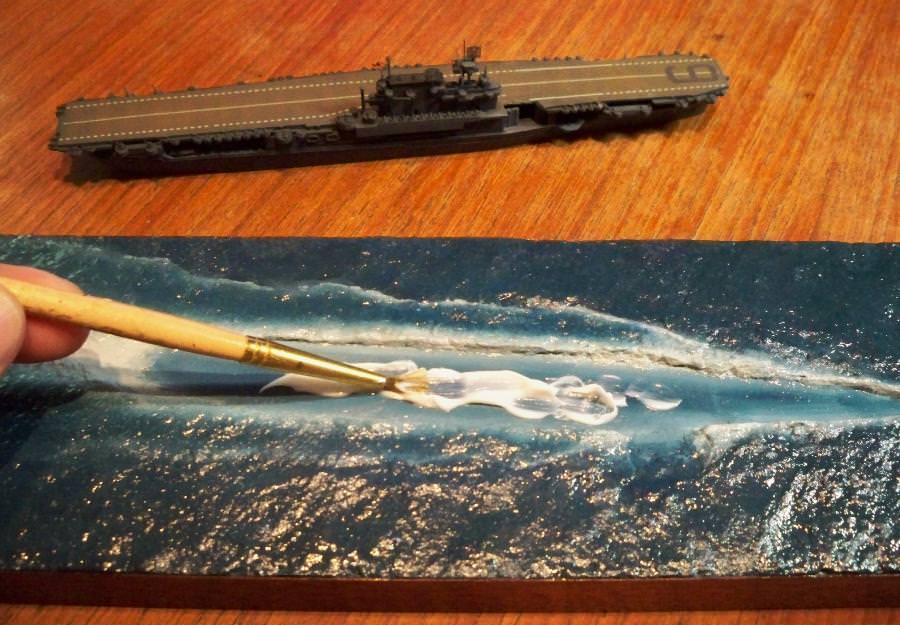

Liberally applied under the ship, the excess gel forced out along the sides when the model was placed in it sealed the ship in place and filled in the gap between the hull and the sea.
To give Enterprise a bone in her teeth, I made some simple bow waves from .010 inch plastic sheet. Each of these was formed around a paintbrush handle to give it a curl and then set in place with a dab of clear acrylic gel medium.

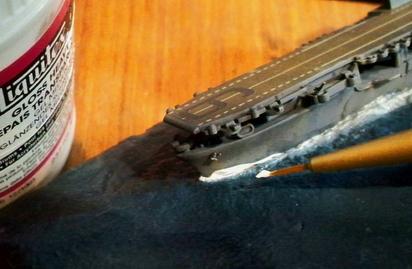
A little more gel with some white acrylic paint mixed in served to bulk the waves out and integrate them into the rest of the wake.


Today is the Fourth of July - Independence Day here in the U.S., so no more modeling for me today. Its time to do my duty as an American and drink too much Jack Daniels Tennessee sour mash, burn some meat on a wobbly outdoor grill, and watch my family scatter as I ignite dangerously unstable pyrotechnics in our back yard.
Happy Birthday America!

Liberally applied under the ship, the excess gel forced out along the sides when the model was placed in it sealed the ship in place and filled in the gap between the hull and the sea.
To give Enterprise a bone in her teeth, I made some simple bow waves from .010 inch plastic sheet. Each of these was formed around a paintbrush handle to give it a curl and then set in place with a dab of clear acrylic gel medium.
A little more gel with some white acrylic paint mixed in served to bulk the waves out and integrate them into the rest of the wake.
Today is the Fourth of July - Independence Day here in the U.S., so no more modeling for me today. Its time to do my duty as an American and drink too much Jack Daniels Tennessee sour mash, burn some meat on a wobbly outdoor grill, and watch my family scatter as I ignite dangerously unstable pyrotechnics in our back yard.
Happy Birthday America!
TimReynaga
Joined: May 03, 2006
KitMaker: 2,500 posts
Model Shipwrights: 1,830 posts
Posted: Saturday, July 12, 2014 - 01:44 PM UTC
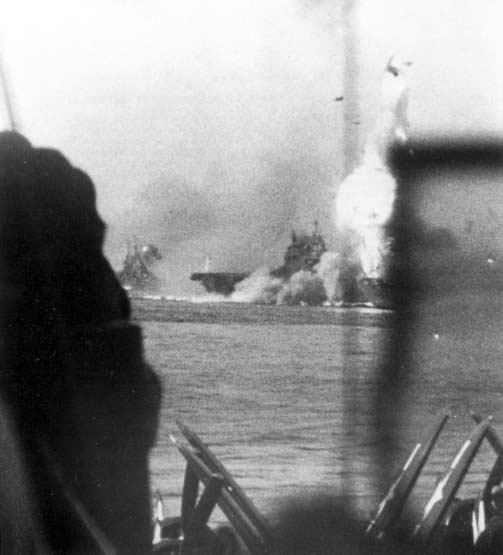
Heres a Kamikaze eye view of the ship what suicide pilot Lieutenant (j.g.) Shunsuke Tomiyasu would have seen in the final moments of his approach on the Big E that awful Monday morning in 1945.

Next up: painting the explosion plume.
Next up: painting the explosion plume.
RussellE
#306
Joined: June 27, 2010
KitMaker: 3,959 posts
Model Shipwrights: 2,777 posts
Posted: Sunday, July 13, 2014 - 11:38 PM UTC
getting dizzy just looking at that point of view, Tim!
TimReynaga
Joined: May 03, 2006
KitMaker: 2,500 posts
Model Shipwrights: 1,830 posts
Posted: Monday, July 14, 2014 - 02:54 PM UTC
I know what you mean, Russell. I cant even begin to imagine the desperation that drove men to the extreme of purposely diving themselves into ships...
Before painting the plume I had to do a little adjusting to the cloud fit it precisely to the model. Also, since it wraps around the upper hull and emerges from inside the hangar deck on the sides, I had to break off the lower portside portion so it could be removed from the ship. Im not sure how difficult it will be to paint the smoke plume, and I dont want to risk getting paint on the completed hull as I work on it, so Ill paint up the plume on the test hulk and then re-attach it to the finished model later.

Before painting the plume I had to do a little adjusting to the cloud fit it precisely to the model. Also, since it wraps around the upper hull and emerges from inside the hangar deck on the sides, I had to break off the lower portside portion so it could be removed from the ship. Im not sure how difficult it will be to paint the smoke plume, and I dont want to risk getting paint on the completed hull as I work on it, so Ill paint up the plume on the test hulk and then re-attach it to the finished model later.
TimReynaga
Joined: May 03, 2006
KitMaker: 2,500 posts
Model Shipwrights: 1,830 posts
Posted: Friday, July 18, 2014 - 01:12 AM UTC
Figuring out just what colors to paint the explosion plume will be a bit of a challenge, especially since Ive never painted fire or smoke effects before. No color images exist of that final Kamikaze hit on the Enterprise, but the classic black and white picture of the explosion does give some idea:

We know the ship was painted dark blue at the time; in comparison the huge smoke column appears to be very light maybe white (or light gray? fire-yellow?) with a darker portion (gray? light brown?) blowing out of the hangar deck onto the sea.
The 14 May 1945 Kamikaze strike on the Enterprise was actually photographed quite a few times. Although these pictures are in black and white, the images all show the light colored smoke plume, and in some you can also make out the flame at the center:
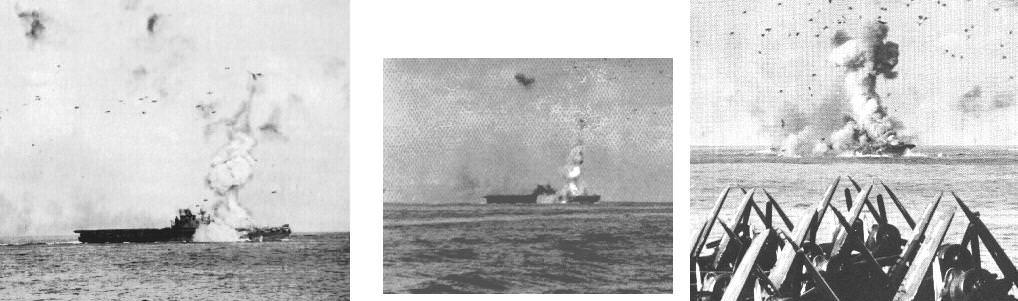
One of the better pictures was this one. This view of the Enterprises port bow shows a burst of bright flame and the billowing darker smoke below flight deck level:
Unfortunately, all the images of the blast are in black and white. There exists some very interesting color movie footage of Enterprises crew fighting fires and evacuating casualties after the strike, but it was taken after the hit and doesnt show the explosion itself.
There are also some clues from written sources. In his book, The Big E The Story of the USS Enterprise, Commander Edward P. Stafford, USN (who was aboard a destroyer at the time) described the scene: ....incredulous watchers on nearby ships saw the Big Es Number One elevator, the cap of a heavy pillar of gray and white smoke, soar 400 feet into the sky... (p. 497). In another passage he describes a similar Kamikaze hit on the Belleau Wood a few months earlier: ...an explosion blasted white smoke down to the waters edge and high into the sky above... flaming debris arched in streamers out of the smoke cloud, red flame licked through the white ... (p. 441).
Finally, there are color movies of hits on other ships which may have looked similar. Heres a still from one of them showing a Kamikaze strike on the Essex:
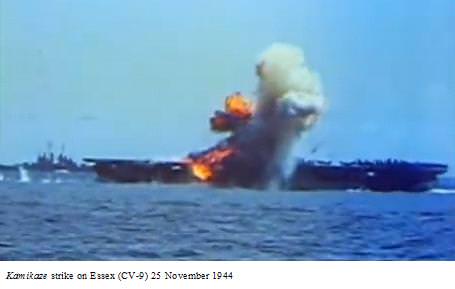
This may or may not provide insight into colors of the Enterprise explosion plume, which seems to have been unusual in that it was vented very quickly and powerfully upwards from the elevator pit. The black and white Enterprise pics seem to show a light gray or yellow plume rather than the darker orange fireball in the Essex picture. Time to experiment!
I think Ill start with a base of Tamiya white primer and then add some yellow, orange, gray, maybe a little brown... I don't really know.
Any suggestions as to how I should proceed?
We know the ship was painted dark blue at the time; in comparison the huge smoke column appears to be very light maybe white (or light gray? fire-yellow?) with a darker portion (gray? light brown?) blowing out of the hangar deck onto the sea.
The 14 May 1945 Kamikaze strike on the Enterprise was actually photographed quite a few times. Although these pictures are in black and white, the images all show the light colored smoke plume, and in some you can also make out the flame at the center:
One of the better pictures was this one. This view of the Enterprises port bow shows a burst of bright flame and the billowing darker smoke below flight deck level:
Unfortunately, all the images of the blast are in black and white. There exists some very interesting color movie footage of Enterprises crew fighting fires and evacuating casualties after the strike, but it was taken after the hit and doesnt show the explosion itself.
There are also some clues from written sources. In his book, The Big E The Story of the USS Enterprise, Commander Edward P. Stafford, USN (who was aboard a destroyer at the time) described the scene: ....incredulous watchers on nearby ships saw the Big Es Number One elevator, the cap of a heavy pillar of gray and white smoke, soar 400 feet into the sky... (p. 497). In another passage he describes a similar Kamikaze hit on the Belleau Wood a few months earlier: ...an explosion blasted white smoke down to the waters edge and high into the sky above... flaming debris arched in streamers out of the smoke cloud, red flame licked through the white ... (p. 441).
Finally, there are color movies of hits on other ships which may have looked similar. Heres a still from one of them showing a Kamikaze strike on the Essex:
This may or may not provide insight into colors of the Enterprise explosion plume, which seems to have been unusual in that it was vented very quickly and powerfully upwards from the elevator pit. The black and white Enterprise pics seem to show a light gray or yellow plume rather than the darker orange fireball in the Essex picture. Time to experiment!
I think Ill start with a base of Tamiya white primer and then add some yellow, orange, gray, maybe a little brown... I don't really know.
Any suggestions as to how I should proceed?
JJ1973
#345
Joined: August 22, 2011
KitMaker: 1,835 posts
Model Shipwrights: 1,832 posts
Posted: Sunday, July 20, 2014 - 04:33 PM UTC
This continues to be a amazing project, great work. I still can't believe the scale and the amount of detail you are doing in this size... Looking forward to your approach to the fire/smoke plume!
Jan
Jan
TimReynaga
Joined: May 03, 2006
KitMaker: 2,500 posts
Model Shipwrights: 1,830 posts
Posted: Wednesday, July 23, 2014 - 02:18 PM UTC
Thanks, Jan- much appreciated!
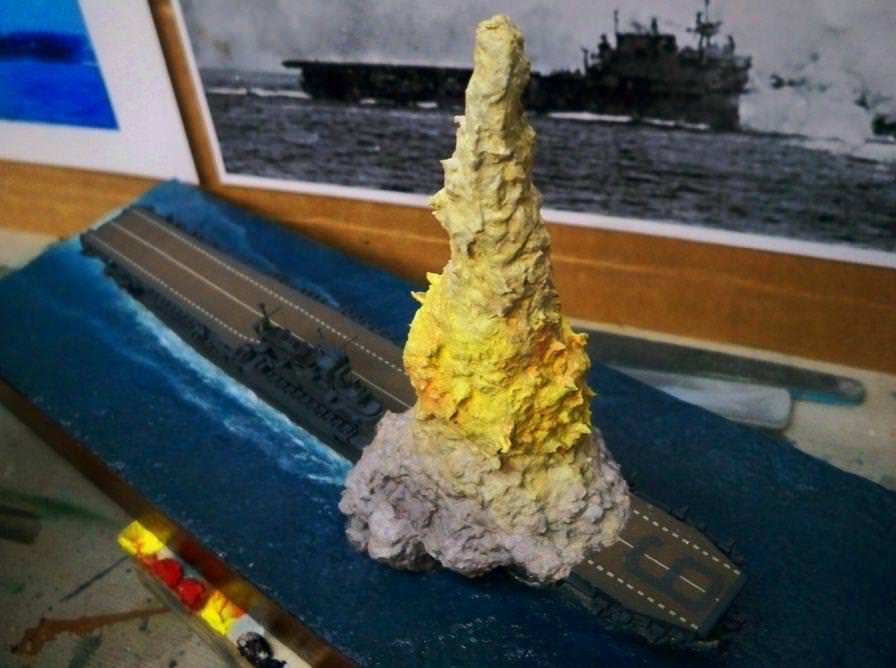
I had planned initially to use acrylics for the fire/smoke plume, but I ultimately opted instead for artists oils since they blend well and have very long working time both advantages since I didnt really know what I was doing. Plus, I already had them on hand! The colors were flake white, arylide (lemon) yellow, cadmium red, ivory black, and burnt umber.

After spraying a coat of Tamiya lacquer-based white primer over the plume, I set it temporarily on my test hulk. When the primer had thoroughly cured, the plume received an overall coating of flake white with a little burnt umber mixed in to make a brownish-white base for the smoke. Then I applied a lemon yellow-white mix to depict the fire peeking through the smoke at the center of the plume. This was intentionally yellower and less orange than most of the generic color explosion photographs I had found online to better match the lighter appearance of the hit in the black and white photos. I reasoned that this lighter yellow shade would more accurately reflect the color of the hot, explosively expanding plume as it burst from the Big Es elevator pit.
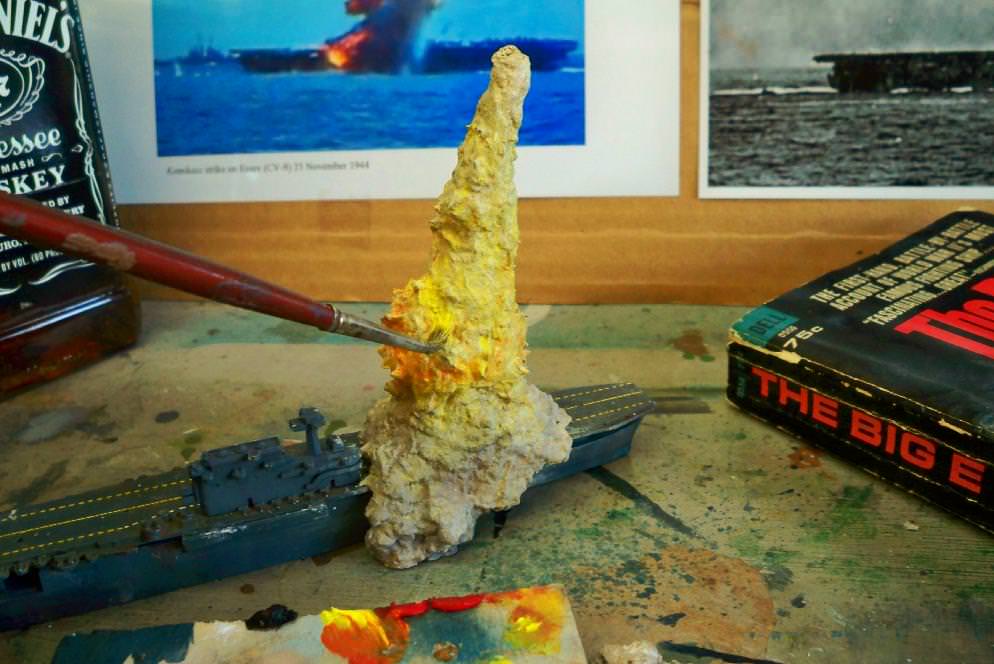
I did blend in a few small spots of cadmium red as well to give the fire a little orange for depth.

I had planned initially to use acrylics for the fire/smoke plume, but I ultimately opted instead for artists oils since they blend well and have very long working time both advantages since I didnt really know what I was doing. Plus, I already had them on hand! The colors were flake white, arylide (lemon) yellow, cadmium red, ivory black, and burnt umber.
After spraying a coat of Tamiya lacquer-based white primer over the plume, I set it temporarily on my test hulk. When the primer had thoroughly cured, the plume received an overall coating of flake white with a little burnt umber mixed in to make a brownish-white base for the smoke. Then I applied a lemon yellow-white mix to depict the fire peeking through the smoke at the center of the plume. This was intentionally yellower and less orange than most of the generic color explosion photographs I had found online to better match the lighter appearance of the hit in the black and white photos. I reasoned that this lighter yellow shade would more accurately reflect the color of the hot, explosively expanding plume as it burst from the Big Es elevator pit.
I did blend in a few small spots of cadmium red as well to give the fire a little orange for depth.
RussellE
#306
Joined: June 27, 2010
KitMaker: 3,959 posts
Model Shipwrights: 2,777 posts
Posted: Friday, July 25, 2014 - 12:32 AM UTC
Will you be adding more 'smokey' colours around the extents of the plume Tim?
The fire will look more intense that way
The fire will look more intense that way
TimReynaga
Joined: May 03, 2006
KitMaker: 2,500 posts
Model Shipwrights: 1,830 posts
Posted: Friday, July 25, 2014 - 01:00 AM UTC
Quoted Text
Will you be adding more 'smokey' colours around the extents of the plume Tim?
The fire will look more intense that way
How's this, Russell?
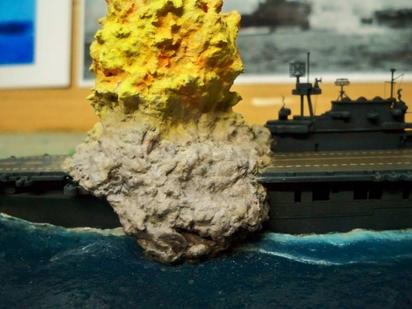
I did add a bit more black (gray) to the hangar deck level smoke... but I've tried to keep the plume and surrounding smoke as light as possible to correspond with the available photographs and verbal descriptions, which seem to agree that it was rather light.
...or did you mean that I should add more gray-white to the upper part of the column?

RussellE
#306
Joined: June 27, 2010
KitMaker: 3,959 posts
Model Shipwrights: 2,777 posts
Posted: Friday, July 25, 2014 - 11:18 AM UTC
It looks great so far, Tim!
I certainly don't want to meddle in your build.
but, I would suggest a little more grey/white to the top of the plume, then in any overhanging areas, perhaps a touch more dark grey. There would be shadows cast by the sun on the plume, much like when you see clouds that are fluffy and white on top but darker underneath.... 
I certainly don't want to meddle in your build.
but,
I would suggest a little more grey/white to the top of the plume, then in any overhanging areas, perhaps a touch more dark grey. There would be shadows cast by the sun on the plume, much like when you see clouds that are fluffy and white on top but darker underneath.... TimReynaga
Joined: May 03, 2006
KitMaker: 2,500 posts
Model Shipwrights: 1,830 posts
Posted: Saturday, July 26, 2014 - 01:33 AM UTC
Thanks for the input, Russell, and dont worry about meddling with the build I really do appreciate the advice! Im learning as I go, and alternate perspectives are welcome. I've continued to work with it after I posted those first photos; here is where things stand at the moment
After initial painting of the plume was finished, I removed it from the test hulk and bonded it to the final model and to the sea with Liquitex heavy gel medium. The joint between the main column and the smoke emerging from the starboard hangar deck was carefully filled in with a small amount of wet Celluclay, then blended in with oil paints once it had dried.
Although hard to see in the photos, I thought my initial go at the plume looked a little too brownish in tone, so I added a few dabs of ivory black and flake white to gray up it a little. This is why I like artists oil paints; blended together, the two colors neatly added a gray undertone without entirely obliterating the brown, giving the smoke a slight color variation.

Also, the slow drying and forgiving working characteristics of the oils made it easy to blend the borders between the brownish-grayish-white smoke and the yellow-orange fire areas. The colors remain distinct, but the transitions are subtle.
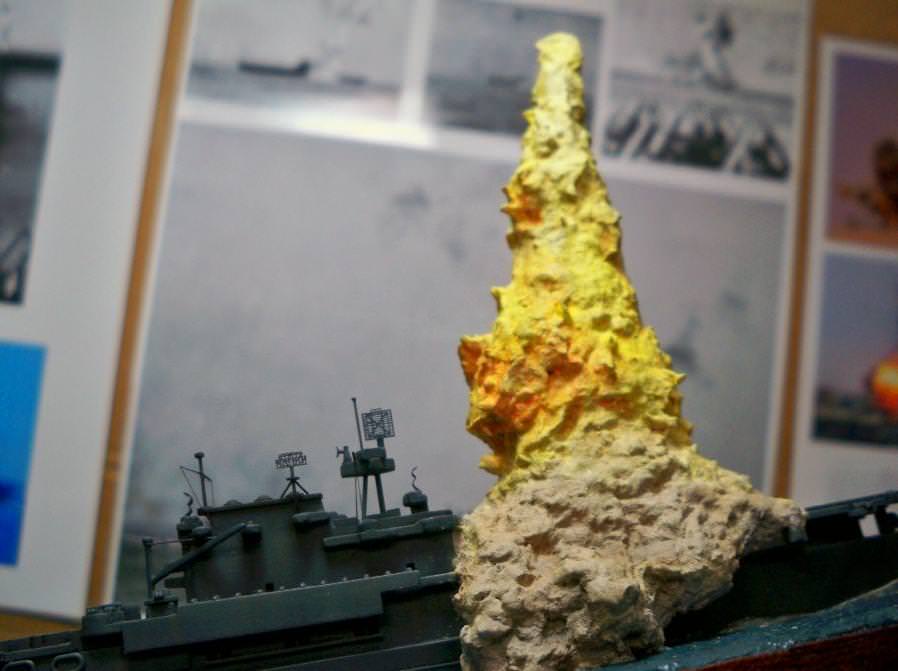
I may mess with it some more, or maybe just switch to the airplanes (there are still a couple I havent painted up yet) and take fresh look at it after a few days...
After initial painting of the plume was finished, I removed it from the test hulk and bonded it to the final model and to the sea with Liquitex heavy gel medium. The joint between the main column and the smoke emerging from the starboard hangar deck was carefully filled in with a small amount of wet Celluclay, then blended in with oil paints once it had dried.
Although hard to see in the photos, I thought my initial go at the plume looked a little too brownish in tone, so I added a few dabs of ivory black and flake white to gray up it a little. This is why I like artists oil paints; blended together, the two colors neatly added a gray undertone without entirely obliterating the brown, giving the smoke a slight color variation.
Also, the slow drying and forgiving working characteristics of the oils made it easy to blend the borders between the brownish-grayish-white smoke and the yellow-orange fire areas. The colors remain distinct, but the transitions are subtle.
I may mess with it some more, or maybe just switch to the airplanes (there are still a couple I havent painted up yet) and take fresh look at it after a few days...
RussellE
#306
Joined: June 27, 2010
KitMaker: 3,959 posts
Model Shipwrights: 2,777 posts
Posted: Sunday, July 27, 2014 - 11:52 PM UTC
I reckon you've nailed it, Tim! 
Great work!
Great work!
JJ1973
#345
Joined: August 22, 2011
KitMaker: 1,835 posts
Model Shipwrights: 1,832 posts
Posted: Monday, July 28, 2014 - 05:59 AM UTC
I agree with Russell, looks great. One would expect more dark grey around the actual fireball, but the picture from the explosion proves you right, not much dark there. I would expect that the color of those plums changes rapidly, bur since you are aiming for the very moment depicted in the picture, I would say you got it spot on! Absolutely impressive!
Jan
Jan
TimReynaga
Joined: May 03, 2006
KitMaker: 2,500 posts
Model Shipwrights: 1,830 posts
Posted: Thursday, July 31, 2014 - 02:55 PM UTC
Quoted Text
I reckon you've nailed it, Tim!
Great work!
_____________________________________________________________
...I agree with Russell, looks great... I would say you got it spot on! Absolutely impressive!
Jan
Thanks Russel and Jan - I guess its time to call the plume painted! Now to finish the last of the ships airplanes...
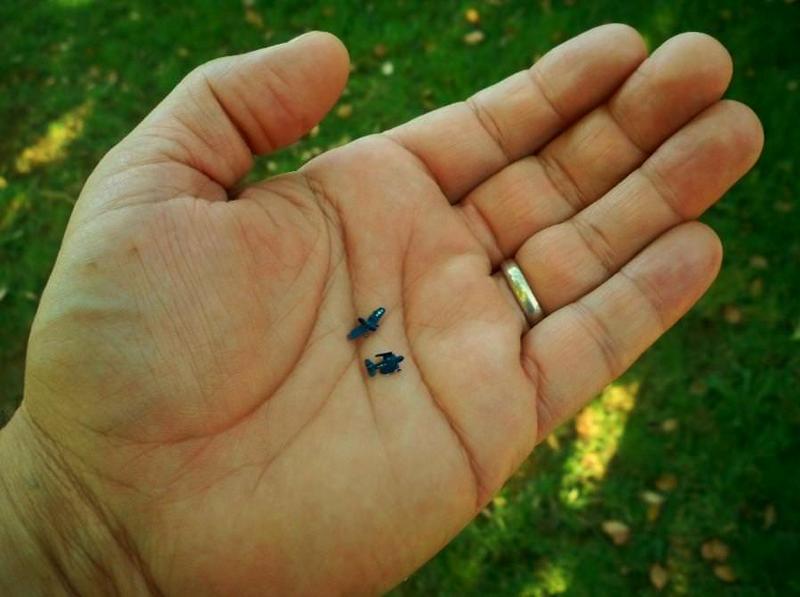
On 14 May 1945 the Enterprise had Night Air Group 90 embarked, which consisted of 21 TBM-3D Avenger bombers and 34 F6F-5N Hellcat night fighters. Of these, 9 Avengers and 27 of the Hellcats on board were destroyed by the Kamikaze strike. Two of the Hellcats were on deck at the time, spotted forward of the Number 1 elevator. One, parked at the extreme end of the flight deck, seems to have escaped the explosion without damage.
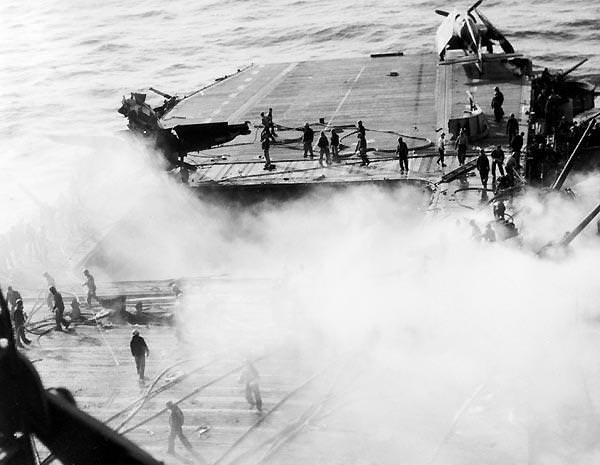
The other one, just in front of the elevator, was destroyed in the blast. Here it is in a still from a movie shot on board immediately after the attack:

As with the TBM Avengers, I started with 1/1250 scale metal planes from Neptun, which I modified slightly.
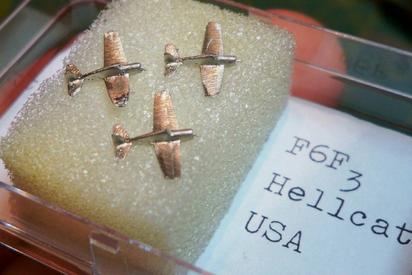

The Night Hellcats wings had to be cut off and reattached, but besides that and the battle damage the only adjustment I made was to add a AN/APS6A radar pod to the starboard wing of the undamaged fighter. Painting these birds was straightforward, since the scheme for these USN fighters in 1945 was a simple overall ANA 623 Glossy Sea Blue. As with the TBMs, I substituted Model Master Blue Angel Blue (FS 15050) for a better scale effect. While it looks way too blue in the close up pics, at normal viewing distances the color looks right. The star and bar national markings on the fuselage sides and wings were 1/1250 scale Navalis decals, and the blue canopy frames were hand painted over Model Master Neutral Gray glass. Finally, I cobbled Night Air Group 90s white outline arrow tail markings together from tiny decal scraps.
Did I mention, these things are really small!

Gremlin56
Joined: October 30, 2005
KitMaker: 3,897 posts
Model Shipwrights: 3,301 posts
KitMaker: 3,897 posts
Model Shipwrights: 3,301 posts
Posted: Thursday, July 31, 2014 - 04:46 PM UTC
It's a very impressive build Tim, magnificent detail.


ejhammer
Joined: June 10, 2008
KitMaker: 230 posts
Model Shipwrights: 136 posts

Posted: Friday, August 01, 2014 - 02:22 AM UTC
Wonderful build! The aircraft are the final touch. I have enough trouble with 1/700 aircraft and can't imagine 1/1200.
Outstanding work.
EJ
Outstanding work.
EJ
TimReynaga
Joined: May 03, 2006
KitMaker: 2,500 posts
Model Shipwrights: 1,830 posts
Posted: Saturday, August 02, 2014 - 06:20 PM UTC
Thanks Julian and EJ, much appreciated!
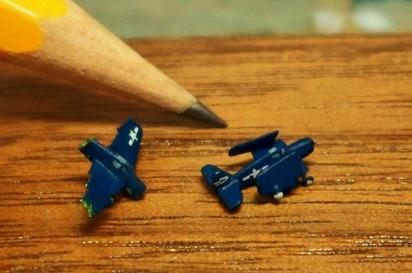
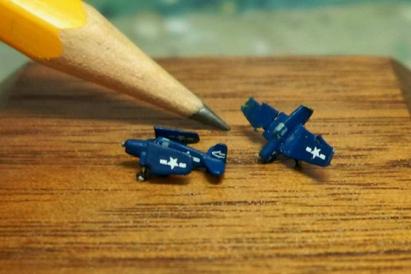
I attached the destroyed F6F to the front of the plume, carving out a little space for it and adding additional Celluclay to integrate the plane with the smoke, as if the expanding gasses were swirling around the hapless fighter.


The intact F6F went aboard at the extreme end of the flight deck. I attached both planes with tiny dabs of Liquitex gloss heavy gel medium under the wheels followed by a touch of Testors flat brushed on to kill the shiny spots.
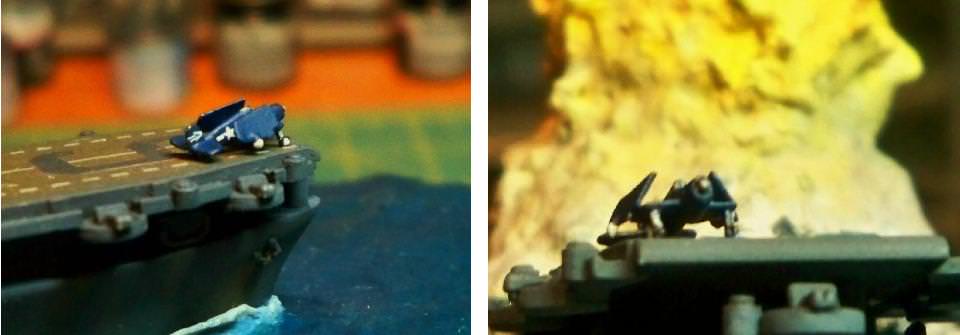
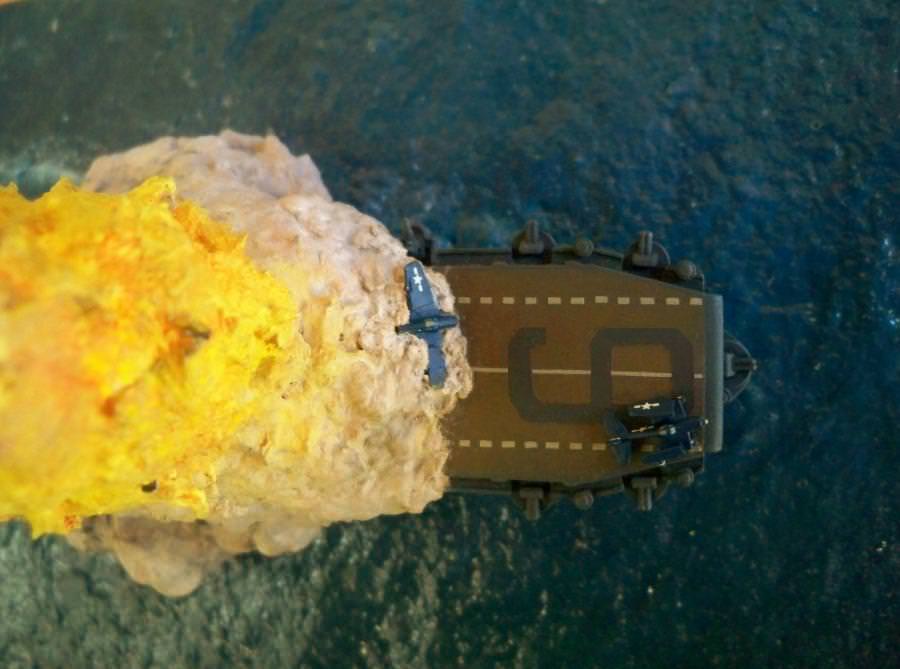
I attached the destroyed F6F to the front of the plume, carving out a little space for it and adding additional Celluclay to integrate the plane with the smoke, as if the expanding gasses were swirling around the hapless fighter.
The intact F6F went aboard at the extreme end of the flight deck. I attached both planes with tiny dabs of Liquitex gloss heavy gel medium under the wheels followed by a touch of Testors flat brushed on to kill the shiny spots.
 |

WEB HOSTING BY


Copyright ©2021 Model Shipwrights and Kitmaker Network, a subsidiary of Silver Star Enterprises
All Rights Reserved. Please read our Conditions of Use and Privacy Policy.
All Rights Reserved. Please read our Conditions of Use and Privacy Policy.