_GOTOBOTTOM
Ships by Class/Type: Battleships
Topics from the Dreadnaught era to modern day.
Hosted by Steve Joyce
Hasegawa Mikasa + Pontos
Cosimodo
#335
Visit this Community
Auckland, New Zealand
Joined: September 03, 2013
KitMaker: 1,808 posts
Model Shipwrights: 871 posts
Posted: Friday, April 10, 2015 - 03:39 PM UTC
This is going to be my next build. I don't have a lot of choices as I only have 3 ships on the shelf. (I won't call it my stash because that would be doing the modelling meaning of the word a disservice )

Anyways, always wanted to try the Pontos etch and with the recent purchase of their set for Mikasa I had a match. So this is what we have to start with

and

Usual gray styrene

and fits together pretty well at the first test

In the pontos box there is etched, brass, wood and resin


All this should keep me busy until the Cruiser campaign later in the year.

cheers
Michael
TRM5150
Visit this Community
Massachusetts, United States
Joined: January 03, 2010
KitMaker: 2,159 posts
Model Shipwrights: 1,400 posts
Posted: Friday, April 10, 2015 - 05:29 PM UTC
I would say it would keep you busy!! Nice looking kit and goodies Michael! Looking forward t following along with your progress on this!

Btw...it's not the size f the stash my friend, it is how you use it!!
RedDuster
Visit this Community
England - South East, United Kingdom
Joined: March 01, 2010
KitMaker: 7,078 posts
Model Shipwrights: 6,649 posts
Posted: Saturday, April 11, 2015 - 01:02 AM UTC
Hi Michael,

Great looking kit and aftermarket, will be along fo the ride on this one.

Si
Blespooky
Visit this Community
Tel Aviv-Yafo, Israel
Joined: June 03, 2014
KitMaker: 277 posts
Model Shipwrights: 171 posts
Posted: Saturday, April 11, 2015 - 01:14 AM UTC
Im always tempted by the Pontos sets but deterred by the price. I look forward to hearing your thoughts on it.

Im sure it will keep you plenty busy up to the Cruiser campaign.
Bryan
Fordboy
Visit this Community
Auckland, New Zealand
Joined: July 13, 2004
KitMaker: 2,169 posts
Model Shipwrights: 1,597 posts
Posted: Sunday, April 12, 2015 - 12:37 AM UTC
Ahoy Michael

This looks like a great project.

Really looking forward to seeing how you progress.

Cheers


Sean
rolltide31
#377
Visit this Community
Texas, United States
Joined: June 27, 2010
KitMaker: 1,481 posts
Model Shipwrights: 1,332 posts
Posted: Sunday, April 12, 2015 - 12:42 AM UTC
Michael,

Looks like you are moving along nicely. Looking forward to watching as you progress.

Dave
warreni
Visit this Community
South Australia, Australia
Joined: August 14, 2007
KitMaker: 5,926 posts
Model Shipwrights: 2,624 posts
Posted: Sunday, April 12, 2015 - 02:51 PM UTC
Hi Michael.

I have the Mikasa in the stash as well, but I have the Hasegawa PE sets for the kit.

I would have gone Pontos way but I had everything way before Pontos where even known.. but the stash is big and the build rate slow at the moment due to the projects being enormous!!

Cheers and good luck,
Warren
RussellE
#306
Visit this Community
Victoria, Australia
Joined: June 27, 2010
KitMaker: 3,959 posts
Model Shipwrights: 2,777 posts
Posted: Sunday, April 12, 2015 - 04:24 PM UTC
Ahoy Michael!

Nice choice!

I was thinking about adding the Mikasa to the 'stash' myself, so I'm following along with interest!

Russ
Cosimodo
#335
Visit this Community
Auckland, New Zealand
Joined: September 03, 2013
KitMaker: 1,808 posts
Model Shipwrights: 871 posts
Posted: Saturday, May 23, 2015 - 07:26 AM UTC
Well thanks for all your kind comments and apologies for such a late acknowledgement. I have had to let this slip for a month as we all face from time to time the issue of life getting in the way.

For the last few weeks all I have been able to do is drill a few holes for barrels.

Actually you dont have to drill holes for the big guns because Pontos provide some neat brass fittings for inside the turret.
Had to look at a few in situ for the smaller guns

Now I would be very interested for those of you who have built pre-dreadnought ships, did you paint these smaller guns before fitting or in place?
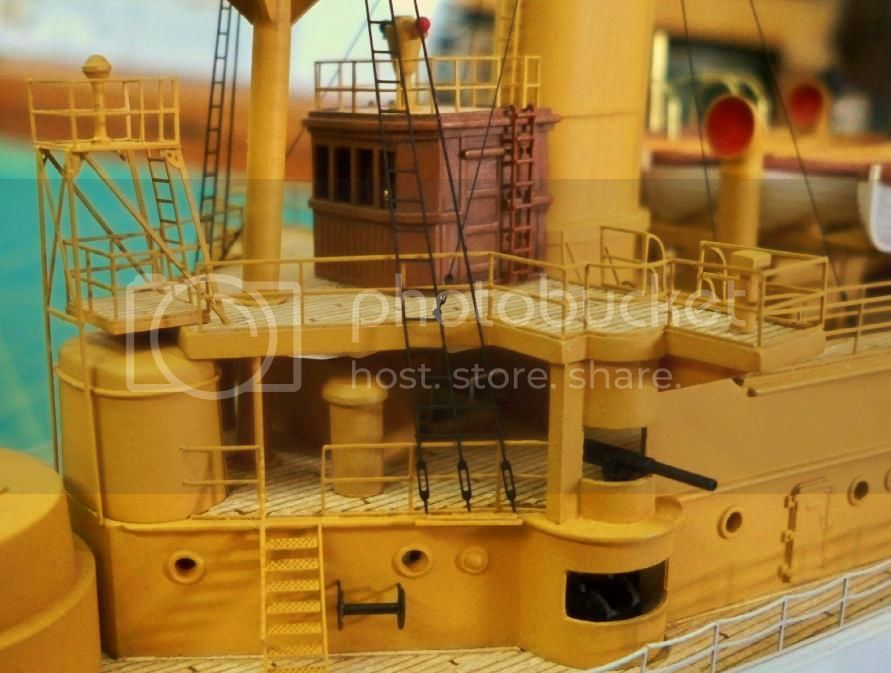
There were about 40 guns in total with a fair mixture of the very small


But this weekend the weather gods (modelling gods perhaps!) have smiled so some progress has been made. I started with the funnels and bases


The funnels and vents aren't glued in place yet to allow easier painting.

The Pontos set is amazing for detail and I like that it is pretty solid ao easy to work with. Interestingly, in those two sub-structures there about 140 pieces, more pieces than went in to the whole of Achilles!

My main conundrum is the hull. Usually I would have painted it as a starter before adding the decks etc. With this Pontos set there about 200 pieces to add to the hull below the main deckline. I am stuck between adding them all on and then trying to paint but knowing I will knocking bits off from here to the end of the kit because it will so difficult to handle the hull. Any thoughts?

cheers

Michael
TRM5150
Visit this Community
Massachusetts, United States
Joined: January 03, 2010
KitMaker: 2,159 posts
Model Shipwrights: 1,400 posts
Posted: Saturday, May 23, 2015 - 09:36 AM UTC
WOW Michael, that is some snazzy work on the shiny stuff! Those funnels looks awesome! Best guess would be to construct a temporary base to hold the ship...something that would not matter if painted. The hull would be the tricky one though...if the posts (if you plan on using them) were long enough you could invert the model so to paint the underside holding on to a slave post. Best of luck on the painting stage!
RedDuster
Visit this Community
England - South East, United Kingdom
Joined: March 01, 2010
KitMaker: 7,078 posts
Model Shipwrights: 6,649 posts
Posted: Saturday, May 23, 2015 - 01:38 PM UTC
Really coming on Michael,

For the smaller guns, The guns I the hull casemates I would paint in place, If you paint the hull from the bottom up you don't have to mask round the guns. Deck guns build, paint and fit.

Looking great, I really fancy doing this one myself.

Cheers

Si
berndm
Visit this Community
Niedersachsen, Germany
Joined: March 26, 2014
KitMaker: 844 posts
Model Shipwrights: 151 posts
Posted: Saturday, May 23, 2015 - 04:26 PM UTC
Amazing work ! This amount of brass is realy stunning.
Fordboy
Visit this Community
Auckland, New Zealand
Joined: July 13, 2004
KitMaker: 2,169 posts
Model Shipwrights: 1,597 posts
Posted: Sunday, May 24, 2015 - 12:55 AM UTC
Ahoy Michael

Truly outstanding work thus far.

Yes the weather was pretty wet and cold over the weekend ideal modelling weather indeed but somehow I still didn't get any bench time mmmmm.

Perhaps this long weekend (Queens Birthday)

The Pontos set looks great where did you source your set from?


Cheers


Sean
TimReynaga
Staff MemberAssociate Editor
MODEL SHIPWRIGHTS
Visit this Community
California, United States
Joined: May 03, 2006
KitMaker: 2,500 posts
Model Shipwrights: 1,830 posts
Posted: Sunday, May 24, 2015 - 04:48 AM UTC

Quoted Text

...Now I would be very interested for those of you who have built pre-dreadnought ships, did you paint these smaller guns before fitting or in place?


Michael,

Each ship is unique, but on my USS Olympia I first painted and installed the gun mounts inside the embrasures, minus the guns/barrels. Then I masked them off and painted the exterior (this made sense for the Olympia as the guns, deck, interior, superstructure, and hull were all different colors!)

Only towards the end of assembly did I fit the guns through the embrasure openings and secure them on their mounts. In the picture, I have installed the smaller gun in the semi-open deck position, but the larger gun in the embrasure below it has yet to be fitted to its mount:

Doing things this way is more labor intensive, but it also gives maximum control - and I didn’t have to worry about snapping off the guns during later assembly!

Good luck with your Mikasa - she's looking great so far!
surfsup
Visit this Community
Queensland, Australia
Joined: May 20, 2010
KitMaker: 1,230 posts
Model Shipwrights: 1,212 posts
Posted: Sunday, May 24, 2015 - 09:55 AM UTC
The detail is superb. Love what you have done so far......Cheers Mark
Cosimodo
#335
Visit this Community
Auckland, New Zealand
Joined: September 03, 2013
KitMaker: 1,808 posts
Model Shipwrights: 871 posts
Posted: Sunday, May 24, 2015 - 11:30 AM UTC

Quoted Text

Ahoy Michael

Truly outstanding work thus far.

Yes the weather was pretty wet and cold over the weekend ideal modelling weather indeed but somehow I still didn't get any bench time mmmmm.

Perhaps this long weekend (Queens Birthday)

The Pontos set looks great where did you source your set from?


Cheers


Sean


Hi Sean,
Thanks for that. Unfortunately the weather only delays that other painting I am meant to be doing

The Pontos kit came from Free Time Hobbies. I had wanted to try a Pontos set for a while so I saw it advertised and at the same time the LHS had Mikasa on special. Fortuitous really, it could have been any combination.

cheers

Michael

Cosimodo
#335
Visit this Community
Auckland, New Zealand
Joined: September 03, 2013
KitMaker: 1,808 posts
Model Shipwrights: 871 posts
Posted: Sunday, May 24, 2015 - 11:38 AM UTC

Quoted Text

WOW Michael, that is some snazzy work on the shiny stuff! Those funnels looks awesome! Best guess would be to construct a temporary base to hold the ship...something that would not matter if painted. The hull would be the tricky one though...if the posts (if you plan on using them) were long enough you could invert the model so to paint the underside holding on to a slave post. Best of luck on the painting stage!


Hi Todd,
I think your right. I will paint the red anti foul, stick it on a basel, cover it all up from the waterline down. I will have to fit the deck but not the decking before adding the etch. Sounds easy in theory but...photos will follow.

cheers

Michael
Cosimodo
#335
Visit this Community
Auckland, New Zealand
Joined: September 03, 2013
KitMaker: 1,808 posts
Model Shipwrights: 871 posts
Posted: Sunday, May 24, 2015 - 11:47 AM UTC

Quoted Text


Quoted Text

...Now I would be very interested for those of you who have built pre-dreadnought ships, did you paint these smaller guns before fitting or in place?


Michael,

Each ship is unique, but on my USS Olympia I first painted and installed the gun mounts inside the embrasures, minus the guns/barrels. Then I masked them off and painted the exterior (this made sense for the Olympia as the guns, deck, interior, superstructure, and hull were all different colors!)

Only towards the end of assembly did I fit the guns through the embrasure openings and secure them on their mounts. In the picture, I have installed the smaller gun in the semi-open deck position, but the larger gun in the embrasure below it has yet to be fitted to its mount:
Doing things this way is more labor intensive, but it also gives maximum control - and I didn’t have to worry about snapping off the guns during later assembly!

Good luck with your Mikasa - she's looking great so far!


Hi Tim,
thanks for the info. That looks like a tiny space to operate in to put that gun into the embrasure, but I think you maybe right. The smaller guns slide in and click into place so its doable but the problem is the etch that is around the slots. It's my fat fingers I'm worried about

cheers
Michael
Cosimodo
#335
Visit this Community
Auckland, New Zealand
Joined: September 03, 2013
KitMaker: 1,808 posts
Model Shipwrights: 871 posts
Posted: Sunday, May 24, 2015 - 11:49 AM UTC
Hi Simon, Bernd and Mark,
Thanks for you comments. There's more to come.

cheers

Michael
RussellE
#306
Visit this Community
Victoria, Australia
Joined: June 27, 2010
KitMaker: 3,959 posts
Model Shipwrights: 2,777 posts
Posted: Sunday, May 24, 2015 - 03:15 PM UTC
Very nice comeback, Michael.

Lots of the shiny stuff here, and how delicate do those funnel hand rails look!

Great work!
Russ
warreni
Visit this Community
South Australia, Australia
Joined: August 14, 2007
KitMaker: 5,926 posts
Model Shipwrights: 2,624 posts
Posted: Sunday, May 24, 2015 - 03:56 PM UTC
Out all the PE in place that has to be the base colour, spray it all that colour and when the deck stuff is all painted apply the wooden deck. Anything you add after that can be painted before you attach it either as individual parts or as sub-assemblies. Paint the railings before you attach them. Leave any sticky-uppy bits until after painting as you are sure to snap them off, especially those two big, tall masts...
rolltide31
#377
Visit this Community
Texas, United States
Joined: June 27, 2010
KitMaker: 1,481 posts
Model Shipwrights: 1,332 posts
Posted: Monday, May 25, 2015 - 03:43 AM UTC
Michael,

Very nice work. The Mikasa is on my wish list so I am excited to watch you continue this build.

Dave
Namabiiru
Staff MemberAssociate Editor
MODEL SHIPWRIGHTS
#399
Visit this Community
Rhode Island, United States
Joined: March 05, 2014
KitMaker: 2,888 posts
Model Shipwrights: 73 posts
Posted: Monday, May 25, 2015 - 04:01 AM UTC
Mike,
Judging by the detail you've already got (and it looks outstanding so far!) I don't think you really need any outside help, but you might find something useful in the photos I took of the real Mikasa, which is sitting ensconced in concrete in Yokosuka, Japan. Here's the link to photo feature I did last year if you haven't seen it: http://modelshipwrights.kitmaker.net/features/6078

Cosimodo
#335
Visit this Community
Auckland, New Zealand
Joined: September 03, 2013
KitMaker: 1,808 posts
Model Shipwrights: 871 posts
Posted: Monday, June 01, 2015 - 12:49 PM UTC

Quoted Text

Out all the PE in place that has to be the base colour, spray it all that colour and when the deck stuff is all painted apply the wooden deck. Anything you add after that can be painted before you attach it either as individual parts or as sub-assemblies. Paint the railings before you attach them. Leave any sticky-uppy bits until after painting as you are sure to snap them off, especially those two big, tall masts...


Hi Warren,
I think you have it one. That's approach I am going to take but its the sticky outty bits I am worried about (as well as those funnels). Mikasa has what would be called balconies in a house on the hull. I am sure there is a naval term for them but they look pretty fragile.

cheers

Michael
Cosimodo
#335
Visit this Community
Auckland, New Zealand
Joined: September 03, 2013
KitMaker: 1,808 posts
Model Shipwrights: 871 posts
Posted: Monday, June 01, 2015 - 01:38 PM UTC

Quoted Text

Mike,
Judging by the detail you've already got (and it looks outstanding so far!) I don't think you really need any outside help, but you might find something useful in the photos I took of the real Mikasa, which is sitting ensconced in concrete in Yokosuka, Japan. Here's the link to photo feature I did last year if you haven't seen it: http://modelshipwrights.kitmaker.net/features/6078


Hi Mark,
I saw your photos. That was some recovery they did on Mikasa. I was looking for a waterline on her but since she's buried in concrete I guess they didn't bother. The kit suggests no waterline so that's what I will go with.

cheers

Michael
 _GOTOTOP