

Thanks Sean and Russ,
Yes plenty of dust. It is so fine it is hard to clean up.
And certainly hope the rest of the build is easier...but somehow I know that's not going to be the case.
cheers
Michael


Go to modelshipwrights.com for the current dynamic site!
Hosted by Jim Starkweather
Cruiser Campaign - HMS New Zealand

Cosimodo

#335

Joined: September 03, 2013
KitMaker: 1,808 posts
Model Shipwrights: 871 posts

Posted: Sunday, March 06, 2016 - 02:06 PM UTC
Cosimodo
#335
Joined: September 03, 2013
KitMaker: 1,808 posts
Model Shipwrights: 871 posts
Posted: Monday, March 21, 2016 - 02:17 PM UTC
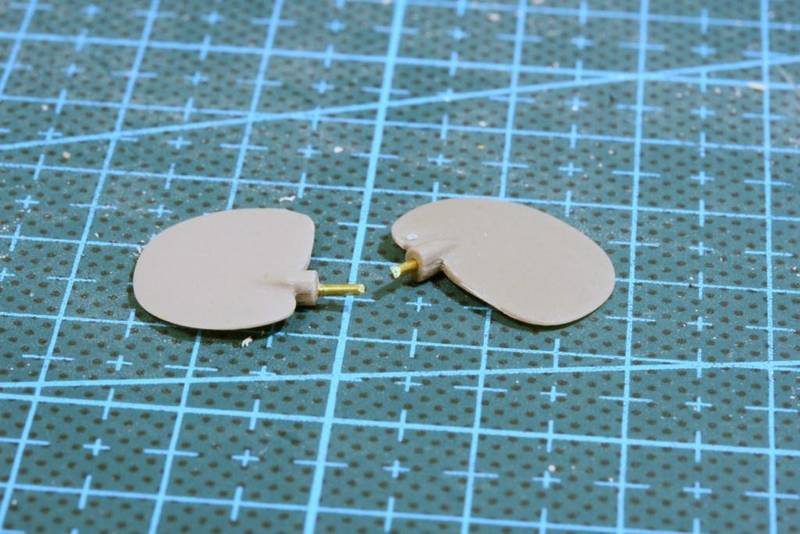
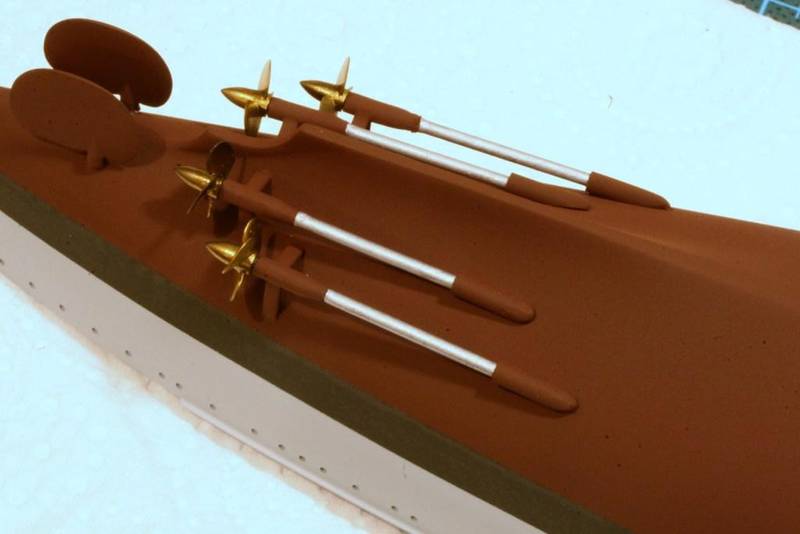
The last piece of the puzzle for the hull. Attaching the screws and rudders.
As with the rest of the pieces they are finely cast.

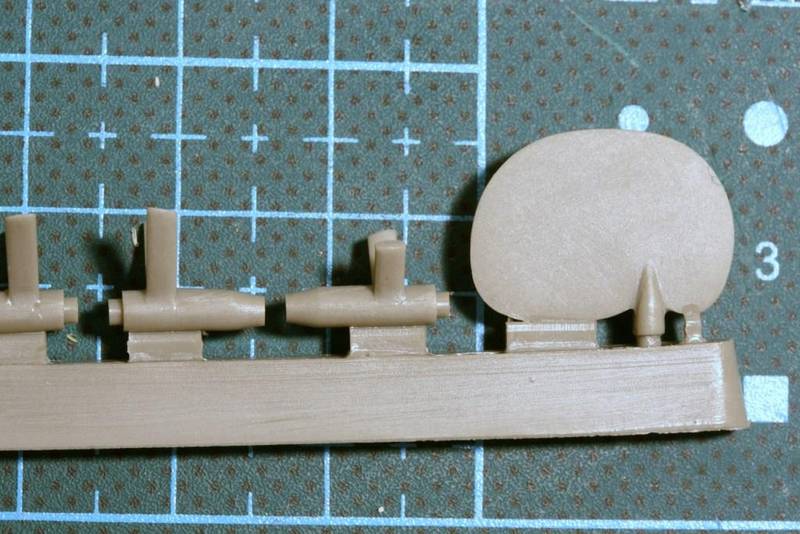
The eagle eyed may have noticed the missing pieces...there are no shafts provided. Length and width is provided but you need to scratch build your own.
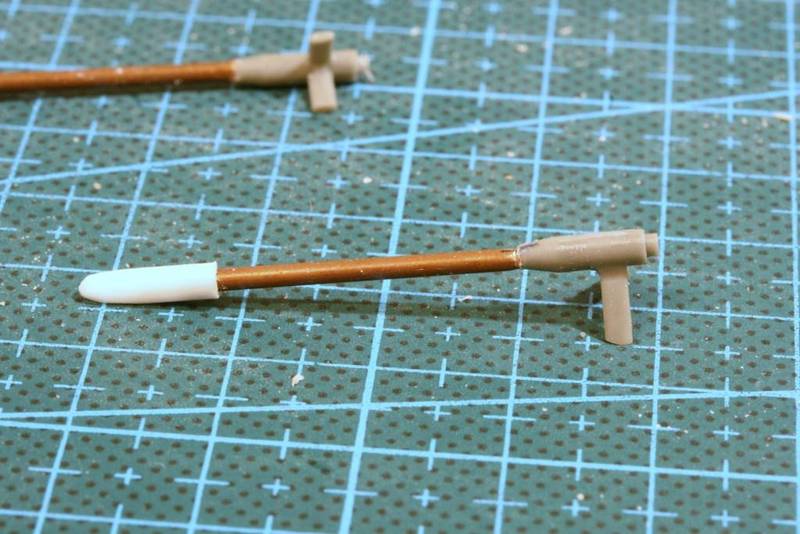
Under a coat or two of hull red they'll pass the three foot test.
The second challenge offered by ComBrig is where to put them all.
As you can see no markings, indents, holes. I used my Dreadnought as a base for where everything may go and drew some markings and drilled a couple of holes. I put pins in the rudders to give something to grip with.
It all looks pretty reasonable
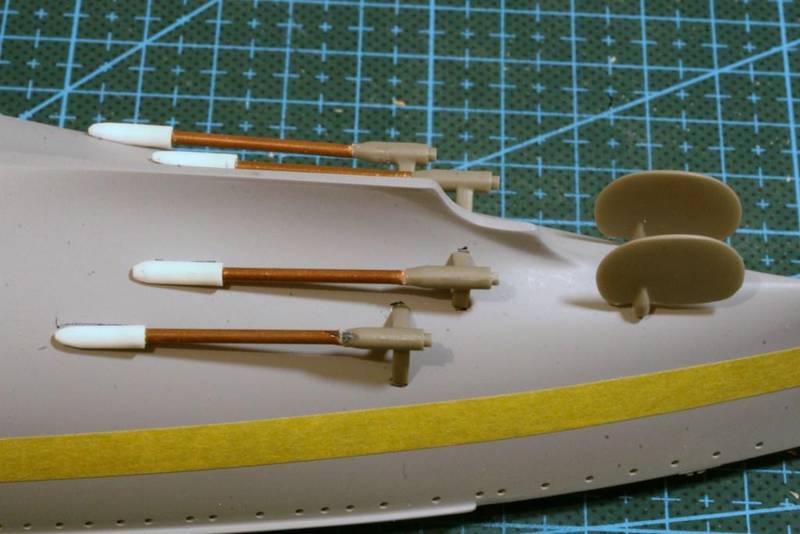
Once it's painted, I have some Alclad brass coated screws to go on.

Easter should see red.
Any ideas for above the waterline for late WW1 RN - I am guessing AP 507A - happy to hear any other views.
cheers
Michael
As with the rest of the pieces they are finely cast.
The eagle eyed may have noticed the missing pieces...there are no shafts provided. Length and width is provided but you need to scratch build your own.
Under a coat or two of hull red they'll pass the three foot test.
The second challenge offered by ComBrig is where to put them all.
As you can see no markings, indents, holes. I used my Dreadnought as a base for where everything may go and drew some markings and drilled a couple of holes. I put pins in the rudders to give something to grip with.
It all looks pretty reasonable
Once it's painted, I have some Alclad brass coated screws to go on.
Easter should see red.
Any ideas for above the waterline for late WW1 RN - I am guessing AP 507A - happy to hear any other views.
cheers
Michael

MartinJQuinn

Joined: January 19, 2005
KitMaker: 574 posts
Model Shipwrights: 530 posts

Posted: Monday, March 21, 2016 - 08:43 PM UTC
Quoted Text
Any ideas for above the waterline for late WW1 RN - I am guessing AP 507A - happy to hear any other views.
My understanding is the the RN used a neutral gray color during WW1 for it's capital ships. 507A - in my opinion - would be too dark.
Check out Sovereign Hobbies selection of Colourcoat paints. They have Great War specific colors:
https://www.sovereignhobbies.co.uk/collections/colourcoats-sea
GW01 - #1 grey or GW02 - #2 grey may be a better choice.

JJ1973
#345

Joined: August 22, 2011
KitMaker: 1,835 posts
Model Shipwrights: 1,832 posts
Posted: Monday, March 21, 2016 - 10:57 PM UTC
Hi Michael,
very nice progress!!
I just realized that I entirely missed your last update, so quite some progress for me to see!!
The cast looks really nice! And I can live with scratchbuilding the shafts - I would say, for a model like this it's a fair guess that anybody who builds this is not a total beginner. But no markings AT ALL as to where the shafts, rudders, propellers would go - that's tough.
Great solution here as well - no way to prove, but the way you put it looks spot on!!
And I would agree that 507a is too dark. Way too dark I would say. If you look at my Belfast, 507a is the darkest part of the camouflage, it is almost difficult to distinguish it from the boot topping.
Cheers,
Jan

RedDuster

Joined: March 01, 2010
KitMaker: 7,078 posts
Model Shipwrights: 6,649 posts

Posted: Tuesday, March 22, 2016 - 12:19 AM UTC
Hi Michael,
Nice work on the props and shafts, good to see some more progress.
Si
Nice work on the props and shafts, good to see some more progress.
Si
Removed by original poster on 03/22/16 - 20:34:01 (GMT).

RussellE
#306

Joined: June 27, 2010
KitMaker: 3,959 posts
Model Shipwrights: 2,777 posts
Posted: Tuesday, March 22, 2016 - 01:35 AM UTC
Hi Michael
well, there's certainly a few challenges to overcome with this kit, not the least of which is location for the props and rudders, which you've handled very nicely.
Soveriegn Hobbies have a lot of information about RN colour schemes in WW1, as per Martin's recommendation. They have the colours for HMS Queen Elizabeth 1918 and HMS NZ should be very much the same, one would guess.
It's not very often we get to see HMS New Zealand modeled up, so this is a treat!

Cosimodo
#335
Joined: September 03, 2013
KitMaker: 1,808 posts
Model Shipwrights: 871 posts
Posted: Tuesday, March 22, 2016 - 01:19 PM UTC
Quoted Text
Quoted TextAny ideas for above the waterline for late WW1 RN - I am guessing AP 507A - happy to hear any other views.
My understanding is the the RN used a neutral gray color during WW1 for it's capital ships. 507A - in my opinion - would be too dark.
Check out Sovereign Hobbies selection of Colourcoat paints. They have Great War specific colors:
https://www.sovereignhobbies.co.uk/collections/colourcoats-sea
GW01 - #1 grey or GW02 - #2 grey may be a better choice.
Thanks Martin, I hadn't seen that site before. Very useful. Only problem is nobody ships internationally paints these days and I have never seen Colourcoat for sale downunder. Maybe on my next trip to Blighty I will have to stock up. Fortunately that's quite soon but soon enough for this ship.
thanks
Michael
Cosimodo
#335
Joined: September 03, 2013
KitMaker: 1,808 posts
Model Shipwrights: 871 posts
Posted: Tuesday, March 22, 2016 - 01:24 PM UTC
Quoted Text
Hi Michael,
very nice progress!!
I just realized that I entirely missed your last update, so quite some progress for me to see!!
The cast looks really nice! And I can live with scratchbuilding the shafts - I would say, for a model like this it's a fair guess that anybody who builds this is not a total beginner. But no markings AT ALL as to where the shafts, rudders, propellers would go - that's tough.
Great solution here as well - no way to prove, but the way you put it looks spot on!!
And I would agree that 507a is too dark. Way too dark I would say. If you look at my Belfast, 507a is the darkest part of the camouflage, it is almost difficult to distinguish it from the boot topping.
Cheers,
Jan
Hi Jan,
Thanks for the comments.
You are right about the 507A. I actually hadn't looked at it before and having used 507C, a very pale grey, I mistakenly assumed 507A was only a standard grey. That's what I rely on you guys for

cheers
Michael
Cosimodo
#335
Joined: September 03, 2013
KitMaker: 1,808 posts
Model Shipwrights: 871 posts
Posted: Tuesday, March 22, 2016 - 01:25 PM UTC
Quoted Text
Hi Michael,
Nice work on the props and shafts, good to see some more progress.
Si
Thanks Si. I realised also that I haven't posted on the Cruiser Campaign blog. I will rectify that this weekend.
cheers
Michael
Cosimodo
#335
Joined: September 03, 2013
KitMaker: 1,808 posts
Model Shipwrights: 871 posts
Posted: Tuesday, March 22, 2016 - 01:31 PM UTC
Quoted Text
Hi Michael
well, there's certainly a few challenges to overcome with this kit, not the least of which is location for the props and rudders, which you've handled very nicely.
Soveriegn Hobbies have a lot of information about RN colour schemes in WW1, as per Martin's recommendation. They have the colours for HMS Queen Elizabeth 1918 and HMS NZ should be very much the same, one would guess.
It's not very often we get to see HMS New Zealand modeled up, so this is a treat!
You're spot on Russ. I looked at a few pictures and late war RN capital ships look pretty similar and the website you guys mentioned has colour for Queen Elizabeth. All I need to do now is find a matching acrylic. Really only two options over here, Tamiya or Hobby Colour. I will do some matching.
thanks
Michael
JJ1973
#345
Joined: August 22, 2011
KitMaker: 1,835 posts
Model Shipwrights: 1,832 posts
Posted: Tuesday, March 22, 2016 - 11:38 PM UTC
Hi Michael,
this color business can be a science of its own...but once into it, it's kind of fun!
However, over time and trying a couple brands of colors, I found that I could work good with some, and not really with others. Maybe it's just me... But my point is - instead of trying to match different colors of different brands and have several in stock, I pickt the brand that I could work with best (for me it's Tamiya, but that means absolutely nothing) and started mixing colors.
It's really not hard Mostly you'll find something close to what you need and then need to lighten or darken it.
A few examples - my 507c is Tamiya White XF2 and Grey XF 66, four parts white, 1 part grey; 507a is one part Black XF 1 and three parts Field Blue XF 50; B6 is five parts white XF2 and one part Medium Blue XF 18. I got me some Snyder and Short Paint Chips as reference. I have not worked with WWI colors so far, so I can't help you with any reference there.
Cheers,
Jan
this color business can be a science of its own...but once into it, it's kind of fun!
However, over time and trying a couple brands of colors, I found that I could work good with some, and not really with others. Maybe it's just me... But my point is - instead of trying to match different colors of different brands and have several in stock, I pickt the brand that I could work with best (for me it's Tamiya, but that means absolutely nothing) and started mixing colors.
It's really not hard
Mostly you'll find something close to what you need and then need to lighten or darken it. A few examples - my 507c is Tamiya White XF2 and Grey XF 66, four parts white, 1 part grey; 507a is one part Black XF 1 and three parts Field Blue XF 50; B6 is five parts white XF2 and one part Medium Blue XF 18. I got me some Snyder and Short Paint Chips as reference. I have not worked with WWI colors so far, so I can't help you with any reference there.
Cheers,
Jan
Cosimodo
#335
Joined: September 03, 2013
KitMaker: 1,808 posts
Model Shipwrights: 871 posts
Posted: Wednesday, March 30, 2016 - 11:14 AM UTC
Well with the challenge thrown down by Jan to do it myself I thought I would give it a go.
I made a colour chart of all the grays/greys I own (is there any reason why the same manufacturer uses different spelling? Is one more correct than the other? )

The aim was to match the Colourcoat GW01. Allowing for monitor differences I decided that Tamiya's Neutral Grey (XF53) and MRHobby's Medium Sea Gray (H335) would be the best base.
What was obvious was the clear representation of what everybody had told me, AP507A is way, way darker tha AP507C.
Anyway, I tried various dilutions with white and Tamiya seemed the closer match. In comparison with the Colourcoat it was clear there was a touch of blue missing, so a few more attempts and it seemed XF53:1, H11:4, XF23:1 (second from the bottom) was the closest to GW01.

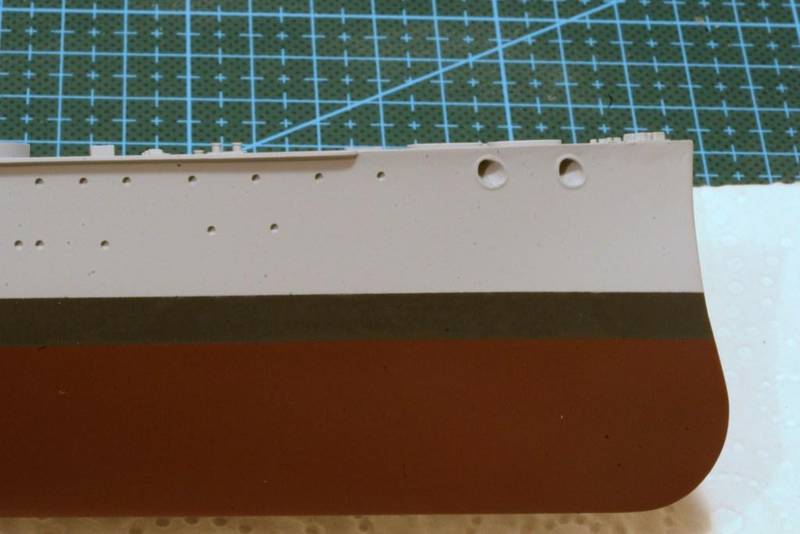
The basic part of the hull is now complete.
Starting with the propulsion and steering gear
The hull
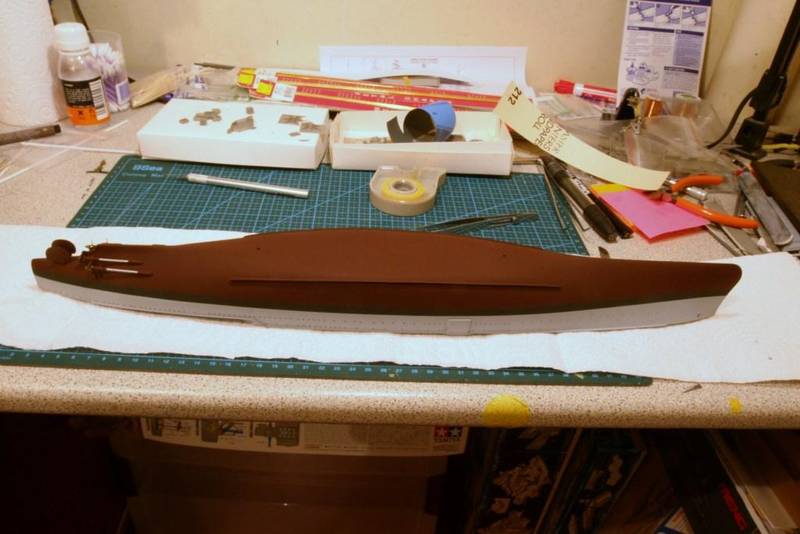
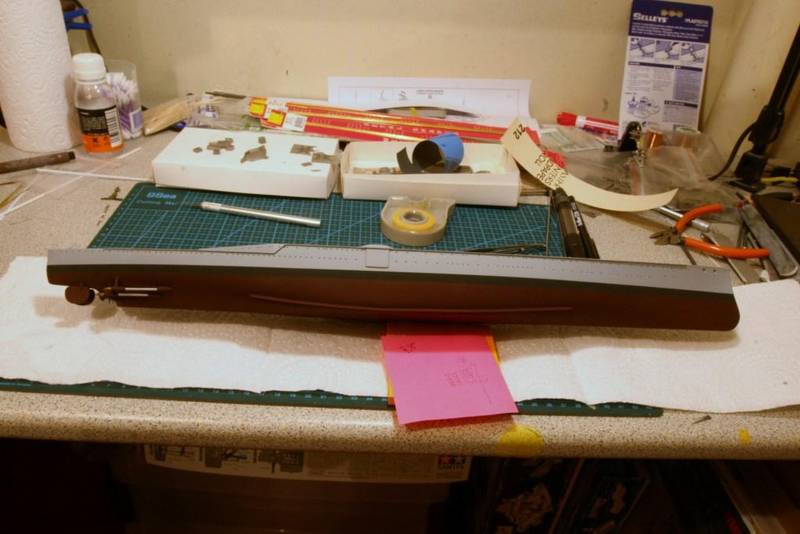
Is it the right colour? it does look like it in real life. I am not sure the photos do it justice. It's a bit bluer in the flesh, so to speak.
Next up is the panelling on the hull. I tried this on Achilles and will see if I can improve it here.
A blank canvas
And this is what I want to achieve
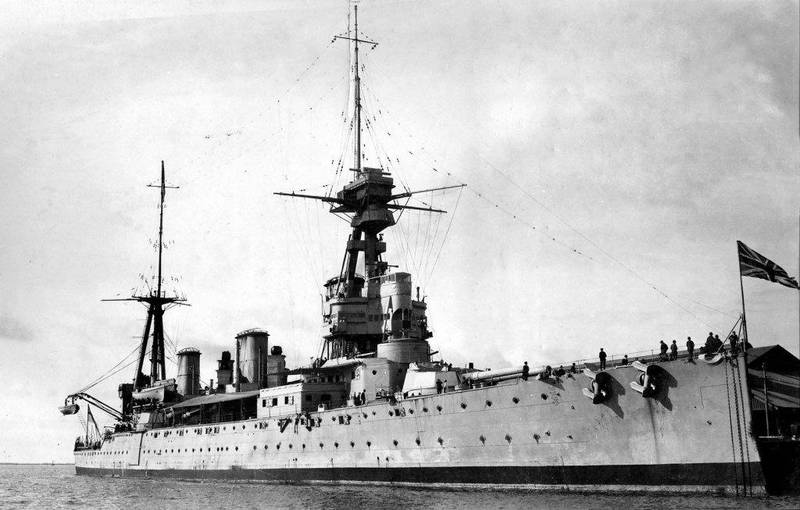
By State Library of South Australia from Australia - HMS New Zealand, CC BY 2.0, https://commons.wikimedia.org/w/index.php?curid=17836371
You can see the faint lines that run the length of the ship.
That hopefully will be this weekend's challenge.
With the hull basically complete I will also conclude my review of it as part of the ongoing review of this kit.
The top section of the hull has been finely cast though there is minimal detail which befits the clean appearance of this class of battlecruiser. There are some skylights, anchor hawses, mooring pieces and hatches. The decking is finely done. The anchor hawses need to be drilled opened as they cast filled in. There are indentations for the various superstructures and fittings which come as separate parts. The upper hull has no provision for the torpedo net and booms HMS New Zealand would have carried at the start of the war. It would take some research and fabrication to add these. If you wanted to build a late or post war ship then it would be fine but the as we will note later there are other issues to resolve. The last point is demonstrated from the photo that HMS New Zealand had a pronounced curve to the hull, most evident below the X/Y turret. On the kit this is vertical. I am not sure you could rectify this if the photo is correct and not distorted.
cheers
Michael
I made a colour chart of all the grays/greys I own (is there any reason why the same manufacturer uses different spelling? Is one more correct than the other?
)The aim was to match the Colourcoat GW01. Allowing for monitor differences I decided that Tamiya's Neutral Grey (XF53) and MRHobby's Medium Sea Gray (H335) would be the best base.
What was obvious was the clear representation of what everybody had told me, AP507A is way, way darker tha AP507C.
Anyway, I tried various dilutions with white and Tamiya seemed the closer match. In comparison with the Colourcoat it was clear there was a touch of blue missing, so a few more attempts and it seemed XF53:1, H11:4, XF23:1 (second from the bottom) was the closest to GW01.
The basic part of the hull is now complete.
Starting with the propulsion and steering gear
The hull
Is it the right colour? it does look like it in real life. I am not sure the photos do it justice. It's a bit bluer in the flesh, so to speak.
Next up is the panelling on the hull. I tried this on Achilles and will see if I can improve it here.
A blank canvas
And this is what I want to achieve
By State Library of South Australia from Australia - HMS New Zealand, CC BY 2.0, https://commons.wikimedia.org/w/index.php?curid=17836371
You can see the faint lines that run the length of the ship.
That hopefully will be this weekend's challenge.
With the hull basically complete I will also conclude my review of it as part of the ongoing review of this kit.
The top section of the hull has been finely cast though there is minimal detail which befits the clean appearance of this class of battlecruiser. There are some skylights, anchor hawses, mooring pieces and hatches. The decking is finely done. The anchor hawses need to be drilled opened as they cast filled in. There are indentations for the various superstructures and fittings which come as separate parts. The upper hull has no provision for the torpedo net and booms HMS New Zealand would have carried at the start of the war. It would take some research and fabrication to add these. If you wanted to build a late or post war ship then it would be fine but the as we will note later there are other issues to resolve. The last point is demonstrated from the photo that HMS New Zealand had a pronounced curve to the hull, most evident below the X/Y turret. On the kit this is vertical. I am not sure you could rectify this if the photo is correct and not distorted.
cheers
Michael
RussellE
#306
Joined: June 27, 2010
KitMaker: 3,959 posts
Model Shipwrights: 2,777 posts
Posted: Wednesday, March 30, 2016 - 03:37 PM UTC
Well, those colours look correct to me Michael
she's looking good
she's looking good
RedDuster
Joined: March 01, 2010
KitMaker: 7,078 posts
Model Shipwrights: 6,649 posts
Posted: Wednesday, March 30, 2016 - 11:40 PM UTC
Very nice job on the paintwork Michael,
Keep up the good work.
Cheers
Si
Keep up the good work.
Cheers
Si

Fordboy
Joined: July 13, 2004
KitMaker: 2,169 posts
Model Shipwrights: 1,597 posts

Posted: Thursday, March 31, 2016 - 12:41 AM UTC
Ahoy Michael
Great update nice to see you refocused on this build.
It appears that the workers in your dockyard are extra busy indeed.
Cheers
Sean
Great update nice to see you refocused on this build.
It appears that the workers in your dockyard are extra busy indeed.
Cheers
Sean
JJ1973
#345
Joined: August 22, 2011
KitMaker: 1,835 posts
Model Shipwrights: 1,832 posts
Posted: Thursday, March 31, 2016 - 01:32 AM UTC
Hi Michael,
by now means I wanted to throw a challenge on you - but it's great to see that you tried it. Very straightforward approach, I have to admit my first time mixing colors some years back was a little more erratic...your results look pretty good to me!!
Very nice progress on this certainly very special model - great job!!
Cheers,
Jan
Cosimodo
#335
Joined: September 03, 2013
KitMaker: 1,808 posts
Model Shipwrights: 871 posts
Posted: Friday, April 01, 2016 - 02:09 PM UTC
Quoted Text
Well, those colours look correct to me Michael
she's looking good
Thanks Russ,
Yes I am happy with the colour. I think it will look good when it's all done.
cheers
Michael
Cosimodo
#335
Joined: September 03, 2013
KitMaker: 1,808 posts
Model Shipwrights: 871 posts
Posted: Friday, April 01, 2016 - 02:11 PM UTC
Quoted Text
Very nice job on the paintwork Michael,
Keep up the good work.
Cheers
Si
Cheers Si,
It came out better than I expected after I was in the early days of sanding the hull wondering whether I would ever get it smooth. But I am glad I did it.
thanks
Michael
Cosimodo
#335
Joined: September 03, 2013
KitMaker: 1,808 posts
Model Shipwrights: 871 posts
Posted: Friday, April 01, 2016 - 02:15 PM UTC
Quoted Text
Ahoy Michael
Great update nice to see you refocused on this build.
It appears that the workers in your dockyard are extra busy indeed.
Cheers
Sean
Hi Sean,
There still a lot of toil for those workers to go yet. I have to make sure I don't overreach with the final target whish is still not yet determined. I am still wondering late war with planes on turrets or post war and the Jellicoe grand tour as depicted in the photo.
cheers
Michael
Cosimodo
#335
Joined: September 03, 2013
KitMaker: 1,808 posts
Model Shipwrights: 871 posts
Posted: Friday, April 01, 2016 - 02:18 PM UTC
Quoted Text
Hi Michael,
by now means I wanted to throw a challenge on you - but it's great to see that you tried it. Very straightforward approach, I have to admit my first time mixing colors some years back was a little more erratic...your results look pretty good to me!!
Very nice progress on this certainly very special model - great job!!
Cheers,
Jan
Hi Jan, actually it was fun mixing the paints and seeing the outcome. I was surprised how little blue I needed to effect the final outcome. I only hope I made enough to finish because I am sure if I mix it again it will be different.
cheers
Michael
Cosimodo
#335
Joined: September 03, 2013
KitMaker: 1,808 posts
Model Shipwrights: 871 posts
Posted: Monday, April 04, 2016 - 02:44 PM UTC
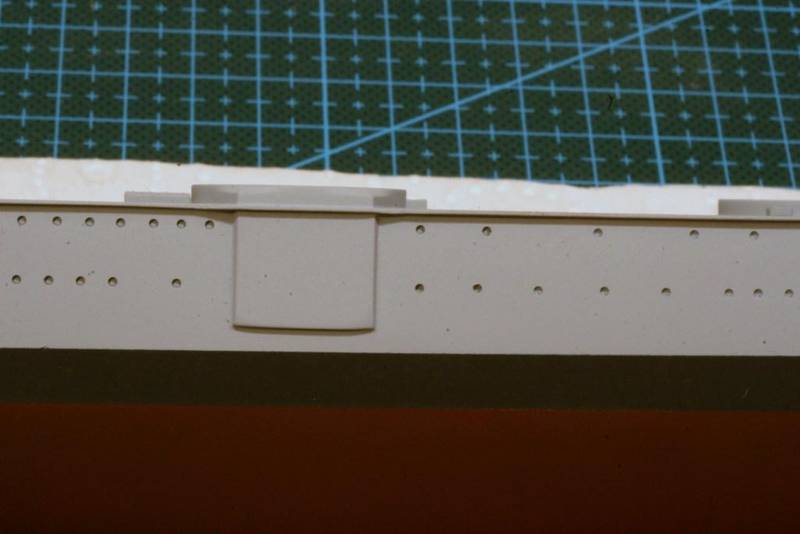
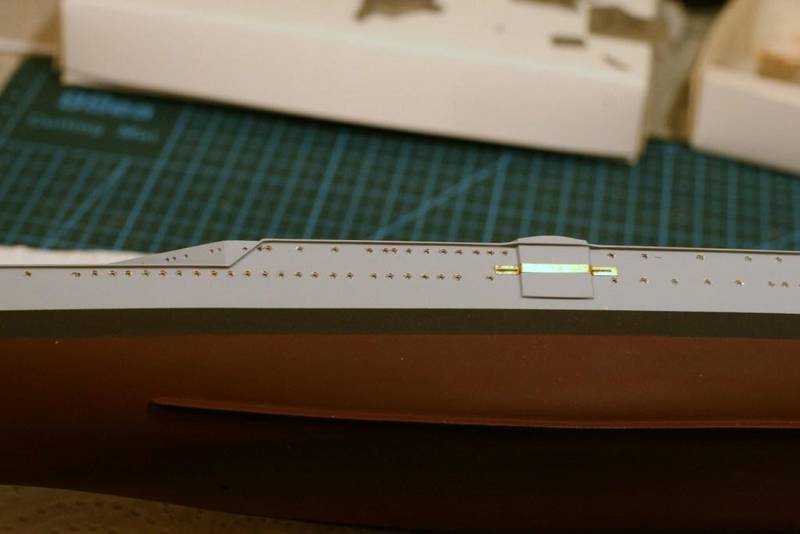
There is a peculiar madness to modelling as some of you well know. I sat down on Saturday to mask the hull for the plating as per the earlier photo when my eye was drawn to the portholes. Yesterday, after 136, I was done. Only one more side to go 
Of course as I moved down the hull, I saw more things I must do. And that's just one photo
Who knew "eyebrows" could be so addictive.
cheers
Michael
p.s. here's a better closeup
Of course as I moved down the hull, I saw more things I must do. And that's just one photo
Who knew "eyebrows" could be so addictive.
cheers
Michael
p.s. here's a better closeup
RussellE
#306
Joined: June 27, 2010
KitMaker: 3,959 posts
Model Shipwrights: 2,777 posts
Posted: Monday, April 04, 2016 - 03:01 PM UTC
OMG Michael, eyebrows at this scale? Ay Carrumba! Looks great though
JJ1973
#345
Joined: August 22, 2011
KitMaker: 1,835 posts
Model Shipwrights: 1,832 posts
Posted: Monday, April 04, 2016 - 11:02 PM UTC
Wow Michael,
that's truly amazing - seen this 'eyebrow' -business in 1/200 scale, but that's almost a new dimension... great job! And good luck for the second half...
I think I know very well the peculiar madness you are talking about...
Cheers,
Jan
that's truly amazing - seen this 'eyebrow' -business in 1/200 scale, but that's almost a new dimension... great job!
And good luck for the second half... I think I know very well the peculiar madness you are talking about...
Cheers,
Jan
RedDuster
Joined: March 01, 2010
KitMaker: 7,078 posts
Model Shipwrights: 6,649 posts
Posted: Monday, April 04, 2016 - 11:41 PM UTC
Hi Michael,
Very nice work with eyebrows, strange with jobs like that on a build, sometimes you just get in the zone.
Looking forward to seeing more progress.
Cheers
Si
Very nice work with eyebrows, strange with jobs like that on a build, sometimes you just get in the zone.
Looking forward to seeing more progress.
Cheers
Si
 |

WEB HOSTING BY


Copyright ©2021 Model Shipwrights and Kitmaker Network, a subsidiary of Silver Star Enterprises
All Rights Reserved. Please read our Conditions of Use and Privacy Policy.
All Rights Reserved. Please read our Conditions of Use and Privacy Policy.