Italeri 1/35 scale S-100 Schnellboot
Netherlands
Joined: December 09, 2008
KitMaker: 336 posts
Model Shipwrights: 333 posts
Posted: Saturday, January 10, 2009 - 04:47 AM UTC
Thanks a lot Brian,
I stand corrected, please feel free to correct me on other mistakes

. As I confessed before I'm not an expert, I simply pass on the info I've found (without knowing how reliable the source is). My info on the props came from Lutz Fuhrmann who pointed out that the bronze colour was a classic mistake.
Regards,
Arjan
Joined: October 30, 2005
KitMaker: 3,897 posts
Model Shipwrights: 3,301 posts
Posted: Saturday, January 10, 2009 - 05:53 AM UTC
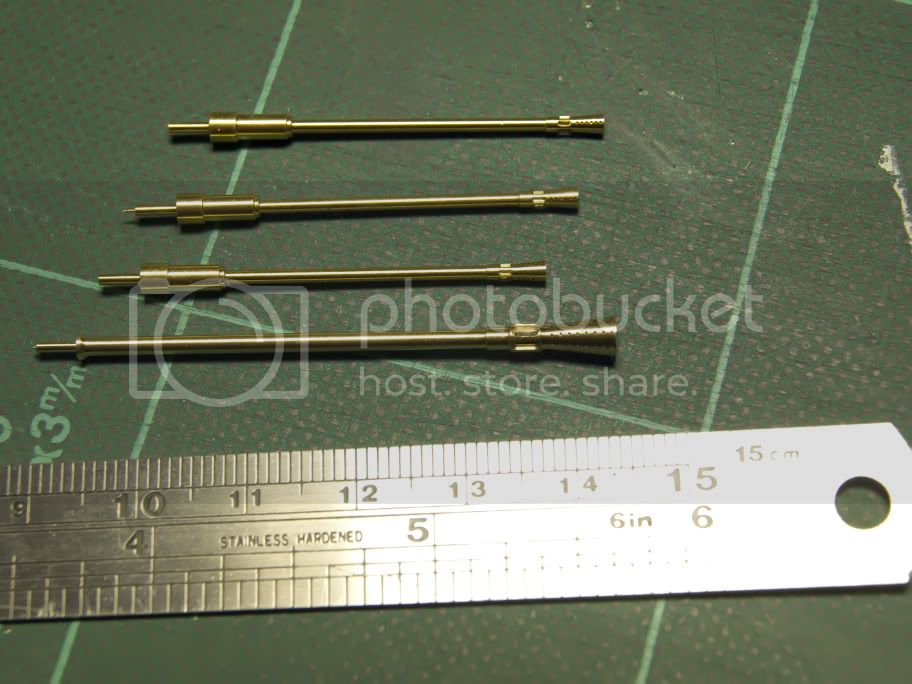
Bless you Brian, the photo of the screw will be great help for weathering the screws on my model.
Connecticut, United States
Joined: August 03, 2008
KitMaker: 875 posts
Model Shipwrights: 872 posts
Posted: Sunday, January 11, 2009 - 03:24 AM UTC
Is that prop off of S-130 or is from the hulk of S-97 or did they get it off of a wreck?
England - East Midlands, United Kingdom
Joined: August 13, 2005
KitMaker: 357 posts
Model Shipwrights: 31 posts
Posted: Sunday, January 11, 2009 - 11:29 PM UTC
Hi Garth
The prop comes off one the wrecks off Denmark. These were 5 boats scuttled at the end of the war. If you go across to the S130 site you can also see the salvaged armoured bridge and other pics
Brian
All idealism is falsehood in the face of necessity
Nordrhein-Westfalen, Germany
Joined: January 11, 2009
KitMaker: 673 posts
Model Shipwrights: 386 posts
Posted: Monday, January 12, 2009 - 03:59 AM UTC
Hi Arjan,
great review of the S-100!
May be it's easier to make that rivets with Archer surface details?
There are different rivets to buy: 0,2 mm, 0,28 mm an bigger. I think in 1:35 scale, the 0,2mm decals are the right choice.
www.archertransfers.de/Surface-Details/Nieten-und-Schraubenkoepfe-02mm::576.html 
Gotrek
Connecticut, United States
Joined: August 03, 2008
KitMaker: 875 posts
Model Shipwrights: 872 posts
Posted: Monday, January 12, 2009 - 04:05 AM UTC
Netherlands
Joined: December 09, 2008
KitMaker: 336 posts
Model Shipwrights: 333 posts
Posted: Monday, January 12, 2009 - 04:45 AM UTC
Hi Michael,
Thanks for your advice. I happened to be looking on the internet for small rivets yesterday . I believe there are no smaller plastic rivets than the Grandt line ones (153 round head) which are 0.32". I tried one yesterday and it's still too big... I removed all the rivets I had added because I didn't like the look of them... Yesterday I started all over again, this time using rivets I shaved off from an old Tamiya Sdkfz 251 kit (I've got two more of these which should give me an ample supply of rivets, at least, for the pilothouse because there are plenty missing from the Kalotte as well ). It's an awful job ,though, shaving these little buggers off and applying them to the pilothouse. Perhaps it would be wiser to order some of these decals you mentioned. Have you used them yourself Michael and do you think they look good?
Gruss,
Arjan
Nordrhein-Westfalen, Germany
Joined: January 11, 2009
KitMaker: 673 posts
Model Shipwrights: 386 posts
Posted: Monday, January 12, 2009 - 07:04 AM UTC
Hi Arjan,
I think, they'll look great, but I have not used them still today, it's an entirely new technology, that molds three dimensional details onto clear decal film that is applied UNDER the paint to add missing details or replace details lost by sanding - to be applied like water slide decals.
I placed my order today; not only the rivets, but also some weld seams for other projects (Revells type VII u-boats).
Here's another link concerning other surface details:
http://www.archertransfers.com/catSurfaceDetails.html Michael
Netherlands
Joined: December 09, 2008
KitMaker: 336 posts
Model Shipwrights: 333 posts
Posted: Monday, January 12, 2009 - 08:07 AM UTC
Thanks a lot Michael,
You convinced me, I will order some as well. I hope you are right about the size , perhaps it's wise to order sheet 8001 first because that seems to contain some different sizes.
Arjan
Nordrhein-Westfalen, Germany
Joined: January 11, 2009
KitMaker: 673 posts
Model Shipwrights: 386 posts
Posted: Monday, January 12, 2009 - 09:39 AM UTC
...look at the pic with RN Commander Hugh Ascoli and the rivets in the background. In comparison to... for example his fingers - I think, the 0,2mm rivets in 1:35 (that are 7mm in original size) are the best choice! The next Archer decal would be 0,28mm in 1:35 and 9,8mm for the real rivet - I think that's too wide in diameter.
So, let's wait... for the rivets... the Schatton mines and depth charges ... Eduard or Aber and so on!
I received my Schatton heavy metal last month: a nice improvement to the plastic parts:

Michael
Netherlands
Joined: December 09, 2008
KitMaker: 336 posts
Model Shipwrights: 333 posts
Posted: Monday, January 12, 2009 - 10:24 AM UTC
Thanks again Michael,
I have no doubt that you are quite right about the size of the rivets. I love the hardware, I'm afraid I will have to order those as well , it's going to be an expensive build. But then we only live once (unless one believes in reincarnation)
. I requested some info about the decal rivets on a Dutch armour forum I visit regularly. It appears that a special liquid is necessary to "glue" them to the surface :
http://www.swannysmodels.com/TheCompleteFuture.htmlThe same person who gave me this advice also felt that the carrier film is rather thick and that it is, therefore, best to cut away as much of this film as possible. He also advised applying the rivets shortly before spraying the model. His final remark was that he felt the rivets were a bit thin. Since there are no good alternatives I will try them anyway.
Arjan
Joined: October 30, 2005
KitMaker: 3,897 posts
Model Shipwrights: 3,301 posts
Posted: Tuesday, January 13, 2009 - 04:03 AM UTC
Just recieved my 1/35 scale Kriegsmarine flag for my S-100:
http://cs.finescale.com/forums/1074541/ShowPost.aspx " TARGET="_blank"> http://cs.finescale.com/forums/1074541/ShowPost.aspx Cheers,
Julian
Thanks for the tip Arjan, not being able to make the link clickable lead to much headscratching yesterday.
Netherlands
Joined: December 09, 2008
KitMaker: 336 posts
Model Shipwrights: 333 posts
Posted: Wednesday, January 14, 2009 - 04:13 AM UTC
Hi Julian,
The paintjob looks very nice indeed and so does the flag. Did you use the Model Master colours or other paint? Have you got other pics of your model as well (some close-ups maybe)? I noticed that there is some variation in the way the foredeck was painted. On some boats the deck area over the torpedotubes isn't completely covered in dark grey and the Schnellbootweiss starts where they slope down toward the sides. By the way, I ordered the Schatton Flak Rohr Set yesterday, I simply couldn't resist them after having seen Michael's pics. They are not terribly expensive either:
http://modellbau-schatton.privat.t-online.de/html/preisliste.htmlArjan
Joined: October 30, 2005
KitMaker: 3,897 posts
Model Shipwrights: 3,301 posts
Posted: Wednesday, January 14, 2009 - 04:46 AM UTC
Hi Arjan, the paints are custom mixed Tamiya acylics. For the schnellboot weiss I used 1 jar of flat white mixed with 1 jar of sky grey (xf-19) to get a lighter grey. The dark grey is 1 jar of German grey (xf-63) mixed with 1 jar of sky grey (xf-19) to lighten that up as well. Postshading is Tamiya smoke and everything is then sealed with Future. Next step will be weathering with oils and pastels and to finish off a coat of satin varnish.
Yes, I was wondering about the curved panels on the foredeck as well. Decided to leave then dark grey as it breaks a rather huge expanse of schnellboot weiss.
I will be be posting more photos (generally post at Fine Scale Modelers but will add links here.
Robert Schatton's barrels arrived just before Christmas and they are really excellent. Robert will be adding depthcharges and mines this month and I don't think I will be able to resist buying a set.
Your build is coming along nicely as well. I will be scratchbuilding the frames that support the hull sides next to the tubes just as you have done, model looks bare compared to your build.
cheers,
Julian
Netherlands
Joined: December 09, 2008
KitMaker: 336 posts
Model Shipwrights: 333 posts
Posted: Wednesday, January 14, 2009 - 05:16 AM UTC
Thanks for your paint recipes. I usually use Tamiya acrylics as well but this time I ordered the Model Master ones. If I don't like the latter I will copy your recipe without hesitation. The usual problem with me is that I find worrying details every day. I noticed e.g. that the detail on the inside of the hatches is quite horrible if you compare it to the original, part 12 E (one of the frames that prevent the gunners from shooting bits off their own boat) was not mounted on the deck itself but rather on the adjacent "platform" (at least on the Lang boat),then there is the missing gunbarrel container on the foredeck etc. etc.

Arjan
Joined: October 30, 2005
KitMaker: 3,897 posts
Model Shipwrights: 3,301 posts
Posted: Wednesday, January 14, 2009 - 05:50 AM UTC
Open hatches in this scale means you have to either add a "black box" beneath the hatch to avoid showing the hull join or doing a tremendous amount of scratch building.
Generally I am an OOB builder but in this scale you sometimes can't avoid a certain amount of "pimping".
I am curious what shade the genuine schnellboot weiss turns out to be. Fun comparing builds in any case
Julian
Okay, I'll bite on this one: where did you find the photo of the spare barrel holder on the fordeck? I have seen a couple of pic's with a rather blurred tube just inside the rail around the 20mm if that is what you mean. Have you got a link to a clearer picture?
Netherlands
Joined: December 09, 2008
KitMaker: 336 posts
Model Shipwrights: 333 posts
Posted: Wednesday, January 14, 2009 - 07:57 AM UTC
The inner side of the hatches: page 42 of the Squadron book , frame I mentioned page 45, bottom left (you may want a magnifying glass here
) and page 25 gives a clear view of the barrel tube. The pic on page 27 also raises questions, in front of the lockers there is a round metal stand/rack whose function is unclear to me. These same round racks can be seen in the Lang boat colour illustration on the rear deck. Meant to contain smoke dischargers or fire-extinguishers or what? These parts definitely look different on the Italeri boat as well.... I think Italeri did include the barrel tube after all, I think it's part E 48, it would appear to be rather small though (that's why I didn't recognize it at first).
Arjan
Joined: October 30, 2005
KitMaker: 3,897 posts
Model Shipwrights: 3,301 posts
Posted: Thursday, January 15, 2009 - 06:42 AM UTC
Hi Arjan,
The hatch cover strengthening/stiffening is easy to scratch with some plastic sheet. Problem is when you look inside the open hatch and see a lot of nothing
The metal holder could be just about anything, when a ship leaves the yard things are adjusted to the way it's used in two fashions: either you buy the the engineer a beer and get him to weld/cobble something up or you put it on a list for the next visit to the shipyard. The holder here could be just about anything. The spare barrel tube looks a bit puny but seems to be in the correct place on the instruction sheet. The photo you pointed me at (missed it completely, probably need new glasses
) shows it in position that is obviously not where it came from. Looks like the Brit navals ransacked the boat when it surrendered. A more beefy tube can be easily scratched methinks.
I have decide to spray the curved tube coverings light grey after your remark yesterday. This will help the shading to show up some more than on on the dark grey. Stand by for photo updates this weekend.
cheers,
Julian
Nordrhein-Westfalen, Germany
Joined: January 11, 2009
KitMaker: 673 posts
Model Shipwrights: 386 posts
Posted: Thursday, January 15, 2009 - 09:24 AM UTC
Hi Arjan,
something new about archer surface details I've just found on perthmilitarymodelling.com: double-row-rivets
www.archertransfers.com/AR88022.html ...maybe it's useful for the boats wheelhouse?!
Michael
Joined: October 30, 2005
KitMaker: 3,897 posts
Model Shipwrights: 3,301 posts
Posted: Thursday, January 15, 2009 - 05:23 PM UTC
Netherlands
Joined: December 09, 2008
KitMaker: 336 posts
Model Shipwrights: 333 posts
Posted: Thursday, January 15, 2009 - 09:38 PM UTC
Thanks Michael/Julian,
The double rows of rivets would probably be ideal for the "doorposts", but I don't think they could be used for other areas on the boat. My sheet of rivets is due to arrive today but so far my paint has not arrived. As for the position of the gun- barrel tube on the lang boat: I feel that this was a deliberate fieldconversion, it would seem that 204 and 205 were rather heavily converted in other areas as well (gunshields, lockers etc). I think that the round metal holders were probably meant to contain fire-extinguishers, on page 41 and 42 of the Frenchman's book similar objects (metal cylinders in metal holders) can be seen. As for the depthcharges, I wonder if these were frequently used on S-100 boats, at least not for hunting submarines I think. Maybe they might have been used to discourage pursuers after having made a strike (in the same manner U.S. PT-boats used theirs). I'm looking forward to your pics Julian, I will make some when my paint arrives...
Cheers,
Arjan
Virginia, United States
Joined: November 03, 2006
KitMaker: 165 posts
Model Shipwrights: 35 posts
Posted: Friday, January 16, 2009 - 12:26 PM UTC
Aren't Archers products"'dry transfer" with no carrier film? Simply "rub" or "burnish" them on right?
Nordrhein-Westfalen, Germany
Joined: January 11, 2009
KitMaker: 673 posts
Model Shipwrights: 386 posts
Posted: Friday, January 16, 2009 - 06:13 PM UTC
it's an entirely new technology, that molds three dimensional details onto clear decal film that is applied UNDER the paint to add missing details or replace details lost by sanding - to be applied like water slide decals.
Netherlands
Joined: December 09, 2008
KitMaker: 336 posts
Model Shipwrights: 333 posts
Posted: Friday, January 16, 2009 - 11:28 PM UTC
Hi Joe,
I received the Archer sheet 88014 yesterday. This is a full sheet containing the smallest rivets of their range. They are probably the right size for the missing rivets on the Kalotte but I feel they are a bit tiny for the rivets on the pilothouse. They are so small that I think one should only apply a thin layer of paint, else this detail may well be obscured. I only ordered the slightly bigger rivet sheet 88015 yesterday. I hope that by tuesday I will be able to show you what the two sizes look like once they have been sprayed. Perhaps there is someone else who can already show what they look like on a finished model.
Cheers,
Arjan
Joined: October 30, 2005
KitMaker: 3,897 posts
Model Shipwrights: 3,301 posts
Posted: Saturday, January 17, 2009 - 06:25 AM UTC