Ships by Class/Type: Military Small Craft
For topics on PT boats, landing craft, Vietnam riverine, etc.
K98 HMS Zinnia 1/350 Mirage + WEM
RedDuster
Visit this Community
England - South East, United Kingdom
Joined: March 01, 2010
KitMaker: 7,078 posts
Model Shipwrights: 6,649 posts
Posted: Sunday, January 12, 2014 - 07:21 AM UTC
A quick update, on with the maindeck fittings.

Depth charges and ladders first.


Minesweeping gear second.


there are two vents numbered B83 that I cannot seem to find on the sprue, but that could be what Mrs Duster calls "man eyes". will look again on the next bash

Si
RedDuster
Visit this Community
England - South East, United Kingdom
Joined: March 01, 2010
KitMaker: 7,078 posts
Model Shipwrights: 6,649 posts
Posted: Saturday, January 18, 2014 - 08:25 AM UTC
Small update, first job was to prepare the bridge for it's planking, this involved filling the pat of the enlarged hole for the ladder up from the fo'c'sle deck. The original hole in the kit component is too small and in the wrong place. here is plastic strip outlining the correct size and position for the hole.


At this levet of enlargement, I can see I need to tidy up the after side.

The hole filled with gap filling superglue, and the bridge test fitted, also the depth charge throwers added.


Si
Shanghaied
Visit this Community
Schleswig-Holstein, Germany
Joined: June 30, 2011
KitMaker: 189 posts
Model Shipwrights: 106 posts
Posted: Saturday, January 18, 2014 - 09:56 PM UTC
Hi Simon,

Are the ladders up to the foc'sle not included in the WEM set?

Greetings from Shanghai
Gremlin56
Joined: October 30, 2005
KitMaker: 3,897 posts
Model Shipwrights: 3,301 posts
Posted: Sunday, January 19, 2014 - 12:02 AM UTC
Looking good Simon, quite a handful in this scale,
RedDuster
Visit this Community
England - South East, United Kingdom
Joined: March 01, 2010
KitMaker: 7,078 posts
Model Shipwrights: 6,649 posts
Posted: Sunday, January 19, 2014 - 06:50 AM UTC
Hi Tom,

I think the angle does not flatter the etched ladders, The side s are very narrow, and did not want to bend up at all, a bit fun to fit.

Hi Julian,

it is a handful, Mirage have put a lot of thought into the design, but the execution is a little crude, has a bit of a limited run feel to it, but all that said still a worthy kit.

Si
Shanghaied
Visit this Community
Schleswig-Holstein, Germany
Joined: June 30, 2011
KitMaker: 189 posts
Model Shipwrights: 106 posts
Posted: Sunday, January 19, 2014 - 05:24 PM UTC
HI Julian,

I meant the two at the aft side of the foc'sle down to the main deck, not the bridge ladder.

Greetings from Shanghai
RedDuster
Visit this Community
England - South East, United Kingdom
Joined: March 01, 2010
KitMaker: 7,078 posts
Model Shipwrights: 6,649 posts
Posted: Monday, January 20, 2014 - 09:52 AM UTC
Hi Tom,

Just to clarify, here is a better shot of the ladders, they are from the WEM set.


What this also shows I have a bit of tidying up to do on the paintwork.

All the best.

Si
amegan
#243
Visit this Community
England - North East, United Kingdom
Joined: March 21, 2008
KitMaker: 996 posts
Model Shipwrights: 16 posts
Posted: Wednesday, January 22, 2014 - 09:20 AM UTC
Very nice, I have built only the 1/72 kits and I'm gob smacked at the detail you are getting at a fifth of the size of mine. It is a while since I read "Three Corvettes" but in it Nicolas Montsarrat clearly indicates that the shipyards would try and modify ships right from the build to please the captain. I doubt if two corvettes were alike so keep doing what you are doing, and if anyone says it is wrong ask them to prove it! I bet they can't.
RedDuster
Visit this Community
England - South East, United Kingdom
Joined: March 01, 2010
KitMaker: 7,078 posts
Model Shipwrights: 6,649 posts
Posted: Wednesday, January 22, 2014 - 10:03 AM UTC
Thanks Andrew,

Appreciate your comments. I am sure Monserrat was right (I remember reading My father's copy of three corvettes about a lot of years ago. That is the real interest for me in small ships, they were far more individual that bigger ships, makes research "interesting" and involves some guesswork, unless you are really lucky, but it is fun.

Si
RedDuster
Visit this Community
England - South East, United Kingdom
Joined: March 01, 2010
KitMaker: 7,078 posts
Model Shipwrights: 6,649 posts
Posted: Saturday, January 25, 2014 - 05:49 AM UTC
Onward, cutting the wood deck for the bridge. because of the shape and cowardice I decided not to do this in one go.

First piece on.


all four section cut and in place.


The bridge fixed in place, and the davits for the depth charge throwers.


I have also picked out the lower bridge windows, and the skylight ports in black to give a bit of depth.

Si
Shanghaied
Visit this Community
Schleswig-Holstein, Germany
Joined: June 30, 2011
KitMaker: 189 posts
Model Shipwrights: 106 posts
Posted: Saturday, January 25, 2014 - 09:37 PM UTC
HI Simon

Coming together nicely!

Greetings from Shanghai
RedDuster
Visit this Community
England - South East, United Kingdom
Joined: March 01, 2010
KitMaker: 7,078 posts
Model Shipwrights: 6,649 posts
Posted: Sunday, January 26, 2014 - 12:13 AM UTC
Thanks Tom,

It was a bit of trail and error getting the decking cut for the bridge, but I think it was worth the effort.

I am definitely going to invest in some of Artworx plain sheets of decking for those kits that there is no pre cut deck available.

Si

RedDuster
Visit this Community
England - South East, United Kingdom
Joined: March 01, 2010
KitMaker: 7,078 posts
Model Shipwrights: 6,649 posts
Posted: Saturday, February 01, 2014 - 09:30 AM UTC
a bit more progress, the etched bridge folded and awaiting glueing.


Painted and fitted in place, wooden decking has been cut from leftovers. The windows I will be glazed with micro Crystal klear.


details going on the after section of the fo'c'sle deck level as well, suppot ofr the 2pdr platform and cable reels.


The rear bridge railings fitted, may be due to my fettling making custom cut wood decking fit, but I could not getht ebulwarks to fit, but will scratch that from good old evergreen.


Si
RedDuster
Visit this Community
England - South East, United Kingdom
Joined: March 01, 2010
KitMaker: 7,078 posts
Model Shipwrights: 6,649 posts
Posted: Sunday, February 02, 2014 - 06:43 AM UTC
Scratchbuilt Bulwark well under way, all three sections made, and the front and starboard sections fitted, the port section sitting on the foredeck.


The starboard section fitted, along with the ralings around the compass platform, these have been filled with micro crystal clear, along with the bridge windows, as the name suggests, these will dry clear.


Whilst that is drying on with the funnel, built.


The funnel cap is very crude, so it had to go, there is an etched replacement on the WEM fret. Here it has been removed, and the rim and interior given a coat of matt black.


The funnel has had the cap fitted glued in place and the green camo painted on, unfortunately I did not have time to put the 507A on so no pic yet.

Also the 2pdr platform has been built, one of the sides of the access shelter did not come off the sprue cleanly, the attachment points are a bit heavy on some of the fragile parts making life interesting. It was repaired with plastic strip, a section of etched ladder has been fitted, now awaits a little clean up and paint.


Si
Littorio
Visit this Community
England - South East, United Kingdom
Joined: September 15, 2004
KitMaker: 4,728 posts
Model Shipwrights: 1,080 posts
Posted: Sunday, February 02, 2014 - 06:59 AM UTC
Simon, I'm following along in the background and taking notes.
I have both the Flower class releases and will with best intentions make a start later this year, the prey is being built first with several u-boats on the bench.
RedDuster
Visit this Community
England - South East, United Kingdom
Joined: March 01, 2010
KitMaker: 7,078 posts
Model Shipwrights: 6,649 posts
Posted: Monday, February 03, 2014 - 08:13 AM UTC
Hi Lucinano,

Thanks for looking, also please feel free to ask any questions, or make any suggestions.

These are interesting little kits to build, a little "limited run" in style, but a vey good effort non the less.

Si
Shanghaied
Visit this Community
Schleswig-Holstein, Germany
Joined: June 30, 2011
KitMaker: 189 posts
Model Shipwrights: 106 posts
Posted: Wednesday, February 05, 2014 - 01:06 AM UTC
Hi Simon

Great Progress!
Btw I use exactly the same technique for the windows and the canvas on the rail. Krystal Klear is very useful stuff!
Does your Zinnia having the sandbag protection for the bridge?

Greetings from Shanghai
RedDuster
Visit this Community
England - South East, United Kingdom
Joined: March 01, 2010
KitMaker: 7,078 posts
Model Shipwrights: 6,649 posts
Posted: Wednesday, February 05, 2014 - 08:26 AM UTC
Hi Tom,

I may well do, I am making what feels like several yards of splinter matting for HMS Tiger I am building over on the Great War Campaign on armourama, another few inches won't be too much extra work.

Si
Shanghaied
Visit this Community
Schleswig-Holstein, Germany
Joined: June 30, 2011
KitMaker: 189 posts
Model Shipwrights: 106 posts
Posted: Wednesday, February 05, 2014 - 08:26 PM UTC
Hi Simon,

try thin cardboard (the one with a smooth surface e.g. from a kitbox). You can slightly cut the surface to simulate the lashings and it gives a much different surfaces from plastic.
You can see it on my pic of the Campion .

Greetings from Shanghai
RedDuster
Visit this Community
England - South East, United Kingdom
Joined: March 01, 2010
KitMaker: 7,078 posts
Model Shipwrights: 6,649 posts
Posted: Thursday, February 06, 2014 - 07:01 AM UTC
Thanks Tom, I will give that a try, I can see advantages over the plastic strip method.

Si
surfsup
Visit this Community
Queensland, Australia
Joined: May 20, 2010
KitMaker: 1,230 posts
Model Shipwrights: 1,212 posts
Posted: Tuesday, February 11, 2014 - 07:45 PM UTC
Looking very nice Si.....Cheers Mark
RedDuster
Visit this Community
England - South East, United Kingdom
Joined: March 01, 2010
KitMaker: 7,078 posts
Model Shipwrights: 6,649 posts
Posted: Wednesday, February 12, 2014 - 08:20 AM UTC
Thanks Mark,

It is a nice little kit

Si
mgrummitt
Visit this Community
California, United States
Joined: January 07, 2014
KitMaker: 133 posts
Model Shipwrights: 105 posts
Posted: Friday, February 14, 2014 - 03:08 AM UTC
Hi Simon,

I'm following your other builds as well and wanted to say great job on all of your builds.

Do you have multipule work stations? LOL
RedDuster
Visit this Community
England - South East, United Kingdom
Joined: March 01, 2010
KitMaker: 7,078 posts
Model Shipwrights: 6,649 posts
Posted: Friday, February 14, 2014 - 08:31 AM UTC
Thanks Mike,

I don't have multiple workstations, just a disorganised tip of a workbench. I will post a pic with the weekend update. Don't ask me how but it works.

Si
RedDuster
Visit this Community
England - South East, United Kingdom
Joined: March 01, 2010
KitMaker: 7,078 posts
Model Shipwrights: 6,649 posts
Posted: Sunday, February 16, 2014 - 08:53 AM UTC
Tom, this is my attempt at your method.

a bit of vertical engraving which doesn't show well on this view, then cut into strips.


Then, the lashing point engraved, and shot light grey from a rattle can.


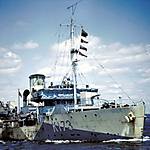
Fitted in the raw state around the bridge, not perfect but I am quite pleased with the effect.


The 2 pdr platform has also been padded, the bulwark moulded on the platform is a little low, so the padding really helps.


The bridge padding has also been painted and washed.

The vents added around the funnel and the funnel stay worked in around them. The 2 pdr platform padding has also had a darker wash, a bit "washed out" by the flash on the camera (If you'll pardon the pun).


I found some L'arsenal resin depth charges left over from another project to fill the depth charge racks, here they ae having a coat of Tamiya XF69 Nato Black.


The depth charges being fitted to the racks.


The racks under construction.


and in place.


Few touch ups with brush needed, both on the racks and the fittings on the deck.

ore soon.

Si.