You are viewing the archived version of the site.
Go to modelshipwrights.com for the current dynamic site!
Go to modelshipwrights.com for the current dynamic site!
1⁄700Build Up of the Tamiya 1:700 IJN Yamato
8
Comments
Hull and Deck Detailing
After the deck film had dried thoroughly, I started at the bow and using the plans in the book went through and added photoetch, paper and styrene parts that I was able to. There are difficulties detailing a ship this small, however the amount of detail that can be added is limited only by your modeling skills and materials at hand.
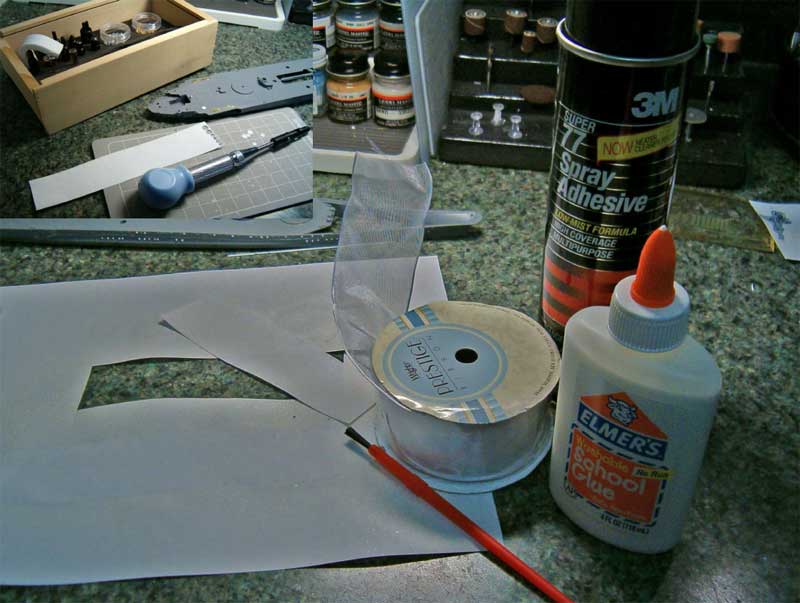
I made some homemade tread plate by using a fine mesh crafting ribbon, spray adhesive, paper and white glue. The wire edge was cut off the ribbon and attached to the paper with a light coating of spray adhesive. Once dry, diluted white glue was brushed over the ribbon to help eliminate the weave look and make the item more durable. When cutting out parts, cut edges diagonal to the weave pattern for an accurate tread plate look. Circles were cut using a scrapbooker’s hole and rivet punch set from the craft store.
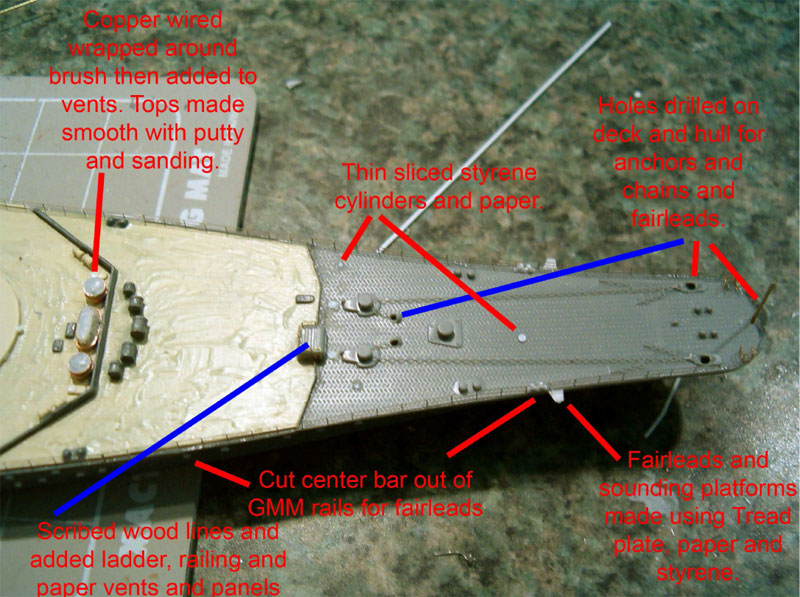
I used Gold Medal Model’s bow railing for the main deck up to the four rear Shielded AA guns as shown in the photos. This railing is very durable and looks good, but can be hard to shape and bend. Tom’s Modelworks’ railing doesn’t look quite as nice, but is easier to cut and shape. The following pictures will demonstrate better what was done to the various portions of the deck to detail it. The guns labeled “F” in the kit instructions were added now and detailed. Detailing for them will be discussed later on as well as the crane assembly.
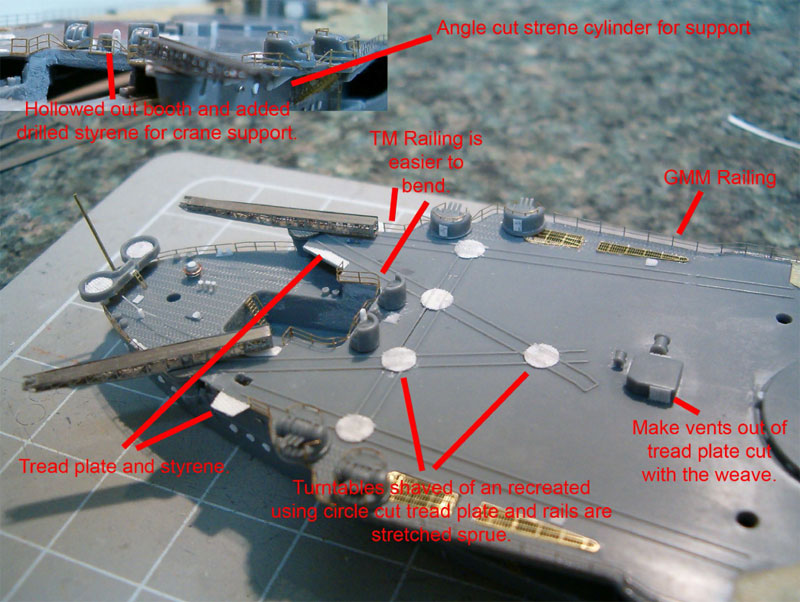
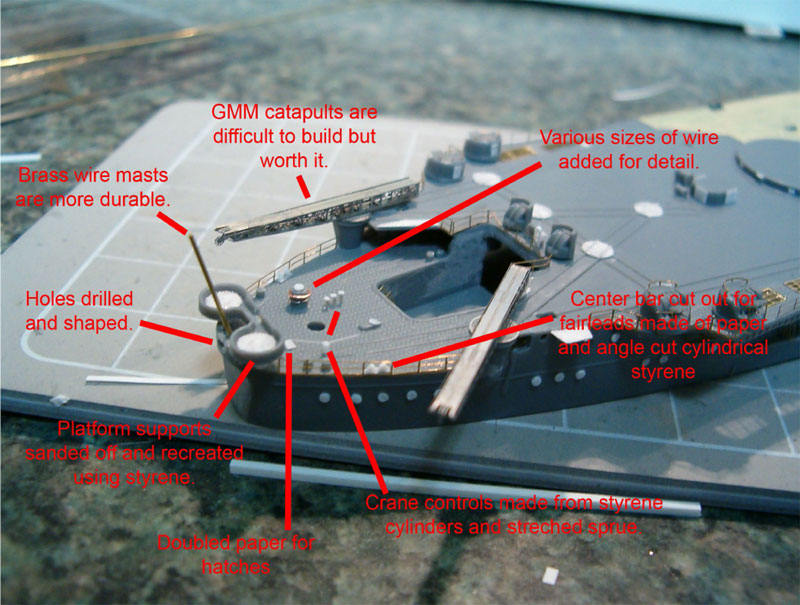
Now is the time to decide if and how any planes will be displayed on the Yamato. If you want a plane being launched, the catapults need to line up with the center booth that was hollowed out. Decide how the rails will be positioned on the turntables as well. There are photoetch kits available that let you redo the rails and turntables in greater detail if you so desire. The Gold Medal catapults are more detailed and durable so I decided to use them on the model.
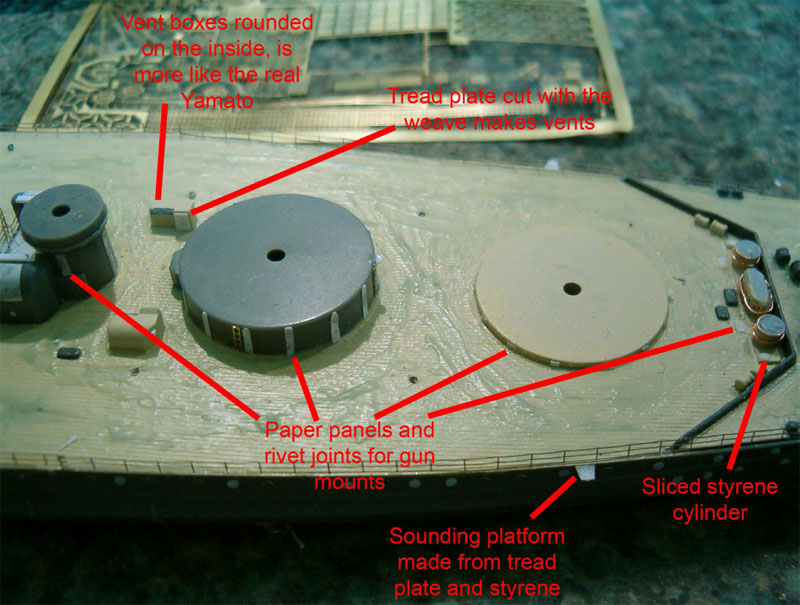
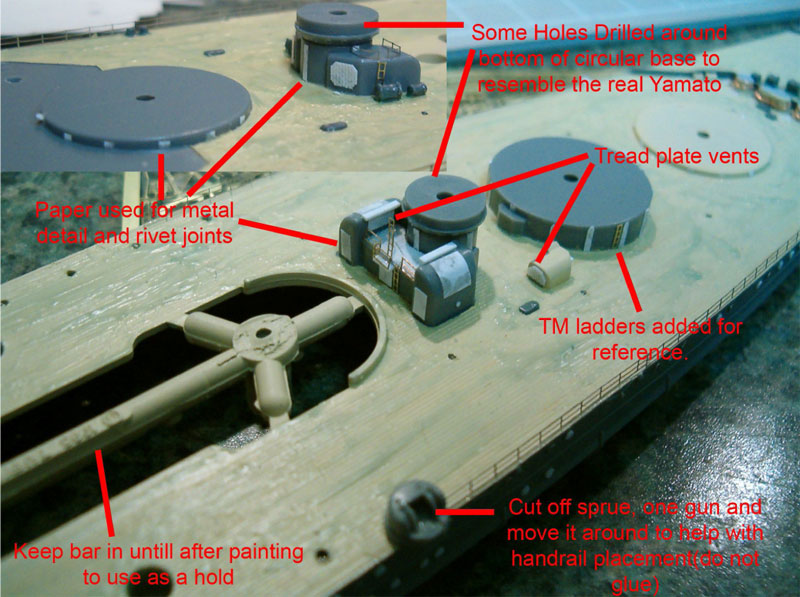
Once I was satisfied with the detailing I had done, I applied another layer of liquid mask over the wood deck to make sure it was well protected. I left a few big globs of the mask around to help aid in its removal after painting. I then used water soaked and dry paper towels and cotton swabs to gently clean the larger areas of the hull to prep it for painting.
Comments
Thank you Anthony for sharing this incredible build with us. This is one of the finest ship models I've ever seen and in 700th scale no less! Your step by step instructions are much appreciated. There are enough construction tips there to keep me coming back over and over.
Thanks again Anthony for a majestic build and thanks Mark for posting.
Frank
JUL 20, 2008 - 02:36 AM
Hi Anthony
Thanks for writing this future reference great article!
I know that it is supposed to be used with the AOTS book (just "sitting" there looking at me), but I must say that you already have cut the path through the jungle - if I might use this way of expression!
Also I would like to make a small correction on a little thing and a challenge...
correction: you called the wooden thing on the stern a raft. It isn't, it is a emergency rudder;
challenge: you have gone the extra mile on this beauty, and although I could accept the water base for other model, in this particular case, I would say that it deserves a better one
Congratulations Anthony!!!
Rui
JUL 20, 2008 - 09:12 AM
Simply one of the best I've seen in a long time.
Thank you for sharing!
JUL 20, 2008 - 02:50 PM
Amazing workmanship there Anthony. Thanks for sharing and giving up all those tips and tricks. I know where I am going to be looking when I start working on my Musashi and Yamato models. One heck of a build and shows just what can be accomplished with the divine scale and some careful work.
JUL 20, 2008 - 04:51 PM
instant bookmark... just gorgeous,, hope my 350 nagato comes out 1/10th a s good as this one... will be watching and going over this one a long time, thanks for sharing!
JUL 22, 2008 - 11:24 AM
Thank you all for your replies. I really enjoy reading full buildup articles and thought I'd write one of a model I had a reference book and several sets of photoetch for. To spite several revisions I still can see alot of spelling/grammer errors I made in the document.
This model also recently won First place, Judges grand and several other awards in a local IPMS show, I was very pleased. Your right that I took the easy way out on the water and perhappes I'll practice and try one day on giving it a better base.
A reason this looked so good is that the kit itself is awesome. It comes with peices to build all versions of the Yamato. I'm going to be using it to build a 1944 Musashi in the future. If you want a good looking kit out of the box this is it. I highly recommend it.
JUL 22, 2008 - 12:59 PM
Indeed Anthony (I have both the Yamato and Musashi in the stash, waiting for better skills)
Thanks again
Rui
JUL 23, 2008 - 12:54 AM
Copyright ©2021 by Anthony Kochevar. _OPINIONS Model Shipwrights, KitMaker Network, or Silver Star Enterrpises. Images also by copyright holder unless otherwise noted. Opinions expressed are those of the author(s) and not necessarily those of Model Shipwrights. All rights reserved. Originally published on: 2008-07-20 00:00:00. Unique Reads: 39630


