

Go to modelshipwrights.com for the current dynamic site!


Hosted by Steve Joyce
Doug Hallets 1/350 Yamato build

Budgie

Joined: November 02, 2010
KitMaker: 163 posts
Model Shipwrights: 162 posts

Posted: Monday, January 03, 2011 - 01:53 PM UTC
Thanks Mark. Today is the last day of this cold snap, so back to work on the project tomorrow.
Budgie
Joined: November 02, 2010
KitMaker: 163 posts
Model Shipwrights: 162 posts
Posted: Thursday, January 06, 2011 - 05:44 PM UTC
Hello folks, after a 5-6 day spell of below-freezing nights here in Seattle that made my basement work shop completely unlivable (combined with the drudgery of back-to-work) the weather has finally moderated enough to make venturing downstairs feasible. Back around the 31st, I actually brought stuff upstairs to the kitchen to work on, but was less than pleased with the results, so everything is much better now that I have my full set-up available...
My current project is to add some hull plating and rivet plates to the hull, prior to adding portholes and degaussing cable. This will follow a technique I found on one of the Japanese web sites I've been monitoring:
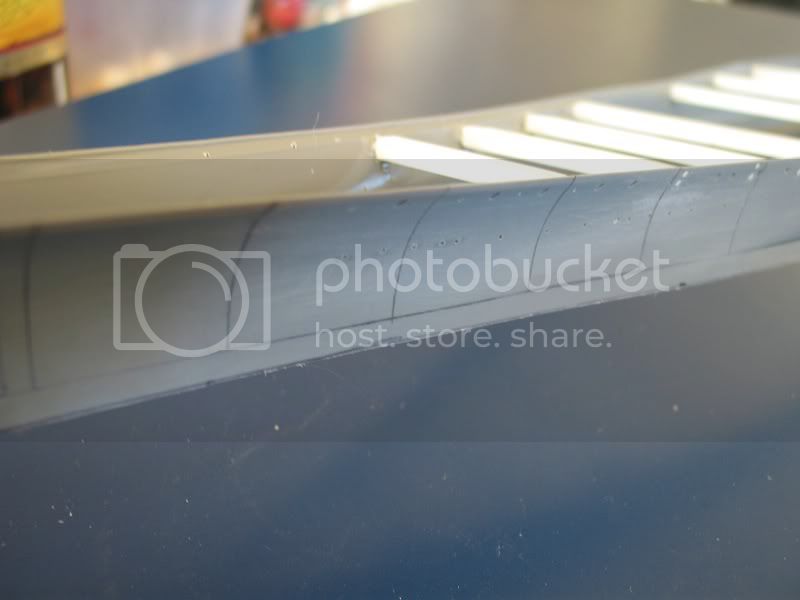
First step is to line off the hull in 25 mm segments, which will correspond to the locations of rivet plates.
I then glued Evergreen .010 x .156" strip styrene in two parallel lines (the bow has a short third one) throughout most of the hull, except for the portion where the hull braces hold the angled void areas mid-ships. The strips are 4 mm wide, which allowed me to run the upper one between the two rows of upper portholes and avoid covering them up. As this required repositioning the strip to follow the shear of the hull as it dropped to the bow, it tended to be a bit messy and considerable time was spent after wards sanding away glue marks.
There would be an additional strip below the waterline had this been a full-hull display, but adding it is unnecessary since the top edge exactly matches the waterline marker. However, the area below the waterline marker will still get a set of rivet plates to simulate this.
My current project is to add some hull plating and rivet plates to the hull, prior to adding portholes and degaussing cable. This will follow a technique I found on one of the Japanese web sites I've been monitoring:
First step is to line off the hull in 25 mm segments, which will correspond to the locations of rivet plates.
I then glued Evergreen .010 x .156" strip styrene in two parallel lines (the bow has a short third one) throughout most of the hull, except for the portion where the hull braces hold the angled void areas mid-ships. The strips are 4 mm wide, which allowed me to run the upper one between the two rows of upper portholes and avoid covering them up. As this required repositioning the strip to follow the shear of the hull as it dropped to the bow, it tended to be a bit messy and considerable time was spent after wards sanding away glue marks.
There would be an additional strip below the waterline had this been a full-hull display, but adding it is unnecessary since the top edge exactly matches the waterline marker. However, the area below the waterline marker will still get a set of rivet plates to simulate this.
Budgie
Joined: November 02, 2010
KitMaker: 163 posts
Model Shipwrights: 162 posts
Posted: Thursday, January 06, 2011 - 05:54 PM UTC
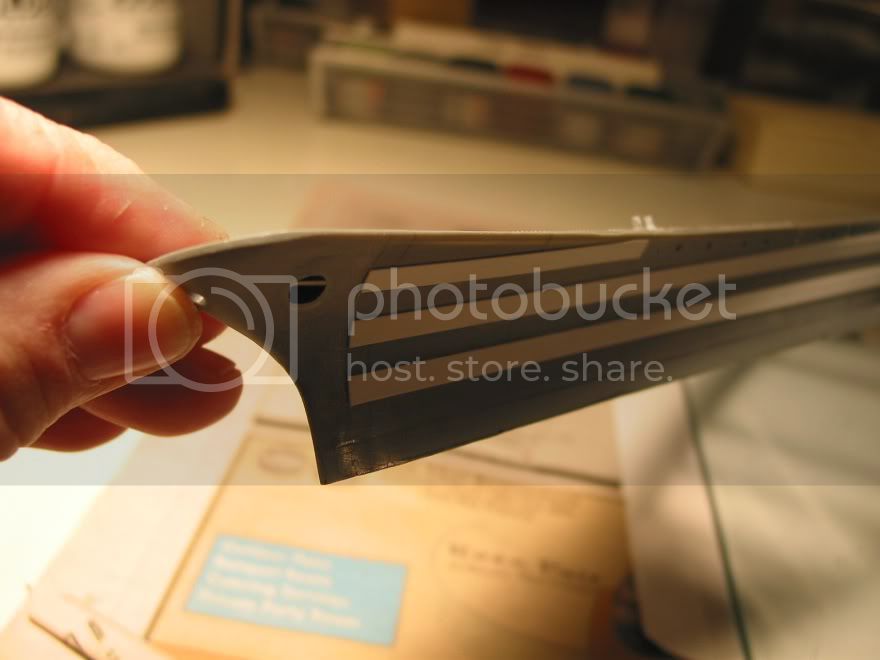
I am now in the process of making rivet plates:
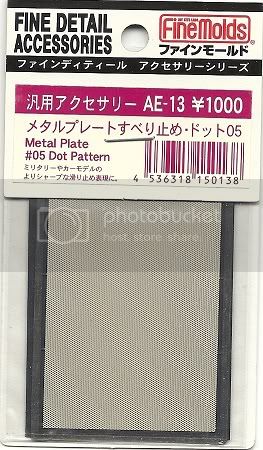
Using the Fine Molds "dot pattern" metal sheet, I cut it up into small strips 4 mm long, which corresponds to the width of the Evergreen strips.

I then divided those into smaller pieces that match an approximate size for a generic rivet plate. These will be glued onto and between the Evergreen strips in alternating patterns. As you can imagine, making these pieces is time consuming, so I am only about 1/3 through the process of making enough fo the entire hull. Hopefully this will be done by the weekend and the hull can actually begin to take shape.
Using the Fine Molds "dot pattern" metal sheet, I cut it up into small strips 4 mm long, which corresponds to the width of the Evergreen strips.
I then divided those into smaller pieces that match an approximate size for a generic rivet plate. These will be glued onto and between the Evergreen strips in alternating patterns. As you can imagine, making these pieces is time consuming, so I am only about 1/3 through the process of making enough fo the entire hull. Hopefully this will be done by the weekend and the hull can actually begin to take shape.
javlin
Joined: August 28, 2008
KitMaker: 106 posts
Model Shipwrights: 92 posts
Posted: Friday, January 07, 2011 - 04:56 AM UTC
So the screen material is .010" thick also?It will be interesting to see the result for I do not think I have ever noticed it before on a ship.When you post the results can you post a pic of what you are replicating?Cheers

Dr_Who2

Joined: September 17, 2008
KitMaker: 90 posts
Model Shipwrights: 89 posts
Posted: Friday, January 07, 2011 - 09:18 AM UTC
Hi Doug,
Very laborious and honorable build log you started here.
I found this log slightly too late but did not want to miss to ask something about the aircraft hangar:
Since we approximately have the same references, did you ever find a source detailing that area?
The ModelArt #745 Super Illustration on Yamato sais something I never found verfied, neither in text nor in photographs and in no drawings. On page 107 it reads:
The Kure Yamato Museum 1/10 model also is missing the hangar interior.

Very laborious and honorable build log you started here.
I found this log slightly too late but did not want to miss to ask something about the aircraft hangar:
Since we approximately have the same references, did you ever find a source detailing that area?
The ModelArt #745 Super Illustration on Yamato sais something I never found verfied, neither in text nor in photographs and in no drawings. On page 107 it reads:
Quoted Text
There was a hugh aircraft hangar inside of the door from which aircraft were carried out and hoisted onto deck by the crane. Since there have been many of commemoration photographs of the crews taken in the hangar found and from these certain details of the aircraft hangar has been cleared...
The Kure Yamato Museum 1/10 model also is missing the hangar interior.
Budgie
Joined: November 02, 2010
KitMaker: 163 posts
Model Shipwrights: 162 posts
Posted: Friday, January 07, 2011 - 01:20 PM UTC
Hi Kevin, There are no pictures of Yamato available which show hull details, but this is a picture of Queen Mary I taken at Long Beach, which shows the rivet plate pattern I'm trying to replicate.
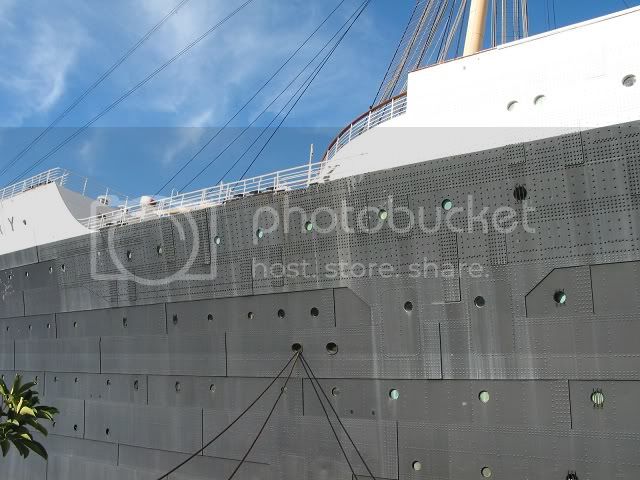
Queen Mary was actually contemporary to Yamato, built just a few years earlier. As thin as the strips are, I will probably try to sand them down a little bit more first. It looks a little garish right now but I think that is mainly because of the color contrast with the white strips. I'm planning a wider plate separation than seen here on QM.
Queen Mary was actually contemporary to Yamato, built just a few years earlier. As thin as the strips are, I will probably try to sand them down a little bit more first. It looks a little garish right now but I think that is mainly because of the color contrast with the white strips. I'm planning a wider plate separation than seen here on QM.
Budgie
Joined: November 02, 2010
KitMaker: 163 posts
Model Shipwrights: 162 posts
Posted: Friday, January 07, 2011 - 01:26 PM UTC
Hi Dariush, no no other research uncovered on the hangar configuration, but I am pretty much locked in to my design in any event. I'm assuming that one of the too-numerous-to-count CGI books on Yamato that get constantly published in Japan probably has a mock-up of the hangar area, but its not that important. I did add a couple more large deck hatches to the hangar that came from the WEM set, based on access panels I've seen in places like the USS Midway hangar. I will do the walls in a light gray or light green to allow a little more visibility to the area and contrast the hull color.
Budgie
Joined: November 02, 2010
KitMaker: 163 posts
Model Shipwrights: 162 posts
Posted: Sunday, January 09, 2011 - 05:29 AM UTC
Speaking about CGI artists, here's a web page for one of them with a nice set of pictures on both Yamato and Musashi (the first two sections):
http://w2322.nsk.ne.jp/qm.masaki/index.html
Although some of these pics are more demonstrations of how he builds and layers his design, some will actually be useful as-is to modelers, such as the one on page 4 showing the facets to to the 460 mm turret sides (which are incorrect on the Tamiya kit).
Yesterday I began placing rivet plates on the hull. The effect is quite nice, so I hope to have pics for you all shortly.

gator
Vendor

#027
Joined: April 13, 2005
KitMaker: 5,422 posts
Model Shipwrights: 5,079 posts

Posted: Sunday, January 09, 2011 - 06:23 AM UTC
Outstanding progress Doug.

Angeleyes

Joined: December 14, 2008
KitMaker: 154 posts
Model Shipwrights: 149 posts

Posted: Sunday, January 09, 2011 - 07:40 AM UTC
Doug,
regarding rivets on the hull plating:I have read somewhere if i remember well, that the outer hull plating of the yamato apart from the section of the armor belt, was a series of overlapping plates in rows.The method of joining these plates was mainly welding (new techniques were devised specially to overcome problems associated with the construction of so large hulls) and rivets were not that much used .Certainly nothing like the QMary.If i recall mainly from what i saw on other models , there are a pair of very prominent rivets at both ends of each plate (4 corners ) but not much else, and in any way not really visible for the scale you working on.
There is a useful drawing on J.Skulski book page 52,53,54 regarding overlapping of plates.I remember reading somewhere about the welding method the Japanese had to use on Yamato hull.
Budgie
Joined: November 02, 2010
KitMaker: 163 posts
Model Shipwrights: 162 posts
Posted: Sunday, January 09, 2011 - 08:40 AM UTC
Hi Kostas, I don't have the Skulski book available right now but I was familiar with there being different interpretations of the hull pattern. This picture is from the blog for a 1/200 Musashi done by "Shin1966" and has a combination of rivet plates, especially below the water line, riveted hull plates adjoining each other (or perhaps overlapping on the butt ends) but not connected by a rivet plate, and welding (mostly around the area where the boat and plane hangars are:
Whatever sources he uses, I tend to feel they are based on best available, considering the recent nature of the build and time he's spent on it. I decided early on that I do not have the temperament to replicate each individual hull plate as he has done, at least not in 1/350 scale, so I've settled on a representation that gives a feel for plating and some riveting without necessarily being 100% accurate.
Whatever sources he uses, I tend to feel they are based on best available, considering the recent nature of the build and time he's spent on it. I decided early on that I do not have the temperament to replicate each individual hull plate as he has done, at least not in 1/350 scale, so I've settled on a representation that gives a feel for plating and some riveting without necessarily being 100% accurate.
Budgie
Joined: November 02, 2010
KitMaker: 163 posts
Model Shipwrights: 162 posts
Posted: Sunday, January 09, 2011 - 02:06 PM UTC
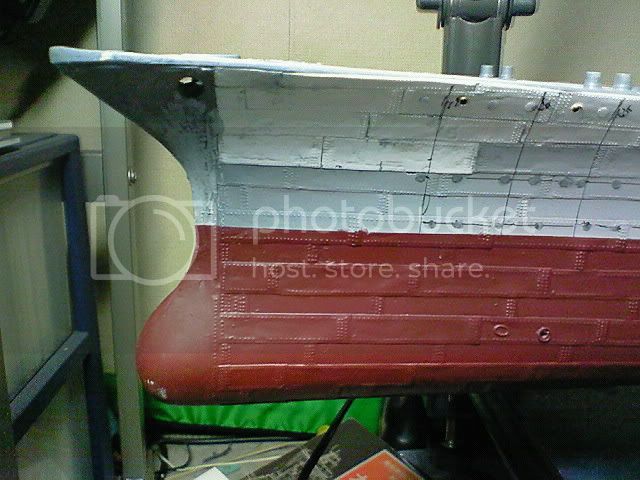
OK, port side has had the rivet plates added; spacing for plates is every 50 mm in a line, so as mentioned, they are more to give a flavor for the effect rather than replicate any particular pattern exactly. The bottom row is actually below the water line and will only be partially seen. We shall see how well this works once I get the rest of the hull-side items attached.
Angeleyes
Joined: December 14, 2008
KitMaker: 154 posts
Model Shipwrights: 149 posts
Posted: Sunday, January 09, 2011 - 09:23 PM UTC
Seen his work on the 1/200 scale i would say even if accurate that they are grossly over scaled.The drag in the real ship from a hull like that would be enormous.
In the J.Skulski book it shows the hull plates thickness in a typical midships frame and in millimeters are as follows:Starting from top row closest to deck level
25mm
next row
18mm
next row 25mm
then armor belt
then underwater portion of hull were all plates have a maximum thickness of just 14 mm until the very lower portion were thickness goes up to 16 ,18 and eventually the bottom side of the hull were thickness was 22mm.
With all that in mind , in 1/350 in the visible area of the hull , if one would wish to portray the overlapping effect and taking into account the maximum difference between 2 plates , that would be 25mm were the thickest plate (25mm)would overlap the thinnest (18mm).That would equate at around 0.07 of a millimeter in other words not even a tenth of a millimeter more closer to 1/15 of a millimeter or something like the thickness of aluminum foil .In 1/200 scale that would be around 0.12 millimeter , or something like a normal paper sheet .
Now considering you are using Evergreen plastic strip to simulate the overlapping effect between the plates , and assuming the strip has just 0.5mm thickness in 1/350 scale that would be equal to a real world of 17.5cm thickness of just the outer plates, never mind if the strip is 1mm.Then your outer plates of the hull would seem to have thickness as much as some Battleships had on their main armor belt or around 35cm.
This is only to give you an idea on arithmetic on Yamato and the scale you are working on.I know sometimes we have to go over scale in order to portray a detail otherwise simply impossible to do, but the hull plating will affect a very large portion of the model surface , and playing a decisive factor in the overall realism in my opinion.
Also check the 1/10 pictures of the Yamato model and see if you can really distinguish that much the hull plating .That is another indication of how prominent it should be in a model 35 times smaller that this.
Senkan
Joined: January 10, 2011
KitMaker: 19 posts
Model Shipwrights: 18 posts
Posted: Sunday, January 09, 2011 - 10:13 PM UTC
Hey Doug. I put copper foil tape on my 1/200 Yamato. I worked out well. It allows you to keep the hull detail (it's foil tape). I didn't include the raised plates but I am considering taking off a row of tape. The tape size I used was 5/16" For a 1/350 the size would be about 3/16" I have some pics but my camera phone really sucks. One is in black and white since it seemed to come out better. Not sure how to post pics on this forum so I put the pics here:
http://www.shipmodels.info/mws_forum/viewtopic.php?f=4&t=33239&p=384483#p384483
http://www.shipmodels.info/mws_forum/viewtopic.php?f=4&t=33239&p=384483#p384483
Angeleyes
Joined: December 14, 2008
KitMaker: 154 posts
Model Shipwrights: 149 posts
Posted: Sunday, January 09, 2011 - 10:46 PM UTC
I might have been wrong regarding rivet number and positioning, but given their size , i doubt one could see them in 1/350 scale at all.Just a 2cm of a rivet head above the plate is around 0.06 of a mm in 1/350 , thinner than a layer of paint.
Probably more effective to portray them with a very fine pin size hole and some black oil wash.
Probably more effective to portray them with a very fine pin size hole and some black oil wash.
Senkan
Joined: January 10, 2011
KitMaker: 19 posts
Model Shipwrights: 18 posts
Posted: Sunday, January 09, 2011 - 11:13 PM UTC
I used a pounce wheel to make my rivets. You can't see then from a distance. Now I was building in 1/200 scale but there are pounce wheels that will produce smaller indentions.
I like adding more detail to models. Nothing overboard. I like the way the protruding plate on these models looks (even though i didn't use it). If doug likes the added detail...albeit not 100% to scale...I say go for it. The deck planking on my Yamato is not to scale but I like the way it looks....
I like adding more detail to models. Nothing overboard. I like the way the protruding plate on these models looks (even though i didn't use it). If doug likes the added detail...albeit not 100% to scale...I say go for it. The deck planking on my Yamato is not to scale but I like the way it looks....

blaster76
Joined: September 15, 2002
KitMaker: 8,985 posts
Model Shipwrights: 3,509 posts

Posted: Monday, January 10, 2011 - 05:14 AM UTC
Loking at that detail shot of the overlapping plate and rivet scheme on the 1/200 version, I have to agree with Kostas on the scale issue.That is just way to pronounced and in real life would have hampered the streamlining. WOW the thickness of paint. I think I would forgo all that effort. I am enjoying the build. i still have a Yamato kit kicking around, so maybe if i ever get rich i'll get the Lionroar Super kit and some of those super 127mm gun sets and have a go at a super accurate kit myelf. I am just wondering why one of the manufactureres hasn't done a new one yet. Revell redid the Bismarck, so at least one manufacturer isn't afraid of the almighty Tamiya.

Budgie
Joined: November 02, 2010
KitMaker: 163 posts
Model Shipwrights: 162 posts
Posted: Monday, January 10, 2011 - 02:15 PM UTC
Hey guys, well that generated a lot of feedback and you are certainly not making it easy on me, which I guess is to be expected when you display your work to your contemporaries far and wide for comment. I will admit that I have some concern over the scale effect of the .010 plating and the validity of the commentary by Kostas. However, my feeling is that over-scaling the plating and rivets is preferable in this case than not doing anything at all - Yamato certainly had more of a 30s feel to it than many other ships from the era and certainly wasn't built for speed, its just a matter of how much one can get away with and still present a feeling of realism. I think the 1/10 model sidestepped the whole issue and left the area bare rather than attempt anything at all. There are plenty of other pieces in the Lionroar sets with representations of rivets.
On the original that I was patterning this after, the modeler actually used some very thin putty to simulate the plating (the height of a piece of tape, actually), but my feeling was that the .010 will work once painted and allowed to blend in with the other items going onto the hull. I think I will do a test paint spray of an area to see if this hypothesis holds any water and then evaluate my options. It is not too late to scrap the whole attempt and start over again, so I will probably take the next couple of days to think about it. Too cold to work downstairs in any event.
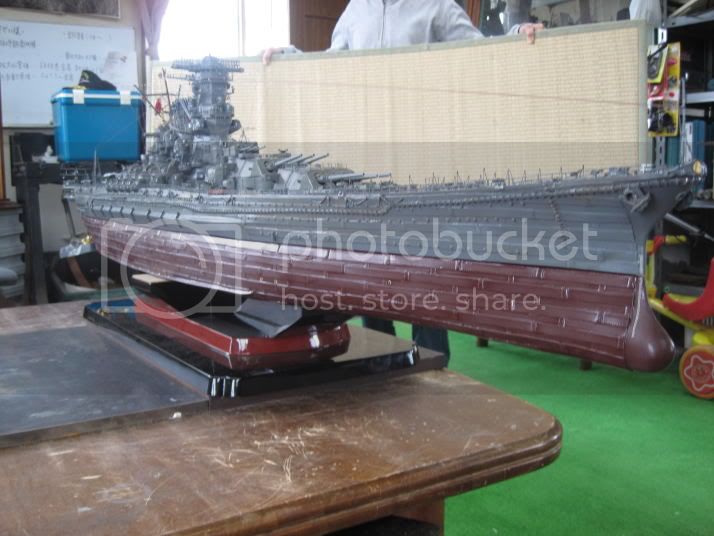
In the mean time, here's another modeler in Japan, in this case the 1/144 brass model, who who went in pretty heavily for plating and rivets, a little more successfully than Shin, although yes, its still over scale. Also, note the quintessentially Japanese use of a tatami mat as a photo back drop....
On the original that I was patterning this after, the modeler actually used some very thin putty to simulate the plating (the height of a piece of tape, actually), but my feeling was that the .010 will work once painted and allowed to blend in with the other items going onto the hull. I think I will do a test paint spray of an area to see if this hypothesis holds any water and then evaluate my options. It is not too late to scrap the whole attempt and start over again, so I will probably take the next couple of days to think about it. Too cold to work downstairs in any event.
In the mean time, here's another modeler in Japan, in this case the 1/144 brass model, who who went in pretty heavily for plating and rivets, a little more successfully than Shin, although yes, its still over scale. Also, note the quintessentially Japanese use of a tatami mat as a photo back drop....
Budgie
Joined: November 02, 2010
KitMaker: 163 posts
Model Shipwrights: 162 posts
Posted: Monday, January 10, 2011 - 02:27 PM UTC
Senkan, out of curiosity (and possibly as an option), where did you get the copper foil tape?
Senkan
Joined: January 10, 2011
KitMaker: 19 posts
Model Shipwrights: 18 posts
Posted: Monday, January 10, 2011 - 03:03 PM UTC
It's on Ebay Doug. Do a search for "foil tape 3/16". Best part about the foil tape is that it keeps the hull detail. When you put the rivits on the ends it raises it to look like it is overlapping. It does take awhile to do this though. The lower the mil the better.
At 1/200 I had the length of each plate at 1.25" (32 mm). At 1/350 the scale should be 3/4" plate lenght at 3/16" height. Not sure how accurate this is but it was easy for cutting. I would cut 5" strips and then make the upper and lower rivets and then cut them into 4 pieces and make the end rivets on one side. I based this on Shins procedure. Please check my math on this. You might want to do more research to get an exact number.
Also Here is a good tool to make the rivets.
http://cgi.ebay.com/Trumpeter-Hobby-Craft-Rivet-Maker-Tool-/250751081157?pt=LH_DefaultDomain_0&hash=item3a61eddac5
Senkan
Joined: January 10, 2011
KitMaker: 19 posts
Model Shipwrights: 18 posts
Posted: Tuesday, January 11, 2011 - 04:20 PM UTC
I put another pick up on the ship model forum. I had put a small amount of primer on a part of the hull to get an idea of what it would look like.
http://www.shipmodels.info/mws_forum/viewtopic.php?f=4&t=33239&start=20
http://www.shipmodels.info/mws_forum/viewtopic.php?f=4&t=33239&start=20
Budgie
Joined: November 02, 2010
KitMaker: 163 posts
Model Shipwrights: 162 posts
Posted: Tuesday, January 11, 2011 - 05:00 PM UTC
Hi Ken, I actually ordered a roll of the stuff earlier this evening, not that I necessarily will use it on this build, but it does look like it has possibilities in general.
Budgie
Joined: November 02, 2010
KitMaker: 163 posts
Model Shipwrights: 162 posts
Posted: Friday, January 14, 2011 - 04:00 PM UTC
Well, weekend is coming up, so some progress will be in order. Very mild but very wet weather here in Seattle the last few days, which is our norm for winter...
Interesting Yamato kit from the Russian Scalemodels.ru site, using Eduard and WEM etch, replacement deck and Aber barrels, and a little bit of scratch building:
http://translate.google.com/translate?u=http%3A//scalemodels.ru/%23&sl=ru&tl
Cheers, Doug
Interesting Yamato kit from the Russian Scalemodels.ru site, using Eduard and WEM etch, replacement deck and Aber barrels, and a little bit of scratch building:
http://translate.google.com/translate?u=http%3A//scalemodels.ru/%23&sl=ru&tl
Cheers, Doug
Budgie
Joined: November 02, 2010
KitMaker: 163 posts
Model Shipwrights: 162 posts
Posted: Sunday, January 16, 2011 - 11:52 AM UTC
Howdy folks, well, after much consideration of scale and the visual effect I was trying to accomplish, I decided to forge ahead with my original plan, albeit with some major modifications based on the feedback above: First, I took off all the rivet plates I had already glued on the port side and spent a considerable amount of time sanding down my .010 plating on both sides of the hull as thin as possible, while leaving a barely visible line. The thickness has to be at least under .005 now and maybe thinner, although of course it varies according to location. The sanding also helped bevel the edges, so there is very little thickness visible along the top edge, where it matters most. Next, I took all my rivet plates and cut them in half, making them more of a representation of riveting at the end of a plate rather than a rivet plate per se itself. They are now thin enough that you will not notice a rivet pattern on them until you get quite close. This literally took me into the realm of the rivet counters, since each strip was measured as "3 dots wide". They were then glued back into place using the same ratio in the original plan:
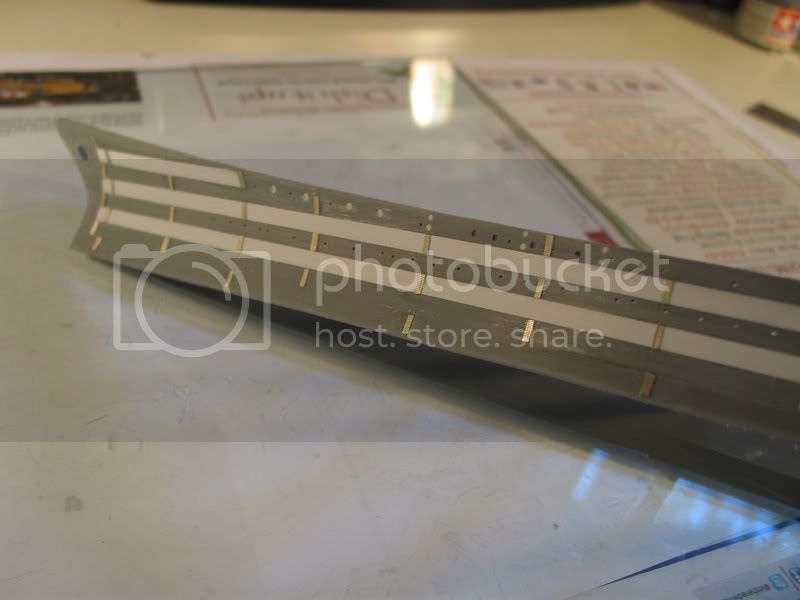
The effect will hopefully give me what I was looking for without drawing too much attention to itself. Of course, this will look much better after those white strips assume hull color. Also note the filled-in "open" portholes near the bow. These will be overlaid with Flyhawk IJN PE portholes, but the odd angle of the machine drilling on the Tamiya kit left them too wide to use as-is. Well, two steps forward, one back, but the feedback and constructive criticism has been much appreciated and helpful, which is a big advantage of doing a blog like this.
The effect will hopefully give me what I was looking for without drawing too much attention to itself. Of course, this will look much better after those white strips assume hull color. Also note the filled-in "open" portholes near the bow. These will be overlaid with Flyhawk IJN PE portholes, but the odd angle of the machine drilling on the Tamiya kit left them too wide to use as-is. Well, two steps forward, one back, but the feedback and constructive criticism has been much appreciated and helpful, which is a big advantage of doing a blog like this.
Budgie
Joined: November 02, 2010
KitMaker: 163 posts
Model Shipwrights: 162 posts
Posted: Monday, January 17, 2011 - 05:17 AM UTC
Many of you who are familiar with the film Otokotachi no Yamato may not know that there was an earlier film about the ship, not counting a number of appearances in films touching on broader war themes. Titled "Senkan Yamato" (Battleship Yamato) the film was released in 1953 (shortly after Japan returned to self-rule and American authorities could no longer object to projects like this), and has never been distributed outside of Japan:

The plot closely follows "Requiem for Battleship Yamato" as far as I can tell (there are no subtitles). As you can imagine, props are quite primitive by today's standards, with a very modestly detailed model of Yamato situated in a water tank with slowed-down filming used for most of the battle scenes. Lots of fire cracker-style pyrotechnics...in other scenes, cast members stand in front of huge painted murals of the ship, with some non-descript merchant ships with out of scale AA guns used a few times. Uniforms look like they were borrowed from the local police station. There's a few stock film images of US planes, and a lot of model planes on strings swinging into attack. Imagine "Sink the Bismark" with about 1/4 the budget, and you'll get the general idea. Anyway, for those of you who are Yamato-holics, the film is worth tracking down, and is still commercially available at places like Amazon.jp.
The plot closely follows "Requiem for Battleship Yamato" as far as I can tell (there are no subtitles). As you can imagine, props are quite primitive by today's standards, with a very modestly detailed model of Yamato situated in a water tank with slowed-down filming used for most of the battle scenes. Lots of fire cracker-style pyrotechnics...in other scenes, cast members stand in front of huge painted murals of the ship, with some non-descript merchant ships with out of scale AA guns used a few times. Uniforms look like they were borrowed from the local police station. There's a few stock film images of US planes, and a lot of model planes on strings swinging into attack. Imagine "Sink the Bismark" with about 1/4 the budget, and you'll get the general idea. Anyway, for those of you who are Yamato-holics, the film is worth tracking down, and is still commercially available at places like Amazon.jp.
 |

WEB HOSTING BY


Copyright ©2021 Model Shipwrights and Kitmaker Network, a subsidiary of Silver Star Enterprises
All Rights Reserved. Please read our Conditions of Use and Privacy Policy.
All Rights Reserved. Please read our Conditions of Use and Privacy Policy.