Ships by Class/Type: Carriers
Topics on all types of carriers from the early 20th century to today.
Enterprise vs.Kamikaze!
TimReynaga
Staff MemberAssociate Editor
MODEL SHIPWRIGHTS
Visit this Community
California, United States
Joined: May 03, 2006
KitMaker: 2,500 posts
Model Shipwrights: 1,830 posts
Posted: Friday, April 25, 2014 - 12:50 AM UTC

Quoted Text

Hi Tim!

any progress on your build of late?


Hey Russell,

I've been unusually busy in my non-modelling life lately, haven't made any progress at all on my Enterprise... but I'll get back to it soon (I hope...)

RussellE
#306
Visit this Community
Victoria, Australia
Joined: June 27, 2010
KitMaker: 3,959 posts
Model Shipwrights: 2,777 posts
Posted: Sunday, April 27, 2014 - 10:23 PM UTC

Quoted Text


Quoted Text

Hi Tim!

any progress on your build of late?


Hey Russell,

I've been unusually busy in my non-modelling life lately, haven't made any progress at all on my Enterprise... but I'll get back to it soon (I hope...)


I know what you mean Tim. Real life has a habit of that

Hope to see you back on this one soon!
TimReynaga
Staff MemberAssociate Editor
MODEL SHIPWRIGHTS
Visit this Community
California, United States
Joined: May 03, 2006
KitMaker: 2,500 posts
Model Shipwrights: 1,830 posts
Posted: Saturday, May 03, 2014 - 02:00 PM UTC

Having decided to abandon the warm brown deck of my experiment for a more gray tone "weathered douglas fir" look, here is how I applied the initial paint to the deck on the actual model. Thus far the bare plastic has received a lateral streaking of the 5-N Navy Blue hull color. The effect at this point is a little too harsh, but I'll mist some gray over the deck to dim it down a bit. I plan to use Model Master "European I Gray" 1788 (a USAF color, I think) with just a touch of brown added to it to stand in for the weathered wood.

RussellE
#306
Visit this Community
Victoria, Australia
Joined: June 27, 2010
KitMaker: 3,959 posts
Model Shipwrights: 2,777 posts
Posted: Sunday, May 04, 2014 - 10:14 PM UTC
Hi Tim

good to see you back on this build!

Still can't get over how small she is...
TimReynaga
Staff MemberAssociate Editor
MODEL SHIPWRIGHTS
Visit this Community
California, United States
Joined: May 03, 2006
KitMaker: 2,500 posts
Model Shipwrights: 1,830 posts
Posted: Friday, May 16, 2014 - 04:03 PM UTC
I applied the various grays to the deck as planned, but the whole thing ended up looking unsatisfying somehow. Taking another look at my references, I realized that the worn flight decks in most of the original color photos, accurate or not, look distinctly brownish:


So I went back to my little Big E and redid the flight deck with a misting of Model Master Military Brown over the White Ensign 5-N Navy Blue and Model Master European I Gray streaks, then weathered with more lateral streaks of 5-N.

Correct or not, the flight deck now looks a bit more like what I see in period color pics of worn USN flight decks.


Next up: the white (or yellow?) aircraft landing guide lines.
TimReynaga
Staff MemberAssociate Editor
MODEL SHIPWRIGHTS
Visit this Community
California, United States
Joined: May 03, 2006
KitMaker: 2,500 posts
Model Shipwrights: 1,830 posts
Posted: Sunday, May 18, 2014 - 01:09 AM UTC
I couldn’t tell definitely from photos whether Enterprise’s flight deck aircraft guide lines were white or yellow in 1945, so I applied both to a spare flight deck to see which looked better. I used Woodland Scenics Dry Transfer Decals MG760 White Stripes and MG763 Yellow Stripes (.010 inch for the centerline, .022 inch for the dashed lines).

The test lines are thin, consistent, and nice and sharp... but they’re WAY too intense. Interestingly, although I had painted the spare test deck exactly the same as the final deck, those lines are so vivid that they tend to obscure the carefully applied weathering! The next task is to find a way to mute them a bit so they look more to scale.

Gremlin56
Joined: October 30, 2005
KitMaker: 3,897 posts
Model Shipwrights: 3,301 posts
Posted: Sunday, May 18, 2014 - 01:35 AM UTC
I had the same problem with the white lines on Hornet's deck. A couple of oil washes toned them down nicely.
TimReynaga
Staff MemberAssociate Editor
MODEL SHIPWRIGHTS
Visit this Community
California, United States
Joined: May 03, 2006
KitMaker: 2,500 posts
Model Shipwrights: 1,830 posts
Posted: Sunday, May 18, 2014 - 02:38 AM UTC

Quoted Text

I had the same problem with the white lines on Hornet's deck. A couple of oil washes toned them down nicely.


Julian, thanks for the oil wash idea, I’ve used it in the past and it does work. I hesitate to try this on the Woodland Scenics dry transfers, though, since they are SO delicate, especially the tiny 1 mm long dashed lines. I’m afraid a wash might lift them right off the deck! I’ll try a different tack first – an airbrushed misting of brown or gray over the lines.
Gremlin56
Joined: October 30, 2005
KitMaker: 3,897 posts
Model Shipwrights: 3,301 posts
Posted: Sunday, May 18, 2014 - 02:46 AM UTC
Put on a layer of matt acryllic varnish first. That will protect the decals.
TimReynaga
Staff MemberAssociate Editor
MODEL SHIPWRIGHTS
Visit this Community
California, United States
Joined: May 03, 2006
KitMaker: 2,500 posts
Model Shipwrights: 1,830 posts
Posted: Sunday, May 18, 2014 - 10:09 AM UTC

After applying a coating of Testors Dullcote to protect the lines, I gave the test deck a misting of the brown followed by a recoating of the deck edge galleries and lateral lines across the deck with the 5-N Navy blue. Even though it looks pretty good in the picture, in person the effect is inconsistent and too heavy. The blindingly bright lines were successfully dimmed down, but the result still just doesn’t look right. I’m disappointed that it did not work as expected... but that’s what experiments are for! Maybe I should have tried the wash after all...

TimReynaga
Staff MemberAssociate Editor
MODEL SHIPWRIGHTS
Visit this Community
California, United States
Joined: May 03, 2006
KitMaker: 2,500 posts
Model Shipwrights: 1,830 posts
Posted: Tuesday, May 20, 2014 - 01:26 AM UTC
The dry transfer lines had otherwise worked well, but those bright colors were just too much. My overspray solution didn’t pan out... so returning to the final deck, I decided to take a different approach entirely. Rather than trying to dim them down with misted overspray, I decided to simply paint the lines prior to application to the deck.

Looking again at pictures of Enterprise’s flight deck around the time of the attack, I decided that the lines were probably a weathered white rather than yellow, so a medium to light gray seemed like an appropriate scale representation. I airbrushed a couple of samples with Model Master Neutral Gray and Model Master Italian Blue Gray to modify the too-bright white transfers to a more muted, scale appearance.

The lighter shade, Italian Blue Gray, seemed best, so I sprayed it on the dry transfers while they were still attached to the backing sheet.

Next I’ll apply them to the deck backwards (i.e., painted undersides up) like the test samples here and see how things look.
Gremlin56
Joined: October 30, 2005
KitMaker: 3,897 posts
Model Shipwrights: 3,301 posts
Posted: Tuesday, May 20, 2014 - 03:25 AM UTC
Nice solution Tim, I'll have to remember this
Cheers,
Julian
TimReynaga
Staff MemberAssociate Editor
MODEL SHIPWRIGHTS
Visit this Community
California, United States
Joined: May 03, 2006
KitMaker: 2,500 posts
Model Shipwrights: 1,830 posts
Posted: Wednesday, May 21, 2014 - 12:18 AM UTC
Here’s how the flight deck looks with the gray-painted dry transfers applied – the muted color is a whole lot more convincing than that original bright white!

Now to make the dashed lines...
TimReynaga
Staff MemberAssociate Editor
MODEL SHIPWRIGHTS
Visit this Community
California, United States
Joined: May 03, 2006
KitMaker: 2,500 posts
Model Shipwrights: 1,830 posts
Posted: Saturday, May 24, 2014 - 02:04 AM UTC
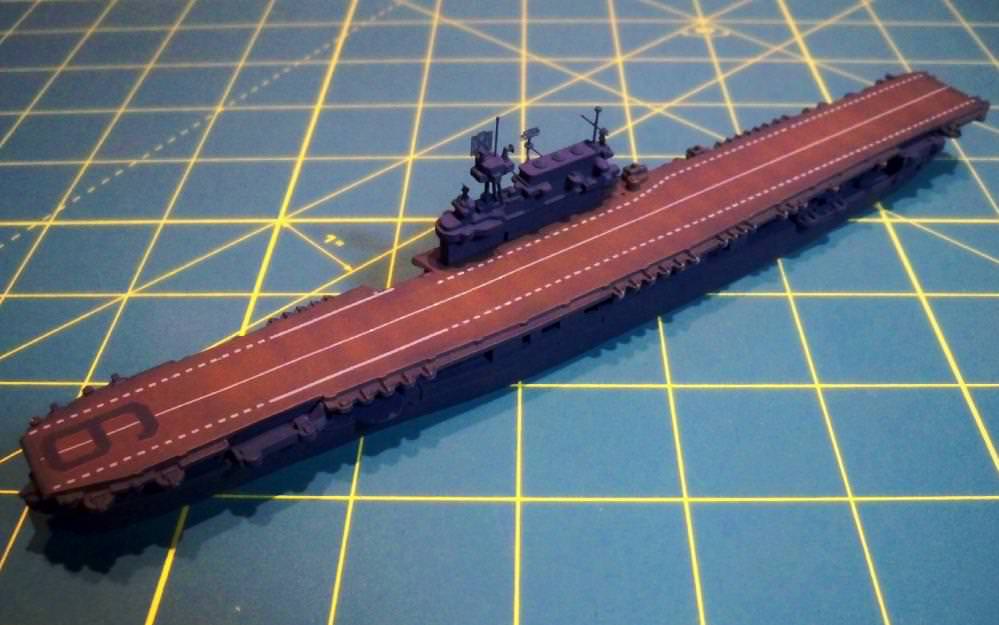
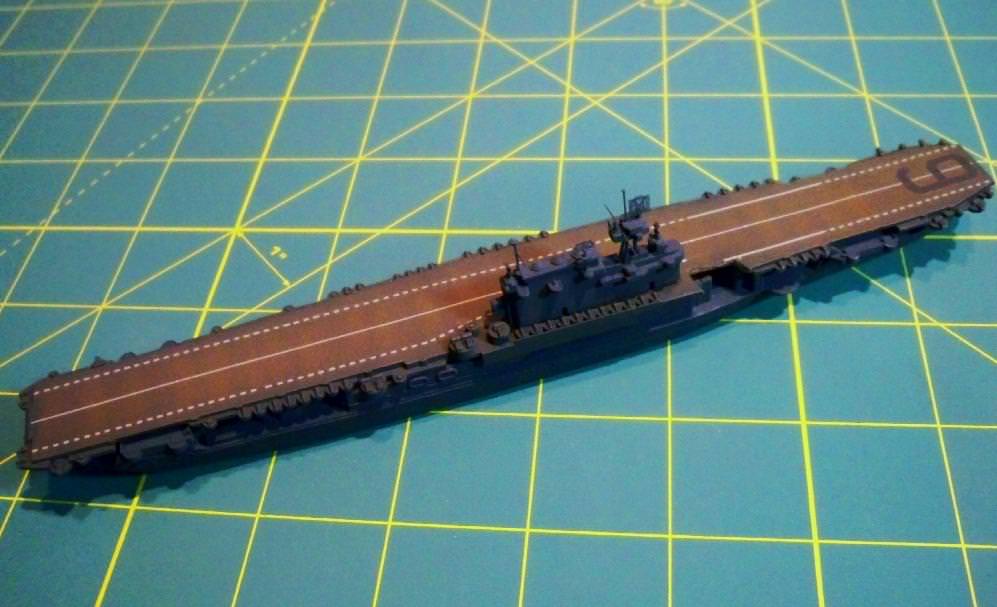
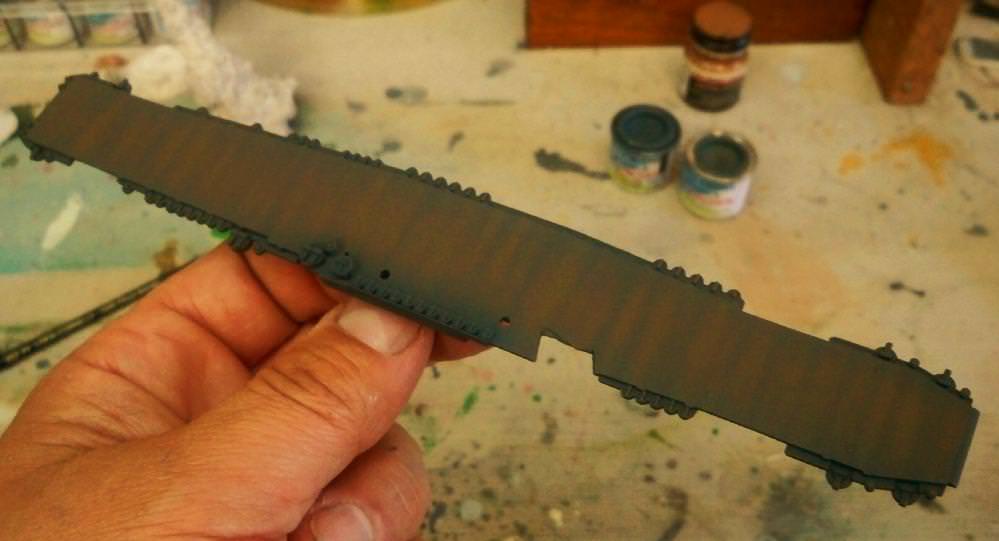
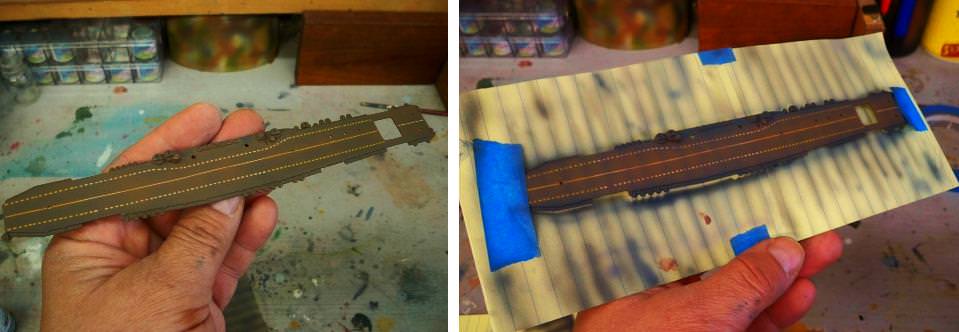
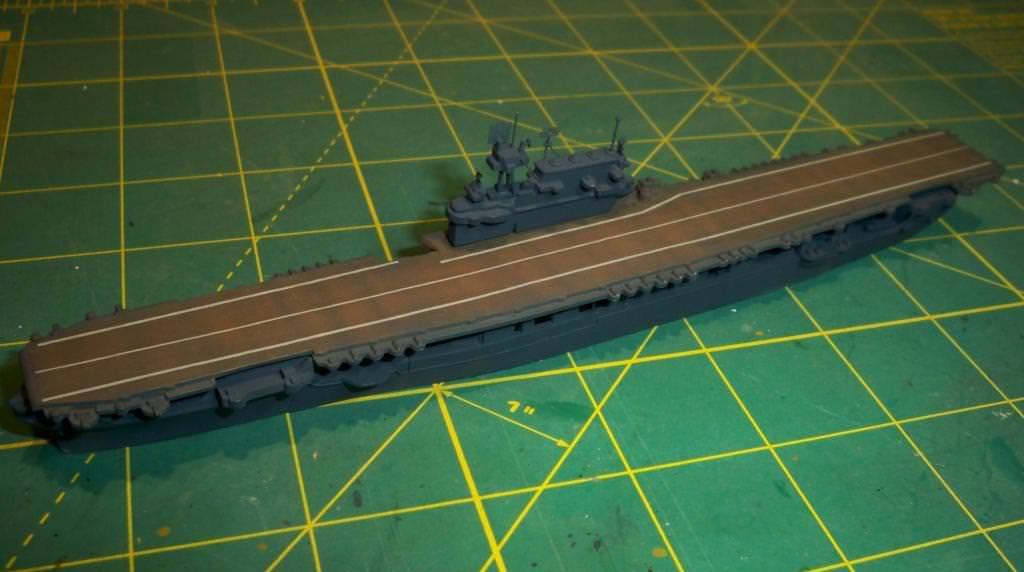
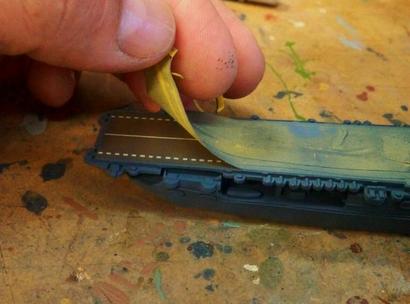
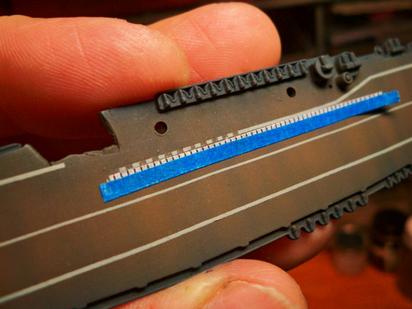
The dry transfers came as solid lines, but only Enterprise’s center line was solid; the outer lines were dashed. I made these individually from the solid lines already applied to the deck. This involved making tiny cuts every one millimeter with a new X-Acto blade and then carefully removing alternate segments. To keep the intervals consistent, I photocopied the edge of my ruler showing 1 mm marks and temporarily taped it to the deck as a guide. This simple process, though tedious, yielded good dashed lines.


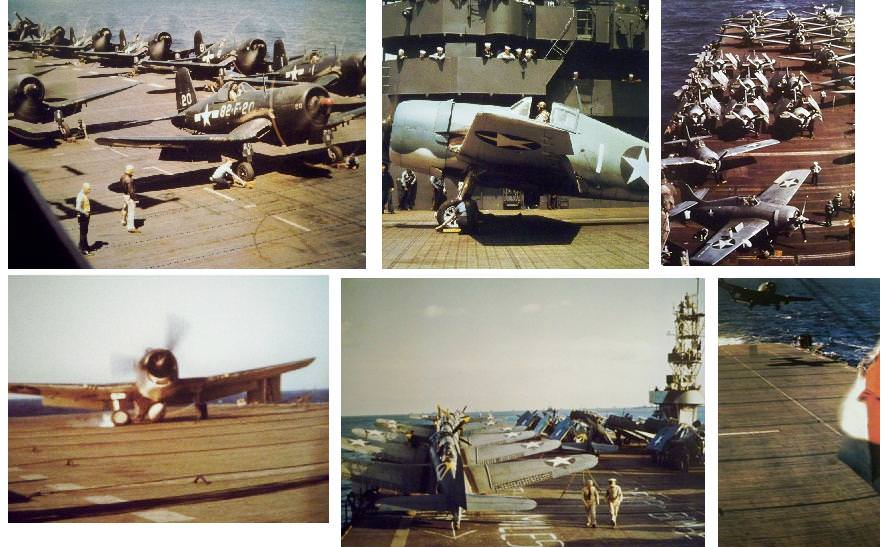
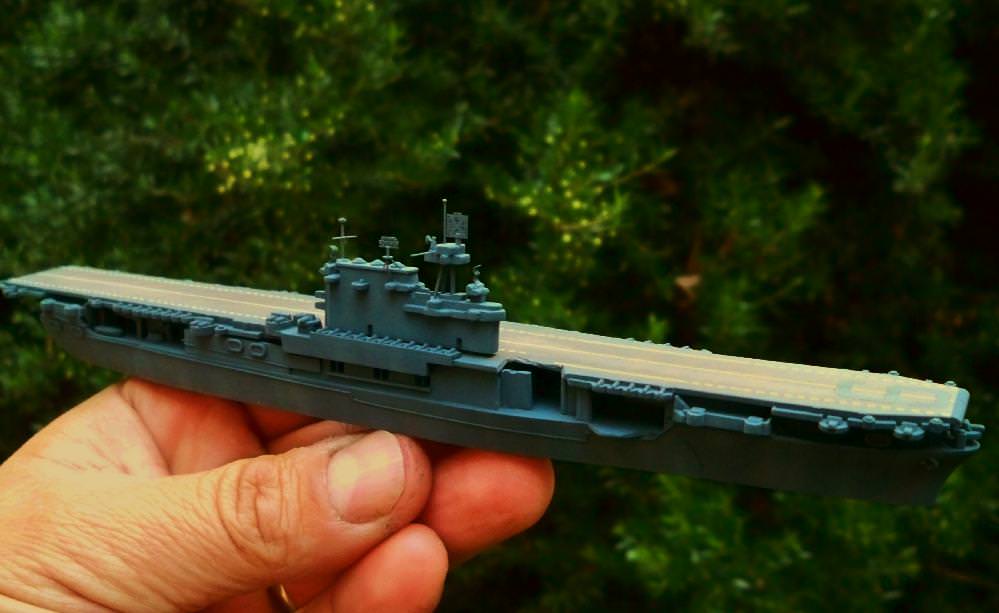
Next on the flight deck came the Enterprise’s (CV-6) identification number. Oddly, the number was oriented so that it would have looked like a “9” when seen from astern, the direction from which landing planes would normally have approached. I thought the whole point of these numbers was ship identification so returning planes wouldn’t land on the wrong carrier, but placing it that way could have caused confusion with the Essex (CV-9) - a ship with which Enterprise was actually operating in 1945! Was this a security measure, since the Enterprise was the only surviving ship of her class by then... or just a screw up? Photos of the ship from before this time show the number positioned in the more logical orientation of “6” when seen from astern, and when she was repaired in the months after the attack, the number was reapplied in that way once again... interesting.


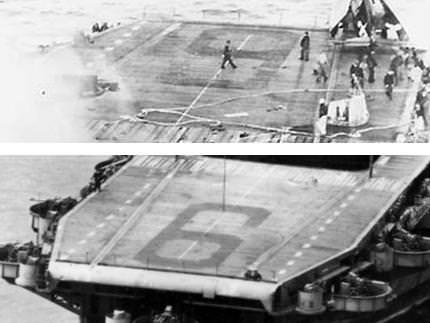
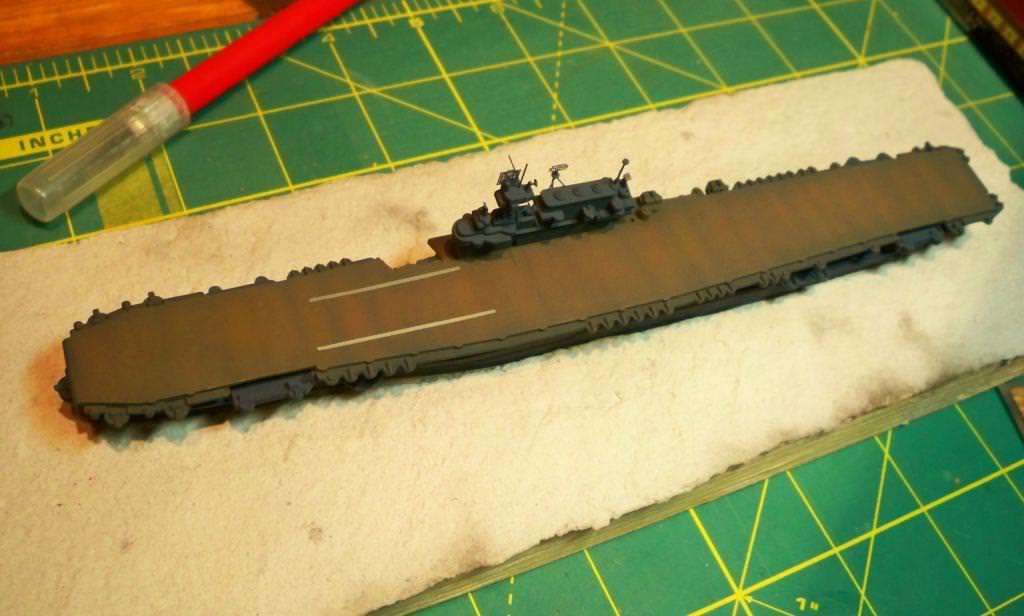
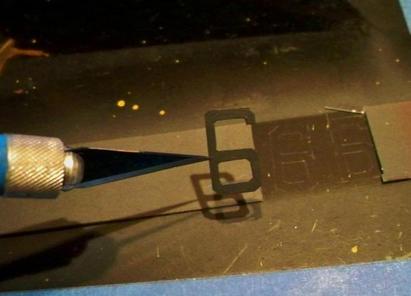
Anyway, the Big E carried only the forward marking at the time of the May 1945 attack. On U.S. carriers of the time these flight deck markings were typically painted in a dull black, and Enterprise appears to have followed this practice as well. Photos show the number to have been weathered down to a fairly low contrast with the worn deck, so I decided to go with a dark gray. Since I didn’t have a marking of the right size or color, I had to make one. Using a number “6” from the Gold Medal Models 700-2D 1/700 scale WW2 US Aircraft Carrier Decals set, I photocopied the image (reducing it to 1/1200 scale) and printed it out. I then airbrushed Model Master Schwartzgrau ’39-43 RAL 7021 (a WWII German Luftwaffe color) over some spare Microscale decal sheet. Taping the printed number over the decal sheet, I cut it out, leaving a nice little homemade gray “6” decal for the flight deck.


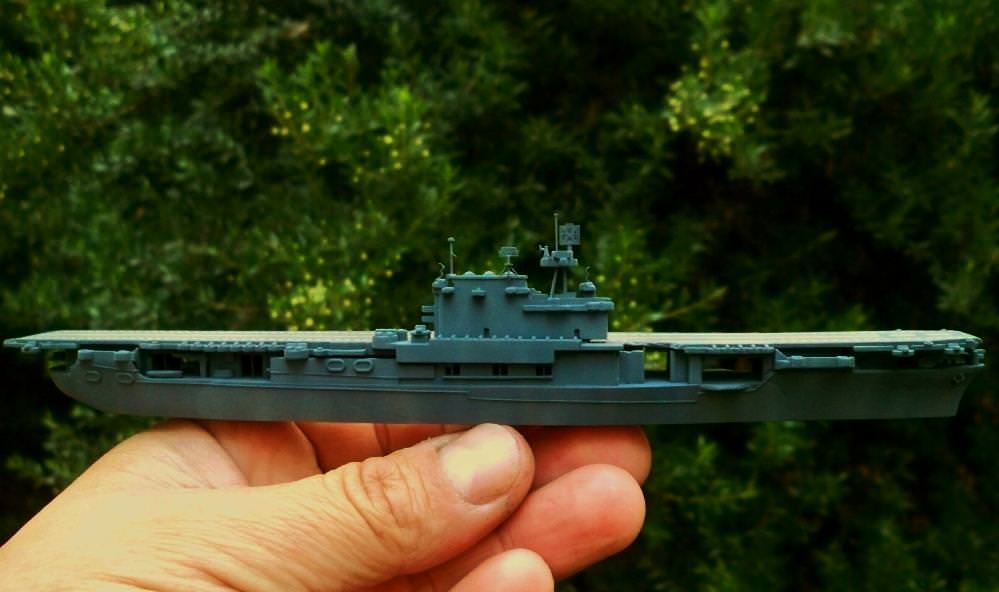
After applying the number to the deck over the centerline forward, the finished flight deck was sealed under another protective layer of Testors Dullcote lacquer.
beefy66
Visit this Community
England - North East, United Kingdom
Joined: October 22, 2007
KitMaker: 971 posts
Model Shipwrights: 645 posts
Posted: Saturday, May 24, 2014 - 12:19 PM UTC
Tim the flight deck lines are looking good now not sure how you manage to pull this off in 1/700 scale but this is another lesson to all off us

thanks Keith
RussellE
#306
Visit this Community
Victoria, Australia
Joined: June 27, 2010
KitMaker: 3,959 posts
Model Shipwrights: 2,777 posts
Posted: Saturday, May 24, 2014 - 06:53 PM UTC
Lovely work, Tim!
Cosimodo
#335
Visit this Community
Auckland, New Zealand
Joined: September 03, 2013
KitMaker: 1,808 posts
Model Shipwrights: 871 posts
Posted: Saturday, May 24, 2014 - 11:07 PM UTC
It certainly is lovely work and a very deft touch in that scale.

Michael
JJ1973
#345
Visit this Community
Niedersachsen, Germany
Joined: August 22, 2011
KitMaker: 1,835 posts
Model Shipwrights: 1,832 posts
Posted: Sunday, May 25, 2014 - 06:40 AM UTC
Fantastic work here as well, Tim!

And it's even 1/1200 if I am not mistaken. The base kit is relatively simple, the more amazing it is to me what you are making out of it!!

It looks simply stunning - looking forward to the next steps!

Jan

TimReynaga
Staff MemberAssociate Editor
MODEL SHIPWRIGHTS
Visit this Community
California, United States
Joined: May 03, 2006
KitMaker: 2,500 posts
Model Shipwrights: 1,830 posts
Posted: Monday, May 26, 2014 - 03:10 AM UTC
Having completed the flight deck, I went back and repainted the surrounding gallery deck antiaircraft positions. They had already received a coat of blue but they’d since taken quite a bit of brown and gray overspray from the flight deck painting. I masked off the deck and hit them again to clean things up.


While the deck was safely masked off I dry fit the basic hull, flight deck, and island components together and shot some Model Master Neutral Gray in a light, irregular vertical pattern over the 5-N Navy Blue. I wanted to break up all that blue and also suggest the paint deterioration Enterprise showed at the time of the Kamikaze hit. By May 1945 the tempo of USN carrier operations against Japan had become intense, and the Big E was at the center of it. She hadn’t had a proper yard period for many months, and her paint was not in great shape.

Still, it is easy to overdo in this small scale, so I’m trying to keep it restrained. After adding a few light airbrushed touches of Model Master Military Brown, I set it aside. She’ll get a little more weathering with brush paint once all this is thoroughly cured.
RussellE
#306
Visit this Community
Victoria, Australia
Joined: June 27, 2010
KitMaker: 3,959 posts
Model Shipwrights: 2,777 posts
Posted: Monday, May 26, 2014 - 11:58 PM UTC
Looking good Tim
TimReynaga
Staff MemberAssociate Editor
MODEL SHIPWRIGHTS
Visit this Community
California, United States
Joined: May 03, 2006
KitMaker: 2,500 posts
Model Shipwrights: 1,830 posts
Posted: Friday, May 30, 2014 - 03:01 PM UTC
Thanks Russell!

Before attaching the completed flight deck, I wanted to add a few planes to the hangar since the interior would be visible through the open side doors. In May 1945 Enterprise was operating as an experimental night carrier with Night Air Group 90 embarked, which consisted of 21 TBM-3D Avengers and 32 F6F(N) Hellcats. The Hellcats were stowed in the forward hangar (where 27 were destroyed in the Kamikaze attack), and the Avengers (9 destroyed) were spotted aft. The below decks Hellcats wouldn’t be visible on the model due to the explosion cloud, so that left the aft hangar with TBM Avengers.

This old Casadio (now Revell Germany) Enterprise kit was actually designed to be built with airplanes visible in the hangars, but the provided planes are crude and don’t seem to depict any particular type. I chose instead to use metal TBMs from Neptun of Germany. Although these 1/1250 planes are a slightly smaller scale than the 1/1200 scale ship, the 1/50 inch (.5mm) difference in length is not at all noticeable – and those tiny Neptun aircraft are beautifully done!

Since Enterprise’s hangar spaces were pretty confined, the relatively large TBMs in them would certainly have had their wings folded. Neptun makes Avengers with folded wings too, but I wasn’t able to obtain any, so I cut the wings off these and re-attached them in folded positions before giving them an initial coat of dark blue paint.

Enterprise’s Night Air Group 90 TBM-3Ds sported the 1943 Non-Specular Three-Tone scheme, with upper surfaces in Army-Navy Aeronautical (ANA) 607 Non-Specular Sea Blue (FS 35042) and fuselage sides and vertical tail surfaces in ANA 608 Non-Specular Intermediate Blue (FS 35164). Undersurfaces of these night intruders were flat black.

There aren’t a lot of pictures of these aircraft, but Starfighter Decals produces a very nice decal set for a 1/350 scale Enterprise Air Group Night 90 (http://www.starfighter-decals.com/35023-air-group-90-night-uss-ente.html). Here’s some of their artwork, which I plan to use as a guide for my 1/1200 micro airgroup:
ejhammer
Visit this Community
Michigan, United States
Joined: June 10, 2008
KitMaker: 230 posts
Model Shipwrights: 136 posts
Posted: Saturday, May 31, 2014 - 12:57 AM UTC

Quoted Text

Oddly, the number was oriented so that it would have looked like a “9” when seen from astern, the direction from which landing planes would normally have approached. I thought the whole point of these numbers was ship identification so returning planes wouldn’t land on the wrong carrier, but placing it that way could have caused confusion with the Essex (CV-9). Was this a security measure, since the Enterprise was the only surviving ship of her class in 1945... or just a screw up? Photos of the ship from before this time show the number positioned in the more logical orientation of “6” when seen from astern, and when she was repaired in the months after the attack, the number was reapplied in that way once again... interesting.


At one point, the thought was to be able to recover aircraft over the bow, and some ships had arresting gear at the bow end and the bow number reversed. This was found to be impractical however and quickly abandoned. There are pics of Yorktown CV10 recovering aircraft over the bow and an aerial view showing the bow #10 reversed, early after commissioning.

EJ
TimReynaga
Staff MemberAssociate Editor
MODEL SHIPWRIGHTS
Visit this Community
California, United States
Joined: May 03, 2006
KitMaker: 2,500 posts
Model Shipwrights: 1,830 posts
Posted: Monday, June 02, 2014 - 02:04 PM UTC
The correct FS 35042 Non-Specular Sea Blue color for the airplanes, although accurate, appears almost black in this miniscule scale, so I substituted Model Master Blue Angel Blue (FS 15050) – a much lighter, bluer shade. Similarly, Model Master 2055 U.S. Navy Blue Gray stood in for the darker ANA 608 Non-Specular Intermediate Blue.

These lighter colors, though not technically correct, more effectively convey the impression of the Three-Tone scheme in this very small scale. The star and bar markings on the fuselage sides and wings were 1/1250 scale Navalis decals (sheet 1250-1, United States part 1 - WWII), and the blue canopy frames were hand painted over Model Master Neutral Gray “glass”.


Painting these guys was fun, although replicating Night Air Group 90’s white outline arrow tail marking was a challenge. I hope it wasn’t a waste of effort – these little birds might be hard to see at all inside that dark hangar!
ejhammer
Visit this Community
Michigan, United States
Joined: June 10, 2008
KitMaker: 230 posts
Model Shipwrights: 136 posts
Posted: Wednesday, June 04, 2014 - 08:12 AM UTC

Quoted Text

That's marvelous work on that Essex, EJ, and you are really making the tiny Revell look like the Enterprise, Tim!

--Karl


Thanks Karl. I follow your work whenever I can. Outstanding stuff.


Quoted Text

Nice work, EJ! I’ve never seen an illuminated hangar on a 1/700 carrier before. Have to try that some time, but this go around I don’t have time – hoping to finish by Jan 1st for the Enterprise Campaign!


Thank you Tim. I follow your work too.

The work on my ESSEX was inspired by the fine work I've seen and followed by you both. Gives me lots of ideas and direction for my builds. I think however I might try a 1/350 aircraft carrier next, an ESSEX of course. These old 72 year old eyeballs and ham sized hands are making 1/700 a little more difficult.

Keep up the good work. You are both inspirations to us lesser modelers striving to improve.

EJ
TimReynaga
Staff MemberAssociate Editor
MODEL SHIPWRIGHTS
Visit this Community
California, United States
Joined: May 03, 2006
KitMaker: 2,500 posts
Model Shipwrights: 1,830 posts
Posted: Wednesday, June 04, 2014 - 04:32 PM UTC
Thanks EJ for your kind words, but as for you being a “lesser modeler”, well... as I test fit the airplanes below decks, I once again appreciate your excellent example of illuminating the hangar on your 1/700 Essex. My 1/1200 Enterprise hangar is even smaller – and it’s pretty dark in there once the flight deck is on!

Placing the completed aircraft aboard also illustrates just how limited space was inside Enterprise’s hangar. Those big TBMs, even with their wings folded, must have been a pretty tight fit.


The airplanes are visible through the open roll doors on the sides, but the view is limited. On the plus side, the ship’s structure that partially obscures the aircraft also helps mask the fact that there are only three of them on the model; there were actually 21 TBMs spotted in the Big E’s hangar when the ship was hit.


With illumination from above blocked by the test fitted flight deck, the view into the hangar becomes even more restricted. Still, what is visible suggests unseen activity in the spaces beyond, and anyone using a penlight will discover more!

By the way, today is the 72nd anniversary of the Battle of Midway - a pivotal victory for the USN in WWII, and one of Enterprise's 20 Battle Stars.