


Go to modelshipwrights.com for the current dynamic site!
Ships by Class/Type
For discussions on ships by class and type.
For discussions on ships by class and type.
Hosted by Jim Starkweather
USS Hornet (CV-8) - 1/200 by Merit, Tetra ...

elmarriachi

Joined: December 26, 2009
KitMaker: 813 posts
Model Shipwrights: 304 posts

Posted: Monday, May 12, 2014 - 10:39 PM UTC
Thank you very much Simon!
elmarriachi
Joined: December 26, 2009
KitMaker: 813 posts
Model Shipwrights: 304 posts
Posted: Tuesday, May 13, 2014 - 01:46 AM UTC
HI at all,
good news .... Tetra Model Works will offer also a 2nd detail set for the Hornet... consisting of photo etched parts for the brake lines on the flight deck and lot of parts for the airplanes....
The set will be here shortly, so that I could add some more PE parts for it....
Also the wonderful brass propellers from G-Factor are ordered and should come shortly....

Gremlin56
Joined: October 30, 2005
KitMaker: 3,897 posts
Model Shipwrights: 3,301 posts
KitMaker: 3,897 posts
Model Shipwrights: 3,301 posts
Posted: Tuesday, May 13, 2014 - 05:00 AM UTC
That is amazingly good news Micha 

Naseby

Joined: October 15, 2010
KitMaker: 825 posts
Model Shipwrights: 97 posts

Posted: Tuesday, May 13, 2014 - 05:58 AM UTC
Great work Michael. Hornet is one of my favourite ships and its great to see Your work. To take on a ship this big, now thats dedication to the hobby.

elmarriachi
Joined: December 26, 2009
KitMaker: 813 posts
Model Shipwrights: 304 posts
Posted: Sunday, May 18, 2014 - 05:08 AM UTC
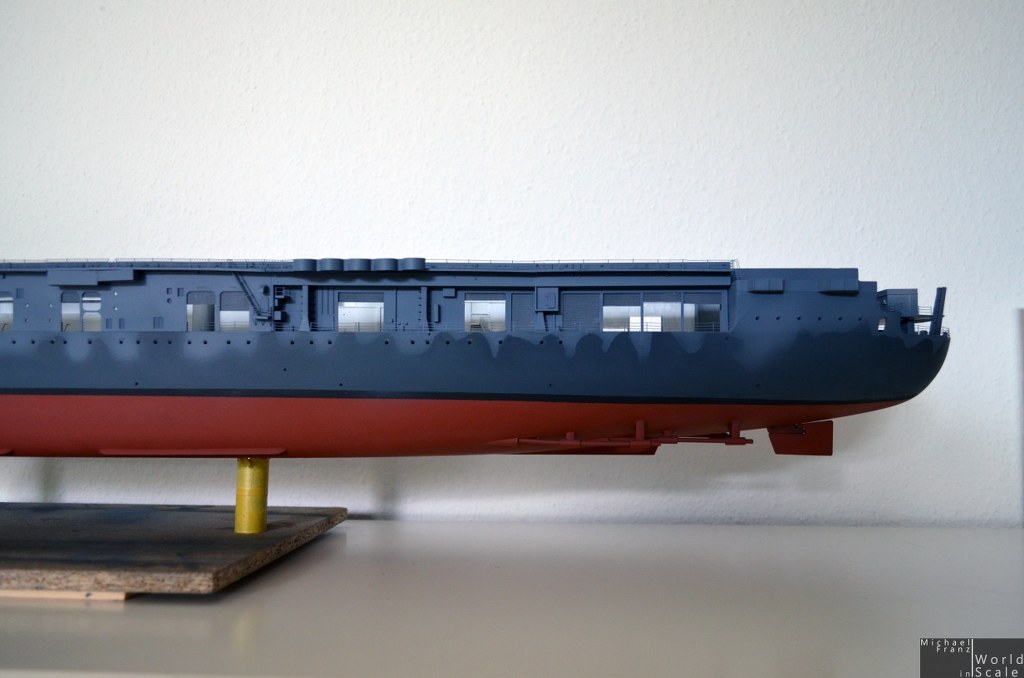
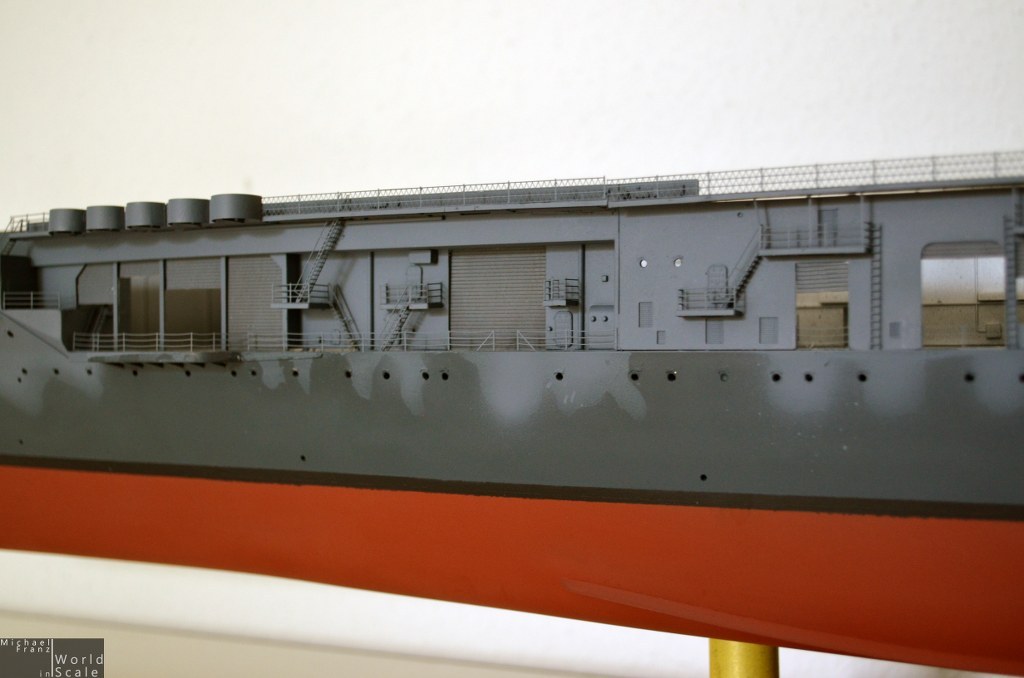
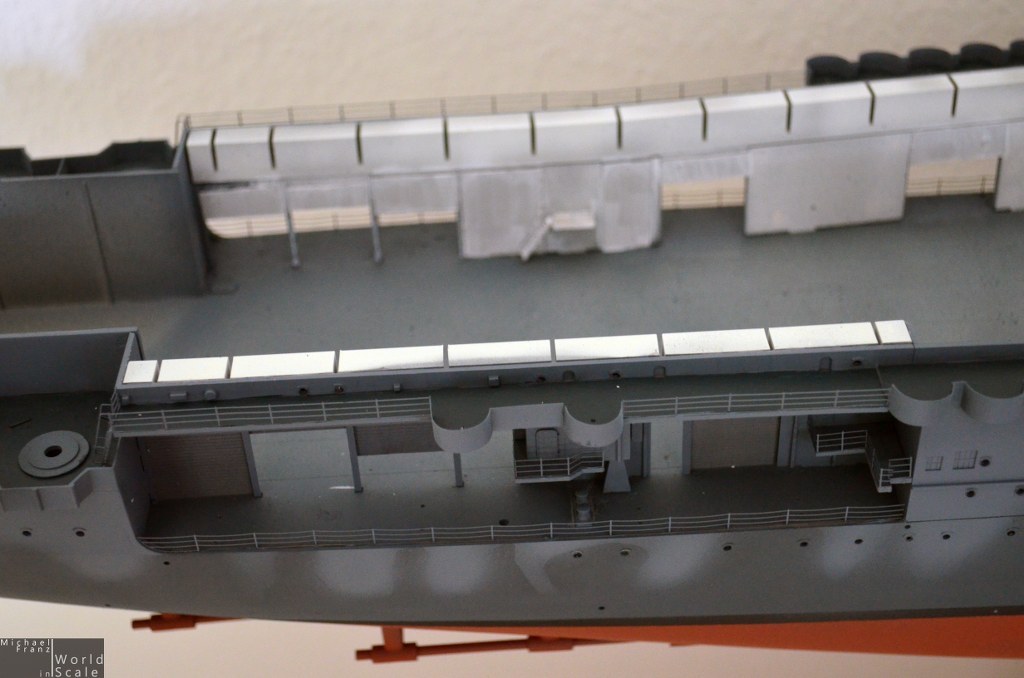
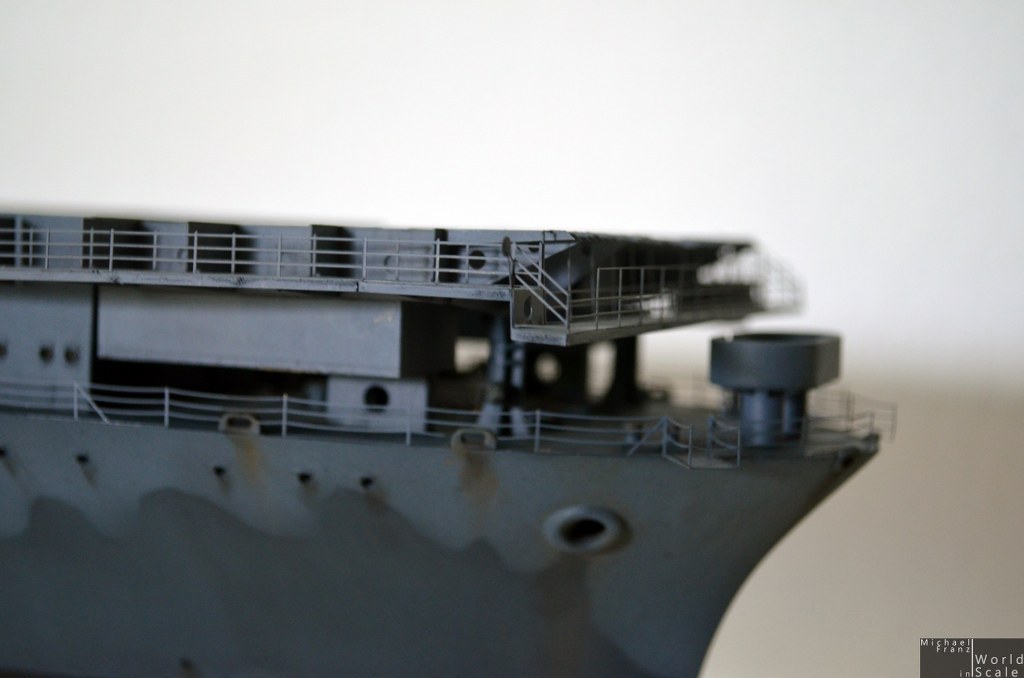
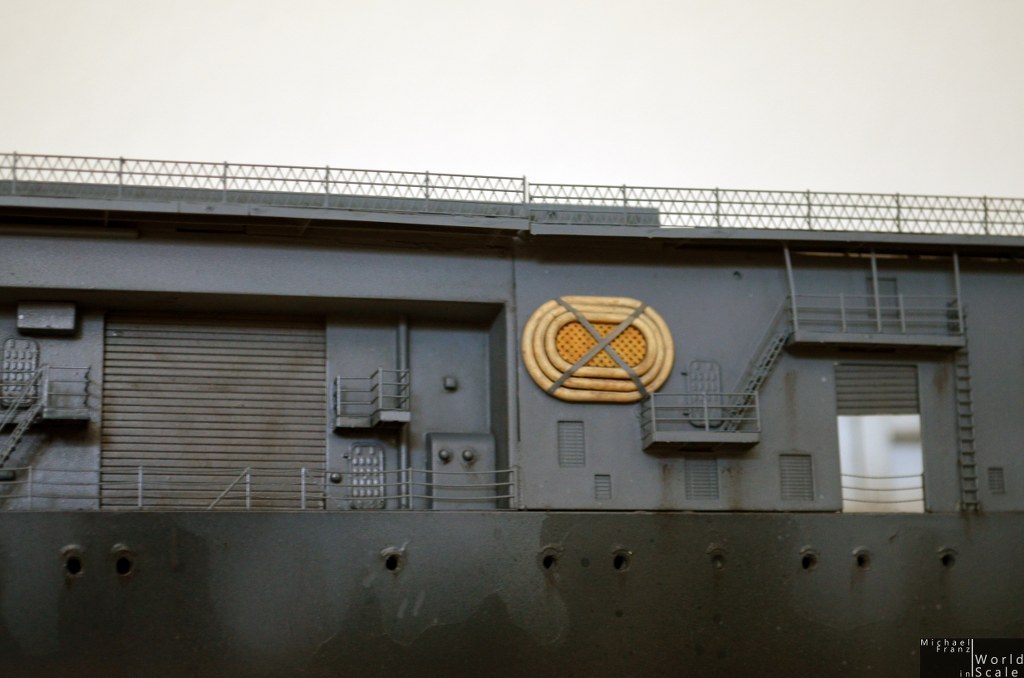
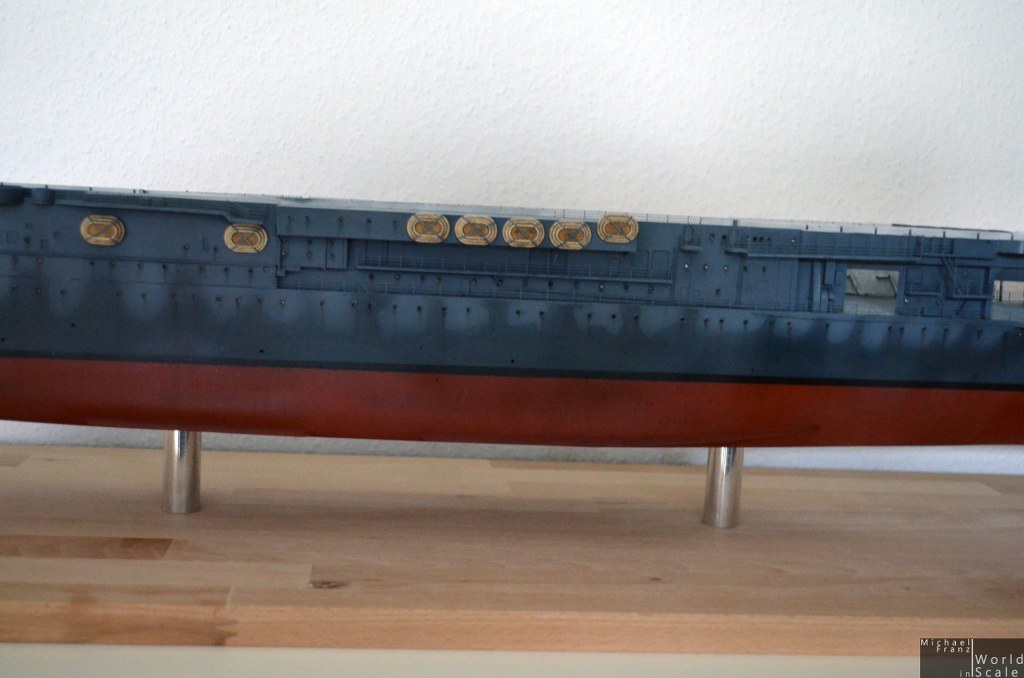
Next steps.... mounting of all the etched parts on the hull... stairways, walkways, hand rails and lot of more. ALso the hangar doors were mounted. I have cut these in different sizes to variy a little bit more.....


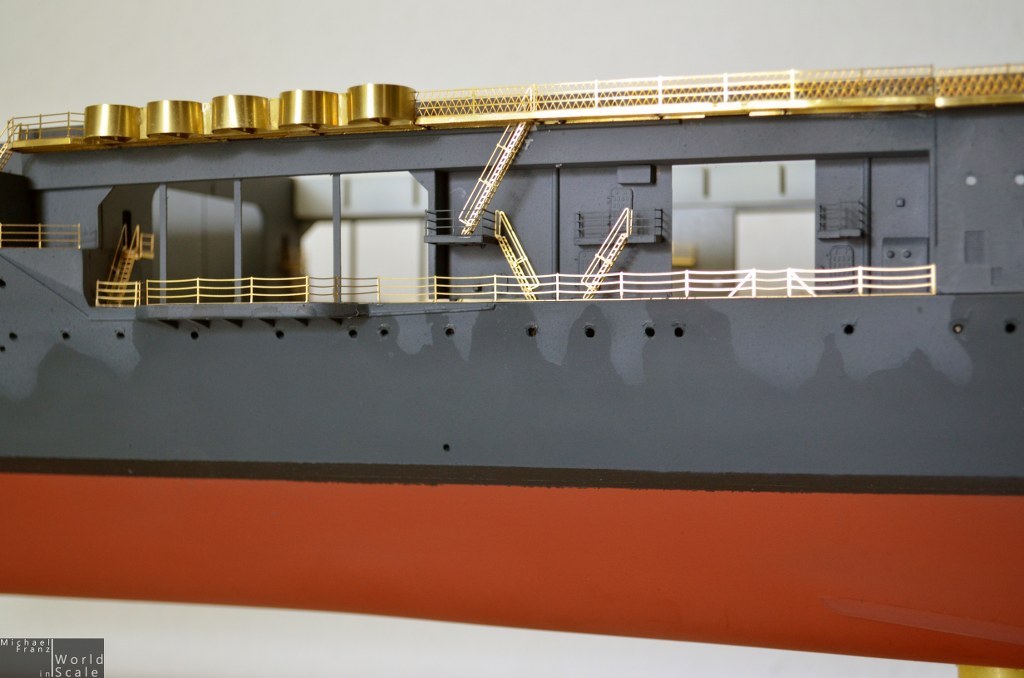
Next steps were the painting of all the etched parts... firstly with the airbrush, then brush painting of all decks.....
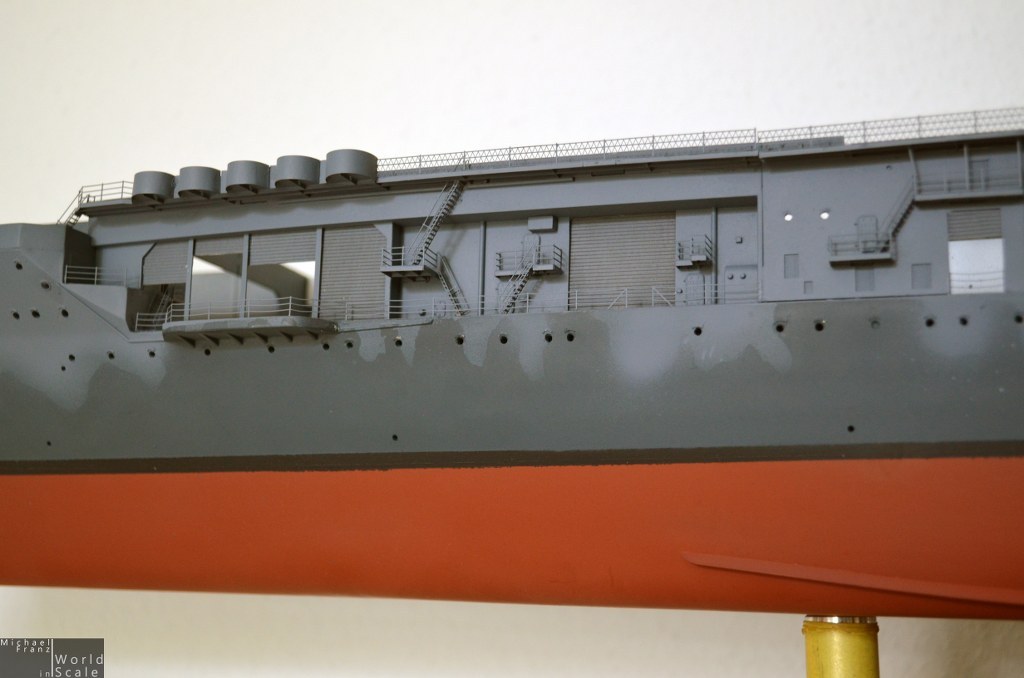

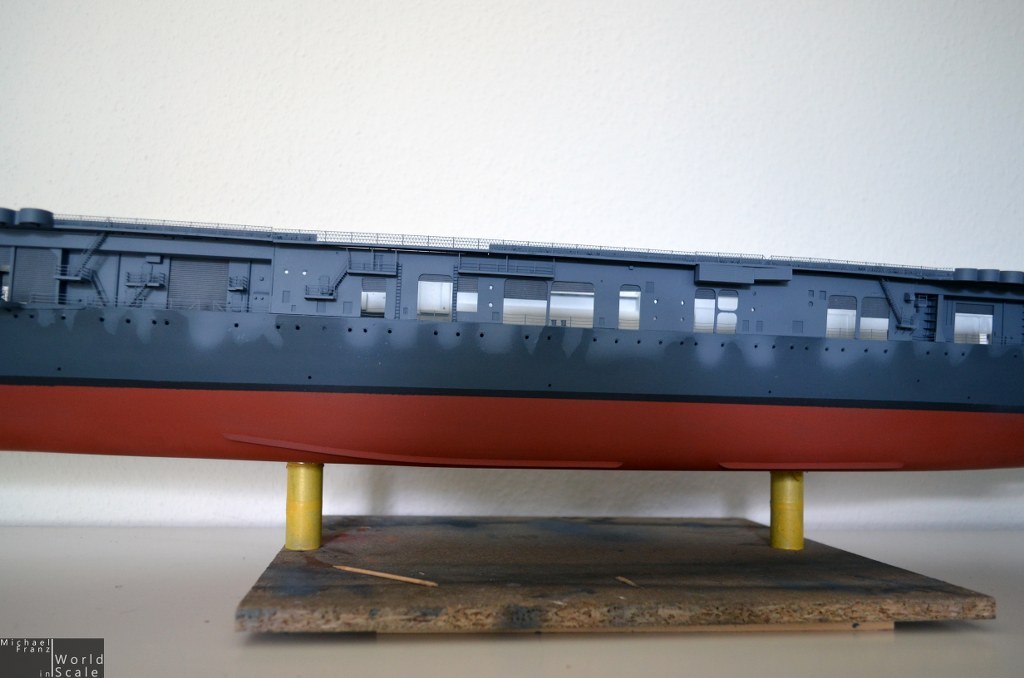
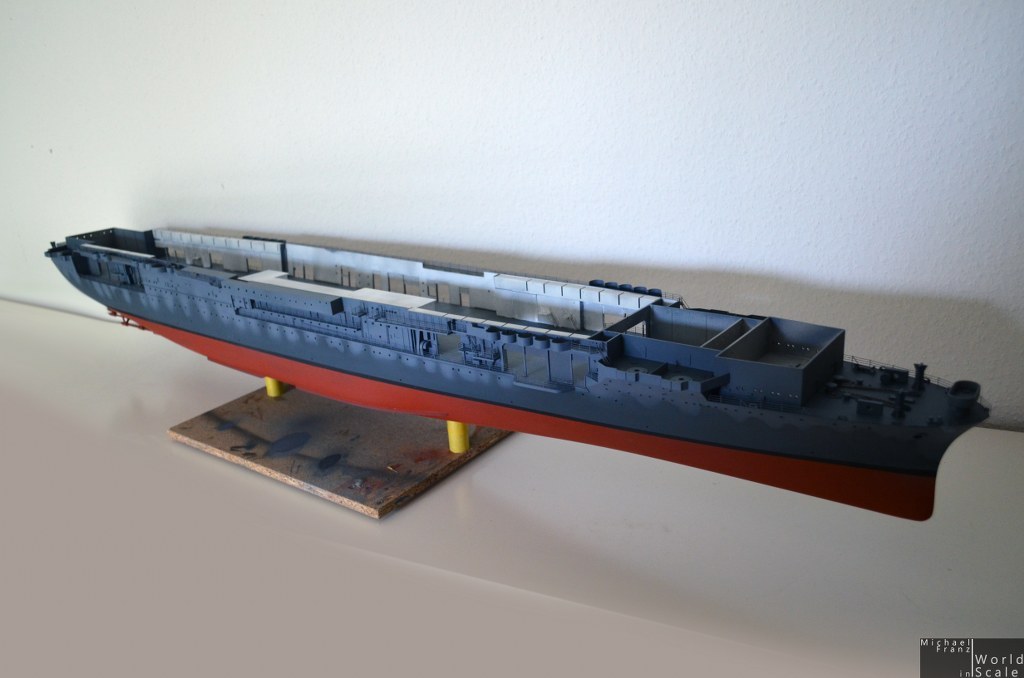
Next steps, life boats, weathering ....
Cheers
Micha
Next steps were the painting of all the etched parts... firstly with the airbrush, then brush painting of all decks.....
Next steps, life boats, weathering ....
Cheers
Micha
elmarriachi
Joined: December 26, 2009
KitMaker: 813 posts
Model Shipwrights: 304 posts
Posted: Tuesday, May 20, 2014 - 08:25 AM UTC
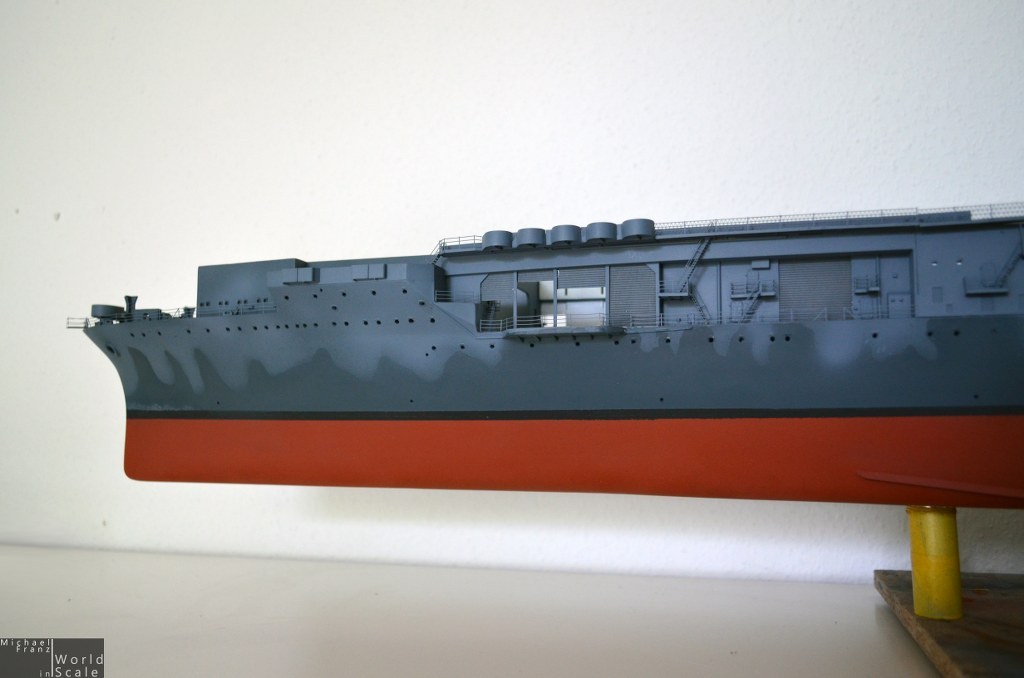
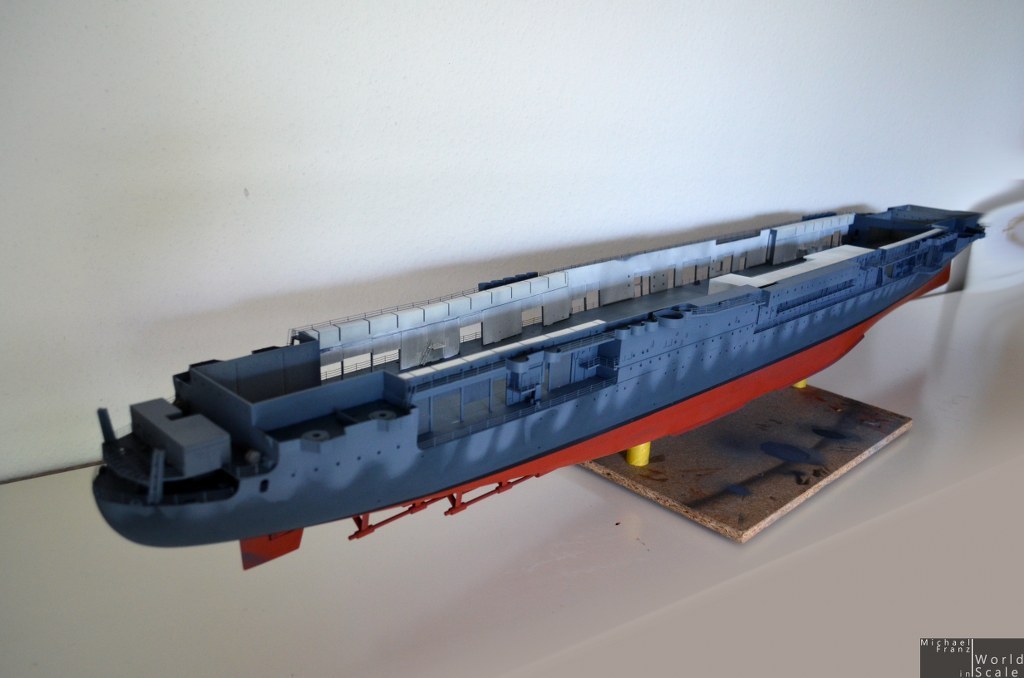
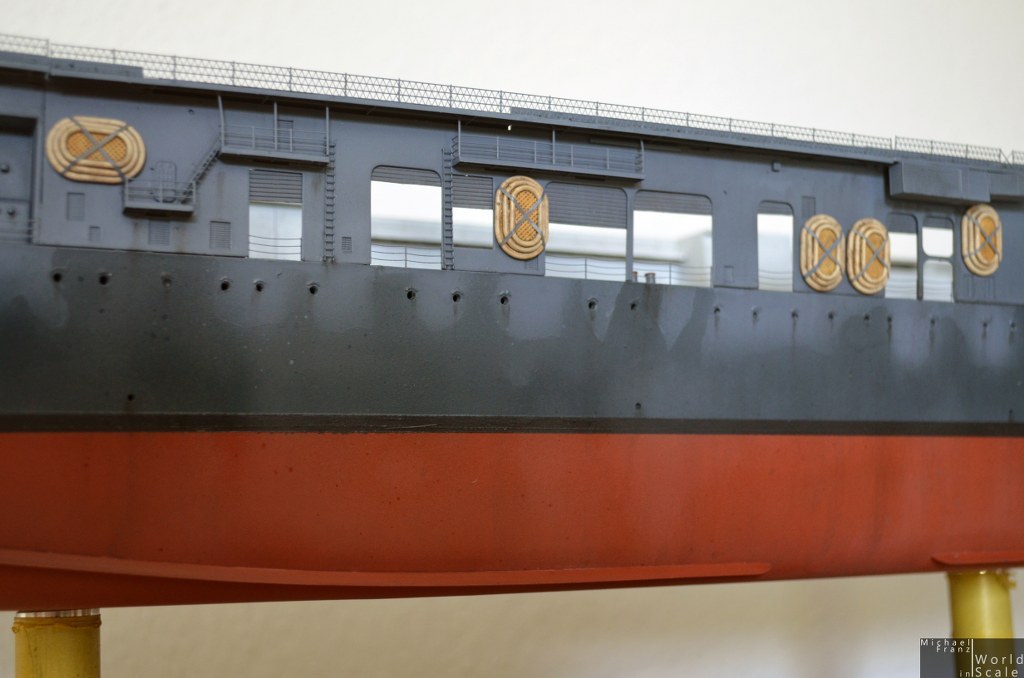
Time for the weathering.....
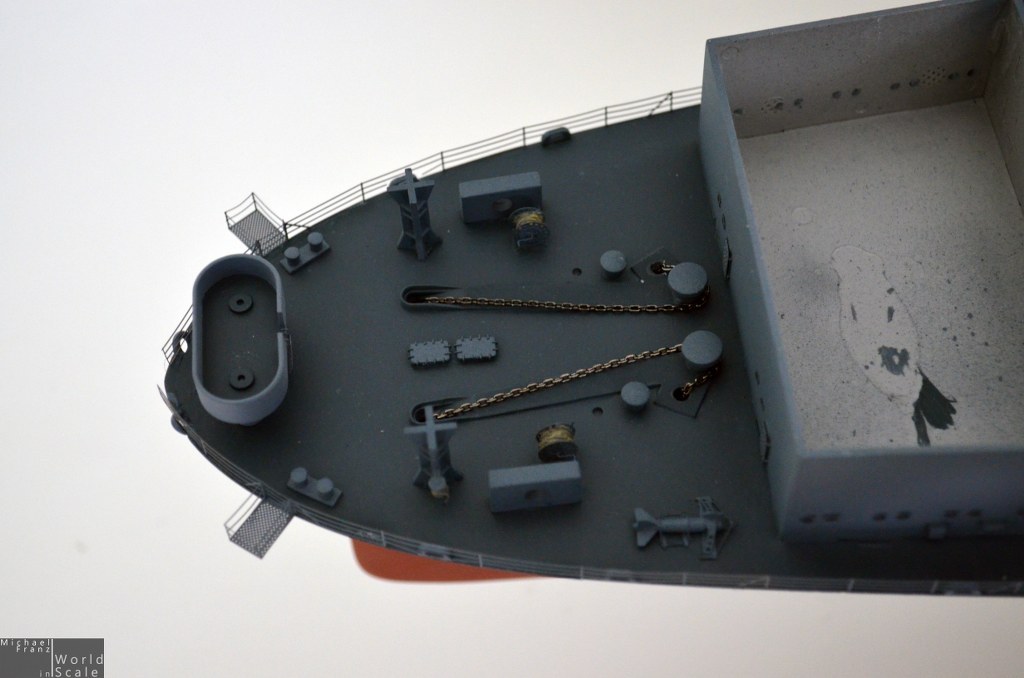
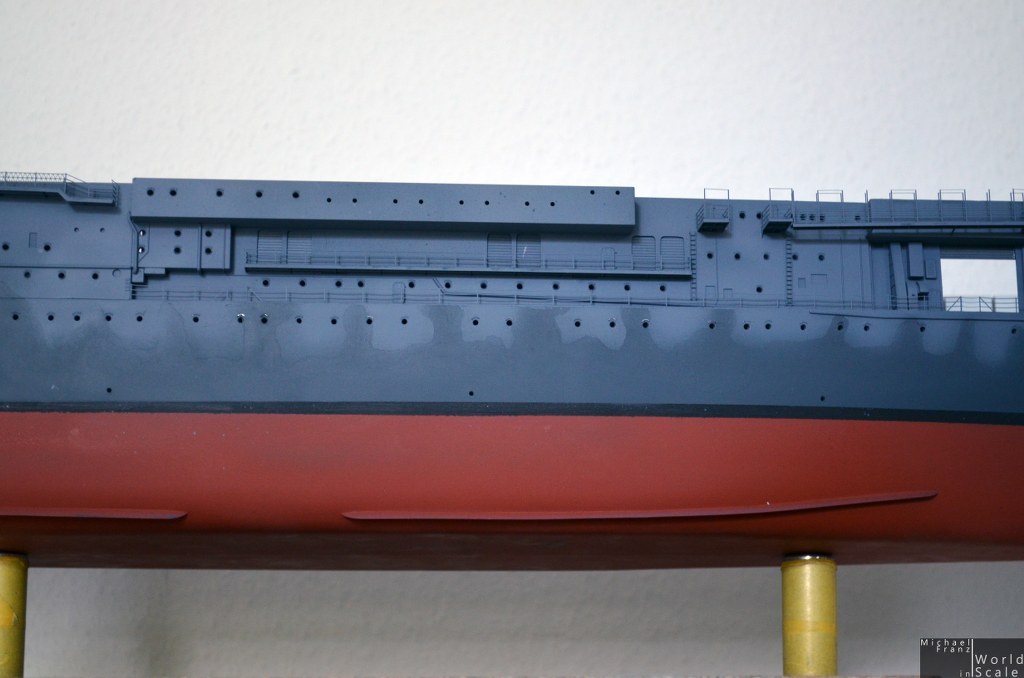
Firstly some small blurs of black oil color were painted under most (not all) porthole, under the anchor hawse poles and under each corner. Then with brown oil color the same procedure again, but this time only at the anchor and other heavy used points.
White spirit colored with a little bit of black oil color now is painted on the complete hole... always from the top to the bottom.... bluring the oil color blurs from the portholes down....making the water drips on the complete hull....
On the decks same same procedure, but with a little more color in the mixture...
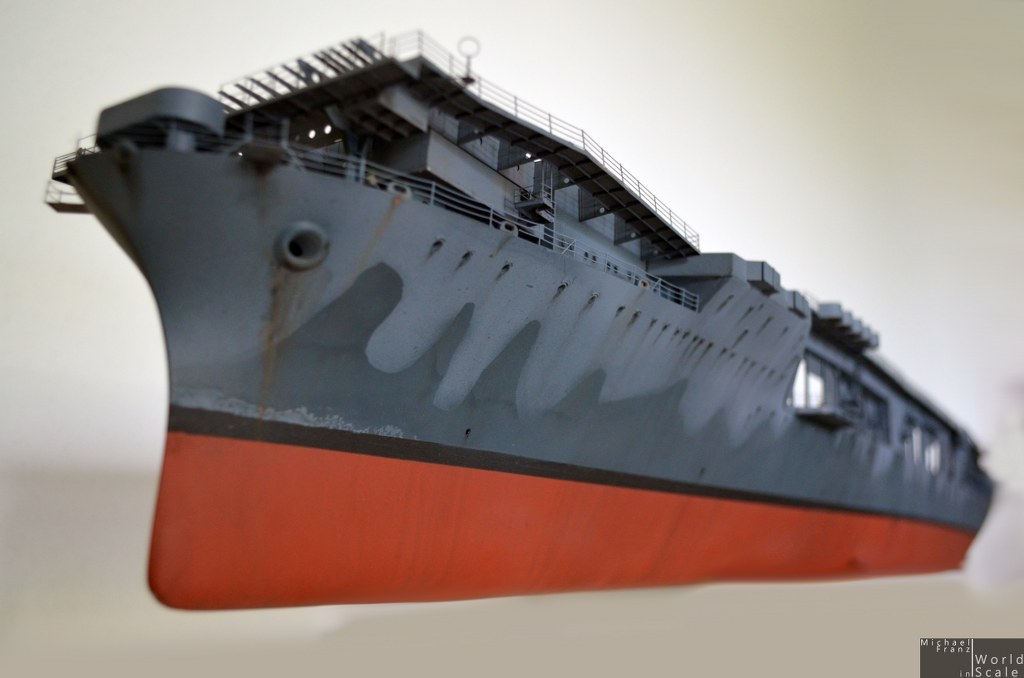


Now the oil color needs some days to dry..... during that time I can go on with the lifeboats, cranes, .....
Cheers.
Micha
Firstly some small blurs of black oil color were painted under most (not all) porthole, under the anchor hawse poles and under each corner. Then with brown oil color the same procedure again, but this time only at the anchor and other heavy used points.
White spirit colored with a little bit of black oil color now is painted on the complete hole... always from the top to the bottom.... bluring the oil color blurs from the portholes down....making the water drips on the complete hull....
On the decks same same procedure, but with a little more color in the mixture...
Now the oil color needs some days to dry..... during that time I can go on with the lifeboats, cranes, .....
Cheers.
Micha

RussellE

#306

Joined: June 27, 2010
KitMaker: 3,959 posts
Model Shipwrights: 2,777 posts
Posted: Tuesday, May 20, 2014 - 10:00 AM UTC
Coming together really nicely, Michael. 


mgrummitt

Joined: January 07, 2014
KitMaker: 133 posts
Model Shipwrights: 105 posts

Posted: Tuesday, May 20, 2014 - 01:28 PM UTC
Fantastic job Micha! Between your build and Julian's build I am considering doing a 1/200 scale. Problem is how can I talk the wife into it! 
Looking forward to more updates!
Mike

Looking forward to more updates!
Mike

TimReynaga
Joined: May 03, 2006
KitMaker: 2,500 posts
Model Shipwrights: 1,830 posts
Posted: Tuesday, May 20, 2014 - 01:47 PM UTC
This is a stunning Hornet, Michael. I LOVE the brass upgrades, they really take it to the next level!


elmarriachi
Joined: December 26, 2009
KitMaker: 813 posts
Model Shipwrights: 304 posts
Posted: Wednesday, May 21, 2014 - 03:03 AM UTC
Thank you very much mates!
Now doing all the small stuff... cranes, lifeboats and other stuff.....
Cheers
Michael
Now doing all the small stuff... cranes, lifeboats and other stuff.....
Cheers
Michael
elmarriachi
Joined: December 26, 2009
KitMaker: 813 posts
Model Shipwrights: 304 posts
Posted: Sunday, May 25, 2014 - 06:23 AM UTC
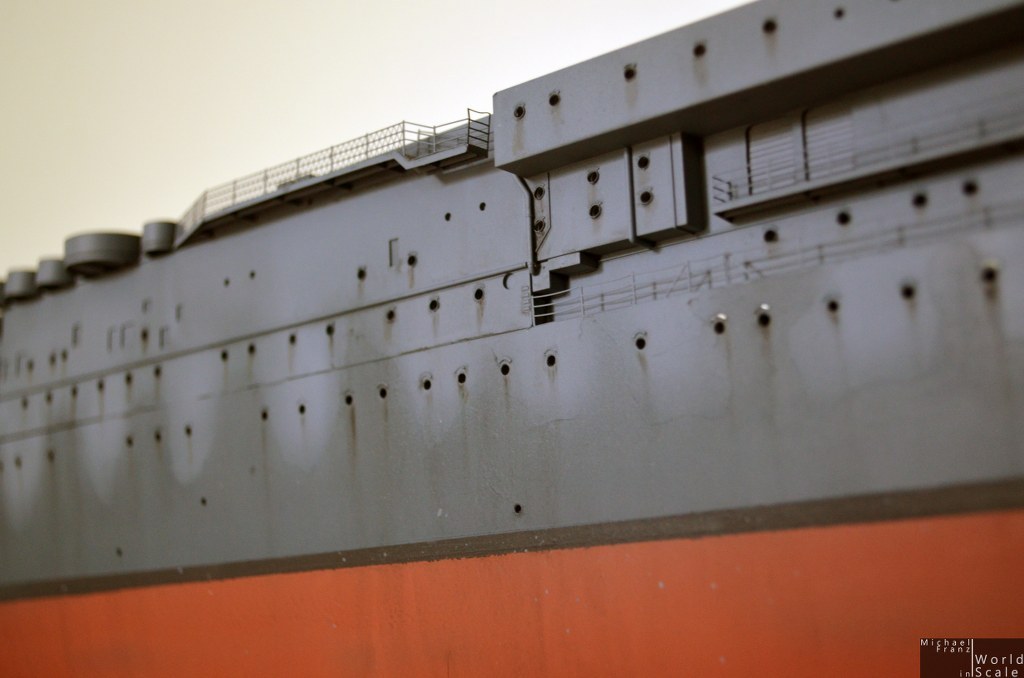
Next step of the painting was a layer of matt clear coat on everything, followed by a little bit of gloss clear coat on several places .....

Next steps were all the portholes... making the glasses....
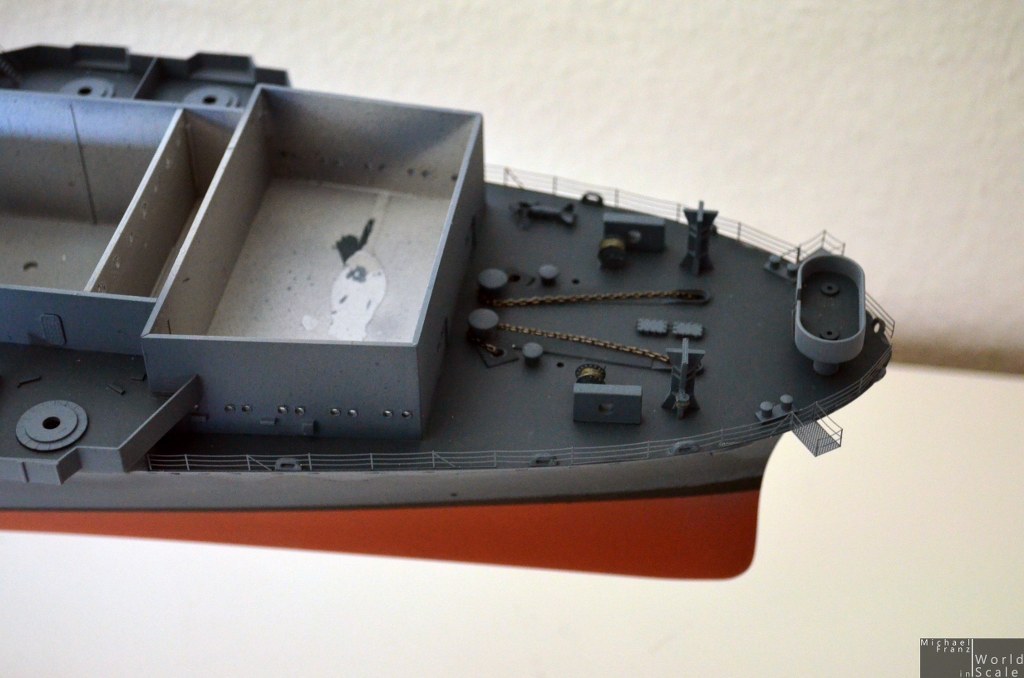
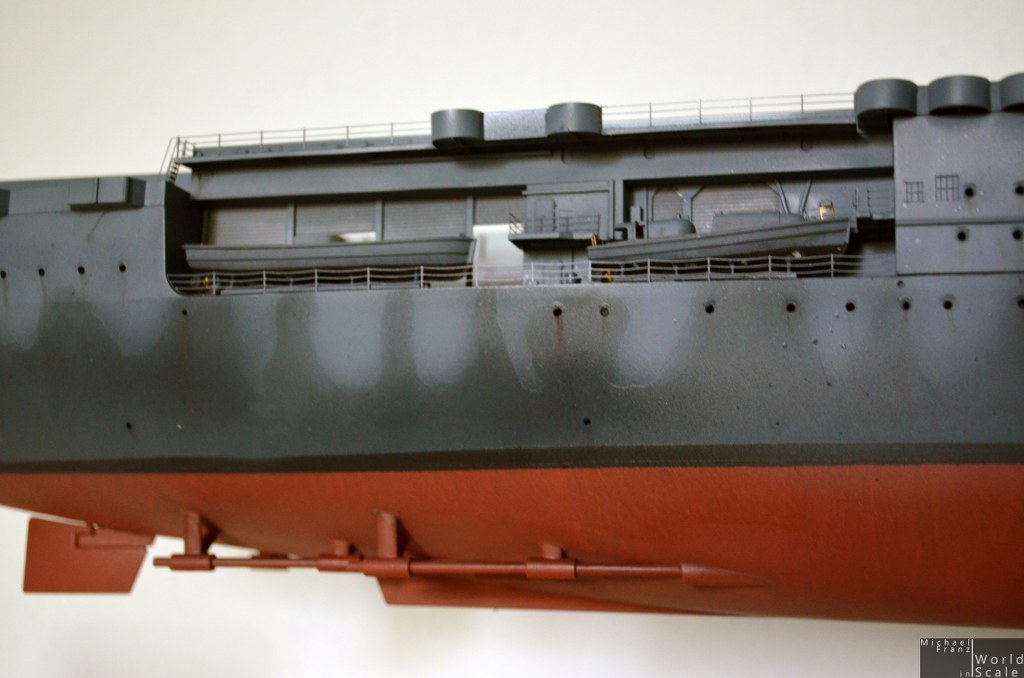
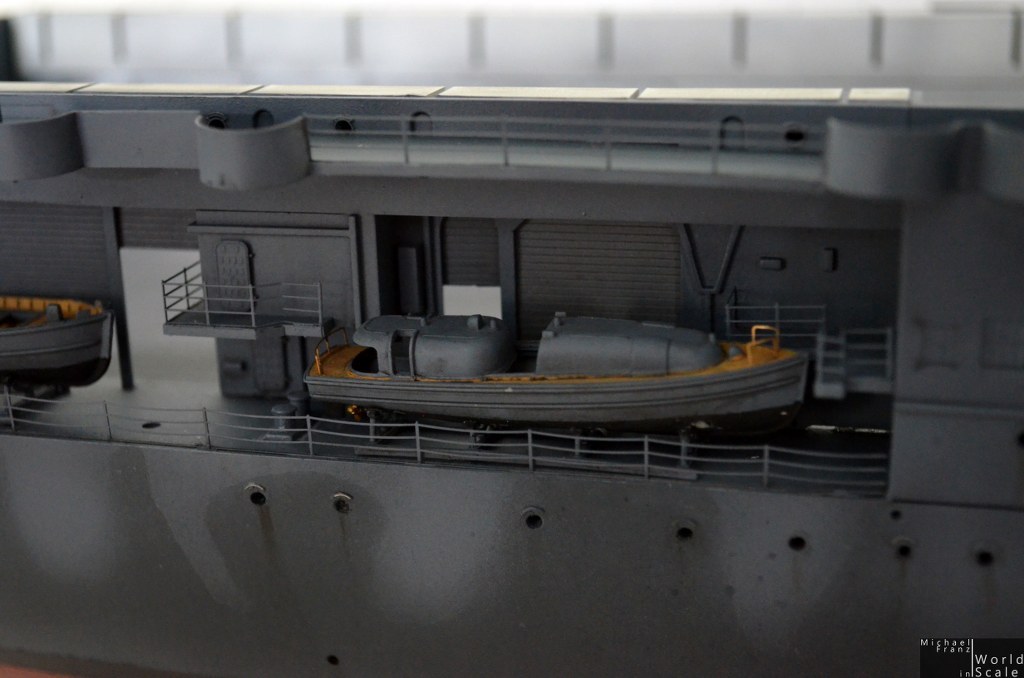
The life boats were put together, painted in beige outside and brown inside, followed by a brown washing with oil colors. The holding strips were made of tamiya tape, painted in grey and cut in thin strips.
The small boats were put together, added some PE-parts from Tetra, colored, oil color wash, and installed at their places.
The cranes for the boatswere made of Tetra PE-parts, solded for better fixing.....


Cheers
Micha
Next steps were all the portholes... making the glasses....
The life boats were put together, painted in beige outside and brown inside, followed by a brown washing with oil colors. The holding strips were made of tamiya tape, painted in grey and cut in thin strips.
The small boats were put together, added some PE-parts from Tetra, colored, oil color wash, and installed at their places.
The cranes for the boatswere made of Tetra PE-parts, solded for better fixing.....
Cheers
Micha
elmarriachi
Joined: December 26, 2009
KitMaker: 813 posts
Model Shipwrights: 304 posts
Posted: Thursday, May 29, 2014 - 05:09 AM UTC
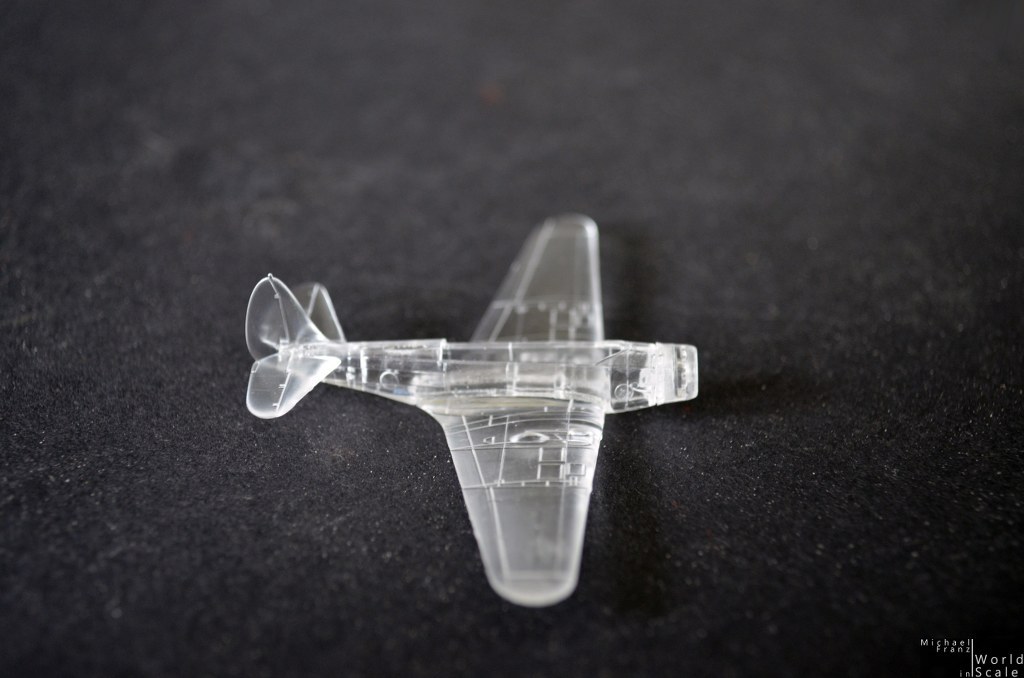
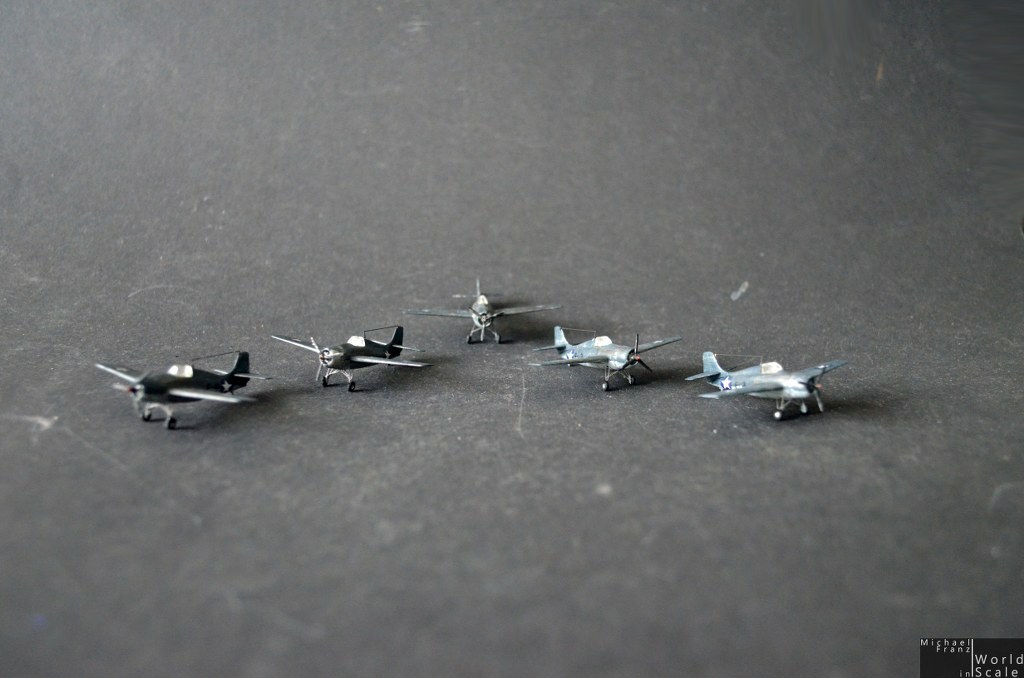
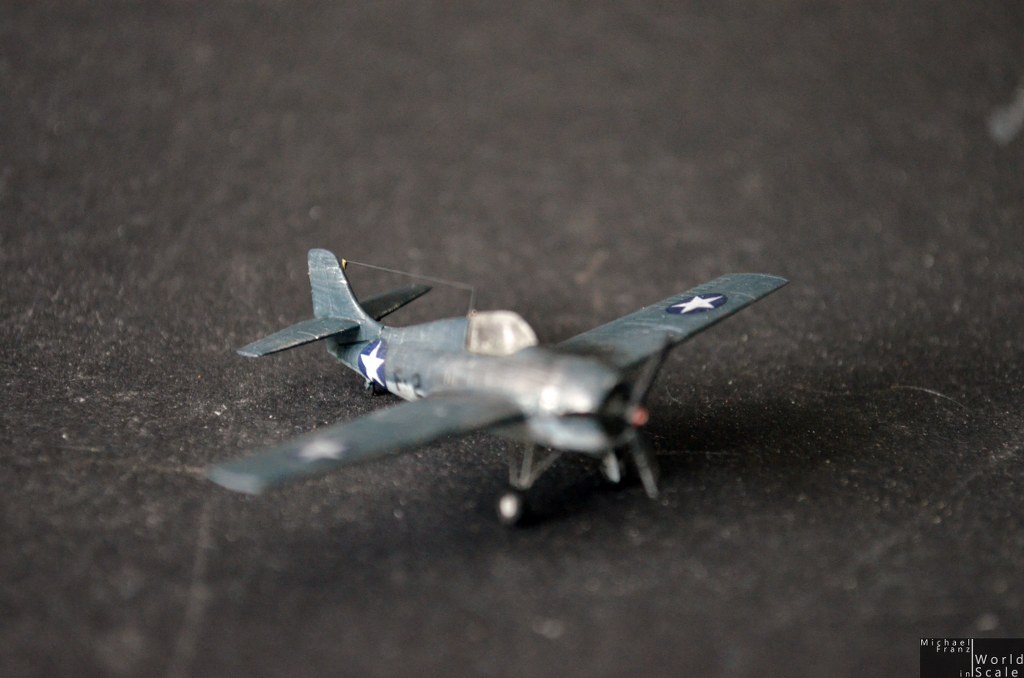
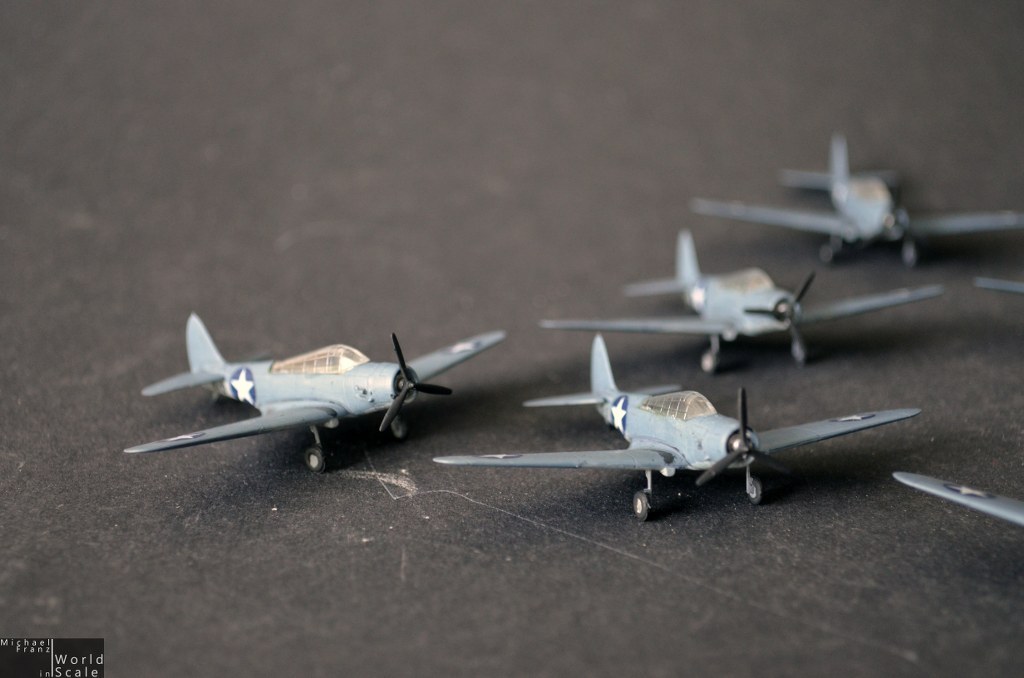
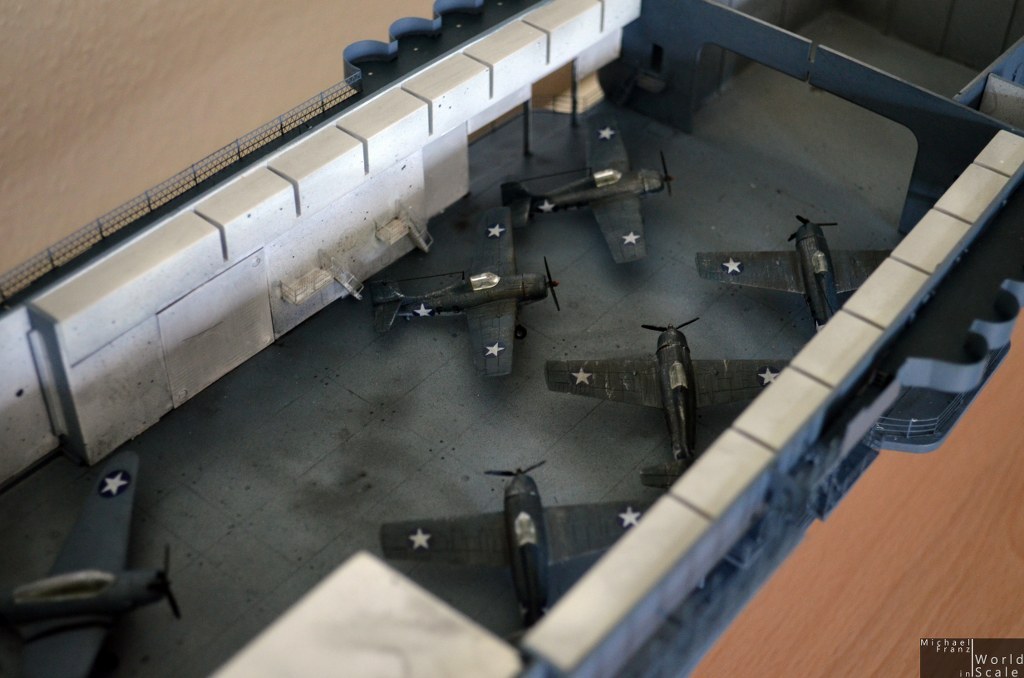
We have several TBD-1, SBD-3 and F4F-4 as well as lot of B-25Bs on board. The B-25B and 4 SBD-3 will find their place on the flight deck at the end.... all other airplanes will go inside the hangar. Due to that I will not detail the airplanes for the hangar with PE-parts or other stuff.... you will not see anything, only a little if looking through the hangar doors or the elevators....
The only PE-parts which will go on this airplanes are the undercarriage and antenna. The wings remain untouched, also no cockpit for these airplanes.
The airplanes on the flight deck receive full PE-stuff later......!
All TBD-1 and F4F-4 will glued together, made of clear plastic parts. Then painted in light grey, later with two different blue colors for the upper side. The undercarriage will be mounted after the painting, later the airplanes were glued inside the hangar bay.


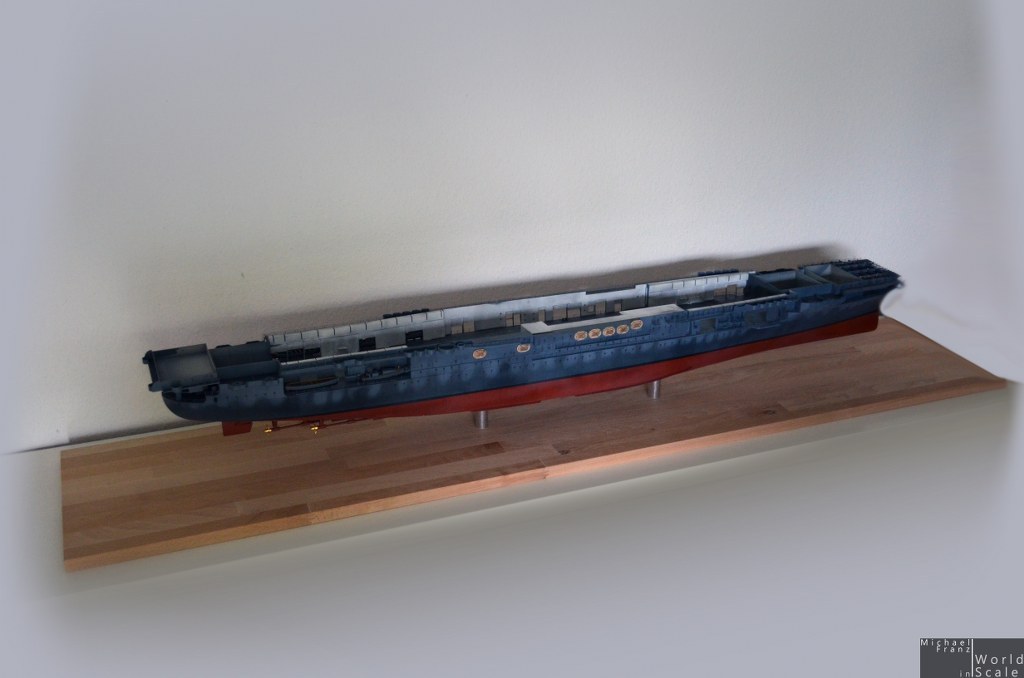
Now I also put the ship on its later display.... removed the tape from the aluminium stands.... looks good, what do you think? A name plate will follow later...


Cheers
Micha
The only PE-parts which will go on this airplanes are the undercarriage and antenna. The wings remain untouched, also no cockpit for these airplanes.
The airplanes on the flight deck receive full PE-stuff later......!
All TBD-1 and F4F-4 will glued together, made of clear plastic parts. Then painted in light grey, later with two different blue colors for the upper side. The undercarriage will be mounted after the painting, later the airplanes were glued inside the hangar bay.
Now I also put the ship on its later display.... removed the tape from the aluminium stands.... looks good, what do you think? A name plate will follow later...
Cheers
Micha

JPTRR

#051
Joined: December 21, 2002
KitMaker: 7,772 posts
Model Shipwrights: 476 posts

Posted: Saturday, May 31, 2014 - 08:35 AM UTC
Micha,
Wonderful work!
I like the airplanes on the painting base - looks like a chaotic airshow!
Wonderful work!
I like the airplanes on the painting base - looks like a chaotic airshow!


RedDuster

Joined: March 01, 2010
KitMaker: 7,078 posts
Model Shipwrights: 6,649 posts

Posted: Saturday, May 31, 2014 - 10:48 AM UTC
Real craftsmanship Michael,
The more I watch your and Julian's progress through the builds on this baby the more I am thinking I have to have a go myself, provided I can obtain Mrs Duster's permission.
Keep tempting me,
Si
The more I watch your and Julian's progress through the builds on this baby the more I am thinking I have to have a go myself, provided I can obtain Mrs Duster's permission.
Keep tempting me,
Si

JJ1973
#345
Joined: August 22, 2011
KitMaker: 1,835 posts
Model Shipwrights: 1,832 posts
Posted: Sunday, June 01, 2014 - 05:22 AM UTC
Michael,
fantastic work on your Hornet as well!! Great job on all the PE!
I have to admit that your camouflage painting, applying the little spray over, did not convince me at first. But now, with the weathering, it all makes sense. Looks really great!
Jan
fantastic work on your Hornet as well!! Great job on all the PE!
I have to admit that your camouflage painting, applying the little spray over, did not convince me at first. But now, with the weathering, it all makes sense. Looks really great!
Jan
RussellE
#306
Joined: June 27, 2010
KitMaker: 3,959 posts
Model Shipwrights: 2,777 posts
Posted: Sunday, June 01, 2014 - 10:44 PM UTC
Fantastic stuff, Michael
elmarriachi
Joined: December 26, 2009
KitMaker: 813 posts
Model Shipwrights: 304 posts
Posted: Friday, June 06, 2014 - 04:35 AM UTC
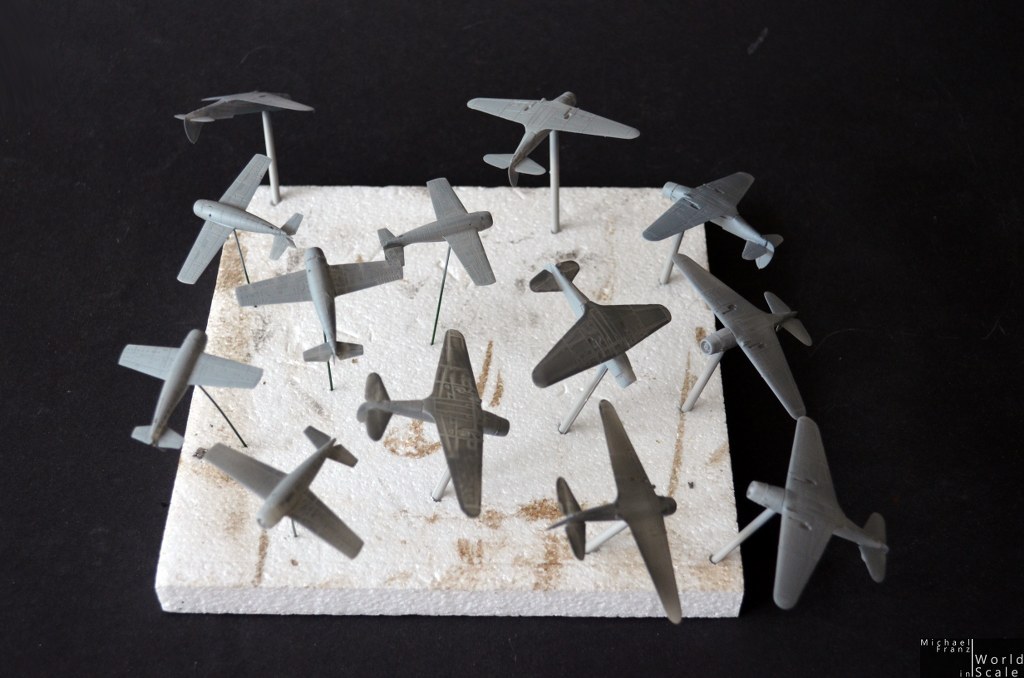
All the TBD-1 and F4F-4 were painted in light grey first, then the different kind of blue upper side is brush-painted. After a layer of clear coat the decals were put on, and the details painted. Finally a layer of matt clear coat on everything. The undercarriage is made of PE-parts by Tetra Models and brush painted after the mounting. Finally all airplanes receive a dark washing with oil paints...
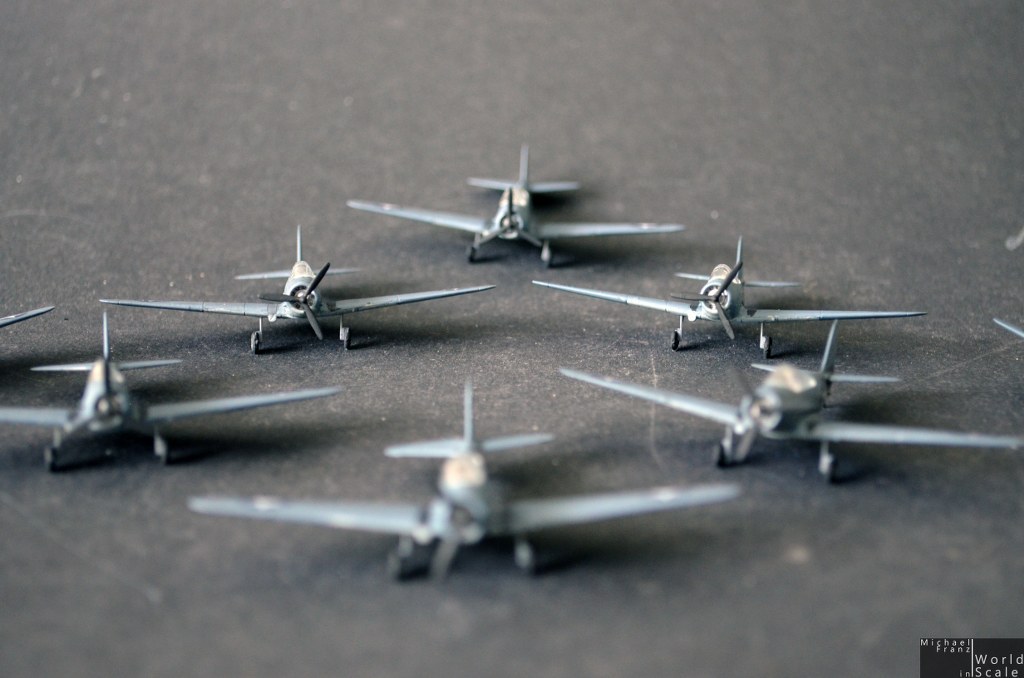
... then the airplanes were put in the hangar bay.... what do you think about their positions? I do not know if this is realistic.... what do you think? It is not yet fixed.....


Next steps is the flight deck underside....
Cheers
Micha
... then the airplanes were put in the hangar bay.... what do you think about their positions? I do not know if this is realistic.... what do you think? It is not yet fixed.....
Next steps is the flight deck underside....
Cheers
Micha

Longshanks8

Joined: July 04, 2013
KitMaker: 430 posts
Model Shipwrights: 390 posts

Posted: Friday, June 06, 2014 - 04:42 AM UTC
Your doing a great job !
Cheers Kev
Cheers Kev

Tojo72
Joined: June 06, 2006
KitMaker: 4,691 posts
Model Shipwrights: 258 posts

Posted: Friday, June 06, 2014 - 04:51 AM UTC
Your build is very impressive,looking great with all of that detail.I was just wondering,wouldn't the planes below deck be stowed with folded wings,I'm not sure,just mentioning since you asked
elmarriachi
Joined: December 26, 2009
KitMaker: 813 posts
Model Shipwrights: 304 posts
Posted: Friday, June 06, 2014 - 05:05 AM UTC
Hi,
as I know not. Only the SBD3 have the option to be displayed folded wings....
BR
Michael
as I know not. Only the SBD3 have the option to be displayed folded wings....
BR
Michael

Devin
Joined: January 18, 2005
KitMaker: 79 posts
Model Shipwrights: 45 posts
Posted: Friday, June 06, 2014 - 07:01 AM UTC
Just to chime in before you go much further, the F4F-4 Wildcat and TBD Devastators would indeed have folded wings, the SBD Dauntless' wings did not fold.

DanielMoscatelli

Joined: August 22, 2011
KitMaker: 998 posts
Model Shipwrights: 941 posts

Posted: Friday, June 06, 2014 - 10:24 AM UTC
Great job Michael !!!! Cheers Daniel .

elmarriachi
Joined: December 26, 2009
KitMaker: 813 posts
Model Shipwrights: 304 posts
Posted: Saturday, June 07, 2014 - 10:07 PM UTC
Hi guys.
I have decided to keep the wings unfolded in the hangar. Modifying all the airplanes in the hangar bay - and later seeing only a little bit of them through the open hangar doors ....
Only the ones on the flight deck will be modified.... the other ones - nobody will see it later
BR
Michael
I have decided to keep the wings unfolded in the hangar. Modifying all the airplanes in the hangar bay - and later seeing only a little bit of them through the open hangar doors ....
Only the ones on the flight deck will be modified.... the other ones - nobody will see it later
BR
Michael
elmarriachi
Joined: December 26, 2009
KitMaker: 813 posts
Model Shipwrights: 304 posts
Posted: Thursday, June 12, 2014 - 01:13 AM UTC
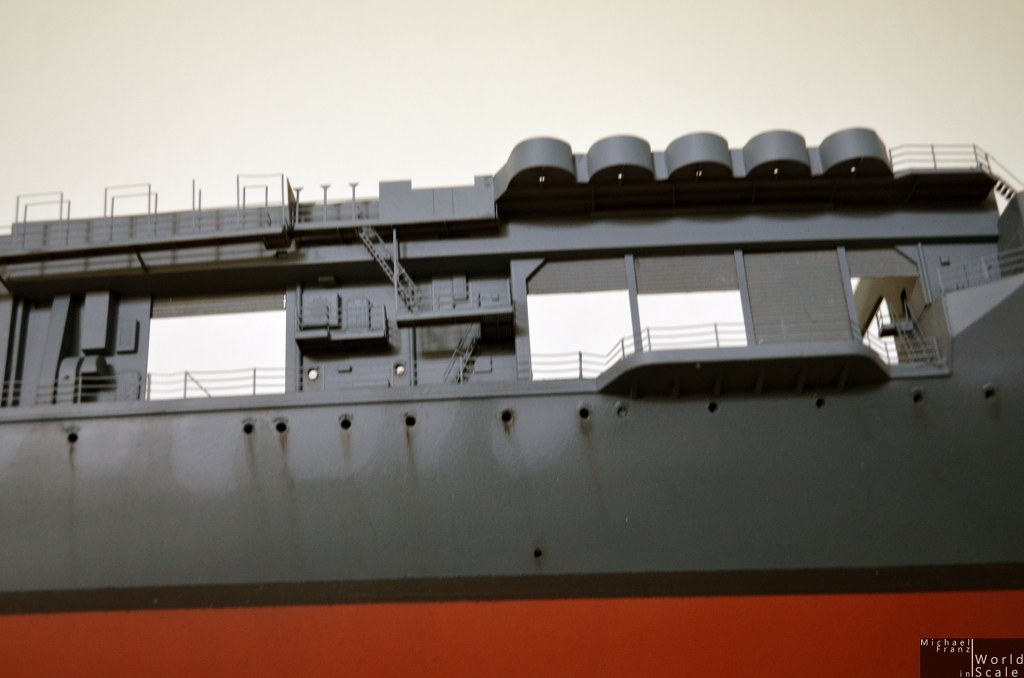
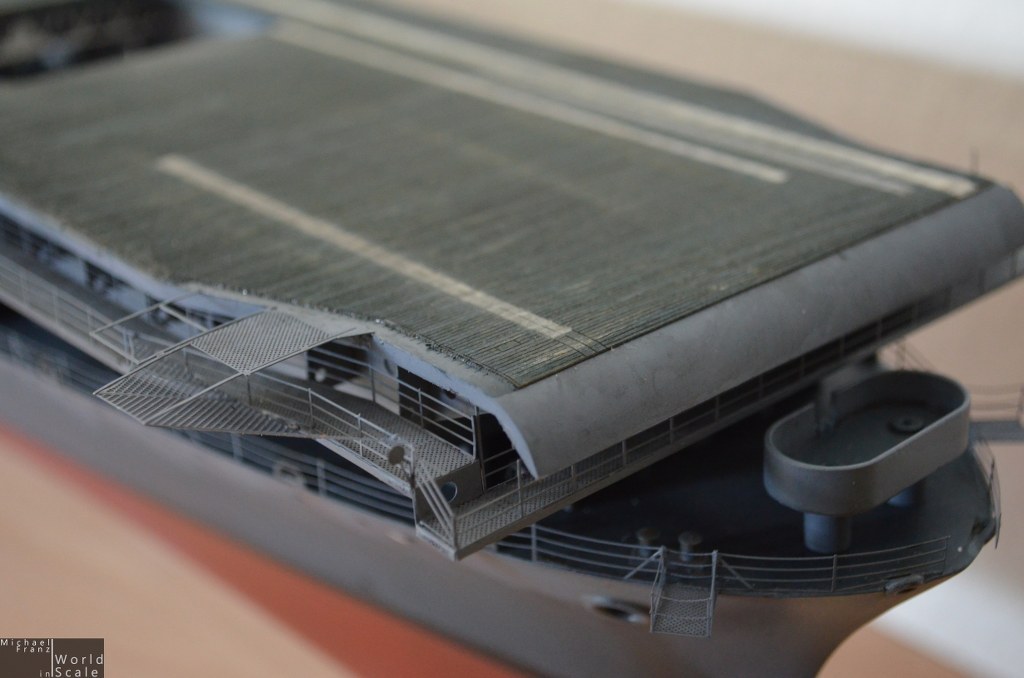
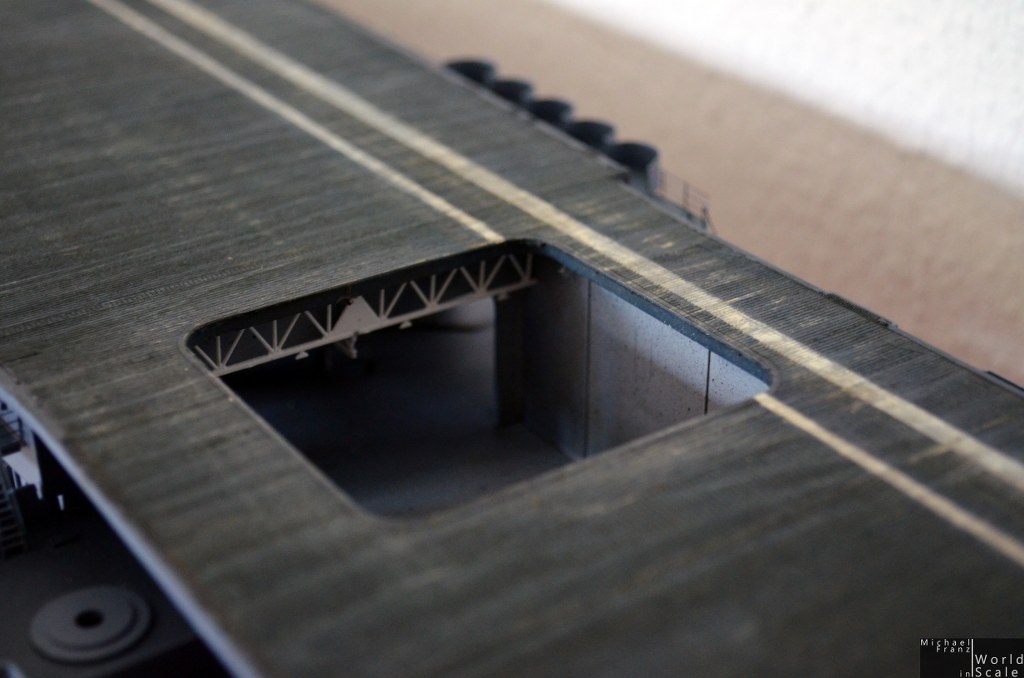
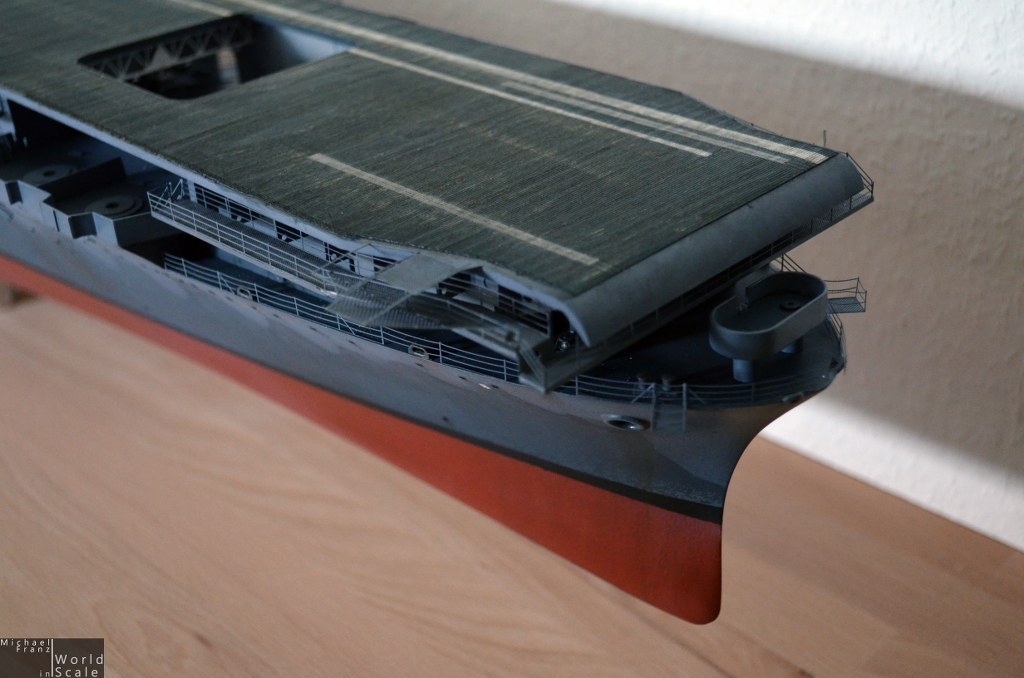
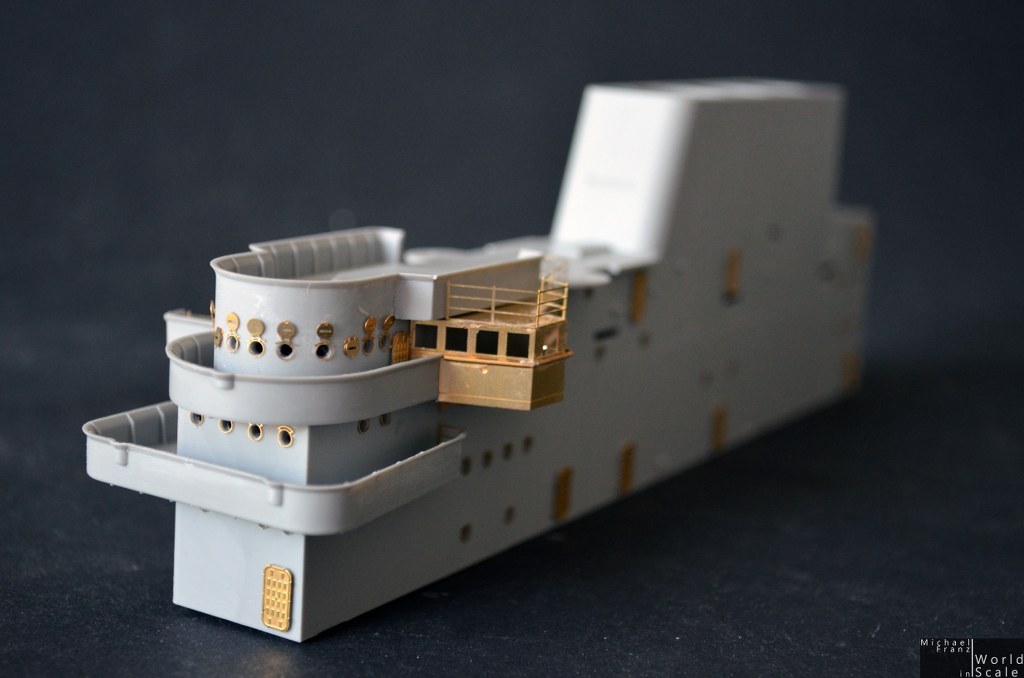
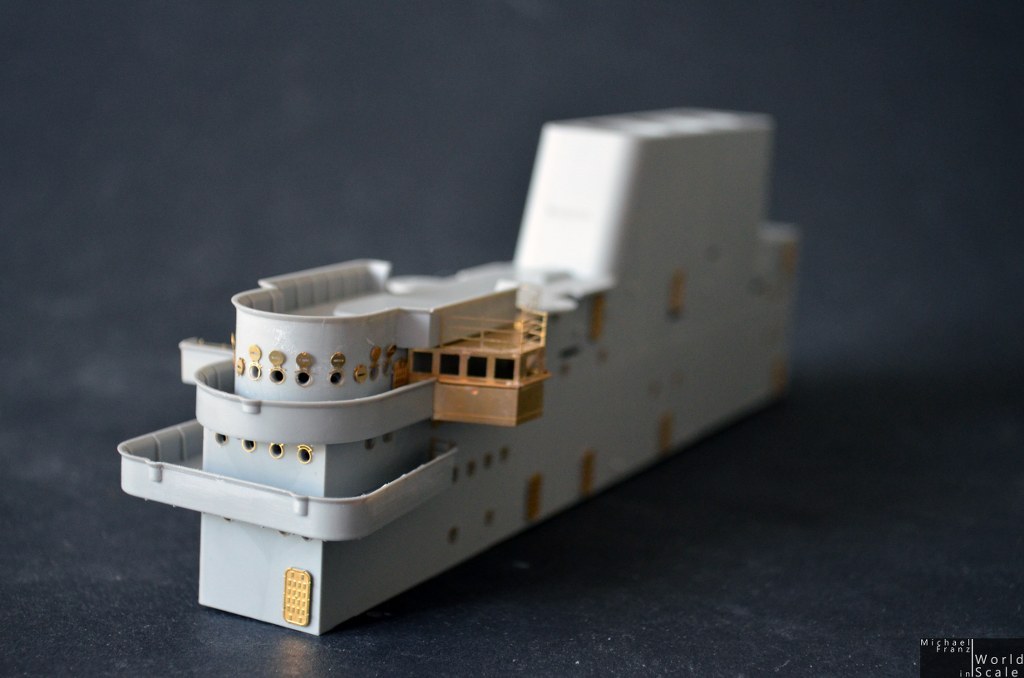
The Nautilus Models wooden deck is painted in deck-blue firstly, then glued on the plastic deck which was painted in hull grey first. After that the complete deck is mounted on the hull. Here I had some smaller sanding and filling works on the finished paint.... no fun, but we made it. After that I have masked the deck for the markings which were brush-painted on the deck. After that a black oil color washing followed, then I have sanded the whole flight deck wo get some scratches and a little bit of wood visible under the colors. A final layer of dark brown oil color washing finished the deck for the moment.
Next task.... the bridge... firstly all portholes opened.... etched frames added... and doors.... then started with the bridge and the further add on parts......

Cheers
Micha
Next task.... the bridge... firstly all portholes opened.... etched frames added... and doors.... then started with the bridge and the further add on parts......
Cheers
Micha
Tojo72
Joined: June 06, 2006
KitMaker: 4,691 posts
Model Shipwrights: 258 posts
Posted: Thursday, June 12, 2014 - 01:30 AM UTC
Great progress,continueing to look real good
 |

WEB HOSTING BY


Copyright ©2021 Model Shipwrights and Kitmaker Network, a subsidiary of Silver Star Enterprises
All Rights Reserved. Please read our Conditions of Use and Privacy Policy.
All Rights Reserved. Please read our Conditions of Use and Privacy Policy.