_GOTOBOTTOM
Ships by Class/Type
For discussions on ships by class and type.
U-Boat Type VII/C - 1/72 by Revell, Pontos...
elmarriachi
Visit this Community
Baden-Württemberg, Germany
Joined: December 26, 2009
KitMaker: 813 posts
Model Shipwrights: 304 posts
Posted: Tuesday, December 01, 2015 - 03:50 PM UTC
Type VII U-boats were the most common type of German World War II U-boat. U-boat stands for Unterseeboot, which means undersea boat in German.

The Type VII was based on earlier German submarine designs going back to the World War I Type UB III and especially the cancelled Type UG, designed through the Dutchdummy company Ingenieurskantoor voor Scheepsbouw den Haag (I.v.S) which was set up by Germany after World War I in order to maintain and develop German submarine technology and to circumvent the limitations set by the Treaty of Versailles, and was built by shipyards around the world. The Finnish Vetehinen class and Spanish Type E-1also provided some of the basis for the Type VII design. These designs led to the Type VII along with Type I, the latter being built in AG Weser shipyard in Bremen, Germany. The production of Type I was cut down only after two boats; the reasons for this are not certain and range from political decisions to faults of the type. The design of the Type I was further used in the development of the Type VII and Type IX. Type VII submarines were the most widely used U-boats of the war and were the most produced submarine class in history, with 703 built. The type had several modifications.

The Type VII was the most numerous U-boat type to be involved in the Battle of the Atlantic
The Type VIIC was the workhorse of the German U-boat force, with 568 commissioned from 1940 to 1945. The first VIIC boat commissioned was the U-69 in 1940. The Type VIIC was an effective fighting machine and was seen almost everywhere U-boats operated, although its range of only 6,500 nautical miles was not as great as that of the larger Type IX (11,000 nautical miles), severely limiting the time it could spend in the far reaches of the western and southern Atlantic without refueling from a tender or U-boat tanker. The VIIC came into service toward the end of the "First Happy Time"[ near the beginning of the war and was still the most numerous type in service when Allied anti-submarine efforts finally defeated the U-boat campaign in late 1943 and 1944.

Type VIIC differed from the VIIB only in the addition of an active sonar and a few minor mechanical improvements, making it 2 feet longer and 8 tons heavier. Speed and range were essentially the same. Many of these boats were fitted with snorkels in 1944 and 1945.

They had the same torpedo tube arrangement as their predecessors, except for U-72, U-78, U-80, U-554, and U-555, which had only two bow tubes, and for U-203, U-331, U-351, U-401, U-431, and U-651, which had no stern tube.

On the surface the boats (except for U-88, U-90 and U-132 to U-136 which used MAN M6V40/46s) were propelled by two supercharged Germaniawerft, 6 cylinder, 4-stroke M6V 40/46 diesels totaling 2,800 to 3,200 PS (2,100 to 2,400 kW; 2,800 to 3,200 shp) at 470 to 490 rpm.
For submerged propulsion, several different electric motors were used. Early models used the VIIB configuration of two AEG GU 460/8-276 electric motors, totaling 750 PS (550 kW; 740 shp) with a max rpm of 296, while newer boats used two BBC GG UB 720/8, Garbe, Lahmeyer & Co. RP 137/c or Siemens-Schuckert-Werke (SSW) GU 343/38-8 electric motors with the same power output as the AEG motors.

Perhaps the most famous VIIC boat was U-96, featured in the movie Das Boot.
[right]Origin: Wikipedia[/right]


NEXT PROJECT ….

The kit by Revell:


Add-on part set by Pontos – etched parts, turned brass, resin, wooden deck:


Resin-set for detailing the pressure hull by Blue Ridge Models:


Main gun made of resin by Eduard:


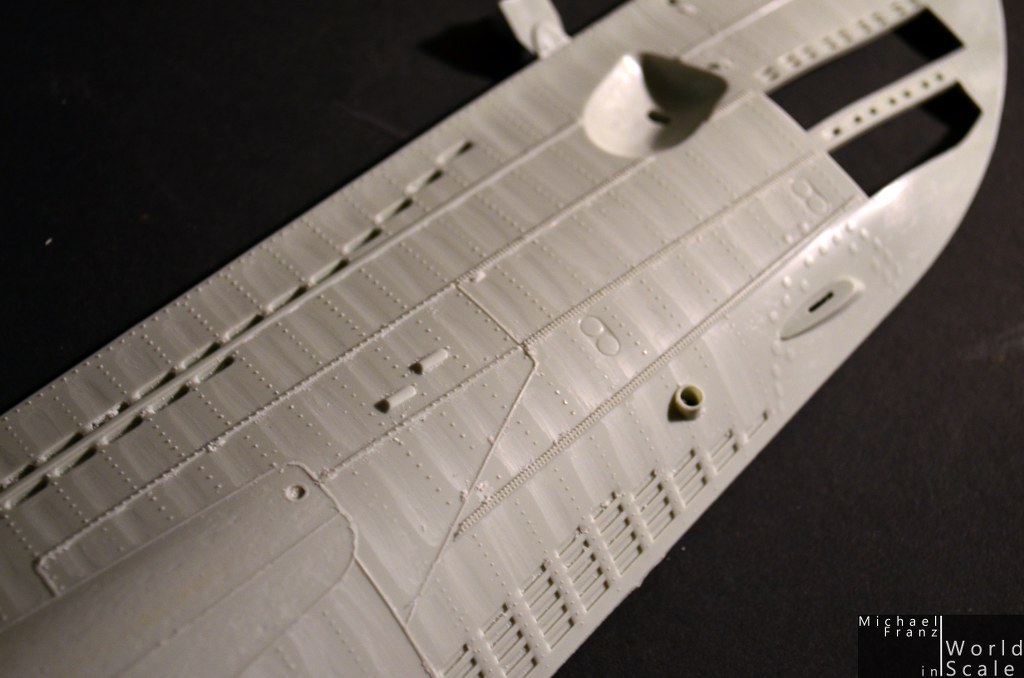
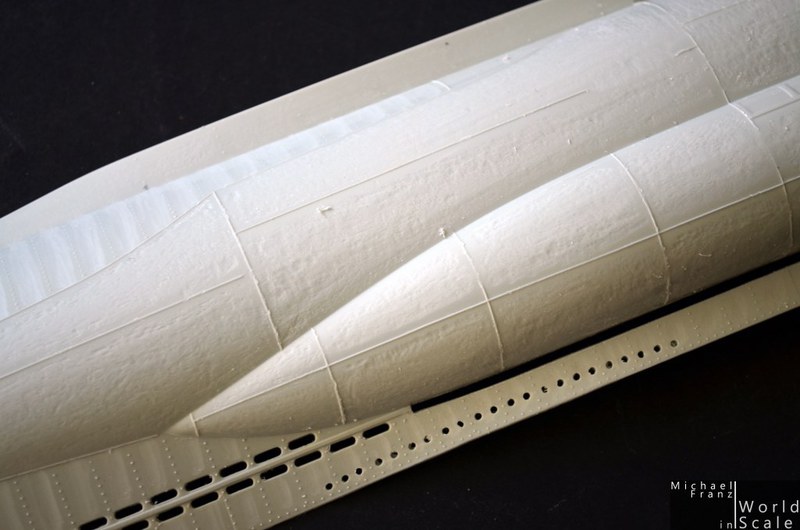
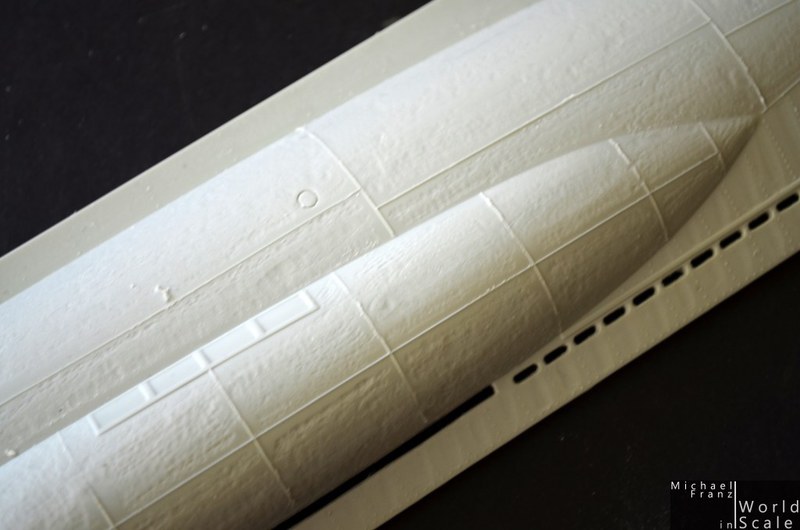
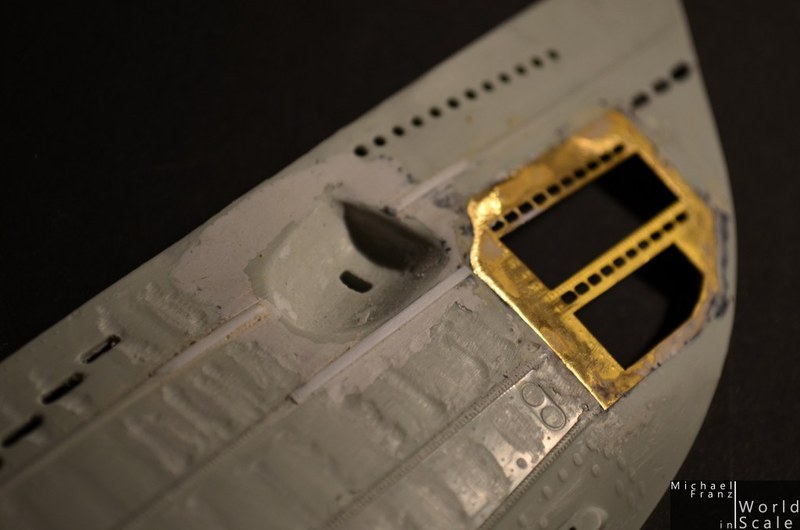
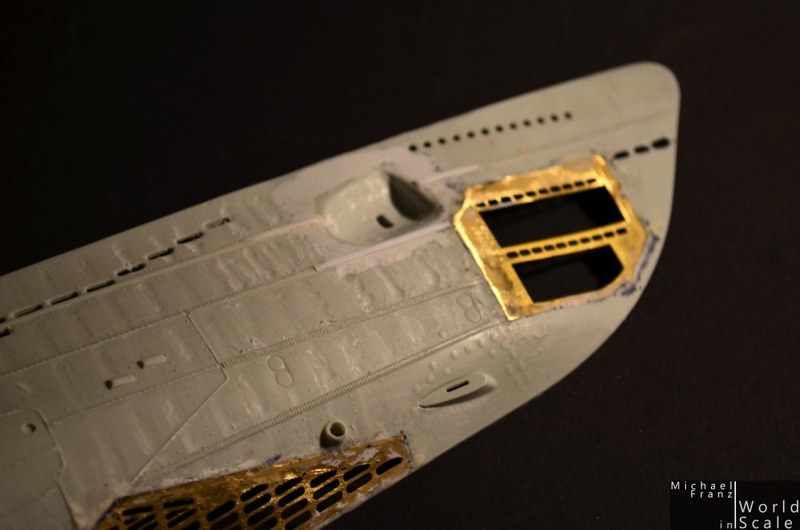
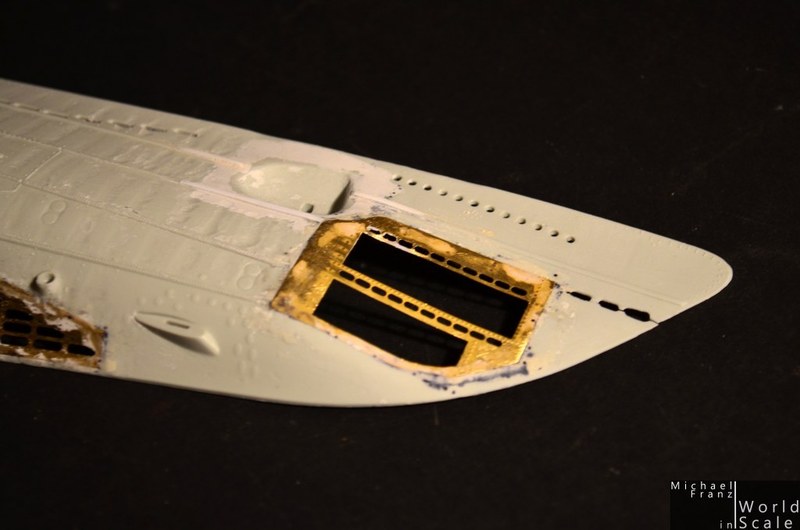
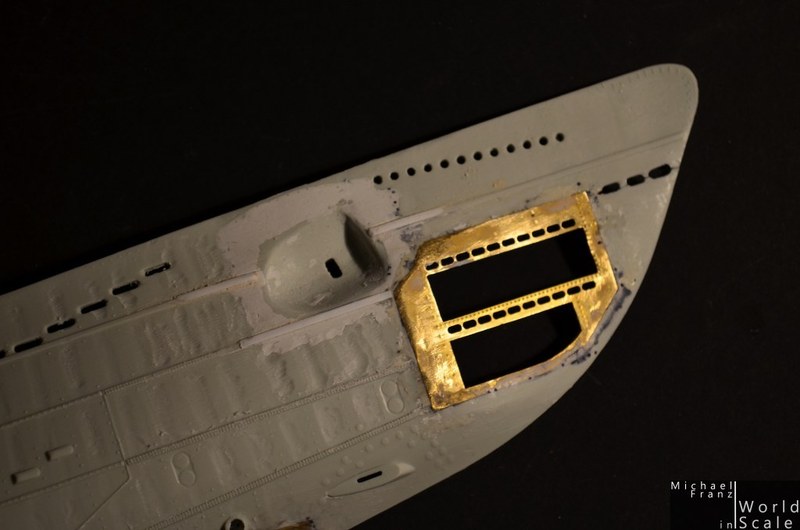
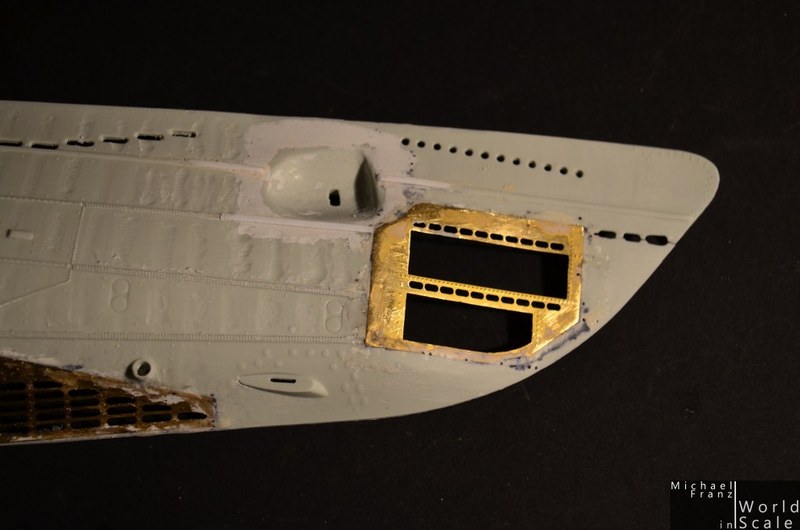
[u]First Stepp, detailing the surface of the hull[/u]
The two main parts of the hull are very well detailed by Revell with several rivets and more. The typical surface of the hull of an U-Boat, long times under water with high external pressure is missing. I think it would have been difficult to make it for Revell.
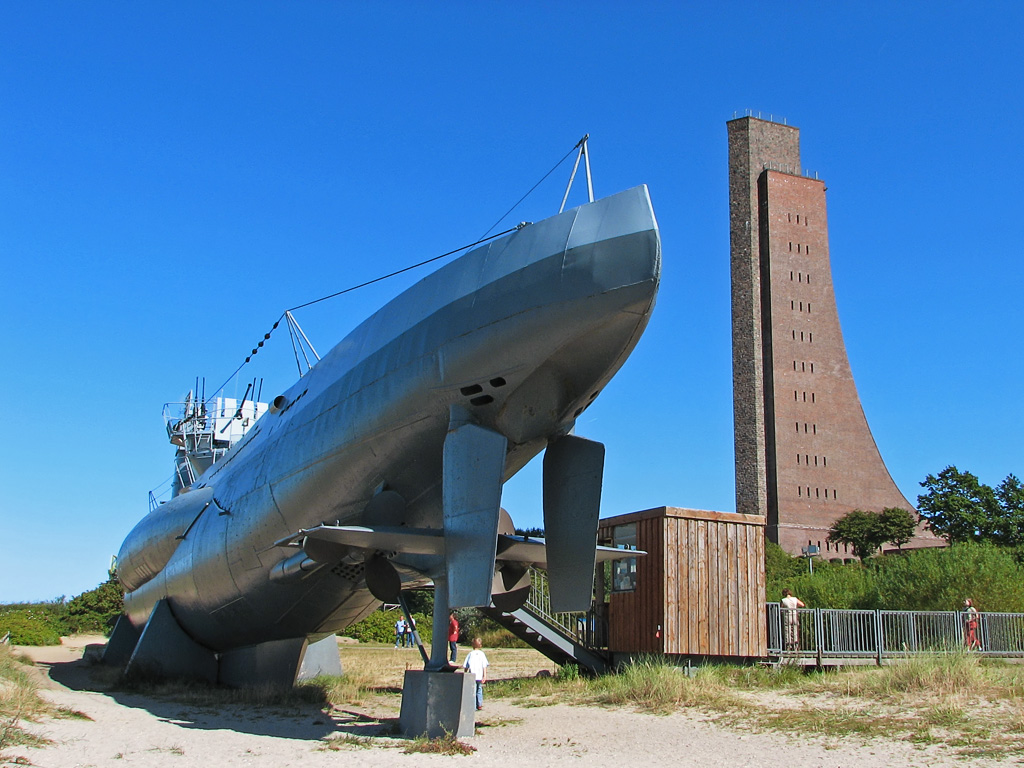

(Quelle: Wikimedia)

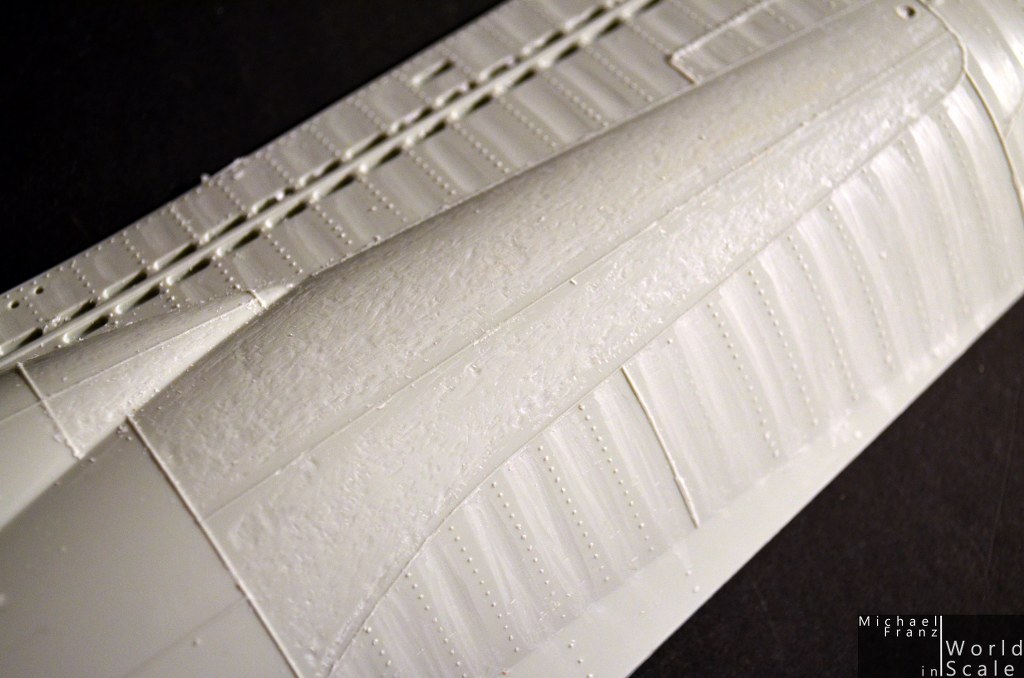
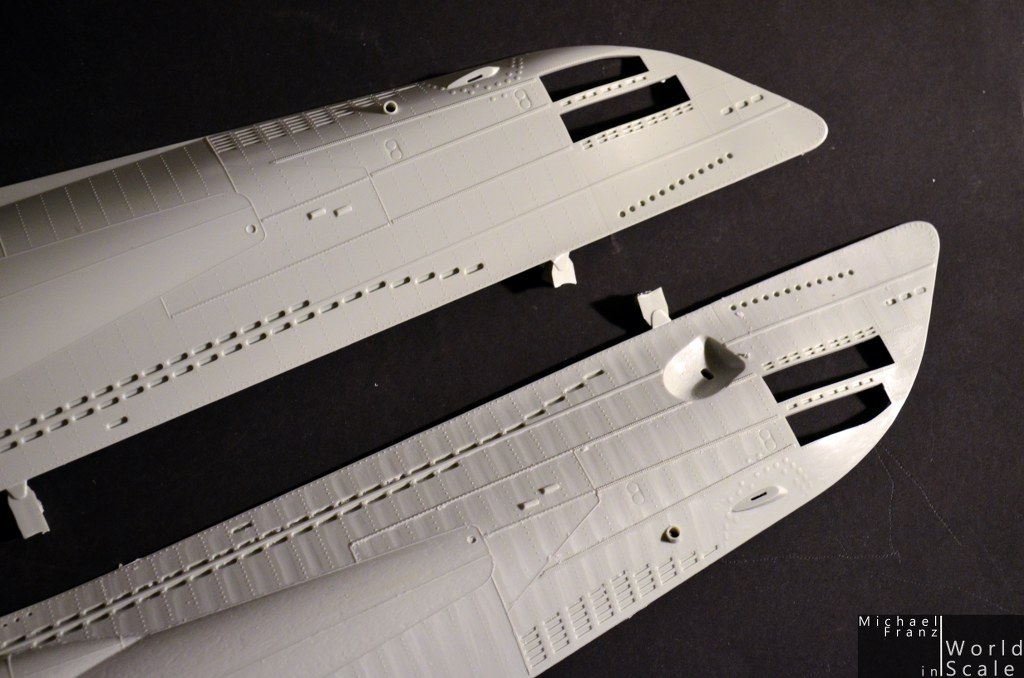
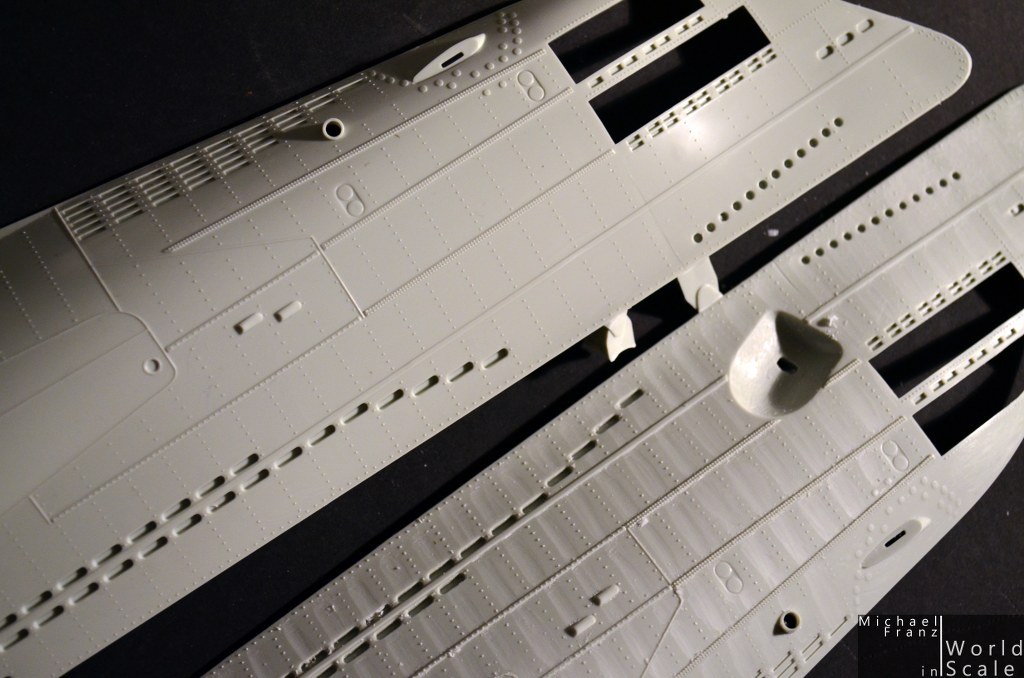
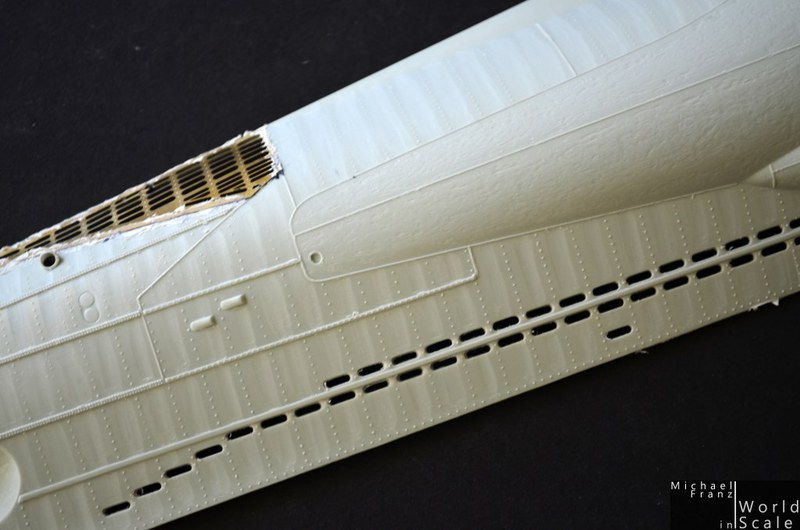
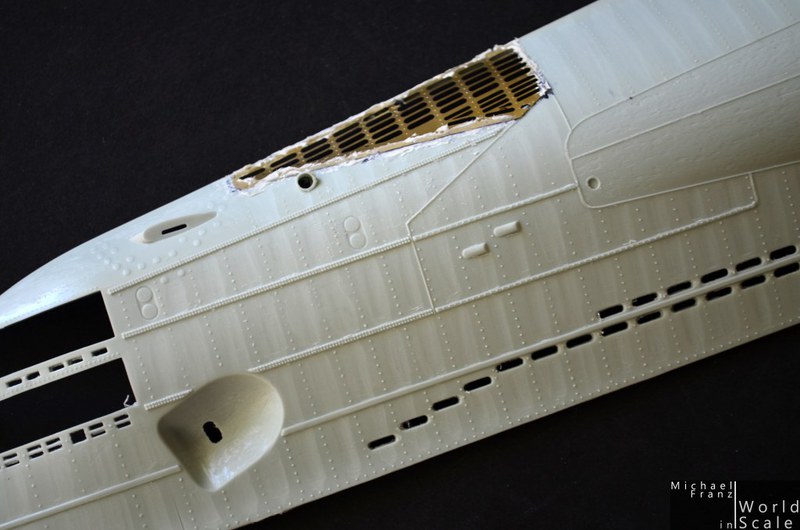
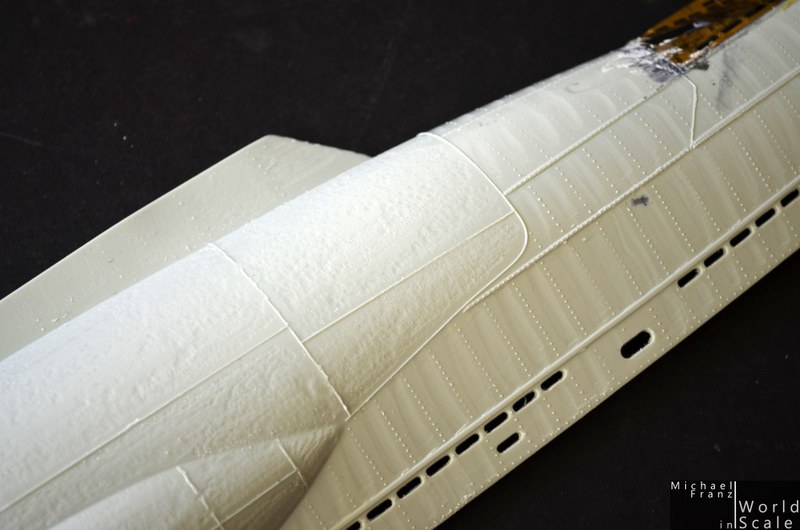
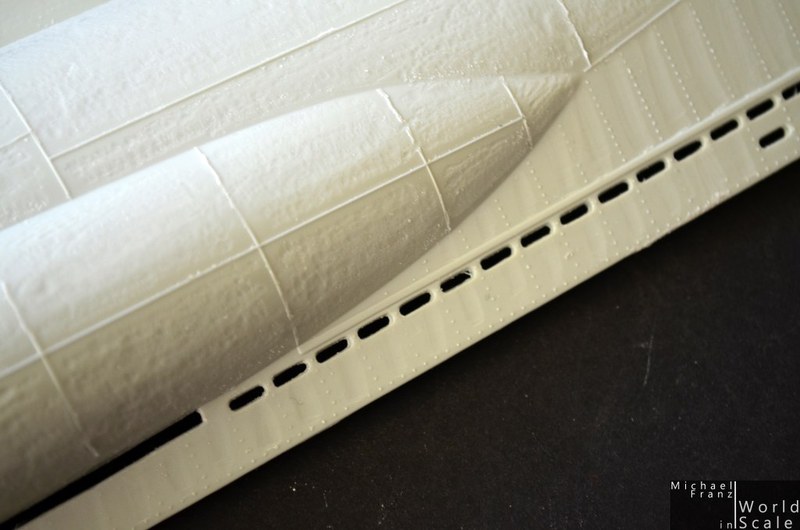
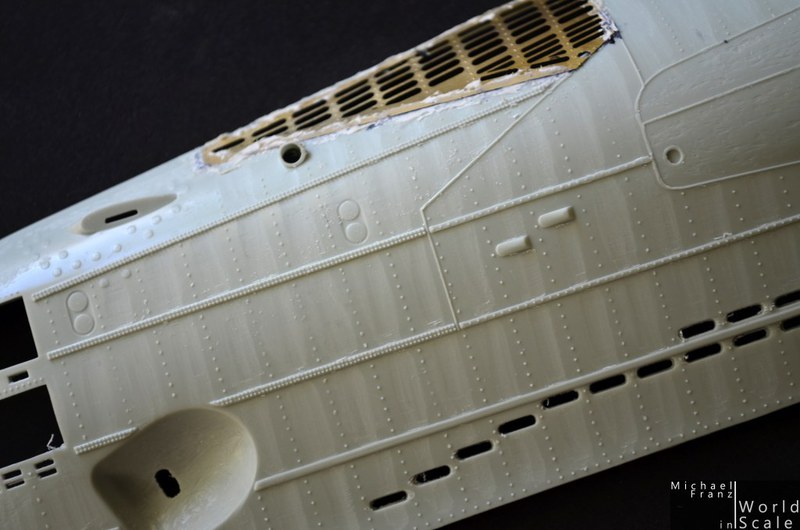
I wanted to show this here and tried several ways. Finally I started, equipped with my hobby knife and a round blade, scratching each “Steel plate” on the hull, between the rivets deeper…. The bigger steel plates at the pressure hull were reworked with a cutter / mill in my dremel…. Worked on the surface to get a realistic surface. As last step I will sand the full hull once again with a fine sanding paper – always taking care that the rivets remain undamaged.

Pictures of the reworked parts follow, with the unmodified plastic part as comparison!

Cheers
Micha
Aurora-7
#360
Visit this Community
Connecticut, United States
Joined: June 18, 2003
KitMaker: 1,020 posts
Model Shipwrights: 630 posts
Posted: Tuesday, December 01, 2015 - 07:36 PM UTC
Ah, nice project, Michael! Please consider using it for the 'Silent Service' Campaign which just started last month:

https://modelshipwrights.kitmaker.net/modules.php?op=modload&name=Campaigns&file=index&req=showcontent&id=816
elmarriachi
Visit this Community
Baden-Württemberg, Germany
Joined: December 26, 2009
KitMaker: 813 posts
Model Shipwrights: 304 posts
Posted: Wednesday, December 02, 2015 - 01:54 AM UTC
... and here we go... first pictures ...


Next steps.... further scratching and cutting on both hull parts, adding some etched parts inside the hull,, drilling and opening some holes, filling, sanding, ....

Cheers.
Micha
raivo74
Visit this Community
Vilnius, Lithuania
Joined: November 09, 2009
KitMaker: 132 posts
Model Shipwrights: 8 posts
Posted: Wednesday, December 02, 2015 - 02:47 AM UTC
Nice start, Michael. I will subscribe to your project.

I would also recommend you one completed project I have found online some time ago. Plenty of reference: U-557Project
TRM5150
Visit this Community
Massachusetts, United States
Joined: January 03, 2010
KitMaker: 2,159 posts
Model Shipwrights: 1,400 posts
Posted: Wednesday, December 02, 2015 - 02:57 AM UTC
Count me in to follow along with this one Michael! Nice choice and a decent pile of goodies to go along with it! I have a U-69 on the shelf with the hull together...of course it has been collection dust for a while...LOL! I also have the Eduard deck gun...sadly not seen on the 69 but still a great piece! You're off to a great start!! Have fun!
GrantGoodale
Visit this Community
Ontario, Canada
Joined: April 26, 2015
KitMaker: 99 posts
Model Shipwrights: 99 posts
Posted: Wednesday, December 02, 2015 - 04:52 AM UTC
Very good so far. I built mine right out of the box. What do you plan to do about that anchor? As I see things, if they dropped anchor, they would have taken off their port bow planes!


Fordboy
Visit this Community
Auckland, New Zealand
Joined: July 13, 2004
KitMaker: 2,169 posts
Model Shipwrights: 1,597 posts
Posted: Wednesday, December 02, 2015 - 06:49 AM UTC
Ahoy Michael

I have been waiting for this build.

Great subject great detail sets.

I will be interested to hear your opinion as regards the add ons.

Cheers


Sean
elmarriachi
Visit this Community
Baden-Württemberg, Germany
Joined: December 26, 2009
KitMaker: 813 posts
Model Shipwrights: 304 posts
Posted: Wednesday, December 02, 2015 - 12:26 PM UTC
Hello @ all,
thank you very much for your interest! It is a lot of work on the hull.... and I have done only about +/- 10% on the first side
I have planned to make the same scratching work also on the big steel plates before I work on the steel surface. Also I will rework all the weldin seams on the hull which are actually only made of thin straight lines without any look of a real welding seam.

Cheers
Michael
RussellE
#306
Visit this Community
Victoria, Australia
Joined: June 27, 2010
KitMaker: 3,959 posts
Model Shipwrights: 2,777 posts
Posted: Wednesday, December 02, 2015 - 02:07 PM UTC
Nice choice Michael

watching with interest...
elmarriachi
Visit this Community
Baden-Württemberg, Germany
Joined: December 26, 2009
KitMaker: 813 posts
Model Shipwrights: 304 posts
Posted: Saturday, December 05, 2015 - 11:16 PM UTC
*** UPDATE ***

Once the surface is ready, then I thinned the areas for the openings on the inside of the hull. I thinned the material so much that I could push away the plastic material at the openings so that there was no damages on the edges of the holes.
At the bow and stern I mounted the first etched parts which replace the area of the hull. Later i have to sand it, on the picture I added some putty. One further etched part at the bow is following (the area of the torpedo outlets).


Now the 2nd half of the hull as long as I am waiting for the delivery of the etched parts from WEM for the torpedo openings.... Then i will cut out this area too

Cheers
Micha
Fordboy
Visit this Community
Auckland, New Zealand
Joined: July 13, 2004
KitMaker: 2,169 posts
Model Shipwrights: 1,597 posts
Posted: Sunday, December 06, 2015 - 12:22 AM UTC
Ahoy Micha

I love the extra detail work you are doing on the hull.

It must be tedious work and a bit hard on the hands/fingers but I am sure its going to be worthwhile.

Be interested in your opinion on the WEM set once it arrives and you start installing it.

Cheers


Sean
GrantGoodale
Visit this Community
Ontario, Canada
Joined: April 26, 2015
KitMaker: 99 posts
Model Shipwrights: 99 posts
Posted: Sunday, December 06, 2015 - 02:18 AM UTC
Very impressive work
JJ1973
#345
Visit this Community
Niedersachsen, Germany
Joined: August 22, 2011
KitMaker: 1,835 posts
Model Shipwrights: 1,832 posts
Posted: Tuesday, December 08, 2015 - 10:39 AM UTC
Micha,

another fascinating subject and a great start to a build log.

In an entirely different way than with your Bismarck, again a great approach with working the hull!!

I am in for your build log - of course!!

Cheers,
Jan
Cosimodo
#335
Visit this Community
Auckland, New Zealand
Joined: September 03, 2013
KitMaker: 1,808 posts
Model Shipwrights: 871 posts
Posted: Wednesday, December 09, 2015 - 09:19 AM UTC
The hull works looks amazing and I imagine a lot of work. Will be following this for some pointers when I try the IXC for the Silent Service Campaign.

cheers

Michael
DanielMoscatelli
Visit this Community
Montevideo, Uruguay
Joined: August 22, 2011
KitMaker: 998 posts
Model Shipwrights: 941 posts
Posted: Wednesday, December 09, 2015 - 09:42 PM UTC
Great job Michael !!!

Cheers Daniel
elmarriachi
Visit this Community
Baden-Württemberg, Germany
Joined: December 26, 2009
KitMaker: 813 posts
Model Shipwrights: 304 posts
Posted: Sunday, December 13, 2015 - 02:56 PM UTC
*** update ***

The modification of the surface details of the first half of the hull is done … mostly….. Some further PE-parts are still missing (parts for improving some details), but these are following later, once the two halfs are finished and put together…


All the holes in the bow are opened, the plastic is thinned as far as possible to give it a realistic look. At the torpedo openings and at the bottom the area is cut open and two photo etched parts are installed to replace the plastic area. The bottom part is made by SRS, the big ones at the torpedo openings are made by White Ensign Models. The material is a bit thicker then the SRS ones.
Several rounds of filling, sanding, filling, sanding, filling and sanding later the surface is smooth. Several rivets are added (3D-decals) and some others replaced….


To be honest, the full surface of the hull is modified, there is no area left which was not modified. The steel plates at the bow and stern and at the upper area were scratched out with a round knife to give it a punched-in-look. The bigger areas were reworked with a mill in the dremel to give it the realistic look of the steel surface. All the weldseams were remade with putty, applied with a toothpick between two tapes.

Later several etched parts (detailing of the exhaust, several covers and further details) follow.


The stern received also a replacement etched part at the bottom …


Next Stepp – doing all the same works once again for the 2nd half of the hull… then adding some details at the inside, some supports for the deck and pressure hull…. And some more….

So far for now ….

Cheers
Micha
Fordboy
Visit this Community
Auckland, New Zealand
Joined: July 13, 2004
KitMaker: 2,169 posts
Model Shipwrights: 1,597 posts
Posted: Sunday, December 13, 2015 - 11:44 PM UTC
Ahoy Micha

I have been looking forward to this update and what an update it is.

Superb work indeed.

Keep the updates coming shipmate!

Cheers


Sean
TRM5150
Visit this Community
Massachusetts, United States
Joined: January 03, 2010
KitMaker: 2,159 posts
Model Shipwrights: 1,400 posts
Posted: Monday, December 14, 2015 - 02:30 AM UTC
Looking good there Michael! The flood vents and torp doors are a huge improvement on the kit! Keep up to good work!!
JJ1973
#345
Visit this Community
Niedersachsen, Germany
Joined: August 22, 2011
KitMaker: 1,835 posts
Model Shipwrights: 1,832 posts
Posted: Monday, December 14, 2015 - 10:32 AM UTC
Michael,

you are producing another work of art here comparing the 'untouched' hull from your first pictures with the hull as you modified it is absolutely stunning!!! You are really bringing it to live!!

Great work!

Cheers,

Jan
elmarriachi
Visit this Community
Baden-Württemberg, Germany
Joined: December 26, 2009
KitMaker: 813 posts
Model Shipwrights: 304 posts
Posted: Monday, December 14, 2015 - 04:01 PM UTC
Thanks a lot!

Next tasks .... moving the position of the anchor.....

Then.... doing all these works once again with the 2nd half of the hull......

Then... installing the interior details behind the openings.... and some holders for the upper pressure hull......

Then... gluing both halfs of the hull together.....

Then.... filling possible gaps.... and sanding all the hull again.... sanding the earlier scribed steel plates to give them a homogenous surface with the rest....

Then... replacing all the rivets on the hull.... all ..... without exceptions ....

Then... primer and further etched parts ....


So ... that's the plan for the next tasks to do ....

Cheers

Michael
Fordboy
Visit this Community
Auckland, New Zealand
Joined: July 13, 2004
KitMaker: 2,169 posts
Model Shipwrights: 1,597 posts
Posted: Tuesday, December 15, 2015 - 11:57 PM UTC
Ahoy Micha

Looks like a simple list.

They always do!

This is going to ne an impressive build indeed.

Cheers


Sean
elmarriachi
Visit this Community
Baden-Württemberg, Germany
Joined: December 26, 2009
KitMaker: 813 posts
Model Shipwrights: 304 posts
Posted: Thursday, December 17, 2015 - 02:55 PM UTC
Just thinking about opening the hull on one side and including the interior kits by CMK.... but I am not 100% shure if I want to do .... thinking about it right now... one minute yes, one minute no.....
elmarriachi
Visit this Community
Baden-Württemberg, Germany
Joined: December 26, 2009
KitMaker: 813 posts
Model Shipwrights: 304 posts
Posted: Thursday, December 17, 2015 - 10:38 PM UTC
*** UPDATE ***

The position of the anchor is corrected. The gap is filles with plastic card and magic sculp, some plastic profiles on the outside added. Now needs a bit of sanding, filling, sanding.... and some correction of the shape of the plastic profiles.


Next step... sanding and filling.... and sanding .....

Cheers
Micha
rolltide31
#377
Visit this Community
Texas, United States
Joined: June 27, 2010
KitMaker: 1,481 posts
Model Shipwrights: 1,332 posts
Posted: Friday, December 18, 2015 - 01:13 AM UTC
Michael,

Your patience and attention to detail are truly inspiring. I do not know if I could do it.

I particularly like the approach you are taking to make it look more realistic such as the compressing the outer hull. Not sure I would have ever thought of that.

Looking forward to he next update.

Dave
youngtiger1
Visit this Community
California, United States
Joined: May 14, 2008
KitMaker: 534 posts
Model Shipwrights: 55 posts
Posted: Monday, December 21, 2015 - 10:02 AM UTC
What a great work Micha. I love how the surface looks on her

Mike
 _GOTOTOP