

Todd,
Thanks for the very nice comments. I've tried to post pictures but can't figure out how - any ideas?
Thanks,
Paul


Go to modelshipwrights.com for the current dynamic site!
General Ship Modeling
Discuss modeling techniques, experiences, and ship modeling in general.
Discuss modeling techniques, experiences, and ship modeling in general.
Hosted by Jim Starkweather
My Build Log of the Heller 1/100 HMS Victory

pbishop

Joined: November 03, 2016
KitMaker: 116 posts
Model Shipwrights: 116 posts

Posted: Monday, December 05, 2016 - 07:23 AM UTC

TRM5150
Joined: January 03, 2010
KitMaker: 2,159 posts
Model Shipwrights: 1,400 posts

Posted: Monday, December 05, 2016 - 08:07 AM UTC
You are most welcome Paul! 
As for posting pics, it's not too bad. Probably the easiest for you would be to right click and select 'Copy Image Location'...then click the [img] icon just above all of the emojis in the editor box....replace the text in between the brackets with your copied link.
If you take a quick look here - https://modelshipwrights.kitmaker.net/forums/231450&page=1 Scroll down and I put together a quick and dirty tutorial on adding pics.
pbishop
Joined: November 03, 2016
KitMaker: 116 posts
Model Shipwrights: 116 posts
Posted: Monday, December 05, 2016 - 12:23 PM UTC
Ok - I got it thanks!!
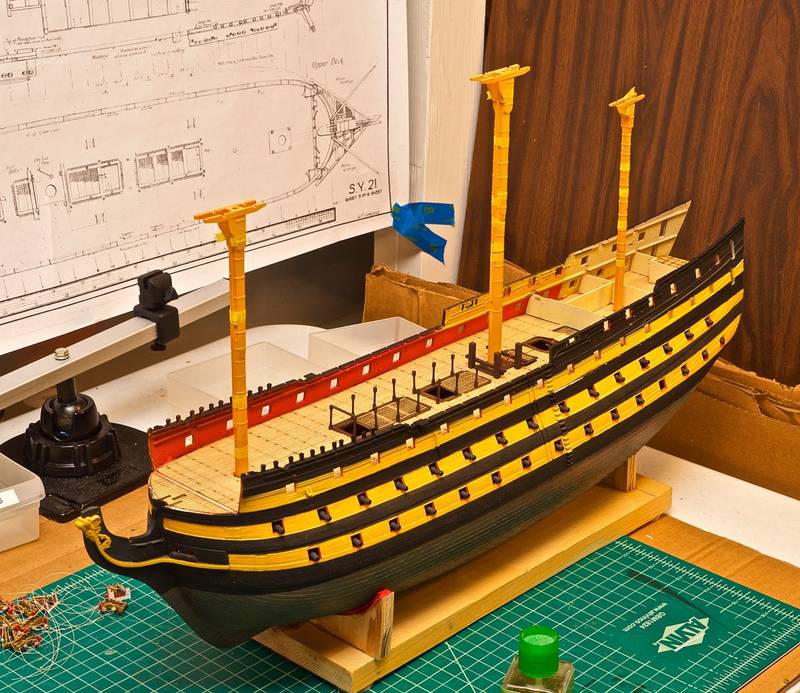
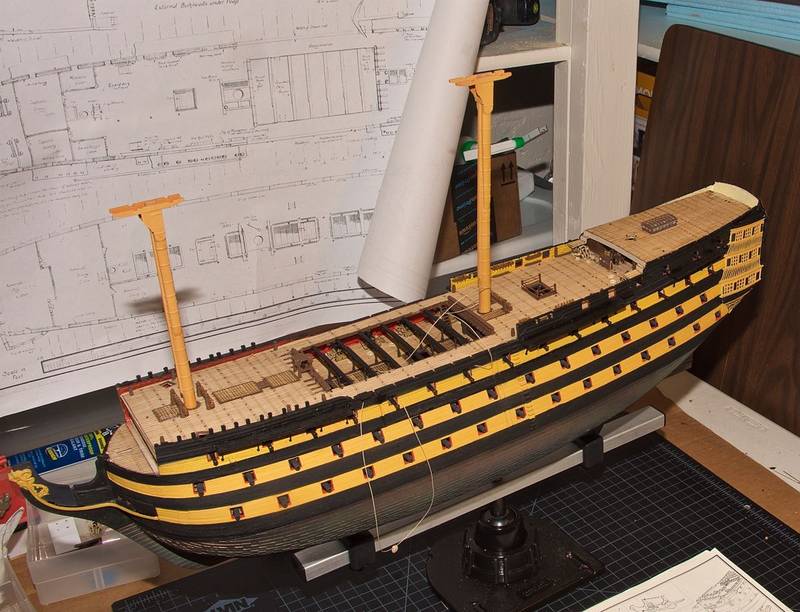
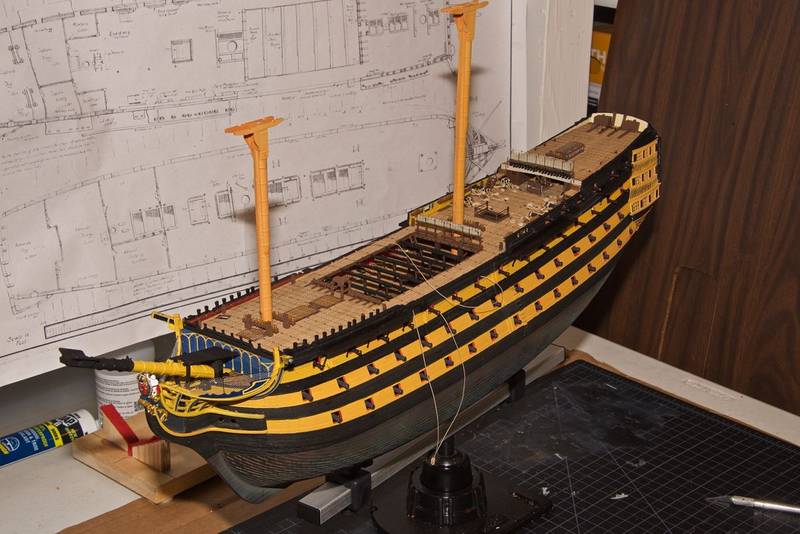
Here is the hull with the masts placed for check fit.
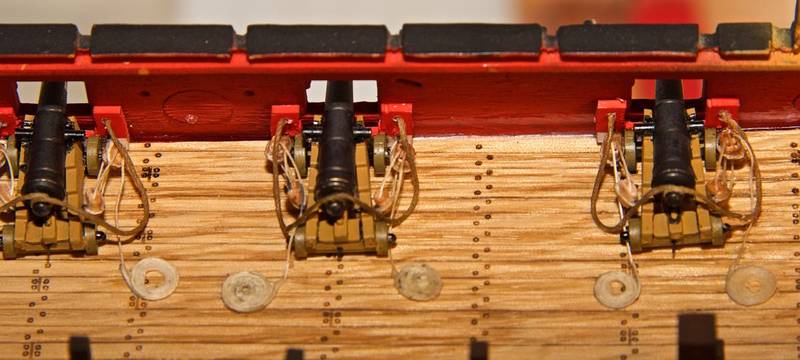
Here is a photo of some of the cannons installed with their breaching tackle.
Here is deck 3 with all cannons rigged and attached.

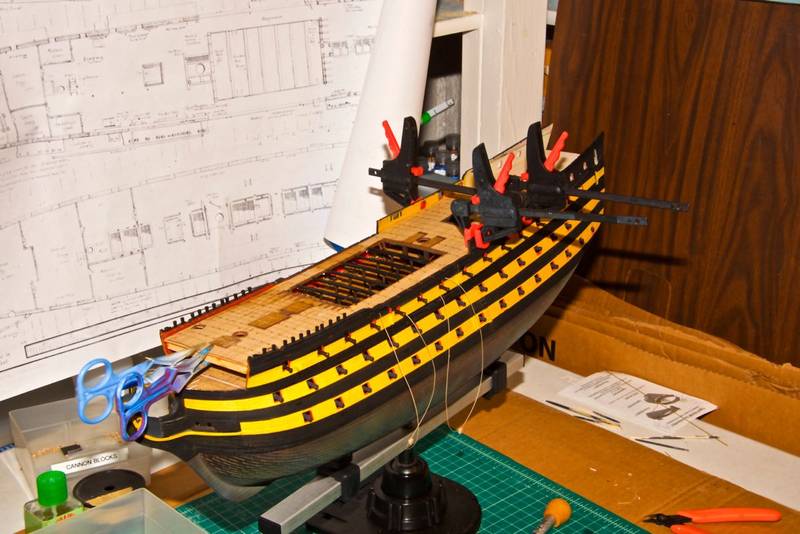
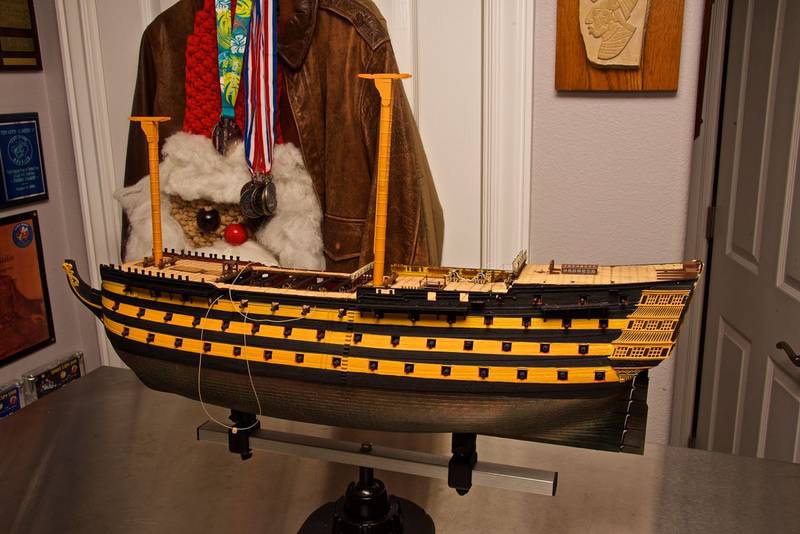
Here is the top deck installed.
Here is a closeup of the thread coiler - I've used black thread to make it easier to see. The thread goes through the hole in the plastic disk the it's assembled as you see. The thread is wound between the white plastic disk and the smaller brass cylinder. The spring keeps things compressed.

Here is the hull with the masts placed for check fit.
Here is a photo of some of the cannons installed with their breaching tackle.
Here is deck 3 with all cannons rigged and attached.
Here is the top deck installed.
Here is a closeup of the thread coiler - I've used black thread to make it easier to see. The thread goes through the hole in the plastic disk the it's assembled as you see. The thread is wound between the white plastic disk and the smaller brass cylinder. The spring keeps things compressed.

JJ1973

#345

Joined: August 22, 2011
KitMaker: 1,835 posts
Model Shipwrights: 1,832 posts

Posted: Thursday, December 08, 2016 - 11:36 AM UTC
Paul,
good to see you managed to bring up the picture here - they are REALLY worth it! Great job, fantastic work on the guns - and the entire ship so far!!
Cheers,
Jan
good to see you managed to bring up the picture here - they are REALLY worth it! Great job, fantastic work on the guns - and the entire ship so far!!
Cheers,
Jan
pbishop
Joined: November 03, 2016
KitMaker: 116 posts
Model Shipwrights: 116 posts
Posted: Friday, December 09, 2016 - 03:15 AM UTC
Thanks Jan!
Here are some more photos:
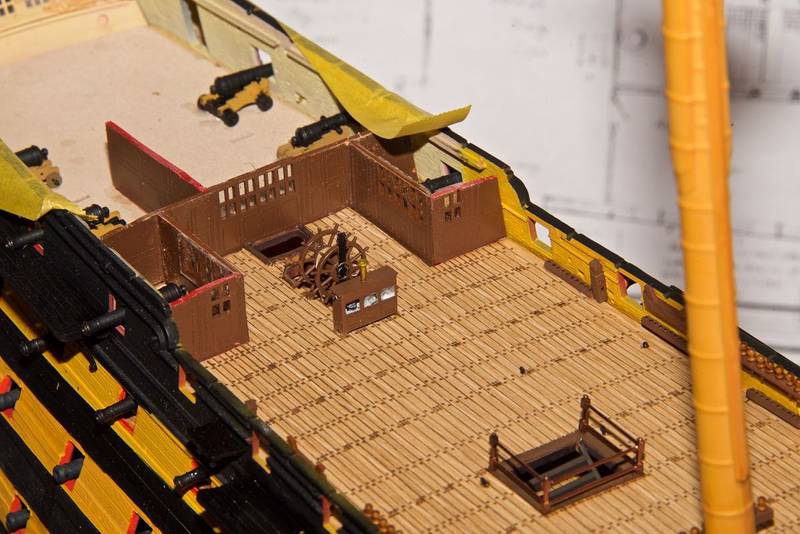
I've added the steering and binnacle:
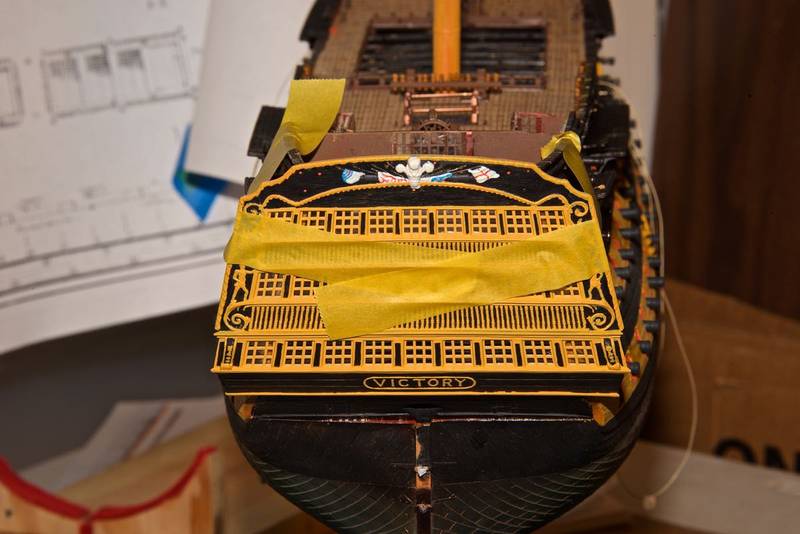
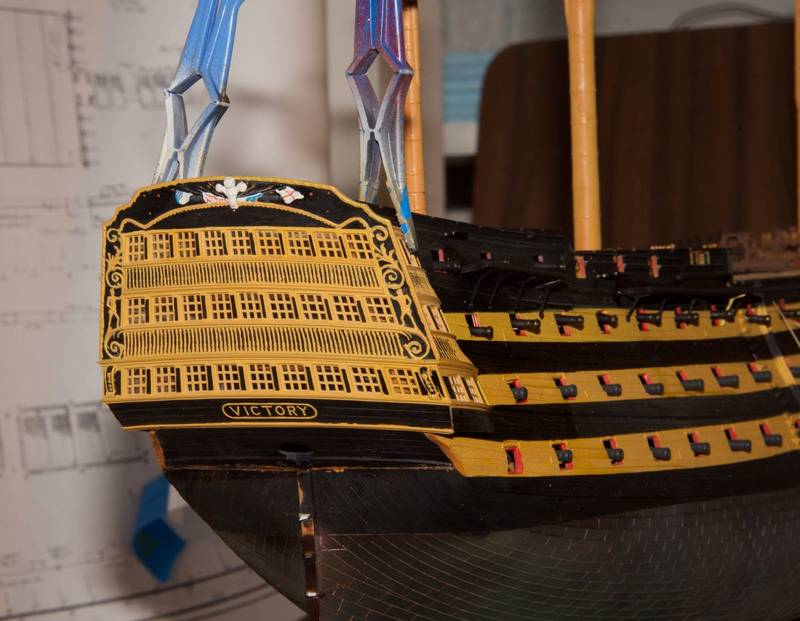
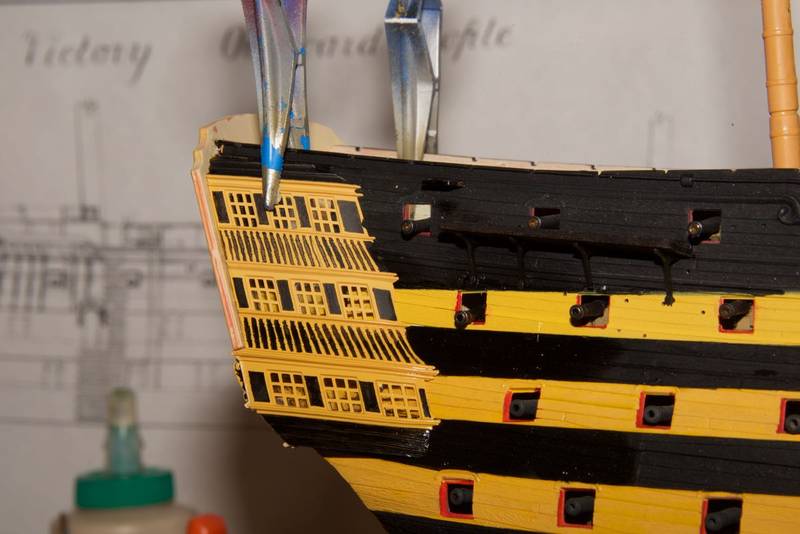
I've added the stern galleries
Here are some more photos:
I've added the steering and binnacle:
I've added the stern galleries
pbishop
Joined: November 03, 2016
KitMaker: 116 posts
Model Shipwrights: 116 posts
Posted: Saturday, December 10, 2016 - 11:48 PM UTC
12/11/2016
I've installed the first fully rigged cannon.
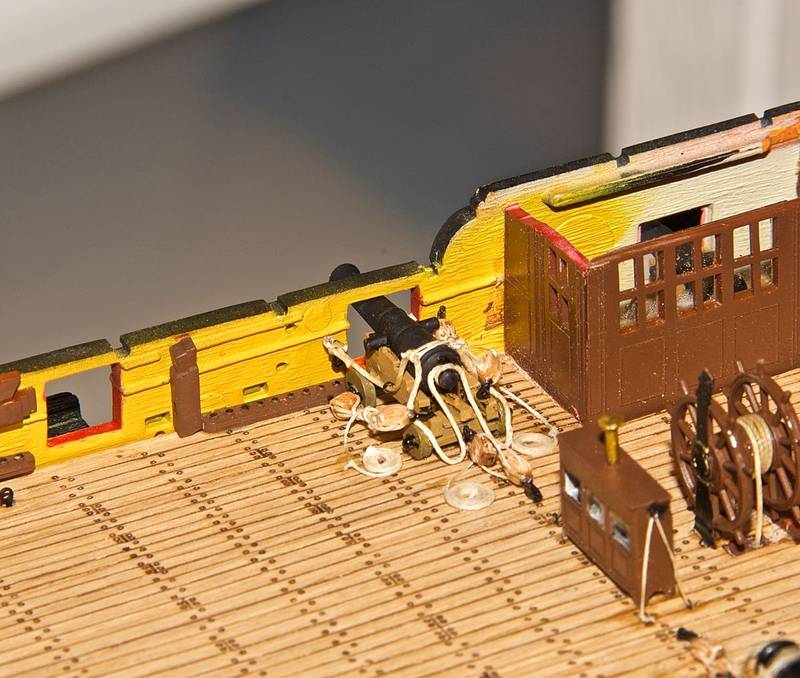
I've installed the first fully rigged cannon.
TRM5150
Joined: January 03, 2010
KitMaker: 2,159 posts
Model Shipwrights: 1,400 posts
Posted: Sunday, December 11, 2016 - 04:27 AM UTC
Looking great!! Nice work on the cannon rigging!  Only a 100 or so to go!!
Only a 100 or so to go!! pbishop
Joined: November 03, 2016
KitMaker: 116 posts
Model Shipwrights: 116 posts
Posted: Sunday, December 11, 2016 - 11:17 AM UTC
Thanks Todd - I need all of the encouragement I can get - this is fighting me all of the way. I've installed the poop deck and no it didn't fit well. I needed all types of glue and adhesives to get it down. I actually had to use brass rods installed through the hull into the deck to secure it. Here are some pics:

JJ1973
#345
Joined: August 22, 2011
KitMaker: 1,835 posts
Model Shipwrights: 1,832 posts
Posted: Monday, December 12, 2016 - 10:28 AM UTC
Amazing work, Paul!! And great pics!
It looks like you got the issues with the poop deck pretty well under control, at least the pictures don't tell the story of bad fitting parts. So great work!
And keep up your spirit with the guns!! They do look great!!
Cheers,
Jan
It looks like you got the issues with the poop deck pretty well under control, at least the pictures don't tell the story of bad fitting parts. So great work!
And keep up your spirit with the guns!! They do look great!!
Cheers,
Jan
pbishop
Joined: November 03, 2016
KitMaker: 116 posts
Model Shipwrights: 116 posts
Posted: Wednesday, December 14, 2016 - 04:37 PM UTC
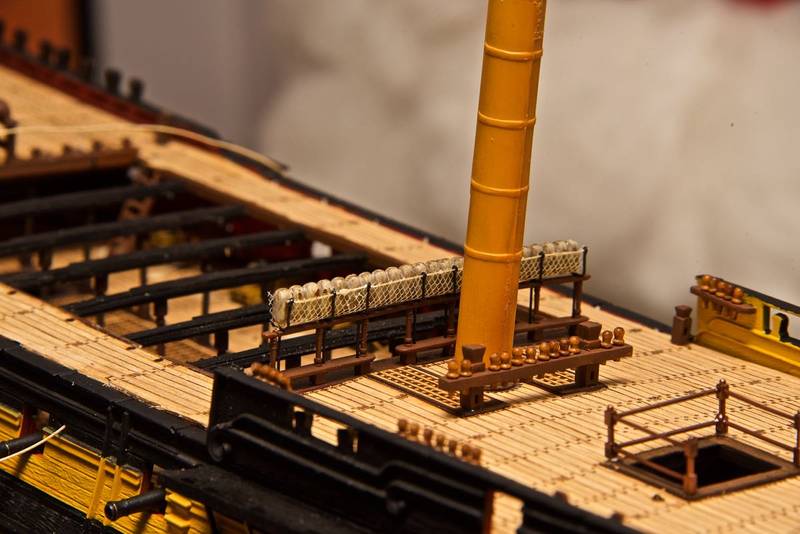
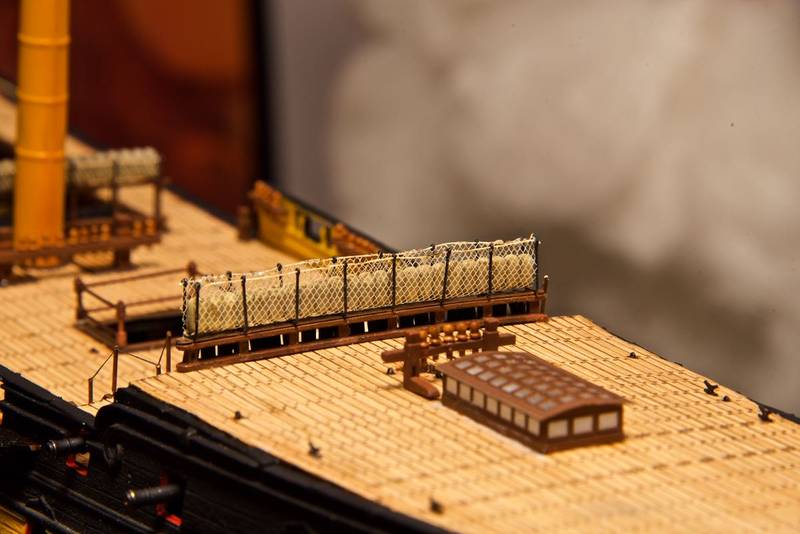
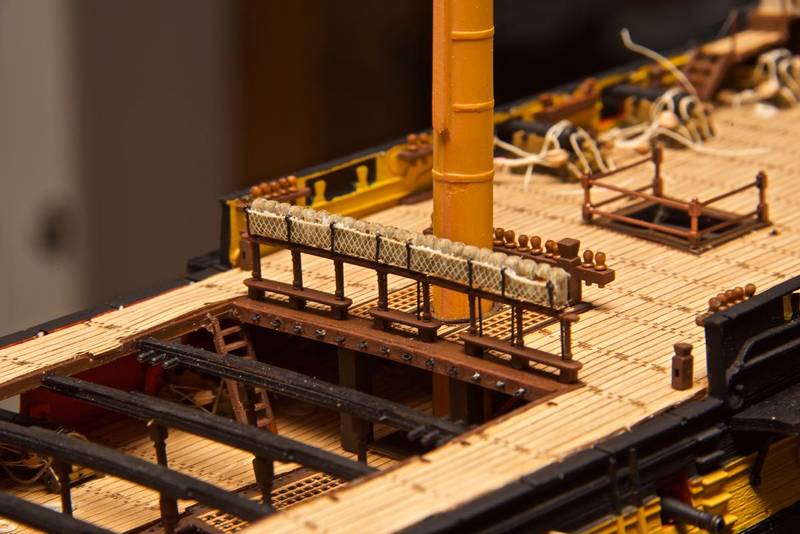
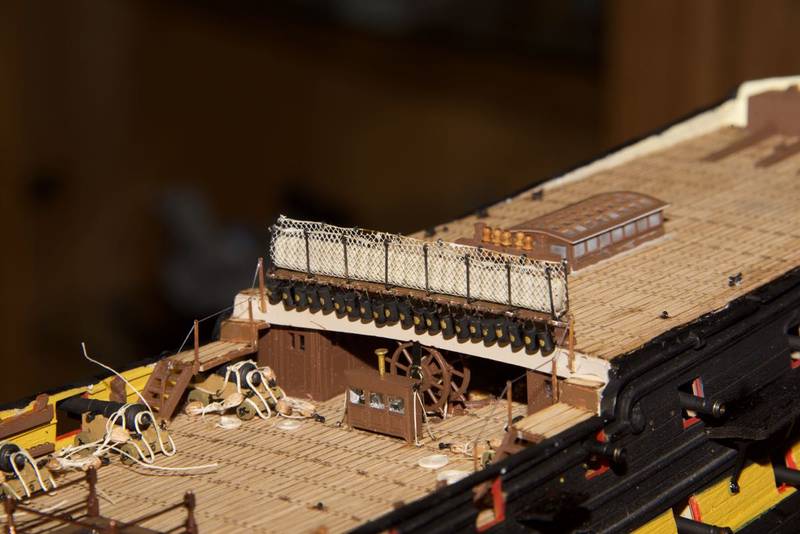
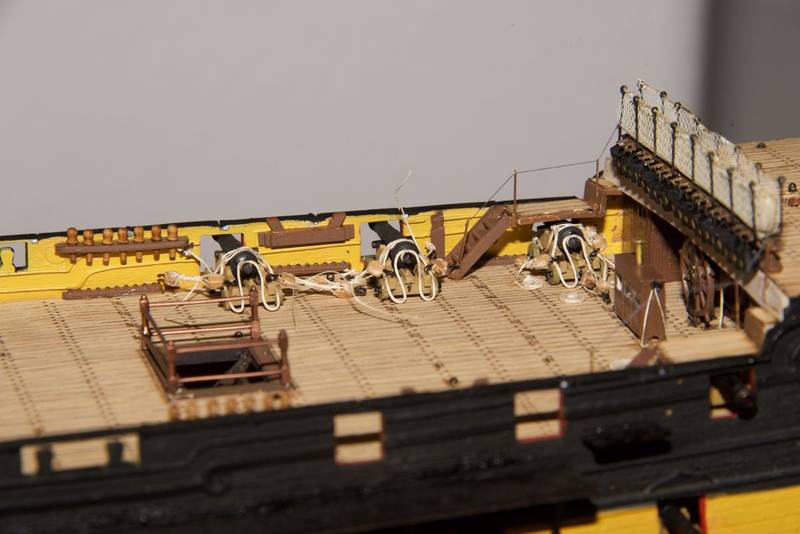
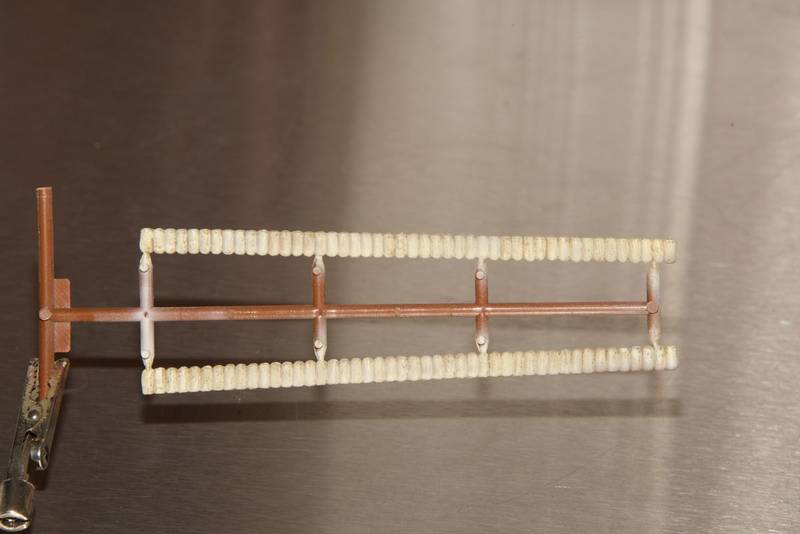
12/15/2016 Following are pictures that cover what I've done in the last few days. I've installed some railing with netting and rolled hammocks. I've finished two more cannon and they are sitting on deck awaiting installation. The rudder has been attached and the rudder irons painted. I used a battery operated soldering iron to melt the netting down to the support ropes it was much more precise than cutting.

timmyp
Joined: May 18, 2008
KitMaker: 496 posts
Model Shipwrights: 404 posts

Posted: Saturday, December 17, 2016 - 07:03 PM UTC
Hi Paul,
I was wondering if you could share your technique on how you (and with what) you covered the hammocks. In Heller's instructions, it says to paint them with mixture M2 (a white & green mixture), but the mixture I have, it looks like a very light mint green color! I sure don't want to paint my hammocks that color. I've been trying to find a color that is close to canvas, but I'm not having the best of luck. Did you paint your hammocks, and if so, what was the technique? They look really good - they have a nice weathered look, which is something I'd like to try and achieve. I've thought about covering them with actual cloth, to try and get a very natural canvas look to them.
In some other news, your pictures of the stern galleries either didn't get uploaded, or there's something amiss with my browser (all of your other photos came through ok).
Would really like to hear your thoughts on the hammocks.
Cheers,
Tim
pbishop
Joined: November 03, 2016
KitMaker: 116 posts
Model Shipwrights: 116 posts
Posted: Sunday, December 18, 2016 - 12:07 AM UTC
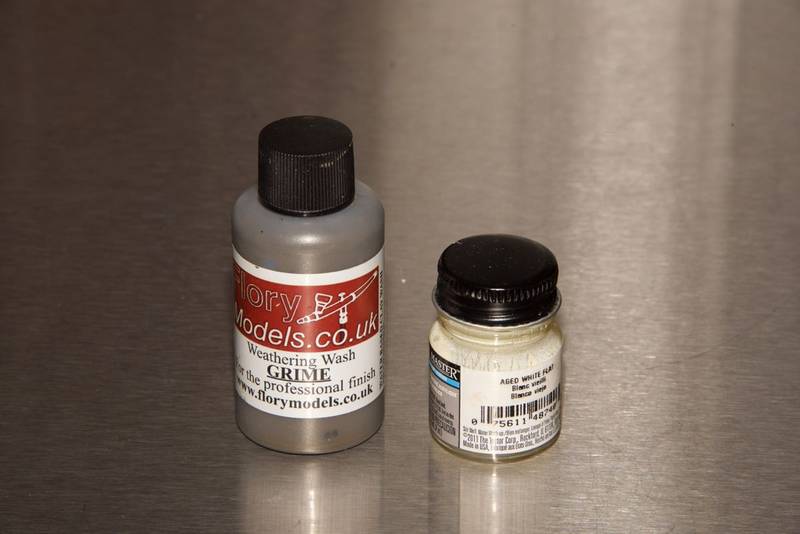
Tim that's a good question - I've painted the hammocks with the following Model Masters aged white flat and Flory's weathering wash (grime) as shown in the following photos:
The netting came as an addition to the photo etch parts that I ordered.
The netting came as an addition to the photo etch parts that I ordered.
timmyp
Joined: May 18, 2008
KitMaker: 496 posts
Model Shipwrights: 404 posts
Posted: Monday, December 19, 2016 - 11:38 PM UTC
Very nice job in painting those stern galleries. On my model, the main stern piece (I think it's part 151), I gave up on trying to paint all the filigree-type engraving that is around the figures. If I tried to do that painting, I'd never be able to move on to the next assembly step!
timmyp
Joined: May 18, 2008
KitMaker: 496 posts
Model Shipwrights: 404 posts
Posted: Monday, December 19, 2016 - 11:41 PM UTC
Thanks for that. Maybe I'll try that technique...I sure don't want to keep all those hammock parts plain white!
pbishop
Joined: November 03, 2016
KitMaker: 116 posts
Model Shipwrights: 116 posts
Posted: Wednesday, December 21, 2016 - 01:28 AM UTC
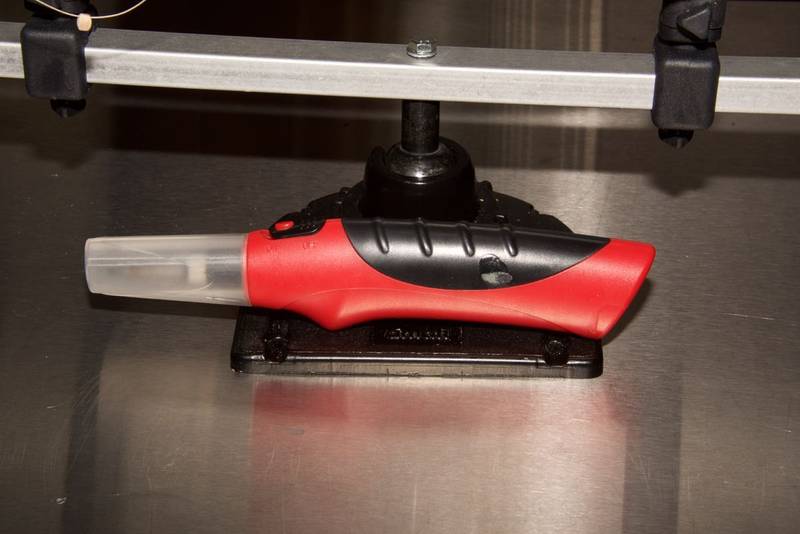
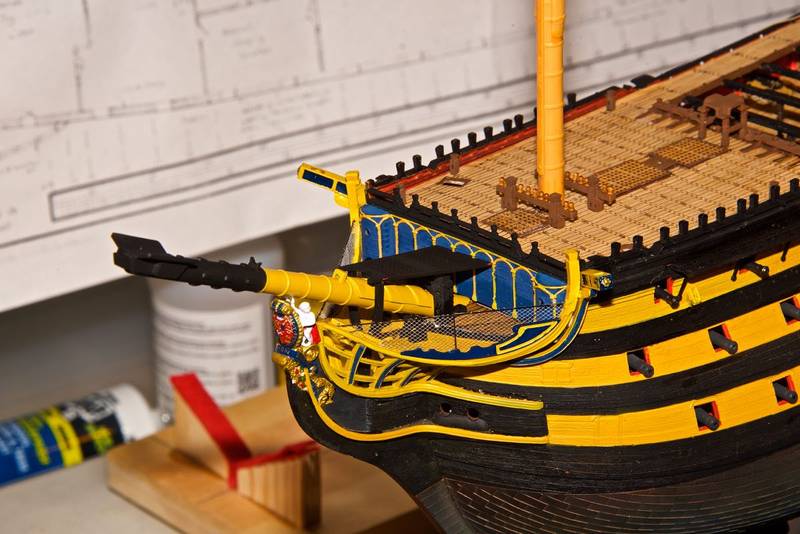
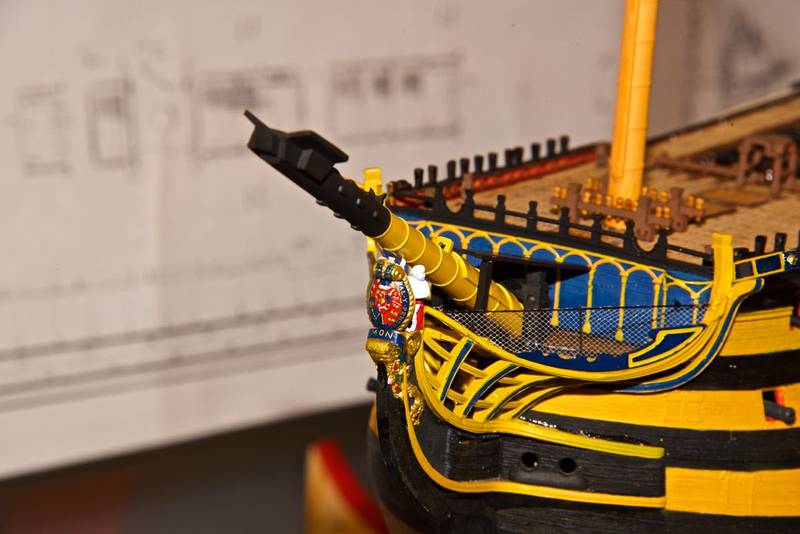
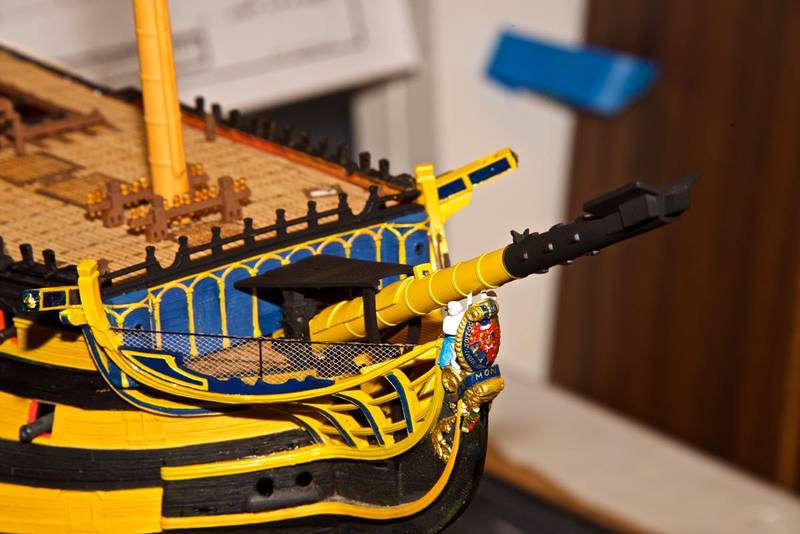
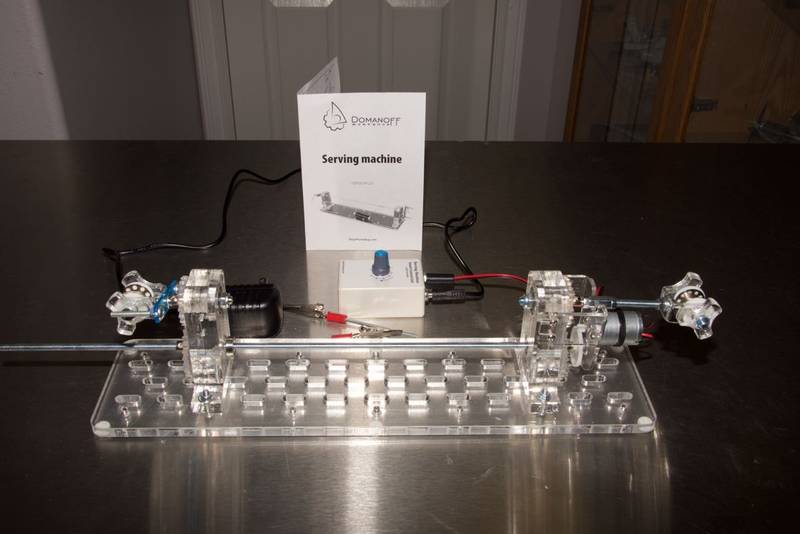
I've been working a lot on the bow. Here are a few pictures. Note that the bow spirit is just set in place here. I've also included a picture of my new rope serving machine.
pbishop
Joined: November 03, 2016
KitMaker: 116 posts
Model Shipwrights: 116 posts
Posted: Thursday, December 22, 2016 - 02:02 AM UTC
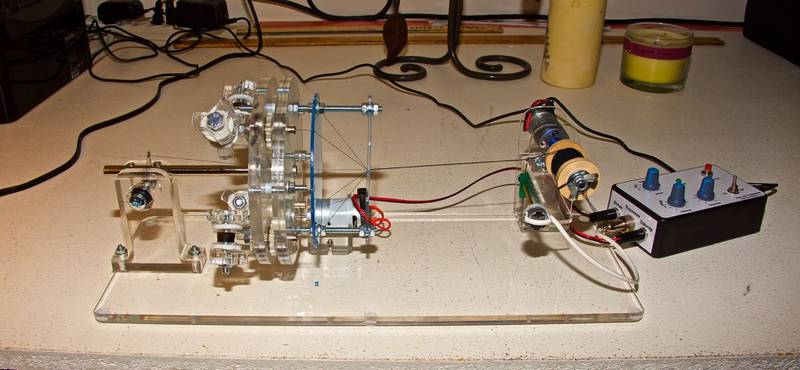
Here is a picture of my new ropewalk machine. With it I can make scale rope from thread.
TRM5150
Joined: January 03, 2010
KitMaker: 2,159 posts
Model Shipwrights: 1,400 posts
Posted: Thursday, December 22, 2016 - 09:07 AM UTC
Clean work on the bow there Paul!! Looking great as always! Love the new toys! I was looking at these too! Looks like you started making some rope already...be sure to let us know how it works out for you and show us some shots! I have them on the short list for purchase at some point!
I have them on the short list for purchase at some point! timmyp
Joined: May 18, 2008
KitMaker: 496 posts
Model Shipwrights: 404 posts
Posted: Thursday, December 22, 2016 - 10:14 PM UTC
Hi Paul,
I was looking at your pictures, and they lead me to a lot of questions!
On the shield, it looks like you haven't added the crown that goes on top of the sheild. Am I not seeing it, or maybe you haven't added it yet? Either way, I'm disappointed with how my crown went on the shield - it sits back at quite an angle, almost to the point you can't see it. One would think that crown would sit level on top of the shield.
Did your bowsprit fit in between those two upright posts ok? I had to file the sides of the bowsprit to get it to fit between those posts. And I should have filed it down a little bit more, because I saw that after I glued the bowsprit in place, it's angled a little bit to the right of the centerline.
It looks like the gangplank grating might be a bit short in length, but maybe you have it overhanging that y-shaped upright that it just looks like it's short. My grating part was probably close a quarter-inch short, so a small repair job was in order.
I'm not sure what the name of the parts are (I call them the basket weave parts), but were they a good fit right out of the box? I had to do some re-shaping on both of mine to get them to fit.
Your cable-making machine is quite a piece of kit!! It's even motorized! Yowsa!
pbishop
Joined: November 03, 2016
KitMaker: 116 posts
Model Shipwrights: 116 posts
Posted: Friday, December 23, 2016 - 12:15 AM UTC
Quoted Text
Hi Paul,
I was looking at your pictures, and they lead me to a lot of questions!
On the shield, it looks like you haven't added the crown that goes on top of the sheild. Am I not seeing it, or maybe you haven't added it yet? Either way, I'm disappointed with how my crown went on the shield - it sits back at quite an angle, almost to the point you can't see it. One would think that crown would sit level on top of the shield.
Tim - I haven't added the crown yet - I'm waiting for some more photo etch that will add to that.
Did your bowsprit fit in between those two upright posts ok? I had to file the sides of the bowsprit to get it to fit between those posts. And I should have filed it down a little bit more, because I saw that after I glued the bowsprit in place, it's angled a little bit to the right of the centerline.
The part you are referring to - I purchased a one piece cast part that fit perfectly.
It looks like the gangplank grating might be a bit short in length, but maybe you have it overhanging that y-shaped upright that it just looks like it's short. My grating part was probably close a quarter-inch short, so a small repair job was in order.
I just set that part in place for the photo. Mine looks to fit about right tho.
I'm not sure what the name of the parts are (I call them the basket weave parts), but were they a good fit right out of the box? I had to do some re-shaping on both of mine to get them to fit.
No they didn't fit properly - one side fit better than the other, but neither was very good. The starboard side in fact cracked after I glued it in place and I had to fill the gap with putty. That's pretty typical for this kit though. Nothing really fits right.
Your cable-making machine is quite a piece of kit!! It's even motorized! Yowsa!
Tim - thanks for looking. I'm still getting used to the ropewalking machine. I still have to find the right thread so the ropes come out right. My thread all has just a little fuzz on it and thats a no no.
Later,
Paul
pbishop
Joined: November 03, 2016
KitMaker: 116 posts
Model Shipwrights: 116 posts
Posted: Friday, December 23, 2016 - 05:08 AM UTC
I've finished the forward cannons. I haven't put in the reload tackle on the forward cannon because it's just too crowded. Any suggestions on that?


GrantGoodale

Joined: April 26, 2015
KitMaker: 99 posts
Model Shipwrights: 99 posts

Posted: Friday, December 23, 2016 - 06:45 AM UTC
Personally, I would leave it just like you have it.
pbishop
Joined: November 03, 2016
KitMaker: 116 posts
Model Shipwrights: 116 posts
Posted: Friday, December 23, 2016 - 11:07 AM UTC
Thanks Grant, I appreciate your suggestion! I will probably do just that.
JJ1973
#345
Joined: August 22, 2011
KitMaker: 1,835 posts
Model Shipwrights: 1,832 posts
Posted: Saturday, December 24, 2016 - 09:21 PM UTC
I haven't been checking in for a little over a week or so - great work and progress!!! Just awesome!!
As for the forward cannons - I am no expert on ships of this time, but to me it looks really good and busy enough for sure. I would leave it as well.
Cheers,
Jan
As for the forward cannons - I am no expert on ships of this time, but to me it looks really good and busy enough for sure. I would leave it as well.
Cheers,
Jan

Fordboy

Joined: July 13, 2004
KitMaker: 2,169 posts
Model Shipwrights: 1,597 posts

Posted: Wednesday, December 28, 2016 - 03:22 AM UTC
Ahoy Paul
Welcome to the website.
A superb build indeed.
Detail aplenty.
Love your website as well.
Cheers
Sean
Welcome to the website.
A superb build indeed.
Detail aplenty.
Love your website as well.
Cheers
Sean
pbishop
Joined: November 03, 2016
KitMaker: 116 posts
Model Shipwrights: 116 posts
Posted: Wednesday, December 28, 2016 - 04:47 AM UTC
Thanks for all the very nice comments, they are much appreciated. I've been in Oregon visiting my son and his family over Christmas, I'll be flying home today. I'm also fighting an upper respiratory infection and cough. I should be getting back to the build soon.
Cheers,
Paul
Cheers,
Paul
 |

WEB HOSTING BY


Copyright ©2021 Model Shipwrights and Kitmaker Network, a subsidiary of Silver Star Enterprises
All Rights Reserved. Please read our Conditions of Use and Privacy Policy.
All Rights Reserved. Please read our Conditions of Use and Privacy Policy.