

Hi Paul,
once again, that's absolute stunning work you are doing there. All the rigging you are doing looks just fantastic!!
I hope you get your rash under control!!
Cheers,
Jan


Go to modelshipwrights.com for the current dynamic site!
General Ship Modeling
Discuss modeling techniques, experiences, and ship modeling in general.
Discuss modeling techniques, experiences, and ship modeling in general.
Hosted by Jim Starkweather
My Build Log of the Heller 1/100 HMS Victory

JJ1973

#345

Joined: August 22, 2011
KitMaker: 1,835 posts
Model Shipwrights: 1,832 posts

Posted: Monday, January 23, 2017 - 10:02 AM UTC

pbishop

Joined: November 03, 2016
KitMaker: 116 posts
Model Shipwrights: 116 posts

Posted: Thursday, January 26, 2017 - 11:44 PM UTC
Jan,
Thanks for the kind remarks. I still have the rash, but hopefully it's subsiding.
I've now finished all of the lower shrouds and ratlines, have rigged and installed the fighting tops. I'm finally out of clove hitch hell! At least for a while. I will now start on the upper sections of the masts, working from the mizzen mast forward as I think that will be the easiest.

Here is a pic of my thread rack. I need a lot of thread of different size black and light tan and this helps to keep things organized.

Thanks for the kind remarks. I still have the rash, but hopefully it's subsiding.
I've now finished all of the lower shrouds and ratlines, have rigged and installed the fighting tops. I'm finally out of clove hitch hell! At least for a while. I will now start on the upper sections of the masts, working from the mizzen mast forward as I think that will be the easiest.
Here is a pic of my thread rack. I need a lot of thread of different size black and light tan and this helps to keep things organized.
pbishop
Joined: November 03, 2016
KitMaker: 116 posts
Model Shipwrights: 116 posts
Posted: Saturday, January 28, 2017 - 01:20 AM UTC
I've glued together then painted and finally installed the upper mast sections. The main mast and fore mast have brass tubing epoxied inside in the middle sections for rigidity. The alignment between the masts isn't perfect, I'll have to adjust that with the shrouds.


LionsDen
Joined: June 28, 2013
KitMaker: 102 posts
Model Shipwrights: 38 posts
Posted: Monday, January 30, 2017 - 07:55 PM UTC
I love the thread rack, great idea! Now I just need a way to keep the cats from using this as a toy box.... 
pbishop
Joined: November 03, 2016
KitMaker: 116 posts
Model Shipwrights: 116 posts
Posted: Tuesday, January 31, 2017 - 11:27 AM UTC
Thanks Troy - the thread rack is handy to keep all of that stuff organized.
Today I've taken a breather form rigging the Victory and worked instead on a 1/100 scale 20 oared ships boat that I got from Russia. The cost was $29.00 includeing shipping. It's a very nice kit, but it measures out at about 130mm when finished. That's really big, bigger than I thought; I'm really not sure how I'm going to use it. I started out using wood glue, then switched to thin CA as it just works better in the close spaces that I had to deal with. Here are the pictures of how far I got today.


Today I've taken a breather form rigging the Victory and worked instead on a 1/100 scale 20 oared ships boat that I got from Russia. The cost was $29.00 includeing shipping. It's a very nice kit, but it measures out at about 130mm when finished. That's really big, bigger than I thought; I'm really not sure how I'm going to use it. I started out using wood glue, then switched to thin CA as it just works better in the close spaces that I had to deal with. Here are the pictures of how far I got today.
pbishop
Joined: November 03, 2016
KitMaker: 116 posts
Model Shipwrights: 116 posts
Posted: Wednesday, February 01, 2017 - 05:02 AM UTC
I've sanded and painted the ships boat (the one that's really too large). First I gave it two coats of Tamiya liquid primer, then sanded then two coats of Tamiya gray primer from a rattle can. It needs more sanding and more parts go in the inside to finish it.
Next I have some updated photos that show a little more rigging done on the bow.


Next I have some updated photos that show a little more rigging done on the bow.
pbishop
Joined: November 03, 2016
KitMaker: 116 posts
Model Shipwrights: 116 posts
Posted: Monday, February 06, 2017 - 06:09 AM UTC
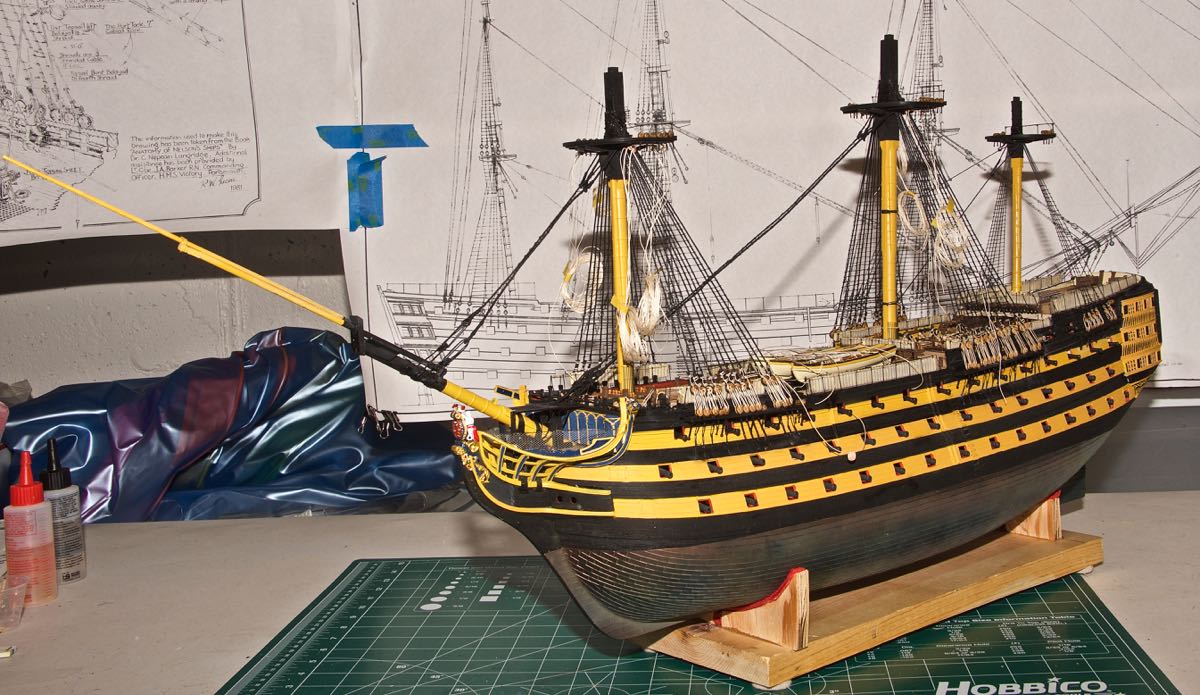
I've finished the shrouds and ratlines on the foremast, and have added one backstay which I used to the foremast alignment so it would line up with the mainmast and mizzen mast. One picture shows the ship on another support so I could tilt it and give me more comfortable access. I've also included another pic of the bow spirit to show the latest rigging there.


JJ1973
#345
Joined: August 22, 2011
KitMaker: 1,835 posts
Model Shipwrights: 1,832 posts
Posted: Monday, February 06, 2017 - 10:29 AM UTC
Wow, I missed out on some quite extensive updates and really great work here!!
The rigging continues to amaze me! And what are you going to do with the separate boat? Will it fit somewhere?
Cheers,
Jan
The rigging continues to amaze me! And what are you going to do with the separate boat? Will it fit somewhere?
Cheers,
Jan
pbishop
Joined: November 03, 2016
KitMaker: 116 posts
Model Shipwrights: 116 posts
Posted: Monday, February 06, 2017 - 11:16 AM UTC
Jan,
Thanks for your nice comments, and no I don't know quite what I'm going to do with the boat. It's way too large to hang from the davits.
Thanks for your nice comments, and no I don't know quite what I'm going to do with the boat. It's way too large to hang from the davits.
pbishop
Joined: November 03, 2016
KitMaker: 116 posts
Model Shipwrights: 116 posts
Posted: Tuesday, February 07, 2017 - 01:11 AM UTC
I've come to the point where I need to start thinking about attaching the sails. I have more standing rigging to do, but the sails will be in the mix pretty soon. With that in mind I'v been researching how best to stain sails. I've read that tea is not the best way because of the acids in it that may cause deterioration over many years. To that end I went out and bought some tea (just to experiment with) and some Minwax wood finish stain specifically "Pickled Oak" as that seemed to be the lightest stain they had. I tried the tea first on a piece of scrap and it seems that you need to leave the material in a long time for the staining to take effect I'm just not that patient. Plus there is that acid effect. I then tried the Minwax stain that that seemed to work much better. I soaked the sails in the stain one at a time then blotted them really well and the result was a nice muted effect just what I wanted. I then hung them all up to dry in my model room. I have the spray booth running to filter out the fumes. I wanted to get away from the bright white original color. So here are the pictures.


pbishop
Joined: November 03, 2016
KitMaker: 116 posts
Model Shipwrights: 116 posts
Posted: Tuesday, February 07, 2017 - 02:20 AM UTC
I'm wondering if I should try to add the reef-hanks. These are the ropes that are on the sails used to furl them. At this scale (1/100) I'm wondering if it's worth the trouble, they will be tedious to add. I've also got a lot of sewing to do on each sail to add earrings and cringles all around the perimeter of each sail.
Any thoughts would be most helpful.
Any thoughts would be most helpful.

timmyp
Joined: May 18, 2008
KitMaker: 496 posts
Model Shipwrights: 404 posts

Posted: Tuesday, February 07, 2017 - 08:47 AM UTC
Hey Paul,
How's the rash?
The sails look good; from your pictures, they have just a hint of coloring.
I'm curious about some of the models in your case: on the lowest shelf of the right-hand case, it looks like you've got the "Famo" transporter down there. To the left of that, it sort of looks like an M109 SP artillery gun. And on the shelf above, is that a Tiger, or a Panther? (Or even a King Tiger? - but I doubt it, considering the road wheels are the early variant). From the size, I'm guessing it's either 1/25th or 1/16th scale?
Regarding the stitchwork you're thinking about doing on your sails - Heller's instructions make a note about adding the reef lines (I think in either 3 or 4 mm length, depending on the sail). The reef lines might look good on cloth sails (and not so much on Heller's plastic sails). I'm still thinking about trying to find some fabric-covered wire to glue to whatever sails I use, not only as a kind of bolt rope, but also to give the sails some shape.
Of course, I just have to finish the shrouds & ratlines on my Victory before I get a chance to move on.
Cheers,
Tim
pbishop
Joined: November 03, 2016
KitMaker: 116 posts
Model Shipwrights: 116 posts
Posted: Tuesday, February 07, 2017 - 09:48 AM UTC
Tim,
You're right it's a Famo tank transporter, to the left of that is a 1/35 tiger 1 tank. On the shelf above left to right:
Hobby Boss 1/16 Tiger 1 with Aber photo etch, 1/6 scale 50 cal machine gun, then Trumpeter's 1/16 T34/85 with full interior. You can get more info on my website.
The reef lines are supposed to be 2/panel on the the sails. I just don't know if I want to go to all of that trouble. I'm not sure I can do it right at this scale either. I'm gonna have to think more on this.
I do hope you get out of ratline hell soon.
Later,
Paul
timmyp
Joined: May 18, 2008
KitMaker: 496 posts
Model Shipwrights: 404 posts
Posted: Wednesday, February 08, 2017 - 07:41 AM UTC
Quoted Text
Tim,
You're right it's a Famo tank transporter, to the left of that is a 1/35 tiger 1 tank. On the shelf above left to right:
Hobby Boss 1/16 Tiger 1 with Aber photo etch, 1/6 scale 50 cal machine gun, then Trumpeter's 1/16 T34/85 with full interior. You can get more info on my website.
The reef lines are supposed to be 2/panel on the the sails. I just don't know if I want to go to all of that trouble. I'm not sure I can do it right at this scale either. I'm gonna have to think more on this.
I do hope you get out of ratline hell soon.
Later,
Paul
I think my next build will of the Famo tank transporter...but that's down the road a bit!
I was looking through my Victory instructions (again!) today, and I noted that Heller says the reef lines are 20 mm long, with 10 mm hanging on either side of the sail. Not sure if that would be a good size for this scale, but at least the 20 mm length would give you plenty of thread to handle. Of course, if you think that's out of scale, then you can always make the threads shorter. Just some thoughts.
I really like the black painting on your masts & tops - it has a smooth, "lamp black" appearance. Plus, it's a good contrast to the yellowness of the masts.
I saw your other post about when to add the sails. My experience has been to add the sails after the yardarms are attached. It usually works ok, but it has its problems. I think, in the end, either method will work, and either method has its pros and cons.
pbishop
Joined: November 03, 2016
KitMaker: 116 posts
Model Shipwrights: 116 posts
Posted: Wednesday, February 08, 2017 - 09:49 AM UTC
The famo was a fun build - I won it at a model show raffle. I won a lot of stuff that way.
I agree about the sails - I'll probably try both ways and see which is the best for this ship. 10mm on each side scales to about 39 inches - that's probably about right. I just may give it a try.
I agree about the sails - I'll probably try both ways and see which is the best for this ship. 10mm on each side scales to about 39 inches - that's probably about right. I just may give it a try.

RobinNilsson

Joined: November 29, 2006
KitMaker: 6,693 posts
Model Shipwrights: 70 posts
Posted: Thursday, February 09, 2017 - 12:59 AM UTC
Hi Paul,
It's just me barging in again ...
You should definitely do the reef bands. In this large scale it would look strange if they were missing.
It is one of those details that reveals if the model builder knows anything about the real life object that they are modelling.
Missing out on something that was only there as a decoration is one thing but missing something which has a vital function is another matter.
No reef hanks (reef points), no buntlines, no clewlines ...
Running rigging ending with a simple knot around a belaying pin without a coil of rope ....
Decks without camber ...
/ Robin
Edit: If I were to do it in this scale (1/100) I would set a long thread in an ordinary sewing needle (smallest possible).
Push the thread through the sail from one side (say fore to aft), pull it almost through leaving sufficient length of thread on the fore side. Push the needle and thread back through the sail again (aft to fore), one single thread of the sail cloth above and then from fore to aft in the original hole. The idea is to loop the reef point line (reef hank ?) around one thread of the sail cloth. Cut the line leaving a suitable length of line on the aft side of the sail.
In this scale the looped thread would give an impression of the line being somehow fastened to the sail cloth
pbishop
Joined: November 03, 2016
KitMaker: 116 posts
Model Shipwrights: 116 posts
Posted: Thursday, February 09, 2017 - 02:00 AM UTC
Fantastic!!! I'll give that a try.
Thanks Robin
Thanks Robin
RobinNilsson
Joined: November 29, 2006
KitMaker: 6,693 posts
Model Shipwrights: 70 posts
Posted: Thursday, February 09, 2017 - 03:53 AM UTC
one more thought: maybe it would be possible to let the thread pierce itself when looping through the original hole the second time?
This would lock the reef hank in position even more securely if this is a concern ..
Aim the needle carefully
/ Robin
This would lock the reef hank in position even more securely if this is a concern ..
Aim the needle carefully
/ Robin
pbishop
Joined: November 03, 2016
KitMaker: 116 posts
Model Shipwrights: 116 posts
Posted: Thursday, February 09, 2017 - 06:50 PM UTC
Yes that is a concern. When I did the sails on my Rattlesnake I superglued the Reef lines, CA is convent, but not the best solution. I like your first idea better as It would enable a continuous thread line when doing the Reef lines, but how do I keep the lines from working their way out? Maybe I could use some clear acrylic or clear lacquer, on the hole where the thread pierces the sail?
The there is the problem of the tendency for the thread to stick out perpendicular to the sail rather the lying flat against it.
Any thoughts?
The there is the problem of the tendency for the thread to stick out perpendicular to the sail rather the lying flat against it.
Any thoughts?
RobinNilsson
Joined: November 29, 2006
KitMaker: 6,693 posts
Model Shipwrights: 70 posts
Posted: Thursday, February 09, 2017 - 09:32 PM UTC
CA could possibly result in small "gloss" spots so test before committing a real sail ... It would depend on how good you are at depositing a very small amount of CA in the right spot ..
A satin or matte acrylic clear laquer would do the trick. If you lacquer the whole sail you could also give it a slight "working" shape instead of the "dead calm" look of floppy sails hanging like laundry on the drying line. Tie the sail to the yard, or a stand-in for the yard, and pull the lower corners outward as if they were stretched to the yard below. The whole thing should now be horizontal with the centre of the sail hanging down like a hammock. Adjust the tension on the "lower" corners to get the desired bulging of the sail.
Airbrush with satin or matte acrylic, I don't think the sail needs to get wet by the lacquer. Test on scrap pieces of cloth to find the needed amount of lacquer, don't want puddles drying like snail tracks on the sail.
Reef hanks defying gravity: This would certainly look strange. On a sail in more than a feeble breeze I could imagine the reef hanks getting blown around by vortexes but then they would be flapping in all directions including straight out.
It depends a little on which thread you use, if it is very soft or a little stiff. One possibility could be to wax the thread to give it some weight and also to hold down possible lint/fluff on the thread. Test on scrap sail cloth!
Another possibility, if you decide to laquer the whole sail, is to "glue" down the threads at the same time. The ones on the rear side would just need to be coaxed into pointing towards the lower edge of the sail. The ones on the forward (lee) side of the sail would need to be treated afterwards, with the sail hanging vertically.
Maybe this strenghtens the case for attaching sails to yard arms before attaching yard arms to masts ?
Since sails are not totally white anyway you don't need to worry about the acrylic laquer you have chosen yellowing with age.
Maybe even use tinted clear lacquer to solve the problem of getting offwhite "canvas" ??
The most important advice: Test on some spare cloth first !
Saves a lot of frustration ....
/ Robin
pbishop
Joined: November 03, 2016
KitMaker: 116 posts
Model Shipwrights: 116 posts
Posted: Thursday, February 09, 2017 - 11:22 PM UTC
Thanks Robin - these are all great suggestions. I really appreciate you help on this. Your use of the word vortex is very correct - I heard that word a lot in my profession as an aerospace engineer - not so much now as I'm retired - lol.
pbishop
Joined: November 03, 2016
KitMaker: 116 posts
Model Shipwrights: 116 posts
Posted: Friday, February 10, 2017 - 10:50 AM UTC
Another question about sewing the rope around the perimeter of each sail. That's going to be really tedious. Is there any nice shortcut to this? Can I somehow glue that thread around each sail, then sew the thicker thread at each corner?
Also any suggestions regarding making the eyelets around each sail?
All is this is going to take me months to do and any shortcuts that still look nice I'm very interested in.
Thanks,
Paul
Also any suggestions regarding making the eyelets around each sail?
All is this is going to take me months to do and any shortcuts that still look nice I'm very interested in.
Thanks,
Paul
RobinNilsson
Joined: November 29, 2006
KitMaker: 6,693 posts
Model Shipwrights: 70 posts
Posted: Friday, February 10, 2017 - 02:35 PM UTC
I forgot one thought about spraying sails with acrylic lacquer.
Thin it a lot more than normal, this makes it easier to control the amount of lacquer and avoid getting too much. The thinner, whatever you use, will evaporate after a while.
The desired effect is similar to a starched shirt.
Edge trim: No clever ideas there I'm afraid. It smells like a lot of tedious work.
The only suggestion I have is to make one sail at the time and do something else in between. Maybe there is some other rigging or building work to "dilute" the sail making with. Maybe doing the complete process for one sail, from cloth to finished sail attached to yard and yard attached to mast?
Start with the largest sails, or those that you are certain that you want to display unfurled. Some of the smaller sails were only used when the winds were so light that they were needed. In this way you can "opt out" of the sailmaking if it gets too boring/tedious/frustrating.
/ Robin
RobinNilsson
Joined: November 29, 2006
KitMaker: 6,693 posts
Model Shipwrights: 70 posts
Posted: Saturday, February 11, 2017 - 02:04 AM UTC
Been doing some thinking during the day ...
The "perimeter rope" (it has a proper seamanly name ...)
I assume that this rope is thinner than a 2 inch diameter hawser (ropes are usually measured by circumference) so it should be in the vicinity of a quarter millimeter (0.25 mm). Trying to sew this with an even thinner thread is bound to fail.
Are the sails cut to exact size yet? Edit: Dumb question, I see them hanging from your "clothes line" in a previous post ...
Maybe this could work:
1. Lay the sail flat, aft side up, on a non-stick surface (waxed paper, thin teflon sheet, glass, you get the general idea).
2. Lay the thread along one edge
3. Use a small paintbrush to pick up thinned (50/50 ??) acrylic lacquer and apply the lacquer to the thread or possibly in the "shadow" under the thread were it lies on the sail cloth. The idea is to glue the thread with lacquer.
4. Wait until the lacquer has set.
5. Repeat from step 2 with the next edge until finished
6. Trim away excess cloth, unless the sail was already cut to the exact size.
Experiment on some scrap sail cloth first. Maybe with less thinned lacquer. If it fails completely then CA might be the only way to go but it is a lot more difficult to work with.
The reason for recommending acrylic lacquer comes from the experience of using floor polish. Johnson Future if you remember it, it was basically an acrylic lacquer, I think it is called Kleer or something nowadays. This is actually a perfectly usable substitute for many of the acrylic lacquers we buy in the hobby stores ...
The cloth I used to polish the floor went stiff when it dried ...
Eyelets: What sizes are we talking about? Less than 2 inches diameter in 1:1 scale? Brass? Use a very fine brush to set a small spot of paint (brass, black, rust ...) where the eyelet should be. Let it dry and make a hole with a very small drill, just large enough for the thread. Stiffen the end of the thread with CA to avoid having to use a needle and insert the thread.
Are we talking eylets as in thimbles on the ends of ropes?

In this case I would paint the inside of the rope loop with CA and when this has hardened and created a solid surface paint it with the desired colour.
/ Robin
The "perimeter rope" (it has a proper seamanly name ...)
I assume that this rope is thinner than a 2 inch diameter hawser (ropes are usually measured by circumference) so it should be in the vicinity of a quarter millimeter (0.25 mm). Trying to sew this with an even thinner thread is bound to fail.
Are the sails cut to exact size yet? Edit: Dumb question, I see them hanging from your "clothes line" in a previous post ...
Maybe this could work:
1. Lay the sail flat, aft side up, on a non-stick surface (waxed paper, thin teflon sheet, glass, you get the general idea).
2. Lay the thread along one edge
3. Use a small paintbrush to pick up thinned (50/50 ??) acrylic lacquer and apply the lacquer to the thread or possibly in the "shadow" under the thread were it lies on the sail cloth. The idea is to glue the thread with lacquer.
4. Wait until the lacquer has set.
5. Repeat from step 2 with the next edge until finished
6. Trim away excess cloth, unless the sail was already cut to the exact size.
Experiment on some scrap sail cloth first. Maybe with less thinned lacquer. If it fails completely then CA might be the only way to go but it is a lot more difficult to work with.
The reason for recommending acrylic lacquer comes from the experience of using floor polish. Johnson Future if you remember it, it was basically an acrylic lacquer, I think it is called Kleer or something nowadays. This is actually a perfectly usable substitute for many of the acrylic lacquers we buy in the hobby stores ...
The cloth I used to polish the floor went stiff when it dried ...
Eyelets: What sizes are we talking about? Less than 2 inches diameter in 1:1 scale? Brass? Use a very fine brush to set a small spot of paint (brass, black, rust ...) where the eyelet should be. Let it dry and make a hole with a very small drill, just large enough for the thread. Stiffen the end of the thread with CA to avoid having to use a needle and insert the thread.
Are we talking eylets as in thimbles on the ends of ropes?
In this case I would paint the inside of the rope loop with CA and when this has hardened and created a solid surface paint it with the desired colour.
/ Robin
pbishop
Joined: November 03, 2016
KitMaker: 116 posts
Model Shipwrights: 116 posts
Posted: Saturday, February 11, 2017 - 02:54 AM UTC
Robin,
Thank you SOOO much for taking the time to respond! This is pretty much what I was mulling over. Actually gluing the thread to the sails (they are pre made to the correct size - see picture). I've ordered Aleene's No-Sew Fabric glue and will try that in very small doses applied with a tooth pick or fine paint brush. Failing that I will try the clear lacquer method and see how that works. For the eyelets I'm thinking like you -mark with paint where they are located then pierce the thread edging with a fine needle to make a hole large enough to pass the appropriate sail rigging line through. I'll seal that with a very (very) small amount of thin CA.
Here are the sails after staining.
P.S. Are you related to Robin Nilsson the Swedish footballer who plays for the Trelleborgs? Never-mind - I see from your profile that you are a computer science engineer. For most of my career I did computer software development.
 |

WEB HOSTING BY


Copyright ©2021 Model Shipwrights and Kitmaker Network, a subsidiary of Silver Star Enterprises
All Rights Reserved. Please read our Conditions of Use and Privacy Policy.
All Rights Reserved. Please read our Conditions of Use and Privacy Policy.