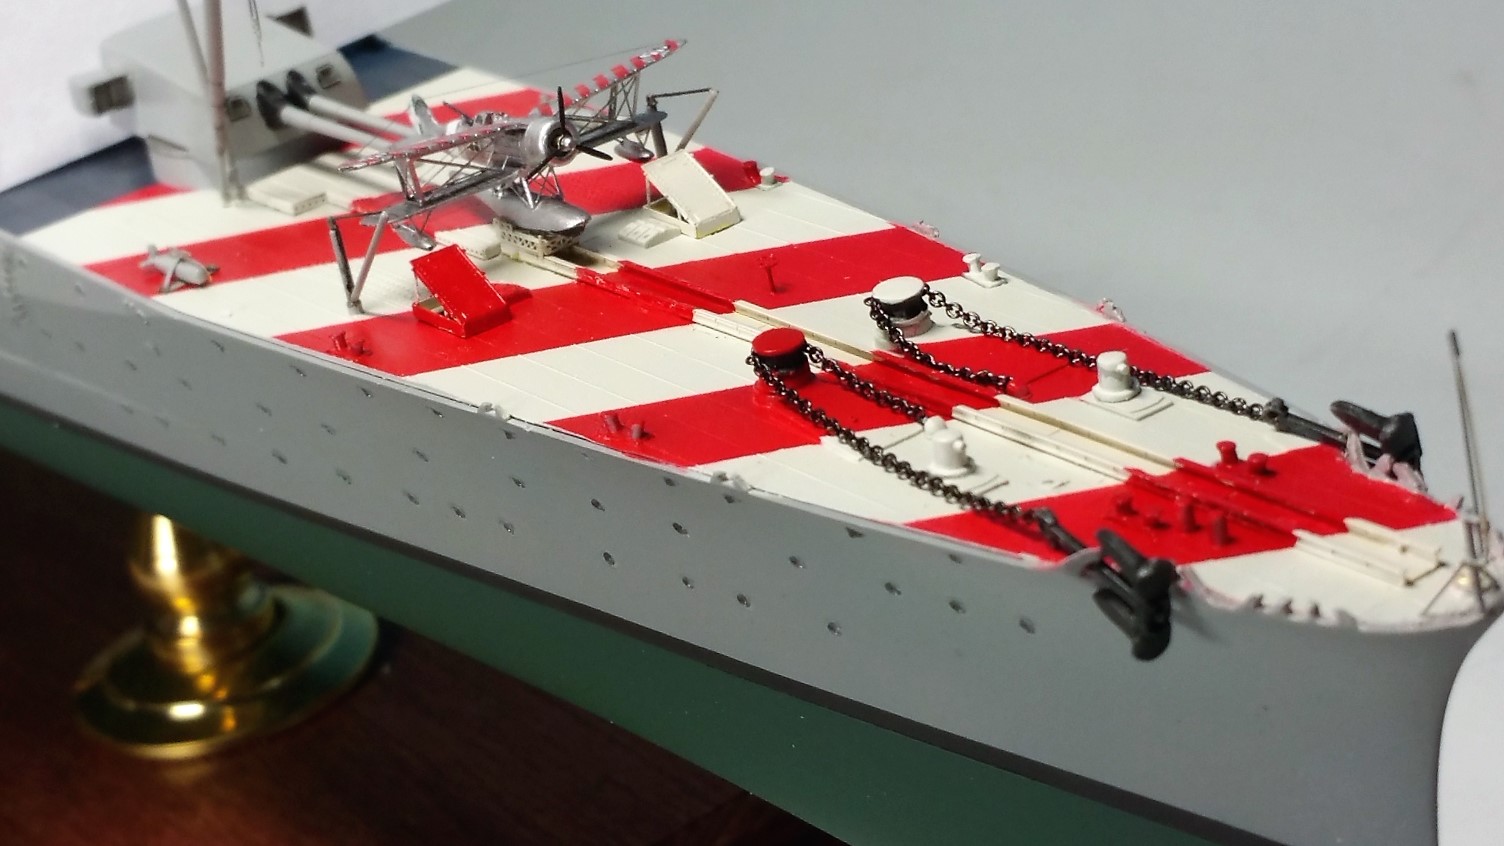
You are viewing the archived version of the site.
Go to modelshipwrights.com for the current dynamic site!
Go to modelshipwrights.com for the current dynamic site!
Hosted by Jim Starkweather
The italian job - heavy cruiser ZARA 1:350

surfsup

Joined: May 20, 2010
KitMaker: 1,230 posts
Model Shipwrights: 1,212 posts

Posted: Wednesday, April 17, 2019 - 04:05 PM UTC
Looking good. Love the Colour Contrast.....Cheers Mark
RedDuster

Joined: March 01, 2010
KitMaker: 7,078 posts
Model Shipwrights: 6,649 posts

Posted: Thursday, April 18, 2019 - 08:29 AM UTC
Looking good Thomas,
The Iron ladders up the side of the hull look the business, the colours look spot on too.
Cheers
Si
The Iron ladders up the side of the hull look the business, the colours look spot on too.
Cheers
Si

Black_sheep

Joined: December 11, 2009
KitMaker: 823 posts
Model Shipwrights: 551 posts

Posted: Saturday, April 20, 2019 - 05:23 AM UTC
Salve Amici,
I was not lazy the last two days and finished the boat´s outer hull - I drilled out all portholes and sealed them again with kristal klear. After it I painted the driving shafts and the screws.
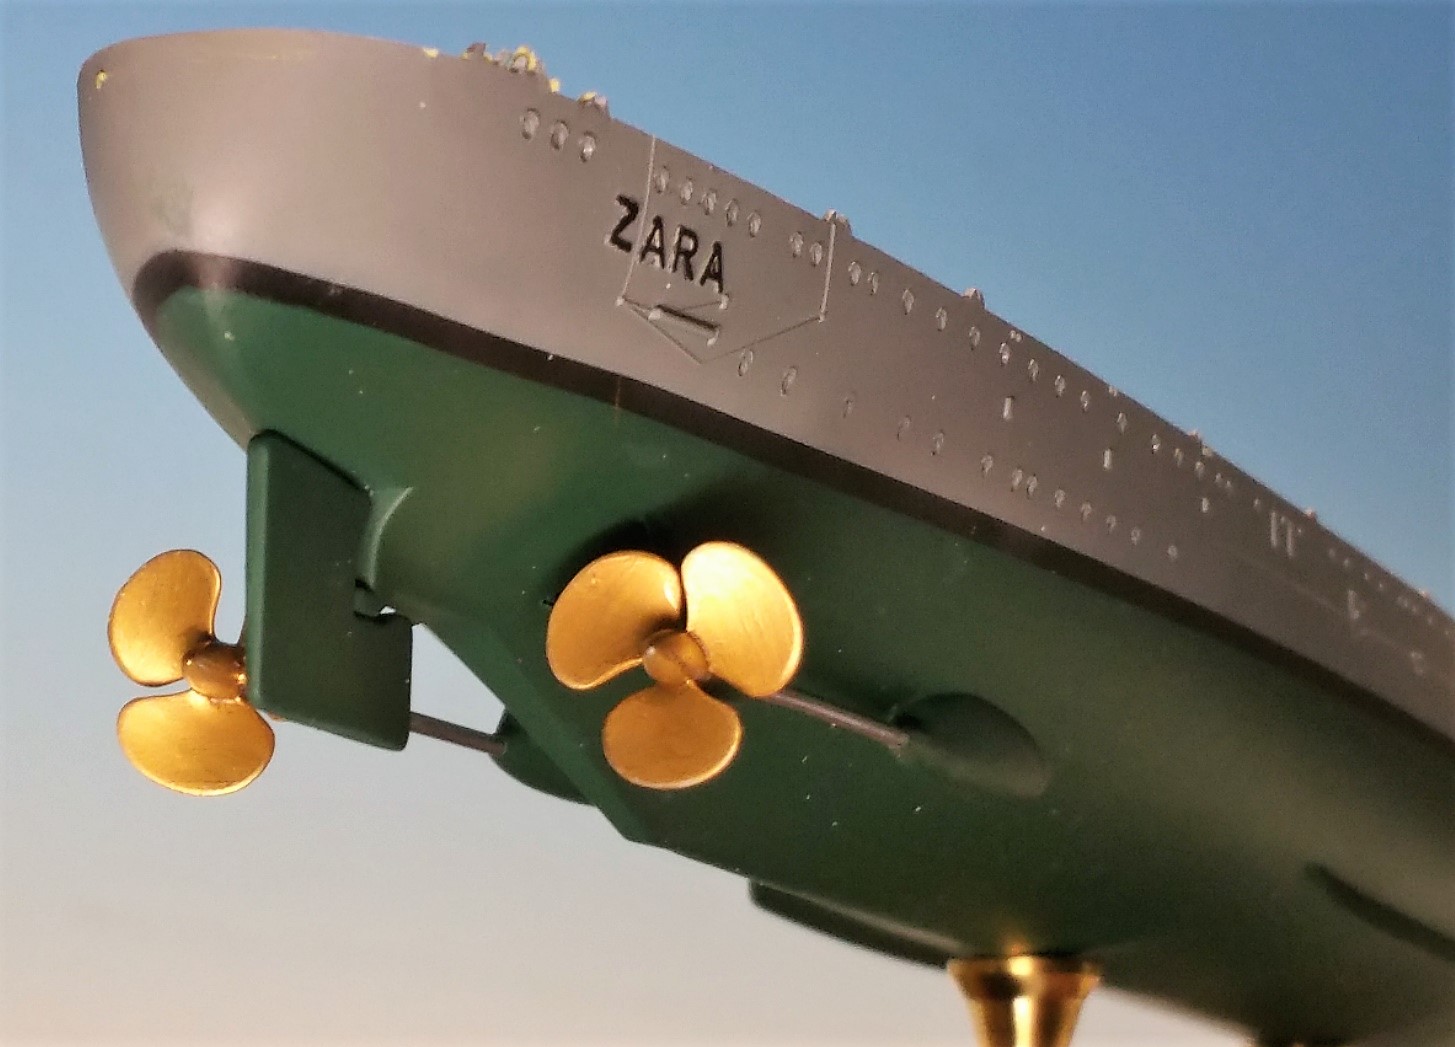
After that I thoroughly fixed the ship onto its socket and glued the aft deck in

I started with the bow of the ship and removed some details of the catapult which will later be replaced by etched parts. I just will let them off for better painting the air recognition Stripes first and just rework the etched parts later. First coat with Gunzes off-white

After drying I masked off the white parts with the masking set of the upgrade kit from SHIPYARD WORKS

Now the red Color followed
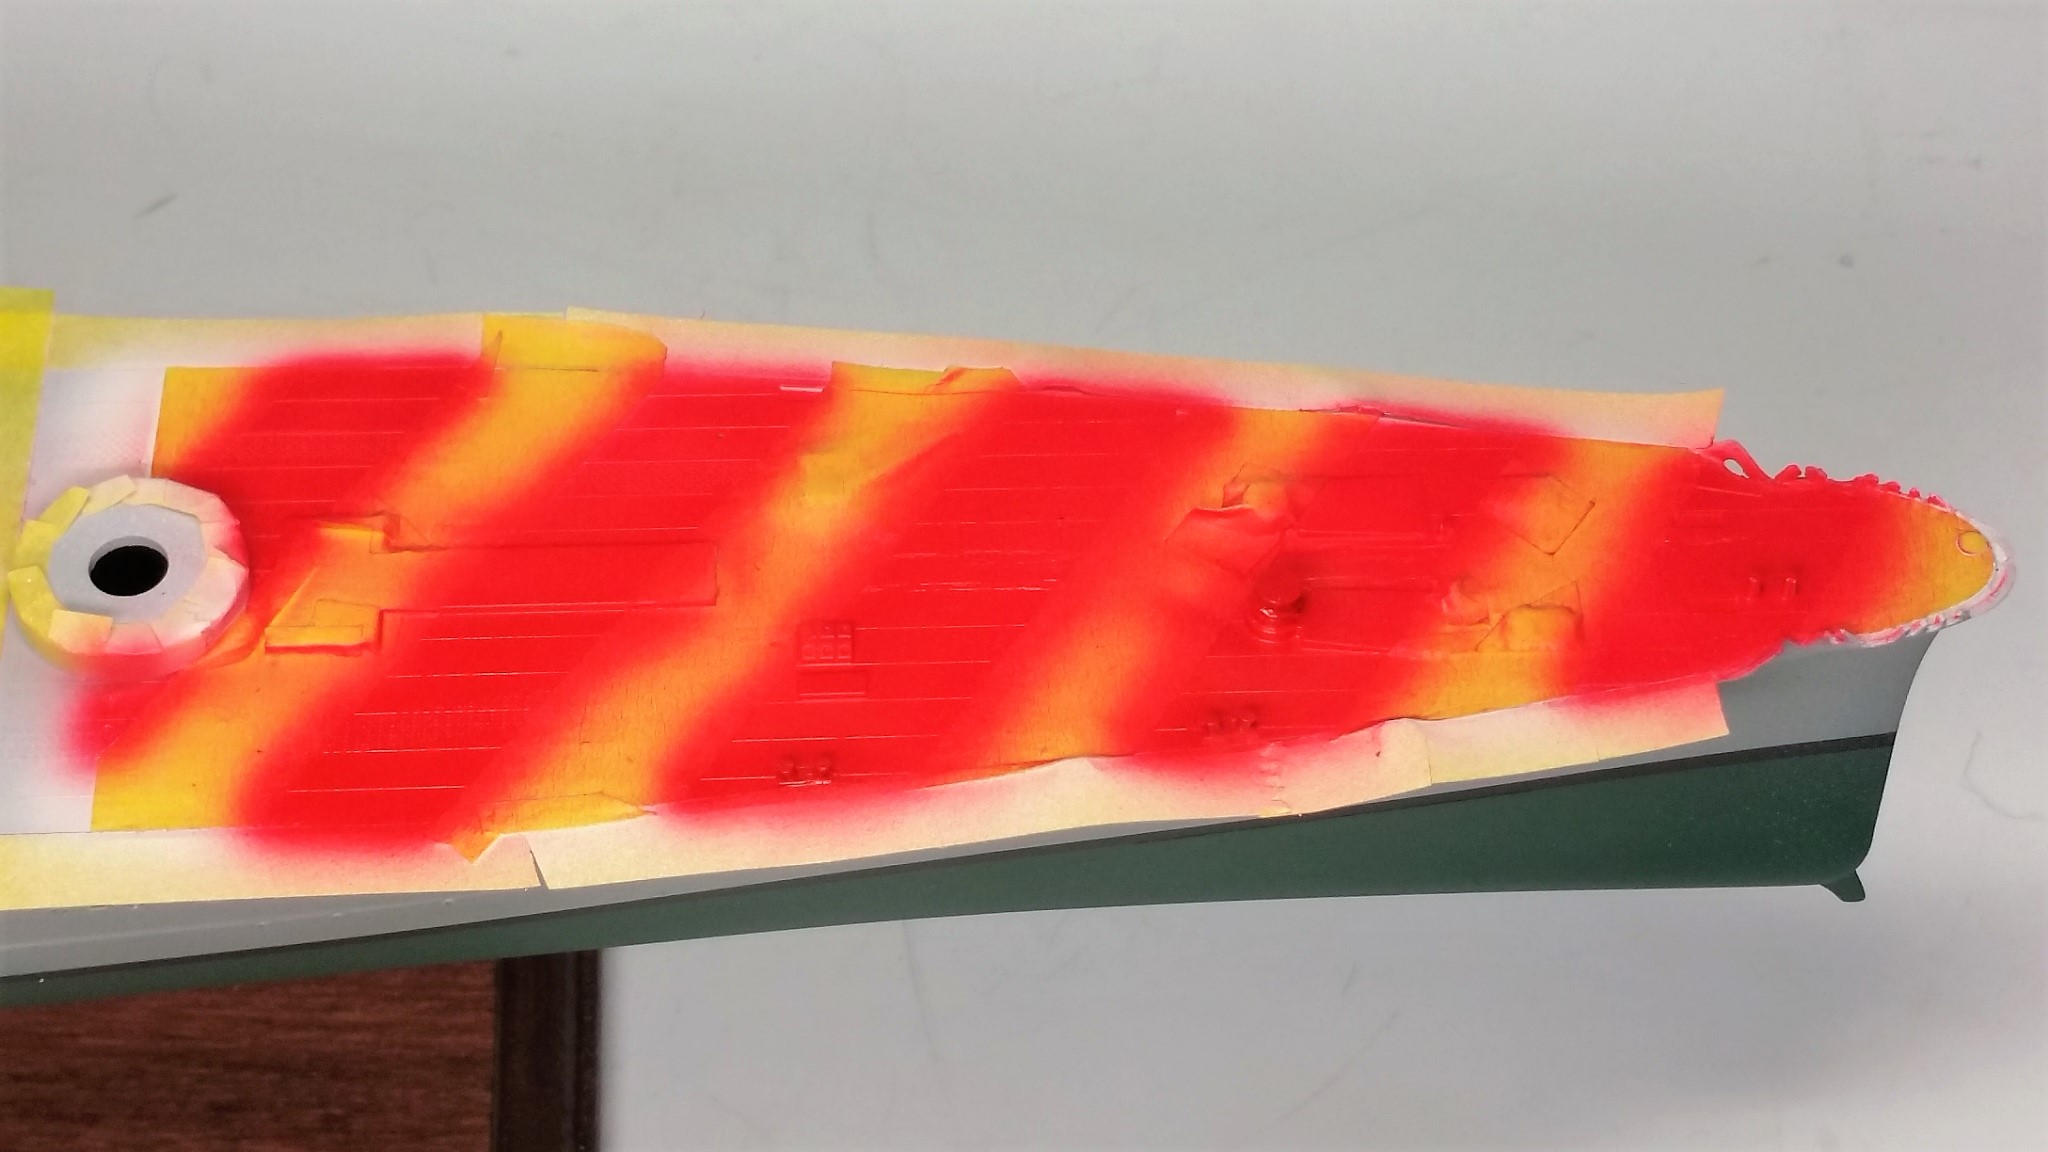
And then comes the part where you Always Keep your breath...

..."phew!" everything went well until now
Continue with the catapult and other parts now
I was not lazy the last two days and finished the boat´s outer hull - I drilled out all portholes and sealed them again with kristal klear. After it I painted the driving shafts and the screws.

After that I thoroughly fixed the ship onto its socket and glued the aft deck in

I started with the bow of the ship and removed some details of the catapult which will later be replaced by etched parts. I just will let them off for better painting the air recognition Stripes first and just rework the etched parts later. First coat with Gunzes off-white

After drying I masked off the white parts with the masking set of the upgrade kit from SHIPYARD WORKS

Now the red Color followed

And then comes the part where you Always Keep your breath...


..."phew!" everything went well until now

Continue with the catapult and other parts now

Posted: Saturday, April 20, 2019 - 05:55 AM UTC
Thomas,
Nice work getting those stripes down, kinda reminds me of candy apple red you see on sports cars.
Mark
Nice work getting those stripes down, kinda reminds me of candy apple red you see on sports cars.
Mark

Quincannon

Joined: June 22, 2018
KitMaker: 275 posts
Model Shipwrights: 273 posts

Posted: Saturday, April 20, 2019 - 09:49 AM UTC
Mark: Tamiya makes an Italian Red in a spray can. Don't know if Thomas used that or not, but the Tamiya looks just like that.
Thomas: I have often wondered when the Italian Navy started applying those stripes, what year. Do you happen to know?
Thomas: I have often wondered when the Italian Navy started applying those stripes, what year. Do you happen to know?

Black_sheep

Joined: December 11, 2009
KitMaker: 823 posts
Model Shipwrights: 551 posts

Posted: Saturday, April 20, 2019 - 06:09 PM UTC
Quoted Text
Mark: Tamiya makes an Italian Red in a spray can. Don't know if Thomas used that or not, but the Tamiya looks just like that.
Thomas: I have often wondered when the Italian Navy started applying those stripes, what year. Do you happen to know?
Chuck and Mark: It is GUNZE´s 68 "red madder" according to the manual. For me it looks spot on.
After Italian aircraft mistakenly bombed their own ships in the Battle of Calabria of July 1940, identification marks were introduced. To simplify identification of allied warships from the air, alternating red and white stripes were applied on the quarterdeck of all the ships. The upper surfaces of ship-borne seaplanes were painted in a similar manner.
Cheers


surfsup

Joined: May 20, 2010
KitMaker: 1,230 posts
Model Shipwrights: 1,212 posts

Posted: Saturday, April 20, 2019 - 07:24 PM UTC
Love the work on the Stripes. Really looking good.....Cheers mark
RedDuster

Joined: March 01, 2010
KitMaker: 7,078 posts
Model Shipwrights: 6,649 posts

Posted: Saturday, April 20, 2019 - 08:48 PM UTC
Very neat job masking the stripes Thomas, look absolutely superb.
Cheers
Si
Cheers
Si
Posted: Sunday, April 21, 2019 - 11:00 PM UTC
Really nice progress Thomas

Black_sheep

Joined: December 11, 2009
KitMaker: 823 posts
Model Shipwrights: 551 posts

Posted: Sunday, April 21, 2019 - 11:42 PM UTC
Mille Grazie signores for all your positive comments 
I continued my work at the bow - I tried to tackle the etched catapult but the triangle stiffening plates (70 pieces altogether they asked me to do ) were impossible to install and glue for my skills - I was barely able to grab the microscopic parts with my microtweezers. And they were not sitting evenly with the top Level so the top railing of the catapult would not sit evently at the whole construction. After some talkings with the harbor workers we decide to leave them off - In the photos of the manual they also decided to leave them off
  . This is the first dryfit

After this setback I needed a quick success for my motivation; I finished building the ship plane. SHIPYARD WORKS offers some substantial improvements here and I was able to install all of them
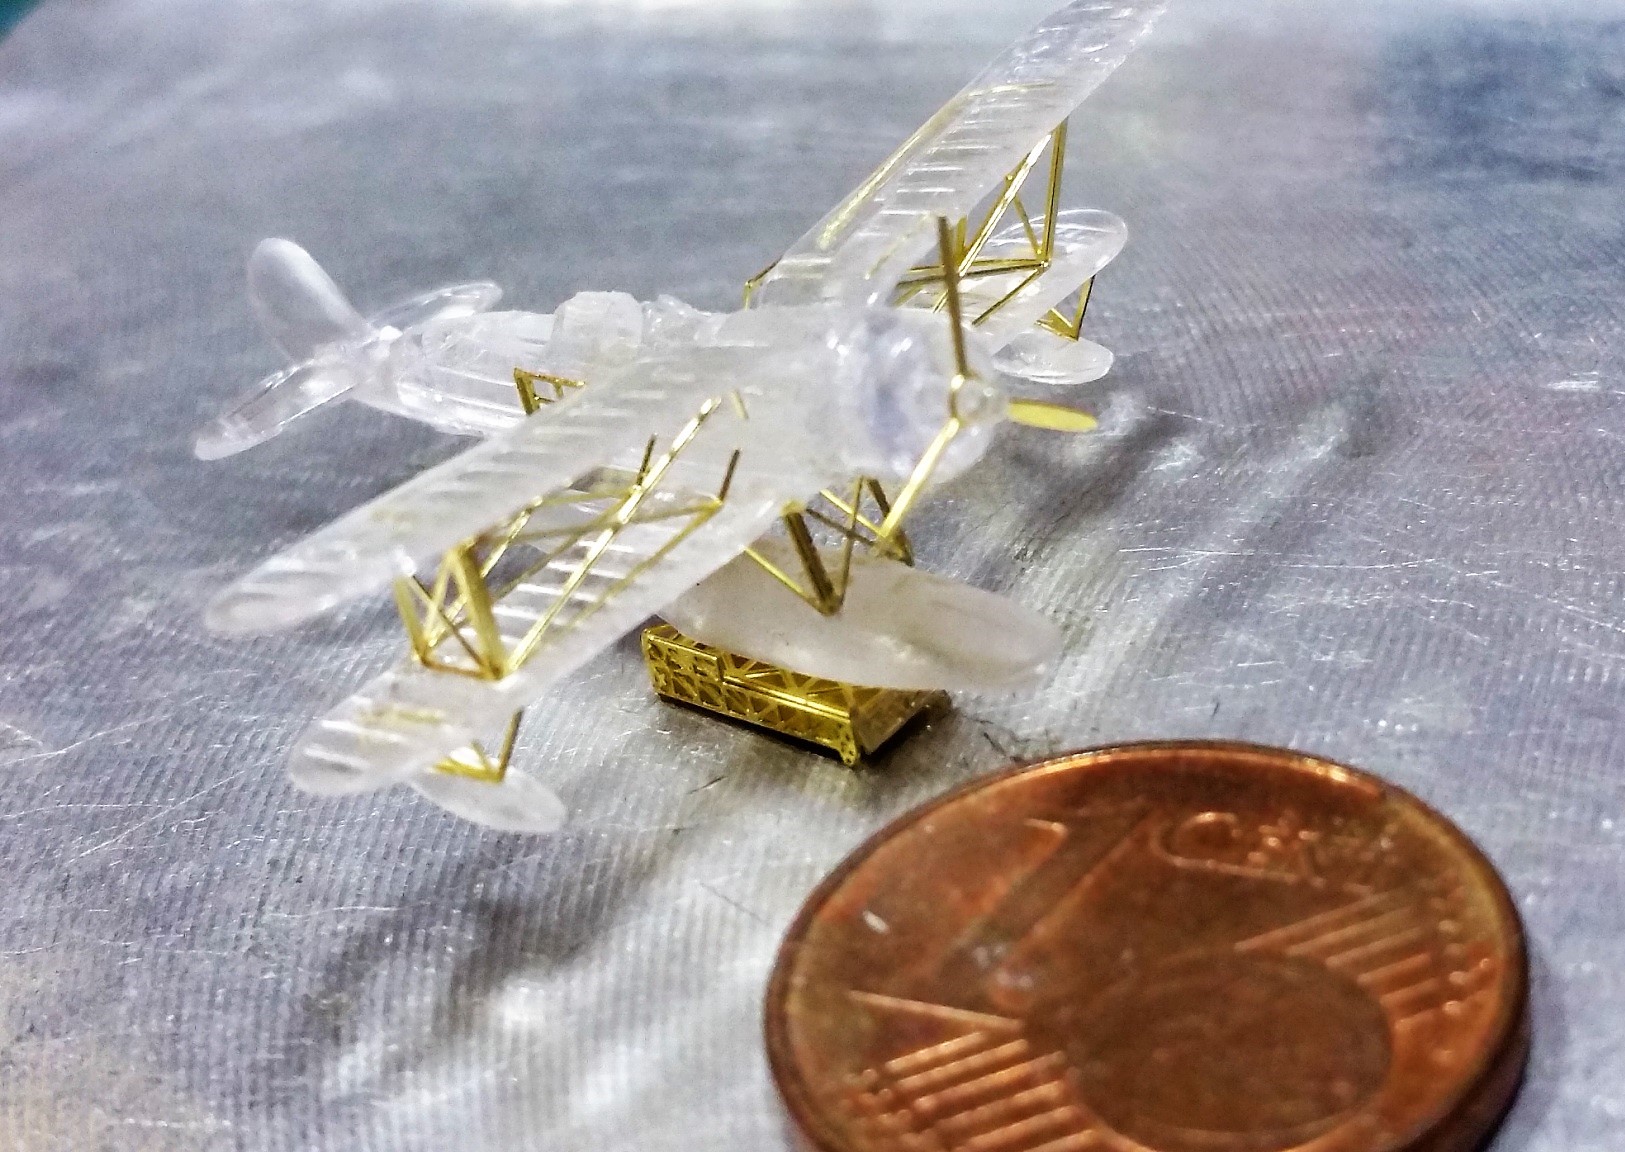

I promise I will never whine around anymore about a 1:48 scale airplane rigging
 . Whish me luck with the painting - a very fragile Enterprise!
But first of all I will need a Minestrone now

I continued my work at the bow - I tried to tackle the etched catapult but the triangle stiffening plates (70 pieces altogether they asked me to do
 ) were impossible to install and glue for my skills - I was barely able to grab the microscopic parts with my microtweezers. And they were not sitting evenly with the top Level so the top railing of the catapult would not sit evently at the whole construction. After some talkings with the harbor workers we decide to leave them off - In the photos of the manual they also decided to leave them off
  . This is the first dryfit
After this setback I needed a quick success for my motivation; I finished building the ship plane. SHIPYARD WORKS offers some substantial improvements here and I was able to install all of them


I promise I will never whine around anymore about a 1:48 scale airplane rigging
 . Whish me luck with the painting - a very fragile Enterprise!
But first of all I will need a Minestrone now

RedDuster

Joined: March 01, 2010
KitMaker: 7,078 posts
Model Shipwrights: 6,649 posts

Posted: Monday, April 22, 2019 - 12:10 AM UTC
The cat looks great without the stiffening plates Thomas. sometimes I think there is an evil streak in some etch designers, I am often beaten by microscopic parts that are near impossible to apply, and add very little to the finished build. Now I just leave them off.
The floatplane looks great too.
Cheers
Si
The floatplane looks great too.
Cheers
Si

Black_sheep

Joined: December 11, 2009
KitMaker: 823 posts
Model Shipwrights: 551 posts

Posted: Monday, April 22, 2019 - 07:42 AM UTC
L´aeroplano finito! I had worked on and off during the whole day at my ship´s plane. It was a lot fun and in the end I really like the outcome.
Trumpeter advices you to paint the aircraft in dark green but, I believe strongly this color was only invented after the ship´s sinking. Profile Warships magazine also suggest an all silver airplane with the usual red stripes at the upper wings - a picture of this is also visible in that magazine so I think I am correct here.
After I handpainted the airplane with vallejo Aluminium Color I made small masking Stripes by myself for the red color. Here I tried to handpaint the red but decided to better airbrush it
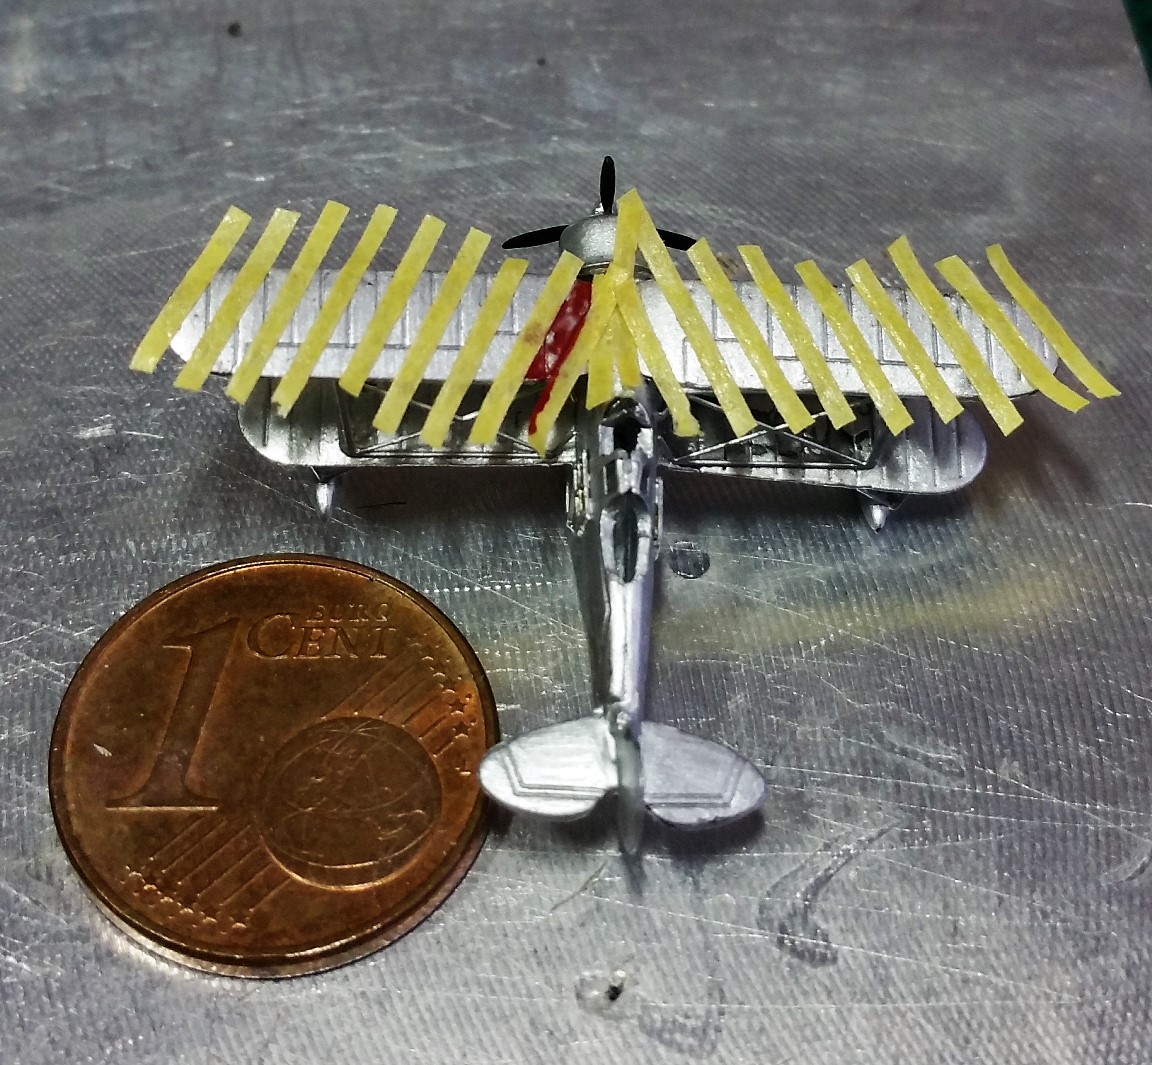
with the red color on
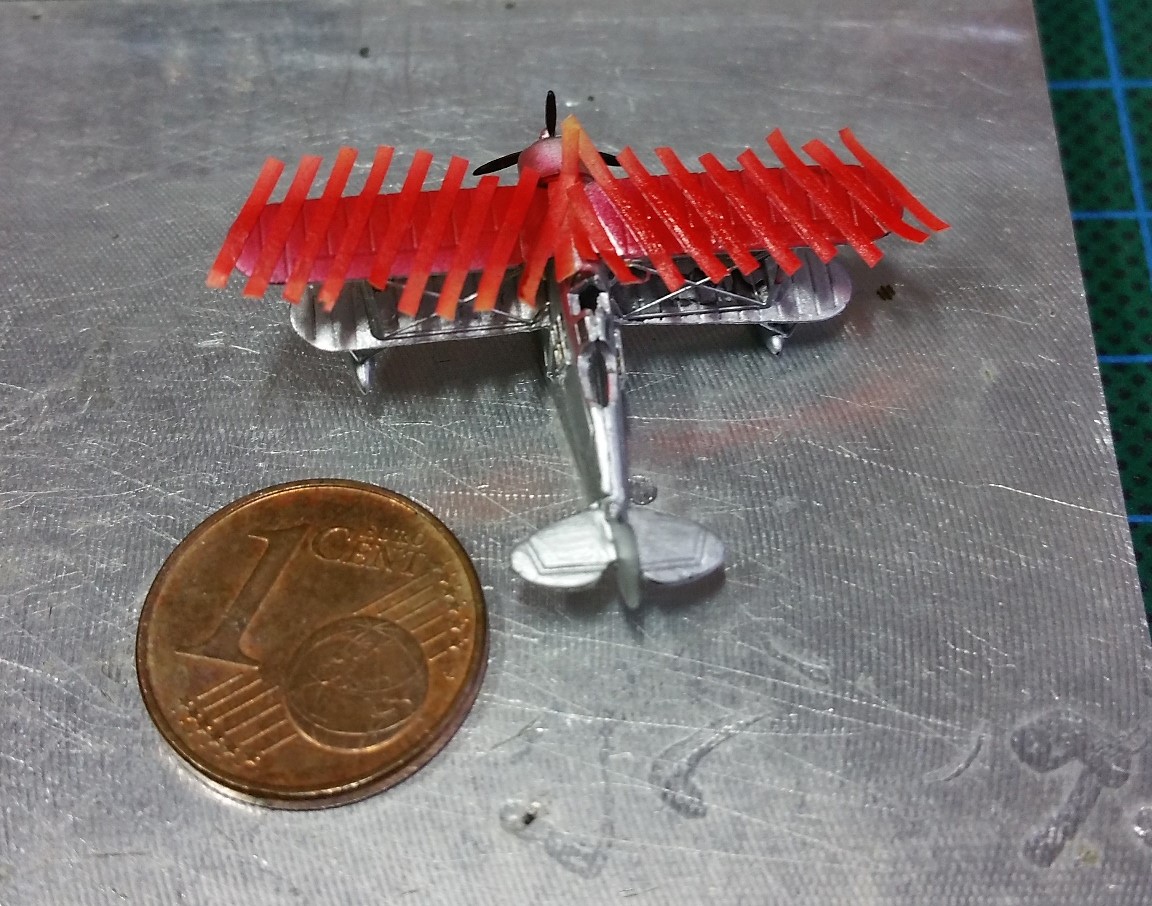
masks removed
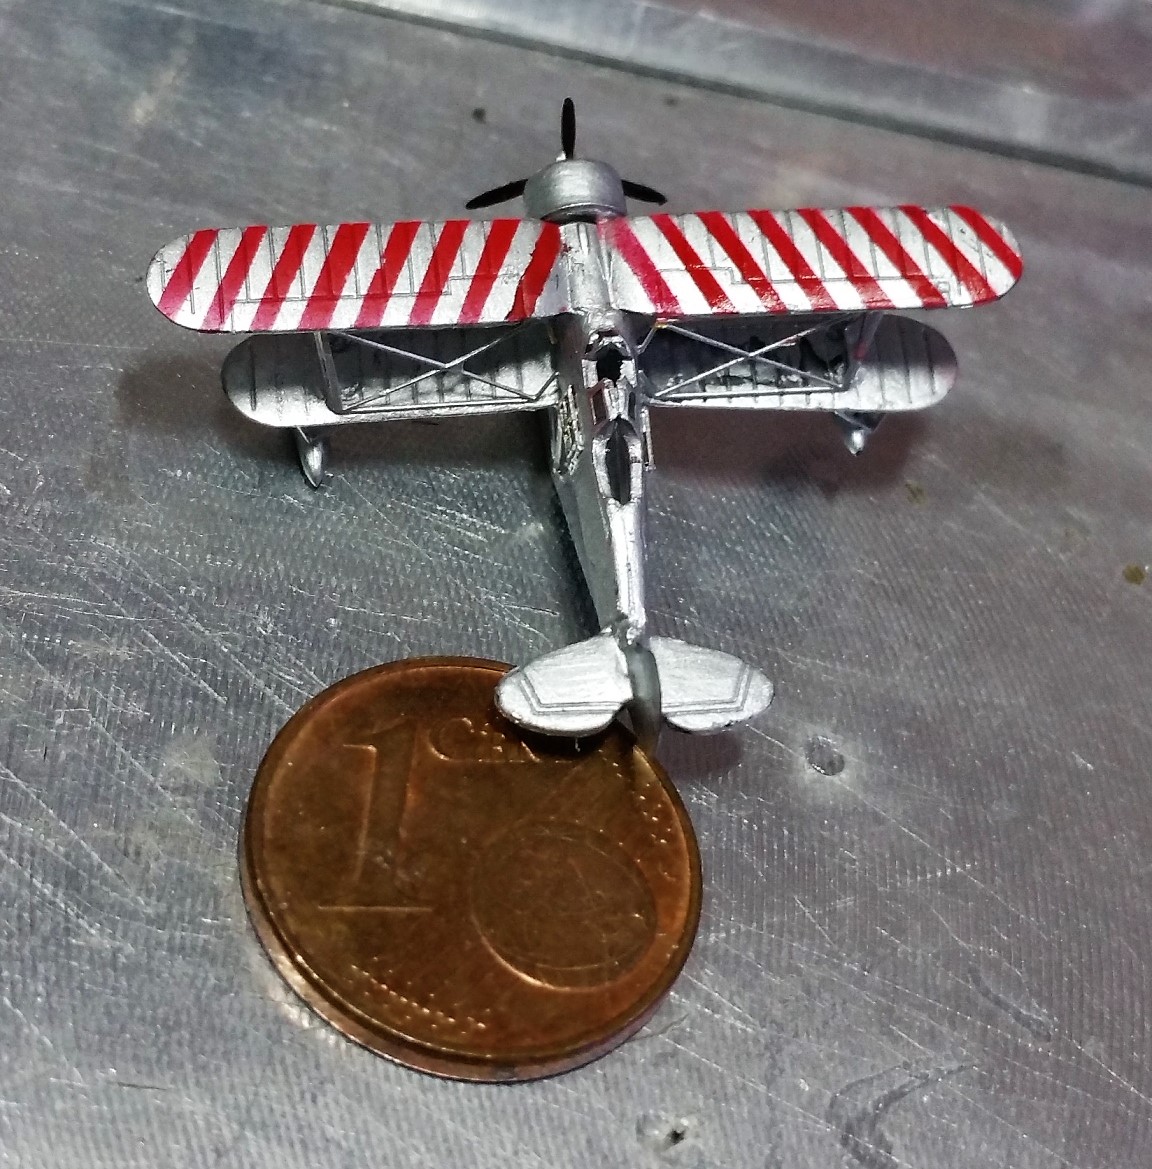
After that I made the spotters rear machinegun out of a lenghtened sprue painted black, applied a small coat of black glaze to give more contrast and applied the decals. And because it was so much fun I decided to finish it up correctly with Uschi van der Rosten´s 0,1 mm superfine rigging wire . Here are the final pictures

and on a white background
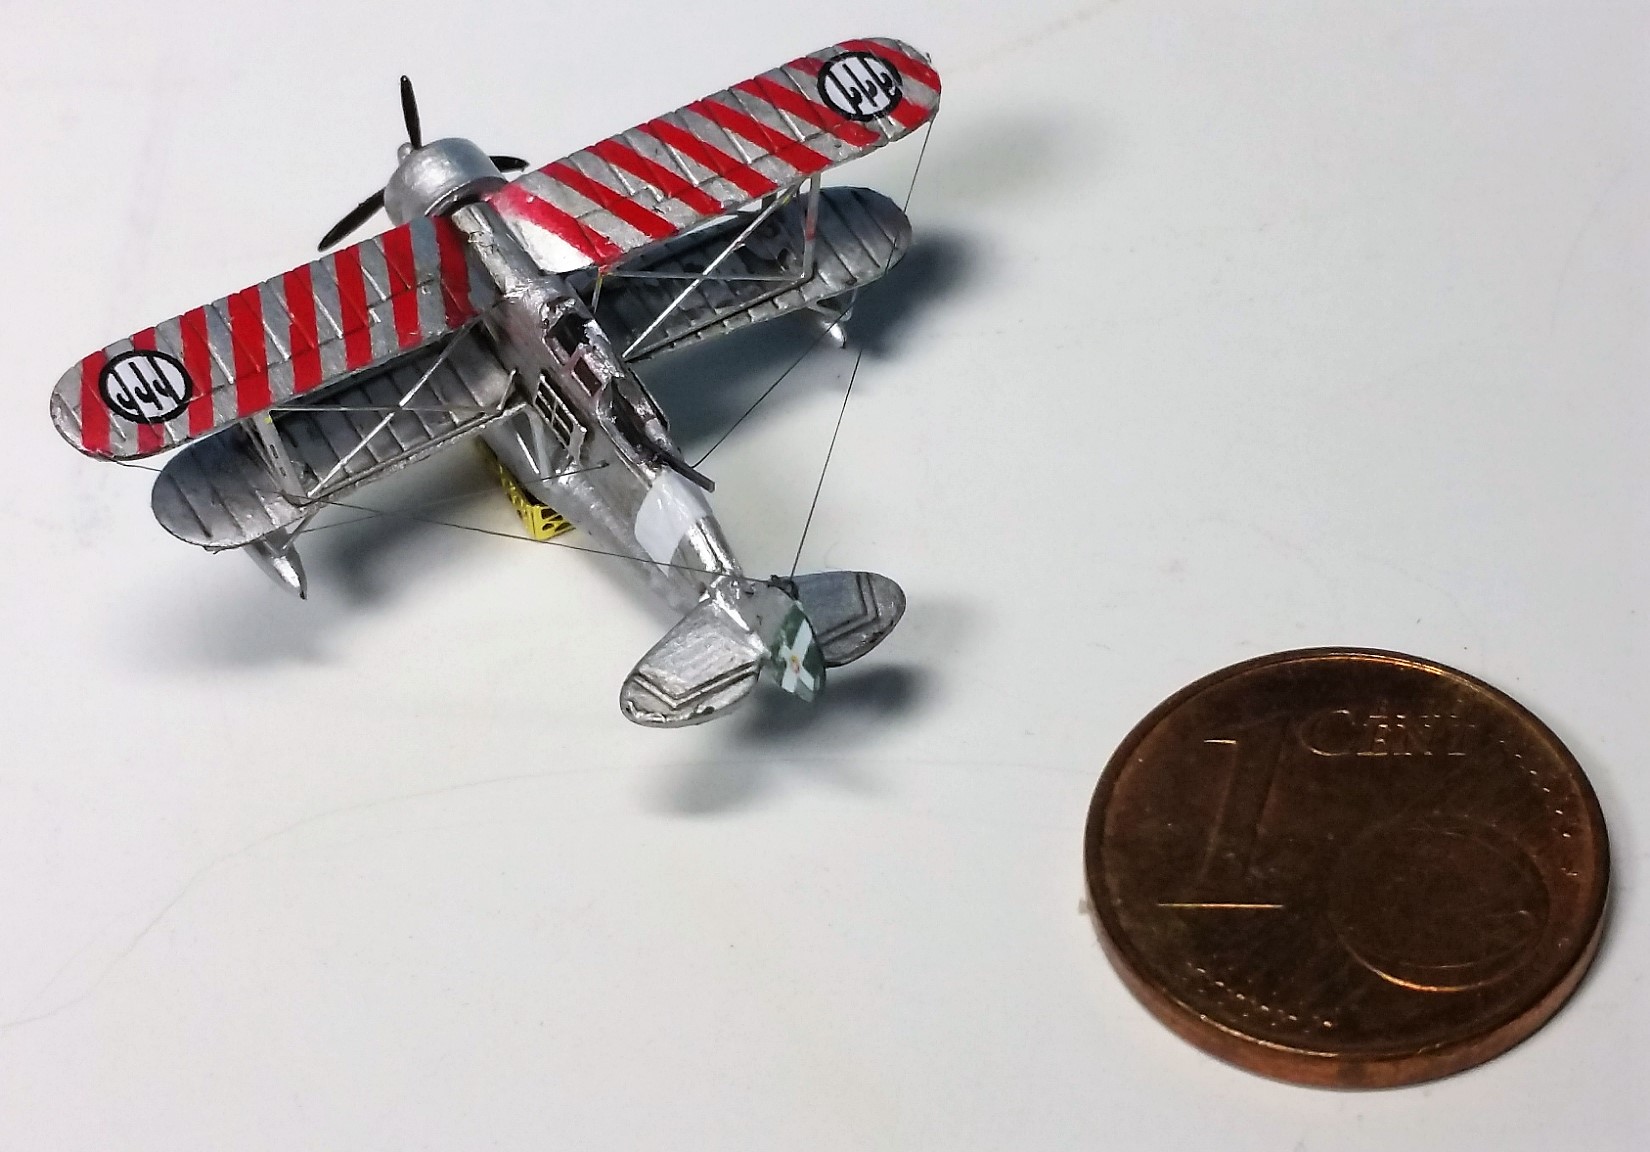


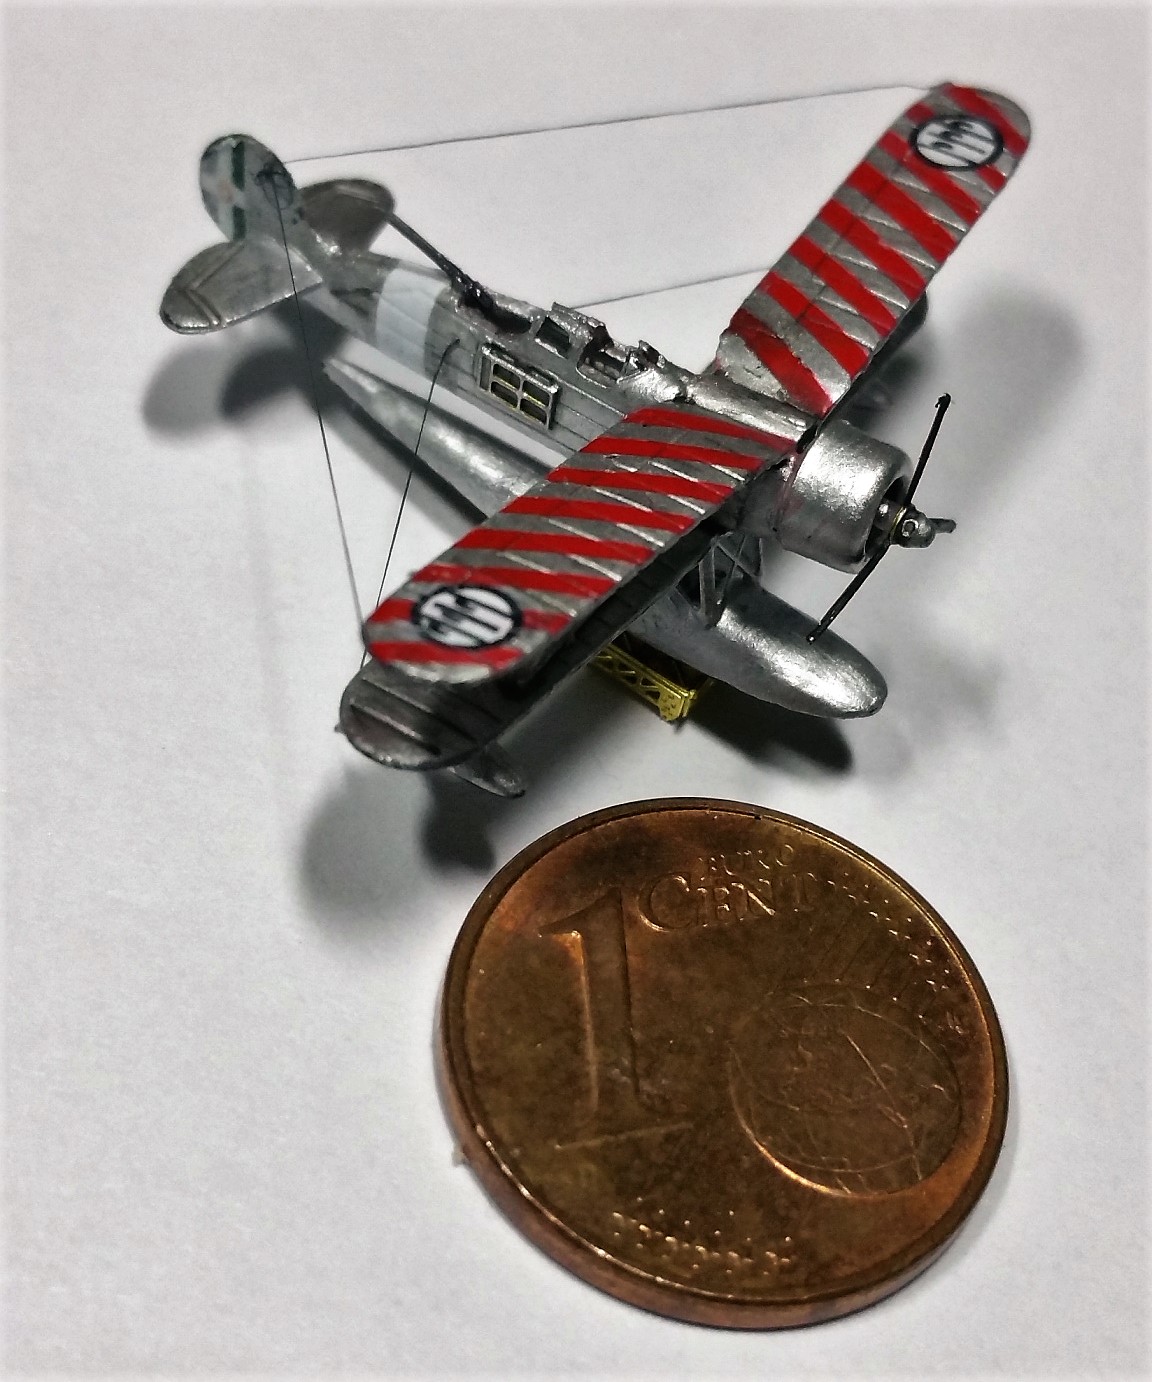
Thats my first 1:350 scale aircraft and I do feel a little proud about it
I think I deserved a Little glass Chianti now?!
Cheers
Trumpeter advices you to paint the aircraft in dark green but, I believe strongly this color was only invented after the ship´s sinking. Profile Warships magazine also suggest an all silver airplane with the usual red stripes at the upper wings - a picture of this is also visible in that magazine so I think I am correct here.
After I handpainted the airplane with vallejo Aluminium Color I made small masking Stripes by myself for the red color. Here I tried to handpaint the red but decided to better airbrush it

with the red color on

masks removed

After that I made the spotters rear machinegun out of a lenghtened sprue painted black, applied a small coat of black glaze to give more contrast and applied the decals. And because it was so much fun I decided to finish it up correctly with Uschi van der Rosten´s 0,1 mm superfine rigging wire
 . Here are the final pictures
and on a white background


Thats my first 1:350 scale aircraft and I do feel a little proud about it

I think I deserved a Little glass Chianti now?!
Cheers

Quincannon

Joined: June 22, 2018
KitMaker: 275 posts
Model Shipwrights: 273 posts

Posted: Monday, April 22, 2019 - 08:17 AM UTC
Thomas: That is absolutely stunning, so stunning in fact, that I may give up ship building, take up knitting, become a monk, and live in a cave in some remote desert, all to do penance for ever referring to myself as a modeler.

ChurchSTSV

Joined: September 20, 2017
KitMaker: 350 posts
Model Shipwrights: 175 posts

Posted: Monday, April 22, 2019 - 08:21 AM UTC
Quoted Text
Thomas: That is absolutely stunning, so stunning in fact, that I may give up ship building, take up knitting, become a monk, and live in a cave in some remote desert, all to do penance for ever referring to myself as a modeler.
Need a friend? I got lots of remote desert out here and I am now free of hobbies.
Posted: Monday, April 22, 2019 - 10:59 AM UTC
Quoted Text
The cat looks great without the stiffening plates Thomas. sometimes I think there is an evil streak in some etch designers, I am often beaten by microscopic parts that are near impossible to apply, and add very little to the finished build. Now I just leave them off.
The floatplane looks great too.
Cheers
Si
DITTO!
Posted: Monday, April 22, 2019 - 03:31 PM UTC
That plane is just amazing Thomas!
I just hope I can do as good a job on my Walrus!
And, yes, the rigging is painful
I just hope I can do as good a job on my Walrus!
And, yes, the rigging is painful


Black_sheep

Joined: December 11, 2009
KitMaker: 823 posts
Model Shipwrights: 551 posts

Posted: Saturday, April 27, 2019 - 07:10 AM UTC
Quoted Text
Thomas: That is absolutely stunning, so stunning in fact, that I may give up ship building, take up knitting, become a monk, and live in a cave in some remote desert, all to do penance for ever referring to myself as a modeler.
Chuck, that was really really funny
 but to be honest I don´t want to see you as a knitting monk somewhere outside at a remote desert´s mancave. Stay with our hobby, we need you, too

Black_sheep

Joined: December 11, 2009
KitMaker: 823 posts
Model Shipwrights: 551 posts

Posted: Saturday, April 27, 2019 - 07:12 AM UTC
Quoted Text
That plane is just amazing Thomas!
I just hope I can do as good a job on my Walrus!
And, yes, the rigging is painful
Some Walruses are also waiting for me (Repulse and Exeter). Will be very "interesting" rigging


Black_sheep

Joined: December 11, 2009
KitMaker: 823 posts
Model Shipwrights: 551 posts

Posted: Saturday, April 27, 2019 - 07:52 AM UTC
continuare a fare il solito tran tran:
I tried to make the internal gangway more attractive and opened both hatches at the ship´s bow. I tried to install two stairs down into the ship but regrettably was just able to get one installed. Three others fell down at the other side never to be salvaged again

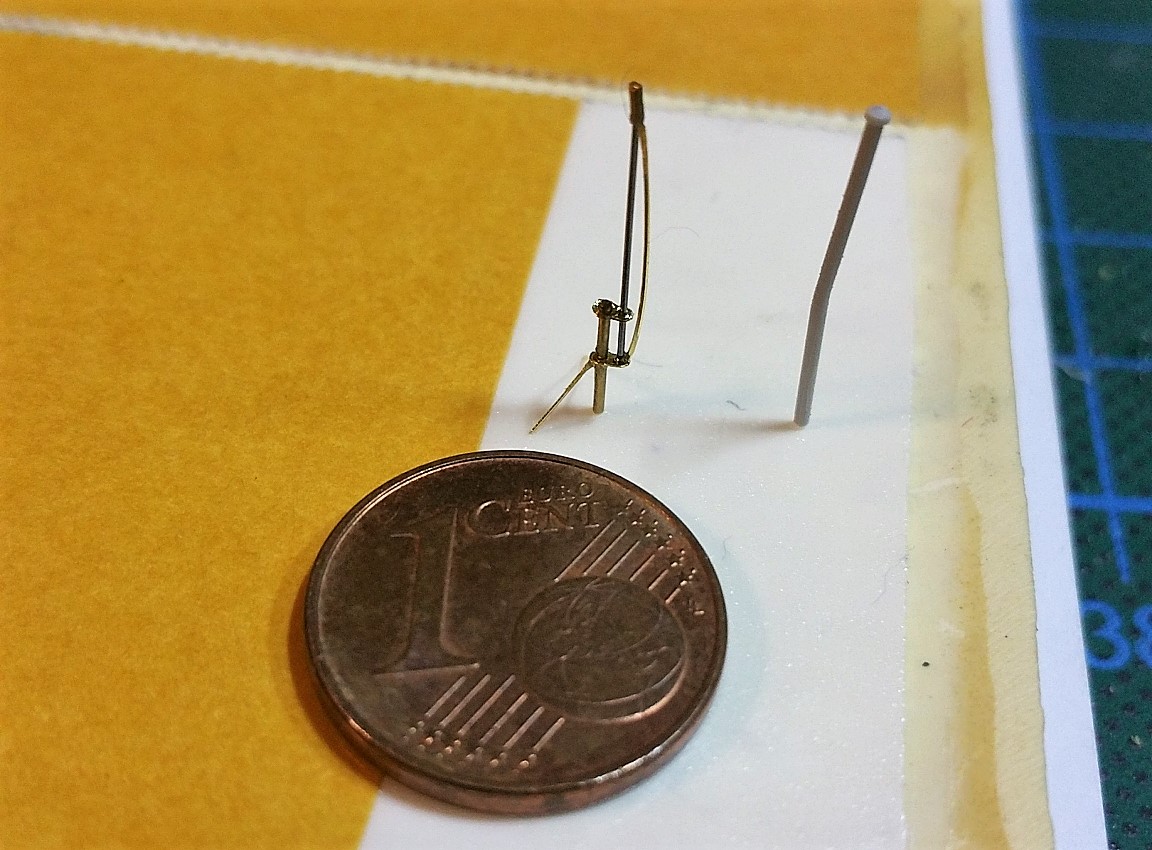
Then I made a more sophisticated bow mast out of 7 parts. Can you see which one is the kit´s ones and which one is mine?
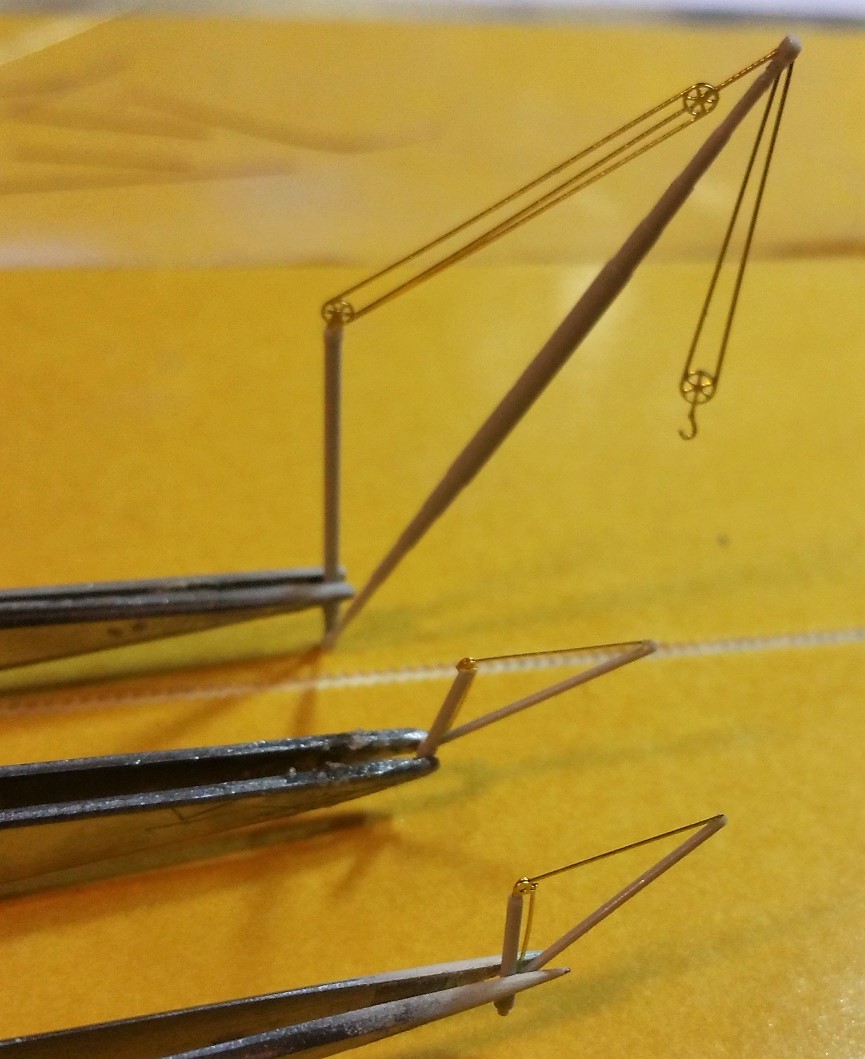
the cranes for the catapult and the paravanes did also get some improvements. A very fragile affaire now!
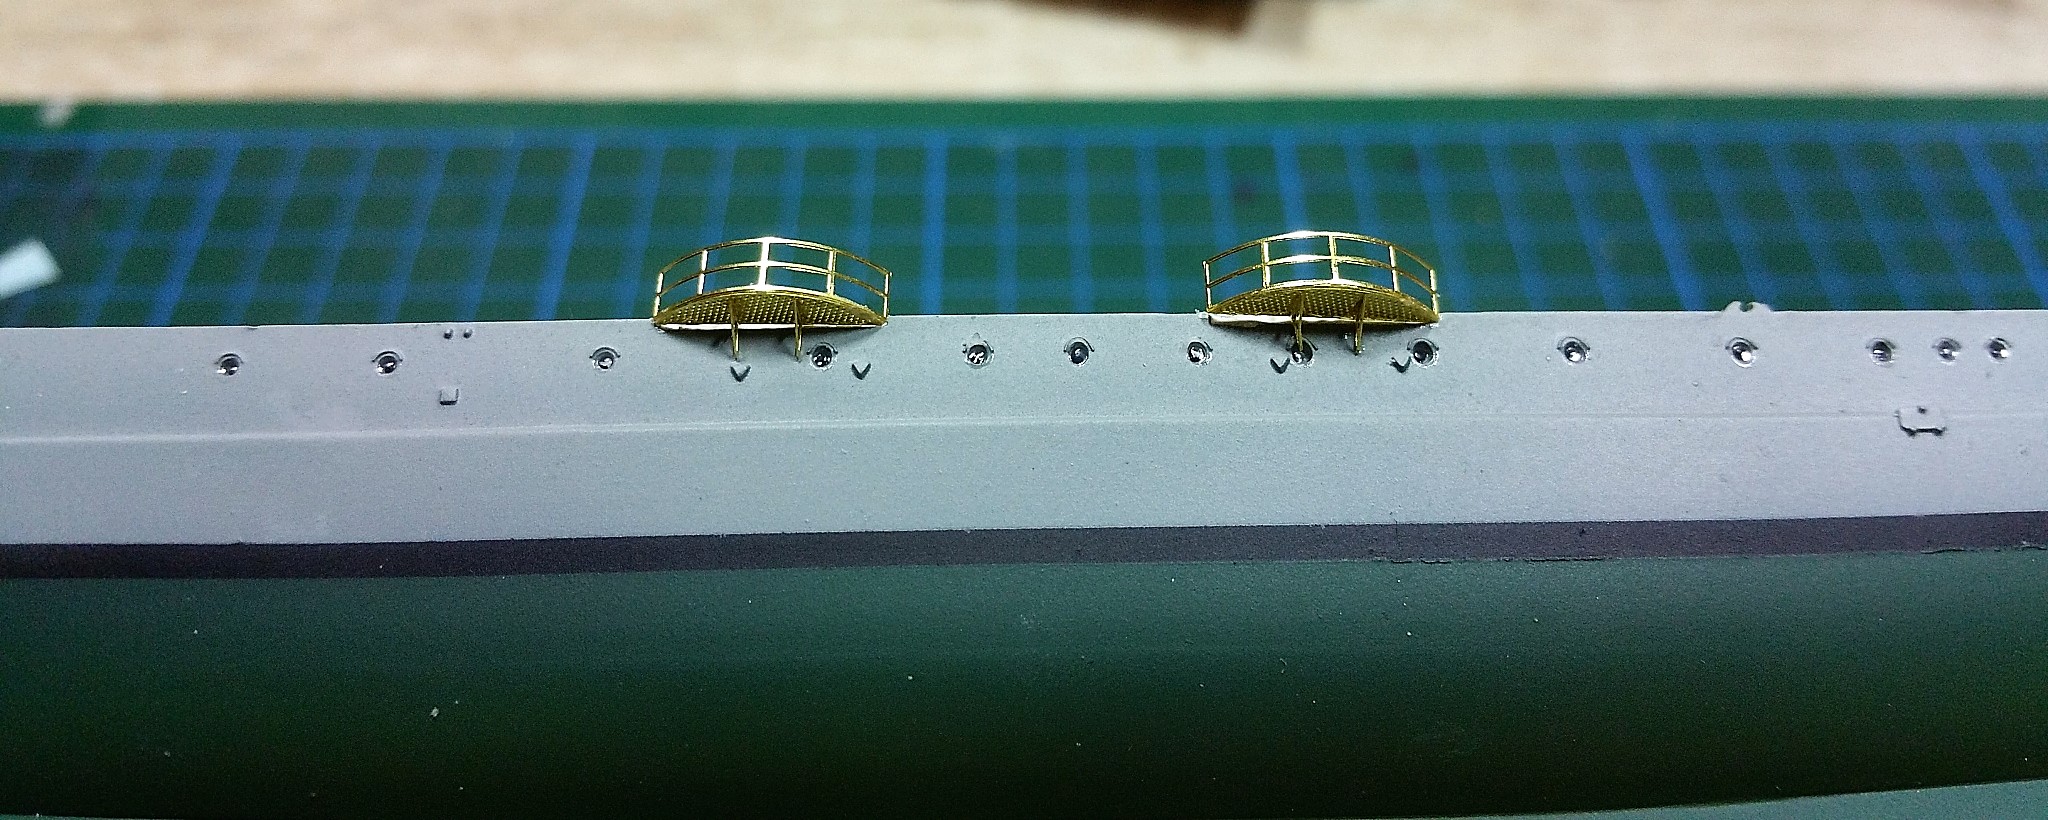
I installed the etched side platforms for the secondary guns. They do look very nice

In the end of this day I played around with one main gun turret and its barrels. I do have two different aftermarket barrels now - Though these of Modelshipyard are nice but a tad too long. The one from Master fit spot on

I airbrushed the middle deck section with GUNZE H54 Navy blue and the ship looks very colorful - elegant italian design

fare festa!

I tried to make the internal gangway more attractive and opened both hatches at the ship´s bow. I tried to install two stairs down into the ship but regrettably was just able to get one installed. Three others fell down at the other side never to be salvaged again


Then I made a more sophisticated bow mast out of 7 parts. Can you see which one is the kit´s ones and which one is mine?


the cranes for the catapult and the paravanes did also get some improvements. A very fragile affaire now!

I installed the etched side platforms for the secondary guns. They do look very nice


In the end of this day I played around with one main gun turret and its barrels. I do have two different aftermarket barrels now - Though these of Modelshipyard are nice but a tad too long. The one from Master fit spot on

I airbrushed the middle deck section with GUNZE H54 Navy blue and the ship looks very colorful - elegant italian design


fare festa!


RedDuster

Joined: March 01, 2010
KitMaker: 7,078 posts
Model Shipwrights: 6,649 posts

Posted: Saturday, April 27, 2019 - 08:17 AM UTC
The floatplane looks absolutely epic Thomas, now that gives a target when I get round to my Zara.
The rest pf her is looking cool too.
Cheers
Si
The rest pf her is looking cool too.
Cheers
Si
Posted: Saturday, April 27, 2019 - 12:43 PM UTC
Thomas,
That bow hatch looks wonderful as does all of the other PE work. Really shaping up nicely.
Mark
That bow hatch looks wonderful as does all of the other PE work. Really shaping up nicely.
Mark


Black_sheep

Joined: December 11, 2009
KitMaker: 823 posts
Model Shipwrights: 551 posts

Posted: Saturday, April 27, 2019 - 06:32 PM UTC
Quoted Text
That plane is just amazing Thomas!
I just hope I can do as good a job on my Walrus!
Russell I just found a new resin/pe-set for the Walrus at L´Arsenal:
http://www.larsenal.com/1-350-walrus-submarine-x2-c2x27691565 Maybe it is of interest to you?!
I will buy two sets for my future builds


Black_sheep

Joined: December 11, 2009
KitMaker: 823 posts
Model Shipwrights: 551 posts

Posted: Saturday, April 27, 2019 - 06:34 PM UTC
Quoted Text
The floatplane looks absolutely epic Thomas, now that gives a target when I get round to my Zara.
The rest pf her is looking cool too.
Cheers
Si
Thanks a lot Si - to hear this from an experienced shipbuilder as you are it is a honor for me


Black_sheep

Joined: December 11, 2009
KitMaker: 823 posts
Model Shipwrights: 551 posts

Posted: Saturday, April 27, 2019 - 06:34 PM UTC
Quoted Text
Thomas,
That bow hatch looks wonderful as does all of the other PE work. Really shaping up nicely.
Mark
Thank you and cheers mate


Black_sheep

Joined: December 11, 2009
KitMaker: 823 posts
Model Shipwrights: 551 posts

Posted: Sunday, April 28, 2019 - 12:32 AM UTC
 |


