

Go to modelshipwrights.com for the current dynamic site!


1⁄350Building the "Perfect Storm"
14
Comments

After thorough removal of the putty, and an intense smoothing, over I constructed the cover for the cargo hold in the center of the weather deck. I spiced it up a bit with LArsenal and Tauro PE parts. Then I went on to place the weather decks bulwark.
It is an Evergreen styrene strip that I found that is fortunately almost exactly having the height I needed. I pre-shaped it by rolling it up with a thin steel rod. The bulwark didnt fit the deck edge exactly, so using the pre-shaped part was a bit harder to do than expected. Maybe it would be easier to fit the bulwark using straight strip and fix it section by section.
Well, it went OK, even though the bulwark is leaning a bit to the starboard inside of the deck. Actually all of the bulwark should be slightly slanted to the inside, but I did not know how to achieve a constant slant, so I went for a straight bulwark.
As the strips for the second bumper guard dried, I started to put on some hull detail such as the reinforcement bars along the stern and the portholes on the forecastle.
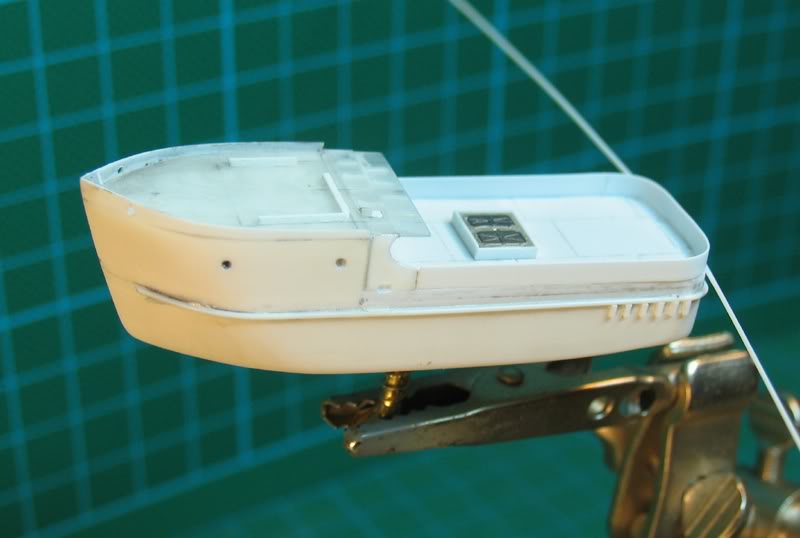
With the second bumper guard in place I drilled out the scuppers, added more of the reinforcements, the handrail along and support struts to the inside of the bulwark. I decided to stop detailing here as anything else would be too fragile to withstand handling. To blend the handrail with the bulwark I added two layers of Elmers to the gap between them. It worked out OK, even though this renders the edge of the bulwark a bit uneven.
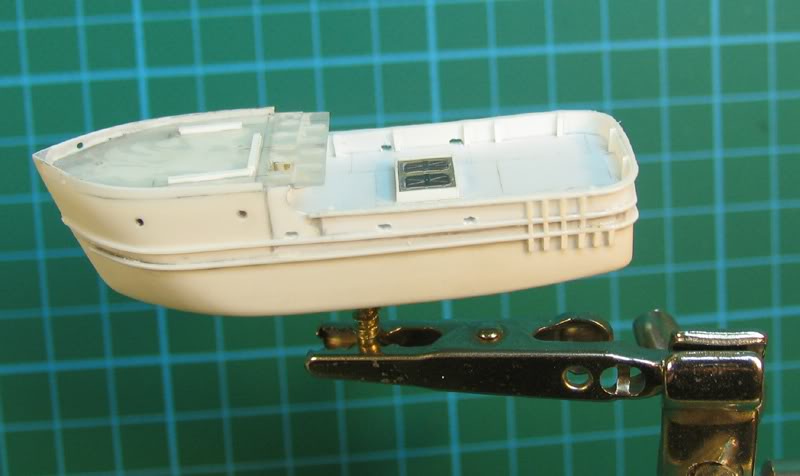
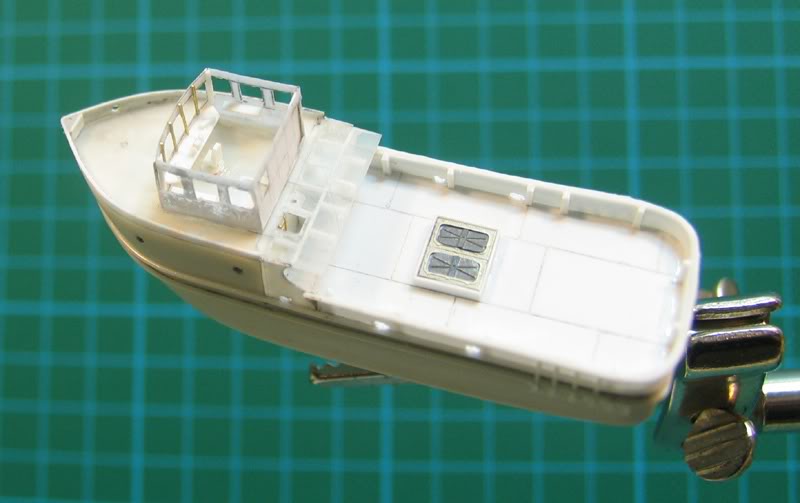
Naturally, I had to turn my attention to the wheelhouse next. It took my about an hour to fabricate the layout of the wheelhouse with photo-shop. I printed the graphic onto a high grade paper. With my trusty Olfa-knife and a fresh blade I had not trouble cutting out the windows and the door on the side and back wall.
The sides and back were then folded and glued to the deck. After having all in good position, I infused highly liquid super glue into the paper. As a result it can be treated very similar to styrene sheet, but is much thinner.
The front of the wheelhouse is a separate part...As the front wall on the original vessels consists of 5 panels, each containing a window, arranged in a very flat arc, so that the front of the wheelhouse is ever so slightly curved. Something thats very subtle, but essential to the look. The panels are very slim resulting in very thin struts between the individual windows. The easiest way seemed to be to cut one opening and back them with thin rod to simulate the struts.
I do not know, if I can manage to back the windows with clear styrene this way, but Ill try. To the inside of the wheelhouse I added a dashboard complete with pelorus (wheel to be added just before closing it by adding the roof), a captains chair and a chart table to the port side of the back wall. One side board to either side of the walls were added, as well.
It is an Evergreen styrene strip that I found that is fortunately almost exactly having the height I needed. I pre-shaped it by rolling it up with a thin steel rod. The bulwark didnt fit the deck edge exactly, so using the pre-shaped part was a bit harder to do than expected. Maybe it would be easier to fit the bulwark using straight strip and fix it section by section.
Well, it went OK, even though the bulwark is leaning a bit to the starboard inside of the deck. Actually all of the bulwark should be slightly slanted to the inside, but I did not know how to achieve a constant slant, so I went for a straight bulwark.
As the strips for the second bumper guard dried, I started to put on some hull detail such as the reinforcement bars along the stern and the portholes on the forecastle.
With the second bumper guard in place I drilled out the scuppers, added more of the reinforcements, the handrail along and support struts to the inside of the bulwark. I decided to stop detailing here as anything else would be too fragile to withstand handling. To blend the handrail with the bulwark I added two layers of Elmers to the gap between them. It worked out OK, even though this renders the edge of the bulwark a bit uneven.
Naturally, I had to turn my attention to the wheelhouse next. It took my about an hour to fabricate the layout of the wheelhouse with photo-shop. I printed the graphic onto a high grade paper. With my trusty Olfa-knife and a fresh blade I had not trouble cutting out the windows and the door on the side and back wall.
The sides and back were then folded and glued to the deck. After having all in good position, I infused highly liquid super glue into the paper. As a result it can be treated very similar to styrene sheet, but is much thinner.
The front of the wheelhouse is a separate part...As the front wall on the original vessels consists of 5 panels, each containing a window, arranged in a very flat arc, so that the front of the wheelhouse is ever so slightly curved. Something thats very subtle, but essential to the look. The panels are very slim resulting in very thin struts between the individual windows. The easiest way seemed to be to cut one opening and back them with thin rod to simulate the struts.
I do not know, if I can manage to back the windows with clear styrene this way, but Ill try. To the inside of the wheelhouse I added a dashboard complete with pelorus (wheel to be added just before closing it by adding the roof), a captains chair and a chart table to the port side of the back wall. One side board to either side of the walls were added, as well.
About the Author


FROM: NORDRHEIN-WESTFALEN, GERMANY
Too old to be young. Too young to be old. Happily married, one son. Living just North of the German Ruhr area . Trying to concentrate on ship models, but having way too many soft spots for other fields of interest. Please remember: Vee Jermans hef no sense of humor (at least Dave of WEM says so) ...
Comments

This is exactly the reason why I check these kind of places day after day after day, because sometimes I let my jaw drop a bit at the sight of something truly original and greatly done like your work Guido
-and what a great step by step too!
MAR 10, 2010 - 07:48 AM

Hi Guido!
Could you describe your low-light photo techniques?
--Karl
MAR 10, 2010 - 10:57 AM

Thank you for your praise, gentlemen!
It means a lot to get so many kind words from such an elect group of modelers.
The low light technique is really quite simple. You switch of all light and illuminate your model with a hand-held torch/ flash light. Of cause you need a tripod for your camera. Your camera will decide for you when it has collected enough light to close the shutter.
You can use colored transparent paper to achieve effects like sunrise/-set.
The art is to crop the pictures to their maximum effect. Take your time. Experiment a bit.
Cheers,
Guido
MAR 11, 2010 - 03:23 AM

Still beautiful - I hope you bring it for the weekend - I would like to see it in real
Cheers/Jan
MAR 11, 2010 - 04:08 AM

Hallo Guido
I had the privilege of seeing it born from plain Evergreen sheet and Styrofoam, with bits of PE from the spare box, and some brass masts... this is the proof that you can make a stunning diorama, a excellent ship (boat in this particular case) with a low budget, and still, be a show stopper!
Thank you once again for all your effort in making this a great place to learn, enjoy and have fun with our hobby!
Tschuss,
Rui
MAR 16, 2010 - 07:19 AM

There's no other feeling like it, the heat of the angle poise on your neck, Beethoven on the MP3, and a wealth of models to build - G'dammit you're a model ship builder! - start theme music.......
Another masterclass, Guido, well done, and bring him to Telford.
Peter F
MAR 16, 2010 - 08:30 PM
Nice interpretation of the "swordfish captain speech", Peter!
Cheers,
Guido
MAR 16, 2010 - 08:42 PM

I already made my comments in the Group Build, but this is so good bears giving you a second BZ. I also want to (yet again) thank all the expert modelers who take the time to record and detail their WIP for the rest of us to learn from.
Cheers
MAR 20, 2010 - 06:16 AM
Copyright ©2021 by Guido Hopp. _OPINIONS Model Shipwrights, KitMaker Network, or Silver Star Enterrpises. Images also by copyright holder unless otherwise noted. Opinions expressed are those of the author(s) and not necessarily those of Model Shipwrights. All rights reserved. Originally published on: 2010-03-10 00:00:00. Unique Reads: 15147

WEB HOSTING BY


Copyright ©2021 Model Shipwrights and Kitmaker Network, a subsidiary of Silver Star Enterprises
All Rights Reserved. Please read our Conditions of Use and Privacy Policy.
All Rights Reserved. Please read our Conditions of Use and Privacy Policy.