

Go to modelshipwrights.com for the current dynamic site!


1⁄35Building the Beast - Part Two
8
Comments
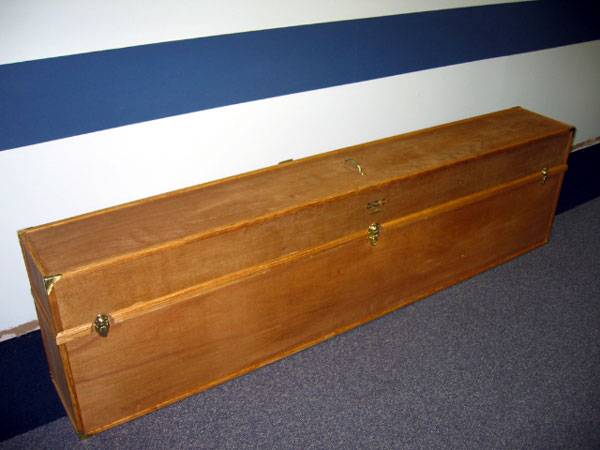
The weather has failed to cooperate and I decide to build the transport box for the sub. Using 1x2 fir strips I constructed a basic box frame. The corners were reinforced with small triangles of the same material. Once this was completed, the entire box was covered in 1/8 Luan plywood. The box measures 80x10x18 and houses the sub nicely. Once the entire box was covered with the Luan Plywood, I measured from the top down, about 6 and marked the box all the way around. Using a chalk line, I snapped out this line. This 6 portion would become the top portion of the carrying box once cut away. I did this rather than try to build the top and main box separately and having the measurements cause them to be off a little. I cut the top off of the box and added four more fir strips for framing inside the top edges of the box and bottom edge of the opening top. Three brass hinges were added to the rear, along with three hasps to the front. I added ½ corner molding to complete the look. As a finishing touch, I purchased eight brass corner pieces to dress up the box. A simple carrying handle was fastened to the top to ease in transporting. The box looks like a small coffin. I can just imagine the looks I am going to get when I open it and remove a 6 plus submarine from the box.
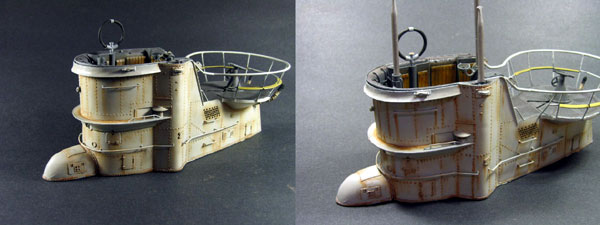
12/05/05. All this time and I have not been able to accomplish much. I have the next three days off and I plan to get something accomplished. The wife leaves for work and I drag the U-ber sub into the garage. The weather outside is still in the teens, but it feels warm enough to paint. I check my putty work from days prior. All of the putty looks nice and smooth. I sanded a couple places and then got things ready for the first shots of primer. As I commenced to painting I noticed there was a definite fog in the air that I was afraid of settling on my Harley. A small break was needed to fix this. Once the HOG was covered I went back to work on the boat. A whopping ¾ if not more, of a can later, the boat was completely coated in primer. I left the boat to dry for a good while. Later that morning, after the primer was dry to the touch I broke out my two cans of Testors Panzer Gray and prepared to paint the lower hull areas. Finally it was starting to take shape. I am glad that I bought two cans, as I would need them both. I normally would have painted the lighter areas first, but this would have involved some tricky masking procedures so I decided to go this route instead. A good liberal coat of Panzer Gray was applied to all of the lower hull areas and left to dry. There was some slight overspray that found its way up onto the upper hull areas, but nothing significant. Now that the Dark Gray was applied I check to see just how visible the missing rivets would be. Unless I was right up on the areas, say within 12 I couldnt tell. Good enough for me. Again, I left the paint to thoroughly dry.


About the Author


FROM: CALIFORNIA, UNITED STATES
After a several year break from the hobby I have happily returned to it. Slowly, but surely getting my mojo back.
Comments

Truly an amazing piece of work, Mathew. Thank you for sharing the experience with us!
Gunny
JAN 12, 2006 - 11:45 PM

Hi matthew
Superb work I liked your information/method on the finishing/painting.
I hope to carry it forward into my 1/72 Revell kit.
Take a large bow for patience and perseverance.
Regards
Sean
JAN 15, 2006 - 06:03 PM

Very very nice,
I particulary like the rust effects, what colour oils did you use for those?
I'm about to start my first boot ever... (any ship) ..
Martyn
JAN 16, 2006 - 09:14 AM

that is just NUTS!!!!! WOW!!!! I wish armorama had a clapping emote
JAN 17, 2006 - 07:16 AM
The rust streaks were done with oil paints. I cant recall the exact color as the label is worn off, but it is either burnt umber/sienna or raw umber/sienna. I always get the two confused. If you open the top of the tube it will look like rust. Thats the easiest way I can describe it. Hope it helps. "Q"
JAN 21, 2006 - 08:47 AM

"The rust streaks were done with oil paints. I cant recall the exact color as the label is worn off, but it is either burnt umber/sienna or raw umber/sienna."
Burnt Sienna
JAN 21, 2006 - 09:12 AM
Copyright ©2021 by Matthew Quiroz. _OPINIONS Model Shipwrights, KitMaker Network, or Silver Star Enterrpises. Images also by copyright holder unless otherwise noted. Opinions expressed are those of the author(s) and not necessarily those of Model Shipwrights. All rights reserved. Originally published on: 2006-01-13 00:00:00. Unique Reads: 23852

WEB HOSTING BY


Copyright ©2021 Model Shipwrights and Kitmaker Network, a subsidiary of Silver Star Enterprises
All Rights Reserved. Please read our Conditions of Use and Privacy Policy.
All Rights Reserved. Please read our Conditions of Use and Privacy Policy.