

Go to modelshipwrights.com for the current dynamic site!


1⁄35Building the Beast - Part Two
8
Comments
Later, when the paint had dried, I placed the boat on its side and began laying in paint in all of the flooding holes. I used Vallejo paints for this so there would be no reaction from thinners etc and the base paint I had already put on. I had a few minor goofs, but I was able to get all of one side done before the day was over. I will go back and touch up these areas later. This concluded the days work and the boat was set aside to dry. As I have to work over the next several days (12 hours a day) the boat and I wont see each other but briefly during that time. Hopefully I can at least get a little more accomplished during those brief meetings.
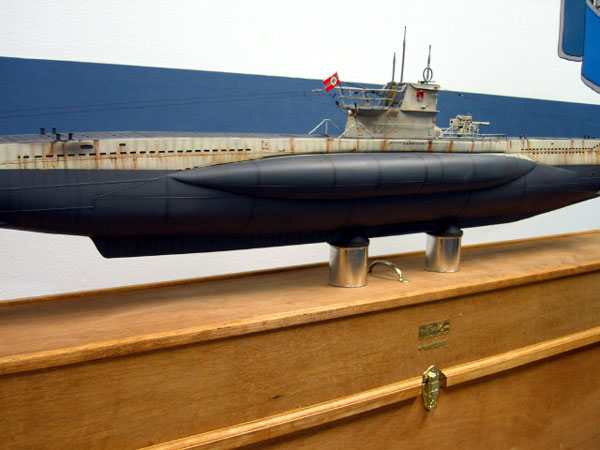
The week end of 12/10/05 finds me finishing up the last of the vent holes on the boat. I initially started off using a wash of enamel paint, but the thinner started to lift the underlying paint. Rather than wait for the paint to cure, I switched to Vallejo paints as it wouldnt react with the underlying paint. I broke out my trusty hair dryer and went to work assisting the newly laid colors to dry. So far, so good. Once these colors were dry I began my weathering. This is the first U-boat, actually, it is my first boat anything that I have ever built, so I was a little nervous about how and where to apply said weathering. Using the internet I grabbed as many pictures as I could and created a file I could draw on for reference. Using these photos and the pictures in the Squadron In Action book I felt pretty good once I finally got started. I tried to mentally picture where the water line was and keep the rusting streaks above this imaginary line. It worked out pretty good for the most part, but I still had a few areas that went a little long. I went back later and fixed these problem areas.
Sunday morning the 11th, I begin to tackle to other side of the boat. I tried to keep the weathering even with the other side. For the heavy older areas of rust I used Vallejo chocolate brown. I applied this liberally over the hull, paying special attention to where the deck railings met the deck, and the areas around the bollards since these saw a lot of use and were prone to a lot of chipping and rusting. These seemed to have a lot of rust on them in the pictures I saw. Once this paint had dried I used my Grumbacher oils to simulate the rust stains.
When these paints are thinned down and applied over a flat paint surface it will spider-web out and create a very realistic rust staining effect. I applied small amounts of my rust colored oils over the hull and let them set for a few minutes to gain some body. By the time I had reached the opposite end of the boat, the other end was ready for blending. Using a soft wide round tip brush, I began to lightly drag this color down the hull. I continued this until I achieved the look I was after. I did have to go back and fix a few areas where I went too far down the hull. Being as I used oils, this was an easy fix. Now that the majority of the weathering was done, I set the boat aside to dry completely. Now that the weathering was done (for the most part) it was time to add the conning tower and the rigging. I mixed up a batch of 5 minute epoxy putty and set it in place. I went and had a cold drink while this cured. Once the conning tower was fully cured, I started my attempts to build the insulators that are a very prominent feature on the boat. Andrea supplies the builder with these white metal coconut shaped insulators that if you can manipulate, will look great. The only problem that I ran into was that they are so small and my fingers are so big, I could not find a way to hold them, even with tweezers, and run the line around them, and then wrap the ends with the other line at the same time. I knew what I needed was a fly tying jig that fly fisherman use, but I couldnt go out and buy one as the funds just werent available for this. My regular extra hands were just too big. What I needed was finesse.
As much as I hated to, I cheated and used large dollops of acrylic paint to simulate the insulators. It doesnt look bad, but I could not for the life of me figure out how to hold these tiny parts and assemble them. As it was, it still took me the entire day to runs these lines thru the various eyes, turn buckles and pulleys. A major part of this operation was wrapping the ends of the lines with small diameter thread. They did not come out too bad, but I figured out a different way of doing it if I had to do it again! Isnt that always the case? Satisfied with what I had accomplished for the day, I set the boat aside for the evening.


About the Author


FROM: CALIFORNIA, UNITED STATES
After a several year break from the hobby I have happily returned to it. Slowly, but surely getting my mojo back.
Comments

Truly an amazing piece of work, Mathew. Thank you for sharing the experience with us!
Gunny
JAN 12, 2006 - 11:45 PM

Hi matthew
Superb work I liked your information/method on the finishing/painting.
I hope to carry it forward into my 1/72 Revell kit.
Take a large bow for patience and perseverance.
Regards
Sean
JAN 15, 2006 - 06:03 PM

Very very nice,
I particulary like the rust effects, what colour oils did you use for those?
I'm about to start my first boot ever... (any ship) ..
Martyn
JAN 16, 2006 - 09:14 AM

that is just NUTS!!!!! WOW!!!! I wish armorama had a clapping emote
JAN 17, 2006 - 07:16 AM

The rust streaks were done with oil paints. I cant recall the exact color as the label is worn off, but it is either burnt umber/sienna or raw umber/sienna. I always get the two confused. If you open the top of the tube it will look like rust. Thats the easiest way I can describe it. Hope it helps. "Q"
JAN 21, 2006 - 08:47 AM

"The rust streaks were done with oil paints. I cant recall the exact color as the label is worn off, but it is either burnt umber/sienna or raw umber/sienna."
Burnt Sienna
JAN 21, 2006 - 09:12 AM
Copyright ©2021 by Matthew Quiroz. _OPINIONS Model Shipwrights, KitMaker Network, or Silver Star Enterrpises. Images also by copyright holder unless otherwise noted. Opinions expressed are those of the author(s) and not necessarily those of Model Shipwrights. All rights reserved. Originally published on: 2006-01-13 00:00:00. Unique Reads: 23852

WEB HOSTING BY


Copyright ©2021 Model Shipwrights and Kitmaker Network, a subsidiary of Silver Star Enterprises
All Rights Reserved. Please read our Conditions of Use and Privacy Policy.
All Rights Reserved. Please read our Conditions of Use and Privacy Policy.