You are viewing the archived version of the site.
Go to modelshipwrights.com for the current dynamic site!
Go to modelshipwrights.com for the current dynamic site!
1⁄35Building the Beast - Part Two
8
Comments

almost disaster
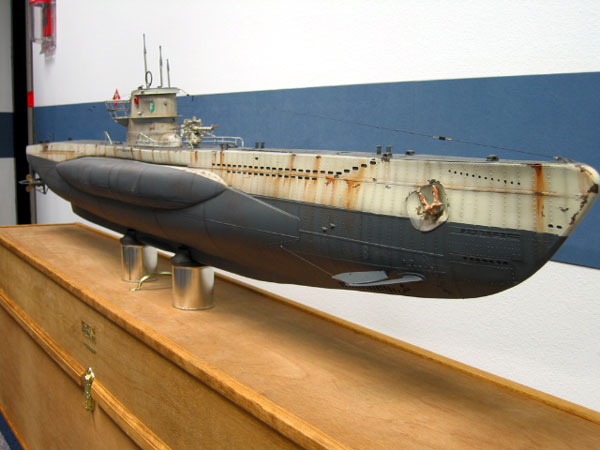
Disaster strikes sometime around noon on Tuesday, as I am moving the boat around the garage. I lose my grip and I drop the boat. It never reaches the floor as I grab it in mid-air. The death grip I have on this bad boy crushes one of the deck rails, but other than some colorful words and a strained fore arm muscle, nothing is severely damaged. The railing was re-shaped and then re-glued into place.finishing up
The final major pieces to go on are the screws. I have differing information about them; some were steel, others were brass. I liked the way the brass looked instead of the steel color so I went with these. I glued them in place with 5 minute epoxy and left things to cure while I went to lunch. After Lunch I added the weathering to the screws and added the dry transfers to the conning tower and the water marks to the hull. With the differing colors, I really liked the way things were looking. A few more minor touch ups, a good coat of flat lacquer and the beast was done.finished! another one?
After almost 9 complete months, I had finished it. Granted a lot of time the sub spent sitting in the corner as I had absolutely no room to work on it. Once I got situated and made some room, things progressed rather smoothly. I enjoyed seeing it thru to the end, and in a bitter sweet way, I am glad to see this thing go on to its new owner. If anybody has any questions in regards to this massive kit, feel free to ask and I will do my best to answer them. I hope you enjoyed the write up.Thanks- Red4
From the editor: Thank you Matthew, for such a good story on your built of the "monster U-ber model"
Building the Beast! Part One
Comments
Truly an amazing piece of work, Mathew. Thank you for sharing the experience with us!
Gunny
JAN 12, 2006 - 11:45 PM
Hi matthew
Superb work I liked your information/method on the finishing/painting.
I hope to carry it forward into my 1/72 Revell kit.
Take a large bow for patience and perseverance.
Regards
Sean
JAN 15, 2006 - 06:03 PM
Very very nice,
I particulary like the rust effects, what colour oils did you use for those?
I'm about to start my first boot ever... (any ship) ..
Martyn
JAN 16, 2006 - 09:14 AM
that is just NUTS!!!!! WOW!!!! I wish armorama had a clapping emote
JAN 17, 2006 - 07:16 AM
The rust streaks were done with oil paints. I cant recall the exact color as the label is worn off, but it is either burnt umber/sienna or raw umber/sienna. I always get the two confused. If you open the top of the tube it will look like rust. Thats the easiest way I can describe it. Hope it helps. "Q"
JAN 21, 2006 - 08:47 AM
"The rust streaks were done with oil paints. I cant recall the exact color as the label is worn off, but it is either burnt umber/sienna or raw umber/sienna."
Burnt Sienna
JAN 21, 2006 - 09:12 AM
Copyright ©2021 by Matthew Quiroz. _OPINIONS Model Shipwrights, KitMaker Network, or Silver Star Enterrpises. Images also by copyright holder unless otherwise noted. Opinions expressed are those of the author(s) and not necessarily those of Model Shipwrights. All rights reserved. Originally published on: 2006-01-13 00:00:00. Unique Reads: 23852


