

Go to modelshipwrights.com for the current dynamic site!


1⁄35Building the Beast - Part Two
8
Comments
building the beast - part two
Andrea Miniatures 1/32 Type VII-C U-boat
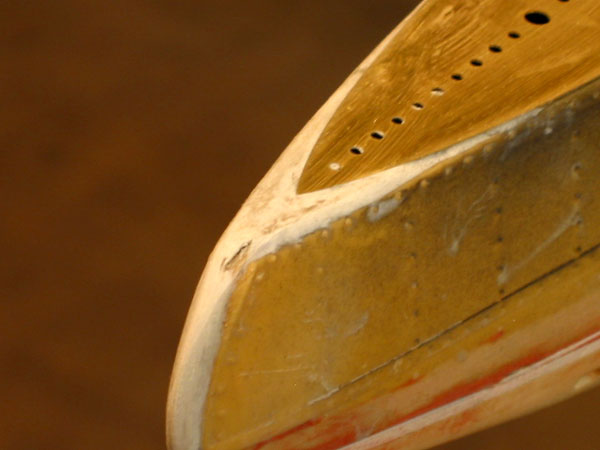
I couldnt pry the hull apart as when I tried, it required more effort than I could muster, and the hull started to crack and I was nowhere close to having them far enough apart. To deal with the rear plates, I decided I would move them towards the bow until they fit and then trim them down. I would lose some of the vent holes or whatever they are called, on the plate, but it wasnt that bad. Now that I had figured out a solution, I proceeded to make the needed cuts. Measuring twice (actually 3 times) and cutting once I was rewarded with all of the pieces falling into place just as I had hoped they would. The end result is that the point of the stern deck plate ends about ½ short of the actual hull, but I could fix this.By this time the paint on the fake pressure hull had dried. Using 5 minute epoxy, I mixed up small batches for each plate I added. Starting at the bow, I glued the white metal cap in place. I have no idea what this thing is, but it looks like a light of some sort. Anyway, once it was solid, I started with the first PE deck plate. Spreading a thin layer of epoxy along the top of the hull, I laid the deck plate on, positioned it, and then let it dry. So far, so good. On to plate number two. I continued like this until all of the plates were installed. My only mistake came at the end. (Dont they all?) I stayed on one side of the hull the entire time and didnt notice that there was a small gap between the deck and the hull on the opposite side. It was maybe 1/64th of an inch, but it was noticeable. There must have been a small resin booger sticking up causing it to sit high. Great, more work. I also noticed that once all of the deck plates were on, not a whole lot, if any of the pressure hull, pipes etc could be seen. Im glad I decided to keep it simple. Using a #11 Blade I pried the deck plate off and took a large bastard file to the offending area. A few minutes later, I test fit the plate and the fit was much better. Not perfect, but a lot closer. Using medium gap filling super glue I reattached the plate.
Some things to note at this point.; If anybody is thinking of getting one of these kits, be warned, IT WILL NOT JUST FALL TOGETHER BY ANY MEANS! It is not for the weak of heart. If I had it to do over again, there are several things I would do differently. Namely, I would spend more time dressing the hull halves to ensure a better fit. I would definitely find all the reference material I could that showed the conning tower and other areas as the instructions are horrible. They are nothing more than a photo copy, of a copy or close to that. It is extremely difficult to see what parts go where. I used the In Action book by Squadron and it really helped. Be prepared to scratch build A LOT of stuff as the kit parts dont always cooperate. This is as far as I have gotten as of 11/23/05. I am hoping to have it complete by December 21 for our annual Christmas banquet. Lets hope so.


About the Author


FROM: CALIFORNIA, UNITED STATES
After a several year break from the hobby I have happily returned to it. Slowly, but surely getting my mojo back.
Comments

Truly an amazing piece of work, Mathew. Thank you for sharing the experience with us!
Gunny
JAN 12, 2006 - 11:45 PM

Hi matthew
Superb work I liked your information/method on the finishing/painting.
I hope to carry it forward into my 1/72 Revell kit.
Take a large bow for patience and perseverance.
Regards
Sean
JAN 15, 2006 - 06:03 PM

Very very nice,
I particulary like the rust effects, what colour oils did you use for those?
I'm about to start my first boot ever... (any ship) ..
Martyn
JAN 16, 2006 - 09:14 AM

that is just NUTS!!!!! WOW!!!! I wish armorama had a clapping emote
JAN 17, 2006 - 07:16 AM

The rust streaks were done with oil paints. I cant recall the exact color as the label is worn off, but it is either burnt umber/sienna or raw umber/sienna. I always get the two confused. If you open the top of the tube it will look like rust. Thats the easiest way I can describe it. Hope it helps. "Q"
JAN 21, 2006 - 08:47 AM

"The rust streaks were done with oil paints. I cant recall the exact color as the label is worn off, but it is either burnt umber/sienna or raw umber/sienna."
Burnt Sienna
JAN 21, 2006 - 09:12 AM
Copyright ©2021 by Matthew Quiroz. _OPINIONS Model Shipwrights, KitMaker Network, or Silver Star Enterrpises. Images also by copyright holder unless otherwise noted. Opinions expressed are those of the author(s) and not necessarily those of Model Shipwrights. All rights reserved. Originally published on: 2006-01-13 00:00:00. Unique Reads: 23851

WEB HOSTING BY


Copyright ©2021 Model Shipwrights and Kitmaker Network, a subsidiary of Silver Star Enterprises
All Rights Reserved. Please read our Conditions of Use and Privacy Policy.
All Rights Reserved. Please read our Conditions of Use and Privacy Policy.