_GOTOBOTTOM
Ships by Class/Type: Battleships
Topics from the Dreadnaught era to modern day.
Hosted by Steve Joyce
1/250 IJN Musashi Build Log
Karybdis
Visit this Community
Maryland, United States
Joined: December 27, 2006
KitMaker: 846 posts
Model Shipwrights: 740 posts
Posted: Wednesday, April 02, 2008 - 11:40 AM UTC
This is my build log for the Arii/ Otaki 1/250 IJN Musashi. I decided to go with this kit instead of the larger 1/200 Nichimo Yamato kit as a.) this kit is a much better starting point for a detailed static model (Doyusha's is basically a toy), b.) even at 1/250 scale, it's big enough, c.) I wanted to build the Musashi, not Yamato and didn't want a daunting project to get even longer for all the AA gun position conversions.

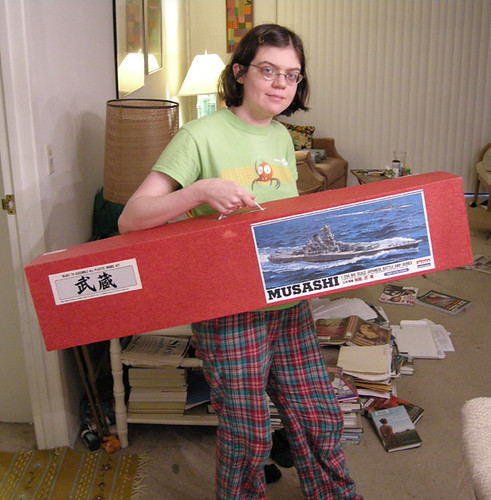
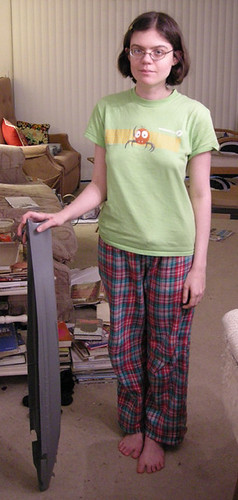
Here are two pictures of my fiancee holding the box and hull (she's 5'6" tall). The hull measures a little over 40" long and 6" wide, so this is no small model.

MuBox3 MuJac2


References:
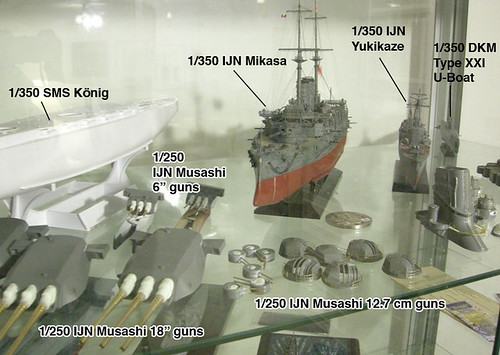
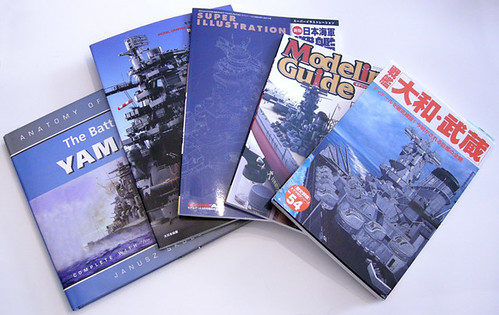
There are lots of other references being used from various magazines, etc., but my main points of reference for this build are (L-R): Anatomy of The Ship: The Battleship Yamato, Iron Battle Wagon Model Graphix Navy Yard Special Issue, Model Art Super Illustration IJN Yamato, Model Art Modeling Guide IJN Yamato, Gakken IJN BB Yamato & Musashi.

MuBooks

Materials:
Arii/ Otaki 1/250 IJN Musashi
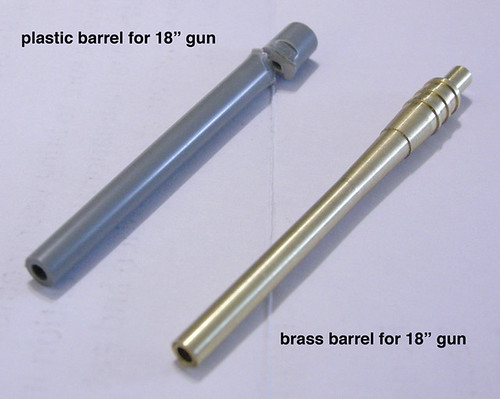
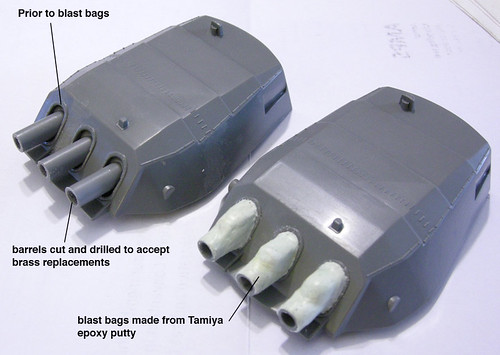
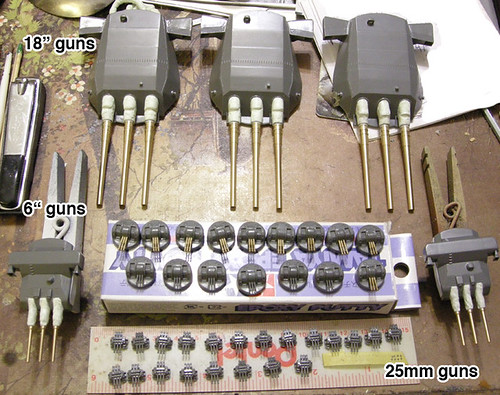
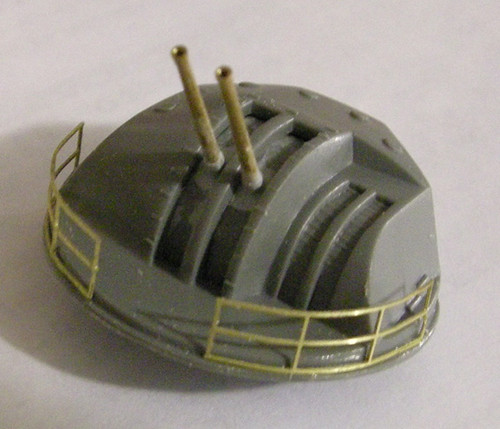
Fukuya 1/250 IJN Yamato Class Main & Sub Gun Barrel (15pcs.)
Fukuya 1/250 IJN Yamato Class AA Gun Barrel (24pcs.)
Fukuya 1/250 IJN Yamato Class 25mm Machine Gun (30pcs.)
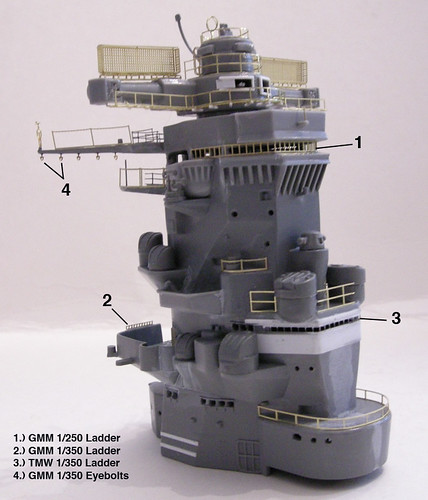
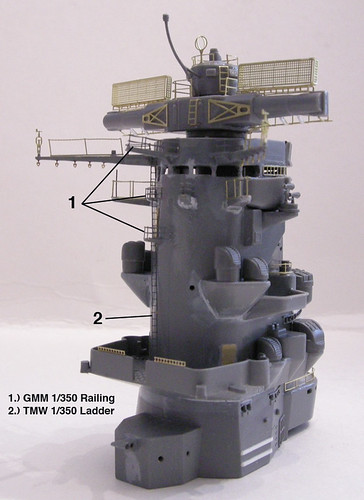
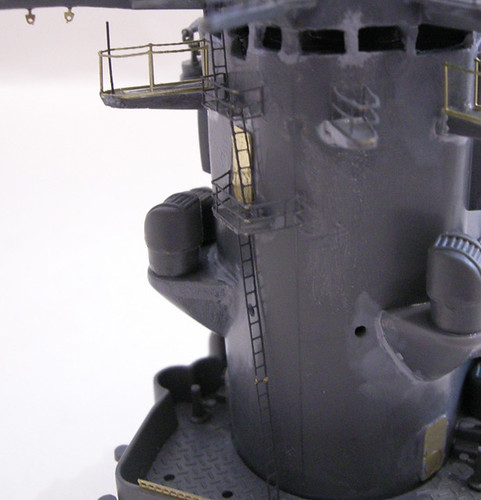
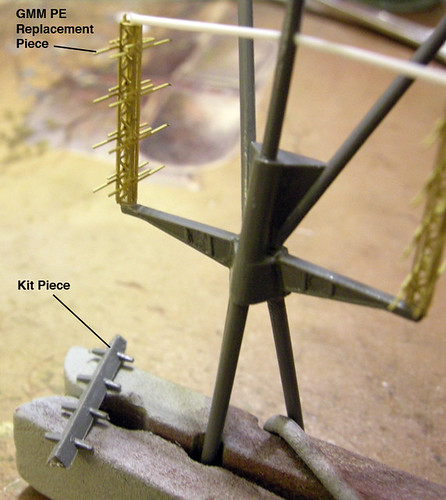
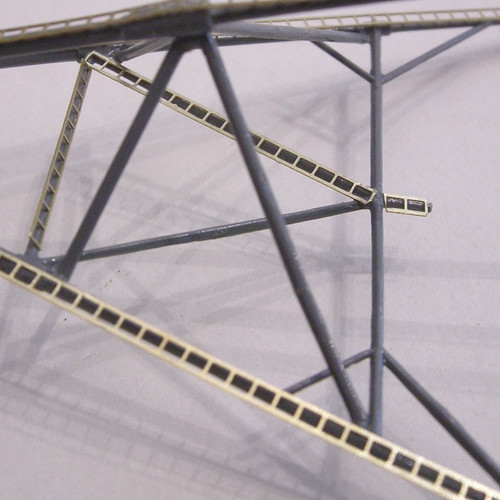
Gold Medal Models (#250-6) 1/250 scale YAMATO / MUSASHI Photo Etch
Gunze Sangyo H-83 Dark Grey 2 (x12) for all above waterline gray
Gunze Sangyo H-33 Russet (x6) for waterline down
Gunze Sangyo H-79 Sandy Yellow (x4) for wood decking
Various thicknesses and widths of Evergreen plastic strip and rod


Building:
Let me state right away that this build is all about "presence" rather than scale accuracy. Part of the appeal of this build is the size of the model and I wanted to build her in a way that adds to the most striking aspects of this beautiful ship. I can debate the rivet counts of IJN ships with the best of them, but that isn't the aim of this build. Even the 1/10 scale Kure model has debatable faults, so if you're looking for a dissertation of scale perfection, I advise you to go elsewhere. This is all about "presence" and "perception", if you will.

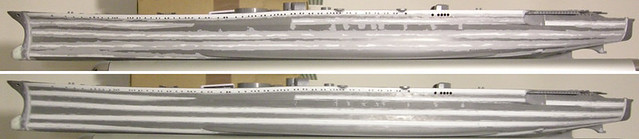
The biggest modification I made was to the bow area. The model's bow is actually too small, so even if you're going for scale accuracy, surgery is required. I decided to make mine just a little larger than accurate to enhance the powerful feel that the prow of this ship contains. I also made the curve between bow and prow more pronounced by grinding out the center area a bit more. The bow was built up with Tamiya Epoxy Putty and filler putty until it had the look I wanted. I also added the fore drain surround, but haven't drilled it out yet.

MuProw1 MuProw2


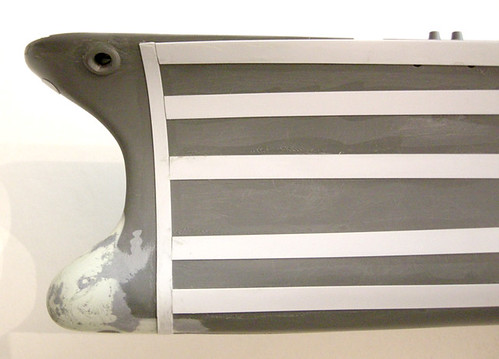
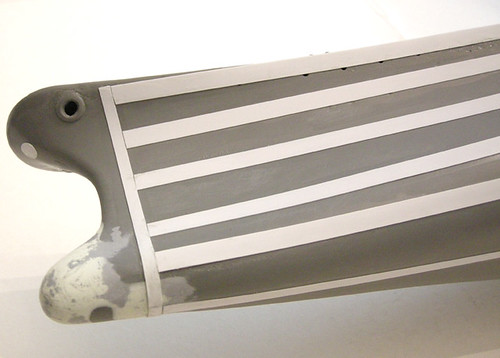
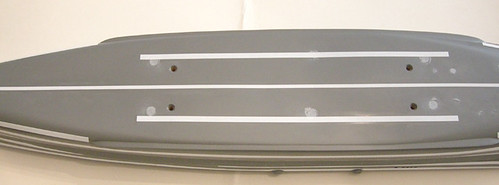
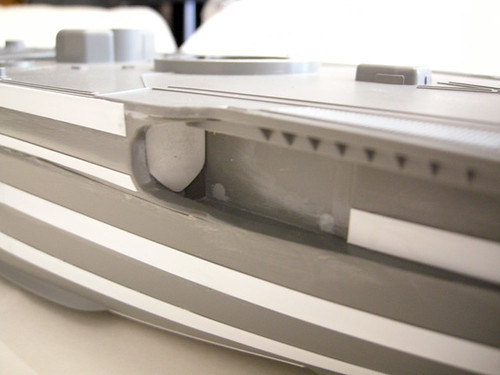
Another addition is the plating along the hull. I sanded off all details from the already fairly smooth hull and added styrene strip. I still have to do some putty work and rounded area pieces (bilge keels, bottom, etc.) in these pictures. The molded on degaussing cable was removed to be replaced with a new one. The molded on anchor chain has been sanded off for real chain.

MuBottom3 MuBottom4 MuAnchorSkid

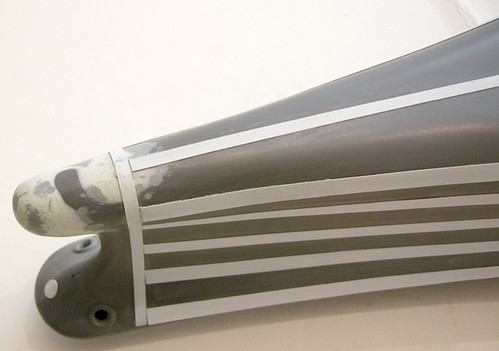
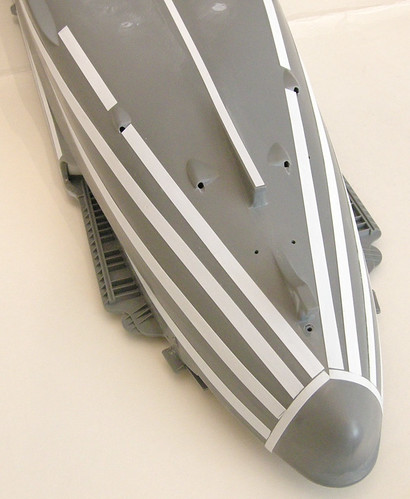
You may notice that there is more space between the third and fourth plates from the top. While this looks "off" without paint, it takes into account the waterline and will look fine after painting.


I knew from the beginning that I wanted a nice base made of oak for this project. A call to my father, a master carpenter who I always beg bases from, with some measuring and a nice base was the result.

MuBase


To keep the model stable, another piece of oak was mounted in the hull and secured with screws put into the bottom. The light gray circles are where the screws have been puttied over. Metal rods in the base slide up into the holes and weight and friction keeps the model secure. Once the hull has been painted and weathered, it will be placed on the base permanently.

MuBottom1


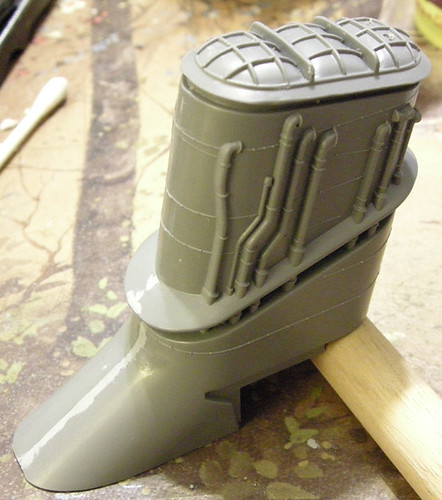
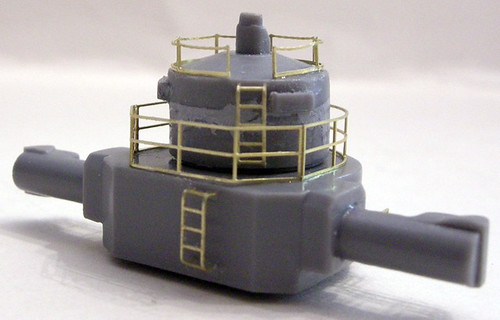
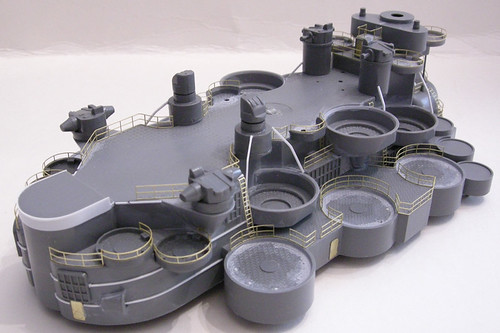
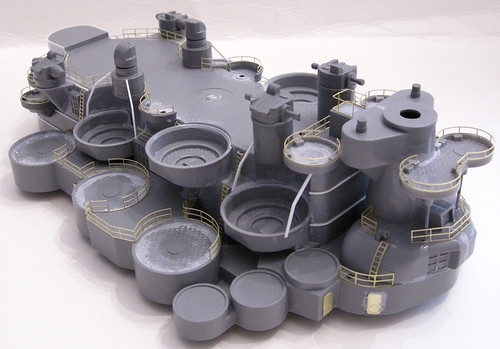
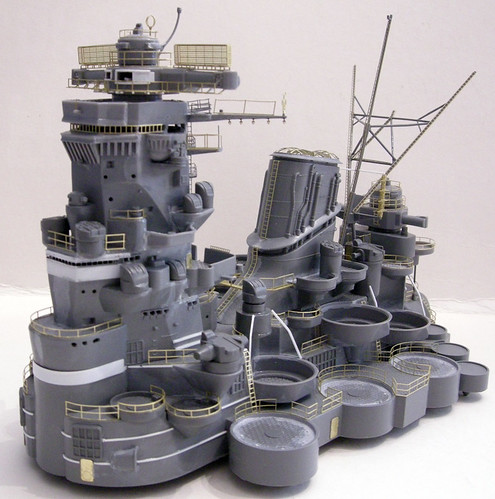
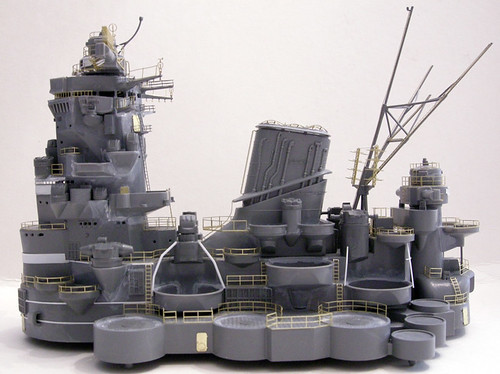
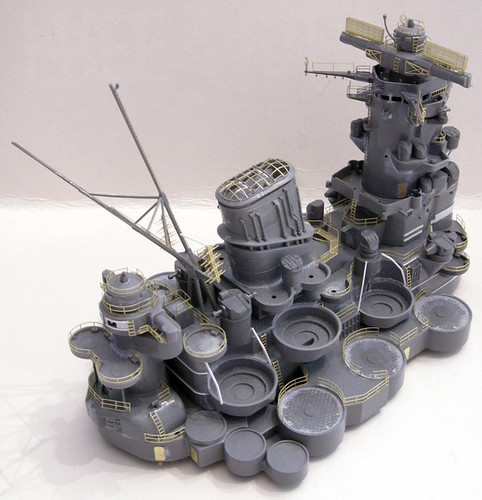
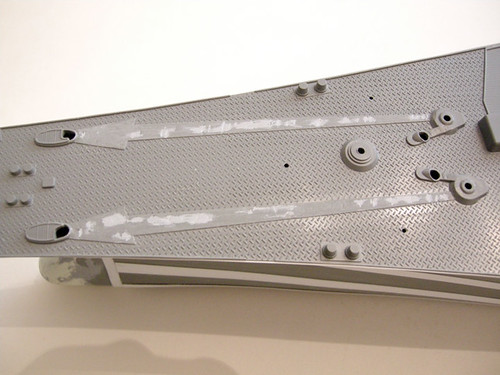
Jumping around to various parts of the ship as others dry, I added some detail to the hanger area. The kit just had a simple box area, so I added doors, rails, and some texture to the floor area. The doors for the rear boat hangars were also added.

MuHanger1 MuBoatHangers


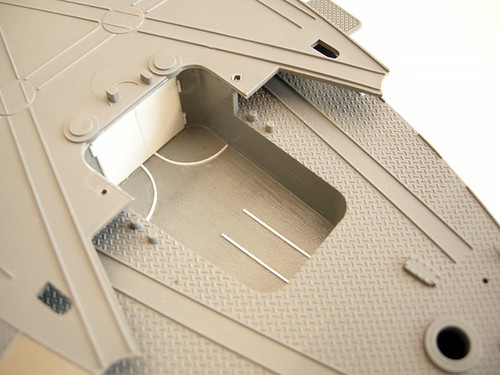
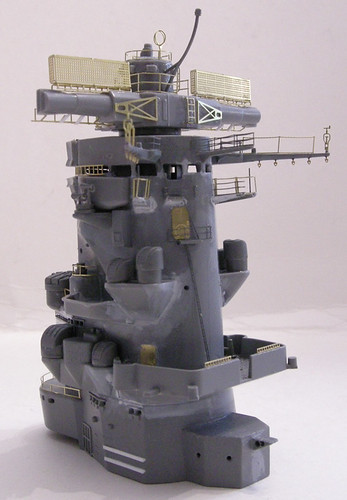
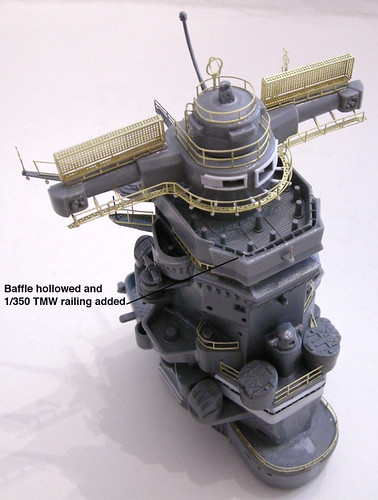
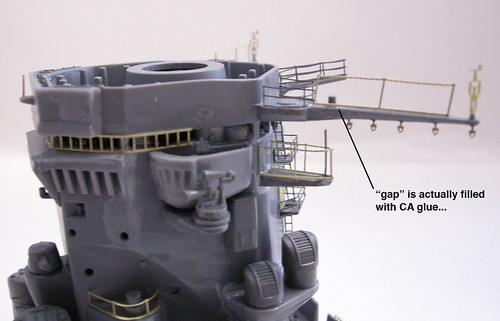
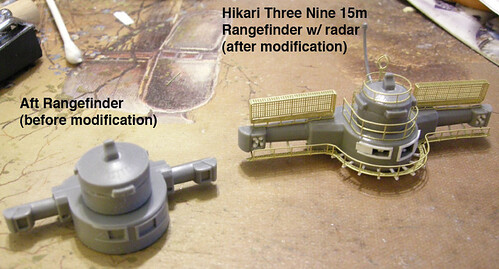
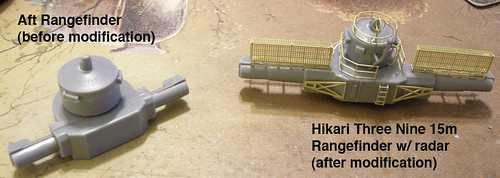
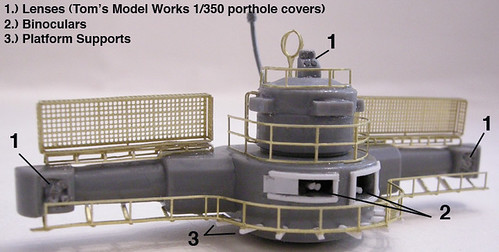
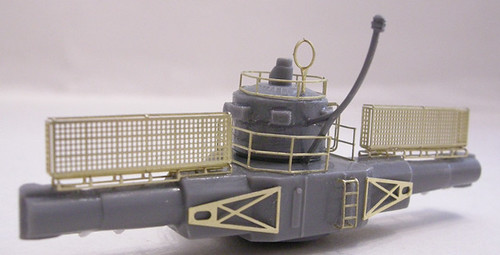
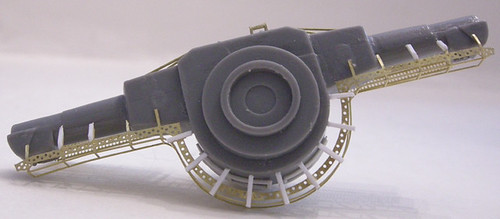
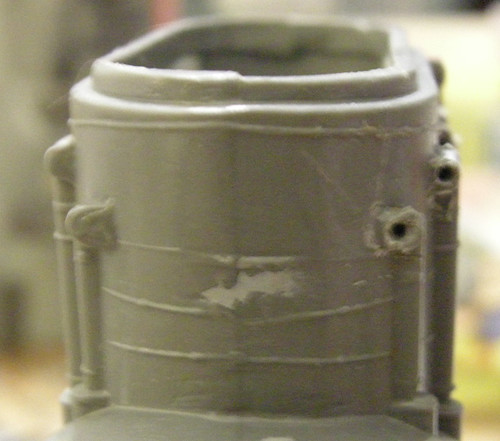
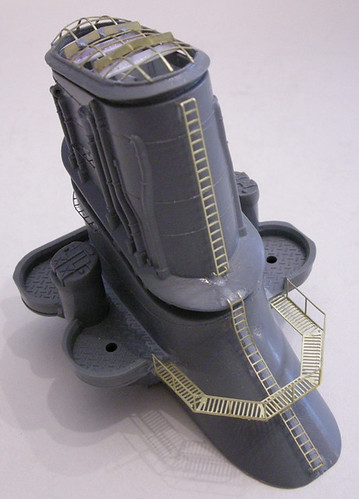
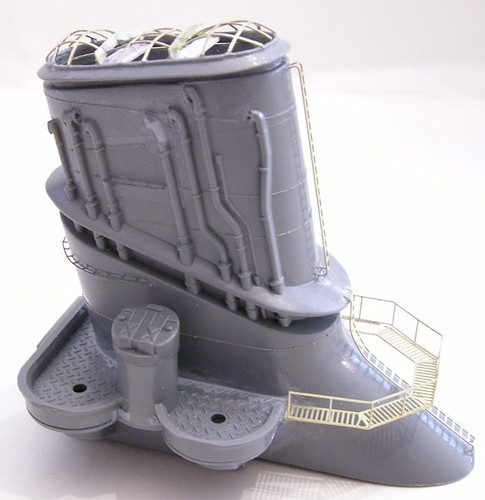
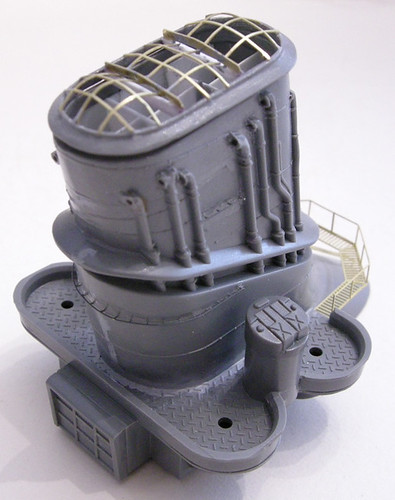
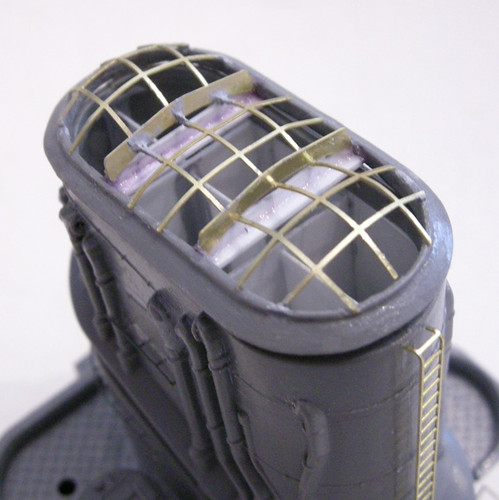
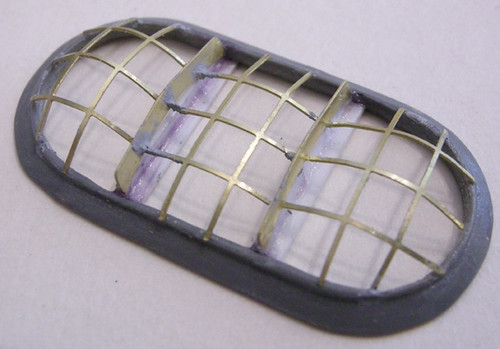
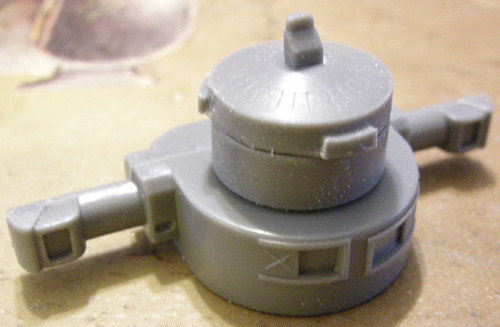
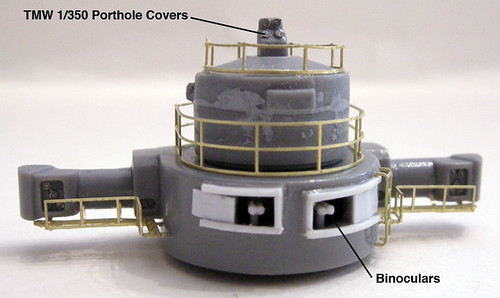
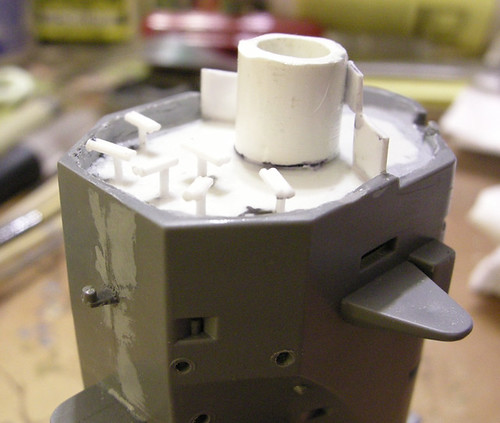
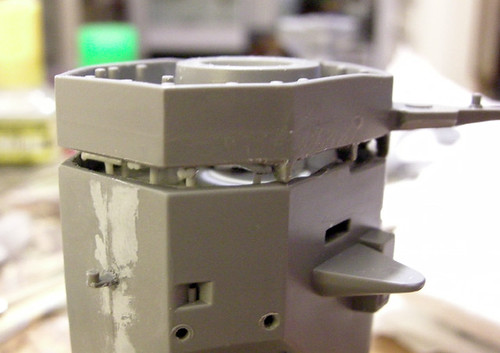
All port holes will be drilled out as they have been on the superstructure. The bridge area looks nice, but the top most interior spotting area was solid, so I carved out the place and added floor, central structure, rear walls, doorways, and binoculars. After the top piece is glued on, I'll add the window sills and Krystal Klear for glass.

MuBridge1 MuBridge3


That's all for now. More at some point as build time permits. I'm shooting for this to be entered in the Orlando Modelpalooza in May, so we'll see what happens...
Clanky44
Visit this Community
Ontario, Canada
Joined: September 15, 2005
KitMaker: 1,901 posts
Model Shipwrights: 934 posts
Posted: Wednesday, April 02, 2008 - 03:46 PM UTC
Impressive work on a very impressive kit. I look forward to seeing future progress.
Thanks for sharing with us.

Frank
Gunny
Visit this Community
Pennsylvania, United States
Joined: July 13, 2004
KitMaker: 6,705 posts
Model Shipwrights: 4,704 posts
Posted: Wednesday, April 02, 2008 - 09:32 PM UTC
Ahoy, Dade!

This is going to be a most impressive project, mate, looking forward to following along with the build...good game plan!

skipper
Visit this Community
Lisboa, Portugal
Joined: February 28, 2002
KitMaker: 5,182 posts
Model Shipwrights: 4,070 posts
Posted: Thursday, April 03, 2008 - 09:54 PM UTC
Hi Dade

An impressive project for a short period of time (to me)!
Keep us posted,
Rui
#027
Visit this Community
Louisiana, United States
Joined: April 13, 2005
KitMaker: 5,422 posts
Model Shipwrights: 5,079 posts
Posted: Friday, April 04, 2008 - 10:48 AM UTC
Super work Dade!

Gator
grayghost666
#021
Joined: August 02, 2007
KitMaker: 2,458 posts
Model Shipwrights: 1,423 posts
Posted: Sunday, April 13, 2008 - 04:59 PM UTC
hello Dade,
most impressive,you got the model,books all the AM and PE,paints and the Woman.
with all the extras you are doing,this is going to be a very impressive build.
i can not wait for your next update,i am going to subscribe to this thread so i will know what your next update will be.
cheers,
Bruce
Karybdis
Visit this Community
Maryland, United States
Joined: December 27, 2006
KitMaker: 846 posts
Model Shipwrights: 740 posts
Posted: Sunday, April 13, 2008 - 06:59 PM UTC
Thanks for all the kind words guys!

I've been working steadily on this project, spending most of the time getting the hull smoothed out before adding the rivets and getting the bridge area details straightened out. I'll have pictures and explanations up in a couple days. This is my first ever build log and I'm still getting used to not going too far without taking pictures of pertinent build steps.
Gunny
Visit this Community
Pennsylvania, United States
Joined: July 13, 2004
KitMaker: 6,705 posts
Model Shipwrights: 4,704 posts
Posted: Sunday, April 13, 2008 - 10:36 PM UTC

Quoted Text

Thanks for all the kind words guys!

I've been working steadily on this project, spending most of the time getting the hull smoothed out before adding the rivets and getting the bridge area details straightened out. I'll have pictures and explanations up in a couple days. This is my first ever build log and I'm still getting used to not going too far without taking pictures of pertinent build steps.


Great news, Dade, glad that you're making good progress on the build...looking forward to seeing the images, mate!
JMartine
Visit this Community
New Jersey, United States
Joined: October 18, 2007
KitMaker: 1,698 posts
Model Shipwrights: 1,514 posts
Posted: Tuesday, April 15, 2008 - 12:50 PM UTC
Good luck in your build! Another massive project with plenty of detail... I like your quote:

"Let me state right away that this build is all about "presence" rather than scale accuracy. Part of the appeal of this build is the size of the model and I wanted to build her in a way that adds to the most striking aspects of this beautiful ship."

Look forward to your build, cheers!
Karybdis
Visit this Community
Maryland, United States
Joined: December 27, 2006
KitMaker: 846 posts
Model Shipwrights: 740 posts
Posted: Saturday, April 19, 2008 - 09:11 AM UTC
I've had four solid days to work on the Musashi and got a lot done on some of the most detail intensive areas. The Model Art Yamato Modeling Guide is a big help here as it shows a build up of the Otaki/ Arii 1/250 Yamato. Many of the steps taken in that build can be applied to the Musashi as well. Also indispensable is the new edition of the Model Art Super Illustration book. In many ways, I believe it to be a superior "work book" to the Skulski book as its soft bound cover and standard size make it a better work space companion.

I had some spare PE left over from Gold Medal Models' (GMM) 1/350 IJN Mikasa and Tom's Model Works' (TMW) 1/350 IJN Yujikaze that work like a charm for the various bits not supplied in the kit or dedicated detail set. My focus has been on the superstructure items so lets take a look (note that many of the small binoculars, lights, etc. won't be fitted until later).


Tower Bridge Area:
After painting the inside of the bridge a neutral grey color to keep the white styrene additions from jumping out, I glued the top on. Now it was time to add the various detail items. Styrene strip was added to the compass bridge to add visual interest and two bands were added to the base on either side.

In place of the solid plastic pieces I used various scale ladders as windowpanes. The compass bridge windows (bottom) are 1/350 ladder from TMW while the 1/250 Yamato/ Musashi PE ladder worked perfectly for the larger forward combat bridge windows (top). I also added 1/350 eyebolts from GMM's Mikasa set to the yardarms to act as pulleys for rigging the signal flag ropes. 1/350 ladder from the GMM Mikasa set was used as tie down spots for the ropes.

MuBridge4

On the back of the structure are the auxiliary ladders and platforms. 1/250 ladder is too big for the skinny ladders so back to 1/350 TMW ladders for these. The smaller rails found on the platforms were also too small for 1/250, so these were also 1/350 rails (note how many of these parts are already painted grey since they were leftovers from previous projects). Mr. Surfacer 500 has been used to fill in many of the gaps and despite the almost rough appearance given in the photos, everything is smooth to the touch.

MuBridge5 MuBridge6 MuBridge9

I hollowed out the shield above the combat bridge and used 1/350 ladder to create the baffling found inside.

MuBridge7 MuBridge8

Forward Rangefinder:
The (literal) crowning piece of the bridge area is the Hikari Three Nine 15m Rangefinder with radar. This little guy took an entire day of work alone just to complete. For comparison, note the differences between the unmodified aft rangefinder and the forward piece.

MuRangeFs1 MuRangeFs2


The GMM PE is rather comprehensive for this structure, but we can still add more. As we can see in the picture, the windows on the rangefinder are solid. So first, cut out the window openings. This is where the Gakken book comes in as a reference for the placement of the binoculars located inside. Binoculars stands are installed from the back and the piece is glued closed (we'll install the actual binoculars from the front). The Gakken book shows four binoculars total, but I stuck with two to make these tiny pieces stand out more.

Styrene is used to add structure around the windows as well as the sliding window shields. Styrene rod is added to the either end (five each) and capped with 1/350 porthole covers to make the ranging lenses. Four more porthole covers for lenses are added to the top of the main gun firing control room. The binoculars, fashioned from styrene rod glued side by side are now installed.

The PE parts are added, but the platform supports aren't long enough to reach to the main piece so styrene is used to build up the supports. A lot of work, but wow, look how it dresses up that forward superstructure! This is one of those times where it seems a shame to paint this...

MuForeRF1 MuForeRF2 MuForeRF3


Funnel:
Moving on to the funnel, the first order of business is that ridiculous solid funnel cap. Considering how big this kit is, I'm still surprised that this piece was solid despite the age of the tooling. Ah well. I also opened up the pipes and shaped the openings to look better.

MuFunnel1 MuFunnel2

Add in the PE ladders, platform and railing (along with some extra grab handles here and there) and the funnel's really shaping up! Note that the massive size of this funnel in 1/250 means that there's plenty of space inside for extra detail in the form of baffling. Styrene sheet is used extensively to add extra visual interest. I will add some interior railings that were used to aid in funnel cleaning(what a fun job that must have been) after I order some more extra 1/350 rails and ladders. I'm blown away by how much 1/350 PE has been used in the project already and my extras are running out! So, if you're going to build one of these, do yourself a favor and pick up one (or two) sets of TMW's 1/350 rails and ladder sets (#3501 or #3527 should do the trick)!

MuFunnel3 MuFunnel4 MuFunnel5 MuFunnel6 MuFunnel7

One final point is the use of styrene "L" beam to make flow adjusters under the PE wind baffles.

MuFunnelCap


That's all for now. I'm finishing up the wacky tripod mast with Type 13 radar arrays and the aft rangefinder, so expect an update in a couple days.
skipper
Visit this Community
Lisboa, Portugal
Joined: February 28, 2002
KitMaker: 5,182 posts
Model Shipwrights: 4,070 posts
Posted: Saturday, April 19, 2008 - 09:33 AM UTC
Hi Dade

You've been very busy and what level of detail you have made!
The PE parts look excellent and indeed make a great difference.

Although a little late, I have a suggestion to make:
Replace the pipes on the Funnel by brass or aluminum tubing. It's a detail that mismatch the other level of detail that you have put on it. (hope that I explained myself properly)

Keep up,
Rui
Karybdis
Visit this Community
Maryland, United States
Joined: December 27, 2006
KitMaker: 846 posts
Model Shipwrights: 740 posts
Posted: Saturday, April 26, 2008 - 07:19 AM UTC
This week was spent finishing the Aft Range Finder, Mast, and Superstructure base.

Aft Range Finder:
Here is the Aft Range Finder before and after modifications. Like the main RF, the aft piece had its windows hollowed out, binoculars installed, 1/350 porthole covers used as lenses and PE installed.

MuAftRF1 MuAftRF2 MuAftRF3


Mast:
The mast was finished with PE Type 13 Radar. Note what a great difference this part makes over the stock kit piece that looks more like a piece of sprue than a radar.

MuMast1

Thankfully, my order for more 1/350 ladders came in just in time to cover the pertinent areas of the mast.

MuMast3 MuMast4


Superstructure Base:
Finally, most of the week was spent preparing the base of the Superstructure. Railings and ladders galore! I also added the large AA turret supports to the upper level of sponsons (white styrene). There will also be supports for the center sponson, but those will wait for final assembly as they connect to the funnel base.

MuSSa1 MuSSa2

Here is the superstructure assembly dry fit together. I'm very happy with the level of detail achieved on this imposing structure. This section alone is about 30% of the work for the overall build. There's enough brass here to make a trumpet!

MuSS2 MuSS3 MuSS5


Speaking of brass, I'll now begin work on the Musashi's arsenal of weapons. Then it's on to finishing the hull. See ya next week!
#027
Visit this Community
Louisiana, United States
Joined: April 13, 2005
KitMaker: 5,422 posts
Model Shipwrights: 5,079 posts
Posted: Saturday, April 26, 2008 - 12:44 PM UTC
Awesome work my friend!

Gator
goldenpony
Visit this Community
Zimbabwe
Joined: July 03, 2007
KitMaker: 3,529 posts
Model Shipwrights: 2,419 posts
Posted: Saturday, April 26, 2008 - 01:17 PM UTC
Simply amazing!

skipper
Visit this Community
Lisboa, Portugal
Joined: February 28, 2002
KitMaker: 5,182 posts
Model Shipwrights: 4,070 posts
Posted: Sunday, April 27, 2008 - 03:07 AM UTC
Nice "Trumpet", Dade
Keep up
Rui
Karybdis
Visit this Community
Maryland, United States
Joined: December 27, 2006
KitMaker: 846 posts
Model Shipwrights: 740 posts
Posted: Sunday, April 27, 2008 - 03:17 AM UTC
Thanks for the nice words, guys! Since I'm shooting for this to be completed by May 17, updates will be coming in a weekly fashion.
Clanky44
Visit this Community
Ontario, Canada
Joined: September 15, 2005
KitMaker: 1,901 posts
Model Shipwrights: 934 posts
Posted: Sunday, April 27, 2008 - 03:04 PM UTC
Fantastic work Dade! Excellent level of detail, and all very clean. I look forward to seeing further progress.

Frank
Karybdis
Visit this Community
Maryland, United States
Joined: December 27, 2006
KitMaker: 846 posts
Model Shipwrights: 740 posts
Posted: Monday, May 05, 2008 - 01:09 PM UTC
Argh, Murphy and that annoying Law of his is beating me over the head since I said I'd have weekly updates!

I've had some time setbacks that have thrown my May 17 completion in serious jeopardy. I'm still soldiering on, though and should have an update posted in a couple days...

At the very least, if this build isn't done by the 17th, it will be done in time for the Nats!
skipper
Visit this Community
Lisboa, Portugal
Joined: February 28, 2002
KitMaker: 5,182 posts
Model Shipwrights: 4,070 posts
Posted: Monday, May 05, 2008 - 01:15 PM UTC
hi Dade

I would like to suggest: take it easy!
You could ruin several days of work because you're pushing it hard - remember, this is JUST A HOBBY!
And if you don't finish it on the 17th, you will have more time to take attention to more minute details
From my own experience

Rui
Karybdis
Visit this Community
Maryland, United States
Joined: December 27, 2006
KitMaker: 846 posts
Model Shipwrights: 740 posts
Posted: Monday, May 05, 2008 - 01:44 PM UTC
Hi Rui,

Thanks for the advice. I will be sure to be careful. I have already decided that if it doesn't get done in time for Modelpalooza on the 17th, it's okay.

I will still push myself because it seems like I get my best work done under pressure, but if it looks like it won't come together in time, I'll go easy. I'll still take the unfinished model because many want to see it. It might be a good thing if it's not painted yet because people who don't build ships will see all the work that goes into one!

Either way, I'm positive that I will have it done for the Nats since that is in August and I know I'll be finished by then!
Karybdis
Visit this Community
Maryland, United States
Joined: December 27, 2006
KitMaker: 846 posts
Model Shipwrights: 740 posts
Posted: Saturday, May 10, 2008 - 10:48 AM UTC
Wow, it's been a busy couple of weeks. I got all of the guns assembled and swapped out the barrels for brass where possible.

MuMainBarrel Mu6inchBarrels


I also had to build blast bags for the 18", 6", and 12.7 cm (sleeve at the barrel base) guns- this took a very long time and a lot of Tamiya epoxy putty. This picture shows a main gun turret before and after the addition of blast bags and before the fitting of barrels.

MuMainGuns1


Here is a picture showing all of the guns except for the twin 12.7 cm turrets and the single 25 mm guns. The main gun barrels were so big and heavy that I used epoxy to glue them in as I didn't trust CA to effectively secure the barrels. Note that photo etch hasn't been fitted yet to these guns.

You'll also see that not all of the 25mm guns are brass. Strangely, the barrel set I got seemed to only have enough to cover the turrets found on the super structure and hull sides... There is a more expensive set lurking out there with more barrels, but I think this set will do. I hollowed out the plastic barrels in the remaining guns.

MuGunSelection


Here is a 12.7 cm gun turret with photo etch rails.

Mu127gun


This is a quick picture I took of the guns laid out in my display case with some 1/350 ships to show just how huge 1/250 18" guns are.

MuGunCompare


Before putting the PE on the guns, I decided to break up the tedium by getting back to the hull. This small picture shows where I applied to Mr. Surfacer 500 to blend in the bands for streamlining, and after I sanded everything down. This process took a whopping 20 hours to complete! I have no idea how so much time went by, but I blew through half a bottle of Mr. Surfacer and after so much sanding, my fingernails have all been sanded down to the quick and are painful (typing this doesn't feel that great).

MuHull1


I will post better pictures of the hull as I get farther along on the construction: next comes the degaussing cable, belts, bolts, supports and lip. I probably won't be posting any more updates until after Modelpalooza so I can devote more time to construction.
grayghost666
#021
Joined: August 02, 2007
KitMaker: 2,458 posts
Model Shipwrights: 1,423 posts
Posted: Saturday, May 10, 2008 - 11:05 AM UTC
hello Dade,
looking great,take your time and relax.and thanks for the update/photo's.
cheers,
Bruce
Clanky44
Visit this Community
Ontario, Canada
Joined: September 15, 2005
KitMaker: 1,901 posts
Model Shipwrights: 934 posts
Posted: Saturday, May 10, 2008 - 11:46 AM UTC
Nicely done Dade, that's a good investment in brass you got there! Should add some lead shot in the back of the turrets to even out the weight, that is unless you're planning to glue the turrets in place.

Frank
Karybdis
Visit this Community
Maryland, United States
Joined: December 27, 2006
KitMaker: 846 posts
Model Shipwrights: 740 posts
Posted: Saturday, May 10, 2008 - 01:52 PM UTC

Quoted Text

Nicely done Dade, that's a good investment in brass you got there! Should add some lead shot in the back of the turrets to even out the weight, that is unless you're planning to glue the turrets in place.


No exaggeration when I say that the all the brass on this ship literally weighs a couple pounds (I tested it).

While the turrets are a little front heavy, they're not as bad as you would think, requiring only a little weight to stay straight. They're keyed to fit in the barbettes, so after inserting sideways and turning, they lock down nicely with no loss of balance. Otherwise, yeah, I would've glued 'em in place since once they're installed, I won't be moving them anyway.
Clanky44
Visit this Community
Ontario, Canada
Joined: September 15, 2005
KitMaker: 1,901 posts
Model Shipwrights: 934 posts
Posted: Saturday, May 10, 2008 - 02:24 PM UTC
One thing to keep in mind,.. depending on the thickness (and strength) of the plastic deck, the pull forwards of the front heavy turrets, might give you a slight buckle on the deck plate which might, or might not be noticeable upon completion.

Excellent work Dade, look forward to your next update,

Frank
 _GOTOTOP