

Go to modelshipwrights.com for the current dynamic site!


General Ship Modeling
Discuss modeling techniques, experiences, and ship modeling in general.
Discuss modeling techniques, experiences, and ship modeling in general.
Hosted by Jim Starkweather
Akagi Build Log

blaster76

Joined: September 15, 2002
KitMaker: 8,985 posts
Model Shipwrights: 3,509 posts

Posted: Monday, December 08, 2008 - 11:50 AM UTC
Glad to see how you are constantly checking and rechecking alignment. That was one of my concerns with this one was checking and rechecking the PE with deck and understructure. Looks like I'll have to do it the same way as you even though I don't like pulling lots of pieces off the sprues prior to assembly.


TracyWhite
Joined: January 18, 2005
KitMaker: 527 posts
Model Shipwrights: 464 posts

Posted: Monday, December 08, 2008 - 12:30 PM UTC
The good news is that the paint for Akagi is relatively simple, so I may build it 90% of the way before even hitting the paint. If I can swing it that would mean that I would have the deck glued down before most of the PE hit the underside.

snaga61
Joined: January 09, 2007
KitMaker: 82 posts
Model Shipwrights: 81 posts

Posted: Monday, December 08, 2008 - 01:16 PM UTC
Quoted Text
The good news is that the paint for Akagi is relatively simple, so I may build it 90% of the way before even hitting the paint. If I can swing it that would mean that I would have the deck glued down before most of the PE hit the underside.
I don't think I would tackle putting the flight deck PE on after the deck has been glued down. I needed all of the space for my hands and fingers to move around without the hull getting in the way
 and it really isn't a big deal pulling the fight deck on and off.
Rab

Joined: October 03, 2006
KitMaker: 353 posts
Model Shipwrights: 207 posts
Posted: Monday, December 08, 2008 - 08:23 PM UTC
The kit with P/E is a real time consumer. Every plastic part taken from the spue has to be checked against the 4 P/E instructions sheets to see if there is a replacement. .

superfly

Joined: October 02, 2008
KitMaker: 40 posts
Model Shipwrights: 36 posts
Posted: Tuesday, December 09, 2008 - 12:42 AM UTC
Quoted Text
The kit with P/E is a real time consumer. Every plastic part taken from the spue has to be checked against the 4 P/E instructions sheets to see if there is a replacement. .
Just take a highlighter and hightlight every part to be replaced with PE on the master instruction sheet before you start anything.... once thats done you can start your build sequence..The jackstays (PE) is a challenge you'll have to plan carefully.
snaga61
Joined: January 09, 2007
KitMaker: 82 posts
Model Shipwrights: 81 posts
Posted: Tuesday, December 09, 2008 - 07:14 AM UTC
Here's a primer question:
I've been using Duplicolor Sandable Auto primer for my models and have had really good results. For this kit, with all the PE, is it advisable to use something else, such as Mr. Primer 1000?
Also what's a better primer color. I've used grey in the past, sort of as a pre-shading, and then a darker grey/black for additional pre-shading, if required, and finally spray basecoat coverage based on if I want shadows, etc. Dade uses white primer then pre-shades with a dark grey.
What are your preferences?

Clanky44
Joined: September 15, 2005
KitMaker: 1,901 posts
Model Shipwrights: 934 posts

Posted: Tuesday, December 09, 2008 - 10:48 AM UTC
I'm always fearful I'll miss patches of the grey plastic with grey primer, therefore I use acrylic flat black paint as a primer. Polly Scale or Tamiya.
Frank
Frank
superfly
Joined: October 02, 2008
KitMaker: 40 posts
Model Shipwrights: 36 posts
Posted: Tuesday, December 09, 2008 - 11:16 AM UTC
Hey 1/350 Akagi Fans,
White Ensign Models have a PE set for 1/350 Akagi "Coming Soon" I hope its other stuff not repeats of Hasegawa's PE...and Fukuya has a brass barrel set for the main guns for the Akagi aswell.
White Ensign Models have a PE set for 1/350 Akagi "Coming Soon" I hope its other stuff not repeats of Hasegawa's PE...and Fukuya has a brass barrel set for the main guns for the Akagi aswell.

gator
Vendor

#027
Joined: April 13, 2005
KitMaker: 5,422 posts
Model Shipwrights: 5,079 posts

Posted: Tuesday, December 09, 2008 - 02:05 PM UTC
Fantastic work Dave!
Kenny
Kenny

snaga61
Joined: January 09, 2007
KitMaker: 82 posts
Model Shipwrights: 81 posts
Posted: Tuesday, December 09, 2008 - 02:45 PM UTC
Thanks Kenny. Your Gator Glue has been a life saver for this project. Definitely would not have been as easy to build up these pieces without it.
snaga61
Joined: January 09, 2007
KitMaker: 82 posts
Model Shipwrights: 81 posts
Posted: Thursday, December 11, 2008 - 08:17 PM UTC
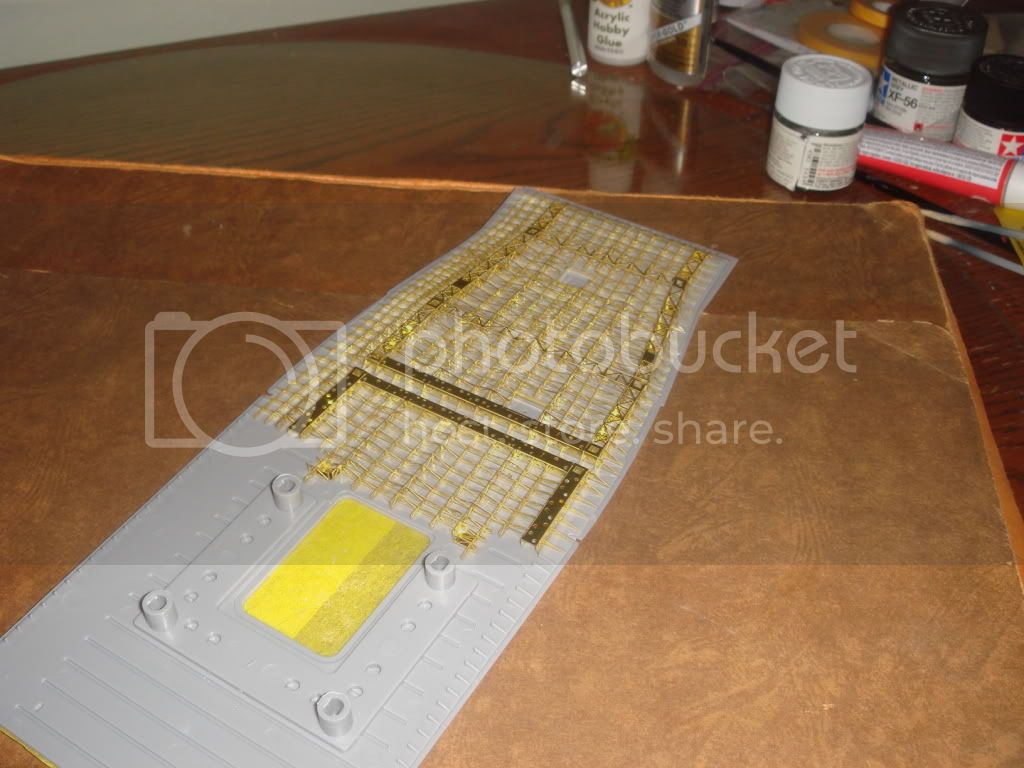
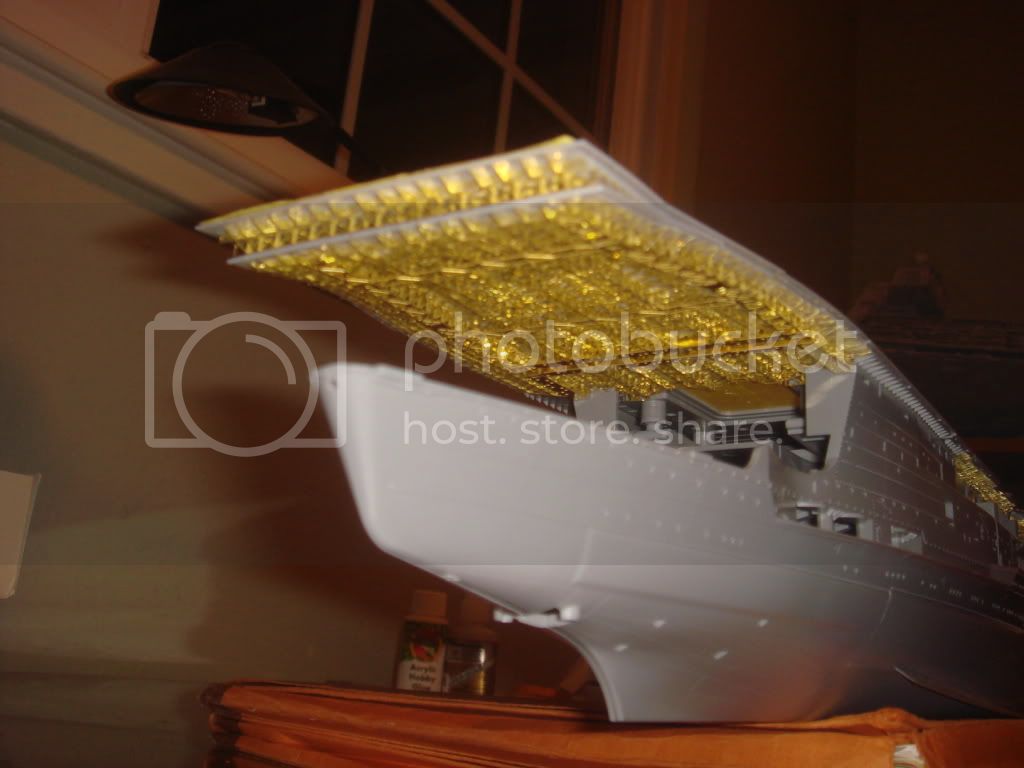
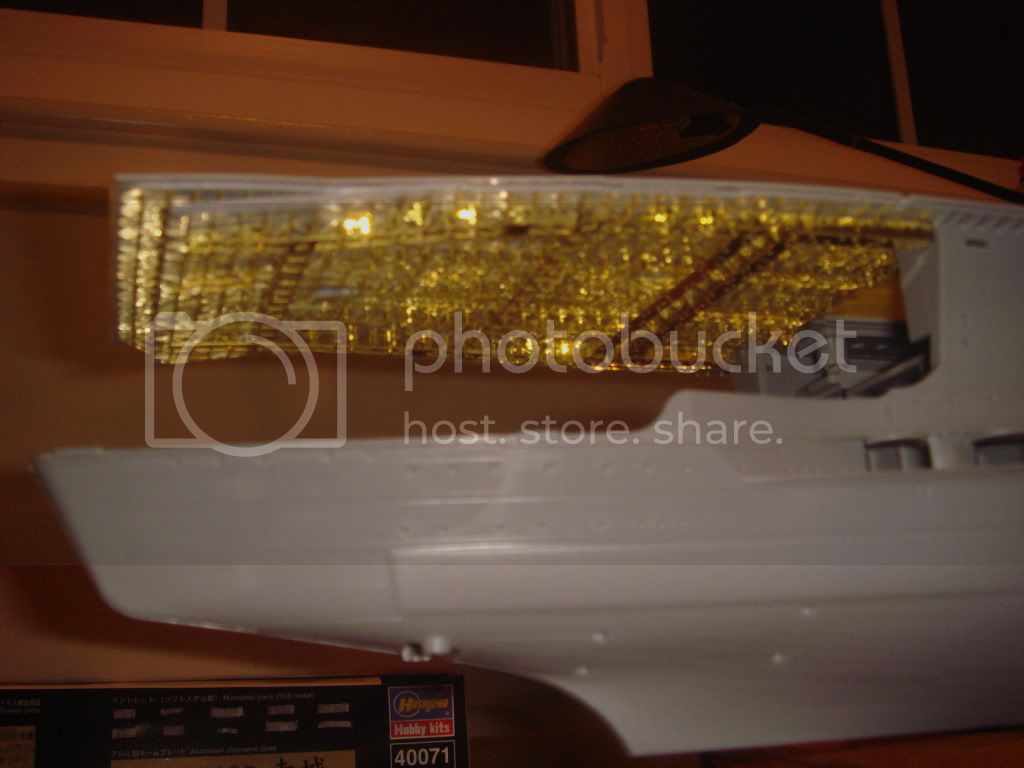
Small update.
The mid deck PE is done .
.
Its a very tight fit all around. The white circles show how close the PE fits to the hull. Be especially careful when aligning the starboard rear area as it will interfere with the fit onto the hull if the main PE rail is even slightly too far inboard.
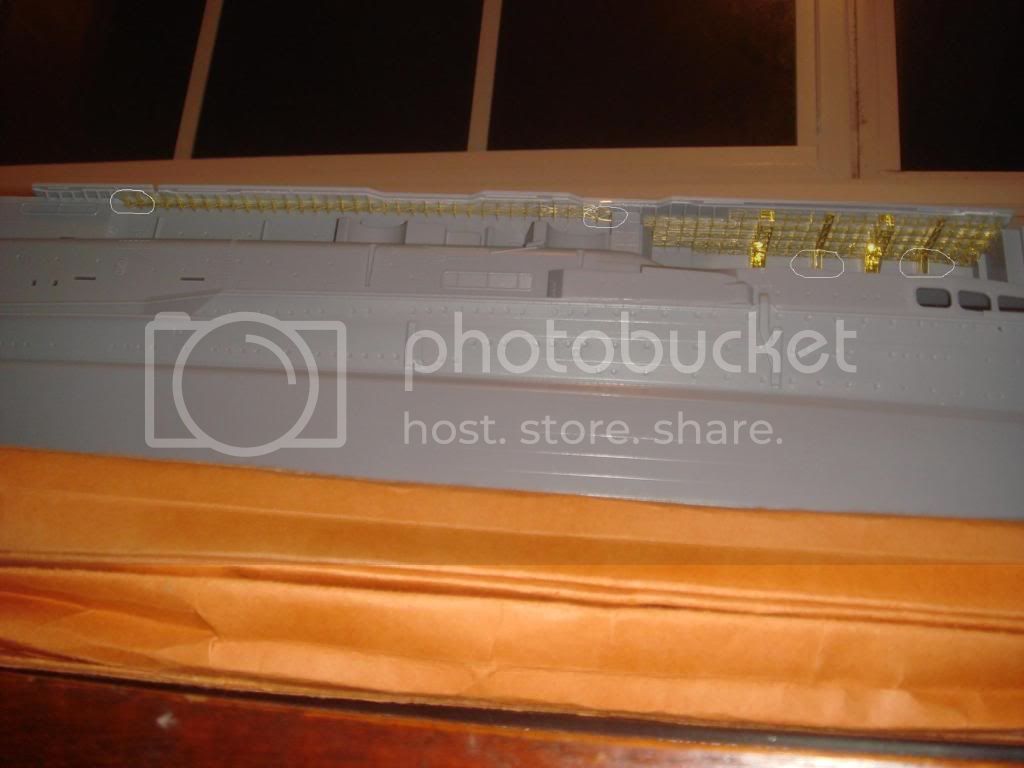
Another thing to remember is to cut out the plastic pieces right under the funnel hull area (white circles again). The built-up PE support girders replaces the plain plastic angle pieces and there is no mention in the PE instructions
Here is another angle of the completed mid deck
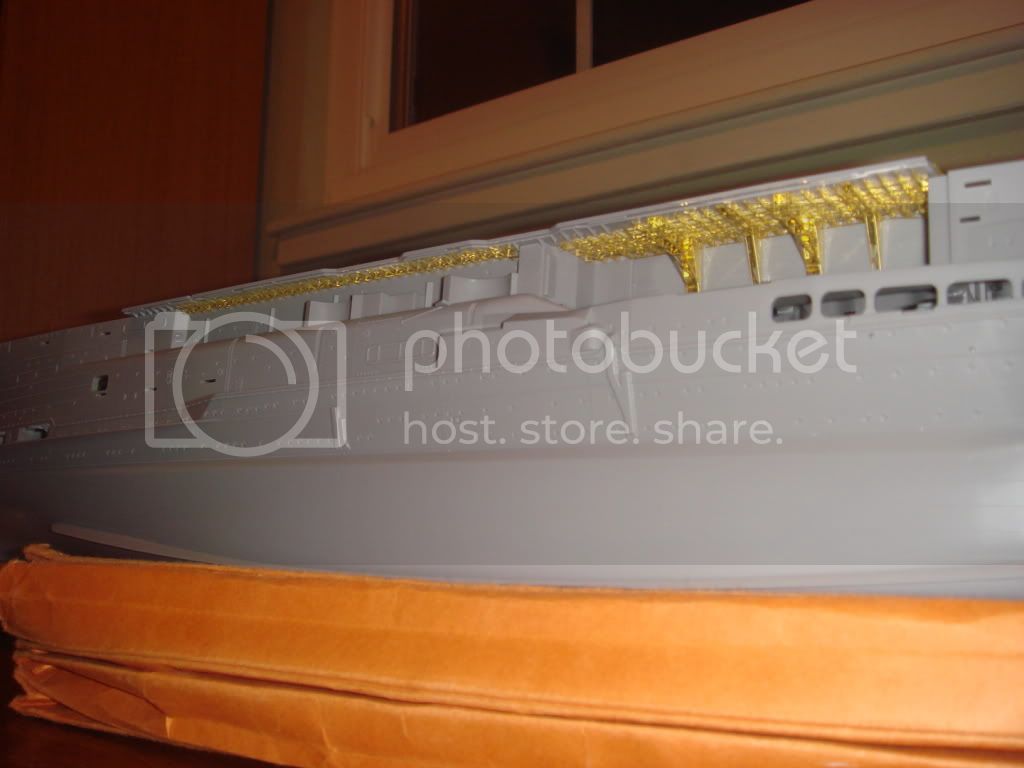
The mid deck PE is done
. Its a very tight fit all around. The white circles show how close the PE fits to the hull. Be especially careful when aligning the starboard rear area as it will interfere with the fit onto the hull if the main PE rail is even slightly too far inboard.
Another thing to remember is to cut out the plastic pieces right under the funnel hull area (white circles again). The built-up PE support girders replaces the plain plastic angle pieces and there is no mention in the PE instructions
Here is another angle of the completed mid deck
Rab
Joined: October 03, 2006
KitMaker: 353 posts
Model Shipwrights: 207 posts
Posted: Thursday, December 11, 2008 - 08:51 PM UTC
Dave,
I'm going about mine the other way round, hull first. Do you have a scanner? If so, could you scan the page of the kits instructions and mark what plastic supports have to be eliminated. I think I have a fair idea but it will make good info for other builders.
I'm going about mine the other way round, hull first. Do you have a scanner? If so, could you scan the page of the kits instructions and mark what plastic supports have to be eliminated. I think I have a fair idea but it will make good info for other builders.
Rab
Joined: October 03, 2006
KitMaker: 353 posts
Model Shipwrights: 207 posts
Posted: Thursday, December 11, 2008 - 08:58 PM UTC
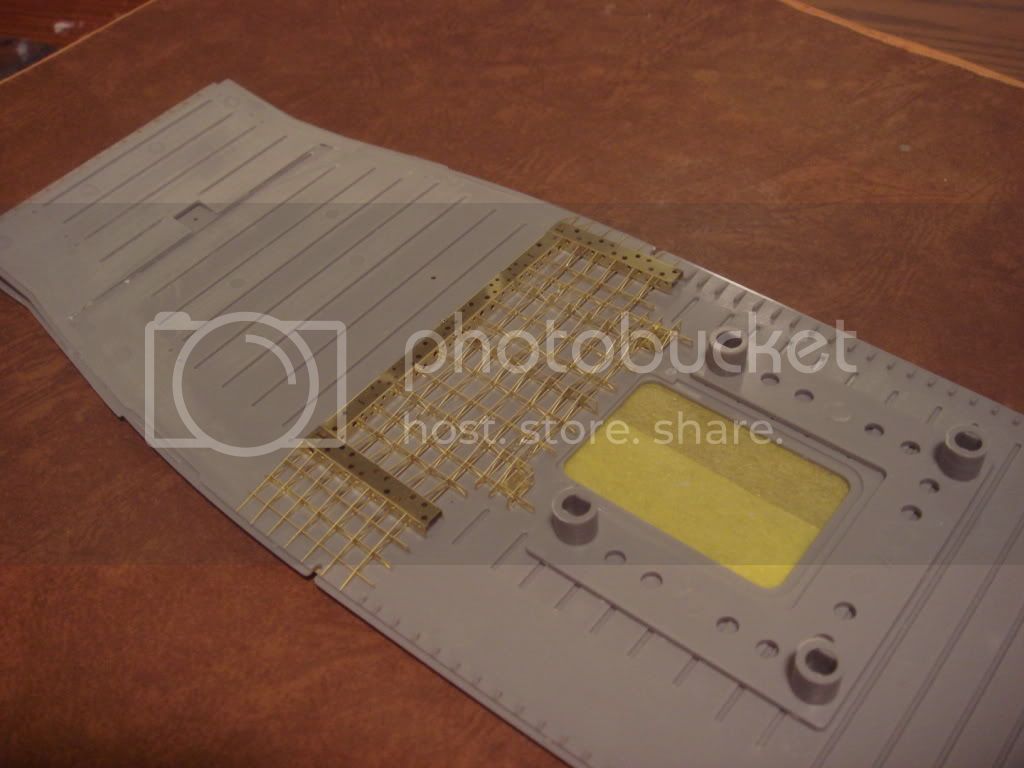
Are these the supports that you mean?

Clanky44
Joined: September 15, 2005
KitMaker: 1,901 posts
Model Shipwrights: 934 posts
Posted: Thursday, December 11, 2008 - 11:48 PM UTC
Great updates,
Kym,... do the hull braces sit above waterline, or did you have to cut the hull braces prior to cutting the hull?
Dave,... that mid deck looks very busy!, thanks for the heads up on the plastic/PE supports.
Frank
Kym,... do the hull braces sit above waterline, or did you have to cut the hull braces prior to cutting the hull?
Dave,... that mid deck looks very busy!, thanks for the heads up on the plastic/PE supports.
Frank

goldenpony

Joined: July 03, 2007
KitMaker: 3,529 posts
Model Shipwrights: 2,419 posts

Posted: Friday, December 12, 2008 - 12:25 AM UTC
Great work, both of you!


skipper

Joined: February 28, 2002
KitMaker: 5,182 posts
Model Shipwrights: 4,070 posts
Posted: Friday, December 12, 2008 - 12:26 AM UTC
Hi Dave,
It's looking good. I will follow your build with interest and curiosity
Keep up,
Rui
It's looking good. I will follow your build with interest and curiosity
Keep up,
Rui

Rab
Joined: October 03, 2006
KitMaker: 353 posts
Model Shipwrights: 207 posts
Posted: Friday, December 12, 2008 - 01:54 AM UTC
Frank,
so I don't hijack Dave's thread, here's a link to some photo's of my hull cut.
http://www.shipmodels.info/mws_forum/viewtopic.php?f=59&t=38433
so I don't hijack Dave's thread, here's a link to some photo's of my hull cut.
http://www.shipmodels.info/mws_forum/viewtopic.php?f=59&t=38433
Rab
Joined: October 03, 2006
KitMaker: 353 posts
Model Shipwrights: 207 posts
Posted: Friday, December 12, 2008 - 02:04 AM UTC
Dave,
I see now that they go directly behind the funnel. The problem is that 2 of those support braces/ spreaders for a bulkhead section that sits on top of the funnel. It also looks like that a lot of the detail in that area will not bee seen once the 'lid' goes on.

I see now that they go directly behind the funnel. The problem is that 2 of those support braces/ spreaders for a bulkhead section that sits on top of the funnel. It also looks like that a lot of the detail in that area will not bee seen once the 'lid' goes on.

treadhead1952
Joined: June 12, 2008
KitMaker: 552 posts
Model Shipwrights: 493 posts

Posted: Friday, December 12, 2008 - 02:59 AM UTC
Excellent work on a very close fitting assembly project. Looking forward to more as you go along.
snaga61
Joined: January 09, 2007
KitMaker: 82 posts
Model Shipwrights: 81 posts
Posted: Friday, December 12, 2008 - 05:49 AM UTC
Quoted Text
Dave,
I see now that they go directly behind the funnel. The problem is that 2 of those support braces/ spreaders for a bulkhead section that sits on top of the funnel. It also looks like that a lot of the detail in that area will not bee seen once the 'lid' goes on.
Its those molded-in plastic supports next to the one's that you've circled. The pieces that you've circled are replaced by deck PE, as the ones that needs to be cut out.
snaga61
Joined: January 09, 2007
KitMaker: 82 posts
Model Shipwrights: 81 posts
Posted: Friday, December 12, 2008 - 05:53 AM UTC
Thanks for the compliments, everyone.
Kym, don't worry about hijacking the thread. I like how this is going as you're providing the section that I'm not doing. Gives us both a chance to find the potential gotchas.
Kym, don't worry about hijacking the thread. I like how this is going as you're providing the section that I'm not doing. Gives us both a chance to find the potential gotchas.

Tojo72
Joined: June 06, 2006
KitMaker: 4,691 posts
Model Shipwrights: 258 posts

Posted: Friday, December 12, 2008 - 09:04 AM UTC
You guys are my heroe's...........this build log is going to be a classic,it should be a keepe,thanks for your efforts

ajkochev
Joined: June 25, 2008
KitMaker: 246 posts
Model Shipwrights: 221 posts

Posted: Friday, December 12, 2008 - 09:09 AM UTC
Awesome work from the both of you. I feel like a cheat though, I'm likely going to be using these builds as a refference to help build a 700 scale akagi eventually.
I'm bummed about the funnel tubes, when I seen a review of the kit peices and the five tubes that get piped into the large one I thought that was cool, a shame it is behind a partial wall, I never knew that is how it was piped until I saw this kit.
I'm bummed about the funnel tubes, when I seen a review of the kit peices and the five tubes that get piped into the large one I thought that was cool, a shame it is behind a partial wall, I never knew that is how it was piped until I saw this kit.
Clanky44
Joined: September 15, 2005
KitMaker: 1,901 posts
Model Shipwrights: 934 posts
Posted: Saturday, December 13, 2008 - 11:41 AM UTC
Your builds definitely compliment each other, well done!... and I too, will be using this fine tutorial when I start my Akagi.
thanks,
Frank
thanks,
Frank
snaga61
Joined: January 09, 2007
KitMaker: 82 posts
Model Shipwrights: 81 posts
Posted: Sunday, December 14, 2008 - 05:19 PM UTC
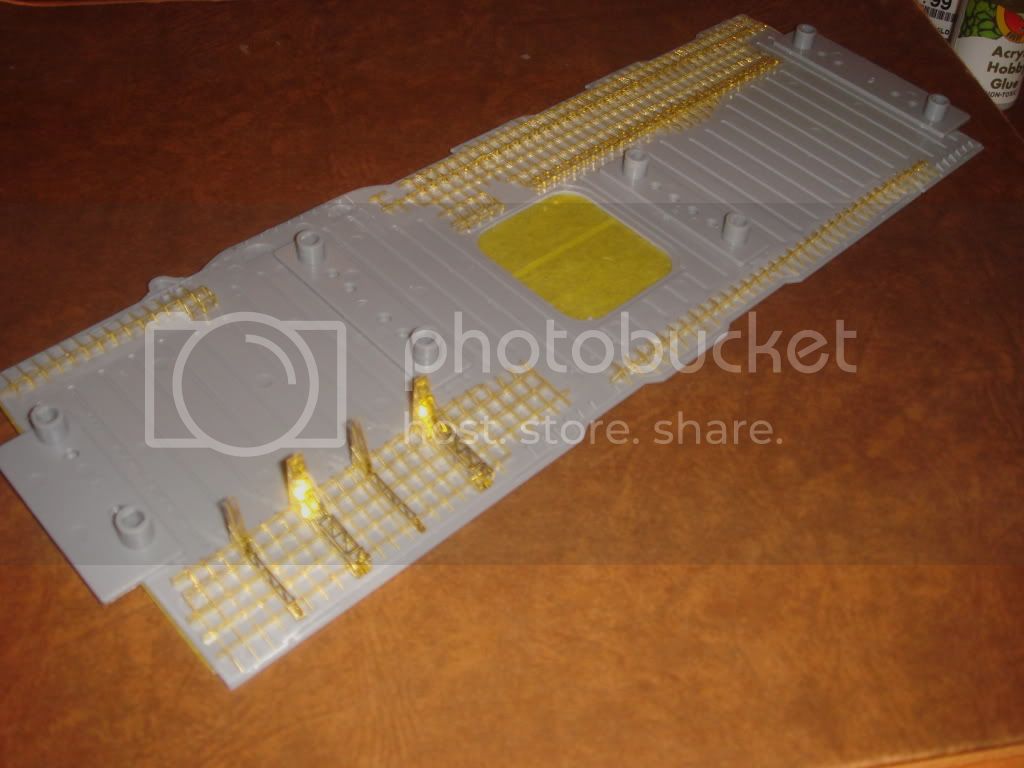
Rear deck completed.
Aside from an particularly nasty area near the end, things went pretty smoothly.
The rear deck are divided into two distinct areas.
The first section came together w/o any issues.
The second section is a big one. Here's what worked for me as a pre-built section before glueing onto the deck
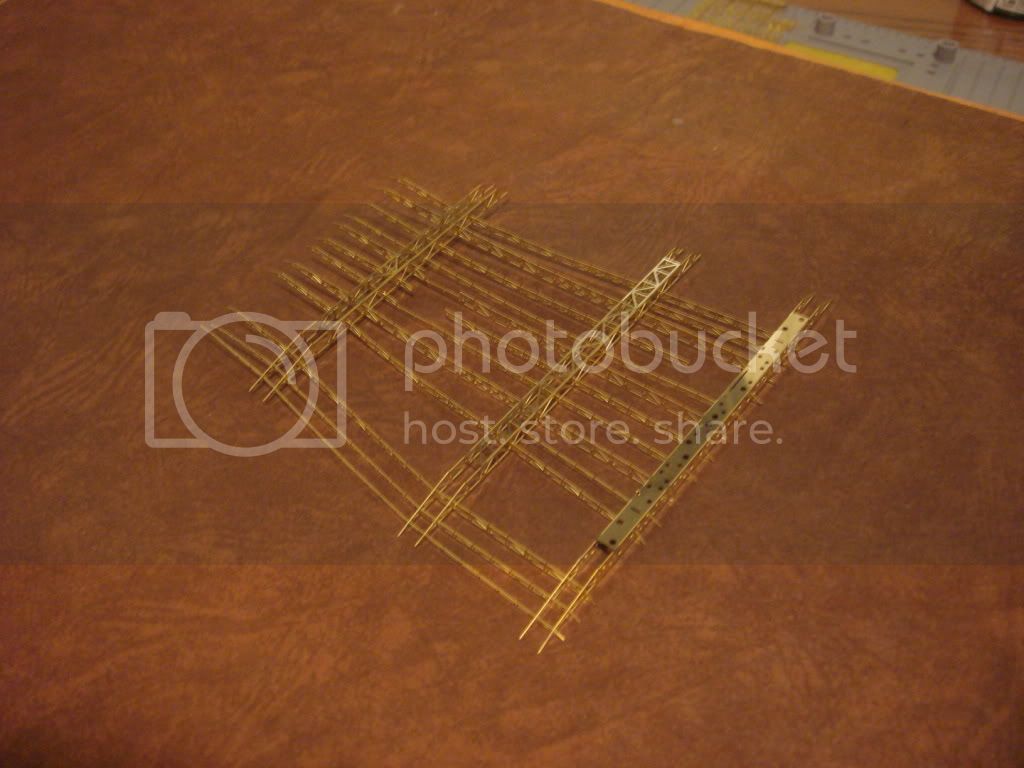
The key is to CA starting on the side with both top and bottom pieces already tacked. Leave the rest unglued while attaching the top inter-locking piece. Once a top piece has been put onto the bottom piece, you can CA the middle section of that specific piece but leave the ends unglued. This will leave some play at the end. You will need the ends to be flexible due to the final two longitudinal pieces at the end of the build for this grid section. See the instruction later for which pieces I'm talking about. This is especially important for this section as there are so many inter-locking pieces. WIthout the flexibility their will be a lot of bent and ruined PE.
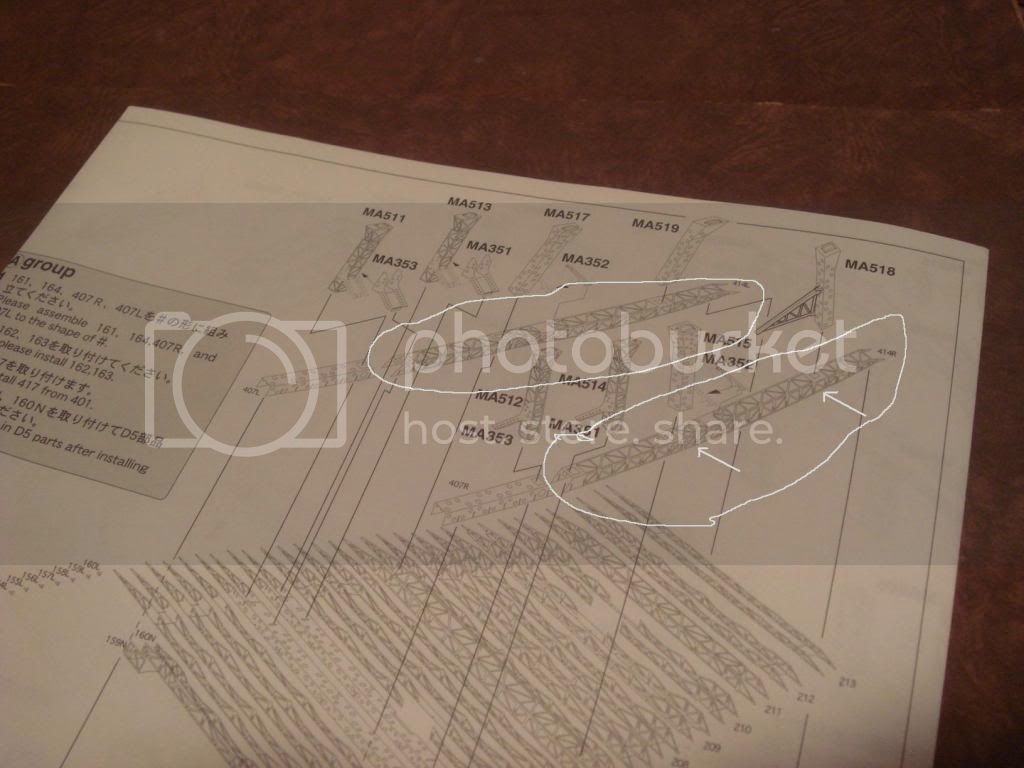
The circled pieces are the final two pieces in this section. Due to the curvature of the deck there is two different independent bends once the piece has been folded, shown by the two arrows. The problem is that the PE grid where these section go on is pretty tight and I had a hell of a time fitting them porperly. What I finally did was to cut the piece into three separate peices, at their natural bend intersection. Once separated I was able to file away small areas so it'll fit better. Also, as three separate pieces, they went onto their respective sections easier than if they were one single piece
Well, the rear is done. I'll leave the the support girders off under I'm ready to glue on the deck.

Aside from an particularly nasty area near the end, things went pretty smoothly.
The rear deck are divided into two distinct areas.
The first section came together w/o any issues.
The second section is a big one. Here's what worked for me as a pre-built section before glueing onto the deck
The key is to CA starting on the side with both top and bottom pieces already tacked. Leave the rest unglued while attaching the top inter-locking piece. Once a top piece has been put onto the bottom piece, you can CA the middle section of that specific piece but leave the ends unglued. This will leave some play at the end. You will need the ends to be flexible due to the final two longitudinal pieces at the end of the build for this grid section. See the instruction later for which pieces I'm talking about. This is especially important for this section as there are so many inter-locking pieces. WIthout the flexibility their will be a lot of bent and ruined PE.
The circled pieces are the final two pieces in this section. Due to the curvature of the deck there is two different independent bends once the piece has been folded, shown by the two arrows. The problem is that the PE grid where these section go on is pretty tight and I had a hell of a time fitting them porperly. What I finally did was to cut the piece into three separate peices, at their natural bend intersection. Once separated I was able to file away small areas so it'll fit better. Also, as three separate pieces, they went onto their respective sections easier than if they were one single piece
Well, the rear is done. I'll leave the the support girders off under I'm ready to glue on the deck.
 |

WEB HOSTING BY


Copyright ©2021 Model Shipwrights and Kitmaker Network, a subsidiary of Silver Star Enterprises
All Rights Reserved. Please read our Conditions of Use and Privacy Policy.
All Rights Reserved. Please read our Conditions of Use and Privacy Policy.