


Go to modelshipwrights.com for the current dynamic site!
Campaigns
Want to be part of a group build? This is where to start, plan, and meet about them.
Want to be part of a group build? This is where to start, plan, and meet about them.
Hosted by Jim Starkweather
"Camouflaged Ships" Thread

redalb2253

Joined: June 02, 2006
KitMaker: 235 posts
Model Shipwrights: 132 posts

Posted: Monday, June 29, 2009 - 01:01 PM UTC
I still don't know if I'll do full hull or not
redalb2253
Joined: June 02, 2006
KitMaker: 235 posts
Model Shipwrights: 132 posts
Posted: Monday, June 29, 2009 - 02:23 PM UTC
I also have to say that Jon at ironshipwrights has been unbelievable in helping me with this kit, he sent me all new parts for everthing from the hull up some of which didn't come with my kit and another set of Photo-etch for nothing, I have to say his devotion to our hobby is probably unmatched! Anyway I'm goint to start posting more pics of the build soon as soon as I figure out what I'm doing as this is my first resin model. 

gator
Vendor

#027
Joined: April 13, 2005
KitMaker: 5,422 posts
Model Shipwrights: 5,079 posts

Posted: Tuesday, June 30, 2009 - 06:24 AM UTC
Nice progress guys.


Kitakami

Joined: February 23, 2009
KitMaker: 30 posts
Model Shipwrights: 29 posts

Posted: Tuesday, June 30, 2009 - 12:47 PM UTC
My camera has hardly any charge left, so only two photos in this update. But I am slowly getting to know the materials I am working with.
First, I have glued the PE doors to most of the walls. The first ones I glued using CA glue, and, well... they are most definitely not square! But the ones I glued using Gator's glue are considerably straighter, and my level of frustration was much, much lower. Still need practice to get it right, but I am far happier with the result.

Next, two of the three main turrets. The photo is out of focus, but it does show traces of paint I tried to apply with a brush... and failed misserably at it. Leason learned: Model flex marine colors are great for the airbrush, but no good for the brush (except for touchups... with patience and several coats minor mistakes can be fixed).

Regarding the hull, no picture, but it is slowly coming along, with the antifouling red painted, as well as the black line above it. I will use Gator's mask to paint the cammo on the hull and will post a picture of it in the next update. Speaking of next update, next I plan to tackle gluing the deck to the hull, putty/sand/scribble to make the deck joints the best I can, paint the deck, and start work on the superstructure. I am going slow by necessity, as my RL workload has increased considerably, but boy am I enjoying this build
Until next time.
First, I have glued the PE doors to most of the walls. The first ones I glued using CA glue, and, well... they are most definitely not square!
But the ones I glued using Gator's glue are considerably straighter, and my level of frustration was much, much lower. Still need practice to get it right, but I am far happier with the result.Next, two of the three main turrets. The photo is out of focus, but it does show traces of paint I tried to apply with a brush... and failed misserably at it. Leason learned: Model flex marine colors are great for the airbrush, but no good for the brush (except for touchups... with patience and several coats minor mistakes can be fixed).
Regarding the hull, no picture, but it is slowly coming along, with the antifouling red painted, as well as the black line above it. I will use Gator's mask to paint the cammo on the hull and will post a picture of it in the next update. Speaking of next update, next I plan to tackle gluing the deck to the hull, putty/sand/scribble to make the deck joints the best I can, paint the deck, and start work on the superstructure. I am going slow by necessity, as my RL workload has increased considerably, but boy am I enjoying this build
Until next time.

MrMox

Joined: July 18, 2003
KitMaker: 3,377 posts
Model Shipwrights: 985 posts

Posted: Tuesday, June 30, 2009 - 07:21 PM UTC
Gator glue gives you a lot more time to align the parts, so I can only recommend it.
I am about to begin my build of the U 201 for the campain. Im not sure if I should begin a separate tread, as it might turn rather picture and text heavy ?
Heres the original:
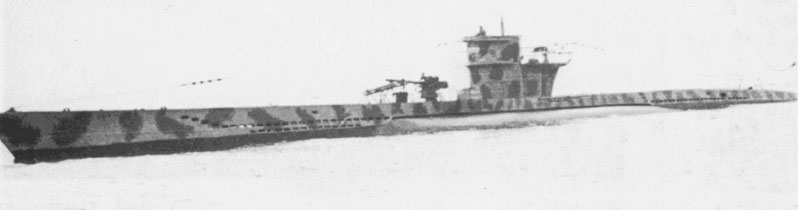
Theres a connection with my U 6 that I build some months ago ....
So far I mostly have been shopping and planning - I have the following updates that I plan to use:
Modelbrass, deck and stuff ...
AMP - vents and torpedohatches
CMK - turret and guns update
I plan on the usual updates, dealing with the inaccuracies of the hull, giving it the correct floodholes for the U 201, building a innerhull and try out some "oilcanning"
As you know, I have been experienting with a base, but I still cant make my mind up if its too much ... but it can wait until later.
Cheers/Jan
I am about to begin my build of the U 201 for the campain. Im not sure if I should begin a separate tread, as it might turn rather picture and text heavy ?
Heres the original:
Theres a connection with my U 6 that I build some months ago ....
So far I mostly have been shopping and planning - I have the following updates that I plan to use:
Modelbrass, deck and stuff ...
AMP - vents and torpedohatches
CMK - turret and guns update
I plan on the usual updates, dealing with the inaccuracies of the hull, giving it the correct floodholes for the U 201, building a innerhull and try out some "oilcanning"
As you know, I have been experienting with a base, but I still cant make my mind up if its too much ... but it can wait until later.
Cheers/Jan


muddyfields

Joined: February 04, 2006
KitMaker: 884 posts
Model Shipwrights: 135 posts

Posted: Sunday, July 05, 2009 - 09:00 AM UTC
Hi
Have finally started to build my kit.
Have managed to get the 2 funnels built & drilled out as they were solid ( look better open).
Also glued the Hull top to the flat water line bottom. That's all at the moment as other projects still on the go.
1 question with such a small ship 1/700 would you build & paint it with the turrets removed to allow painting of the 3 camo colours. I'm used to 1/35 scale armour.
Will add some pic's once there's something of interest to show.
Dave that's a pretty impressive Trio of ships that you have. Well done.
Shaun

goldenpony

Joined: July 03, 2007
KitMaker: 3,529 posts
Model Shipwrights: 2,419 posts

Posted: Monday, July 06, 2009 - 12:42 AM UTC
Shaun,
People do it both ways. I would lean toward more leaving them off so you can paint everything easier.

People do it both ways. I would lean toward more leaving them off so you can paint everything easier.
TheDiggs
Joined: April 25, 2008
KitMaker: 338 posts
Model Shipwrights: 160 posts

Posted: Tuesday, July 07, 2009 - 12:20 AM UTC
Quoted Text
Hi
1 question with such a small ship 1/700 would you build & paint it with the turrets removed to allow painting of the 3 camo colours.
I usually get things built into little modules, paint, and then assemble. I usually count a turret or a story of the superstructure as a module and I typically paint all modules separately before further assembling them or adding them to the hull.
gator
Vendor
#027
Joined: April 13, 2005
KitMaker: 5,422 posts
Model Shipwrights: 5,079 posts
Posted: Tuesday, July 07, 2009 - 04:25 AM UTC
Very nice progress guys.
muddyfields
Joined: February 04, 2006
KitMaker: 884 posts
Model Shipwrights: 135 posts
Posted: Thursday, July 30, 2009 - 04:51 AM UTC
Hi
Have managed to paint the ship in it's base colour am now masking it to try & paint the camo scheme.
Now I know why I dont build small things normally. driving me crazy trying to get the stripes to look straight.
Hope to post some pic's soon.
Shaun
Have managed to paint the ship in it's base colour am now masking it to try & paint the camo scheme.
Now I know why I dont build small things normally. driving me crazy trying to get the stripes to look straight.
Hope to post some pic's soon.
Shaun
Kitakami
Joined: February 23, 2009
KitMaker: 30 posts
Model Shipwrights: 29 posts
Posted: Thursday, July 30, 2009 - 11:34 AM UTC
Status report:
Have almost finished painting the cammo hull and the weather deck, but...
Arthritis hit my right eye (weird, I know, but sometimes it attacks soft tissues), which means I can't focus with it. Thus, for the last two weeks I have been unable to work on the North Carolina. Hopefully in a couple more weeks the swelling will have gone down and I will be able to resume the build and post some more pics.
Cheers!
TheDiggs
Joined: April 25, 2008
KitMaker: 338 posts
Model Shipwrights: 160 posts
Posted: Tuesday, August 04, 2009 - 12:30 PM UTC
Finally getting started after finishing a few campaigns over at armorama. So far Tamiya's USS Cushing looks very straight forward.

CaptSonghouse
Joined: August 08, 2008
KitMaker: 1,274 posts
Model Shipwrights: 1,236 posts

Posted: Saturday, August 08, 2009 - 08:48 AM UTC
My campaign entry: Trumpeter's Repulse, and it's SWEEEEEEEEEEEEEET!
--Karl

--Karl
CaptSonghouse
Joined: August 08, 2008
KitMaker: 1,274 posts
Model Shipwrights: 1,236 posts
Posted: Tuesday, August 11, 2009 - 12:42 PM UTC
More Repulse progress.
--Karl

--Karl
TheDiggs
Joined: April 25, 2008
KitMaker: 338 posts
Model Shipwrights: 160 posts
Posted: Tuesday, August 18, 2009 - 01:53 AM UTC
I have the hull to about where I am happy with it. I decided to try to make the turrets rotatable before I go any further.

I also found some Japanese planes just sitting there while I was digging through my spare parts to find something to experiment on so I decided to finish them up.
I also found some Japanese planes just sitting there while I was digging through my spare parts to find something to experiment on so I decided to finish them up.
TheDiggs
Joined: April 25, 2008
KitMaker: 338 posts
Model Shipwrights: 160 posts
Posted: Wednesday, August 19, 2009 - 06:47 PM UTC
Success it was just as easy as I thought it would be. A few holes and centimeters of platic rod was all it took.

TheDiggs
Joined: April 25, 2008
KitMaker: 338 posts
Model Shipwrights: 160 posts
Posted: Friday, August 21, 2009 - 11:45 AM UTC
All done, it can be hard to see in the picture but there are two shades of gray on her

goldenpony
Joined: July 03, 2007
KitMaker: 3,529 posts
Model Shipwrights: 2,419 posts
Posted: Tuesday, September 01, 2009 - 01:25 AM UTC
My build is slowly moving along. The IJN Mutsuki is my subject, the same one I reviewed a month or so ago. It is one be challange but I am enjoying it so far.
The instructions are not all that good to explain where the added PE parts go or how to add them. But, I am figuring it out. This is the first 1/700 I have done where I have replaced the bridge windows, that was fun.

I need to fix the hole in both sides of the funnel and that gash I put in it. I might get some railings added tonight, unless I get wrapped up in something else.
The instructions are not all that good to explain where the added PE parts go or how to add them. But, I am figuring it out. This is the first 1/700 I have done where I have replaced the bridge windows, that was fun.
I need to fix the hole in both sides of the funnel and that gash I put in it. I might get some railings added tonight, unless I get wrapped up in something else.
goldenpony
Joined: July 03, 2007
KitMaker: 3,529 posts
Model Shipwrights: 2,419 posts
Posted: Tuesday, September 08, 2009 - 01:31 AM UTC
I was doing some more work on the Mutsuki last night. While working on one of the 25mm dual mounts the carpet monster jumped up and ate it. Good thing they included 8 in the kit and you only need 2.
Folding those little guns is actually easier than one might think. I might be able to get some primer on the ship by the end of the week. Then I can maybe give the camo a try.
Hopefully pictures will follow later this week.
Folding those little guns is actually easier than one might think. I might be able to get some primer on the ship by the end of the week. Then I can maybe give the camo a try.
Hopefully pictures will follow later this week.

DMcGillavry

Joined: July 15, 2006
KitMaker: 104 posts
Model Shipwrights: 102 posts

Posted: Friday, September 25, 2009 - 02:39 AM UTC
Hi All,
I started my campaign build today.
Heianmaru with todays newspaper

Box top

Some LionRoar P.E. sets

Tools and materials going to be used

References, Maru Special and ModelArt 1/700 technqs. book lol...

Model Graphix Visual Guide of IJN Merchant Ships in WWII and ModelArt Ship Modeling Special No.27, Northern Pacific Operations.

and the parts ...

Regards,
Serhan
I started my campaign build today.
Heianmaru with todays newspaper
Box top
Some LionRoar P.E. sets
Tools and materials going to be used
References, Maru Special and ModelArt 1/700 technqs. book lol...
Model Graphix Visual Guide of IJN Merchant Ships in WWII and ModelArt Ship Modeling Special No.27, Northern Pacific Operations.
and the parts ...
Regards,
Serhan
tmccall
Joined: February 16, 2009
KitMaker: 43 posts
Model Shipwrights: 21 posts

Posted: Saturday, September 26, 2009 - 08:31 PM UTC
After finally getting settled in my new abode and after all my mail orders have finally caught up to me, I'm ready to begin my entry for the Camouflaged Ships Campaign. I will be building the USS O'BANNON, DD-450 in 1/350 scale using the Tamiya FLETCHER as a base, adding the Eduard PE and Corsair Armada 5"/38 gun mounts to correct a few of the deficiencies of the Tamiya kit. I'm still trying to track down a Quad 1.1 mount, as O'BANNON was one of the few FLETCHER's to actually sail into harm's way with this AA mount still in place. She will be painted in the Modified Measure 12 scheme in which she was commissioned in June 1942, but which was painted over prior to her departure for the Pacific theatre of operations in August of that year.
Upon arrival in the pacific, USS O'BANNON joined DesRon 21 and was one of the prominent units involved in the Solomon's Campaign and the struggle for Guadalcanal. O'BANNON was to earn a Presidential Unit Citation for her efforts in the Solomans and would go on to become one of the most decorated destroyers in the Pacific Theatre in WWII, earning 17 battle stars in her three years of almost continuous operations against the Japanese.
After wrestling with the photo upload process with no success for over an hour, I've given up and will try to sort it out in time to post pic's of the finished product.
gator
Vendor
#027
Joined: April 13, 2005
KitMaker: 5,422 posts
Model Shipwrights: 5,079 posts
Posted: Sunday, September 27, 2009 - 04:02 AM UTC
Nice work everyone!
DMcGillavry
Joined: July 15, 2006
KitMaker: 104 posts
Model Shipwrights: 102 posts
Posted: Thursday, October 01, 2009 - 04:53 AM UTC
Hi,
Portholes and windows are drilled out. Aztec stairs removed. According to Model Graphix Visual Guide of IJN Merchant Ships in WWII book, fwd.bridge window layout is totally wrong. But I am planning to keep fwd. bridge as it is, without drill. What you say about ?

Also same books says, aft gun deck is also totally wrong and needs to be replaced...
Portholes and windows are drilled out. Aztec stairs removed. According to Model Graphix Visual Guide of IJN Merchant Ships in WWII book, fwd.bridge window layout is totally wrong. But I am planning to keep fwd. bridge as it is, without drill. What you say about ?
Also same books says, aft gun deck is also totally wrong and needs to be replaced...

Skayden
Joined: March 03, 2009
KitMaker: 30 posts
Model Shipwrights: 28 posts
Posted: Sunday, October 04, 2009 - 12:32 PM UTC

My entry. Didn't have a paper handy so hopefully the post above serves as proof of date.
My first ship build in 20 years, a camo scheme that doesn't look easy, a kit that is recently out of production, and a photo etch set that might be hard to come by... I think I'm going to call this the "ill conceived, without a net" build. But what the heck, I'll give it a shot

Navy52
Joined: May 08, 2005
KitMaker: 26 posts
Model Shipwrights: 14 posts
Posted: Monday, October 05, 2009 - 02:07 AM UTC
My entry will be a 1/350 Tamiya HMS PRINCE OF WALES with Sea Master barrels and Gold Medal Model's KGV Photoetch set. I plan a waterline build on an oak base. Most of my research is done as I built a 1/700 POW kit 2 years ago. The model will be built for the configuration of the ship at time of loss on 10 December 41. Rich
 |

WEB HOSTING BY


Copyright ©2021 Model Shipwrights and Kitmaker Network, a subsidiary of Silver Star Enterprises
All Rights Reserved. Please read our Conditions of Use and Privacy Policy.
All Rights Reserved. Please read our Conditions of Use and Privacy Policy.