

Hi Todd,
I'm just getting caught up to your build. You're off to a great start. Some insight into the kit and actual deck. I borrowed this from Jeff Davidson's post on the PTBoats.org web site. Here's how the decks were planked...Boat Number / Construction / Dimensions
103-108
Mahogany planking, 2 layers laid fore and aft
Inner layer 5/16", outer layer 3/8"
109-196, 314-367, 372-383, 487-497, 546-563, 731-760
Mahogany planking, 2 layers laid fore and aft
Inner layer 3/8", outer layer 5/16"
486, 498-545, 565-624
Plywood
9/16"
The raised edge on the kit deck is a carry over from the earlier 596 kit. I pointed out the error to Italeri and they are going to try and correct it on future releases. But really it's an easy fix.
That said the plank lines on these boats are visible. From what I see less so with a good coat of paint but they become very visible with time and weathering caused by the harsh sun in the south pacific. The planks on the actual boat are 6" wide planks. I just measured the kit planks and they are just under 6" which is what you would expect for a milled plank.
I have a couple of thoughts if you prefer to keep the planking and correct the deck edge which should be brought down to the level of the rest of the deck.
1. Consider masking the the raised deck lines next to the raised deck edge to protect them. Then carefully sand down the raised edge to meet the height of the deck. You don't have to go that far.
2. If you want to make recessed deck lines consider following the existing decking with a scribing tool or needle in a vise. Don't get too carried away because these should be very subtle.
For me I think I'll follow these steps but not try and recess the deck lines. I think a few layers of paint lightly sanded between coats will get the effect I want.
But sanding smooth isn't a bad idea either. If you look at photos of these boats it's very hard to find any trace of the planking. It's going to come down to personal preference and referring to your reference photos.
Looking forward to watching her come together Todd.
Dave


Go to modelshipwrights.com for the current dynamic site!
General Ship Modeling
Discuss modeling techniques, experiences, and ship modeling in general.
Discuss modeling techniques, experiences, and ship modeling in general.
Hosted by Jim Starkweather
Builing Italeri's PT 109: The Last Night

Weebles

Joined: May 01, 2010
KitMaker: 93 posts
Model Shipwrights: 89 posts
Posted: Saturday, February 02, 2013 - 04:02 AM UTC

TRM5150
Joined: January 03, 2010
KitMaker: 2,159 posts
Model Shipwrights: 1,400 posts

Posted: Saturday, February 02, 2013 - 03:08 PM UTC
Dave,
I more than appreciate the effort of posting this information on the decks. Valuable stuff there! I think this will aid anyone following this build in obtaining a realist depiction of any boat they choose! Thanks a lot!!
I did however, choose to smooth out the deck completely. I did not mind the raised lines and even thought about recessing them again, but after looking at a number of pictures as well as what you mentioned here, smooth will suffice I think. The stern shot of the 109 on the Liberty Ship is a fairly clear pic and shows very little definition in the decking...I do have a couple ideas and tricks up my sleave I might be able to pull off....more on that much later in the build.
For now....
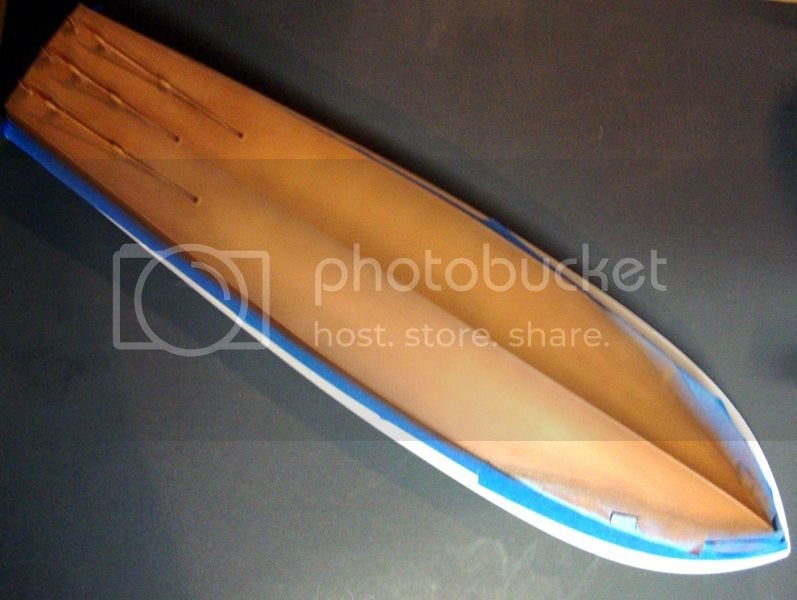
My meager update on this one. I finally cleaned the final parts for the hull as well as scratch building another support for the prop shaft...yeah, I lost it somewhere.
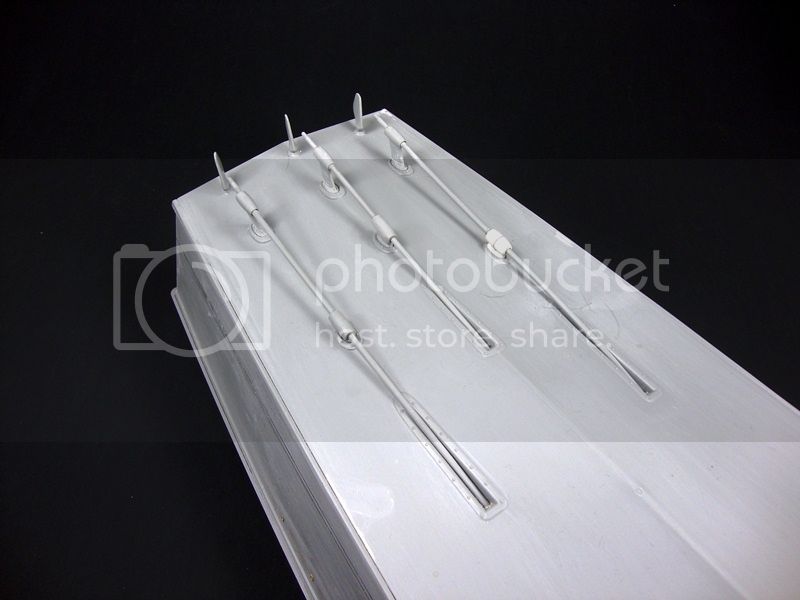
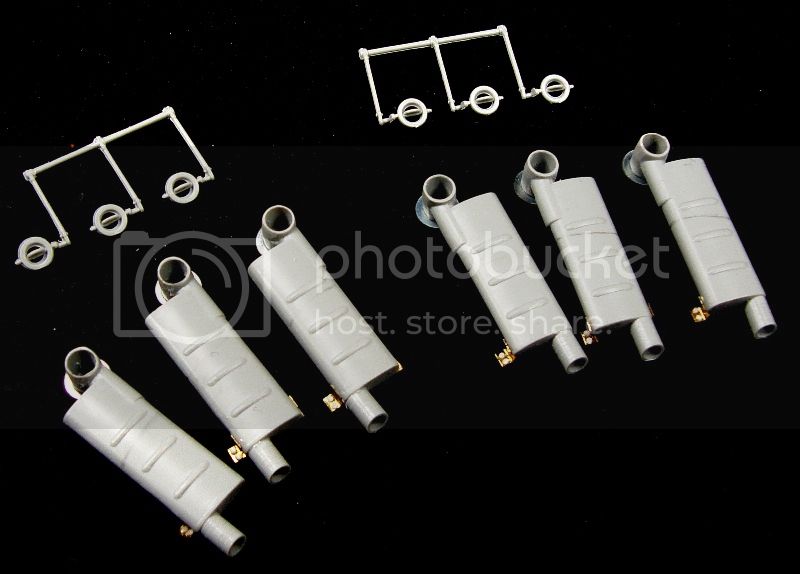
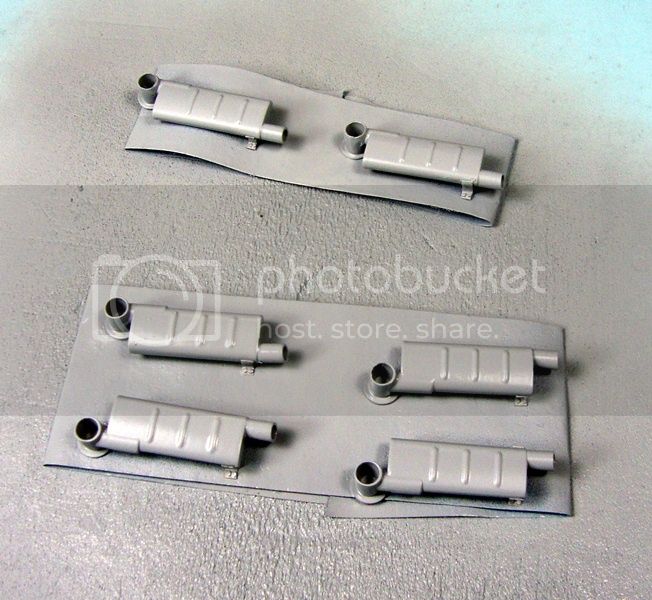
I managed to finish the mufflers too!
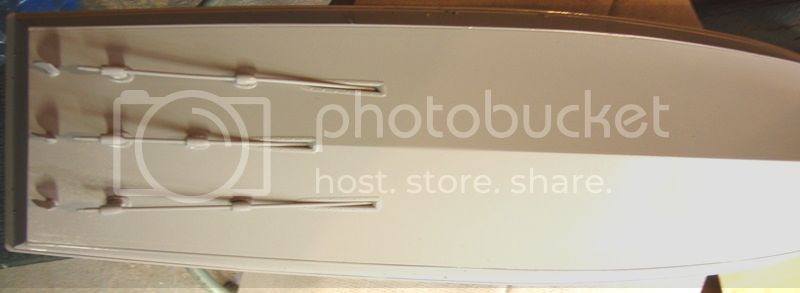
And last but not least, I sot some primer down. I have the paint on order and should be here hopefully this week. I will give the lower end a coat tomorrow I think.
I will take some time tonight to clean up some of the first deck pieces that need to be placed.
As always thanks for dropping in!!
I more than appreciate the effort of posting this information on the decks. Valuable stuff there! I think this will aid anyone following this build in obtaining a realist depiction of any boat they choose! Thanks a lot!!
I did however, choose to smooth out the deck completely. I did not mind the raised lines and even thought about recessing them again, but after looking at a number of pictures as well as what you mentioned here, smooth will suffice I think. The stern shot of the 109 on the Liberty Ship is a fairly clear pic and shows very little definition in the decking...I do have a couple ideas and tricks up my sleave I might be able to pull off....more on that much later in the build.
For now....
My meager update on this one. I finally cleaned the final parts for the hull as well as scratch building another support for the prop shaft...yeah, I lost it somewhere.
I managed to finish the mufflers too!
And last but not least, I sot some primer down. I have the paint on order and should be here hopefully this week. I will give the lower end a coat tomorrow I think.
I will take some time tonight to clean up some of the first deck pieces that need to be placed.
As always thanks for dropping in!!
Weebles
Joined: May 01, 2010
KitMaker: 93 posts
Model Shipwrights: 89 posts
Posted: Saturday, February 09, 2013 - 05:05 AM UTC
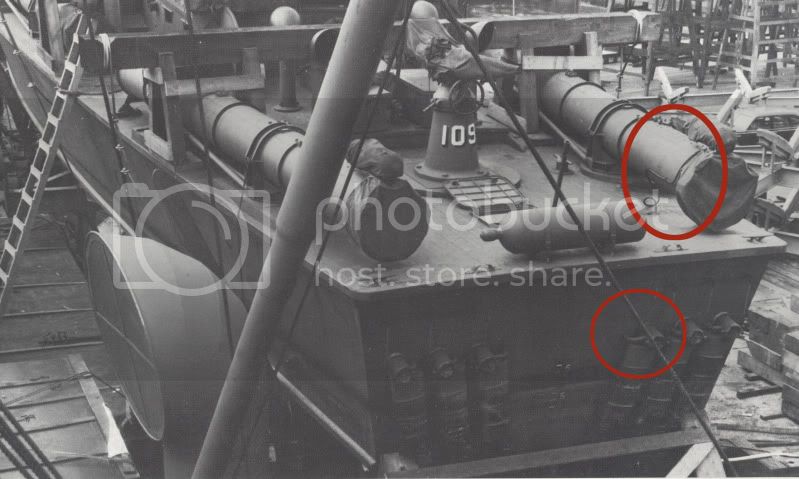
Good idea on using the washers Todd. You're correct about the flanges around the exhaust pipes. Same with the brackets. Another detail on the exhausts with the early 103 class Elco's are the small pipes that come out of the hull and into the side of the exhaust pipe. Notice they get a little further away from the exhaust the closer you get to the centerline.
Nice work Todd, keep it coming!
Dave
Nice work Todd, keep it coming!
Dave

AlanL

Joined: August 12, 2005
KitMaker: 14,499 posts
Model Shipwrights: 1,919 posts
Posted: Sunday, February 10, 2013 - 12:32 AM UTC
Hi Dave,
Nice progress and informative blog.
Cheers
Al
Nice progress and informative blog.
Cheers
Al
TRM5150
Joined: January 03, 2010
KitMaker: 2,159 posts
Model Shipwrights: 1,400 posts
Posted: Sunday, February 10, 2013 - 02:20 PM UTC
Thanks for the the heads up Dave...on the funky little tubes coming off the exhaust. I thought I seen these in the same pic but it was a lousy copy. I was able to enhance the image a bit from another one...
For discussion purposes only
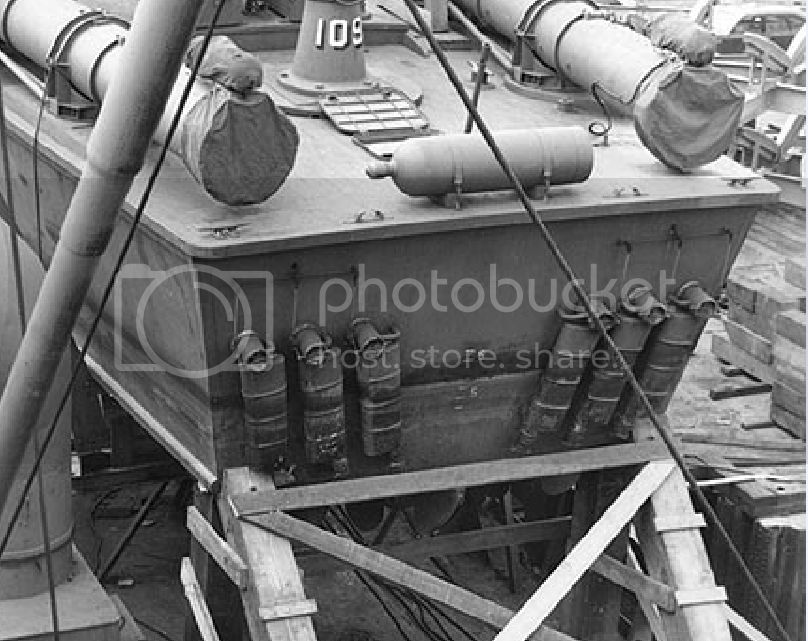
Not too sure on this but the inside tubes seem to be longer and the sets outside are shorter, but the same. Not a big deal. I can make something up to come close to what is here hopefully.
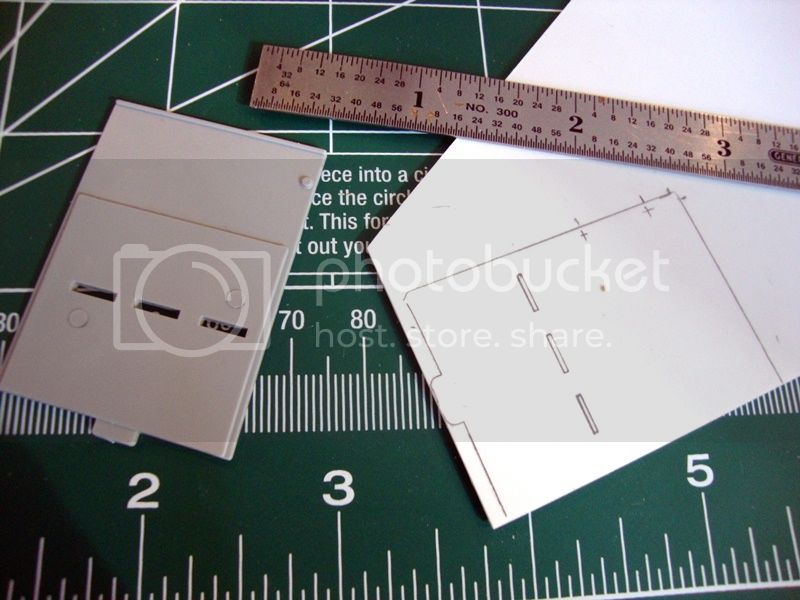
Worked a bit on her today! The Wheel house needed a little attention before I , especially the 109, had some armor plating to the left of the wheel. I cut a piece of 0.015" sheet stock to replicate what was on the 109.
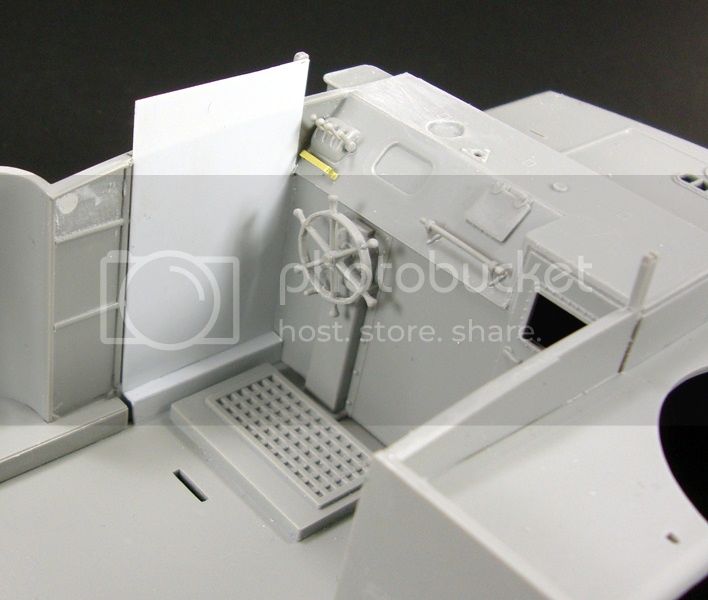
After slapping up the sheet I thought I was home free....then I noticed another small anomaly. The rear wall to the wheel section in the kit part is a little chunky and there were two pin marks I did not catch till now. In itself, not a big deal as you could just sand the pin marks down and continue on. I decided to scratch a new back plate to remove the thicker lower part.
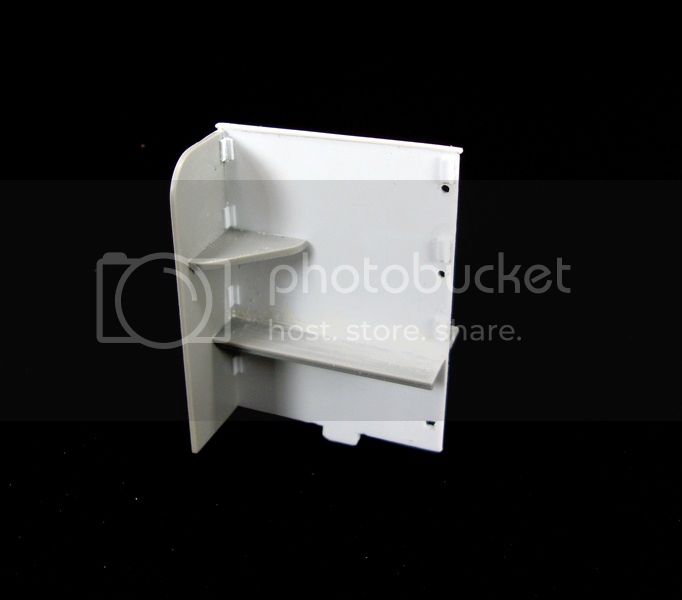
Old Part....
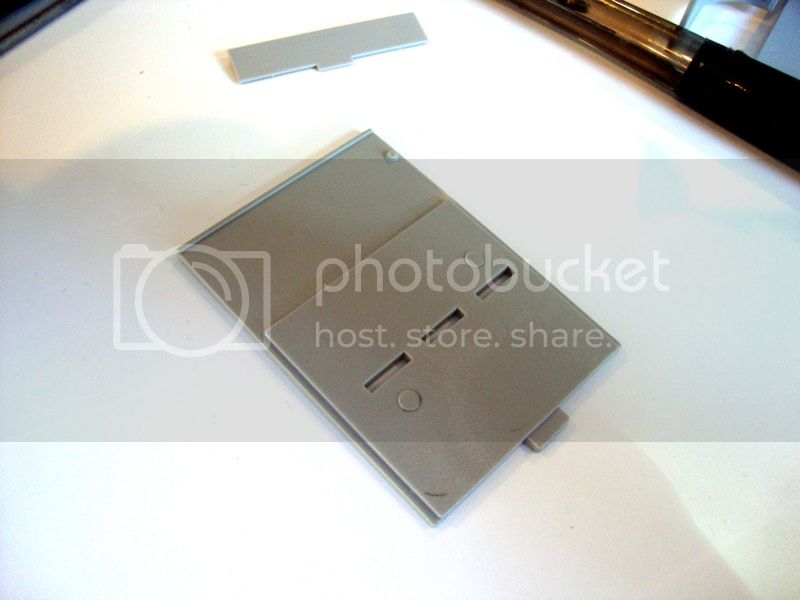
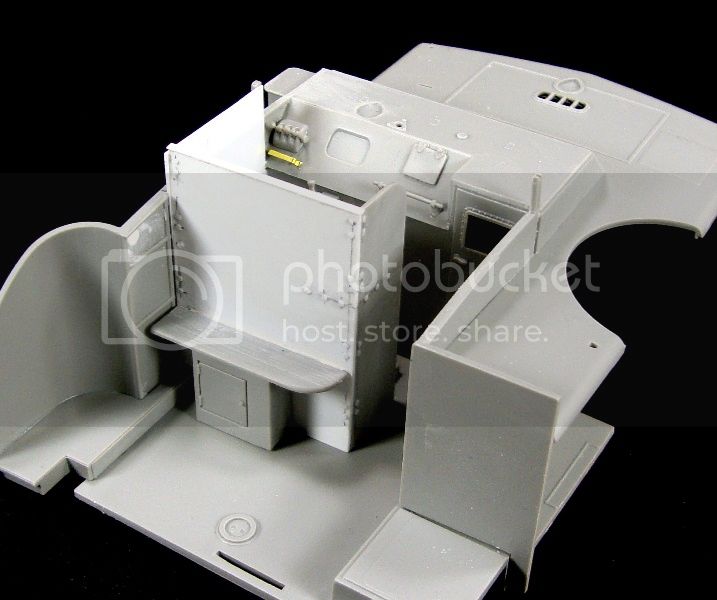
Making the new...
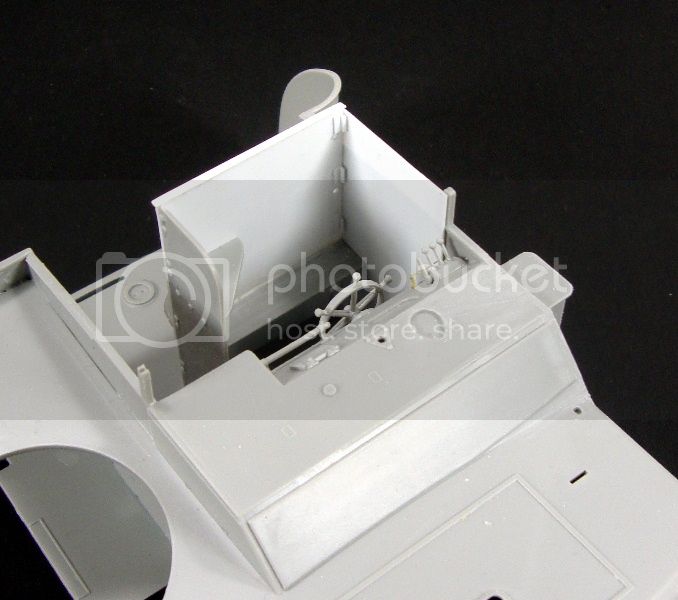
Not a very complex shape this took little time to replicate. I noticed some rivets on the small return section at the entrance, with a quick look at some picture online there are some small brackets that hold the whole thing together. The rivets are on the side plate, but were never on the rear plate. A couple of quick lines and voila.

In addition to playing around with the bridge, I was able to sit and fire up the AB and attack the lower hull.
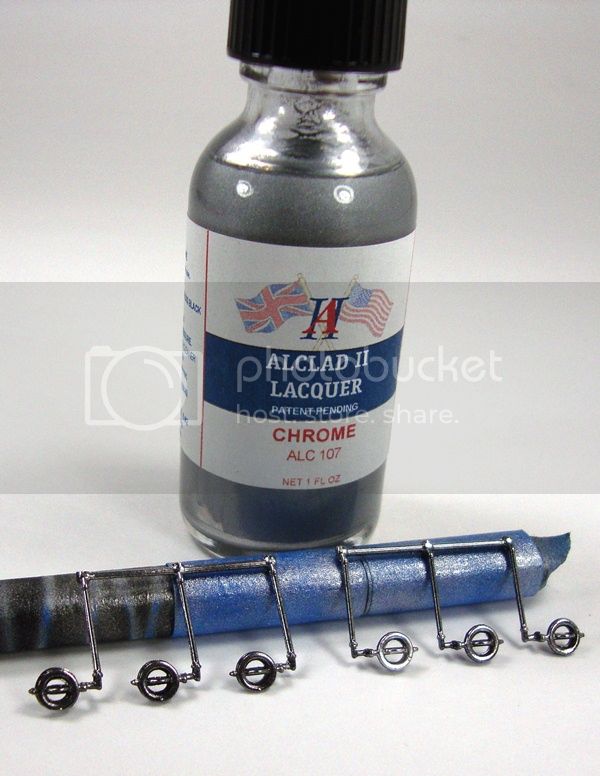
I also wanted to get a jump on the linkage and props since the AB was all warmed up! A little Alclad Chrome for the linkage. Not wanting them to be bright and shinny, I laid down one good coat. The black base shows ever so slightly and the chrome give the appearance of metal shine to them.
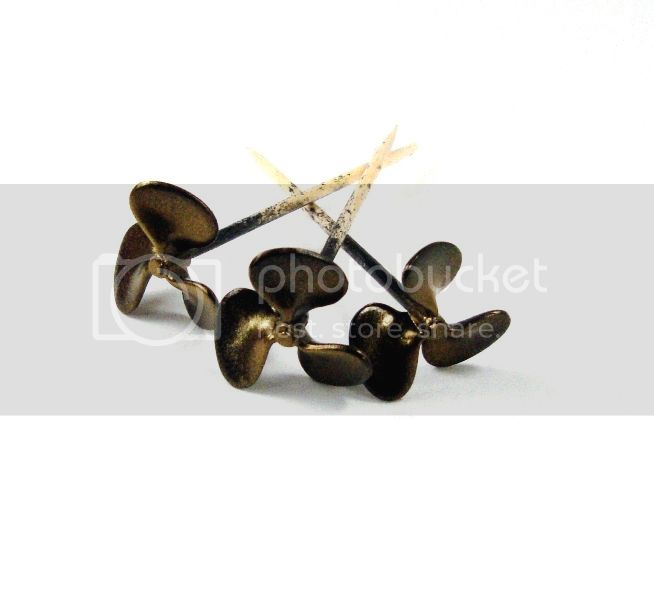
The props were pretty much the same except brass Alclad. Again with the black base it kept these with a slightly bronze appearance.
That's it for tonight. Back at her throughout the week.
Thanks for tuning in!!
For discussion purposes only
Not too sure on this but the inside tubes seem to be longer and the sets outside are shorter, but the same. Not a big deal. I can make something up to come close to what is here hopefully.
Worked a bit on her today! The Wheel house needed a little attention before I , especially the 109, had some armor plating to the left of the wheel. I cut a piece of 0.015" sheet stock to replicate what was on the 109.
After slapping up the sheet I thought I was home free....then I noticed another small anomaly. The rear wall to the wheel section in the kit part is a little chunky and there were two pin marks I did not catch till now. In itself, not a big deal as you could just sand the pin marks down and continue on. I decided to scratch a new back plate to remove the thicker lower part.
Old Part....
Making the new...
Not a very complex shape this took little time to replicate. I noticed some rivets on the small return section at the entrance, with a quick look at some picture online there are some small brackets that hold the whole thing together. The rivets are on the side plate, but were never on the rear plate. A couple of quick lines and voila.
In addition to playing around with the bridge, I was able to sit and fire up the AB and attack the lower hull.
I also wanted to get a jump on the linkage and props since the AB was all warmed up! A little Alclad Chrome for the linkage. Not wanting them to be bright and shinny, I laid down one good coat. The black base shows ever so slightly and the chrome give the appearance of metal shine to them.
The props were pretty much the same except brass Alclad. Again with the black base it kept these with a slightly bronze appearance.
That's it for tonight. Back at her throughout the week.
Thanks for tuning in!!

TGarthConnelly
Joined: August 03, 2008
KitMaker: 875 posts
Model Shipwrights: 872 posts

Posted: Monday, February 11, 2013 - 04:45 AM UTC
Nice job Todd ....................
TRM5150
Joined: January 03, 2010
KitMaker: 2,159 posts
Model Shipwrights: 1,400 posts
Posted: Monday, February 11, 2013 - 07:33 AM UTC
Thank you Garth!!! 
StuartHurley

Joined: July 22, 2009
KitMaker: 16 posts
Model Shipwrights: 1 posts

Posted: Monday, February 11, 2013 - 10:27 PM UTC
Hi Todd,
I am at the same point as you with my build. What are your thoughts on the length of the small step/seat above the aldis light locker? Should it go all the way across the armour plate or stop short of the edge? (as in the drawings on PT 103)
Thanks,
Stu
I am at the same point as you with my build. What are your thoughts on the length of the small step/seat above the aldis light locker? Should it go all the way across the armour plate or stop short of the edge? (as in the drawings on PT 103)
Thanks,
Stu
TRM5150
Joined: January 03, 2010
KitMaker: 2,159 posts
Model Shipwrights: 1,400 posts
Posted: Tuesday, February 12, 2013 - 07:56 AM UTC
Hi Stu!! I did see the seat on the drawing and see what you mean....TBH, I think either way woulf be fine. From a hyper detailing point then you could stick close to the drawing but it seems to me, and from what was mentioned earlier, there were so many field modifications by the individual crews I think either would work without an issue. 

Gremlin56
Joined: October 30, 2005
KitMaker: 3,897 posts
Model Shipwrights: 3,301 posts
KitMaker: 3,897 posts
Model Shipwrights: 3,301 posts

Posted: Tuesday, February 12, 2013 - 08:02 AM UTC
Looking fantastic Todd,
very impressive,
cheers,
Julian
very impressive,
cheers,
Julian
TRM5150
Joined: January 03, 2010
KitMaker: 2,159 posts
Model Shipwrights: 1,400 posts
Posted: Tuesday, February 12, 2013 - 03:20 PM UTC
Thank you very much Julian!! Nice relaxing build so far. I was tempted to pick that 1/2oo Bismaarck up!! LOL! Think the size through me! Did grab a 1/350 Arizona (all-time favorite) Should arrive in a week or two I hope!! 
StuHurley
Joined: December 21, 2009
KitMaker: 26 posts
Model Shipwrights: 24 posts
Posted: Tuesday, February 12, 2013 - 10:54 PM UTC
Todd,
I agree. I have since found an overhead photo of 103 and 105 in the series of shots of the PTs being shipped overseas. This shows the seats, which appear to be correct as in the kit. Incidentally, in the same shot the hatch on the roof of the day cabin is open on both boats. This is hinged on the port side, and not aft as shown in the kit. Also the hatch cover does not appear to be the cast aluminium type and has square corners. Perhaps the kit item is a legacy of the 596 version.
Regards,
Stu
TRM5150
Joined: January 03, 2010
KitMaker: 2,159 posts
Model Shipwrights: 1,400 posts
Posted: Wednesday, February 13, 2013 - 02:44 AM UTC
Hi Stu,
Good catch in those pictures. Like in the "shipping photos that have the 109, 108 & 107 show many things typical on the boats at that time, but many things were "adjusted" by htheir crews once they settled into their new home in the Pacific. I will take a peek at the hatch when I get home, most likely a through back like you mentioned. Would have to expect a couple of items.
Good catch in those pictures. Like in the "shipping photos that have the 109, 108 & 107 show many things typical on the boats at that time, but many things were "adjusted" by htheir crews once they settled into their new home in the Pacific. I will take a peek at the hatch when I get home, most likely a through back like you mentioned. Would have to expect a couple of items.
Weebles
Joined: May 01, 2010
KitMaker: 93 posts
Model Shipwrights: 89 posts
Posted: Wednesday, February 13, 2013 - 02:52 PM UTC
Nice work with the Armor Todd! Very well executed.
Dave
Dave
TRM5150
Joined: January 03, 2010
KitMaker: 2,159 posts
Model Shipwrights: 1,400 posts
Posted: Thursday, February 14, 2013 - 04:41 AM UTC
Thnaks Dave!! Appreciate it! Hoping to get back up to speed on this in the next day or so!!
TGarthConnelly
Joined: August 03, 2008
KitMaker: 875 posts
Model Shipwrights: 872 posts
Posted: Sunday, February 24, 2013 - 10:37 AM UTC
Todd,
Email me, OK?
Email me, OK?
TRM5150
Joined: January 03, 2010
KitMaker: 2,159 posts
Model Shipwrights: 1,400 posts
Posted: Sunday, February 24, 2013 - 03:07 PM UTC
On it's way Garth!
Status update, since I am in here...I finally broke through the pile of work one the house and at the bench. Did some organizing on the parts and will be moving forward this week!!
Status update, since I am in here...I finally broke through the pile of work one the house and at the bench. Did some organizing on the parts and will be moving forward this week!!

Robbd01

#323
Joined: February 13, 2013
KitMaker: 791 posts
Model Shipwrights: 59 posts

Posted: Wednesday, February 27, 2013 - 10:36 AM UTC
I am holding off getting my kit for now. Think I will follow this post through the whole build process. It seems I would have overlooked many details related to the 109. Over the past 40 years I think I have built every kit there was on the 109 (except this current one). Went out and picked up Squadron/Signals PT Boats in Action to start. Cheers  .
.
.
TRM5150
Joined: January 03, 2010
KitMaker: 2,159 posts
Model Shipwrights: 1,400 posts
Posted: Wednesday, February 27, 2013 - 03:09 PM UTC
Hi Robb,
Thanks for coming along for the ride!! I will try not to make too long of a trip for you. As is the kit is beautiful but some minor tweaking add to the build and the overall look I think! The book is a great addition! Information and some great photo reference!
Thanks for coming along for the ride!! I will try not to make too long of a trip for you. As is the kit is beautiful but some minor tweaking add to the build and the overall look I think! The book is a great addition! Information and some great photo reference!
Robbd01
#323
Joined: February 13, 2013
KitMaker: 791 posts
Model Shipwrights: 59 posts
Posted: Monday, March 04, 2013 - 10:52 AM UTC
I was trolling(the fishing term not the internet pest term) for more info on building this kit and I came across a review on the Cybermodelers site:
http://www.cybermodeler.com/hobby/kits/it/kit_it_5613.shtml
In it there is a reference of an accidental firing of a torpedo that did some damage to the boat and was never repaired. Here is a snippet from the review:
This is the first I ever heard of this. Have any of you PT boat gurus heard of this?
http://www.cybermodeler.com/hobby/kits/it/kit_it_5613.shtml
In it there is a reference of an accidental firing of a torpedo that did some damage to the boat and was never repaired. Here is a snippet from the review:
Quoted Text
In the case of PT-109 before Lt(jg) John Kennedy took command, there was an accidental launch of the foreword starboard torpedo tube while in the stowed position and the departing torpedo took out the starboard depth charge rack and a section of the foot railing on its way overboard. The missing rack wasn't replaced by the time Kennedy came aboard. Like the other skippers in the field, Kennedy's crew'requisitioned' whatever heavy armament they could find and in Kennedy's case, an Army 37mm anti-tank gun. The crew lashed the gun to the foredeck atop some wood planking to reinforce the deck. This modification took place the day before PT-109 was rammed by the IJN Destroyer Amagiri. The rest, as they say, is history.
What you see here is the very first accurate representation of PT-109 in kit form. Almost. Italeri provides the port and starboard depth charge racks as well as the 37mm gun. If you're doing PT-109 before Kennedy took command, you use both depth charge racks. If you're doing PT-109 just after he took command, you leave off the starboard rack and some part of the foot railing that would have been shredded as the torpedo and rack made their way off the boat. If you're doing the PT-109 as it appeared on the day of its loss, then the rack still remains off but the gun is definitely lashed to the deck. Italeri provides you with some options here.
This is the first I ever heard of this. Have any of you PT boat gurus heard of this?
StuHurley
Joined: December 21, 2009
KitMaker: 26 posts
Model Shipwrights: 24 posts
Posted: Monday, March 04, 2013 - 10:17 PM UTC
Robb,
Yes, this is well known although some accounts vary as to which side of the boat this occurred on. There is an account IIRC of one of Kennedys' fellow officers from another boat (a 77') trying out the 109 and throwing her into a series of tight turns. When he hit some rough wake, he caused the stowed port side torpedo to be jarred forward into the Depth charge which pushed the entire assembly down through the deck planking.
Kennedy's torpedoman jammed some rags into the torpedo fusing mechanism to prevent it arming.There is no photographic record of whether the rack was replaced or what repairs were made. the photo on the cover of Dr. Ballards book shows the 109 with her starboard depth charge in place.
Tha port side unit cannot be seen. Strangely, the positioning of the charge shows it well aft of the position depicted in the kit. From the angle,it seems to have been moved inboard (a common practice) although they must have been where Italeri place them at some time, for one to have been hit by the torpedo at all. The bottom line is we don't know.
Hope this helps
Regards,
Stu
TGarthConnelly
Joined: August 03, 2008
KitMaker: 875 posts
Model Shipwrights: 872 posts
Posted: Tuesday, March 05, 2013 - 01:41 AM UTC
It wasn't the torpedoman who did that, but ENS. Thom.
StuHurley
Joined: December 21, 2009
KitMaker: 26 posts
Model Shipwrights: 24 posts
Posted: Tuesday, March 05, 2013 - 03:16 AM UTC
Thanks Garth,
I have since found the article again, you are correct.
Best regards,
Stu
I have since found the article again, you are correct.
Best regards,
Stu
TGarthConnelly
Joined: August 03, 2008
KitMaker: 875 posts
Model Shipwrights: 872 posts
Posted: Tuesday, March 05, 2013 - 05:57 AM UTC
Thanks Stu.............
I've got to comment ...
My new book on the Revell PT kits (now available on AMAZON) addresses the 109's depth charges ...
I can't talk to the point of whether or not that after the torpedo smashing (and another "historian" cannot comprehend how a torpedo can make a depth charge smash through the deck) the depth charge through the deck, if the other one was removed or if the one which smashed through the deck was put back ...........
But, logic dictates that the other one would have been removed or this one put back because having over 300 pounds just on one side would adversely affect the handling of the boat.
My "guess"?
After this, to save time? Both depth charges were removed ... but, that's my OPINION ....
Robbd01
#323
Joined: February 13, 2013
KitMaker: 791 posts
Model Shipwrights: 59 posts
Posted: Tuesday, March 05, 2013 - 11:06 AM UTC
Mr. Connelly, I think I will wait for your 'Building the Italeri PT-109' book  If I see depth charges on it, I will do the same. If I don't, I won't...
Besides, in my mind and considering where these boats patrolled and what they are made out of, I am not sure I would be wanting to drop charges at all
If I see depth charges on it, I will do the same. If I don't, I won't...Besides, in my mind and considering where these boats patrolled and what they are made out of, I am not sure I would be wanting to drop charges at all
 |

WEB HOSTING BY


Copyright ©2021 Model Shipwrights and Kitmaker Network, a subsidiary of Silver Star Enterprises
All Rights Reserved. Please read our Conditions of Use and Privacy Policy.
All Rights Reserved. Please read our Conditions of Use and Privacy Policy.