Builing Italeri's PT 109: The Last Night
United Kingdom
Joined: December 21, 2009
KitMaker: 26 posts
Model Shipwrights: 24 posts
Posted: Thursday, March 07, 2013 - 10:18 PM UTC
[im
g]http://put.url.here/image.file[/img]
Just making some mods to the tubes and walking through any little changes that need to be done for my taste.
S
Massachusetts, United States
Joined: January 03, 2010
KitMaker: 2,159 posts
Model Shipwrights: 1,400 posts
Posted: Friday, March 08, 2013 - 09:49 AM UTC
Looking great Stu! Getting close to putting down some color!!

Connecticut, United States
Joined: August 03, 2008
KitMaker: 875 posts
Model Shipwrights: 872 posts
Posted: Friday, March 08, 2013 - 11:20 AM UTC
I echo Todd's sentiments Stu.
United Kingdom
Joined: December 21, 2009
KitMaker: 26 posts
Model Shipwrights: 24 posts
Posted: Saturday, March 09, 2013 - 06:27 AM UTC
Thanks,
I think it will be a while yet. None of the superstructure is permanently fixed. I am trying to work out a strategy for painting so I dont have to mask all the windows. Maybe paint the top half of the cabins and fix the windows in, then glue everything down and clean up, then paint in the lower edges and the deck/hull. I have fixed in a lot of strengthening under the deck as I keep popping the deck to hull seam whilst handling the model.I have a lot of sub-assemlies finished so they can all go on quite quickly. I am super-detailing the tubes at the moment as they are a focal point.
S
Massachusetts, United States
Joined: January 03, 2010
KitMaker: 2,159 posts
Model Shipwrights: 1,400 posts
Posted: Saturday, March 09, 2013 - 11:23 AM UTC
Certainly those details you are adding will make this pop when you are done. I thought about the windows too...tough call, I am thinking better to paint and then add, like in car modeling. I use Krystal Klear which is pretty much a standard PVA glue...Elmer's. I think it dries a lot clearer...if you accidentally get it on anything.
Keep at it!

I can see the end of the tunnel, in regards to non-related 109 model work so I am itching to get back on this one!!

New York, United States
Joined: January 21, 2008
KitMaker: 2,531 posts
Model Shipwrights: 1,244 posts
Posted: Sunday, March 10, 2013 - 08:11 AM UTC
When I did my boat, I painted the cabins first then added the clear parts from the inside. I didn't use the clear parts for the deck lights. I just glued the PE frames in place, painted the deck, then used Testor's "Clear Parts Cement & Window Maker", which is the same as Micro's Crystal Clear.
Al
United States
Joined: March 06, 2013
KitMaker: 33 posts
Model Shipwrights: 28 posts
Posted: Sunday, March 10, 2013 - 03:10 PM UTC
Great build Stuart! Following with interest!
United Kingdom
Joined: December 21, 2009
KitMaker: 26 posts
Model Shipwrights: 24 posts
Posted: Sunday, March 10, 2013 - 08:07 PM UTC
Thanks,
Just keeping the thread warm until Todd gets back.
S
United Kingdom
Joined: December 21, 2009
KitMaker: 26 posts
Model Shipwrights: 24 posts
Posted: Sunday, March 10, 2013 - 08:14 PM UTC
Hi, Al,
I shall probably do the same as you did with the cabins, then fit the decklights last.
S
United States
Joined: April 08, 2008
KitMaker: 2 posts
Model Shipwrights: 2 posts
Posted: Monday, March 11, 2013 - 02:38 AM UTC
I would consider them to be PTs, just like the USN did.
Connecticut, United States
Joined: August 03, 2008
KitMaker: 875 posts
Model Shipwrights: 872 posts
Posted: Monday, March 11, 2013 - 04:42 AM UTC
Will,
Hi. Thanks, but I've moved on from that question ...
Again, the question was just asked "for fun" ... to start a nice, fun discussion - for the sake of discussion ...
But, never mind .... I've been sufficiently admonished for just asking it.
Garth
United States
Joined: April 08, 2008
KitMaker: 2 posts
Model Shipwrights: 2 posts
Posted: Monday, March 11, 2013 - 08:29 AM UTC
TG
Never know unless you ask. . .
Massachusetts, United States
Joined: January 03, 2010
KitMaker: 2,159 posts
Model Shipwrights: 1,400 posts
Posted: Wednesday, March 13, 2013 - 02:18 PM UTC
Quoted Text
Thanks,
Just keeping the thread warm until Todd gets back.
S
LOL...Thanks Stuart! I am hoping to get to the bench and getting organized on this one again. Too many "other" side project creep'ed up op on me!

United Kingdom
Joined: December 21, 2009
KitMaker: 26 posts
Model Shipwrights: 24 posts
Posted: Thursday, March 14, 2013 - 09:24 AM UTC


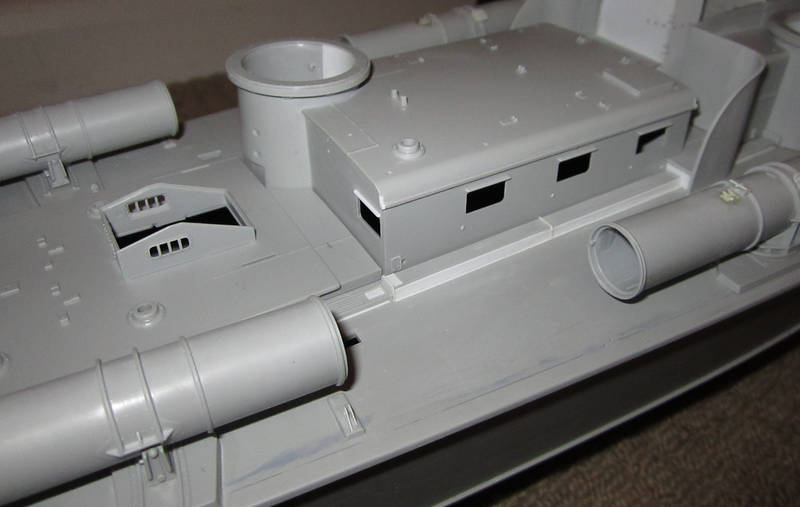
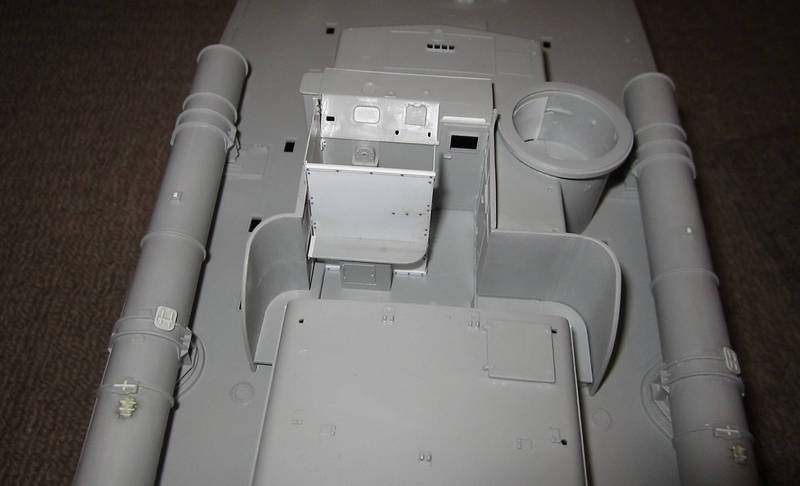
Just to keep the ball rolling, here are some photos of the tubes. I have pre-shaded the first one to show the detail mods that I have made. I have scribed around all the detail to accentuate it, added rivets ,bolts, wing nuts and the prominent weld seam. Note that all the tubes are modified to right hand side as the kit has them handed.I have re-located the tripping latch covers, and added the torpedo stop assembly. The only parts that should be handed are the breech doors, which open inward, and the cable clips, which are on the inner sides.
S
Massachusetts, United States
Joined: January 03, 2010
KitMaker: 2,159 posts
Model Shipwrights: 1,400 posts
Posted: Thursday, March 14, 2013 - 09:52 AM UTC
Great job on the tubes Stu! Love the paint and weathered look of the finished one! Thanks for the heads up in the 'handed' issues.

#323
Arizona, United States
Joined: February 13, 2013
KitMaker: 791 posts
Model Shipwrights: 59 posts
Posted: Thursday, March 14, 2013 - 10:01 AM UTC
Todd, better hurry and get back here. Looks like we are getting into a PT Boat run off here. There better be a book after all of this... from someone, anyone.
I think I am cowering and starting to look back at doing the Revell 1/72 PT-109 with WEM aftermarket now that I have Mr. Connelly's book. I really don't want to be gluing rivets one at a time. But keep it coming.

Cheers

Robbie: "Would 60 Gallons be sufficient ?"
Forbidden Planet - 1956
United States
Joined: March 06, 2013
KitMaker: 33 posts
Model Shipwrights: 28 posts
Posted: Thursday, March 14, 2013 - 10:15 AM UTC
Really! I might threaten to start mine!

#323
Arizona, United States
Joined: February 13, 2013
KitMaker: 791 posts
Model Shipwrights: 59 posts
Posted: Thursday, March 14, 2013 - 10:32 AM UTC
Robbie: "Would 60 Gallons be sufficient ?"
Forbidden Planet - 1956
Massachusetts, United States
Joined: January 03, 2010
KitMaker: 2,159 posts
Model Shipwrights: 1,400 posts
Posted: Thursday, March 14, 2013 - 02:46 PM UTC
LOL...hey Robb, Start yours it's 4 and I have another friend sitting one one!! Woo Hoo!!! A flotilla!! Nothing wrong with an impromptu PT Group Build!!

United Kingdom
Joined: December 21, 2009
KitMaker: 26 posts
Model Shipwrights: 24 posts
Posted: Thursday, March 14, 2013 - 06:29 PM UTC
Anyone building 1/35 japanese destroyers ?
S
United Kingdom
Joined: December 21, 2009
KitMaker: 26 posts
Model Shipwrights: 24 posts
Posted: Thursday, March 14, 2013 - 09:58 PM UTC
Quoted Text
Todd, better hurry and get back here. Looks like we are getting into a PT Boat run off here. There better be a book after all of this... from someone, anyone.
I think I am cowering and starting to look back at doing the Revell 1/72 PT-109 with WEM aftermarket now that I have Mr. Connelly's book. I really don't want to be gluing rivets one at a time. But keep it coming. Cheers
Robb,
It's an impressive kit from the box, you don't have to go to the trouble of adding rivets. It's just that I am sad with no life

United States
Joined: May 01, 2010
KitMaker: 93 posts
Model Shipwrights: 89 posts
Posted: Friday, March 15, 2013 - 12:05 AM UTC
Take note that there's a MTB Campaign starting in July.
Dave
Connecticut, United States
Joined: August 03, 2008
KitMaker: 875 posts
Model Shipwrights: 872 posts
Posted: Friday, March 15, 2013 - 12:37 AM UTC
Stu,
Very nice work on the tubes ...
Garth
United Kingdom
Joined: December 21, 2009
KitMaker: 26 posts
Model Shipwrights: 24 posts
Posted: Sunday, March 17, 2013 - 10:16 PM UTC
Garth,
Thanks. As you are a p.t. guru, could I ask you a couple of questions?
What colour do you reckon the 109 and 107 boats were painted before shipping overseas on the Joseph Stanton early in 1942.
I reckon, overall ocean gray 5-0 (same as the ship)
(They are certainly not the two shades as built)
Were the boats painted green upon arrival at Panama?
Thanks in advance.
S
#027
Louisiana, United States
Joined: April 13, 2005
KitMaker: 5,422 posts
Model Shipwrights: 5,079 posts
Posted: Monday, March 18, 2013 - 01:15 AM UTC
Great work Todd and Stuart.
"Hark, now hear the sailors cry
Smell the sea and feel the sky
Let your soul and spirit fly into the mystic