Building Bronco's Big Type XXIII Sub
New York, United States
Joined: January 21, 2008
KitMaker: 2,531 posts
Model Shipwrights: 1,244 posts
Posted: Tuesday, August 06, 2013 - 05:05 AM UTC
Alan, I decided not to go with a RN prize crew aboard, I'll leave that up to you (cue Darth Vader-ish music) I'll bring you to the dark side yet!


Al
Nordrhein-Westfalen, Germany
Joined: January 11, 2009
KitMaker: 673 posts
Model Shipwrights: 386 posts
Posted: Tuesday, August 06, 2013 - 05:20 AM UTC
Hi Al, really nice work!

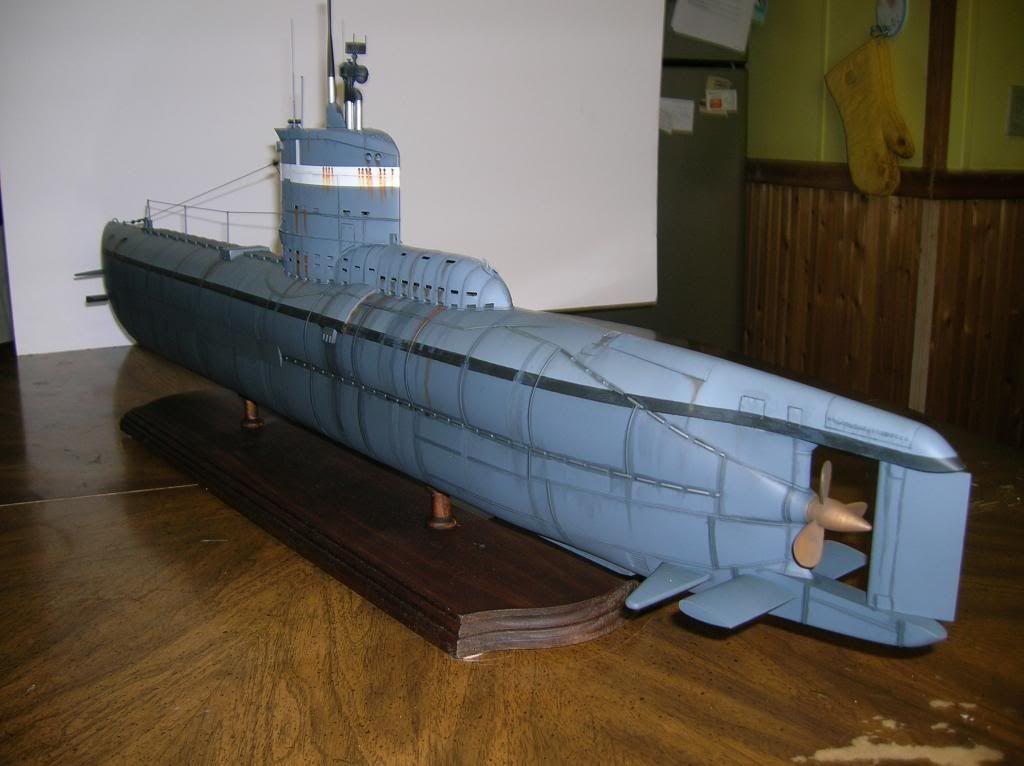
I'm still losing time for small potatoes! Because my beast will be presented in a dockyard and in some weathered condition, there's no place for a gleaming prop made from polished brass! So it was time for some chemical warfare, normally in use to blacken gun barrels.
In 30 sec. steps the massive brass part was tested and this was the result (2:30 min.):

Nice pastina for the screw, so the brass parts were potted:


I think that's better, than a pure brass prop to fake a salt water weathered screw...
Michael
New York, United States
Joined: January 21, 2008
KitMaker: 2,531 posts
Model Shipwrights: 1,244 posts
Posted: Tuesday, August 06, 2013 - 07:26 AM UTC
Thanks Michael, the weathered brass looks great, never could understand shiny props on a model ship.
Al
Indiana, United States
Joined: August 19, 2007
KitMaker: 2,184 posts
Model Shipwrights: 204 posts
Posted: Tuesday, August 06, 2013 - 09:17 AM UTC
Hey Al, got down to the library today and as promised, got to check out the tub. Looks real nice with all the scratch building added. Now I hope to see 2 British and one German in the tower!!! Anyway you go about the figures, it will look great. bob
There is no return policy on time spent
New York, United States
Joined: January 21, 2008
KitMaker: 2,531 posts
Model Shipwrights: 1,244 posts
Posted: Tuesday, August 06, 2013 - 12:18 PM UTC
Hey Al, got down to the library today and as promised, got to check out the tub. [quote]
Hey Bob, I hope you meant to say "check out the sub". I'd hate to have to sink your Vosper.
Al
South Carolina, United States
Joined: June 17, 2013
KitMaker: 78 posts
Model Shipwrights: 78 posts
Posted: Tuesday, August 06, 2013 - 11:05 PM UTC
I cannot recommend the manufacturer of that prop to any of you after the let-down he gave me. I had ordered the M-type prop with pointed hub and got a blunt hub. One fluke was badly bent due to the fact that, despite charging around $14 shipping and handling, the only protection this guy gave the prop was a thin, bubblewrap envelope.
When I complained about the damage, he told me he'd never had a prop damaged in the post. Then he wanted me to return the bent prop to him first ... and we could discuss options afterward. A photo of the damage wouldn't suffice ... and he wouldn't even consider putting the little brass propeller in a proper box for shipping a replacement.
The people at the post office are pretty rough with flimsy bubblewrapp envelopes, so consider finding a local vendor who stands behind his product. You're looking for a 50mm (2 inch) three-bladed right-hand propeller with extended boss and pointed hub.
I've managed to straighten the fluke on mine and sanded the flukes down to scale thickness, nice and sharp. I've also removed all the brazing at the seams and am getting ready to put micro-grind patterns into the flukes with a rubber polishing bit ... to simulate the grind marks from a shipyard worker who just ground off all the barnacles and marine growth.
I plan to weather my brass prop with brown shoe polish after the final polishing.
The hub will need to be ground down and a replacement pointed hub fitted to the prop. Perhaps some drillings in that to simulate attachment bolt holes. Lotta work yet to do on just the prop.
Nordrhein-Westfalen, Germany
Joined: January 11, 2009
KitMaker: 673 posts
Model Shipwrights: 386 posts
Posted: Sunday, August 18, 2013 - 12:25 AM UTC
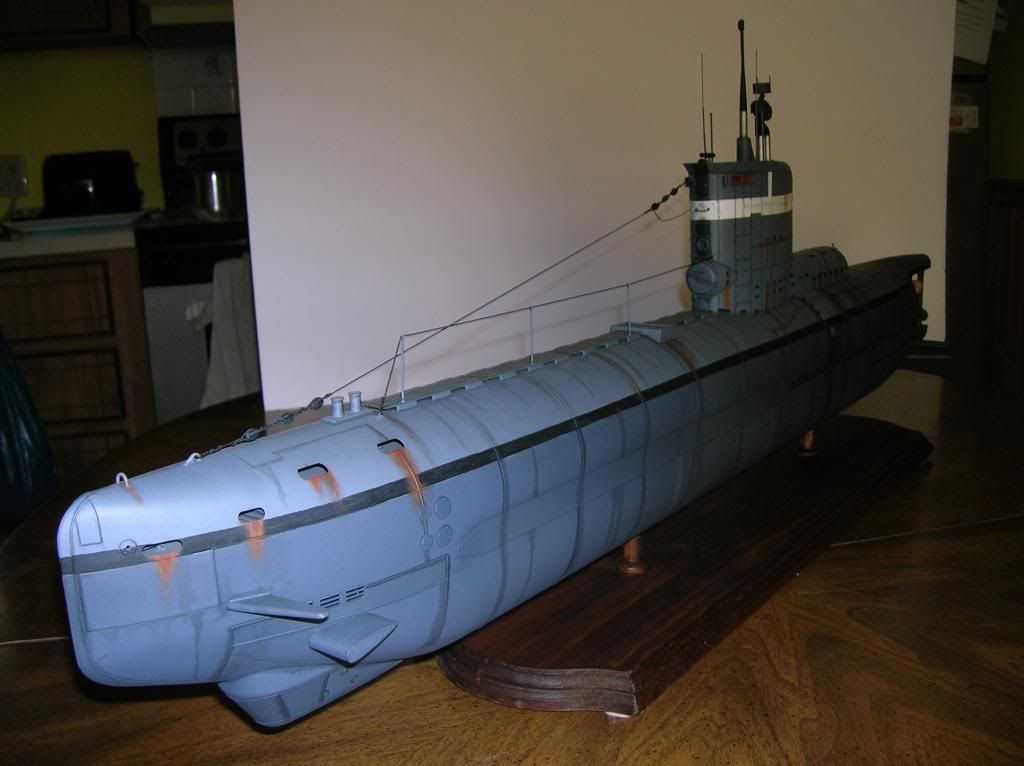
just closed the rear halfes of the beast, filled, sanded and polished:


And today some paint work and a little bit of weathering: a warm grey filter and worn paint simulated not by dry brushing but with a silver pencil:


Now the front locker with the wooden step and the "floor", boot battered:


Hope to close the tower soon...
Michael
New York, United States
Joined: January 21, 2008
KitMaker: 2,531 posts
Model Shipwrights: 1,244 posts
Posted: Sunday, August 18, 2013 - 01:32 AM UTC
Looking good, Michael.
Al
Nordrhein-Westfalen, Germany
Joined: January 11, 2009
KitMaker: 673 posts
Model Shipwrights: 386 posts
Posted: Tuesday, August 20, 2013 - 08:36 AM UTC
The tower is closed now, front locker and Uzo-plate glued:


And some progress at the rear part of the tower. Some sprue heated, drawn and cut to length. The ends were pressed with a small gripper:
Again parts Bronco forgot!


At close range:

Michael
South Carolina, United States
Joined: June 17, 2013
KitMaker: 78 posts
Model Shipwrights: 78 posts
Posted: Thursday, August 22, 2013 - 10:28 AM UTC
Michael! Wonderful work ... extraordinary detail and workmanship. One suggestion: the hinged line locker doors and access doors on the sides of the sail have oval hand holes in the originals ... for reaching in with the fingers and pulling them open. They may have been bolted shut and they may have had a catch of some sort inside; don't know which. Easily done with a drill or burr and then relieved from the inside with a larger drill bit to simulate thin metal. I also like to undercut the "seams" of molded hatches and doors, where they seal against the sail, with an X-acto knife to make those seams look more realistic. Makes the hatch or door look like a separate piece.
I'm also planning to sand in some very lightly done inward dented panels, also known as "oil canning" into the sail panels. Place a thin, steel straight edge along the rivet boundaries and lightly sand alongside the edge ... all four sides of the sunken panel and don't overdo it. Just a few light sanding strokes does wonders. After being battered by seas, almost all sails show oil canning in various degrees.
Keep the photos coming, Amigo!
Queensland, Australia
Joined: May 20, 2010
KitMaker: 1,230 posts
Model Shipwrights: 1,212 posts
Posted: Saturday, August 24, 2013 - 08:00 PM UTC
Ditto. Really beautifully done so far.....Cheers mark
If I was your Wife I would Poison your Tea
If I was your Husband, I would drink it.
England - South East, United Kingdom
Joined: March 01, 2010
KitMaker: 7,078 posts
Model Shipwrights: 6,649 posts
Posted: Monday, August 26, 2013 - 07:48 AM UTC
Al, Michael
Just caught up with this thread, great builds, Inspiring.
Si
New York, United States
Joined: January 21, 2008
KitMaker: 2,531 posts
Model Shipwrights: 1,244 posts
Posted: Tuesday, August 27, 2013 - 05:00 AM UTC
Joined: October 30, 2005
KitMaker: 3,897 posts
Model Shipwrights: 3,301 posts
Posted: Tuesday, August 27, 2013 - 06:32 AM UTC
A very enjoyable blog and a great build Al, really enjoyed it.
I am waiting for my XXIII to clear customs at Schiphol. Arrived from China last Sunday morning. Looking forward to this build.
JUlian
New York, United States
Joined: January 21, 2008
KitMaker: 2,531 posts
Model Shipwrights: 1,244 posts
Posted: Tuesday, August 27, 2013 - 06:37 AM UTC
Thanks Julian, I'm enjoying the 'Channel Adversaries', especially the friendly banter, great work there.
Al
Joined: October 30, 2005
KitMaker: 3,897 posts
Model Shipwrights: 3,301 posts
Posted: Wednesday, August 28, 2013 - 04:57 AM UTC
Woot, the XXIII arrived today, it's huge, it's long, it's absolutely gorgeous

Julian
New York, United States
Joined: January 21, 2008
KitMaker: 2,531 posts
Model Shipwrights: 1,244 posts
Posted: Wednesday, August 28, 2013 - 05:41 AM UTC
Quoted Text
Woot, the XXIII arrived today, it's huge, it's long, it's absolutely gorgeous
Julian
It needs a little help, but what you get is a great starting point for an impressive model. By the way, the above description is exactly what my wife said when she saw one of Budweiser's Clydesdale horses for the first time.
Al
Joined: October 30, 2005
KitMaker: 3,897 posts
Model Shipwrights: 3,301 posts
Posted: Wednesday, August 28, 2013 - 06:06 AM UTC
She most definately does need some help. Not a really beautiful ship either with a slightly top heavy look and she looks wierd without saddle tanks. Will be an interesting build though even if only due to the sheer size. For now into the stash......
Queensland, Australia
Joined: May 20, 2010
KitMaker: 1,230 posts
Model Shipwrights: 1,212 posts
Posted: Friday, August 30, 2013 - 12:16 PM UTC
You have done a great job on her. I love the Torp peering out of the Tube too......Cheers mark
If I was your Wife I would Poison your Tea
If I was your Husband, I would drink it.
New York, United States
Joined: January 21, 2008
KitMaker: 2,531 posts
Model Shipwrights: 1,244 posts
Posted: Friday, August 30, 2013 - 03:01 PM UTC
Quoted Text
You have done a great job on her. I love the Torp peering out of the Tube too......Cheers mark
Thanks Mark, Rather than the whole torpedo I used just the warhead only, with a piece of plastic tube for the 'body'.
Al
England - East Anglia, United Kingdom
Joined: August 12, 2005
KitMaker: 14,499 posts
Model Shipwrights: 1,919 posts
Posted: Sunday, September 01, 2013 - 08:34 AM UTC
Hi Al,
Cracking work and a really useful reference blog. You do need a figure for scale though! lol, lol.
Cheers
Alan

'Action this Day'
Winston Spencer Churchill
South Australia, Australia
Joined: August 14, 2007
KitMaker: 5,926 posts
Model Shipwrights: 2,624 posts
Posted: Sunday, September 01, 2013 - 08:39 AM UTC
Al, that looks bloody brilliant my friend. I am not into weathering myself prefering the pristine look, mostly, but you have excelled in your efforts. I think I may have to get one of these to go with the other 1/35 boats I have here or on their way.
Excellent work mate
Regards
Warren
You may be right, I may be crazy.
New York, United States
Joined: January 21, 2008
KitMaker: 2,531 posts
Model Shipwrights: 1,244 posts
Posted: Sunday, September 01, 2013 - 10:14 AM UTC
Quoted Text
Hi Al,
Cracking work and a really useful reference blog. You do need a figure for scale though! lol, lol.
Cheers
Alan
The first 'draft' should be arriving from the "repple-depple" soon.
Al
New York, United States
Joined: January 21, 2008
KitMaker: 2,531 posts
Model Shipwrights: 1,244 posts
Posted: Sunday, September 01, 2013 - 10:20 AM UTC
Quoted Text
Al, that looks bloody brilliant my friend. I am not into weathering myself prefering the pristine look, mostly, but you have excelled in your efforts. I think I may have to get one of these to go with the other 1/35 boats I have here or on their way.
Excellent work mate
Regards
Warren
Thanks Warren, While it is missing a lot of detail I wouldn't hesitate to recommend it. She definitely looks impressive sitting alongside the rest of my 1/35 flotilla. I certainly hope there are more subjects in this scale on the way. Waiting on the X-craft for now.
Al
Nordrhein-Westfalen, Germany
Joined: January 11, 2009
KitMaker: 673 posts
Model Shipwrights: 386 posts
Posted: Thursday, September 05, 2013 - 07:24 AM UTC
Some progress with U-2336 after a short holiday - scratching the antenna mount started with small parts:

...and glued:


There's no pic showing this detail of U-2336 but U-2326 had the mount on the starboard side of the tower. And on a pic of U-2336 at Lisahelly we can see that the antenna isn't attached to the tower front, like on other boats. And here's the result of my effort:


Michael