Building Bronco's Big Type XXIII Sub
New York, United States
Joined: January 21, 2008
KitMaker: 2,531 posts
Model Shipwrights: 1,244 posts
Posted: Friday, March 15, 2013 - 10:56 AM UTC
I received Bronco's big coastal sub on Monday and dove right in. The size of the box is deceptive, sure fooled the wife. It is big. I studied the instructions and deviated from them right off the bat. The hull is divided into four pieces, two for each side. Bronco would have you build the front half of the hull, and then the back half, and then join the two assemblies. I opted to join the front and back halves of each side of the hull instead. It allowed me to apply cement to both the inside and outside of the hull joint for a stronger bond. The fit is excellent and the joint is hidden by a weld seam.
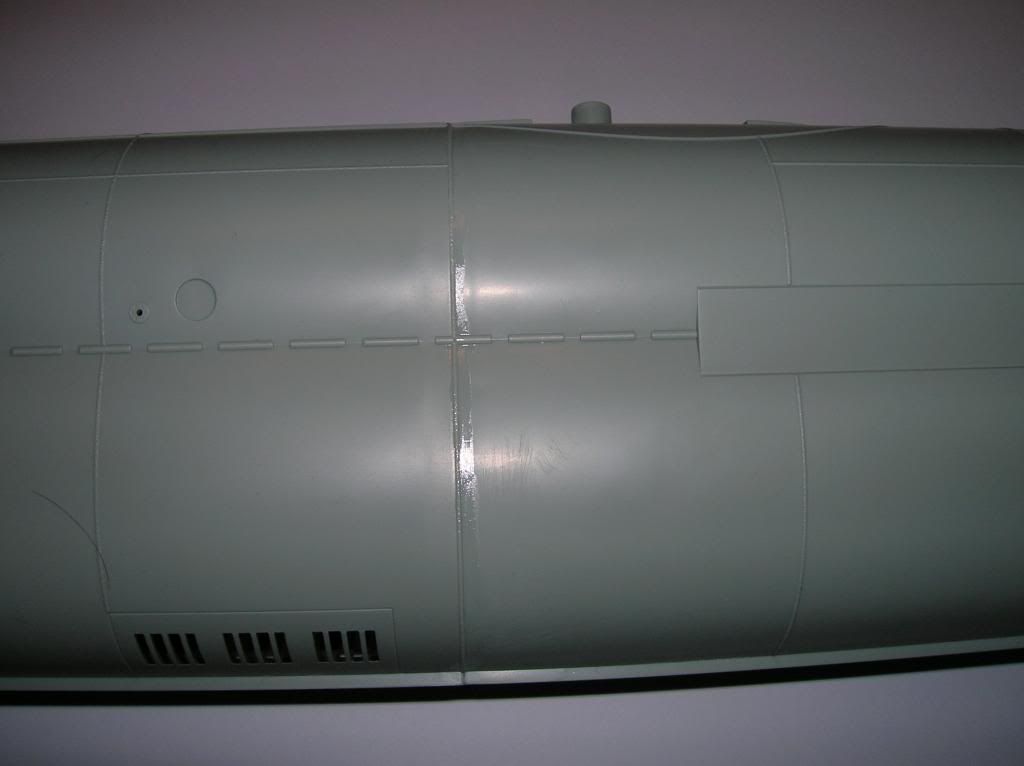
These seams are molded to the rear hull quarters and are delicate. Use care when handling these parts to avoid damaging them. I ended up with a couple of gaps at the top and bottom of the hull halves. Probably my fault rather than the kit. It helps to be an octopus when trying to join the halves.


The two completed hull halves are just held together with rubber bands in these photos. The tube visible projecting through the upper hull is the periscope well. That's it for now, will post more as I go.

Al
CMOT
 Editor-in-Chief
England - South West, United Kingdom
Joined: May 14, 2006
KitMaker: 10,954 posts
Model Shipwrights: 88 posts
Posted: Friday, March 15, 2013 - 11:07 AM UTC
Al: my build has stalled for the moment as I have been side tracked on other projects. Did you have any issues with mating the two halves as the rear half of mine was distorted, It is my belief that mine was distorted because of the sides coming apart during transit and your feedback will confirm if my belief is right.
New York, United States
Joined: January 21, 2008
KitMaker: 2,531 posts
Model Shipwrights: 1,244 posts
Posted: Friday, March 15, 2013 - 12:03 PM UTC
Quoted Text
Al: my build has stalled for the moment as I have been side tracked on other projects. Did you have any issues with mating the two halves as the rear half of mine was distorted, It is my belief that mine was distorted because of the sides coming apart during transit and your feedback will confirm if my belief is right.
Hello Darren, I had the same issue of some distortion with mine. I agree with you as to the cause. It didn't pose any problem when joining the hull halves though. Bronco molded bulkheads inside the front halves, I wonder why they just didn't do the same with the back halves? It would have avoided the problem altogether.
Al
CMOT
Editor-in-Chief England - South West, United Kingdom
Joined: May 14, 2006
KitMaker: 10,954 posts
Model Shipwrights: 88 posts
Posted: Friday, March 15, 2013 - 12:07 PM UTC
That is very true Al and something I didn't consider.
New York, United States
Joined: January 21, 2008
KitMaker: 2,531 posts
Model Shipwrights: 1,244 posts
Posted: Friday, March 15, 2013 - 02:36 PM UTC
I often find myself scratching my head over why a model company decided to not do something that would seem to be obvious.
Al
England - East Anglia, United Kingdom
Joined: August 12, 2005
KitMaker: 14,499 posts
Model Shipwrights: 1,919 posts
Posted: Friday, March 15, 2013 - 07:37 PM UTC
Hi Al,
Off to a good start, look forward to developments.
Now Bronco have entered the 1/35 boat arena perhaps they might consider a follow up with a British S type boat
 https://commons.wikimedia.org/wiki/British_S_class_submarine
 We live in hope.
Alan

'Action this Day'
Winston Spencer Churchill
New York, United States
Joined: January 21, 2008
KitMaker: 2,531 posts
Model Shipwrights: 1,244 posts
Posted: Saturday, March 16, 2013 - 12:37 AM UTC
Hello Alan, glad to hear from you. I take it you're talking 1/72 scale for that S-boat, be a helluva big boat in 1/35. It would be impressive though. Andreas did do a German Type VII in resin and PE in 1/35 a few years back. Very expensive as I remember, but a plastic one would be a lot less costly I imagine. Who knows what evil lurks in the minds of manufacturers?

Al
New York, United States
Joined: January 21, 2008
KitMaker: 2,531 posts
Model Shipwrights: 1,244 posts
Posted: Saturday, March 16, 2013 - 04:31 AM UTC
Some more progress, the torpedo tube assembly.

The assembly temporarily in place.
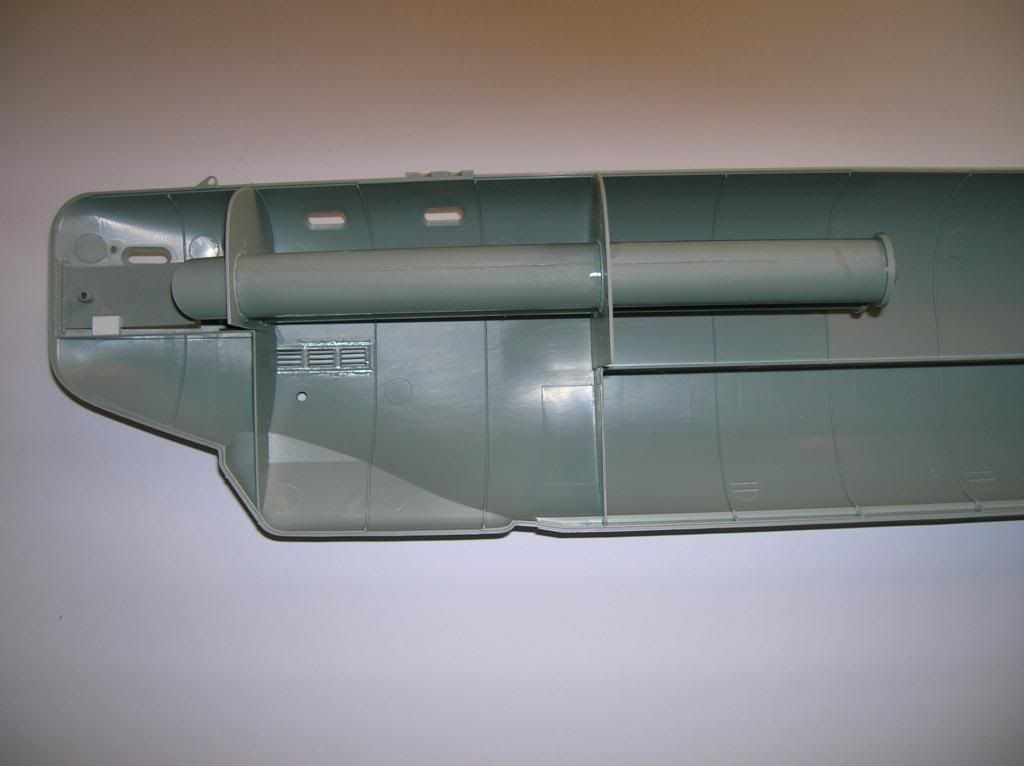
There is no positive alignment for positioning the after bulkhead (part# A8) onto the tubes. I assembled the halves of the two tubes and then glued the tubes to the forward bulkhead (part# A1). Then I slid the after bulkhead onto this assembly and then glued the two end caps (parts#B7) on. I positioned the completed assembly in one of the hull halves using that to properly space the after bulkhead which I then glued to the tubes. The kit gives you the option of movable torpedo tube outer doors. Not being a fan of moving parts I decided to glue one open and the other shut.


Bronco provides two magnets to hold both doors together in the open position. Someone on another site said they were too big and too strong, causing problems. Another reason I chose to glue the doors. The final photo shows the periscope well glued in place.

You can also see the internal half-bulkheads and bracing provided in the forward hull halves. There is no such
bracing in the after hull sections resulting in a little warping of one of them. I believe this is caused by one piece sliding inside of the other during shipping and causing a little distortion. Thankfully, it didn't cause a problem when gluing the two parts of each side together.
Al
CMOT
Editor-in-Chief England - South West, United Kingdom
Joined: May 14, 2006
KitMaker: 10,954 posts
Model Shipwrights: 88 posts
Posted: Saturday, March 16, 2013 - 04:36 AM UTC
AL; the information you have is correct as the magnets ripped the door off of its connection point caussing me some issues. I have cut the magnet free from one door to prevent further problems and then cemented one door closed and the other open.
Nordrhein-Westfalen, Germany
Joined: January 11, 2009
KitMaker: 673 posts
Model Shipwrights: 386 posts
Posted: Saturday, March 16, 2013 - 05:20 AM UTC
Hi Al, nice to see a building report of that beast here, for it's lying on my own working bench right now. I'm going to glue the left door in the opened position. Therefore it's a disapointment to have no details of that area! Open torpedo tubes - what a pitty and the best way for an everlasting dive.
So I will go to scratch a door for the muzzle and some bulkheads
Michael
btw. it's not glued - only layed in position...
New York, United States
Joined: January 21, 2008
KitMaker: 2,531 posts
Model Shipwrights: 1,244 posts
Posted: Saturday, March 16, 2013 - 09:26 AM UTC
Hello Michael, I like what you're doing. Information is hard to come by on this boat. I wonder if it actually had outer tube doors? The torpedoes were loaded externally, so there probably weren't any inner tube doors either, except maybe to inspect the tubes.
Al
Nordrhein-Westfalen, Germany
Joined: January 11, 2009
KitMaker: 673 posts
Model Shipwrights: 386 posts
Posted: Saturday, March 16, 2013 - 10:13 AM UTC
Hello Al,
there are only 2 books concerning u-boat type XXIII with useable information:
http://www.amazon.com/s/ref=nb_sb_noss?url=search-alias%3Daps&field-keywords=Uboottyp+XXIII The torpedos were loaded externally with a special device, but they could be pulled back for controlling and maintenance reasons for some 4.5m.
Therefore, like on all other german u-boats - the torpedos were stored dry. Only just before the launch the tubes were flooded. Tubes without doors at the muzzle wouldn'd allow this kind of maintenance! On www you can find a lot of pics showing either the inner tube doors or the outer hull fairings. So I could only find one pic with the muzzle door at this very interesting site:
http://www.ubootwaffe.pl/en/u-boats/equipment/torpedo-tubes-of-german-u-boats 
Later this will be my way to show that kind of muzzle door on a XXIII with

Still under construction

Michael
New York, United States
Joined: January 21, 2008
KitMaker: 2,531 posts
Model Shipwrights: 1,244 posts
Posted: Saturday, March 16, 2013 - 10:37 AM UTC
Very interesting picture, thanks for sharing that info, Michael.
Al
Joined: October 30, 2005
KitMaker: 3,897 posts
Model Shipwrights: 3,301 posts
Posted: Saturday, March 16, 2013 - 07:08 PM UTC
Good to see you back at the workbench Al,
some nice work going here.
cheers,
Julian
New York, United States
Joined: January 21, 2008
KitMaker: 2,531 posts
Model Shipwrights: 1,244 posts
Posted: Sunday, March 17, 2013 - 01:14 AM UTC
Hello Julian, making some progress, but I won't be able to get paint on her til the warmer weather sets in. 'Cause of the size of the beast I'll have to paint her outside. I had to do the same with my 'little' 1/72 Type VII. I was using a "Lazy Susan" as a turntable, and the sub would swing into the wind at every little breeze. I briefly considered turning it into a weather vane!
Al
Joined: October 30, 2005
KitMaker: 3,897 posts
Model Shipwrights: 3,301 posts
Posted: Sunday, March 17, 2013 - 01:22 AM UTC
I still want to add this one to my collection Al but seeing the amount of after market goodies I have bought for the Bismarck I think I will wait a little while.
Cheers,
Julian
New York, United States
Joined: January 21, 2008
KitMaker: 2,531 posts
Model Shipwrights: 1,244 posts
Posted: Sunday, March 17, 2013 - 03:38 AM UTC
I understand completely, discretion is definitely the better part of valor, especially when dealing with the missus.
Al
Joined: October 30, 2005
KitMaker: 3,897 posts
Model Shipwrights: 3,301 posts
Posted: Sunday, March 17, 2013 - 05:47 AM UTC
New York, United States
Joined: January 21, 2008
KitMaker: 2,531 posts
Model Shipwrights: 1,244 posts
Posted: Sunday, March 17, 2013 - 05:53 AM UTC
Just ordered a couple of books on the Type XXIII. I think they're both written in German but they should have photos that will be of value. I want to thank Michael for turning me onto them. One of the books is a modelers guide.
Al
England - East Anglia, United Kingdom
Joined: August 12, 2005
KitMaker: 14,499 posts
Model Shipwrights: 1,919 posts
Posted: Sunday, March 17, 2013 - 10:52 PM UTC
Hi Al,
Good progress. Michael thanks for the links, more reading.
On the British S Class, don't know much about them but I was aware of HMS Seraph which features in a number of notable special ops. Can't say I've ever seen a model of a British Submarine but there seems to be a lot of scope there. Yes, 1/35 scale would be big, but that scale would be my preference
Keep up the good work guys.
Alan
'Action this Day'
Winston Spencer Churchill
New York, United States
Joined: January 21, 2008
KitMaker: 2,531 posts
Model Shipwrights: 1,244 posts
Posted: Monday, March 18, 2013 - 03:07 AM UTC
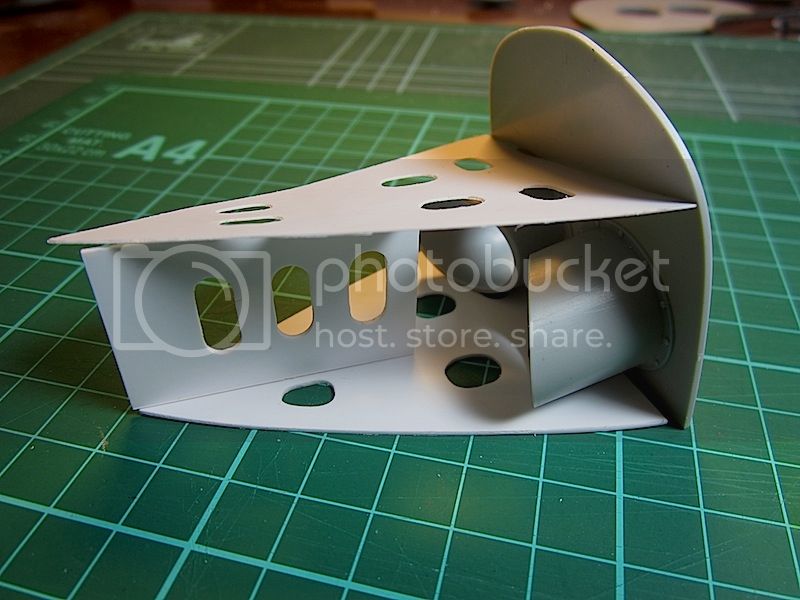
While waiting for some references to arrive, I did a little more work. Bronco includes a nice little raft as a bonus.

The following pictures show the two halves of the sail.

The dome-like piece in the left hand half is the stowage compartment for the raft (part# A17). I also glued the top of the sail (part# A26) in place. The fit was excellent. It included the upper deck & hatch for the bridge. The back of the periscope housing was open and visible through the top of the sail. So, I glued a short piece of plastic tubing in place. I used another small piece of tubing glued to the front of the other half to back an opening in the sail that if I remember correctly is the ship's horn. The navigation light housings (parts A5 & A6) were also glued into place. I'll add the clear parts that represent the lights later. I'm pretty impressed by the fit of the parts so far. With care, I think this kit could be built without using putty at all.
Al
Montevideo, Uruguay
Joined: August 22, 2011
KitMaker: 998 posts
Model Shipwrights: 941 posts
Posted: Monday, March 18, 2013 - 07:25 AM UTC
Boys. My congratulations for all!!! They are doing a great work .....
Regards Daniel
" My bigger dread is to look at the history of my life and to ask me what I did with her "
New York, United States
Joined: January 21, 2008
KitMaker: 2,531 posts
Model Shipwrights: 1,244 posts
Posted: Tuesday, March 19, 2013 - 02:49 AM UTC
A small update as work progresses.

In the above photo you can see the muffler, schnorkel, and conning tower. The piece attached to it is is the deck inside the after portion of the sail (part#A2). Two parts C1 make up the snorkel tube attached to that. Be careful one end of this tube is square and the other has a slight concave surface. Presumably this is to match the curve of the upper hull. However, the tube comes up a little short and doesn't quite reach the hull. As this will be invisible after completion, I didn't correct it. There is no positive alignment provided for locating this tube. I used a suitably sized drill bit inserted through the hole in A2 to position it. Bronco doesn't give you the second tube necessary for the snorkel, so I used a piece of plastic tubing to represent it. Not much will be seen of these tubes or the muffler after joining the sail to the hull. You may notice one of the tubes on the snorkel itself is shorter than the other. I sawed part of it off to lower the height that the snorkel sticks out of the sail. Al
England - East Anglia, United Kingdom
Joined: August 12, 2005
KitMaker: 14,499 posts
Model Shipwrights: 1,919 posts
Posted: Tuesday, March 19, 2013 - 08:50 AM UTC
Hi Al,
Looks like you making good progress. Tempted by this one even if it is Axis, were many captured by the British at wars end?
Al
'Action this Day'
Winston Spencer Churchill
New York, United States
Joined: January 21, 2008
KitMaker: 2,531 posts
Model Shipwrights: 1,244 posts
Posted: Tuesday, March 19, 2013 - 09:21 AM UTC
Hello Alan, According to my information both U-2326 and U-2353 survived the war and soldiered on in British service as N-35 & N-37, respectively. U-4706 also served after the war as the Norwegian sub "Knerten". Coincidentally, U-2326 is one of the markings options offered in the kit. An English U-boat, how tempting is that! Cheers, Al