

Go to modelshipwrights.com for the current dynamic site!


Hosted by Jim Starkweather
Building Bronco's Big Type XXIII Sub

surfsup

Joined: May 20, 2010
KitMaker: 1,230 posts
Model Shipwrights: 1,212 posts

Posted: Friday, May 31, 2013 - 04:34 PM UTC
Superb job on upgrading the Tower. Really enjoying it.....Cheers mark

Gotrek58

Joined: January 11, 2009
KitMaker: 673 posts
Model Shipwrights: 386 posts

Posted: Saturday, June 01, 2013 - 12:08 AM UTC
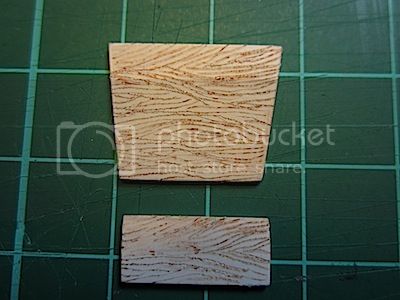
...only a little step:
some card and a very sharp needle (and a pencil to show the effect) is all ypou need


Michael
some card and a very sharp needle (and a pencil to show the effect) is all ypou need
Michael

TAFFY3

Joined: January 21, 2008
KitMaker: 2,531 posts
Model Shipwrights: 1,244 posts

Posted: Saturday, June 01, 2013 - 12:23 AM UTC
Hello Michael, Nice wood grain effect, it adds to the look of the step. Al
Al
RedDuster

Joined: March 01, 2010
KitMaker: 7,078 posts
Model Shipwrights: 6,649 posts

Posted: Saturday, June 01, 2013 - 05:16 AM UTC
Really effective wood grain Michael,
Fantastic thread guys, really enjoyable and informative.
Very tempted to have a crack at this big baby to add to the little 1/35th subs I am collecting.
Si
Fantastic thread guys, really enjoyable and informative.
Very tempted to have a crack at this big baby to add to the little 1/35th subs I am collecting.
Si
TAFFY3
Joined: January 21, 2008
KitMaker: 2,531 posts
Model Shipwrights: 1,244 posts
Posted: Saturday, June 01, 2013 - 06:29 AM UTC

I just noticed the bloke on the left in this photo is a RN Officer and it looks like he's wearing a sidearm. Give you any ideas Simon? Al
Gotrek58
Joined: January 11, 2009
KitMaker: 673 posts
Model Shipwrights: 386 posts
Posted: Saturday, June 01, 2013 - 08:28 AM UTC
Hi Al,
on page 40 in "Vom Original zum Modell - Uboottyp XXIII" this pic is subtitled as follows:
"U 2326 at Dundee. On the bridge OL Jobst and a british officer. The boat was escorted at may 15. to Dundee by an RAF rescue launch and moored near King-Georg-shipyard. Next morning U 2326 - under direction of a british officer - has to go to a nearby minefield to launch its both torpedos to ground. At 19:00h / 16. may the boat was escorted by the frigate "P 34" to the staging area for german uboats at Loch Eriboll. The boat was later carried over via Loch Alsh to reach Lisahally at 20. may."
Michael
Gotrek58
Joined: January 11, 2009
KitMaker: 673 posts
Model Shipwrights: 386 posts
Posted: Saturday, June 01, 2013 - 11:04 PM UTC
...the next step  and locker:

Doorhandles and hinges added:

Michael
and locker: Doorhandles and hinges added:
Michael
TAFFY3
Joined: January 21, 2008
KitMaker: 2,531 posts
Model Shipwrights: 1,244 posts
Posted: Sunday, June 02, 2013 - 12:29 AM UTC
Looking Good, Michael.
Al
AlTAFFY3
Joined: January 21, 2008
KitMaker: 2,531 posts
Model Shipwrights: 1,244 posts
Posted: Sunday, June 02, 2013 - 06:07 AM UTC
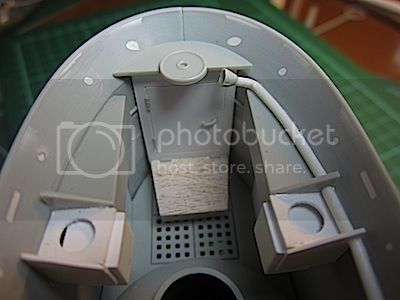
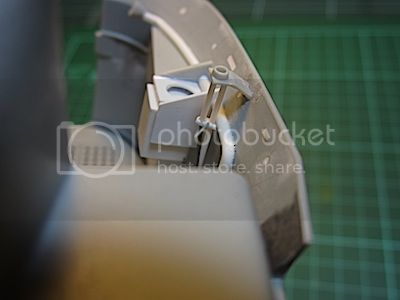
Some more added to the bridge area of the tower. First, the two lower brackets for the horseshoe-shaped life preserver.

They seem to have been used as steps as often as for holding a life preserver. I still have to add the upper bracket. Next the folding step on the UZO platform.
It's movable!

Though I'll probably cement it into position once everything is painted. Now all I need is a 1/35 Admiral Donitz. Al
Al
They seem to have been used as steps as often as for holding a life preserver. I still have to add the upper bracket. Next the folding step on the UZO platform.
It's movable!
Though I'll probably cement it into position once everything is painted. Now all I need is a 1/35 Admiral Donitz.
AlRedDuster
Joined: March 01, 2010
KitMaker: 7,078 posts
Model Shipwrights: 6,649 posts
Posted: Sunday, June 02, 2013 - 09:47 AM UTC
Great Photo Al, very interesting diorama possibilities.
Great work on both builds guys.
si
Great work on both builds guys.
si
TAFFY3
Joined: January 21, 2008
KitMaker: 2,531 posts
Model Shipwrights: 1,244 posts
Posted: Monday, June 03, 2013 - 06:27 AM UTC
I noticed in that photograph with the RN Officer that the top of the periscope housing should be a little flatter. There is also a narrow ring with what look to be bolt heads, probably a seal.
So, I sanded down the top and added the ring.

That's all for now.
Al
So, I sanded down the top and added the ring.
That's all for now.
AlGotrek58
Joined: January 11, 2009
KitMaker: 673 posts
Model Shipwrights: 386 posts
Posted: Monday, June 03, 2013 - 07:41 AM UTC
Nice detail, Al! 
On my shipyard it was cable guys day to connect the antennas (some rod was needed and 0.6mm lead wire, but at first brackets:

And now the antenna mounts with guide tube and cable:

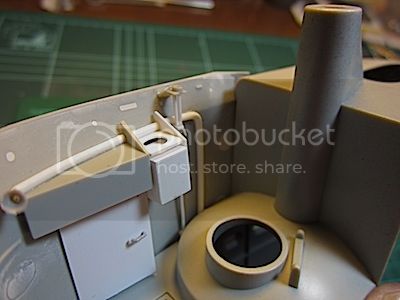
Michael
On my shipyard it was cable guys day to connect the antennas (some rod was needed and 0.6mm lead wire, but at first brackets:
And now the antenna mounts with guide tube and cable:
Michael
TAFFY3
Joined: January 21, 2008
KitMaker: 2,531 posts
Model Shipwrights: 1,244 posts
Posted: Monday, June 03, 2013 - 09:07 AM UTC
That looks great Michael. Al
AlTAFFY3
Joined: January 21, 2008
KitMaker: 2,531 posts
Model Shipwrights: 1,244 posts
Posted: Monday, June 03, 2013 - 11:38 AM UTC
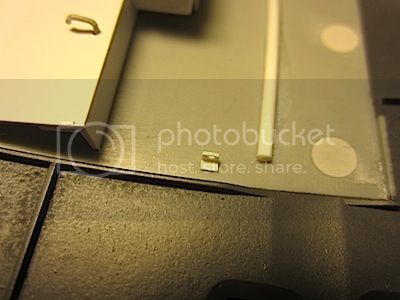
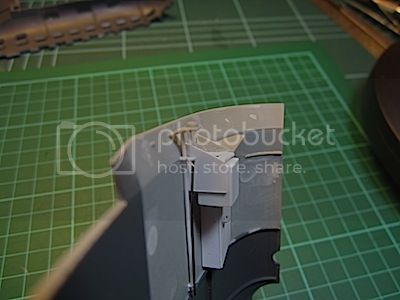
There is a cable that runs from the tower down to the hull, near the bow. Bronco molded a small ring to one of the tower halves to attach it to. Unfortunately, it is too small, too fragile, and in the wrong place. If you attached the cable where Bronco intended, it would prevent anyone from climbing the ladder rungs on the front up and into the tower. Here's my replacement.

I cut off a narrow section of rectangular tube from Evergreen. Then cut that into two 'U' shaped pieces. Luckily there were two because I broke the first while sanding it to shape. I Glued a styrene strip to the back of the 'U' , sanded it to shape, and then drilled a couple of holes and inserted a piece of styrene rod. Al
I cut off a narrow section of rectangular tube from Evergreen. Then cut that into two 'U' shaped pieces. Luckily there were two because I broke the first while sanding it to shape. I Glued a styrene strip to the back of the 'U' , sanded it to shape, and then drilled a couple of holes and inserted a piece of styrene rod.
AlTAFFY3
Joined: January 21, 2008
KitMaker: 2,531 posts
Model Shipwrights: 1,244 posts
Posted: Tuesday, June 04, 2013 - 08:26 AM UTC
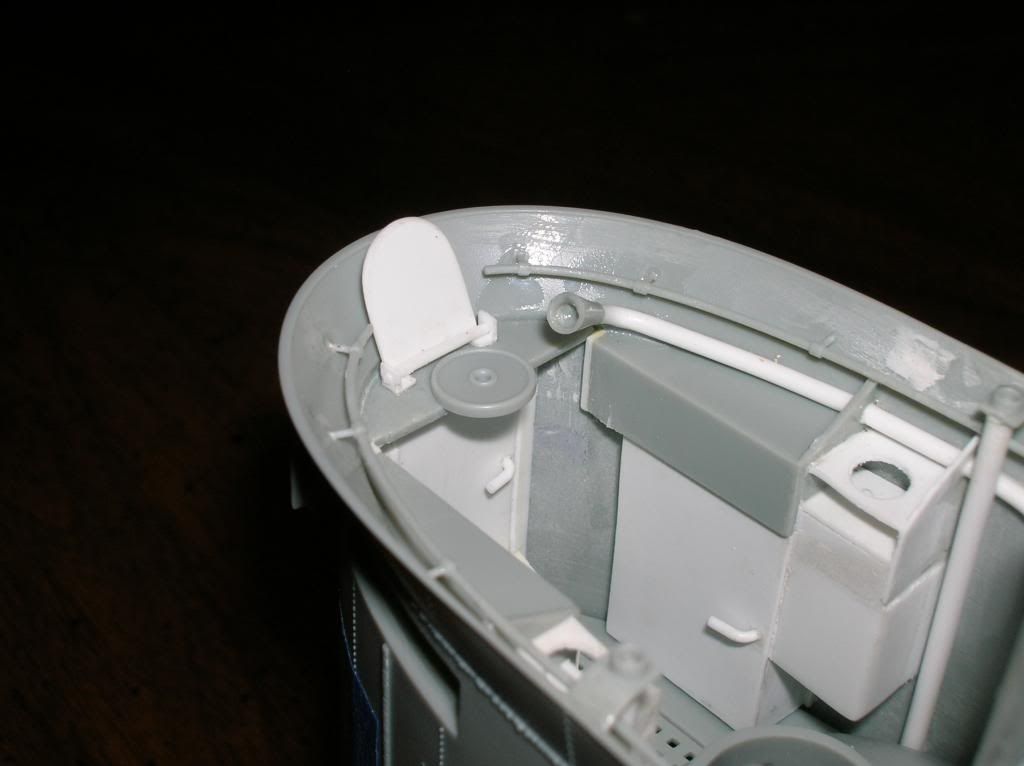
On the front of the tower there is a gaping hole above the stowage compartment for the life raft. This is where the ship's horn should be. Alas, Bronco neglected to supply one. So a little ingenuity is called for. First I cemented a short piece of tube whose inner diameter matched the hole, then I cemented a disc of plastic to the back of the tube. This would be my mount for the horn. I stretched another piece of tube like you would a piece of sprue. It took several tries.

I drilled a hole in the disc at the back of the mounting tube, then inserted the 'horn'. I cemented another piece of tubing over the end of the horn and closed it off with another styrene disc.

Once the tower halves are joined this won't be seen of course, I just wanted a tapered opening when viewed from the front.

Unfortunately the taper doesn't show in the photo due to the flash. It does look good though. Al
I drilled a hole in the disc at the back of the mounting tube, then inserted the 'horn'. I cemented another piece of tubing over the end of the horn and closed it off with another styrene disc.
Once the tower halves are joined this won't be seen of course, I just wanted a tapered opening when viewed from the front.
Unfortunately the taper doesn't show in the photo due to the flash. It does look good though.
AlTAFFY3
Joined: January 21, 2008
KitMaker: 2,531 posts
Model Shipwrights: 1,244 posts
Posted: Wednesday, June 05, 2013 - 01:02 AM UTC
The latest addition is the fold-down map board shown in the drawings.

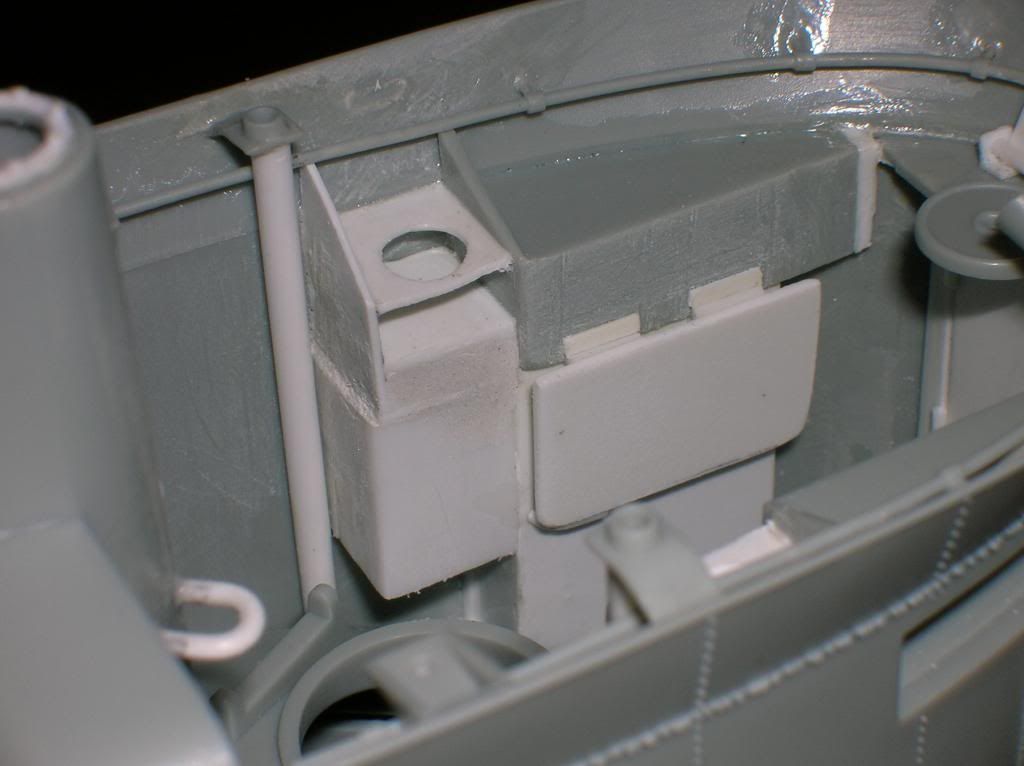
I have to say that I'm quite happy with how the tower is shaping up. Al
I have to say that I'm quite happy with how the tower is shaping up.
AlGotrek58
Joined: January 11, 2009
KitMaker: 673 posts
Model Shipwrights: 386 posts
Posted: Wednesday, June 05, 2013 - 07:33 AM UTC
Nice map board Al, but I'm still in doubt...
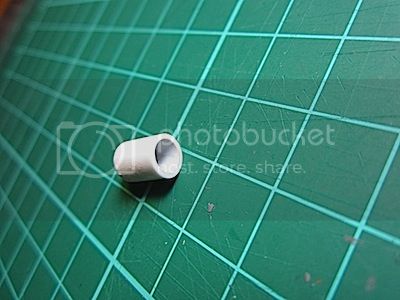
Here's my tyfon - a simplified version. Some tube filled with 2 component putty and formed with a sharp pencil

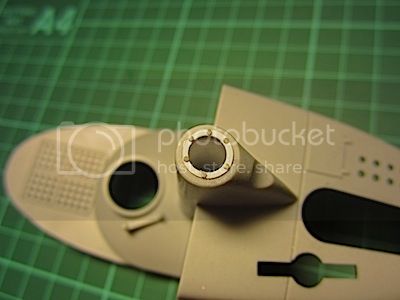
...and the periscope flange - an Evergreen ring and 12 bolts (calibre35), 6 for the carpet monster and 6 added to the flange

Michael
Here's my tyfon - a simplified version. Some tube filled with 2 component putty and formed with a sharp pencil
...and the periscope flange - an Evergreen ring and 12 bolts (calibre35), 6 for the carpet monster and 6 added to the flange
Michael
dioman13
Joined: August 19, 2007
KitMaker: 2,184 posts
Model Shipwrights: 204 posts

Posted: Wednesday, June 05, 2013 - 10:27 AM UTC
Nice work there guys. Al, you have more white than gray, not your hair. This is tempting me so much, I have dio. possabilities running amuck through my brain.
TAFFY3
Joined: January 21, 2008
KitMaker: 2,531 posts
Model Shipwrights: 1,244 posts
Posted: Wednesday, June 05, 2013 - 01:28 PM UTC
Here's my tyfon - a simplified version. Some tube filled with 2 component putty and formed with a sharp pencil [Quoted text]
Ingenious idea Michael and it looks good. Al
Ingenious idea Michael and it looks good.
AlTAFFY3
Joined: January 21, 2008
KitMaker: 2,531 posts
Model Shipwrights: 1,244 posts
Posted: Wednesday, June 05, 2013 - 01:31 PM UTC
Al, you have more white than gray, not your hair. [Quoted text]
Bob, I don't care what color my hair turns as long as it stays where it is. Al
Bob, I don't care what color my hair turns as long as it stays where it is.
AlTAFFY3
Joined: January 21, 2008
KitMaker: 2,531 posts
Model Shipwrights: 1,244 posts
Posted: Thursday, June 06, 2013 - 01:23 AM UTC
Nice map board Al, but I'm still in doubt...[Quoted text]
When building a model I try to be as accurate as I can be. But sometimes you have to take your best guess and live with it. I often wonder how many models don't get finished because of the search for perfection. Sometimes you never find the answer until after the model is built. Al
When building a model I try to be as accurate as I can be. But sometimes you have to take your best guess and live with it. I often wonder how many models don't get finished because of the search for perfection. Sometimes you never find the answer until after the model is built.
AlGotrek58
Joined: January 11, 2009
KitMaker: 673 posts
Model Shipwrights: 386 posts
Posted: Thursday, June 06, 2013 - 04:18 AM UTC
Agree absolutely!
This type of boat was built in segments and by a lot of different companies. During our special boat constrution we could recognize that there are very varied details as flood holes, boats with cable from tower to bow, diff. cable attachments, boats w/o any cable etc. Maybe there were boats with screwed on map boards...
As I stated on my german forum some days ago, if there isn't a pitcorial proof, but the solution is logical (like our locker in the tower front), it's o.k.! I'm now waiting for the ordered plate with lug pattern in 1:35 to build the step...
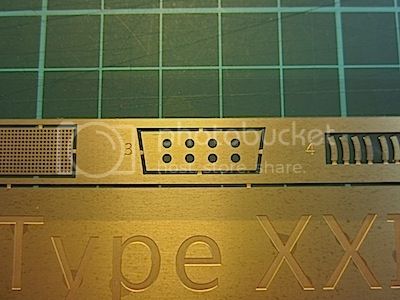
And Bronco made another mistake: the PE part P-3 is mostlikely wrong.
On all pics I could find there are 8 narrow slots - not holes! I'll try to crack it...
Michael
This type of boat was built in segments and by a lot of different companies. During our special boat constrution we could recognize that there are very varied details as flood holes, boats with cable from tower to bow, diff. cable attachments, boats w/o any cable etc. Maybe there were boats with screwed on map boards...
As I stated on my german forum some days ago, if there isn't a pitcorial proof, but the solution is logical (like our locker in the tower front), it's o.k.! I'm now waiting for the ordered plate with lug pattern in 1:35 to build the step...
And Bronco made another mistake: the PE part P-3 is mostlikely wrong.
On all pics I could find there are 8 narrow slots - not holes!
I'll try to crack it... Michael
Gotrek58
Joined: January 11, 2009
KitMaker: 673 posts
Model Shipwrights: 386 posts
Posted: Thursday, June 06, 2013 - 06:22 AM UTC
Solved!
Here some pics to establish understanding
the real part:

Broncos part P-3:
And here's my offer: a drain cover (Miniart "River Embankment" or "Street Accessories"), just folded a little bit:
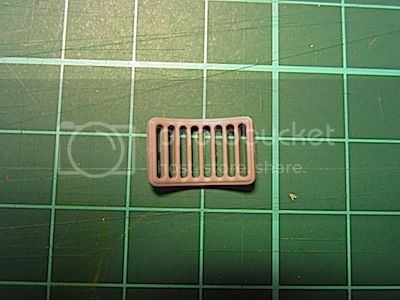
...and in place (only layed in position):

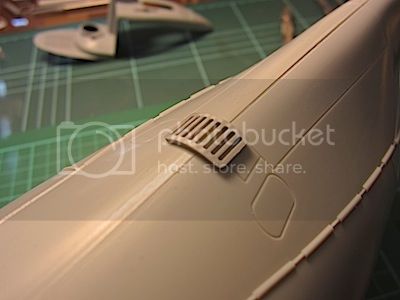
8 slots - fits!
Michael
Here some pics to establish understanding
the real part:
Broncos part P-3:
And here's my offer: a drain cover (Miniart "River Embankment" or "Street Accessories"), just folded a little bit:
...and in place (only layed in position):
8 slots - fits!
Michael
TAFFY3
Joined: January 21, 2008
KitMaker: 2,531 posts
Model Shipwrights: 1,244 posts
Posted: Thursday, June 06, 2013 - 09:49 AM UTC
That's a pretty neat solution to the problem. Al
AlTAFFY3
Joined: January 21, 2008
KitMaker: 2,531 posts
Model Shipwrights: 1,244 posts
Posted: Thursday, June 06, 2013 - 02:13 PM UTC
I took a break from the sub to do a favor for a friend of my wife. Her son is Cub Scout whose father is away on a business trip and he needed to build an entry for their "Raingutter Regatta". So I was asked to lend my expertise to the project. Here's the result.

The Scouts race these little trimarans down a 20' course made from two sections of rain gutter, hence the name. The upper hull was molded plastic but the two outer hulls had to be shaped from two blocks of wood. I've been building models for over 40 years and this was only the second time that I have worked with wood. So much for my 'expertise'. I rough cut the shape of the hulls and then finished shaping them with sandpaper. They didn't come out half bad, if I do say so myself. Then I painted them and the mast, painted the red stripes on the sail, and added a pennant made from blue masking tape. I gotta say, I had a blast with this little project. Al
The Scouts race these little trimarans down a 20' course made from two sections of rain gutter, hence the name. The upper hull was molded plastic but the two outer hulls had to be shaped from two blocks of wood. I've been building models for over 40 years and this was only the second time that I have worked with wood. So much for my 'expertise'. I rough cut the shape of the hulls and then finished shaping them with sandpaper. They didn't come out half bad, if I do say so myself. Then I painted them and the mast, painted the red stripes on the sail, and added a pennant made from blue masking tape. I gotta say, I had a blast with this little project.
Al |

WEB HOSTING BY


Copyright ©2021 Model Shipwrights and Kitmaker Network, a subsidiary of Silver Star Enterprises
All Rights Reserved. Please read our Conditions of Use and Privacy Policy.
All Rights Reserved. Please read our Conditions of Use and Privacy Policy.