

 Al
Al

Go to modelshipwrights.com for the current dynamic site!
Hosted by Jim Starkweather
Building Bronco's Big Type XXIII Sub

TAFFY3

Joined: January 21, 2008
KitMaker: 2,531 posts
Model Shipwrights: 1,244 posts

Posted: Sunday, May 26, 2013 - 07:26 AM UTC
Looks good Michael. I was wondering about he 'see-through' effect of those openings. Was not sure if you should be able to look right through the hull, or not. Thanks for clearing it up for me. Al
Al
RedDuster

Joined: March 01, 2010
KitMaker: 7,078 posts
Model Shipwrights: 6,649 posts

Posted: Sunday, May 26, 2013 - 08:59 AM UTC
Nice work Michael,
Two great builds going on now, enjoying both.
Si
Two great builds going on now, enjoying both.
Si

Gotrek58

Joined: January 11, 2009
KitMaker: 673 posts
Model Shipwrights: 386 posts

Posted: Sunday, May 26, 2013 - 02:44 PM UTC
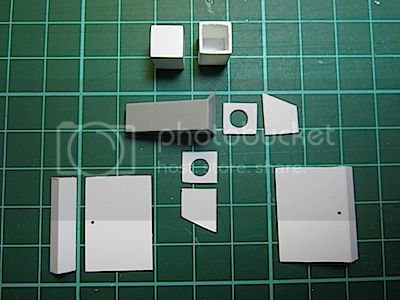
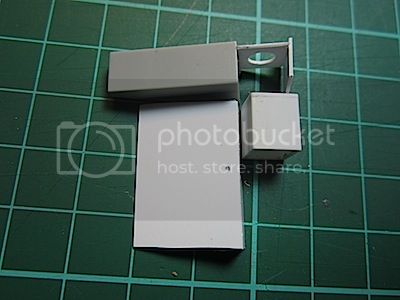
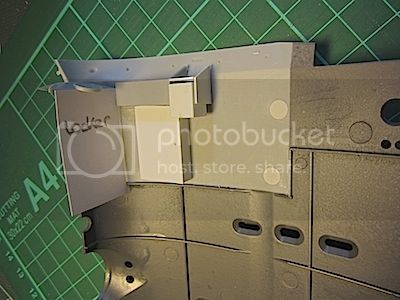
...and some more scratch parts for the tower - there were doors below the lantern housings:
Michael
Michael
TAFFY3
Joined: January 21, 2008
KitMaker: 2,531 posts
Model Shipwrights: 1,244 posts
Posted: Wednesday, May 29, 2013 - 02:29 AM UTC
Following in Michael's footsteps, I added the doors he mentioned (lockers I would presume) to the tower. They definitely add some interest to what will be a focal point of the model.

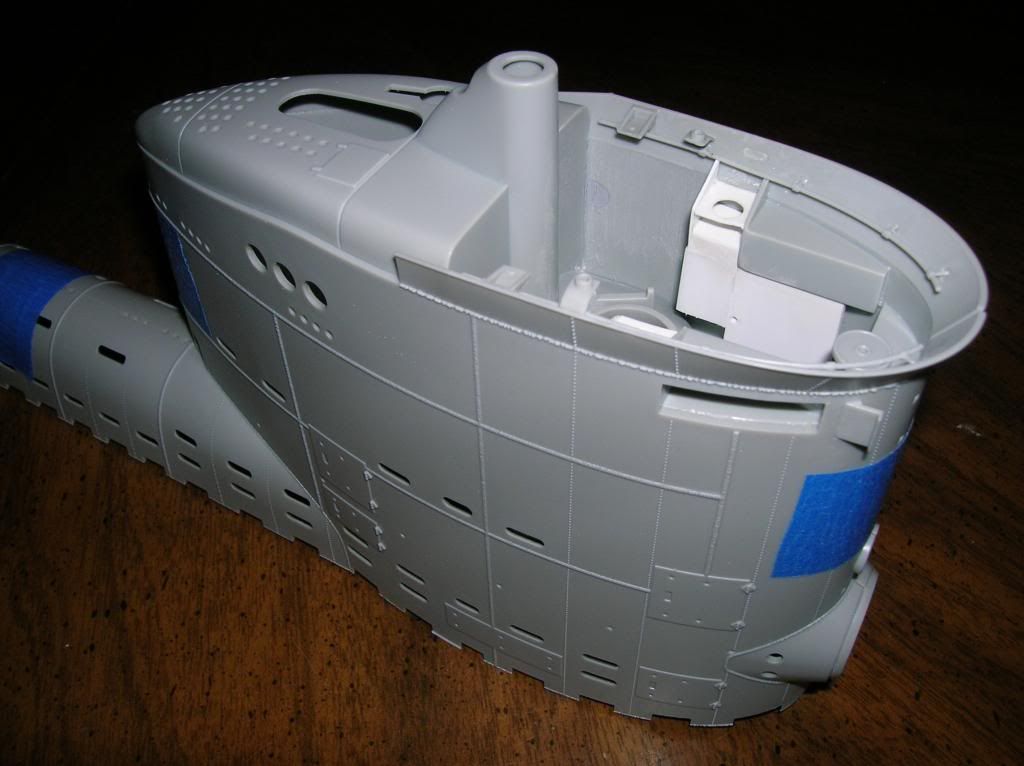
You can see the difference it makes from this earlier photo of the tower.

My thanks to Michael for the inspiration. It seems the fates have conspired against me acquiring any references of my own, so it's really great to be able to follow along with his excellent build. Thus enabling me to add more detail and visual interest to my own model. Al
You can see the difference it makes from this earlier photo of the tower.
My thanks to Michael for the inspiration. It seems the fates have conspired against me acquiring any references of my own, so it's really great to be able to follow along with his excellent build. Thus enabling me to add more detail and visual interest to my own model.
AlGotrek58
Joined: January 11, 2009
KitMaker: 673 posts
Model Shipwrights: 386 posts
Posted: Wednesday, May 29, 2013 - 08:43 AM UTC
Hi Al,
I hope your scratch parts are not glued yet. That box beside the locker is installed too low. There's only a slim space between the box and that part with the hole! Sorry, if my pic showed that in the wrong way. It was only a pic displaying the different parts and not their correlated position.
The plate to hold the UZO is too low as well and below that plate is another locker with a step in front. Above the UZO-plate there's a hinged step t climb out.
At last I'm not shure if we can find the handrails on all boats; till now I can't find them pictured. The antenna mounts have to move backwards to find a place behind the enlarged lantern housing, not above.
I hope my notes in crude english can help, but a self-explanatory pic is much better:

Michael
I hope your scratch parts are not glued yet. That box beside the locker is installed too low. There's only a slim space between the box and that part with the hole! Sorry, if my pic showed that in the wrong way. It was only a pic displaying the different parts and not their correlated position.
The plate to hold the UZO is too low as well and below that plate is another locker with a step in front. Above the UZO-plate there's a hinged step t climb out.
At last I'm not shure if we can find the handrails on all boats; till now I can't find them pictured. The antenna mounts have to move backwards to find a place behind the enlarged lantern housing, not above.
I hope my notes in crude english can help, but a self-explanatory pic is much better:
Michael
TAFFY3
Joined: January 21, 2008
KitMaker: 2,531 posts
Model Shipwrights: 1,244 posts
Posted: Wednesday, May 29, 2013 - 08:54 AM UTC
Hello Michael, Unfortunately they are glued in place. I told myself to wait and see the parts assembled, but my enthusiasm got the better of me. I don't know if I can correct their position. Do you have any pictures of the locker below the UZO platform, and the steps that you mentioned? I also noticed a voice tube in the picture you posted, I thought that there probably had to be one someplace on the bridge. Al
AlGotrek58
Joined: January 11, 2009
KitMaker: 673 posts
Model Shipwrights: 386 posts
Posted: Wednesday, May 29, 2013 - 10:34 AM UTC
Sorry Al, no pics! I use the scaled-up drawings from the 2 Rössler books. They are showing the voice tube, the foldable steps and a folding map table just below the starboard lantern housing.
Here's my solution to improve the tower configuration:
...and the papermade forward locker with the elevated UZO plate
You've noticed the life buoy at the periscope housing? So you have to add the clamps...
Michael
Here's my solution to improve the tower configuration:
...and the papermade forward locker with the elevated UZO plate
You've noticed the life buoy at the periscope housing? So you have to add the clamps...
Michael
Gotrek58
Joined: January 11, 2009
KitMaker: 673 posts
Model Shipwrights: 386 posts
Posted: Wednesday, May 29, 2013 - 10:45 AM UTC
here they are - no steps, but used as, only the life buoy clamps:

Michael
Michael
TAFFY3
Joined: January 21, 2008
KitMaker: 2,531 posts
Model Shipwrights: 1,244 posts
Posted: Wednesday, May 29, 2013 - 11:58 AM UTC
Thanks Michael, I relocated the antenna mounts and I noticed in that photo that part of the antenna runs down below that bracket to the deck. I also narrowed the gap between the boxes and those brackets. It may not be 100% but it's as close as I can get.

I did notice the life preserver and will add the brackets.
There also seems to be a handrail on the right side (left side of picture) that curves down from the side of the tower to the deck. That would be handy when climbing up out of the hatch. Al
I did notice the life preserver and will add the brackets.
There also seems to be a handrail on the right side (left side of picture) that curves down from the side of the tower to the deck. That would be handy when climbing up out of the hatch.
AlTAFFY3
Joined: January 21, 2008
KitMaker: 2,531 posts
Model Shipwrights: 1,244 posts
Posted: Wednesday, May 29, 2013 - 04:41 PM UTC
Michael, could you give me some idea what the locker and step under the UZO platform look like? A drawing or sketch would do. I was able to raise the platform up higher and then I cut a piece of plastic to fit under it.

The panel is just placed in position not glued yet. I would really appreciate any help you could provide as to what it should look like. Al
The panel is just placed in position not glued yet. I would really appreciate any help you could provide as to what it should look like.
AlGotrek58
Joined: January 11, 2009
KitMaker: 673 posts
Model Shipwrights: 386 posts
Posted: Wednesday, May 29, 2013 - 06:05 PM UTC
YES Al, much better!
I'l try to find a sketch...
Michael
I'l try to find a sketch...
Michael
Gotrek58
Joined: January 11, 2009
KitMaker: 673 posts
Model Shipwrights: 386 posts
Posted: Wednesday, May 29, 2013 - 08:19 PM UTC
...and here they are:


Print it DIN A4 and the details are nearly 1:35 scale - I hope this is helpful!
It's one of the first blueprints, but I think the inner arrangement hasn't changed...
And it's the best I could find!
Michael
PS: the front "locker" is too broad. Maybe it's only a steel plate were the foldable footstep is hinged. And it has to move forward for a little bit. But this is only my interpretation of the drawings...

AlanL

Joined: August 12, 2005
KitMaker: 14,499 posts
Model Shipwrights: 1,919 posts
Posted: Wednesday, May 29, 2013 - 10:00 PM UTC
Hi Al and Michael,
Excellent work, still following along.
Cheers
Alan
Excellent work, still following along.
Cheers
Alan
Gotrek58
Joined: January 11, 2009
KitMaker: 673 posts
Model Shipwrights: 386 posts
Posted: Thursday, May 30, 2013 - 06:21 AM UTC
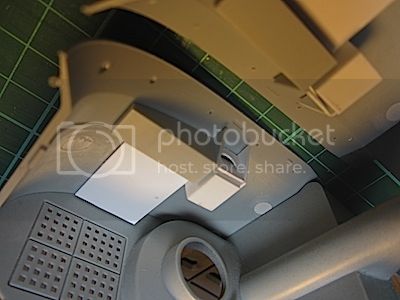
...next step: First some styrene run off

to clear a space for the voice tube
I think, it's ok in this angle of view too:
Michael
to clear a space for the voice tube
I think, it's ok in this angle of view too:
Michael
TAFFY3
Joined: January 21, 2008
KitMaker: 2,531 posts
Model Shipwrights: 1,244 posts
Posted: Thursday, May 30, 2013 - 07:29 AM UTC
Hello Michael, Thanks for posting those drawings they've been a great help. That voice tube looks very good. I'm really surprised that Bronco left out so much detail in the bridge area. Judging by a couple of other kits of theirs that I have, they are usually much more thorough. Al
AlRedDuster
Joined: March 01, 2010
KitMaker: 7,078 posts
Model Shipwrights: 6,649 posts
Posted: Thursday, May 30, 2013 - 08:12 AM UTC
Great builds guys, following with much interest and enjoyment.
Si
Si
TAFFY3
Joined: January 21, 2008
KitMaker: 2,531 posts
Model Shipwrights: 1,244 posts
Posted: Thursday, May 30, 2013 - 10:58 AM UTC
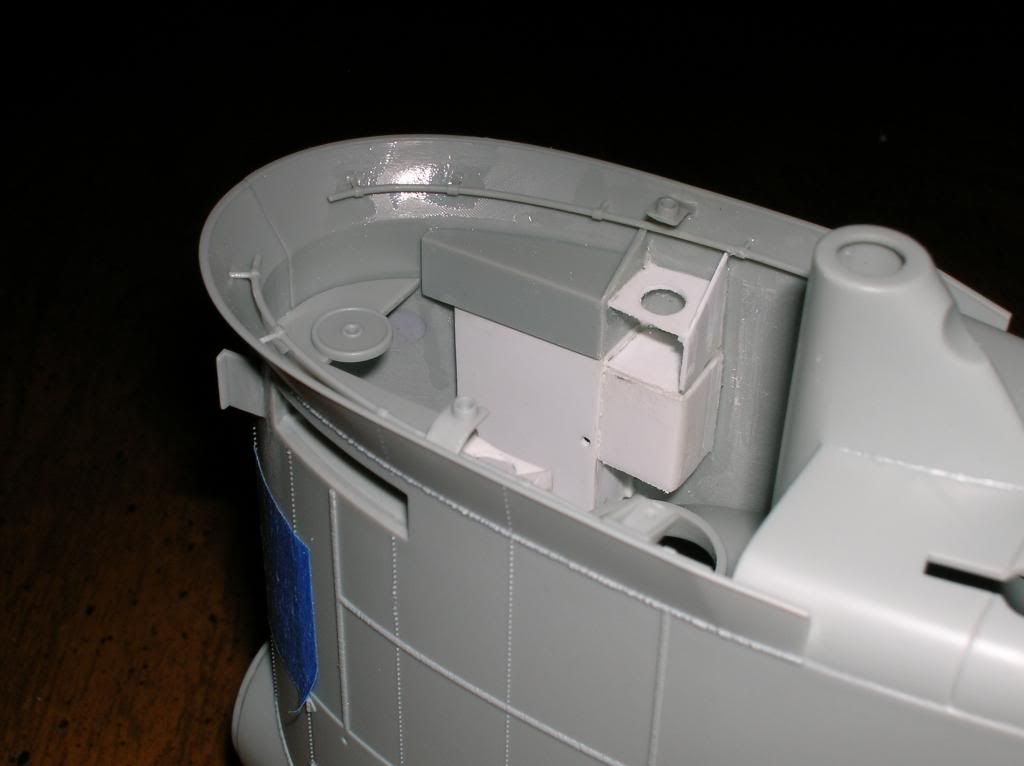
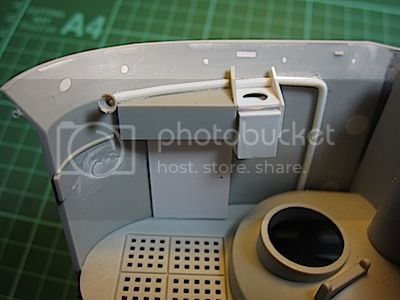
Thanks to the drawings provided by Michael, I was able to add some more missing detail to the bridge. The instructions would have you mount the UZO (torpedo sighting mechanism) platform (Part# A14) too low. It should be level with tops of the housings for the navigation lights (Parts# A5 & A6). There is a panel under there that mounts a fold down step. I first thought this panel was flush with the edge of the platform, but realized from the drawings that it should be recessed about halfway under it. Here's a photo of the panel, and the step and its support temporarily in position.

I'm not 100% percent sure about the door but I figured it wouldn't be dead space behind that panel and there would be some kind of access. I also added the voice tube and the section of each antenna that extends from the deck to the angled bracket on the inside edge of both sides of the tower.


The cone-shaped mouthpiece on the end of the voice pipe was made from a tapered section of stretched sprue that was hollowed out. I think the bridge is really starting to shape up. More to follow. Al
I'm not 100% percent sure about the door but I figured it wouldn't be dead space behind that panel and there would be some kind of access. I also added the voice tube and the section of each antenna that extends from the deck to the angled bracket on the inside edge of both sides of the tower.
The cone-shaped mouthpiece on the end of the voice pipe was made from a tapered section of stretched sprue that was hollowed out. I think the bridge is really starting to shape up. More to follow.
AlGotrek58
Joined: January 11, 2009
KitMaker: 673 posts
Model Shipwrights: 386 posts
Posted: Thursday, May 30, 2013 - 02:56 PM UTC
Hi Al,
nice work! And a good idea with that front door due to the fact that in the drawing a "Kartentisch Stauplatz" = "stowage for map board" is marked at this place.
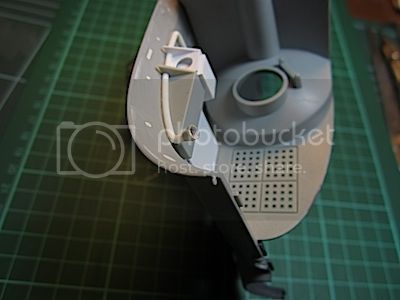
Now you can add some more detail to the antennas mounts - if you wish:

And the foldable step (with an anti-skid pattern) above der UZO-plate is still missing
Michael
nice work! And a good idea with that front door due to the fact that in the drawing a "Kartentisch Stauplatz" = "stowage for map board" is marked at this place.
Now you can add some more detail to the antennas mounts - if you wish:
And the foldable step (with an anti-skid pattern) above der UZO-plate is still missing
Michael
TAFFY3
Joined: January 21, 2008
KitMaker: 2,531 posts
Model Shipwrights: 1,244 posts
Posted: Friday, May 31, 2013 - 12:56 AM UTC
Thanks Michael, I don't see that other folding step you mention in those drawings. Is it the "D" shaped object on top of the UZO platform in the photo? Also, in the fore & aft drawing there is a small map board shown folded down against the locker, on the side opposite the voice tube. In the side-view drawing it looks to be as wide as the locker is, but about half as long as the locker is tall. I guess they would use that and if they needed a larger work surface, lay the one stowed below the UZO upon it. Al
AlGotrek58
Joined: January 11, 2009
KitMaker: 673 posts
Model Shipwrights: 386 posts
Posted: Friday, May 31, 2013 - 04:39 AM UTC
Hello Al,
yes, that "D" shaped plate just above the UZO plate is the foldable step!
And this step isn't neccessary on boats with this kind of tower like U-2322. No steps in front of the tower to climb in, but step holes on the tower sides! Later the holes were welded over to increase speed by a streamline tower. And the upper edge of the tower is very different to our boat, because it's a very early blueprint of U-2341. You can see water and wind deflectors as we know them on VII-boats. But I think the inner arrangement wasn't converted a lot...
The line on the left locker is not the lower outline of the map board folded down against the locker, it's only a dimension line stating the width of the locker door!
The map board is only fixed in this position if in use; not in use it was stored inside the front locker.
Michael
TAFFY3
Joined: January 21, 2008
KitMaker: 2,531 posts
Model Shipwrights: 1,244 posts
Posted: Friday, May 31, 2013 - 05:43 AM UTC
http://i279.photobucket.com/albums/kk140/TheralSadurns/XXIIITower2Kopie_zpsc6bec0aa.jpeg
I'm confused, in the first drawing it clearly shows a map board extending from the left hand side. In the second it says map board and there is an arrow pointing to the front of the locker.
http://i279.photobucket.com/albums/kk140/TheralSadurns/XXIIITower1Kopie_zps12e6dc93.jpeg
You also mention it in one of your posts.
"They are showing the voice tube, the foldable steps and a folding map table just below the starboard lantern housing." [Quoted text]. Also that upper step, above the UZO platform, does it just fold upward against the front of the tower? It can be difficult to decipher line drawings sometimes. They can seem to contradict each other.
Al
I'm confused, in the first drawing it clearly shows a map board extending from the left hand side. In the second it says map board and there is an arrow pointing to the front of the locker.
http://i279.photobucket.com/albums/kk140/TheralSadurns/XXIIITower1Kopie_zps12e6dc93.jpeg
You also mention it in one of your posts.
"They are showing the voice tube, the foldable steps and a folding map table just below the starboard lantern housing." [Quoted text]. Also that upper step, above the UZO platform, does it just fold upward against the front of the tower? It can be difficult to decipher line drawings sometimes. They can seem to contradict each other.
AlGotrek58
Joined: January 11, 2009
KitMaker: 673 posts
Model Shipwrights: 386 posts
Posted: Friday, May 31, 2013 - 06:10 AM UTC
Side view drawing:
Just below the my word "MAP BOARD" is printed "Kartentisch" meaning the same. The upper line of the left door is the map board as well!
The word under "Kartentisch" is "Stauplatz" = storage place, pointing to a vertical line. And that is the stored map board
Front view drawing:
My line (sorry, not an arrow as the other) is pointing to the same map board
But I have to correct me: it's not foldable, I guess. Stored in the front locker if not in use.
Michael
TAFFY3
Joined: January 21, 2008
KitMaker: 2,531 posts
Model Shipwrights: 1,244 posts
Posted: Friday, May 31, 2013 - 07:47 AM UTC
Michael, I think that you might be reading the side-view drawing wrong. The storage place may have nothing to do with the map board. I think Kartentisch is just printed above Stauplatz with one line pointing to the map board and the other to the storage space. The drawing might just be showing that there is a storage locker beneath the UZO. I think you were right about the map board in the first place, that it is attached above the left hand locker and just folds down for storage. Al
AlGotrek58
Joined: January 11, 2009
KitMaker: 673 posts
Model Shipwrights: 386 posts
Posted: Friday, May 31, 2013 - 07:57 AM UTC
Maybe Al, maybe... 
Now to the "front step"; it folds upwards against the front of the tower- my witness? Admiral Dönitz in person on U-2324:

Michael
Now to the "front step"; it folds upwards against the front of the tower- my witness? Admiral Dönitz in person on U-2324:
Michael
TAFFY3
Joined: January 21, 2008
KitMaker: 2,531 posts
Model Shipwrights: 1,244 posts
Posted: Friday, May 31, 2013 - 08:18 AM UTC
Ach So! Al
Al |

WEB HOSTING BY


Copyright ©2021 Model Shipwrights and Kitmaker Network, a subsidiary of Silver Star Enterprises
All Rights Reserved. Please read our Conditions of Use and Privacy Policy.
All Rights Reserved. Please read our Conditions of Use and Privacy Policy.