Building Bronco's Big Type XXIII Sub
Nordrhein-Westfalen, Germany
Joined: January 11, 2009
KitMaker: 673 posts
Model Shipwrights: 386 posts
Posted: Sunday, April 14, 2013 - 06:24 AM UTC
Back to the navigation lights: not only the colors are wrong. I think there were only 2 lights on each side and that "clear blue" light makes no sense!

Michael
New York, United States
Joined: January 21, 2008
KitMaker: 2,531 posts
Model Shipwrights: 1,244 posts
Posted: Sunday, April 14, 2013 - 07:44 AM UTC
Quoted Text
Back to the navigation lights: not only the colors are wrong. I think there were only 2 lights on each side and that "clear blue" light makes no sense!
Michael
Hello Michael, Did you mean there were only 2 lights, one on each side? I agree about the "blue" light, makes no sense to me either. BTW I followed your lead on modifying the tops of the bollards and adding the tubing below them. I'm assuming they were retractable, like those on the Type VII's.
Al
Nordrhein-Westfalen, Germany
Joined: January 11, 2009
KitMaker: 673 posts
Model Shipwrights: 386 posts
Posted: Sunday, April 14, 2013 - 09:36 AM UTC
Hi Al,
yes I think only that light in the corner of the housing (the "orange" one on the right side of the instruction) is o.k.
There was a long discussion on my german modelling forum with the result, that there's only one red or green light as a navigation light.
Michael
New York, United States
Joined: January 21, 2008
KitMaker: 2,531 posts
Model Shipwrights: 1,244 posts
Posted: Sunday, April 14, 2013 - 10:58 AM UTC
Quoted Text
Hi Al,
yes I think only that light in the corner of the housing (the "orange" one on the right side of the instruction) is o.k.
There was a long discussion on my german modelling forum with the result, that there's only one red or green light as a navigation light.
Michael
One red and one green would be the usual set-up, but it seems that there is always that one that's completely out of the ordinary that manages to surprise you. I'll be going with one light in each housing unless someone comes up with different information on the mysterious 'blue' light.
Al
New York, United States
Joined: January 21, 2008
KitMaker: 2,531 posts
Model Shipwrights: 1,244 posts
Posted: Tuesday, April 16, 2013 - 08:36 AM UTC
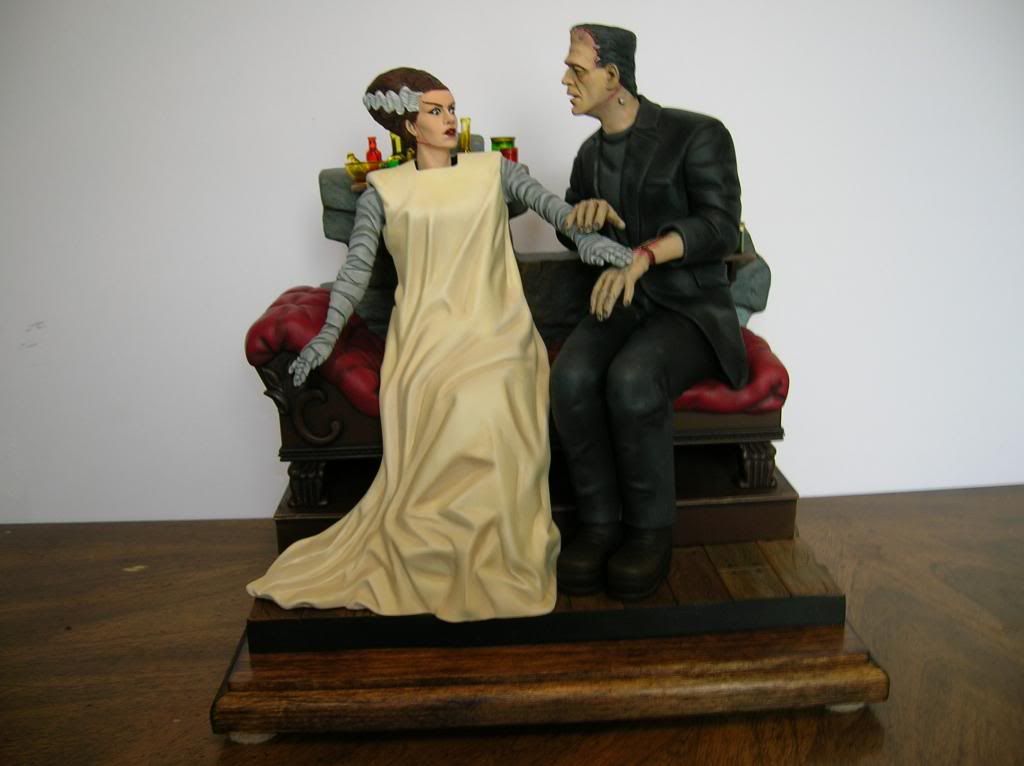
Took a little detour while waiting for a book that I ordered to arrive. I decided to finish "The Bride of Frankenstein" which I had started just before the Type XXIII arrived.
Now that that's out of the laboratory, back to the sub. I did some work around the bow adding free-flooding holes to the lower bulkhead (deck?) below the outer door.

Sorry about the blurry picture, it looked good on the camera's screen. Need a better camera I guess, or better eyes maybe, or steadier hands might help. Also added the upper bulkhead (deck?) above the torpedo door.

Wow, this one's even blurrier than the first. Well, at least you kinda get the idea. Having one outer door open and the other one shut limits what can be seen and simplified things a bit.

Al
New York, United States
Joined: January 21, 2008
KitMaker: 2,531 posts
Model Shipwrights: 1,244 posts
Posted: Thursday, April 18, 2013 - 07:30 AM UTC
Here's another small progress report. The rear diving planes are supposed to be connected by a plastic rod with two rather short rectangular tabs (part A-13). This part is supposed to be trapped between the two aft hull sections during Step 3. The diving planes are added later, in Step 4. I wasn't too happy with this arrangement for a couple of reasons. First, it didn't look too sturdy, the diving planes could easily be snapped off. Secondly, I don't know how you're supposed to keep A-13 in place while cementing the hull halves together. My solution was to use square [1.57mm x 3.55mm] brass tube (K&S Brass #1497).

I super-glued a piece a little shy of 3 7/8" long to one half of a diving plane. I added a piece of .040. x .250 plastic strip to reinforce it. The brass fit perfectly in the notch in the plane, but I had to file the inner support a little.

In the second photo you can see all four diving plane halves have had the plastic strip glued in place. The brass piece is only glued to the bottom half of one side, the other is just placed in position for the pic. I'll glue the 'top' half to the one with the brass, and glue the top and bottom of the other plane together. After the two hull halves are joined I can feed the brass through the hull and cement the other plane into place. I used a piece of 1/8" tubing to replace A-13 as a spacer. I had to ream out the plastic tube a little for the brass to fit inside, and I'll have to enlarge the holes in the hull a hair for it to fit through them. Please note the location of the alignment holes and their corresponding pins on each dive plane half. Each plane consists of one part C-5 & one C-6, the 'top' part on one side is the 'bottom' part on the other side.
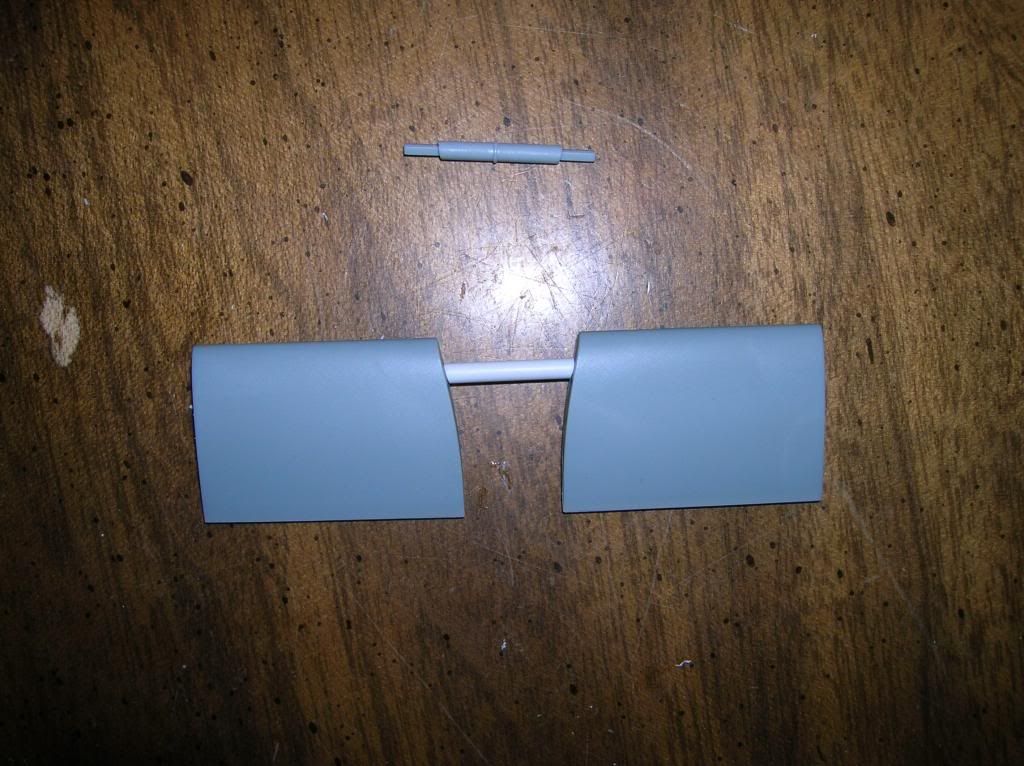
The last pic shows the whole assembly dry-fitted together. I think doing it this way is certainly more effort, but worth it in the long run, both for strength and ease of final assembly. I'll eventually be doing the same for the bow planes.
Al
New York, United States
Joined: January 21, 2008
KitMaker: 2,531 posts
Model Shipwrights: 1,244 posts
Posted: Thursday, April 18, 2013 - 08:57 AM UTC
Here is a photo of the aft dive plane inserted into position (note: the hull is just held together with rubber bands).
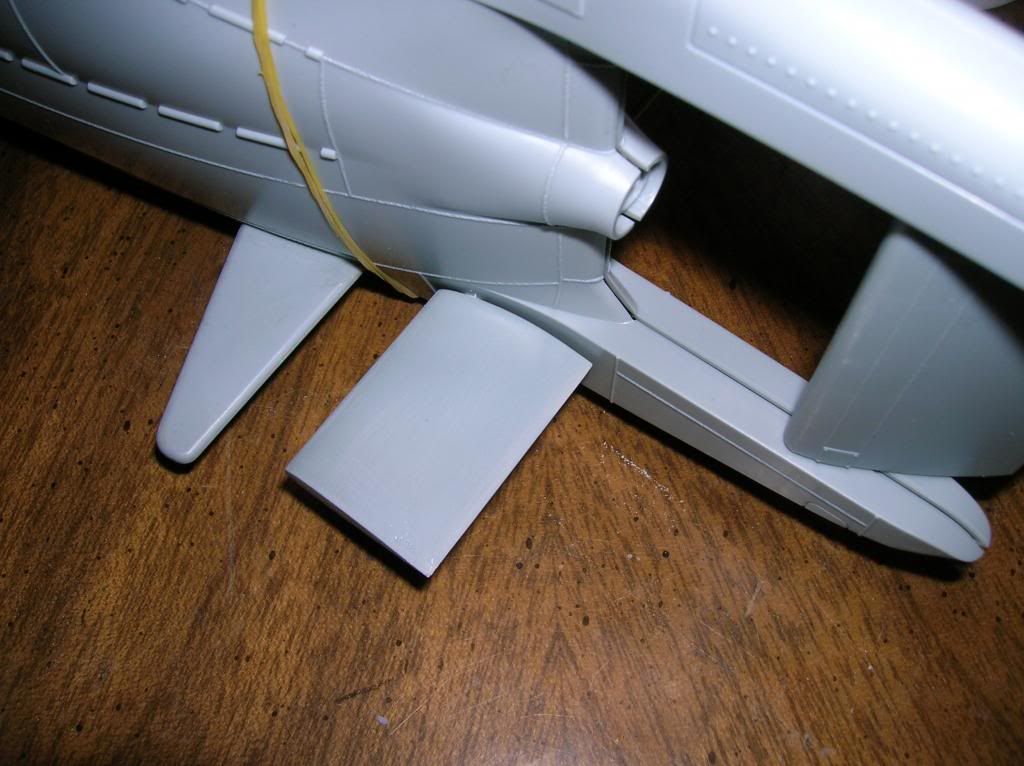
This shows the other side with the square brass tube extending through the hull.
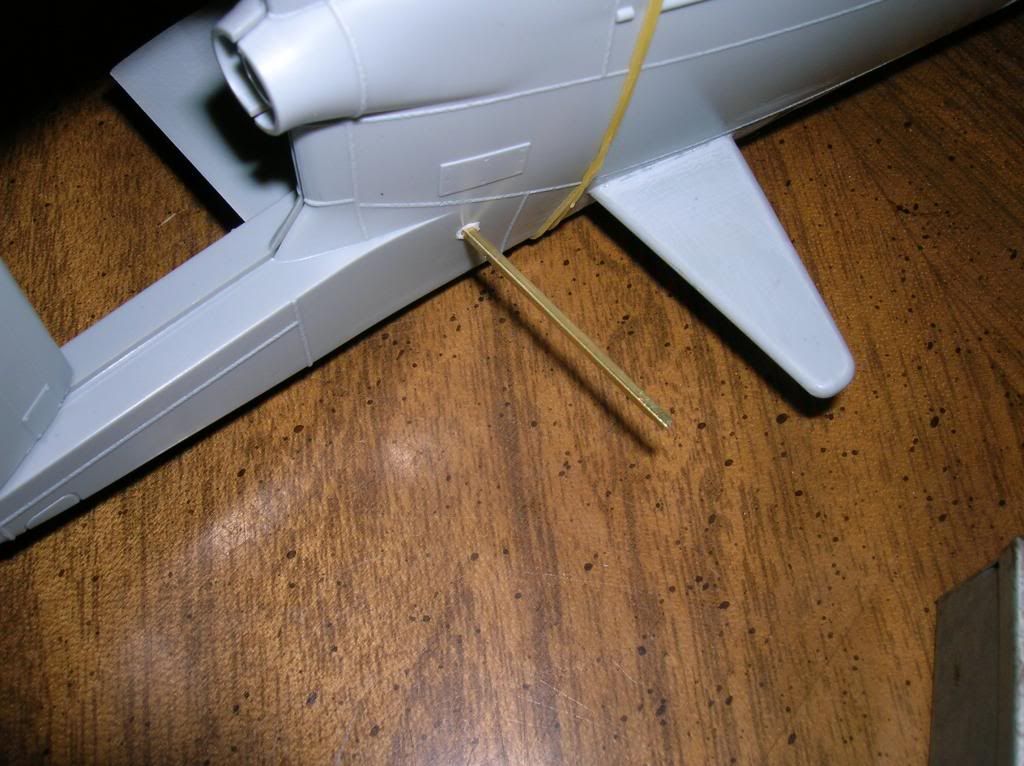
You can also see the plastic tube that was cemented over the brass and replaced part A-13 to act as a spacer.
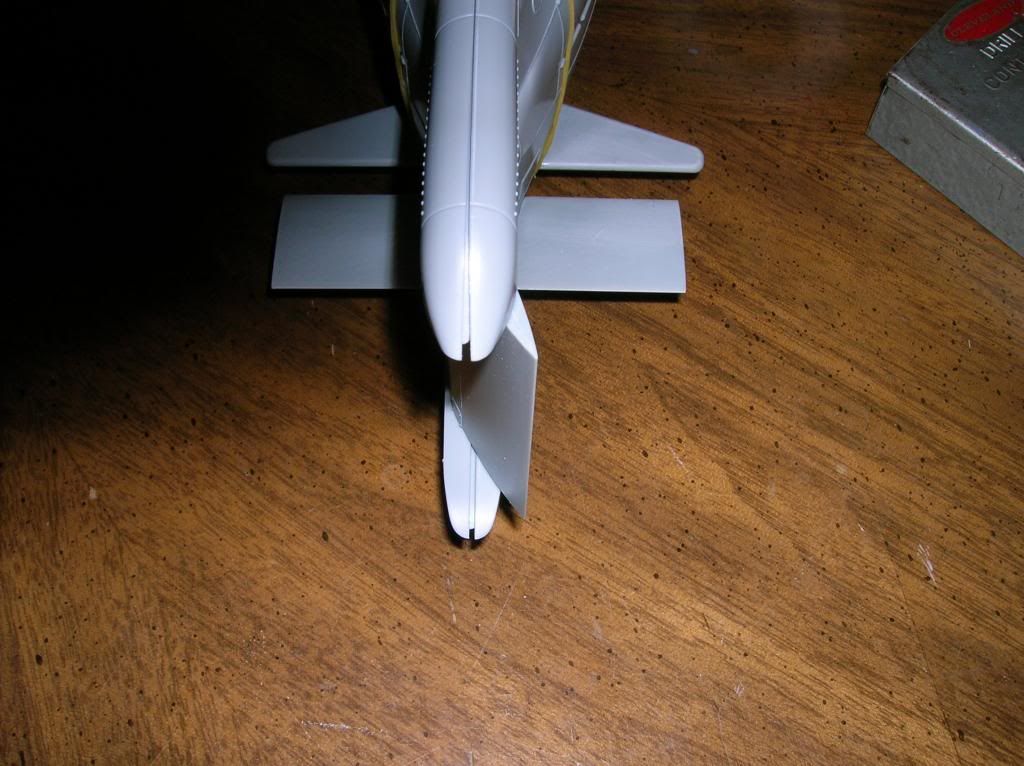
In the last photo the other dive plane is temporarily slipped onto the brass shaft. After final assembly the dive planes will be positionable. I didn't need the rudder to be movable so it is just cemented to one of the hull halves. I was lucky to find square brass tubing just the right size, which made this a very simple modification to perform.
Al
Joined: October 30, 2005
KitMaker: 3,897 posts
Model Shipwrights: 3,301 posts
Posted: Thursday, April 18, 2013 - 04:30 PM UTC
Fantastic work on your Frankenstein and bride

Getting a black suit to look right can be a major pain but yours looks very impressive. The bride looks suspiciously like a Dutch politician from a few years back, same white lock of hair........................
Top notch build and paintwork Al
cheers,
Julian
New York, United States
Joined: January 21, 2008
KitMaker: 2,531 posts
Model Shipwrights: 1,244 posts
Posted: Friday, April 19, 2013 - 03:57 AM UTC
The bride looks suspiciously like a Dutch politician from a few years back, same white lock of hair........................[Quote]
Old monsters never die, they just go into politics.
Thanks for the kind words. The suit was a base coated in flat black and then dry brushed with different shades of very dark grays.
Al
England - East Anglia, United Kingdom
Joined: August 12, 2005
KitMaker: 14,499 posts
Model Shipwrights: 1,919 posts
Posted: Friday, April 19, 2013 - 06:32 AM UTC
'Action this Day'
Winston Spencer Churchill
New York, United States
Joined: January 21, 2008
KitMaker: 2,531 posts
Model Shipwrights: 1,244 posts
Posted: Friday, April 19, 2013 - 07:02 AM UTC
You could always have used the rubber bands connect to the propeller to power it along[Quote]
Alan, my only experience with a R/C boat was less than a rousing success.... Sighted R/C boat, Sailed R/C boat, Sank same! Fortunately there was no loss of life. The Admiral (my wife) did have something to say about it of course.
Al
Montevideo, Uruguay
Joined: August 22, 2011
KitMaker: 998 posts
Model Shipwrights: 941 posts
Posted: Friday, April 19, 2013 - 07:54 AM UTC
" My bigger dread is to look at the history of my life and to ask me what I did with her "
New York, United States
Joined: January 21, 2008
KitMaker: 2,531 posts
Model Shipwrights: 1,244 posts
Posted: Friday, April 19, 2013 - 10:27 AM UTC
Hello Daniel, While it would be sweet to have a working R/C sub, that's a little over my budget, and if it was ever 'lost in action' I'd have to go down with the ship, or my wife would kill me!
Al
Queensland, Australia
Joined: May 20, 2010
KitMaker: 1,230 posts
Model Shipwrights: 1,212 posts
Posted: Saturday, April 20, 2013 - 12:08 PM UTC
Frankie and Bride look fantastic. Enjoying the work you are doing on the Boat also.....Cheers mark
If I was your Wife I would Poison your Tea
If I was your Husband, I would drink it.
England - South East, United Kingdom
Joined: March 01, 2010
KitMaker: 7,078 posts
Model Shipwrights: 6,649 posts
Posted: Sunday, April 21, 2013 - 05:12 AM UTC
Fantastic paint job on Frankie & Bride Al, Nice solution on the rear planeson the boat, the kit fitting looks too fragile.
Si
New York, United States
Joined: January 21, 2008
KitMaker: 2,531 posts
Model Shipwrights: 1,244 posts
Posted: Sunday, April 21, 2013 - 06:45 AM UTC
Thanks for the kind words, both Mark & Simon. The Bride was a fun build. The fit was surprisingly good, and the detail very nice. It makes an impressive piece and for a lot less cash than some comparable resin kits that I've looked at.
Al
Nordrhein-Westfalen, Germany
Joined: January 11, 2009
KitMaker: 673 posts
Model Shipwrights: 386 posts
Posted: Sunday, April 21, 2013 - 11:17 AM UTC
Hi Al,
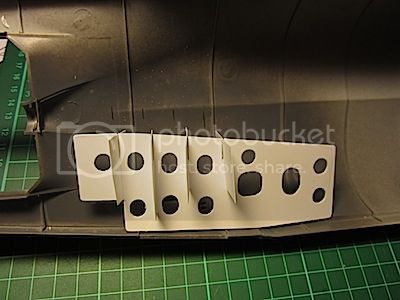
back from my short holiday, but the whole week, I thought something's wrong with my beast. The space around the torpedo tubes and the pressure tanks is the "Tauchzelle 3" (ballast tank), but all that space? No! The water floods the tank, when the boat's going to dive. And air has to be pressed into the tank to push the water out to surface the boat. But now look at Bronco's kit: large openings at the bottom and at the top of the hull. Only bubbles will return to the surface, but no boat.
Here's my solution to solve that problem:
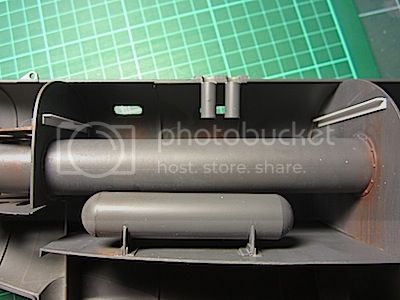

Tadaa! Tauchzelle 3 is finished; painting and weathering of the tubes and the pressure tanks wasn't really neccessary
Michael
Nordrhein-Westfalen, Germany
Joined: January 11, 2009
KitMaker: 673 posts
Model Shipwrights: 386 posts
Posted: Thursday, May 02, 2013 - 11:33 PM UTC
Hi Al,
what's up with your beast - no further progress?
I've just tried to finish the Schnorchel; planked with "Weschmatten", some kind of rubber matting to reduce radar reflection and one of the first attempts for stealth capacity
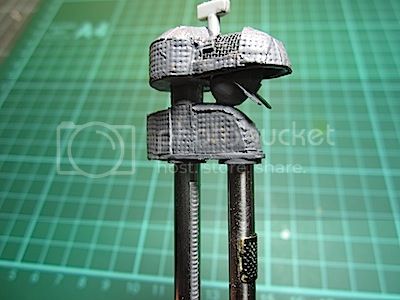
...and placed on the top of real V2A-steel tubes; only what's from metal, looks like metal...
Michael
New York, United States
Joined: January 21, 2008
KitMaker: 2,531 posts
Model Shipwrights: 1,244 posts
Posted: Friday, May 03, 2013 - 03:21 AM UTC
Hello Michael, I'm stalled. I ordered "Vom Original Zum Modell" for the XXIII and it seems to be lost in the mail. You're moving right along. How did you make the coating on the snorkel? looks good.
Al
Nordrhein-Westfalen, Germany
Joined: January 11, 2009
KitMaker: 673 posts
Model Shipwrights: 386 posts
Posted: Friday, May 03, 2013 - 04:25 AM UTC
Hello Al, the Wesch-matting was made from paper! It's a very old Zimmerit-coating for a StuG III by "The Show Modelling" attached with super glue.
Michael
United States
Joined: November 07, 2012
KitMaker: 5 posts
Model Shipwrights: 5 posts
Posted: Sunday, May 05, 2013 - 02:38 AM UTC
Al!
I just got that book in the mail a few days ago --- it's beautiful! Too bad I can't read German.

At the end of the book is a color section where someone has built a XXIII from scratch and rigged her for RC. Those pictures answered a lot of questions for me. Now I just need a few spare hours to work on my monster.
BTW I was concerned about you. All of your pictures have vanished from the thread. Good thing I saved them for reference.
- Leelan
New York, United States
Joined: January 21, 2008
KitMaker: 2,531 posts
Model Shipwrights: 1,244 posts
Posted: Sunday, May 05, 2013 - 03:24 AM UTC
Hello Leelan, I'm fine, just had some issues with Photobucket and inadvertently deleted some pictures. I've since restored them all. My book seems to be lost in the mail, seller says it was shipped and should have arrived.
Al
England - East Anglia, United Kingdom
Joined: August 12, 2005
KitMaker: 14,499 posts
Model Shipwrights: 1,919 posts
Posted: Sunday, May 05, 2013 - 09:11 PM UTC
Hi Michael and Al,
Nice work guys.
Alan

'Action this Day'
Winston Spencer Churchill
Nordrhein-Westfalen, Germany
Joined: January 11, 2009
KitMaker: 673 posts
Model Shipwrights: 386 posts
Posted: Thursday, May 09, 2013 - 04:50 AM UTC
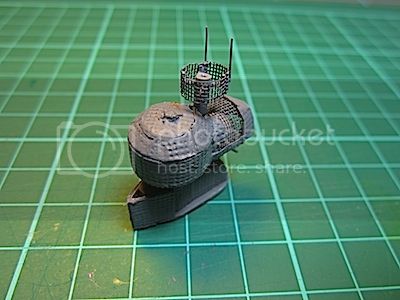
...after several attemps my new "FuMB Ant. 3 Bali1":
Michael
Nordrhein-Westfalen, Germany
Joined: January 11, 2009
KitMaker: 673 posts
Model Shipwrights: 386 posts
Posted: Saturday, May 25, 2013 - 10:16 PM UTC
...cos the flooding slits are a little bit too big offering a see-through, here's the next problem to solve. Not really necessary, but I know "It's inside!"
"Tauchzelle (ballast tank) 1" inner life:

and "Tauchzelle 2":

Michael


