Ships by Class/Type: Frigates
This is for topics on modern Frigates. For the sailing variety they should still go under Sailing.
1/350 Academy FFG-57 Build
Blespooky
Visit this Community
Tel Aviv-Yafo, Israel
Joined: June 03, 2014
KitMaker: 277 posts
Model Shipwrights: 171 posts
Posted: Sunday, February 22, 2015 - 04:42 AM UTC
1/350 FFG-57 Reuben James

Thanks everyone for you great comments, its a lot of fun.

Jan I will add some tie downs in the hanger in a logical pattern.

Today's Progress:

RAST control station situated on the flight deck.
Here is a good view of the station on a modernized Spanish FFG:


Here are some views of the kit part which up to this point is one of the most disappointing ones in the box. Underneath are my sketches for scratch building:


and my solution:


Do you guys like these photo collages?

Thanks for looking in,
Bryan
Blespooky
Visit this Community
Tel Aviv-Yafo, Israel
Joined: June 03, 2014
KitMaker: 277 posts
Model Shipwrights: 171 posts
Posted: Monday, February 23, 2015 - 03:44 AM UTC
1/350 FFG-57 Reuben James

Little update

Davits (I think), maybe a little off scale but they look the part, the real thing can be seen in the photo to the left. Also a hatch that was missing from the flight deck:


Chocks and these black boxes of which there are 5 on the flight deck. I have no idea what they are, maybe some kind of ILS for the LAMPS helicopters:


At this point I have finished deck details, now onto the superstructure bulkheads
Thanks for looking,
Bryan
TRM5150
Visit this Community
Massachusetts, United States
Joined: January 03, 2010
KitMaker: 2,159 posts
Model Shipwrights: 1,400 posts
Posted: Monday, February 23, 2015 - 08:22 AM UTC
Some great scratching on the tiny parts there Bryan! All these extras are sure to really pop in the finals!! Keep it coming!
JJ1973
#345
Visit this Community
Niedersachsen, Germany
Joined: August 22, 2011
KitMaker: 1,835 posts
Model Shipwrights: 1,832 posts
Posted: Tuesday, February 24, 2015 - 12:01 AM UTC
Bryan,

fine job as always you're picking up details I did not even notice before!

And your photo collages, original and your 'translation' of it next to each other, is a splendid idea, I like it very much!!

Cheers,
Jan
RedDuster
Visit this Community
England - South East, United Kingdom
Joined: March 01, 2010
KitMaker: 7,078 posts
Model Shipwrights: 6,649 posts
Posted: Tuesday, February 24, 2015 - 01:43 AM UTC
What Todd and Jan said!,

Great job Bryan.

Si
Blespooky
Visit this Community
Tel Aviv-Yafo, Israel
Joined: June 03, 2014
KitMaker: 277 posts
Model Shipwrights: 171 posts
Posted: Sunday, March 01, 2015 - 04:03 AM UTC
1/350 FFG-57 Reuben James

Alright, keeping it alive.

Thanks for all the comments, I'm glad you like the collages, I'd hate to have Photobucket get mad at me so maybe this will help save some bandwidth along with more essential advantages of comparison and format.

Todays Update:

I finally built the superstructure but before I ground off with knife and file all the detail to be replaced (see a few posts back for whats what) I made a drawing of what goes where because I was frankly scared of permanently messing this up.
In building the walls I tried to concentrate on fit so that the whole thing would sit flat and flush on the deck. All of those extra supports are keeping the bulkheads flush on deck, patience patience:


Port Hangar Bay:

I am building the left bay open which means scratch building an interior. I found one picture which I will present with the finished product, which was used for reference. Construction has taken some time and is not through yet. Here is my progress up till now. Note: the extensive supports inside the superstructure acting as guides for the hangar. The black stock is the hangar ceiling.

Original Sketch and scale measurement:


Bulkheads with details penciled on:


Bulkheads with details:


The ceiling also has a good amount of corresponding detail that will be attached once the sides are placed in the superstructure. You will just have to wait and see how it turns out.

Thanks for looking,
Bryan
TRM5150
Visit this Community
Massachusetts, United States
Joined: January 03, 2010
KitMaker: 2,159 posts
Model Shipwrights: 1,400 posts
Posted: Sunday, March 01, 2015 - 06:39 AM UTC
Some great detailing there Bryan!! Having a bunch of fun following along with your build!!
JJ1973
#345
Visit this Community
Niedersachsen, Germany
Joined: August 22, 2011
KitMaker: 1,835 posts
Model Shipwrights: 1,832 posts
Posted: Monday, March 02, 2015 - 10:51 AM UTC
Wow Bryan,

quite ambitious plans for the hangar bay, but that's really great!!

Great work!

Cheers,
Jan
Blespooky
Visit this Community
Tel Aviv-Yafo, Israel
Joined: June 03, 2014
KitMaker: 277 posts
Model Shipwrights: 171 posts
Posted: Thursday, March 05, 2015 - 01:34 PM UTC
1/350 FFG-57 Reuben James


Huge update but no time to talk so just pics
As always I really appreciate you participation here
Ive been thinking hard about Simon's Cruiser campaign, research has detracted from progress here


Hanger Reference with SeaSprite:


Finished hanger:


Just for fun:


And the closed hanger garage door:


Thanks for stopping by
Bryan
TRM5150
Visit this Community
Massachusetts, United States
Joined: January 03, 2010
KitMaker: 2,159 posts
Model Shipwrights: 1,400 posts
Posted: Thursday, March 05, 2015 - 04:28 PM UTC
Bryan, the devil is in the details brotha'!! You have them for sure!! The hanger looks sweet!! The chair though...brilliant!! Keep pushing this across the bench!!
RedDuster
Visit this Community
England - South East, United Kingdom
Joined: March 01, 2010
KitMaker: 7,078 posts
Model Shipwrights: 6,649 posts
Posted: Saturday, March 07, 2015 - 02:46 AM UTC
Great work on the interior of the hanger Bryan, that is going to give real depth to he finished article.

Keep up the good work.

Si
JJ1973
#345
Visit this Community
Niedersachsen, Germany
Joined: August 22, 2011
KitMaker: 1,835 posts
Model Shipwrights: 1,832 posts
Posted: Sunday, March 08, 2015 - 12:30 AM UTC
Hangar Bay turned out marvelous, Bryan!!

And the chair is a nice touch - even though the bas.... stole this one from the wardroom most likely on your reference picture

Cheers,
Jan
Blespooky
Visit this Community
Tel Aviv-Yafo, Israel
Joined: June 03, 2014
KitMaker: 277 posts
Model Shipwrights: 171 posts
Posted: Saturday, March 14, 2015 - 02:31 AM UTC
1/350 FFG-57 Reuben James

Hey everyone, thanks for the great comments,

I have been very slow lately as I am experiencing doubt about how to proceed with this model (and a new grown up job), more on that in a minute.

Jan, Simon and Tim (Halseysbeard), I have had such a lovely time watching your builds, amazing, thanks for the inspiration.

Today's update:
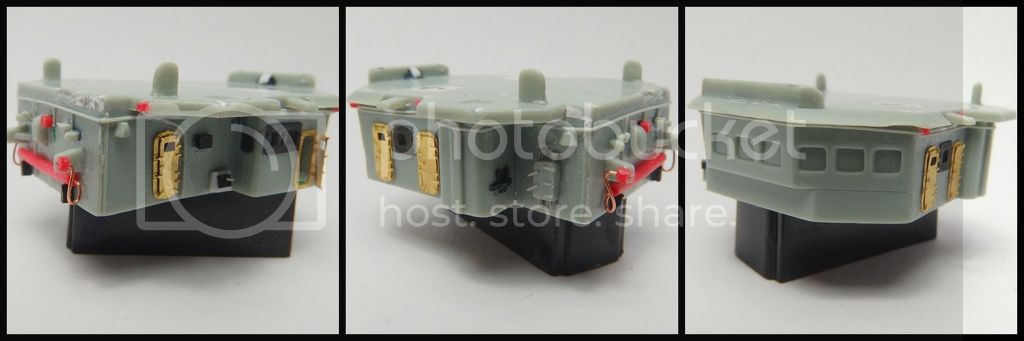
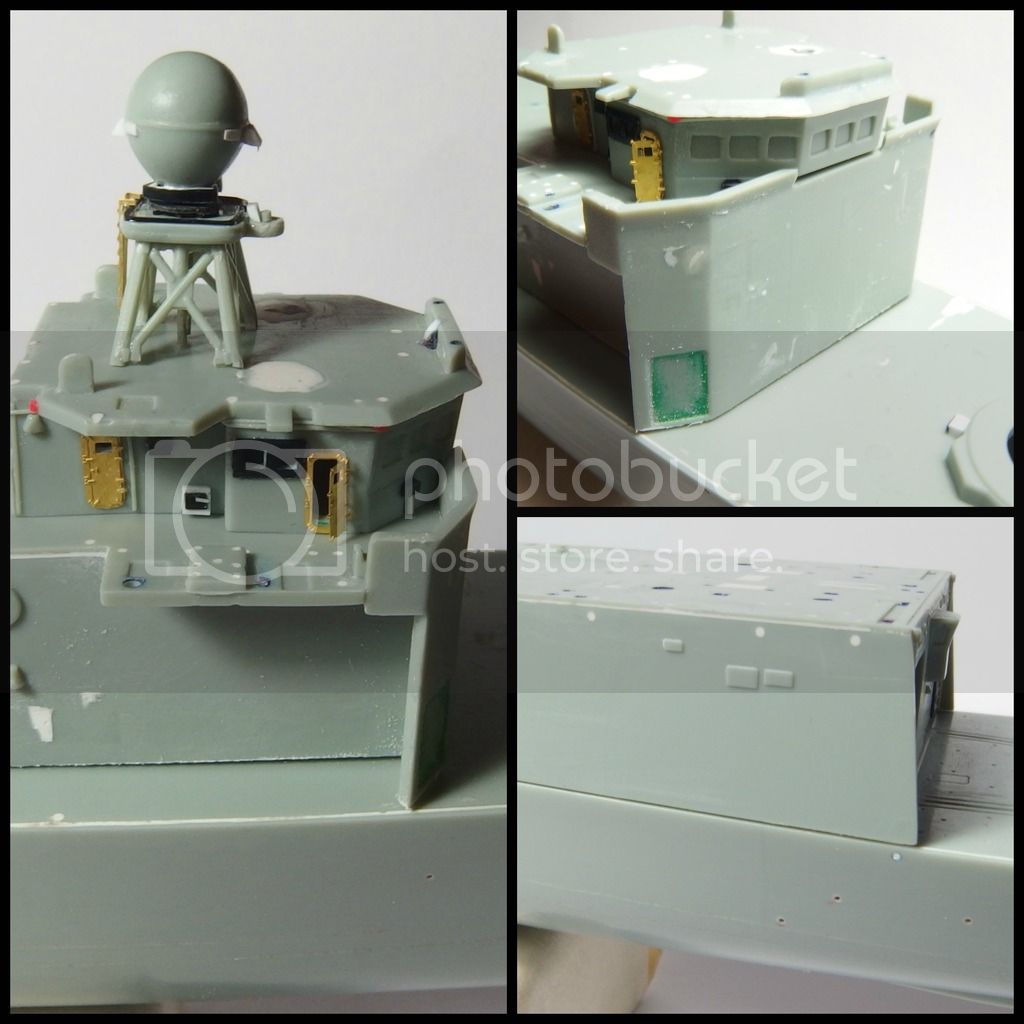
Built the pilot deck/bridge, cleared it of detail and then added scratch built/PE details according to reference photos. It turned out the kit left out three windows. Drilling squares in plastic is really hard so I used really thin strip as a window frame in order to make a sharp square. On the aft bulkhead there is the structure (make of red wire casing and copper wire) which looks like it hooks up to a fire hose.


and now the problem. I need your HELP.

Essentially it is a question of order of operations. The following collage shows some of the seams between the deck, superstructure, and bridge. I worked really hard on fit but no dice, there will have to be some pressure applied or even filler to make these seems perfect.


There are essentially two colors going on here: deck grey and bulkhead grey. So the question is:

Do I glue the superstructure and bridge together and paint everything using lots of masking, or do I keep them separate providing an easier painting procedure but requiring touch up after attachment?

Finally, I think an interesting way around filler would be to use very thin strip where external bulkheads meet the deck like in the following photo of the James departing Pearl Harbor. I'am not sure about that though.


How do you guys deal with painting deck color, bulkhead color, fixtures, and railings?

Thanks in advance,
Bryan
RedDuster
Visit this Community
England - South East, United Kingdom
Joined: March 01, 2010
KitMaker: 7,078 posts
Model Shipwrights: 6,649 posts
Posted: Saturday, March 14, 2015 - 03:15 AM UTC
Great work Bryan.

Painting, on a plastic kit I spray the deck before fitting, and paint in all the moulded on with a fine hairy stick.

Railings spray them on the fret, fit them by spot tacking with superglue and running white glue along the join.

hope that helps

Si.
RussellE
#306
Visit this Community
Victoria, Australia
Joined: June 27, 2010
KitMaker: 3,959 posts
Model Shipwrights: 2,777 posts
Posted: Saturday, March 14, 2015 - 04:09 PM UTC
Hi Bryan!

This continues to be an excellent build! Really enjoyable to see all your detailing efforts

On the subject of painting: well this is a really tricky one, when it comes to ships. When I've no areas that need to be seamless then I will leave the superstructure off, paint the decks, mask them, then paint the vertical surfaces. For areas that are highly visible & need to be seemless I would join & fill, then paint the decks first as above, mask, then paint the vertical areas.

As per Si, all railings are painted on the fret prior to fitting

Hope this helps

Russ
TRM5150
Visit this Community
Massachusetts, United States
Joined: January 03, 2010
KitMaker: 2,159 posts
Model Shipwrights: 1,400 posts
Posted: Saturday, March 14, 2015 - 06:36 PM UTC
Outstanding continuation!! That is some incredible detailing!!

As for the joint, not going to be much help here as I am about 50/50 on doing both AB the parts separate with joining after and runs some white glue in the joint with a toothpick cleaning it off with a damp Q-tip...hand paining if needed...or join them, fill and mask! I guess fill and mask might be the way to go if I was backed into a corner!!

Good luck!
Blespooky
Visit this Community
Tel Aviv-Yafo, Israel
Joined: June 03, 2014
KitMaker: 277 posts
Model Shipwrights: 171 posts
Posted: Monday, March 23, 2015 - 03:04 AM UTC
1/350 FFG-57 Reuben James

Been awhile since I posted, progress is very slow, Im still having fun though.

Today's update:
Working on the main mast, this is a photo of a modern Spanish FFG which has been significantly upgraded. I think it is a good example of the complexity of this fixture. Obviously the 1987 American ship had less electronic stuff going on but it was great reference.


This was really a good set of plastic from Academy, with a little putty and love it came out great. The instructions were kind of weird and I had to cut the lower island up a bit to fit it through the struts but in the end it all fit ok. I heavily detailed underneath the islands as well.


Here are some photos of the finished mast, it has many interesting parts, lots of wire conduits, and other stuff. Anyway:


Next up, gluing the superstructure and filling seems, what fun
Thanks for taking a look,

Bryan
ejhammer
Visit this Community
Michigan, United States
Joined: June 10, 2008
KitMaker: 230 posts
Model Shipwrights: 136 posts
Posted: Monday, March 23, 2015 - 05:57 AM UTC
Looks very complex, especially with all the rigging and antenna wires. Great job.

EJ
HalseysBeard
Visit this Community
New Brunswick, Canada
Joined: March 17, 2011
KitMaker: 137 posts
Model Shipwrights: 135 posts
Posted: Monday, March 23, 2015 - 09:00 AM UTC
Great build Ryan!...and your attention to detail is inspirational! Congrats on what you've got accomplished so far and I look forward to more great pics!

Thanks for posting! -Tim
JJ1973
#345
Visit this Community
Niedersachsen, Germany
Joined: August 22, 2011
KitMaker: 1,835 posts
Model Shipwrights: 1,832 posts
Posted: Monday, March 23, 2015 - 08:33 PM UTC
Great work on the mainmast Bryan, your Reuben James is really taking shape!

Your scratch build modifications continue to amaze, looking forward to your progress!

Cheers,

Jan
RedDuster
Visit this Community
England - South East, United Kingdom
Joined: March 01, 2010
KitMaker: 7,078 posts
Model Shipwrights: 6,649 posts
Posted: Tuesday, March 24, 2015 - 12:27 AM UTC
Great work Bryan,

the scratchbuilt detail is excellent, following with interest.

Si
RussellE
#306
Visit this Community
Victoria, Australia
Joined: June 27, 2010
KitMaker: 3,959 posts
Model Shipwrights: 2,777 posts
Posted: Tuesday, March 24, 2015 - 02:33 PM UTC
Those masts are looking great Bryan
Blespooky
Visit this Community
Tel Aviv-Yafo, Israel
Joined: June 03, 2014
KitMaker: 277 posts
Model Shipwrights: 171 posts
Posted: Saturday, March 28, 2015 - 01:00 AM UTC
1/350 FFG-57 Reuben James


Thanks for the great comments everyone. It turns out that there were a couple of PE parts on the masts that I forgot, I will add them much later I think just so that I dont break them as they are exceedingly fragile.

Anyone, just perusing photos and building up some more detail on the forward superstructure. This is the wood railing and supports around the bridge including some other little electrical boxes etc:


Im not sure whats next,

Thanks for looking,
Bryan
TimReynaga
Staff MemberAssociate Editor
MODEL SHIPWRIGHTS
Visit this Community
California, United States
Joined: May 03, 2006
KitMaker: 2,500 posts
Model Shipwrights: 1,830 posts
Posted: Saturday, March 28, 2015 - 01:32 AM UTC
Looking good Bryan! It is added details like those wood rails and supports which really give depth to a model, even though all that work briefly seems to disappear under the gray paint!
ejhammer
Visit this Community
Michigan, United States
Joined: June 10, 2008
KitMaker: 230 posts
Model Shipwrights: 136 posts
Posted: Saturday, March 28, 2015 - 01:32 AM UTC
Great detailing. Like the open watertite door.

EJ