Ships by Class/Type: Frigates
This is for topics on modern Frigates. For the sailing variety they should still go under Sailing.
1/350 Academy FFG-57 Build
Blespooky
Visit this Community
Tel Aviv-Yafo, Israel
Joined: June 03, 2014
KitMaker: 277 posts
Model Shipwrights: 171 posts
Posted: Friday, June 19, 2015 - 07:38 PM UTC
So I escaped for a few days from the army, laying down my rifle for the more accurate tools on the workbench. I really want to start painting soon but we have a lot of dust here in Israel and in any case I will never have a place to display this model, so I devised a solution based on an 81mm mortar ammunition crate. I constructed the box out of .5cm foam core, super glue, white glue and strap meant for window shades. All in all I think the final product is pretty cute. More supporting parts will be added after painting but this preliminary construction will keep the James safe during the painting process.

Planning, measuring and cutting, first construction:


Finished box open and closed with base, ship and main mast mock up:


Maybe tomorrow I will finally get some primer on this boat,
Thanks for looking,
Bryan
RedDuster
Visit this Community
England - South East, United Kingdom
Joined: March 01, 2010
KitMaker: 7,078 posts
Model Shipwrights: 6,649 posts
Posted: Saturday, June 20, 2015 - 03:48 AM UTC
Box looks great Bryan,

you have given me an idea for traveling boxes for my fleet.

Cheers.

Si
TRM5150
Visit this Community
Massachusetts, United States
Joined: January 03, 2010
KitMaker: 2,159 posts
Model Shipwrights: 1,400 posts
Posted: Saturday, June 20, 2015 - 08:04 AM UTC
Fine work on that case Bryan! I think we all need to be making these! Great idea!
ejhammer
Visit this Community
Michigan, United States
Joined: June 10, 2008
KitMaker: 230 posts
Model Shipwrights: 136 posts
Posted: Saturday, June 20, 2015 - 08:26 PM UTC
Great way to transport models to club meetings and contests without damage. Gonna get some foambord and make a few of those.

Thanks for the great idea.

EJ
Blespooky
Visit this Community
Tel Aviv-Yafo, Israel
Joined: June 03, 2014
KitMaker: 277 posts
Model Shipwrights: 171 posts
Posted: Saturday, June 20, 2015 - 09:21 PM UTC
Thanks guys I'm glad you like the box idea,

I'd been thinking about the box for a long time, in time it will get a couple of foam buffers up against the ship fore and aft and a complete frame with supports around the base. The nice thing with this box is that there is room for other extras such as aircraft. Just make a little floating shelf which the little model fits snugly into. I also attached an envelope to the flap that opens to store the instruction and other interesting things. I suppose you could really overdo it and print the ship blueprints or a diagram on the flap, or even make a place for a book next to the ship, that would be cool.

I have been avoiding it for a long time but finally I gave the ship a sponge bath and gave it two coats of primer and pre-shading:


Next steps:

1. Simultaneous Hull Red and White on landing pad fore and aft
2. Masking painted stuff
3. Deck color
4. More masking
5. Everything else haze grey

Thanks for stopping by,
Bryan

TRM5150
Visit this Community
Massachusetts, United States
Joined: January 03, 2010
KitMaker: 2,159 posts
Model Shipwrights: 1,400 posts
Posted: Saturday, June 20, 2015 - 09:54 PM UTC
Outstanding! Great to see the primer come out Bryan!! Time to play!!
RussellE
#306
Visit this Community
Victoria, Australia
Joined: June 27, 2010
KitMaker: 3,959 posts
Model Shipwrights: 2,777 posts
Posted: Sunday, June 21, 2015 - 03:53 PM UTC
Great to see some 'clothes' going on the lady, Bryan
Blespooky
Visit this Community
Tel Aviv-Yafo, Israel
Joined: June 03, 2014
KitMaker: 277 posts
Model Shipwrights: 171 posts
Posted: Monday, June 22, 2015 - 12:15 PM UTC
Hey guys, thanks for the comments, I was very apprehensive about painting but once the airbrush got going the paint flowed true.

I go back to the army today so this is it for awhile.

I quickly masked off the upper hull and superstructure of the ship in order to paint the red lower hull and white landing pad fore and aft.

The lower hull was sprayed with a mix of red and green. With each coat there was less green, in addition some highlighting was done on the leading edges and shadowing on the trailing. The beauty of spraying vallejo model color is that you can seamlessly airbrush and hand brush, what fun.


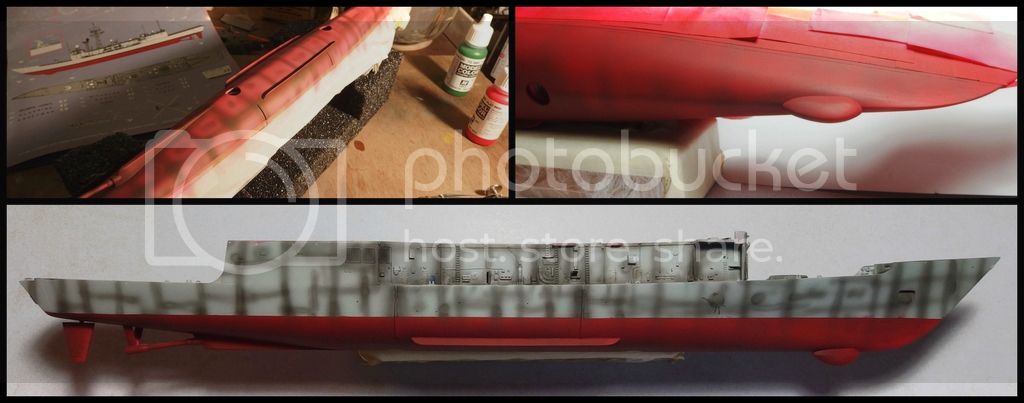
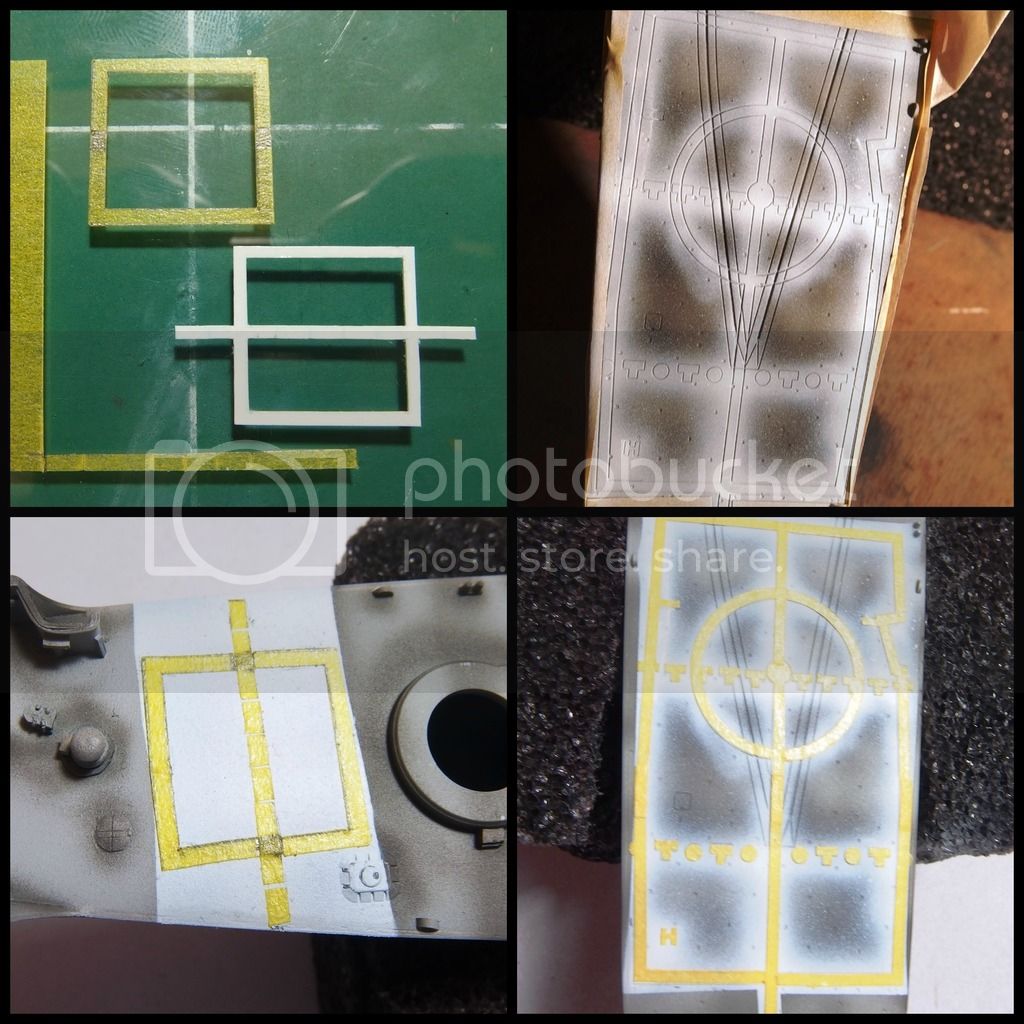
On deck I sprayed white and then masked on top for the markings. The kit supplied laser cut masks for the aft landing pad but not for the one on the bow so I made a mask based on the provided decal. It might have come out a little crooked, fingers crossed, masks were sealed with a coat of future.


Finally I painted the deck color which was Grey Green. Went on well in two very slow and thin coats. I painted free hand and I think it came out well.


Up next:
1. Mask off lower hull and deck (easier said than done)
2. Light grey upper hull and everything else
4. Bootstripe
5. Start adding details (see following picture for a taste of whats to come)

All the scratch building and detailing in one little plastic box:


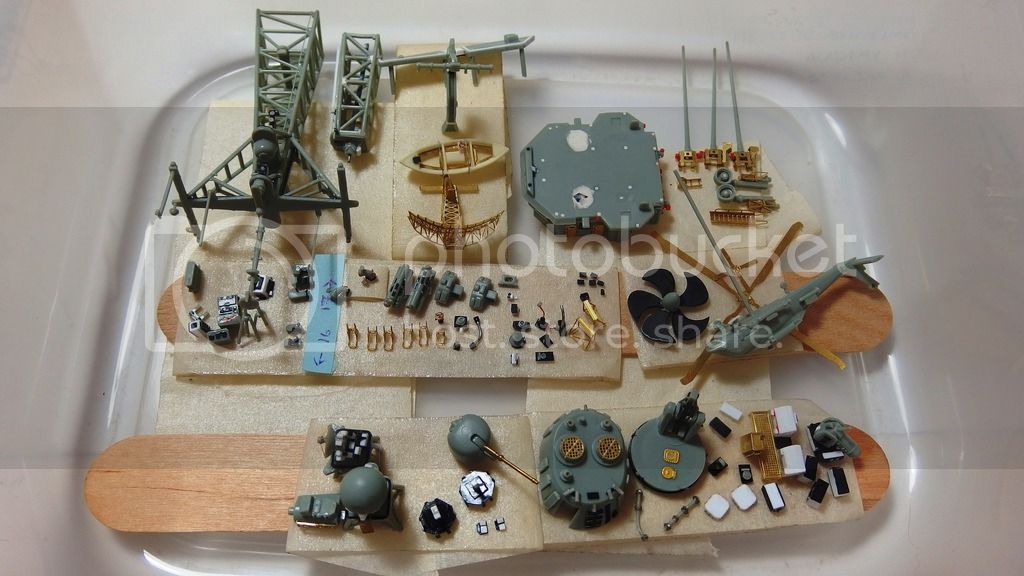
Now if only I could remember what goes where?

Thanks for you support and stopping in,
Bryan
RussellE
#306
Visit this Community
Victoria, Australia
Joined: June 27, 2010
KitMaker: 3,959 posts
Model Shipwrights: 2,777 posts
Posted: Monday, June 22, 2015 - 04:11 PM UTC
Very nice, Bryan.

Look forward to seeing more when you get back from training!

Russ
Blespooky
Visit this Community
Tel Aviv-Yafo, Israel
Joined: June 03, 2014
KitMaker: 277 posts
Model Shipwrights: 171 posts
Posted: Saturday, July 11, 2015 - 12:53 AM UTC
All right, back safe and sound from the fence, traded in my rifle for a ... *%$# load of masking tape. There must be a better order of operations for building/painting a ship. In any case, Ill try and get the light grey on in the next few days. and then the bootstripe.


Until next time,

Bryan
RussellE
#306
Visit this Community
Victoria, Australia
Joined: June 27, 2010
KitMaker: 3,959 posts
Model Shipwrights: 2,777 posts
Posted: Sunday, July 12, 2015 - 02:44 AM UTC
Hi Bryan!

good to see you back from the 'front' safely!

Yep, ships are a lot of work, compared to wing things etc, but worth the effort!

great work!
JJ1973
#345
Visit this Community
Niedersachsen, Germany
Joined: August 22, 2011
KitMaker: 1,835 posts
Model Shipwrights: 1,832 posts
Posted: Sunday, July 12, 2015 - 09:38 AM UTC
Hi Bryan,

good to see you back safe and sound! And great progress on your Reuben James! She has come a long way!!

Looks great with some color on, I keep my fingers crossed that all the paint under your masking tape remains where it should!!! Your preceding looks awesome!

Cheers,

Jan
Blespooky
Visit this Community
Tel Aviv-Yafo, Israel
Joined: June 03, 2014
KitMaker: 277 posts
Model Shipwrights: 171 posts
Posted: Saturday, August 01, 2015 - 12:00 AM UTC
SLOOOOOWWWW progress,

Here she is with here Red-Black-Grey-Grey Green base coat. I was very impressed with both the Tamiya tape and the Vallejo paints, I had no problem with the paint peeling with the tape or anything. Unfortunately the fore resupply markings came out a little bit crooked, I will have to decide if I want to take action but I think it is pretty much unfixable.


Next week I am travelling on business so progress will be even slower while I see that the cruiser campaign has just set sail, better get a move on,

Just remind me not to forget the decals!!

Thanks for looking,
Bryan
Choowy
Visit this Community
Victoria, Australia
Joined: April 17, 2015
KitMaker: 125 posts
Model Shipwrights: 125 posts
Posted: Saturday, August 01, 2015 - 08:12 AM UTC
Looking really good Bryan, I've been watching this build with interest. I have the same kit along with the Pontos advanced PE kit.

Keep up the great work, very nice.
RedDuster
Visit this Community
England - South East, United Kingdom
Joined: March 01, 2010
KitMaker: 7,078 posts
Model Shipwrights: 6,649 posts
Posted: Saturday, August 01, 2015 - 02:11 PM UTC
Hi Bryan,

looking good with some paint on Bryan.

Cheers.

Si
RussellE
#306
Visit this Community
Victoria, Australia
Joined: June 27, 2010
KitMaker: 3,959 posts
Model Shipwrights: 2,777 posts
Posted: Saturday, August 01, 2015 - 03:38 PM UTC
Very nice to see her with her "clothes" on, Bryan
JJ1973
#345
Visit this Community
Niedersachsen, Germany
Joined: August 22, 2011
KitMaker: 1,835 posts
Model Shipwrights: 1,832 posts
Posted: Saturday, August 01, 2015 - 10:32 PM UTC
Bryan,

that looks great, the colors really make a difference!!

Cheers,

Jan
Blespooky
Visit this Community
Tel Aviv-Yafo, Israel
Joined: June 03, 2014
KitMaker: 277 posts
Model Shipwrights: 171 posts
Posted: Friday, February 12, 2016 - 04:16 AM UTC
The James is Back!!

After finishing a thesis, starting a career, traveling to a myriad of places for work and pleasure, writing an academic article and planning a wedding (the event is scheduled for next week) I have finally gotten out my favorite ship and gotten to work.

The plan is to finish her with enough time to get into the Cruiser Campaign before time runs out.

Todays Progress:

The main hull and structure have been painted, highlighted, shaded, detailed and lightly weathered. In addition decals have been added and coated clear. In parallel I have given the same treatment to all other ship fixtures and will now start assembling the whole mess starting with railings from the center out.

I have concluded that building this ship like a plane, constructing and then painting as a whole was not necessarily the best method. On the next ship I will try a different method similar to Simon or Jan, construct sub assembly, prime, paint and store. I think this way the building is less tedious as you are always starting something new.

Here is a standard collage of the hull/main structure at this point:


Up Next:

Seahawk Helicopter
Sky Scan Radars railings and mast railings

Thanks for stopping by, Im very excited to devoting some time to catching up on the action on the website, I miss it.

Cheers, Bryan
RedDuster
Visit this Community
England - South East, United Kingdom
Joined: March 01, 2010
KitMaker: 7,078 posts
Model Shipwrights: 6,649 posts
Posted: Friday, February 12, 2016 - 02:25 PM UTC
Excellent work Bryan,

Good to see you back on this build.

Cheers

Si
Blespooky
Visit this Community
Tel Aviv-Yafo, Israel
Joined: June 03, 2014
KitMaker: 277 posts
Model Shipwrights: 171 posts
Posted: Saturday, February 13, 2016 - 02:06 AM UTC
Todays Progress: the ships Seahawk Helicopter complete with Chalks and tie downs for the rotors. It probably the most colorful thing on the whole ship.


Thanks for Looking, until next time,

Bryan
TRM5150
Visit this Community
Massachusetts, United States
Joined: January 03, 2010
KitMaker: 2,159 posts
Model Shipwrights: 1,400 posts
Posted: Saturday, February 13, 2016 - 03:22 AM UTC
Welcome back to the bench Bryan! Fine bit of work bringing things up to speed! Fantastic looking Seahawk! Details really pop nicely!!
JJ1973
#345
Visit this Community
Niedersachsen, Germany
Joined: August 22, 2011
KitMaker: 1,835 posts
Model Shipwrights: 1,832 posts
Posted: Sunday, February 14, 2016 - 10:17 AM UTC
Hi Bryan,

first of all let me say -it's great to have you back here!! I really was missing you and your work and updates on your fine frigate!!

And congratulations on all that you achieved in the meantime!! Certainly sounds like a busy - but good! - time!

Your Reuben James looks fantastic, it's really coming together!! All your super-detailing and creative work pays off!
Very nice SH 60 as well!

Looking forward to see you approaching the finishing line!!

Cheers,
Jan
RussellE
#306
Visit this Community
Victoria, Australia
Joined: June 27, 2010
KitMaker: 3,959 posts
Model Shipwrights: 2,777 posts
Posted: Sunday, February 14, 2016 - 01:56 PM UTC
Bryan, I couldn't say it any better than Jan!
berndm
Visit this Community
Niedersachsen, Germany
Joined: March 26, 2014
KitMaker: 844 posts
Model Shipwrights: 151 posts
Posted: Monday, February 15, 2016 - 05:57 PM UTC
The level of perfect made details is amazing. The helicopter is a small kit in its own right for example.
Its also tempting to get a more modern warship on the bench.
Blespooky
Visit this Community
Tel Aviv-Yafo, Israel
Joined: June 03, 2014
KitMaker: 277 posts
Model Shipwrights: 171 posts
Posted: Friday, February 03, 2017 - 08:23 PM UTC
1/350 FFG-57 Reuben James

Well it has been 353 days since I updated this post, but I again find myself returning to the Reuben James. I had never burnt out building a model until this one. I think it was mainly a lack of definition on my part. Defining how to go about this build story, how much detail to add to each ship competent and more. In order to get back to normal, I built a Tamyiya 1/48 Crusader tank and an AFV Type B IJN submarine as a scene. These models were basically Out of Box.


So now that things are in proportion and we love modelling again. We are going to finish the Reuben James in all her ASW/Tom Clancy/1980s glory.

I openened up the boxes of pieces, components and of course the ship itself. Everything had been wrapped in a sheet so the desert dust hadnt latched on. With a bottle of whiskey I made of a to do list to try and make sense of what had stopped all the detailed progress. The answer I found in a single railing that was bent only once and then left. On the instruction it was marked for 1 purpose, but renewed study showed that it was actually on the main mast. I think this little mismatch had caused me to box up the model so long ago. Pushing forward, I used both the MK1 and Academy PE to apply all the railing to the ships components.

Main Mast:


Pilot House:


Lookouts and Radars


In addition I gave a coat of Klear to the ship and gave a light black oil wash. It really gave a lot of character to the overall look of the ship. Less plain grey and a little more shadow.


Next steps:
-Wash for deck components
-Propeller and Rudder attachment

Cheers,
Bryan