

Coming on good Norman,
The superstructure looks great test fitted.
Cheers
Si


Go to modelshipwrights.com for the current dynamic site!
Campaigns
Want to be part of a group build? This is where to start, plan, and meet about them.
Want to be part of a group build? This is where to start, plan, and meet about them.
Hosted by Jim Starkweather
Official: Cruiser Campaign

RedDuster

Joined: March 01, 2010
KitMaker: 7,078 posts
Model Shipwrights: 6,649 posts

Posted: Thursday, January 21, 2016 - 12:46 AM UTC

rolltide31

#377

Joined: June 27, 2010
KitMaker: 1,481 posts
Model Shipwrights: 1,332 posts

Posted: Thursday, January 21, 2016 - 04:24 AM UTC
Norman,
Very impressive work. Glad to hear that the fit of the kit is going well.
Michael,
Great work on your Miami, I am always impressed with how you guys work on such a small scale. 1/350 gives me trouble as it is let alone 1/700.
Looking forward to seeing both works move forward.
Dave
Very impressive work. Glad to hear that the fit of the kit is going well.
Michael,
Great work on your Miami, I am always impressed with how you guys work on such a small scale. 1/350 gives me trouble as it is let alone 1/700.
Looking forward to seeing both works move forward.
Dave

MikeyBugs95
Joined: May 27, 2013
KitMaker: 2,210 posts
Model Shipwrights: 83 posts

Posted: Friday, January 22, 2016 - 05:40 AM UTC
Thanks David. This is actually my first kit ever in 1/700. Also the first time I've used photoetch this extensively. I've also started giving the same treatment to a Skywave Rudderow. Although I won't be going as extensive this time.
Well so for on my build I've added all the chocks and the side supports for the boat davits. As far as I can tell all the deck hatches I find are on. Doors and wall hatches as well. I've made the SK radar antenna and mounted one of the small SG antennas as well. The aft crane is also made. I still have yet to make 1 more catapult and the director radars along with the final funnel grill cap. I also need to finally flesh out where the yardarm goes on the mast.
Well so for on my build I've added all the chocks and the side supports for the boat davits. As far as I can tell all the deck hatches I find are on. Doors and wall hatches as well. I've made the SK radar antenna and mounted one of the small SG antennas as well. The aft crane is also made. I still have yet to make 1 more catapult and the director radars along with the final funnel grill cap. I also need to finally flesh out where the yardarm goes on the mast.

JJ1973
#345

Joined: August 22, 2011
KitMaker: 1,835 posts
Model Shipwrights: 1,832 posts

Posted: Saturday, January 23, 2016 - 11:55 PM UTC
Great progress here!! 
And really good to see more and more build joining in - eventually it's become really busy!
BELFAST has made some progress as well - shipyard is back up and running, not only the PomPom shop...
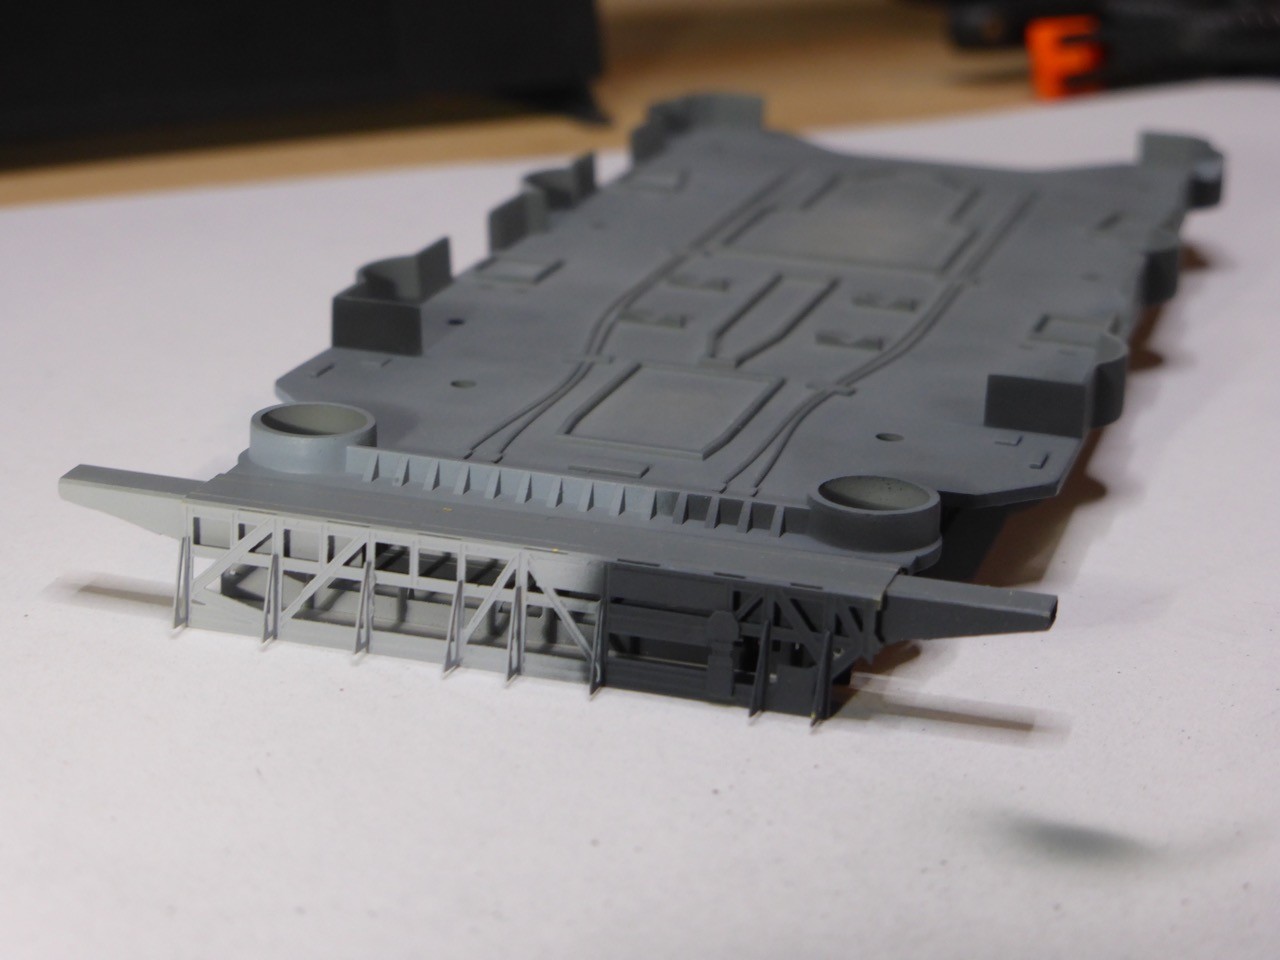
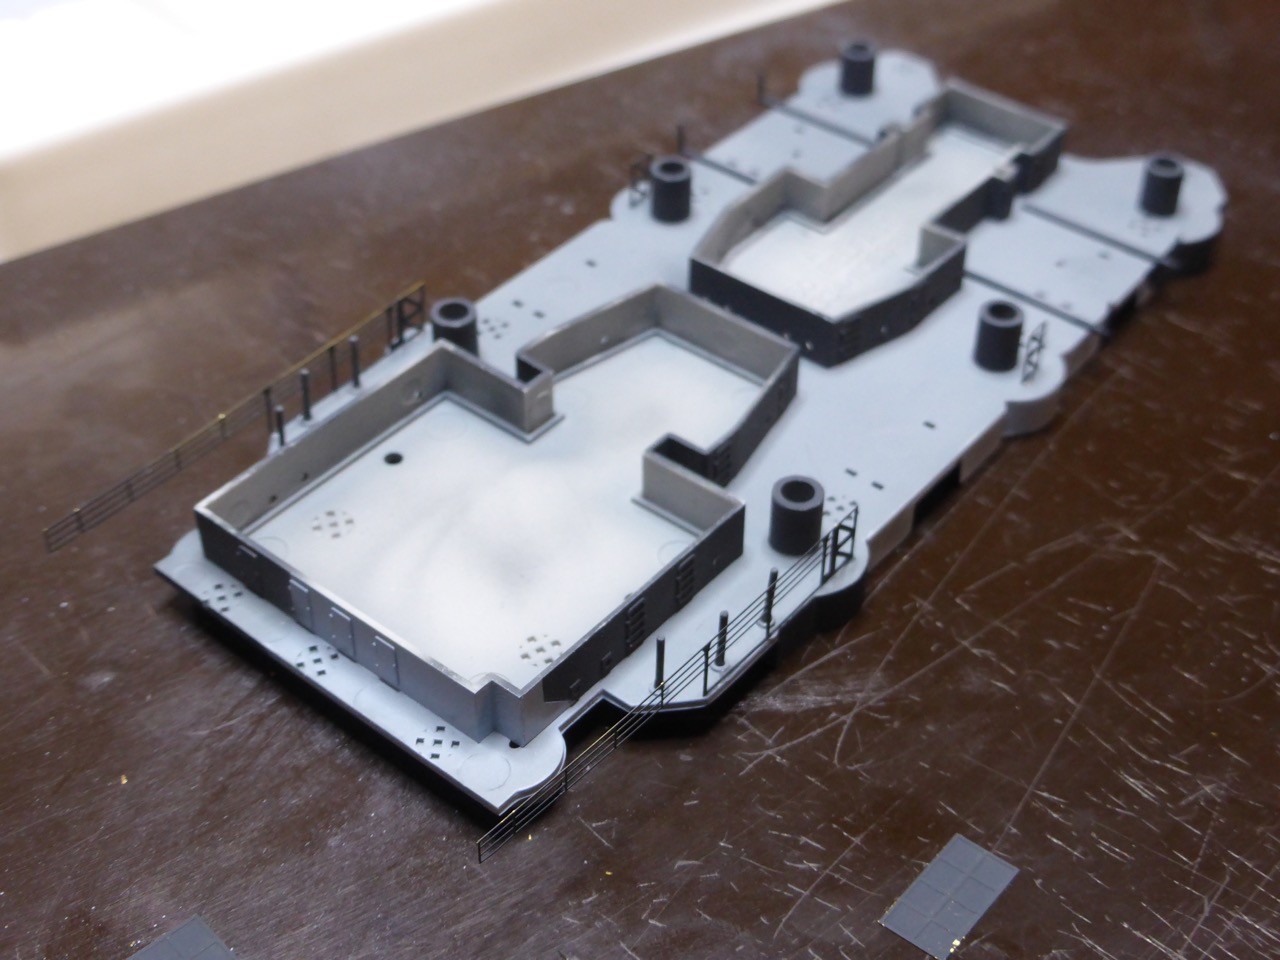
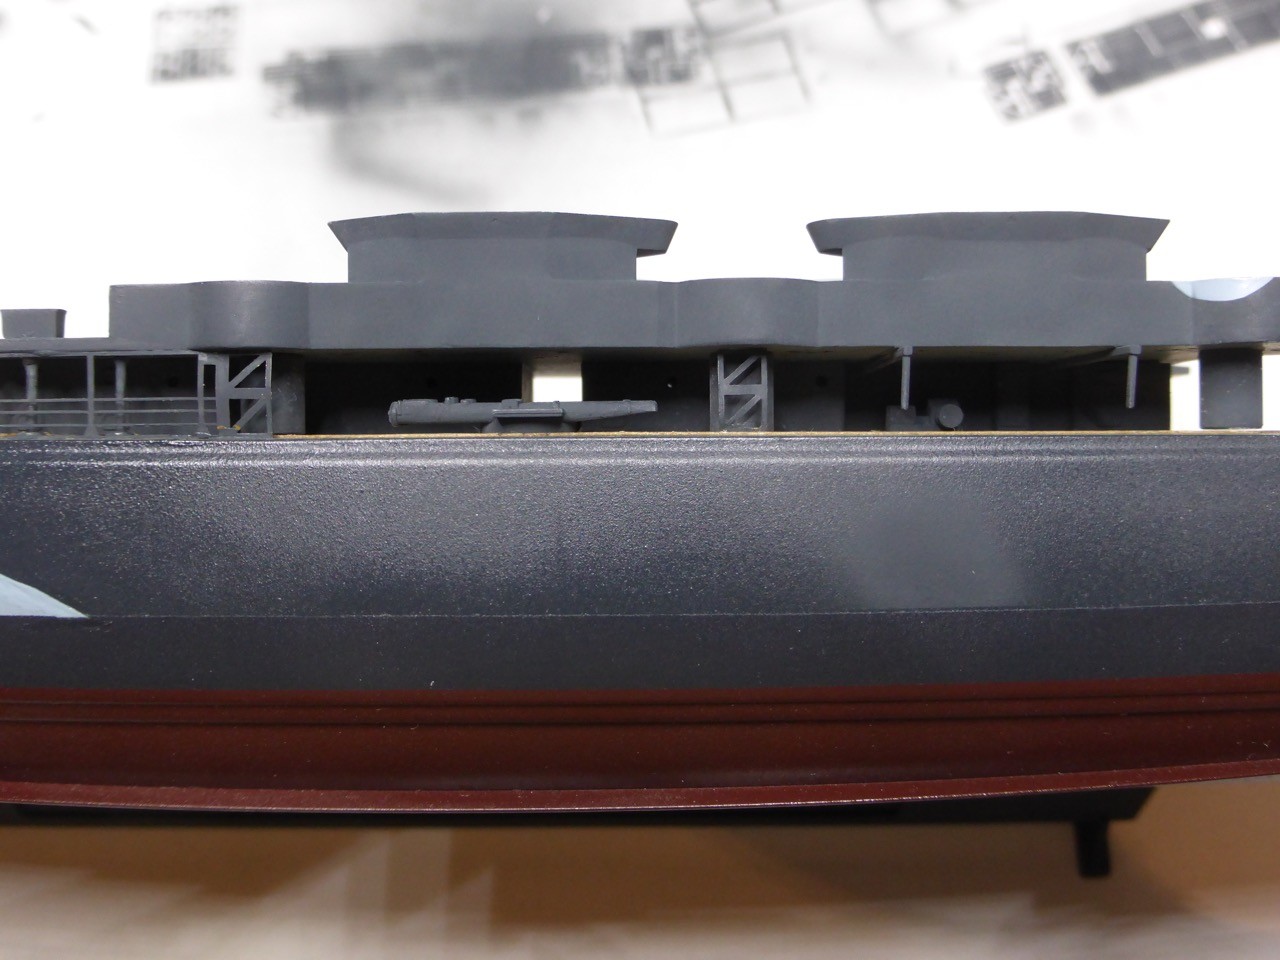
Focus for this weekend was the middle deck, or shelter deck - which proofed a quite complex task, even though not all the many small parts involved. But the camouflage question - and when to paint - makes it a little tricky.
So here's a few impressions of the shelter deck and the aircraft catapult. The full story as alway will be at the BELFAST blog shortly...

Cheers,
Jan
And really good to see more and more build joining in - eventually it's become really busy!
BELFAST has made some progress as well - shipyard is back up and running, not only the PomPom shop...
Focus for this weekend was the middle deck, or shelter deck - which proofed a quite complex task, even though not all the many small parts involved. But the camouflage question - and when to paint - makes it a little tricky.
So here's a few impressions of the shelter deck and the aircraft catapult. The full story as alway will be at the BELFAST blog shortly...
Cheers,
Jan
RedDuster
Joined: March 01, 2010
KitMaker: 7,078 posts
Model Shipwrights: 6,649 posts
Posted: Sunday, January 24, 2016 - 03:46 AM UTC
Hi Jan,
The Catapult looks impressive, the whole deck looks great in place.
I have made a little progress on the Scharnhorst, started work on the single and quad 20mm.... so many microscopic parts. No pics yet, hope to get a bit further next weekend.
Si
The Catapult looks impressive, the whole deck looks great in place.
I have made a little progress on the Scharnhorst, started work on the single and quad 20mm.... so many microscopic parts. No pics yet, hope to get a bit further next weekend.
Si

steve-o
Joined: February 05, 2004
KitMaker: 545 posts
Model Shipwrights: 113 posts

Posted: Tuesday, January 26, 2016 - 08:46 PM UTC
I'm glad that everyone is still working hard! Checking in helps encourage me to keep up. I've bought a few masking products (Tamiya Tape and Mig putty), and I think I just have to get better with my airbrush. I might call this camo done for now, and keep building.
Question: Should the deck and/or all horizontal services be Deck Blue? The pictures on Navsource look like the deck is a light color.


Question: Should the deck and/or all horizontal services be Deck Blue? The pictures on Navsource look like the deck is a light color.


MikeyBugs95
Joined: May 27, 2013
KitMaker: 2,210 posts
Model Shipwrights: 83 posts
Posted: Tuesday, January 26, 2016 - 11:32 PM UTC
Well technically, according to SHIPS-2 (the manual that lists the camouflage measures that were in use in the US Navy at certain times during WWII), the deck should be painted a pattern of Deck Blue 20-B and Ocean Gray 5-O. But it looks like the deck is just overall Deck Blue. Hard for me to tell...
steve-o
Joined: February 05, 2004
KitMaker: 545 posts
Model Shipwrights: 113 posts
Posted: Wednesday, January 27, 2016 - 08:39 PM UTC
Thanks Michael,
Is this what you are looking at? It's one of the things that has confused me a bit too, since I have not seen good pictures of this being applied in the field (or...water). It would be cool since the Ocean Gray kind of wraps around the ship, but I am hesitant to use it without photos.
Of course, I guess I could get involved in the multiple-page somewhat heated discussion about the Ocean Gray vs. Black paint issue taking place on another website...

clovis899
#155
Joined: May 05, 2002
KitMaker: 774 posts
Model Shipwrights: 19 posts

Posted: Saturday, January 30, 2016 - 06:01 AM UTC
Here is my in progress shot of the USS San Francisco. I have been surprised at how quickly I was able to move through the construction. I was also a bit dismayed at the amount of flash and giant ejector pin marks in many parts. Hopefully, Trumpeter has worked out the issues in later releases but I didn't think this one was that old. Oh well.
I'm sure that sharp eyes will find more than a few mistakes here or things I missed. If you see something glaring please let me know before it is to late. Moving on!
Cheers,
Rick

I'm sure that sharp eyes will find more than a few mistakes here or things I missed. If you see something glaring please let me know before it is to late. Moving on!
Cheers,
Rick
clovis899
#155
Joined: May 05, 2002
KitMaker: 774 posts
Model Shipwrights: 19 posts
Posted: Sunday, January 31, 2016 - 12:22 AM UTC
A quick question for my cruiser friends hanging about here. Detail painting; should I be picking out any areas for painting with anything other than the deck blue or 5-N Navy Blue? I am thinking of things like the blast bags, hoses, life boats, a=or anything else?
I have the Friedman book on US Cruisers but it is all black and while and hard to tell. If anyone has any insight it would be greatly appreciated.
Cheers,
Rick
I have the Friedman book on US Cruisers but it is all black and while and hard to tell. If anyone has any insight it would be greatly appreciated.
Cheers,
Rick
JJ1973
#345
Joined: August 22, 2011
KitMaker: 1,835 posts
Model Shipwrights: 1,832 posts
Posted: Sunday, January 31, 2016 - 01:08 AM UTC
Very nice progress, Rick and Steve!! Looking good your cruisers!!
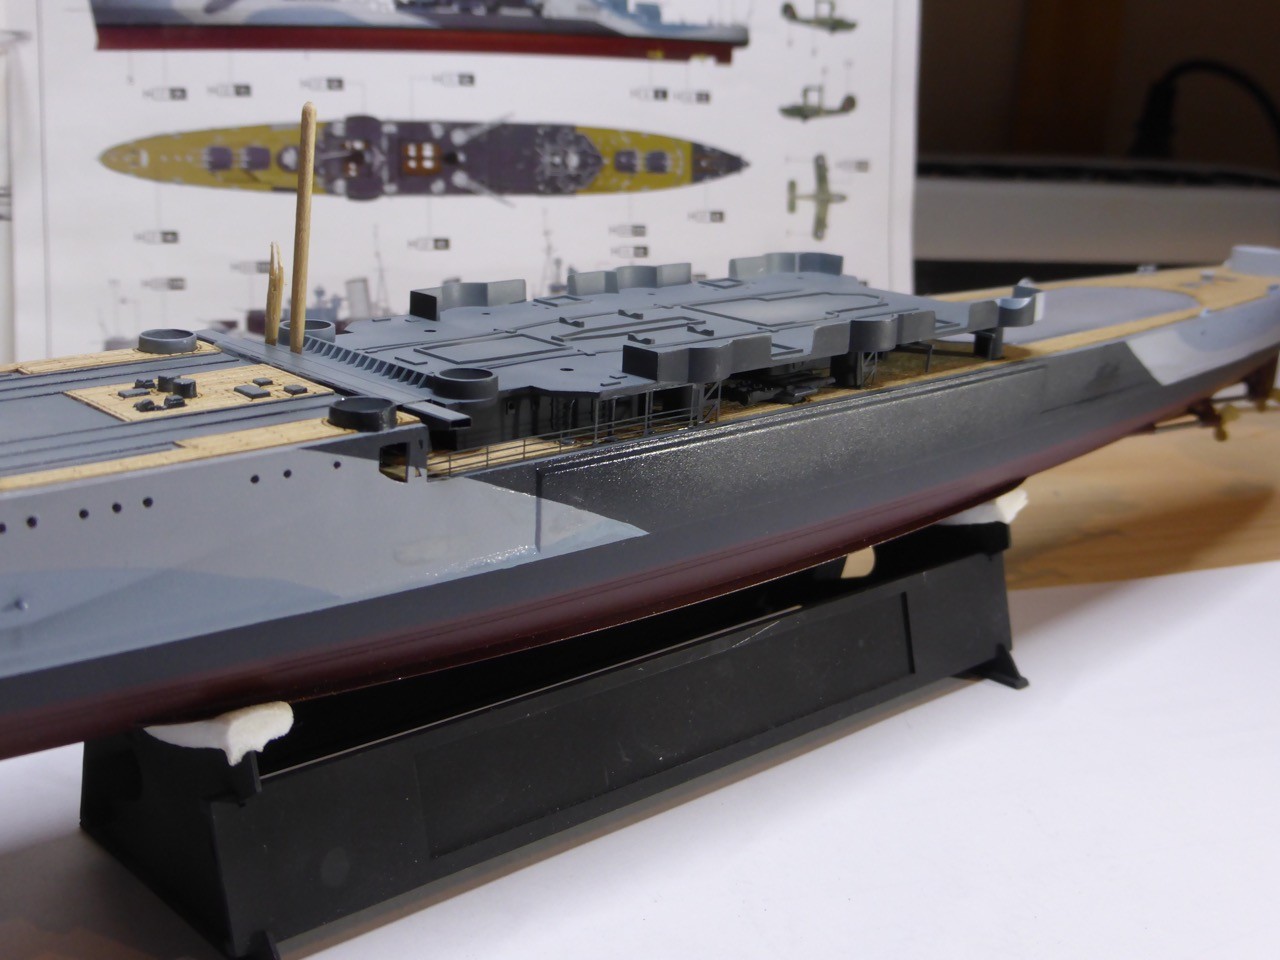
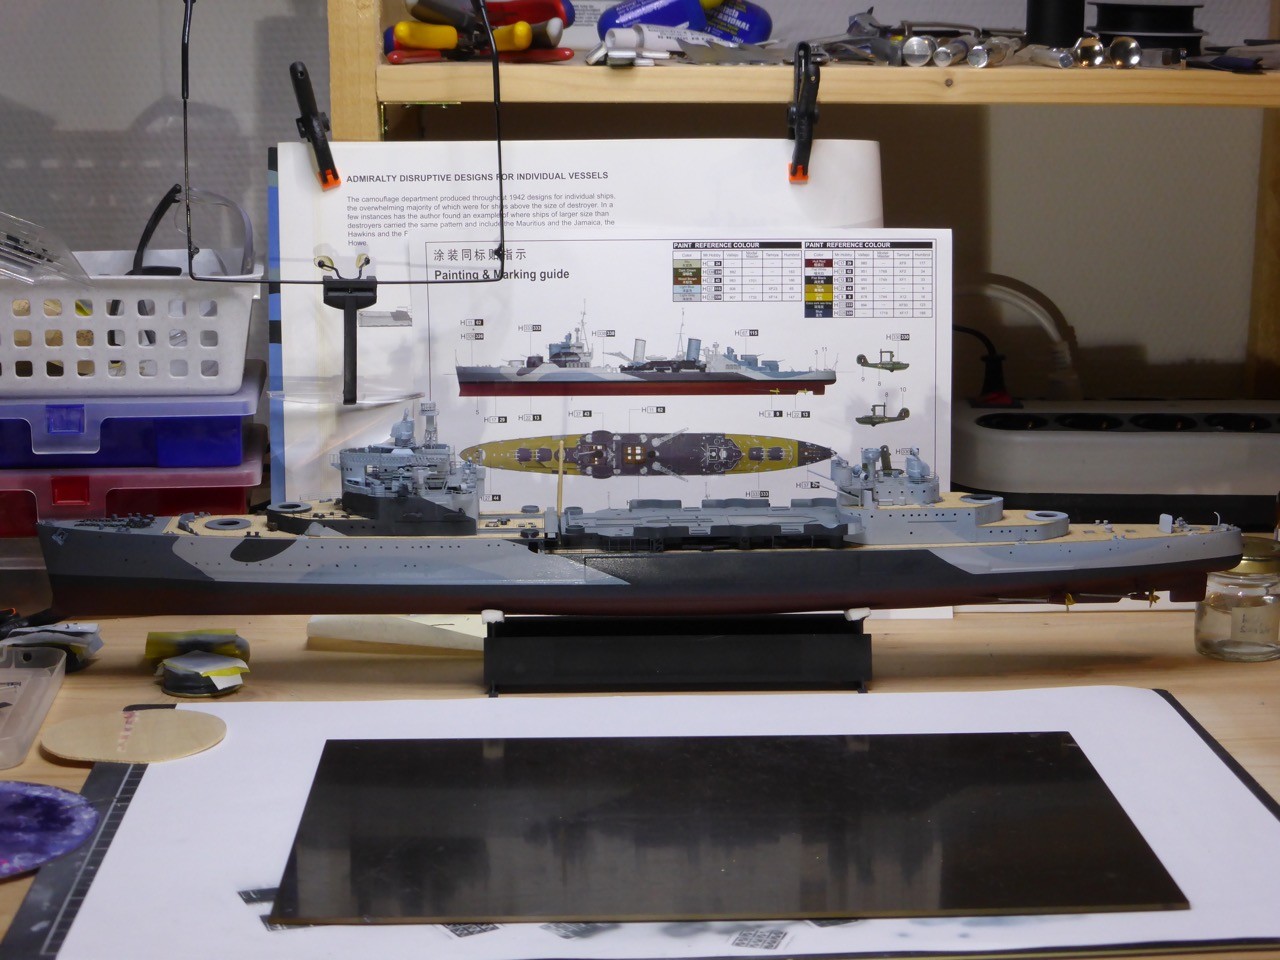
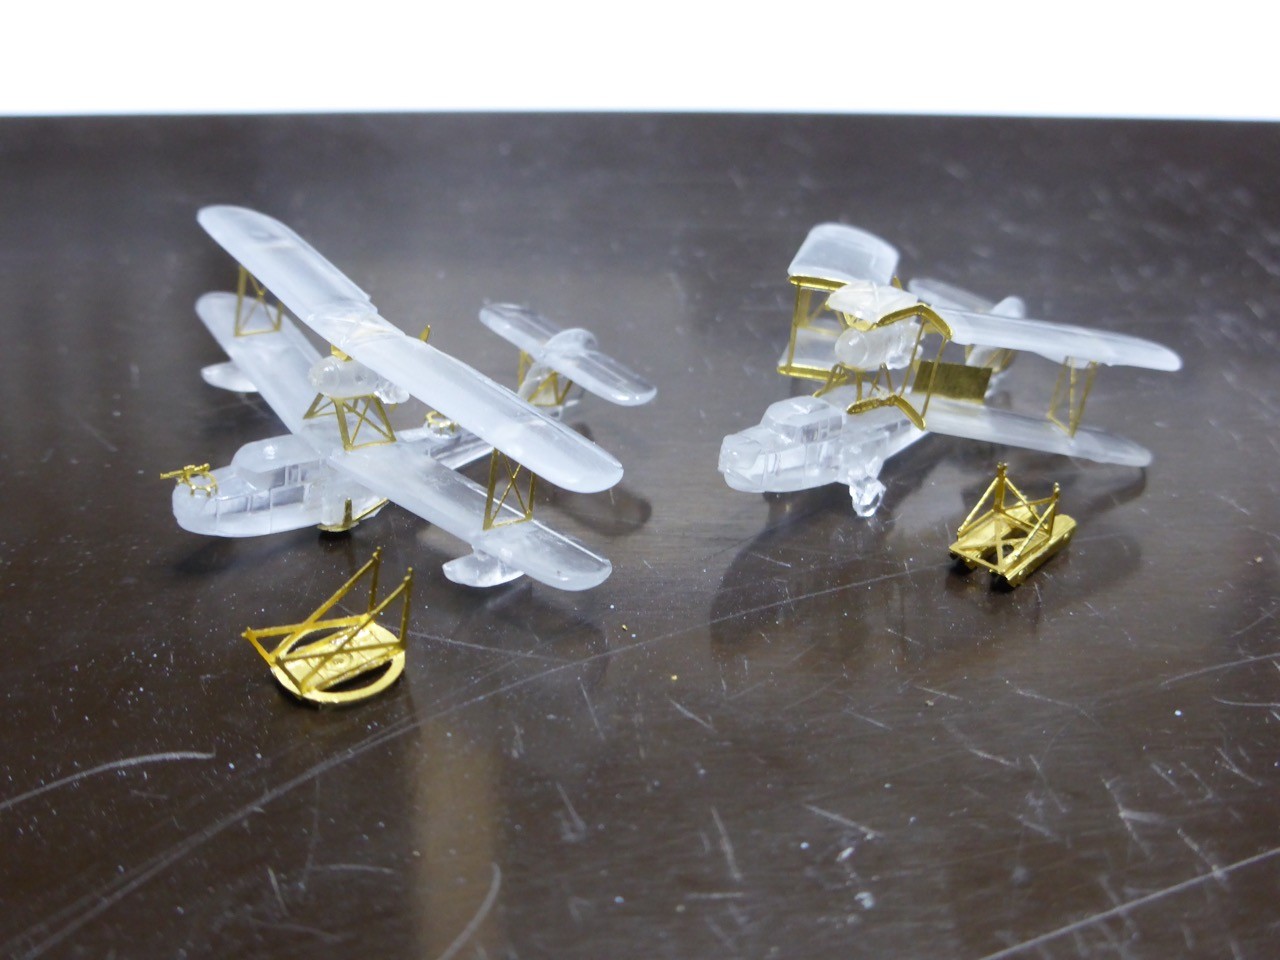
Here's the latest from my BELFAST, platforms installed on the shelter deck:


Still some touch ups needed...
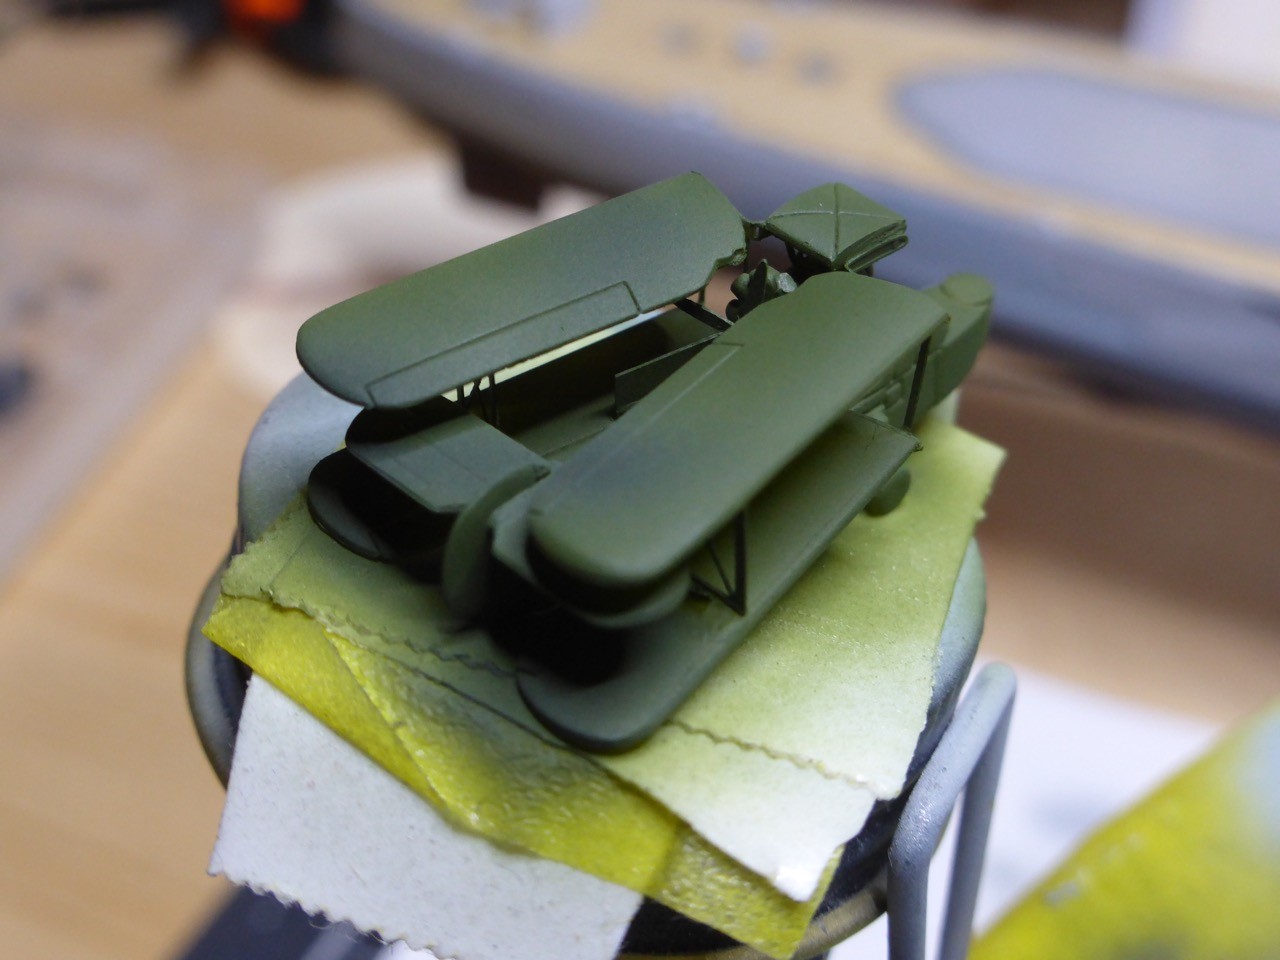
And two Walrus on the way:


Cheers,
Jan

Here's the latest from my BELFAST, platforms installed on the shelter deck:
Still some touch ups needed...
And two Walrus on the way:
Cheers,
Jan
JJ1973
#345
Joined: August 22, 2011
KitMaker: 1,835 posts
Model Shipwrights: 1,832 posts
Posted: Sunday, January 31, 2016 - 01:13 AM UTC
Rick,
I would certainly do that (i.e. pick some details and paint the differently). I just think it looks so much better and gives life to the model. I have no insight as to how exactly the US cruisers looked like, but the details you are mentioning are likely to have had different colors... And I for myself allow a certain degree of 'artistic freedom' to my models, when I am not sure about something, or whenever I think something looks particularly interesting in a certain way...
Cheers,
Jan
clovis899
#155
Joined: May 05, 2002
KitMaker: 774 posts
Model Shipwrights: 19 posts
Posted: Sunday, January 31, 2016 - 01:26 AM UTC
Jan thanks for the feedback, I think that is exactly what I will do unless I hear something different. Your Belfast is coming along nicely, the Walrus are especially impressive. Love the clean PE additions, you have some impressive skills with CA my friend!
Cheers,
Rick
Cheers,
Rick
RedDuster
Joined: March 01, 2010
KitMaker: 7,078 posts
Model Shipwrights: 6,649 posts
Posted: Sunday, January 31, 2016 - 01:37 AM UTC
Rick, Steve, Jan
Great work guys, three excellent cruisers coming on.
bit of a hiatus on the Scharnhorst, real life and a nasty cold have kept me from the bench, (I daren't handle sharp objects or fine etch with a tendency to uncontrolled coughing or sneezing fits)
Hope to be back in action by next weekend.
cheers
Si
rolltide31
#377
Joined: June 27, 2010
KitMaker: 1,481 posts
Model Shipwrights: 1,332 posts
Posted: Monday, February 01, 2016 - 08:33 AM UTC
Rick, Steve, Jan,
I echo Si's comments great job on your Cruisers.
Rick, your "Friso" is looking great. Nice clean paint job. I have both the "44" and the "42" version on the stash. looking forward to building them one day.
Steve, nice job. I am still amazed at your skill with such a small scale. Keep up the great work.
Jan, Your Walrus' look amazing. Will really add a level of realism once added to your Belfast. Nice job on the gun tubs too, I will look at stealing that method in the future.
Looking forward to seeing more great work soon.
Dave

Cadeus
Joined: September 01, 2015
KitMaker: 144 posts
Model Shipwrights: 139 posts

Posted: Monday, February 01, 2016 - 09:57 AM UTC
So after multuple sieres of painting sessions i am now on to more brass. This weekend consited of final touchups on the main paint and then some stairs, ladders, and brass platforms. Let me stop here and suggest a quiet room, some peaceful music, some strong coffee or whiskey, and tons of patience. This is a jigsaw puzzle. The main supports for the crows nest have to go in by themselves without glue to anything else. Do not, i repeat do not think you can build it up and install it afterwards. The angle at wich they set will not allow. As far as the aft platforms behind the smoke stack. Be careful and take your time building these and PAY ATTENTION TO WICH SIDE THEY GO TO. If not and you bend them the wrong way youll be soldering and sharing choice words with yourself.
I have to say it looks good bow after it was fixed. Steady hands and a good weller iron helped. On to the pictures.


As always, im sorry for the quality of the pictures, a camera and computer are in the works but all i have is a phone at the moment. Any and all contrsuctive criticism is welcome. Im going off kit instructions so if you spot an inaccuracy or have a question about the kit itself id be happy to hear from you. More to come soon.
I have to say it looks good bow after it was fixed. Steady hands and a good weller iron helped. On to the pictures.
As always, im sorry for the quality of the pictures, a camera and computer are in the works but all i have is a phone at the moment. Any and all contrsuctive criticism is welcome. Im going off kit instructions so if you spot an inaccuracy or have a question about the kit itself id be happy to hear from you. More to come soon.
RedDuster
Joined: March 01, 2010
KitMaker: 7,078 posts
Model Shipwrights: 6,649 posts
Posted: Tuesday, February 02, 2016 - 12:19 AM UTC
Very tidy etch work Norman,
That is quite a collection of ladders,
Cheers
Si
That is quite a collection of ladders,
Cheers
Si

RussellE
#306

Joined: June 27, 2010
KitMaker: 3,959 posts
Model Shipwrights: 2,777 posts
Posted: Tuesday, February 02, 2016 - 02:48 AM UTC
Quoted Text
Rick, Steve, Jan
Great work guys, three excellent cruisers coming on.
bit of a hiatus on the Scharnhorst, real life and a nasty cold have kept me from the bench, (I daren't handle sharp objects or fine etch with a tendency to uncontrolled coughing or sneezing fits)
Hope to be back in action by next weekend.
cheers
Si
I second what Si says: great work going on here guys!
Si, I hope you are feeling better soon mate, and can get back to the dockyard
PS. I heard a rumor that Dragon models has gone bust-can anyone confirm that?


rolltide31
#377
Joined: June 27, 2010
KitMaker: 1,481 posts
Model Shipwrights: 1,332 posts
Posted: Tuesday, February 02, 2016 - 05:39 AM UTC
Si - I hope you feel better soon!!!
Norman, very nice work with the ladder puzzle, you can tell it took a great level of patience to accomplish.
As Russell said, great work going on for this campaign. Look forward to seeing some more updates soon.
Dave
Norman, very nice work with the ladder puzzle, you can tell it took a great level of patience to accomplish.
As Russell said, great work going on for this campaign. Look forward to seeing some more updates soon.
Dave
Cadeus
Joined: September 01, 2015
KitMaker: 144 posts
Model Shipwrights: 139 posts
Posted: Tuesday, February 02, 2016 - 07:23 AM UTC
Thank you gents, the ladders in all took a couple hours, the worst part was making sure you bent the rails the right direction. I dont know if you can tell but the left middle (as looking towards the bow) platform was soldered back together. Thanks for the kind words.
RedDuster
Joined: March 01, 2010
KitMaker: 7,078 posts
Model Shipwrights: 6,649 posts
Posted: Tuesday, February 02, 2016 - 01:57 PM UTC
Russ, Dave,
Thanks guys, back at work, bit of a busy family weekend coming up, but hoping to get a few hours in on Sunday on the Scharnhorst's 20mm.
Should have an update then.
Cheers
Si
Thanks guys, back at work, bit of a busy family weekend coming up, but hoping to get a few hours in on Sunday on the Scharnhorst's 20mm.
Should have an update then.
Cheers
Si
steve-o
Joined: February 05, 2004
KitMaker: 545 posts
Model Shipwrights: 113 posts
Posted: Tuesday, February 02, 2016 - 07:39 PM UTC
Love the ladders!
Great progress everyone. I've been stalled with the paint job on the San Diego, and now that I started applying the Weathered deck blue, I'm not really a fan of it. I know it's supposed to be dark. Maybe I can't get past the light look of the decks from the photos of it at Mare Island.
One thing I have leaned: Before spraying paint, build in sub-assemblies!!

From Navsource.org:

JJ1973
#345
Joined: August 22, 2011
KitMaker: 1,835 posts
Model Shipwrights: 1,832 posts
Posted: Tuesday, February 02, 2016 - 11:21 PM UTC
Norman,
very nice work on the ladders and your PE in general! -I can't spot the broken and soldered platform, nice and clean fix!!
Steve,
your camouflage looks good! And the color of your deck looks fine to me, as well I see your point with the photograph, but I would not worry too much!
I always paint the individual sub-assemblies first, sometimes even down to individual parts. Lately I have resorted to painting even earlier and accepting that I have to do some sanding and re-painting afterwards. Sometimes that allows you to spare areas that are not accessible later on - at least not without over-spraying other areas - while you can arrange the build up in a way that the sanding is required only in easy accessible spots. And those you can normally spray without doing (much - any) damage to other parts.
Cheers,
Jan
very nice work on the ladders and your PE in general! -I can't spot the broken and soldered platform, nice and clean fix!!
Steve,
your camouflage looks good! And the color of your deck looks fine to me, as well
I see your point with the photograph, but I would not worry too much!I always paint the individual sub-assemblies first, sometimes even down to individual parts. Lately I have resorted to painting even earlier and accepting that I have to do some sanding and re-painting afterwards. Sometimes that allows you to spare areas that are not accessible later on - at least not without over-spraying other areas - while you can arrange the build up in a way that the sanding is required only in easy accessible spots. And those you can normally spray without doing (much - any) damage to other parts.
Cheers,
Jan
RedDuster
Joined: March 01, 2010
KitMaker: 7,078 posts
Model Shipwrights: 6,649 posts
Posted: Wednesday, February 03, 2016 - 12:33 AM UTC
Looks good Steve,
Agree with Jan, the deck colour looks good. Black and white photos can be misleading. One solution if you think it looks too light is to put a dark wash over the deck, will also bring out the moulded detail.
Cheers
Si
Agree with Jan, the deck colour looks good. Black and white photos can be misleading. One solution if you think it looks too light is to put a dark wash over the deck, will also bring out the moulded detail.
Cheers
Si
MikeyBugs95
Joined: May 27, 2013
KitMaker: 2,210 posts
Model Shipwrights: 83 posts
Posted: Wednesday, February 03, 2016 - 10:24 AM UTC
Looks good with the camouflage. I actually did a photo essay on all about USN camouflage on the World of Warships forum.
I have gotten a little bit of work done on my Cleveland build. I've built both Mk 34 with Mk 8 main battery directors and both Mk 37 5in directors. I've started adding rafts (which unfortunately I've run out of ) as well along with a sparse few hatches and doors. On the 2 finished turrets I just need to add a periscope out of wire and those will be finished. I was also able to do up the directors so that they too can rotate (at the rate I'm going I be able to get the 40s to rotate as well). This stemmed more from the fact that the little pegs on the bottom of the 3D printed mk 37 directors were too big to fit in the holes of the kit structure. I cut them off and drilled holes for wires. I also added small platforms to part of the aft superstructure that were absent in the kit. I'm also changing parts of the structure as I see fit to try to to match a plan I have of the Miami. Not making any major changes; just small changes that I'm confident in.
I have gotten a little bit of work done on my Cleveland build. I've built both Mk 34 with Mk 8 main battery directors and both Mk 37 5in directors. I've started adding rafts (which unfortunately I've run out of
) as well along with a sparse few hatches and doors. On the 2 finished turrets I just need to add a periscope out of wire and those will be finished. I was also able to do up the directors so that they too can rotate (at the rate I'm going I be able to get the 40s to rotate as well). This stemmed more from the fact that the little pegs on the bottom of the 3D printed mk 37 directors were too big to fit in the holes of the kit structure. I cut them off and drilled holes for wires. I also added small platforms to part of the aft superstructure that were absent in the kit. I'm also changing parts of the structure as I see fit to try to to match a plan I have of the Miami. Not making any major changes; just small changes that I'm confident in.  |

WEB HOSTING BY


Copyright ©2021 Model Shipwrights and Kitmaker Network, a subsidiary of Silver Star Enterprises
All Rights Reserved. Please read our Conditions of Use and Privacy Policy.
All Rights Reserved. Please read our Conditions of Use and Privacy Policy.