

Si,
Great progress so far. I am feeling a little jealous with seeing everyone moving forward. I may just have to pay the dockworkers overtime to get the hull and deck complete for the Noshiro...hmmm
Dave


Go to modelshipwrights.com for the current dynamic site!
Campaigns
Want to be part of a group build? This is where to start, plan, and meet about them.
Want to be part of a group build? This is where to start, plan, and meet about them.
Hosted by Jim Starkweather
Official: Cruiser Campaign

rolltide31

#377

Joined: June 27, 2010
KitMaker: 1,481 posts
Model Shipwrights: 1,332 posts

Posted: Wednesday, August 05, 2015 - 01:43 AM UTC

RedDuster

Joined: March 01, 2010
KitMaker: 7,078 posts
Model Shipwrights: 6,649 posts

Posted: Wednesday, August 05, 2015 - 02:00 AM UTC
Thanks Dave,
Because we have a strike on the underground in London which started this evening, I went into work early & left early today. Seemed a shame to waste an extra hour at home.
Cheers.
Si
Because we have a strike on the underground in London which started this evening, I went into work early & left early today. Seemed a shame to waste an extra hour at home.
Cheers.
Si
Removed by original poster on 08/07/15 - 00:27:38 (GMT).

GrantGoodale

Joined: April 26, 2015
KitMaker: 99 posts
Model Shipwrights: 99 posts

Posted: Thursday, August 06, 2015 - 05:30 AM UTC
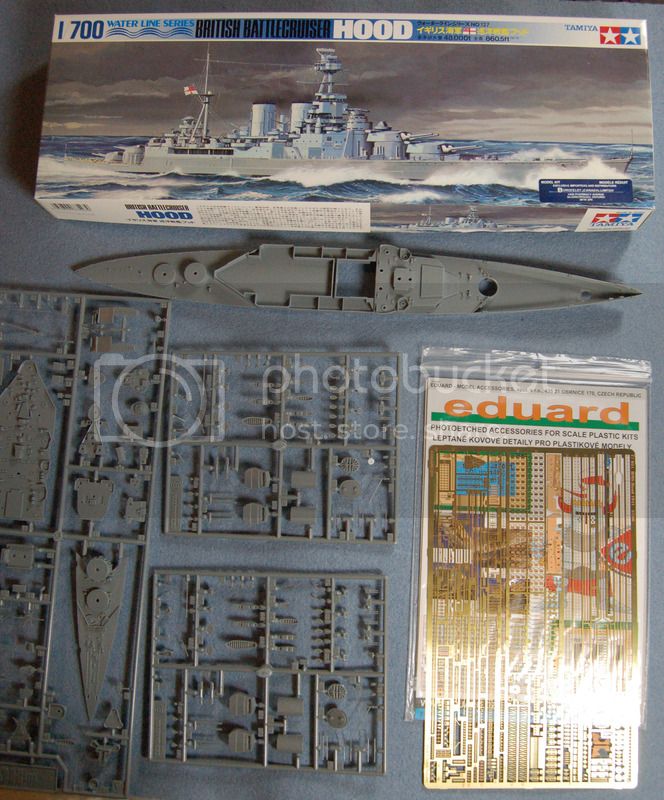
Here is my starting point for HMS Hood. It is the Tamiya kit with Eduard photoetch.
RedDuster
Joined: March 01, 2010
KitMaker: 7,078 posts
Model Shipwrights: 6,649 posts
Posted: Thursday, August 06, 2015 - 12:54 PM UTC
Hi Grant,
Welcome aboard. Nice choice, an oldy but a goody.
Looking forward to seeing it progress.
Cheers.
Si
Welcome aboard. Nice choice, an oldy but a goody.
Looking forward to seeing it progress.
Cheers.
Si

TankSGT
Joined: July 25, 2006
KitMaker: 1,139 posts
Model Shipwrights: 84 posts

Posted: Friday, August 07, 2015 - 12:33 PM UTC
Here is my entry into the cruiser campaign. The Dragon USS Long Beach. It looks like I have the most modern ship so far and the only nuke powered one. I have a few other campaigns on the bench so I won't be starting the Long Beach for awhile. I will be following along though. I still need some photo etch for her as well.

Cheers, Tom

Cheers, Tom

RedDuster
Joined: March 01, 2010
KitMaker: 7,078 posts
Model Shipwrights: 6,649 posts
Posted: Friday, August 07, 2015 - 12:52 PM UTC
Hi Tom
Nice choice, she is an iconic looking ship.
welcome aboard.
Chees.
Si
Nice choice, she is an iconic looking ship.
welcome aboard.
Chees.
Si
RedDuster
Joined: March 01, 2010
KitMaker: 7,078 posts
Model Shipwrights: 6,649 posts
Posted: Saturday, August 08, 2015 - 01:48 AM UTC
Quick update,
Taking advantage of the good weather, the camp going on.
The boot topping masked and the very light grey on, misting Citadel "Skull White" on until I was happy with the shade.
The squiggly lines on with thin masking tape and the medium grey sprayed on.
More soon
Si
Taking advantage of the good weather, the camp going on.
The boot topping masked and the very light grey on, misting Citadel "Skull White" on until I was happy with the shade.

The squiggly lines on with thin masking tape and the medium grey sprayed on.

More soon
Si

JJ1973
#345

Joined: August 22, 2011
KitMaker: 1,835 posts
Model Shipwrights: 1,832 posts

Posted: Saturday, August 08, 2015 - 06:03 PM UTC
Great to see, this is really becoming an interesting campaign with lots of wonderful builds!!  Si, you are running ahead - great work!!
Not much to report from my Belfast, progress is slow these weeks... Did a little work on my Oerlikons without to much progress and finished the touch ups on the camo, pictures will follow when I have a little more to report. Some pics are on my Belfast build log, however.
Cheers ,
,
Jan
Si, you are running ahead - great work!! Not much to report from my Belfast, progress is slow these weeks...
Did a little work on my Oerlikons without to much progress and finished the touch ups on the camo, pictures will follow when I have a little more to report. Some pics are on my Belfast build log, however.Cheers
,Jan
RedDuster
Joined: March 01, 2010
KitMaker: 7,078 posts
Model Shipwrights: 6,649 posts
Posted: Saturday, August 08, 2015 - 09:53 PM UTC
Thanks Jan,
It is quite a project, so need to get on.
Looking forward to seeing more progress on the Belfast when you are ready.
Cheers.
Si
It is quite a project, so need to get on.
Looking forward to seeing more progress on the Belfast when you are ready.
Cheers.
Si
RedDuster
Joined: March 01, 2010
KitMaker: 7,078 posts
Model Shipwrights: 6,649 posts
Posted: Monday, August 10, 2015 - 12:14 AM UTC
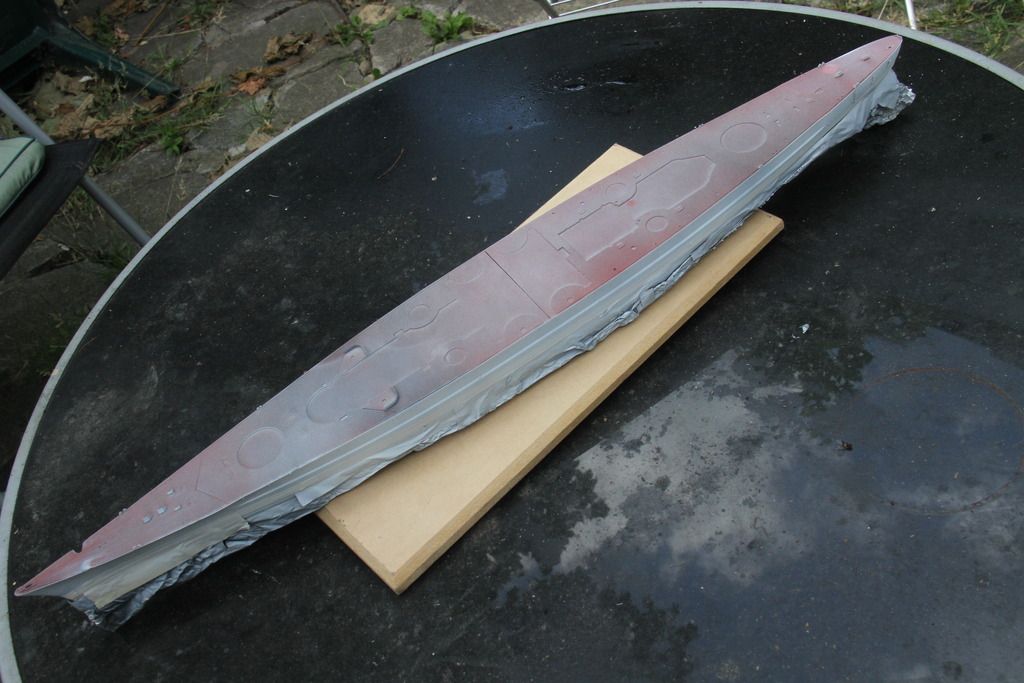
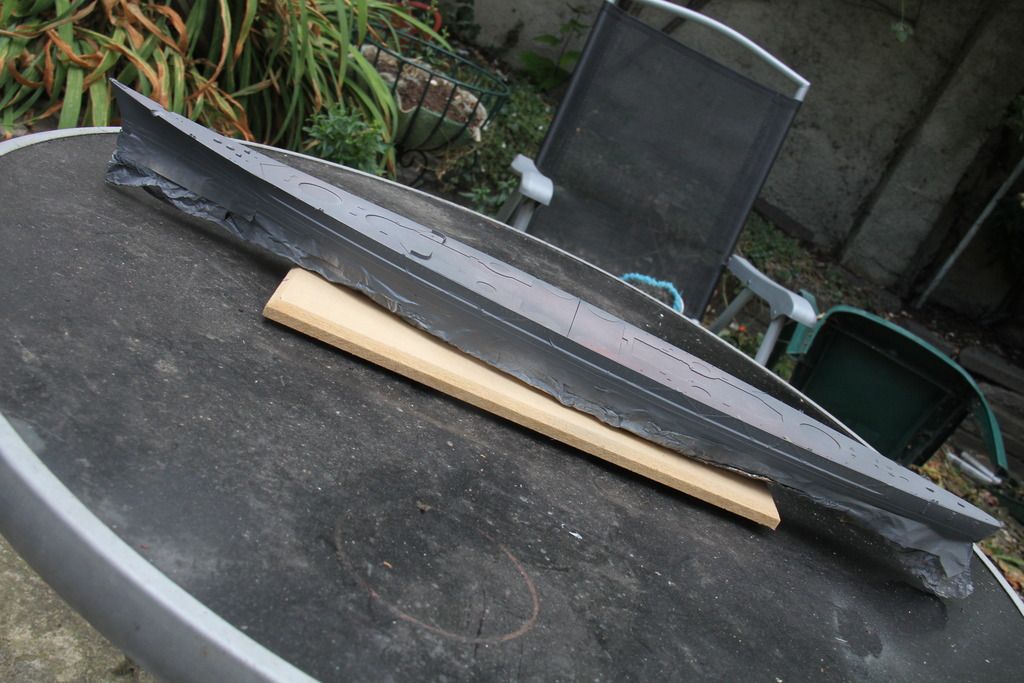
On with the Camouflage.
The mid grey masked ready for spraying.
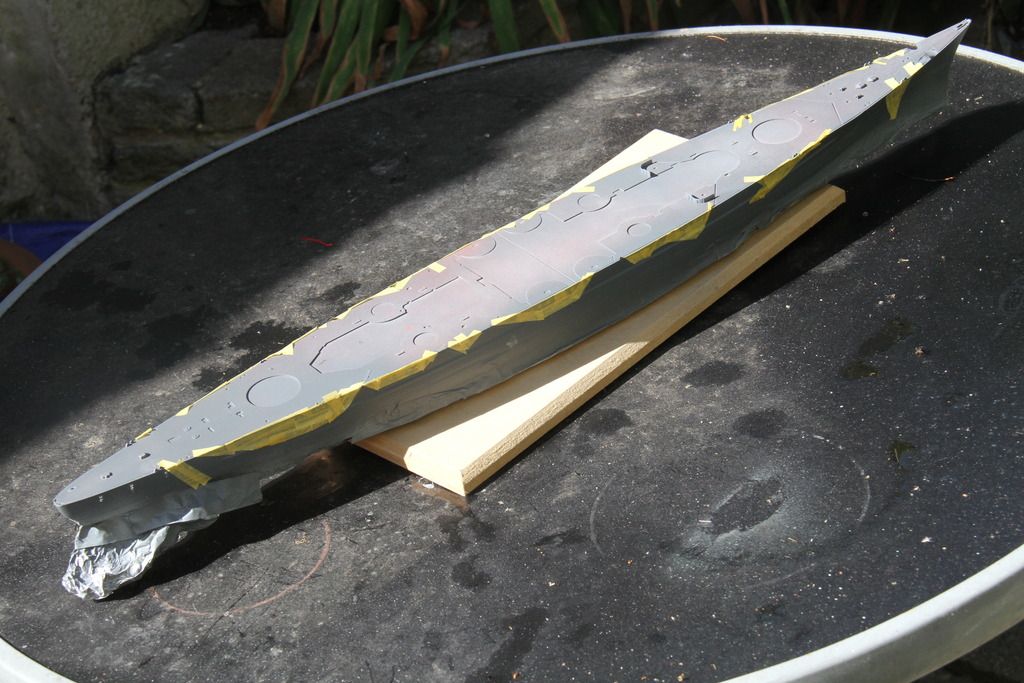
and sprayed.
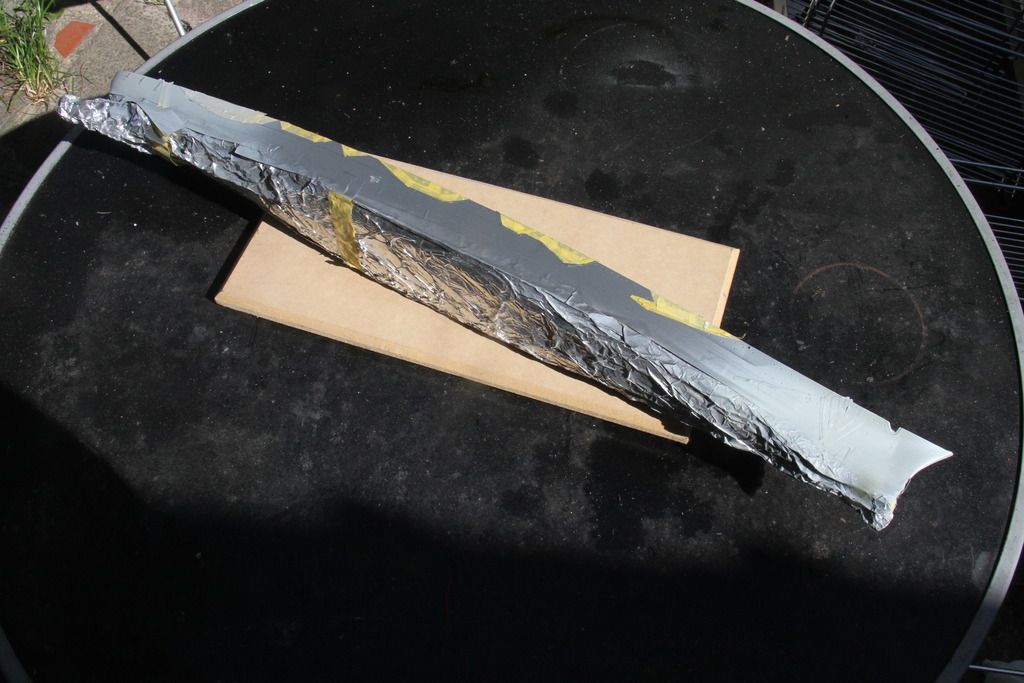
The light grey masked off, the foil around the stern is to protect the etched iron ladders.
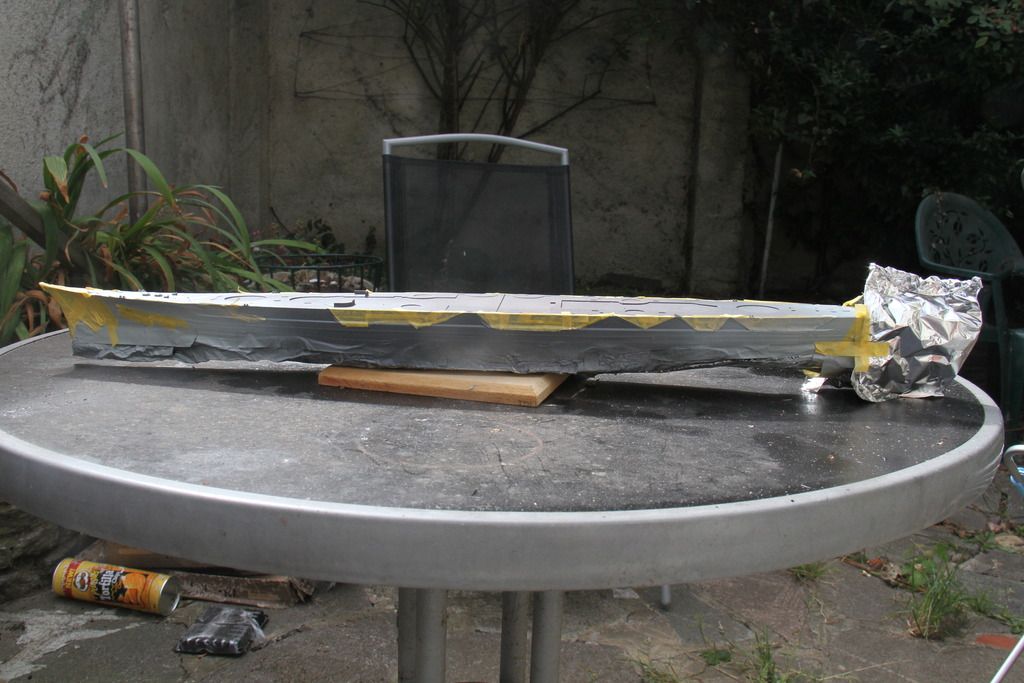
The "dull black" sprayed on, (Tamiya XF69 NATO black), and the masking removed.
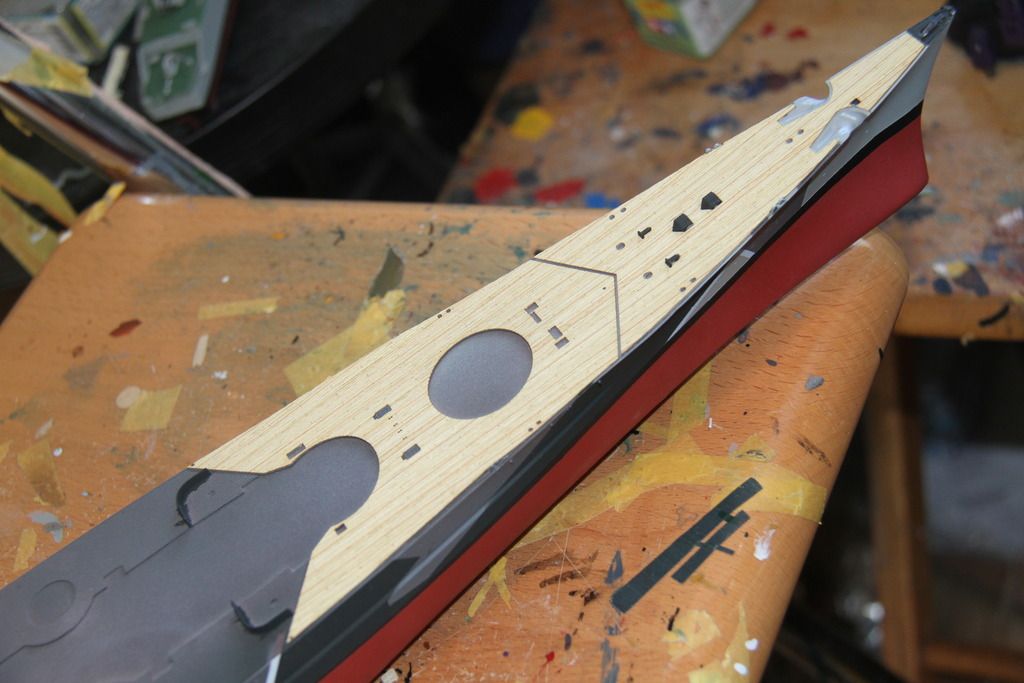
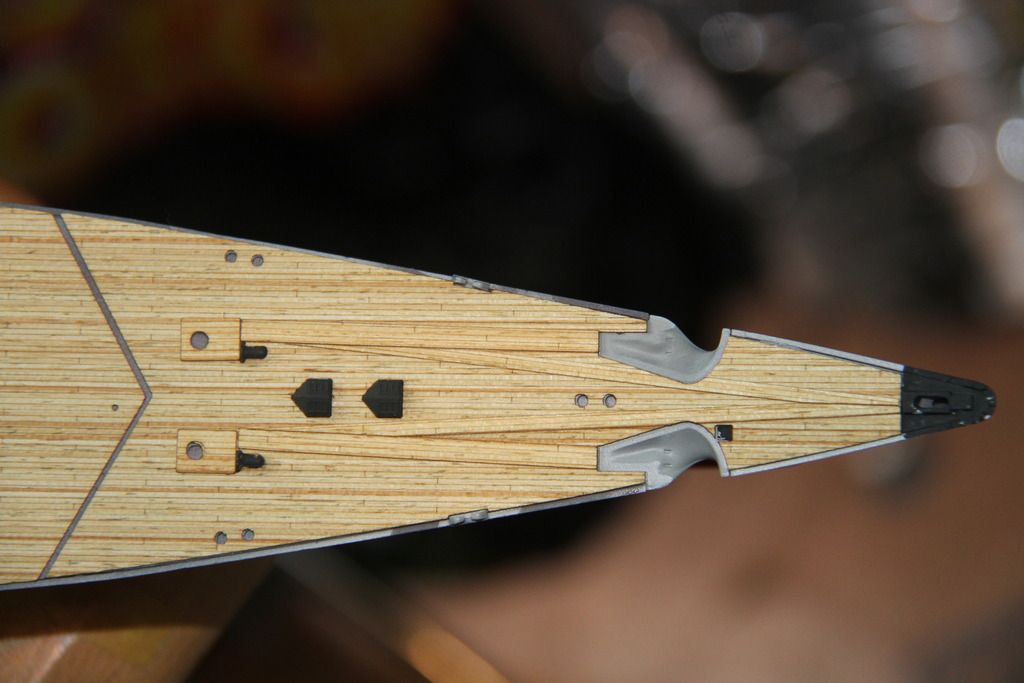
The wood deck unpacked, this is the most complex deck I have dealt with, 31 parts.
The first two sections down.
More soon.
Si
The mid grey masked ready for spraying.

and sprayed.

The light grey masked off, the foil around the stern is to protect the etched iron ladders.

The "dull black" sprayed on, (Tamiya XF69 NATO black), and the masking removed.

The wood deck unpacked, this is the most complex deck I have dealt with, 31 parts.

The first two sections down.

More soon.
Si
rolltide31
#377
Joined: June 27, 2010
KitMaker: 1,481 posts
Model Shipwrights: 1,332 posts
Posted: Monday, August 10, 2015 - 03:03 AM UTC
Si,
Great progress forward. Love the camo job and how clean the deck looks.
Dave
Great progress forward. Love the camo job and how clean the deck looks.
Dave
RedDuster
Joined: March 01, 2010
KitMaker: 7,078 posts
Model Shipwrights: 6,649 posts
Posted: Monday, August 10, 2015 - 01:11 PM UTC
Thanks David,
Was a tricky one, but I am quite pleased with the results.
I am looking forward to getting full deck down, but that is 11 sections, plus all the sections of the Anchor cableways.
Cheers.
Si
Was a tricky one, but I am quite pleased with the results.
I am looking forward to getting full deck down, but that is 11 sections, plus all the sections of the Anchor cableways.
Cheers.
Si
JJ1973
#345
Joined: August 22, 2011
KitMaker: 1,835 posts
Model Shipwrights: 1,832 posts
Posted: Wednesday, August 12, 2015 - 09:30 AM UTC
Si,
that's quite a camouflage scheme!! The thin, light grey line seems particularly tricky I would say great result!!!
Just couldn't help to take my Scharnhorst from my stash for a few minutes last weekend and look at the kit and the parts...should not delay her to much...but so much more boxes there... Well, need to get on with my Belfast, first. Can't promise anything for this weekend either...I'll be off on a quick tour to London, maybe get a chance to have a look at the real thing...
Cheers
Jan
that's quite a camouflage scheme!! The thin, light grey line seems particularly tricky I would say
great result!!! Just couldn't help to take my Scharnhorst from my stash for a few minutes last weekend and look at the kit and the parts...should not delay her to much...but so much more boxes there...
Well, need to get on with my Belfast, first. Can't promise anything for this weekend either...I'll be off on a quick tour to London, maybe get a chance to have a look at the real thing...Cheers
Jan

Cosimodo
#335

Joined: September 03, 2013
KitMaker: 1,808 posts
Model Shipwrights: 871 posts

Posted: Wednesday, August 12, 2015 - 03:00 PM UTC
Hi Simon,
That's a great result on the camouflage, you should be very pleased with that.
Having the deck in so many parts should make it easier to handle rather than one or two great lengths to be managed.
Looking forward to further progress. Hopefully I will be able to start on this campaign soon.
cheers
Michael
RedDuster
Joined: March 01, 2010
KitMaker: 7,078 posts
Model Shipwrights: 6,649 posts
Posted: Wednesday, August 12, 2015 - 04:22 PM UTC
Hi Jan,
The Camo was fun, but good thin masking tape helped.
Hope you get a chance to get on board the Belfast she is certainly worth a look.
Won't get much time this weekend either. Airshow on Saturday and up to Duxford on Sunday, might get an hour or two when we get back from that.
Hi Micheal.
I am pleased with the Camo, and the deck is bringing it out.
I think you are right, the small should be easier to handle. The cableways are going to be fun though, they are three pieces each side.
Cheers for the comments guys.
Si

wildspear
Joined: April 03, 2007
KitMaker: 960 posts
Model Shipwrights: 901 posts

Posted: Saturday, August 15, 2015 - 07:00 PM UTC
My build will be of the USS San Francisco. Still need to order it, but I'm on the road for work so no great rush
RedDuster
Joined: March 01, 2010
KitMaker: 7,078 posts
Model Shipwrights: 6,649 posts
Posted: Saturday, August 15, 2015 - 11:15 PM UTC
Hi Frank,
Great choice, plenty of time yet, but look forward to seeing your build.
Cheers
Si
Great choice, plenty of time yet, but look forward to seeing your build.
Cheers
Si
RedDuster
Joined: March 01, 2010
KitMaker: 7,078 posts
Model Shipwrights: 6,649 posts
Posted: Sunday, August 16, 2015 - 11:35 PM UTC
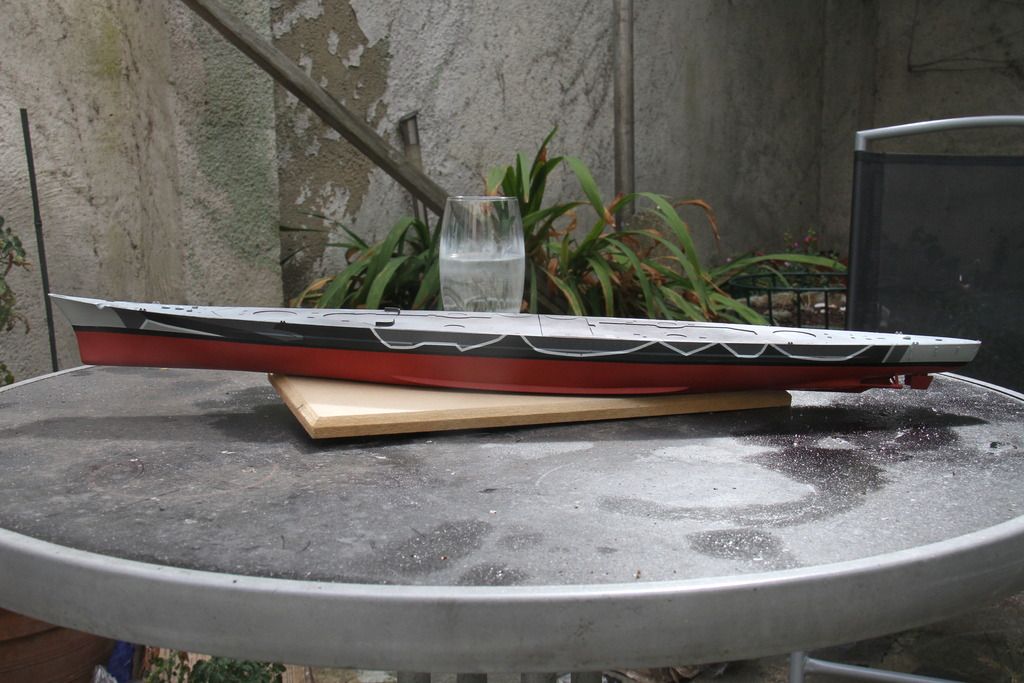
The busy schedule last weekend did allow for a couple of hours in the workshop.
main deck down.
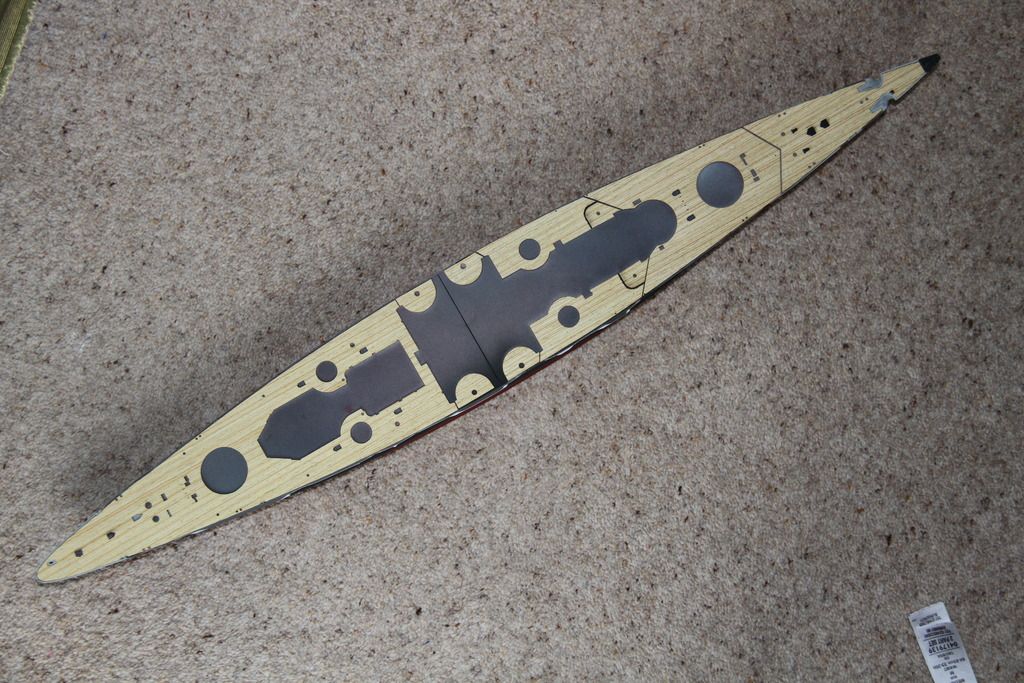
Cableways, also wood in place on the f'o'c's'le.
Screws painted and fitted.
More soon, well when real life stops getting in the way.
Cheers.
Si
main deck down.

Cableways, also wood in place on the f'o'c's'le.

Screws painted and fitted.

More soon, well when real life stops getting in the way.
Cheers.
Si

Aurora-7
#360
Joined: June 18, 2003
KitMaker: 1,020 posts
Model Shipwrights: 630 posts

Posted: Wednesday, August 19, 2015 - 06:06 AM UTC
My open box: Heller's 1/400 of the Admiral Scheer. The most successful Kriegsmarine surface ship.


RedDuster
Joined: March 01, 2010
KitMaker: 7,078 posts
Model Shipwrights: 6,649 posts
Posted: Wednesday, August 19, 2015 - 11:40 PM UTC
Nice choice Michael,
Looking forward to seeing that come together, built it about 30 years ago.... Excuse me a sec just being mugged down memory lane
Cheers
Si
Looking forward to seeing that come together, built it about 30 years ago.... Excuse me a sec just being mugged down memory lane
Cheers
Si

Halfyank
Joined: February 01, 2003
KitMaker: 5,221 posts
Model Shipwrights: 1,821 posts

Posted: Thursday, August 20, 2015 - 09:24 AM UTC
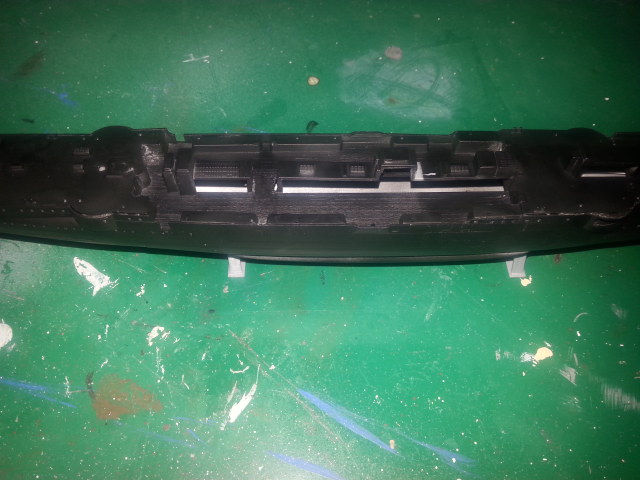
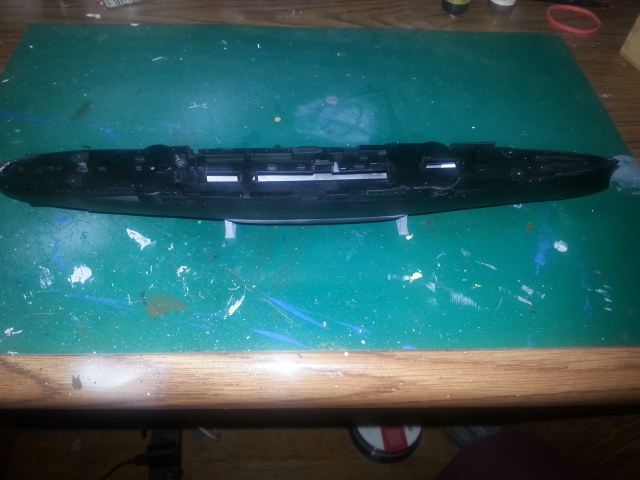
Well, it's been a while since I've last posted. I really was beginning to think this kit, the Revell Emden, had beaten me. I was about to give up, possibly even ready to buy another kit of this ship. As I mentioned I'd tried building this kit years ago and messed up the rear cut away area where the screws are. This time I was determined to get it right. I managed to get the small insert area decently lined up, but then I had a problem getting the hull to line up properly at the stern. Finally I got it to work, then couldn't get the deck to go on right!  I worked and worked on it and was ready to quit. I just set my jaw and glued it down a little bit at a time until I got it to line up mostly. With a lot of glue, and a little putty, I managed to get it to look about right. So I preceded to paint it black. This gives me a bit of shading.
[img] src="http://gallery.kitmaker.net/data/14749/2015-08-20_06_12_28.[/jpg]
[img]http://gallery.kitmaker.net/data/14749/2015-08-20_06_12_41.[/jpg]
(I'm hoping these pics are going in right)
Next I started to paint the lower hull. I use a method I found in Tamiya magazine. A fellow named Ulf Lundberg has written this up in a couple of issues. I followed his instructions in the September 2013 issue. (I get my magazines a electronic versions. This issue is available through Google Play.)
First step, after painting it black, is to spray a squiggly pattern on the upper sides of the lower hull using a light brown. All paints I'm using here are Vallejo Model Air. For the light brown I used US Flat Brown 71026.
[img]http://gallery.kitmaker.net/data/14749/2015-08-20_06_21_38.[/jpg]
Next I did a similar pattern using Pale Green 71095.
[img]http://gallery.kitmaker.net/data/14749/2015-08-20_06_24_53.[/jpg]
Next I did a similar pattern, but this time on the lower area of the hull using Cam Medium Brown 7138. I'm not sure if this picture is after the Medium Brown or the next color.
[img]http://gallery.kitmaker.net/data/14749/2015-08-20_06_29_04.[/jpg]
Lastly a pattern using US Dark Green 71016.
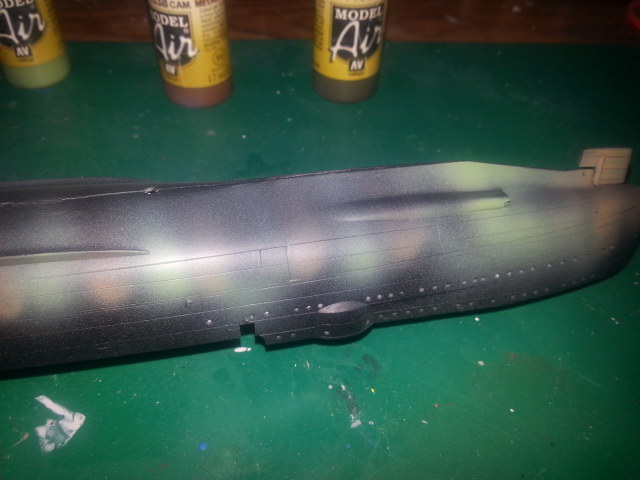
Now comes the tricky part. You have to cover all these patterns with a hull red, but not enough to cover them completely. I use Hull Red, 71039. Even though Model Air is already thinned for airbrushing, I thin it even more, then turn the down the preasure to about 15 psi. (I probably could go even lower)
[img]http://gallery.kitmaker.net/data/14749/2015-08-20_06_36_42.[/jpg]
The final results aren't half bad. The whole idea is to give the hull a splotchy look that mimics corrosion, sea growth, etc.
The last thing I did was paint the wooden deck area of the upper deck a light tan. I used Sand 71075. I tried to cover this area very lightly so as to have some of the black show through. Next step will be to cover this area with future and let it dry for a few days to protect it from the next step. After it dries I'll be using a pastel suspended in thinner.
[img]http://gallery.kitmaker.net/data/14749/2015-08-20_06_45_30.[/jpg]
Hopefully all these pics will post properly. (Blast, the pics didn't go through properly.) I'll work on this.
Arggg...I can't work on this tonight. If anybody has any suggestions on what I'm doing wrong please post them and I'll try to get this cleared up tomorrow.
I worked and worked on it and was ready to quit. I just set my jaw and glued it down a little bit at a time until I got it to line up mostly. With a lot of glue, and a little putty, I managed to get it to look about right. So I preceded to paint it black. This gives me a bit of shading. [img] src="http://gallery.kitmaker.net/data/14749/2015-08-20_06_12_28.[/jpg]
[img]http://gallery.kitmaker.net/data/14749/2015-08-20_06_12_41.[/jpg]
(I'm hoping these pics are going in right)
Next I started to paint the lower hull. I use a method I found in Tamiya magazine. A fellow named Ulf Lundberg has written this up in a couple of issues. I followed his instructions in the September 2013 issue. (I get my magazines a electronic versions. This issue is available through Google Play.)
First step, after painting it black, is to spray a squiggly pattern on the upper sides of the lower hull using a light brown. All paints I'm using here are Vallejo Model Air. For the light brown I used US Flat Brown 71026.
[img]http://gallery.kitmaker.net/data/14749/2015-08-20_06_21_38.[/jpg]
Next I did a similar pattern using Pale Green 71095.
[img]http://gallery.kitmaker.net/data/14749/2015-08-20_06_24_53.[/jpg]
Next I did a similar pattern, but this time on the lower area of the hull using Cam Medium Brown 7138. I'm not sure if this picture is after the Medium Brown or the next color.
[img]http://gallery.kitmaker.net/data/14749/2015-08-20_06_29_04.[/jpg]
Lastly a pattern using US Dark Green 71016.
Now comes the tricky part. You have to cover all these patterns with a hull red, but not enough to cover them completely. I use Hull Red, 71039. Even though Model Air is already thinned for airbrushing, I thin it even more, then turn the down the preasure to about 15 psi. (I probably could go even lower)
[img]http://gallery.kitmaker.net/data/14749/2015-08-20_06_36_42.[/jpg]
The final results aren't half bad. The whole idea is to give the hull a splotchy look that mimics corrosion, sea growth, etc.
The last thing I did was paint the wooden deck area of the upper deck a light tan. I used Sand 71075. I tried to cover this area very lightly so as to have some of the black show through. Next step will be to cover this area with future and let it dry for a few days to protect it from the next step. After it dries I'll be using a pastel suspended in thinner.
[img]http://gallery.kitmaker.net/data/14749/2015-08-20_06_45_30.[/jpg]
Hopefully all these pics will post properly. (Blast, the pics didn't go through properly.) I'll work on this.
Arggg...I can't work on this tonight. If anybody has any suggestions on what I'm doing wrong please post them and I'll try to get this cleared up tomorrow.
RedDuster
Joined: March 01, 2010
KitMaker: 7,078 posts
Model Shipwrights: 6,649 posts
Posted: Thursday, August 20, 2015 - 01:44 PM UTC
Hi Rodger,
Looks to me, for the pictures, you are not copying all of the "img" link, should have [img] on the end as well as the beginning.
Hope that helps
cheers.
Si
Looks to me, for the pictures, you are not copying all of the "img" link, should have [img] on the end as well as the beginning.
Hope that helps
cheers.
Si
Aurora-7
#360
Joined: June 18, 2003
KitMaker: 1,020 posts
Model Shipwrights: 630 posts
Posted: Thursday, August 20, 2015 - 03:18 PM UTC
Close, Roger.
For example for this image link you made:
 ]
]
Change the '.[/jpg]' at the end to '.jpg[/img]'

without the (') of course. It'll come out like:
For example for this image link you made:
]Change the '.[/jpg]' at the end to '.jpg[/img]'
without the (') of course. It'll come out like:
Halfyank
Joined: February 01, 2003
KitMaker: 5,221 posts
Model Shipwrights: 1,821 posts
Posted: Thursday, August 20, 2015 - 05:24 PM UTC
[b]DOH!!![/img] Thanks Simon and Michael. I was putting the brackets around the jpg instead of at the end. Hopefully this will do it.
Well, it's been a while since I've last posted. I really was beginning to think this kit, the Revell Emden, had beaten me. I was about to give up, possibly even ready to buy another kit of this ship. As I mentioned I'd tried building this kit years ago and messed up the rear cut away area where the screws are. This time I was determined to get it right. I managed to get the small insert area decently lined up, but then I had a problem getting the hull to line up properly at the stern. Finally I got it to work, then couldn't get the deck to go on right! I worked and worked on it and was ready to quit. I just set my jaw and glued it down a little bit at a time until I got it to line up mostly. With a lot of glue, and a little putty, I managed to get it to look about right. So I preceded to paint it black. This gives me a bit of shading.
(I'm hoping these pics are going in right)
Next I started to paint the lower hull. I use a method I found in Tamiya magazine. A fellow named Ulf Lundberg has written this up in a couple of issues. I followed his instructions in the September 2013 issue. (I get my magazines a electronic versions. This issue is available through Google Play.)
First step, after painting it black, is to spray a squiggly pattern on the upper sides of the lower hull using a light brown. All paints I'm using here are Vallejo Model Air. For the light brown I used US Flat Brown 71026.
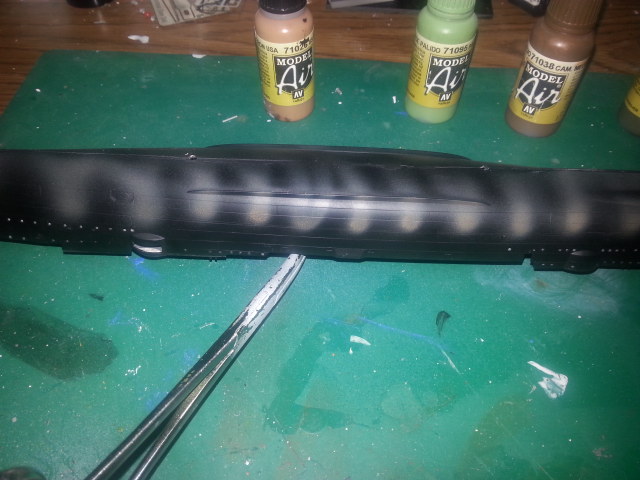
Next I did a similar pattern using Pale Green 71095.
Next I did a similar pattern, but this time on the lower area of the hull using Cam Medium Brown 7138. I'm not sure if this picture is after the Medium Brown or the next color.
Lastly a pattern using US Dark Green 71016.
Now comes the tricky part. You have to cover all these patterns with a hull red, but not enough to cover them completely. I use Hull Red, 71039. Even though Model Air is already thinned for airbrushing, I thin it even more, then turn the down the pressure to about 15 psi. (I probably could go even lower)
The final results aren't half bad. The whole idea is to give the hull a splotchy look that mimics corrosion, sea growth, etc.
The last thing I did was paint the wooden deck area of the upper deck a light tan. I used Sand 71075. I tried to cover this area very lightly so as to have some of the black show through. Next step will be to cover this area with future and let it dry for a few days to protect it from the next step. After it dries I'll be using a pastel suspended in thinner.
Hopefully all these pics will post properly. (Blast, the pics didn't go through properly.) I'll work on this.
Arggg...I can't work on this tonight. If anybody has any suggestions on what I'm doing wrong please post them and I'll try to get this cleared up tomorrow.
Well, it's been a while since I've last posted. I really was beginning to think this kit, the Revell Emden, had beaten me. I was about to give up, possibly even ready to buy another kit of this ship. As I mentioned I'd tried building this kit years ago and messed up the rear cut away area where the screws are. This time I was determined to get it right. I managed to get the small insert area decently lined up, but then I had a problem getting the hull to line up properly at the stern. Finally I got it to work, then couldn't get the deck to go on right! I worked and worked on it and was ready to quit. I just set my jaw and glued it down a little bit at a time until I got it to line up mostly. With a lot of glue, and a little putty, I managed to get it to look about right. So I preceded to paint it black. This gives me a bit of shading.
(I'm hoping these pics are going in right)
Next I started to paint the lower hull. I use a method I found in Tamiya magazine. A fellow named Ulf Lundberg has written this up in a couple of issues. I followed his instructions in the September 2013 issue. (I get my magazines a electronic versions. This issue is available through Google Play.)
First step, after painting it black, is to spray a squiggly pattern on the upper sides of the lower hull using a light brown. All paints I'm using here are Vallejo Model Air. For the light brown I used US Flat Brown 71026.
Next I did a similar pattern using Pale Green 71095.
Next I did a similar pattern, but this time on the lower area of the hull using Cam Medium Brown 7138. I'm not sure if this picture is after the Medium Brown or the next color.
Lastly a pattern using US Dark Green 71016.
Now comes the tricky part. You have to cover all these patterns with a hull red, but not enough to cover them completely. I use Hull Red, 71039. Even though Model Air is already thinned for airbrushing, I thin it even more, then turn the down the pressure to about 15 psi. (I probably could go even lower)
The final results aren't half bad. The whole idea is to give the hull a splotchy look that mimics corrosion, sea growth, etc.
The last thing I did was paint the wooden deck area of the upper deck a light tan. I used Sand 71075. I tried to cover this area very lightly so as to have some of the black show through. Next step will be to cover this area with future and let it dry for a few days to protect it from the next step. After it dries I'll be using a pastel suspended in thinner.
Hopefully all these pics will post properly. (Blast, the pics didn't go through properly.) I'll work on this.
Arggg...I can't work on this tonight. If anybody has any suggestions on what I'm doing wrong please post them and I'll try to get this cleared up tomorrow.
 |

WEB HOSTING BY


Copyright ©2021 Model Shipwrights and Kitmaker Network, a subsidiary of Silver Star Enterprises
All Rights Reserved. Please read our Conditions of Use and Privacy Policy.
All Rights Reserved. Please read our Conditions of Use and Privacy Policy.