Official: Cruiser Campaign
Ohio, United States
Joined: February 05, 2004
KitMaker: 545 posts
Model Shipwrights: 113 posts
Posted: Sunday, November 22, 2015 - 11:32 PM UTC
Anyhow, my current ship is coming along finally.
Si, the Dragon kit includes 4 Dragon sprues and 2 Pitroad sprues for most weapons, radar, and smaller fittings.
The instructions are pretty awful. It has the wrong bridge being installed, and it's just of poor quality all around. I'm spending a lot of time cleaning things up and correcting little errors with a knife, putty, and a lot of PE. Here's an example of 4 corrections I'm trying to make around the bridge. I'm pretty much doing this same process with every part of the ship. It's fun, but tedious.


#345
Niedersachsen, Germany
Joined: August 22, 2011
KitMaker: 1,835 posts
Model Shipwrights: 1,832 posts
Posted: Sunday, November 22, 2015 - 11:37 PM UTC
Steve,
wow, that's quite ambitious with all your corrections!! But it certainly looks like it's going to be a great model

Looking forward to see more!!
Si,
again and again it's great to see the Scharnhorst growing!!
You're doing a fantastic job! And you are still fast!!
Cheers,
Jan
#345
Niedersachsen, Germany
Joined: August 22, 2011
KitMaker: 1,835 posts
Model Shipwrights: 1,832 posts
Posted: Sunday, November 22, 2015 - 11:45 PM UTC
And eventually some progress on the Belfast, as well.
Actually, I think I made some good progress over the last days, only it does not show on the ship since I couldn't really install much yet.
So here's small stuff

and small stuff painted
and even more small stuff coming up:

However, when I wanted to 'harvest' and install what I had accomplished, it pretty soon was clear that installing then HACS, signal lamps, Oerlikons, ladders etc. before having certain railings in place would be set up for failure...
So, first painting and getting those railings in place, but that will have to wait. Not too lang I hope, but not today...

I'll have some more pictures and details on my Belfast log shortly.
Cheers,
Jan
England - South East, United Kingdom
Joined: March 01, 2010
KitMaker: 7,078 posts
Model Shipwrights: 6,649 posts
Posted: Monday, November 23, 2015 - 12:26 AM UTC
Thanks Greg,
some details on the shelter deck just aft of Bruno turret, and some breakwaters on the maindeck then the eight twin 37mm so I can get the main control tower glued down, then searchlights and the remaining pulling boats,
Will have to take a deep breath at that point, because it will be working out where I need to fit railings before I fit guns.
Thanks Jan, still a long way to go.
Hi Steve,
I know what you mean about Dragon instructions. Will be watching with interest your corrections and upgrades.
Cheers.
Si
England - South East, United Kingdom
Joined: March 01, 2010
KitMaker: 7,078 posts
Model Shipwrights: 6,649 posts
Posted: Monday, November 23, 2015 - 12:30 AM UTC
looking good Jan,
The small bits are real Fun,very nice etch work on the radars, very neat indeed.
looking forward to seeing them in place.
Si
Colorado, United States
Joined: March 07, 2011
KitMaker: 158 posts
Model Shipwrights: 123 posts
Posted: Monday, November 23, 2015 - 12:40 AM UTC
Quoted Text
wow, black? That's different! Now I'm even more confused.
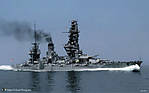
(But to make sure there is no confusion on my other post, I did not build that Chikuma. Those are just pictures I used for mine: With the coloring I chose below).
Steve,
I think it is just the lighting of the photo. the rear deck is the red linoleum they just have it in a real dark shade. The photo does show the upper deck as grey not linoleum.
That looks like a lot of work to correct all those issues, but it will look great and accurate when you are done.
#306
Victoria, Australia
Joined: June 27, 2010
KitMaker: 3,959 posts
Model Shipwrights: 2,777 posts
Posted: Monday, November 23, 2015 - 02:42 PM UTC
Great work here guys! Everyone's build's are looking very nice indeed!
Stay home and build models!
In 1/72
Gloster Gladiator MkII for the Bi-planes Campaign
In 1/350
Airfix 1:350 Type 45 Destroyer
England - South East, United Kingdom
Joined: March 01, 2010
KitMaker: 7,078 posts
Model Shipwrights: 6,649 posts
Posted: Saturday, November 28, 2015 - 02:12 AM UTC
Thanks Russ.
A bit of progress today,
searchlight production line, all five bases competed.
and the bodies fitted. I will spray these and paint the reflectors silver prior to fitting the lenses.
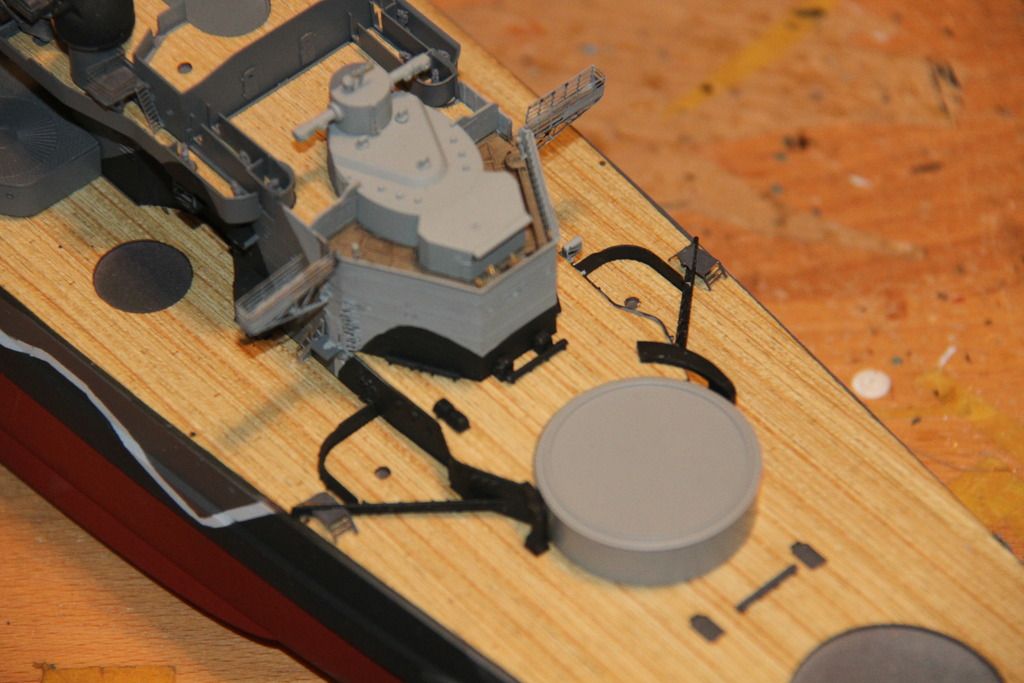
Details around Bruno gun deck added.
Six of the eight pulling boats being painted ready to go on.
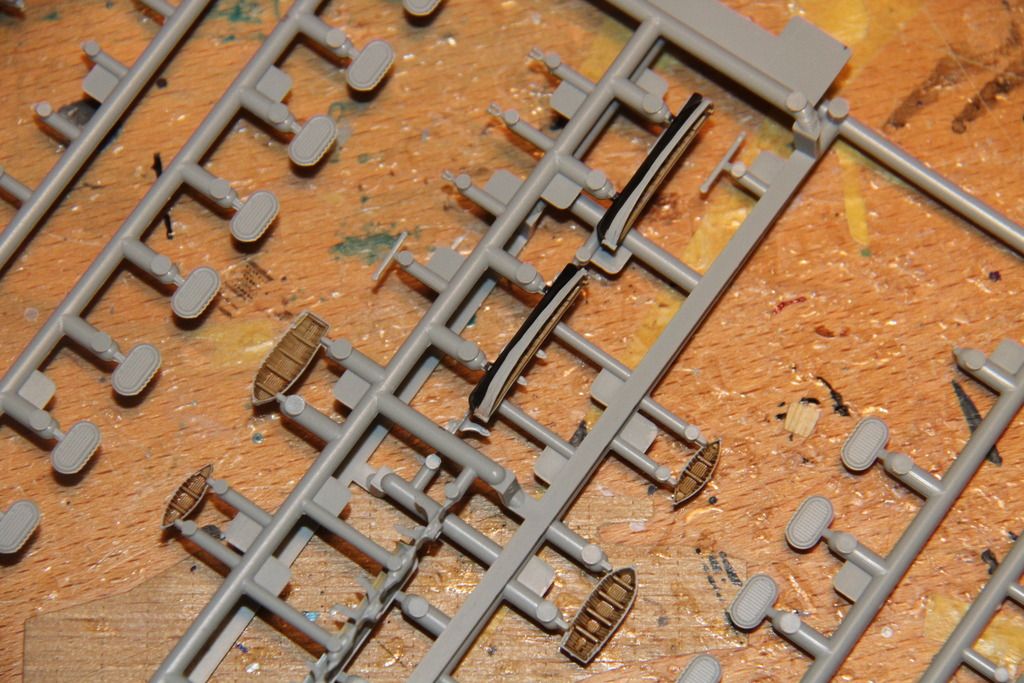
And fitted in place.
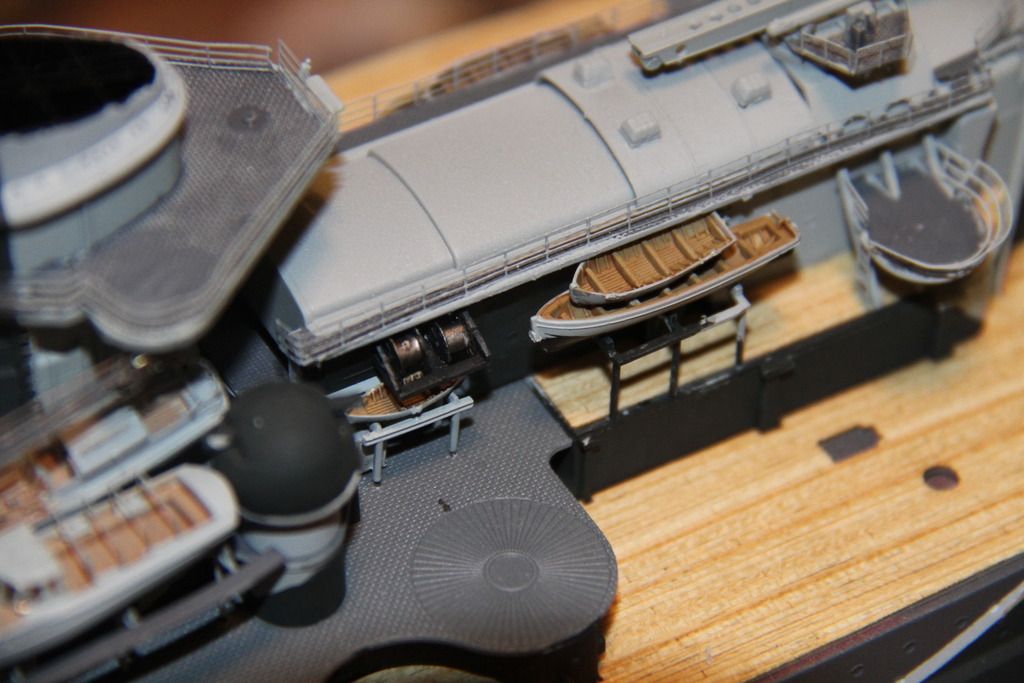
More soon,
Si
Michigan, United States
Joined: April 03, 2007
KitMaker: 960 posts
Model Shipwrights: 901 posts
Posted: Saturday, November 28, 2015 - 08:33 PM UTC
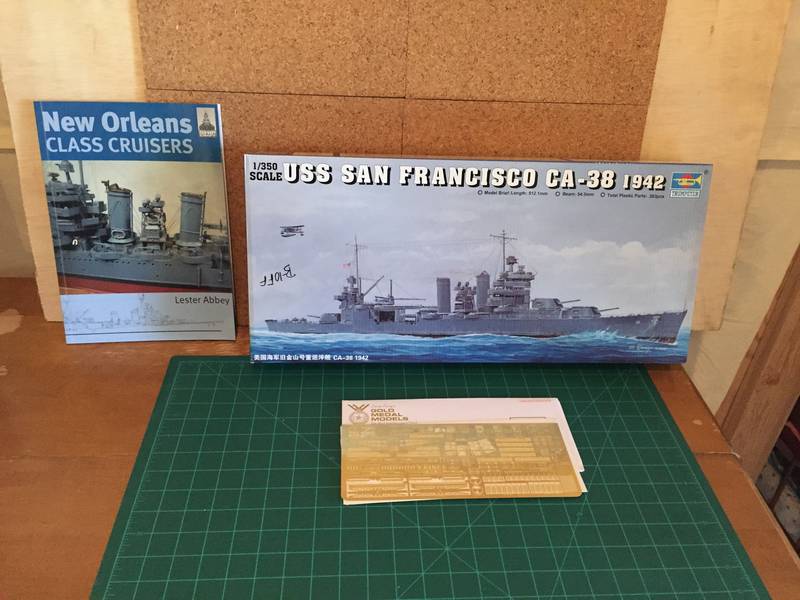
Start of my USS New Orleans build
It is not a sin to fall.......It is a sin not too get up......
England - South East, United Kingdom
Joined: March 01, 2010
KitMaker: 7,078 posts
Model Shipwrights: 6,649 posts
Posted: Sunday, November 29, 2015 - 01:45 AM UTC
Welcome aboard Frank,
Looking forward to seeing her come along.
Cheers
Si
Ohio, United States
Joined: February 05, 2004
KitMaker: 545 posts
Model Shipwrights: 113 posts
Posted: Tuesday, December 01, 2015 - 11:21 PM UTC
Frank, that looks awesome! I look forward to seeing yours since I have a San Francisco '44 in my stash. Good luck!
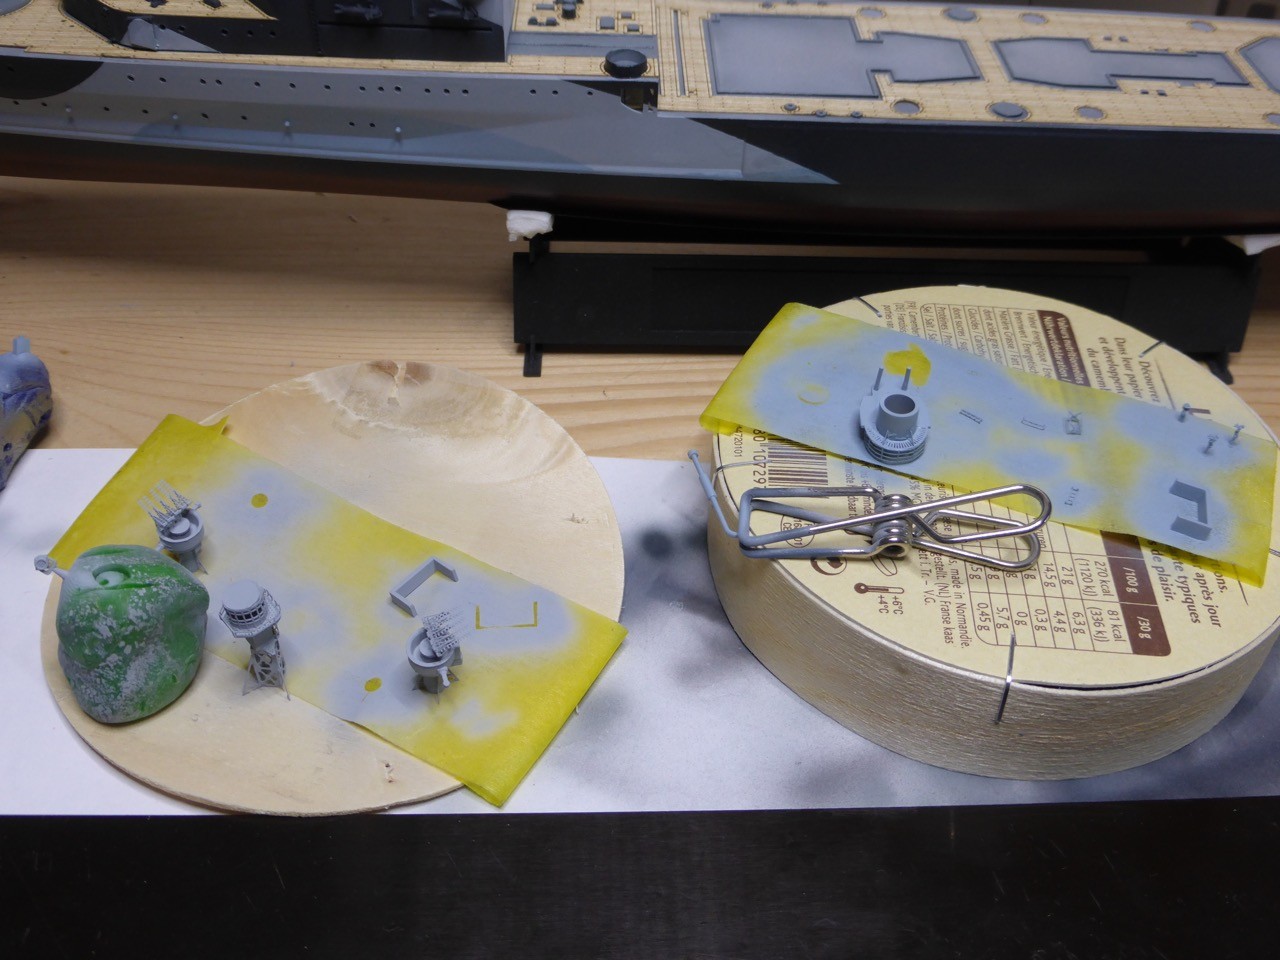
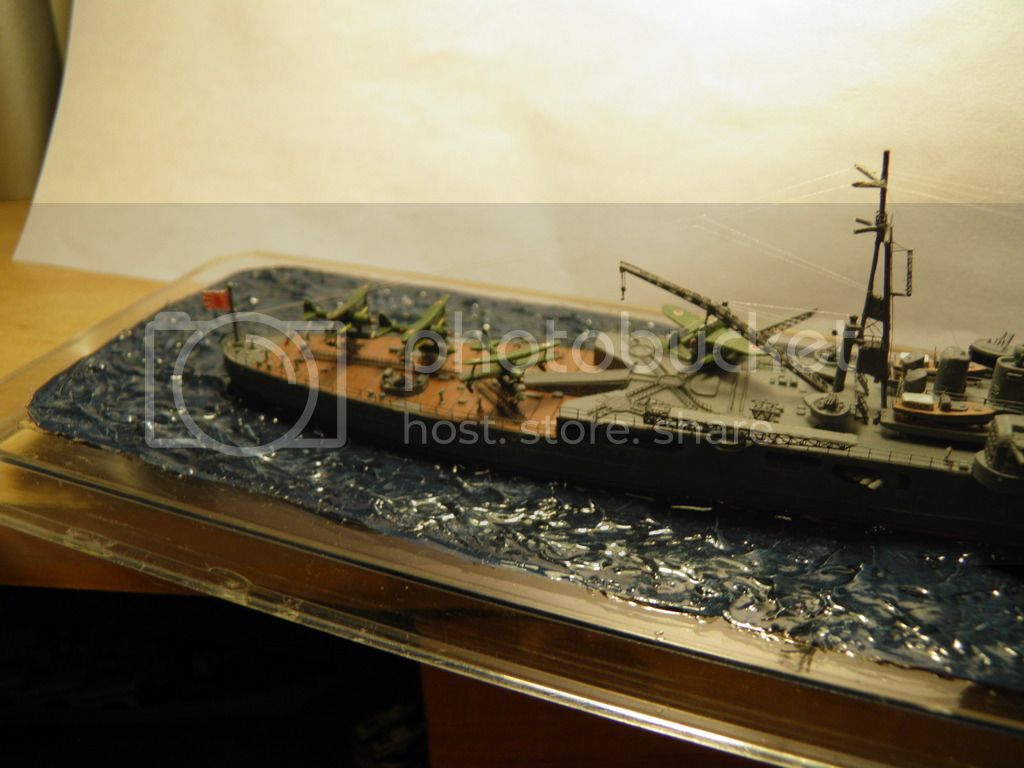
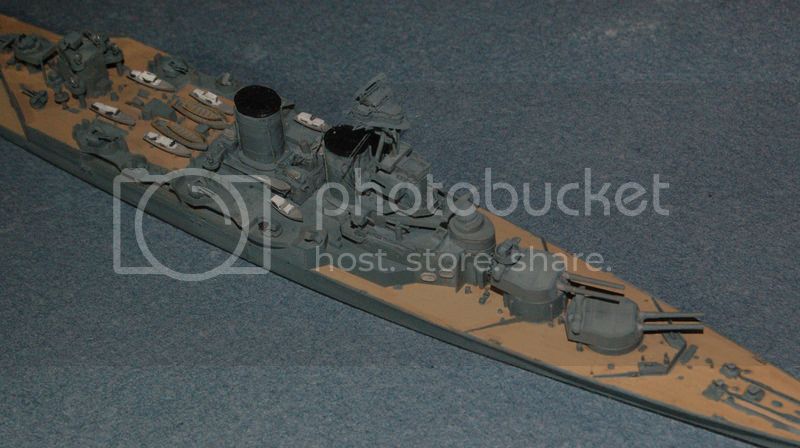
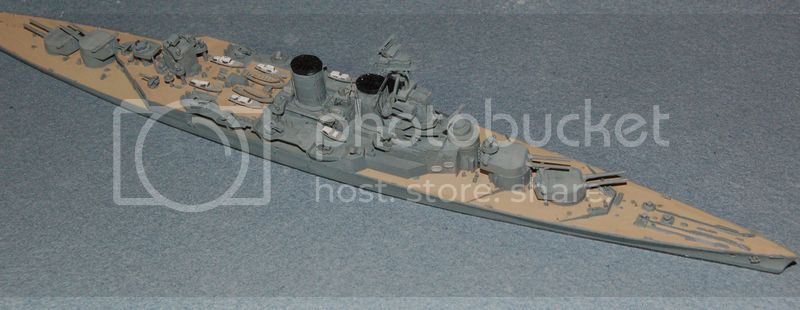
I've had a few nights to work on the San Diego. I'm happy so far! When I first bought the kit, I was really worried, as the hull and torpedo bulge were in separate pieces. It looked much worse than the newer DML offerings.

I counted 92 pieces of photo etch. Doors, hatches, cable reels, firefighting equipment, railings, radar, ammo boxes, etc. Plus, I added some open bridge detail with spare PE sheets and cut wire. Can't wait to start painting!
Any tips on the model, or how to get a better photo from my iphone are welcome!
Michigan, United States
Joined: April 03, 2007
KitMaker: 960 posts
Model Shipwrights: 901 posts
Posted: Tuesday, December 01, 2015 - 11:39 PM UTC
Looks really good Steve. Keep us up to date while you put the finishing touches on your build

It is not a sin to fall.......It is a sin not too get up......
England - South East, United Kingdom
Joined: March 01, 2010
KitMaker: 7,078 posts
Model Shipwrights: 6,649 posts
Posted: Tuesday, December 01, 2015 - 11:42 PM UTC
Looking good Steve,
Some close ups of the additional work on the bridge would be great.
Keep up the good work, looking forward to seeing more progress.
Cheers
Si
Ontario, Canada
Joined: April 26, 2015
KitMaker: 99 posts
Model Shipwrights: 99 posts
Posted: Sunday, December 06, 2015 - 02:21 AM UTC
My latest progress on the Tamiya 1/700 HMS Hood. I hope to have it wrapped up by Christmas.
Grant Goodale
Peel Scale Modellers
England - South East, United Kingdom
Joined: March 01, 2010
KitMaker: 7,078 posts
Model Shipwrights: 6,649 posts
Posted: Sunday, December 06, 2015 - 02:29 AM UTC
Nice job Grant.
Looking forward to seeing more progress.
Si
Ohio, United States
Joined: February 05, 2004
KitMaker: 545 posts
Model Shipwrights: 113 posts
Posted: Monday, December 07, 2015 - 02:52 AM UTC
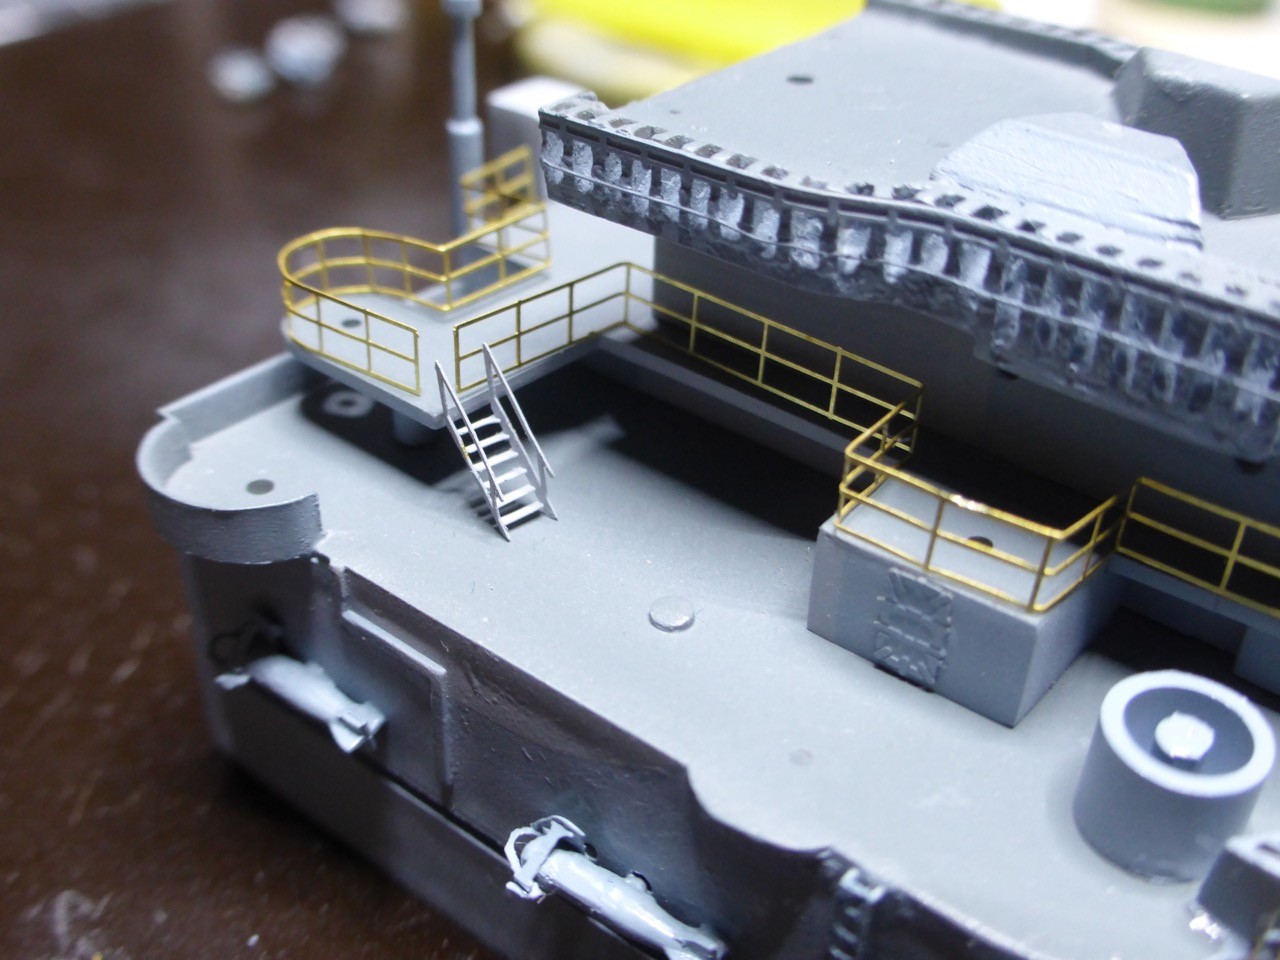
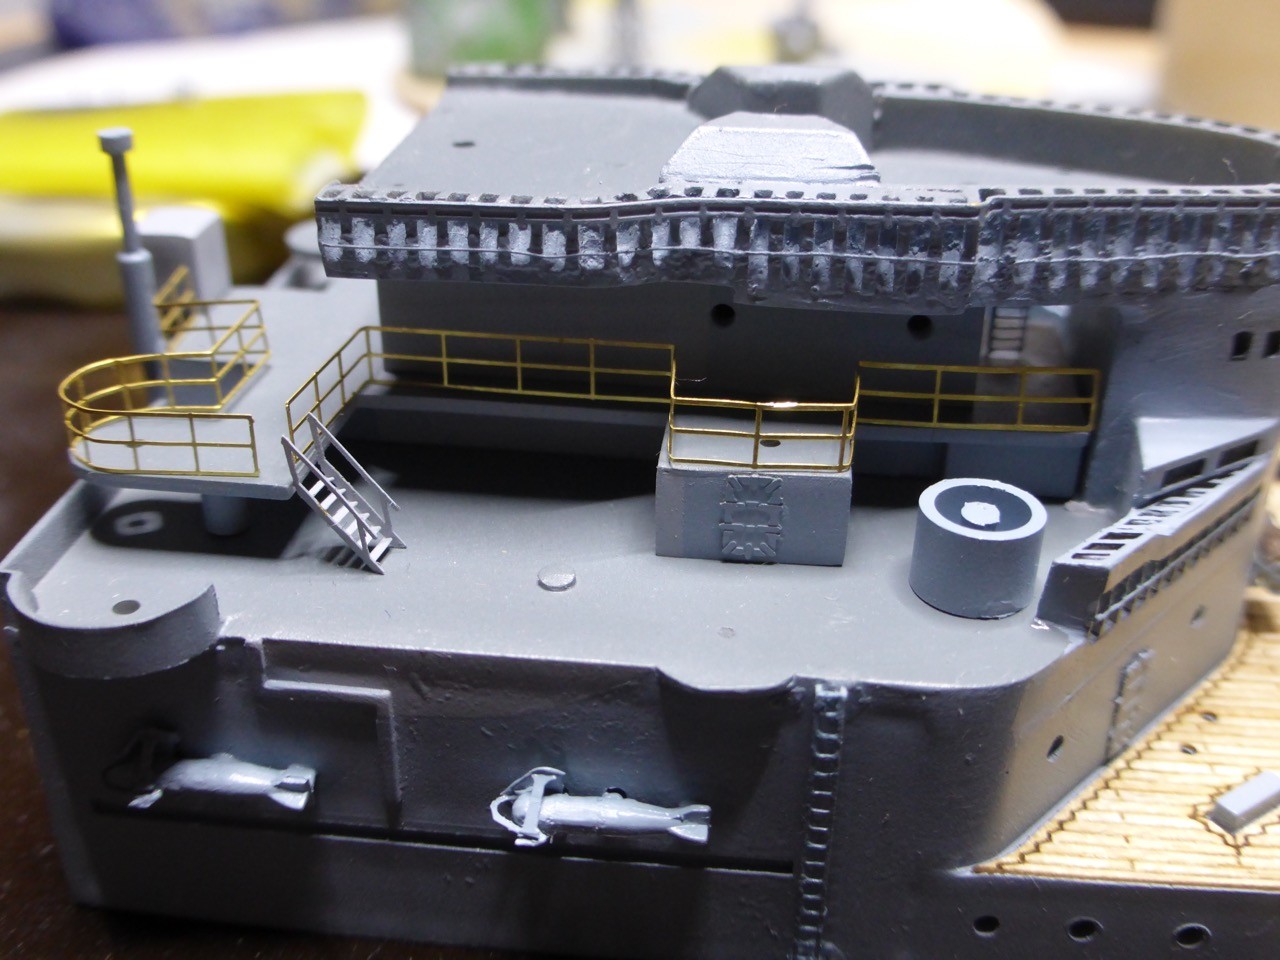
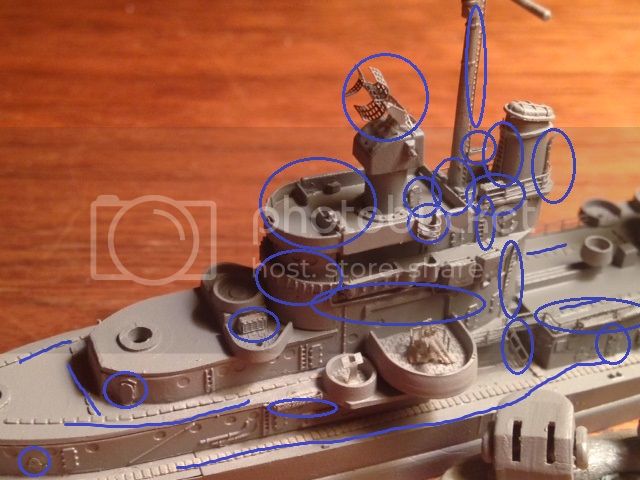
Close-up of the modified Bridge.
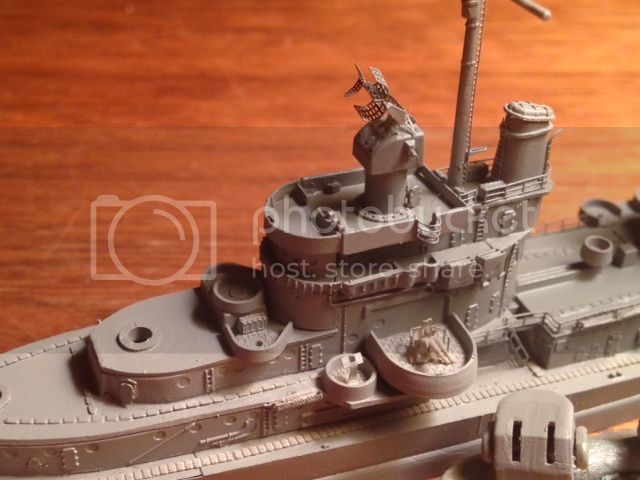
A good model I found online with the Original kit parts.
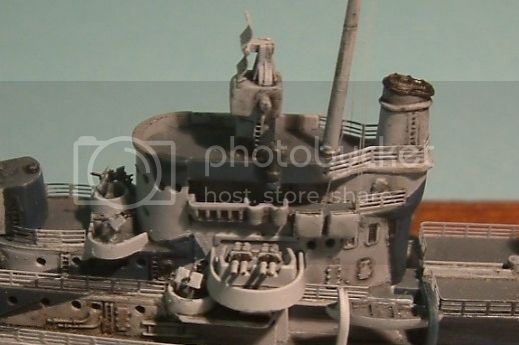
...I got a bit carried away. Here are the parts I modified/added.
Michigan, United States
Joined: April 03, 2007
KitMaker: 960 posts
Model Shipwrights: 901 posts
Posted: Monday, December 07, 2015 - 06:48 AM UTC
great work Steve, cant wait to see more
It is not a sin to fall.......It is a sin not too get up......
Ontario, Canada
Joined: April 26, 2015
KitMaker: 99 posts
Model Shipwrights: 99 posts
Posted: Monday, December 07, 2015 - 07:40 AM UTC
Grant Goodale
Peel Scale Modellers
England - South East, United Kingdom
Joined: March 01, 2010
KitMaker: 7,078 posts
Model Shipwrights: 6,649 posts
Posted: Tuesday, December 08, 2015 - 03:03 AM UTC
Great job Steve, that bridge looks more like 1/350th than 1/700th.
Cheers.
Si
#345
Niedersachsen, Germany
Joined: August 22, 2011
KitMaker: 1,835 posts
Model Shipwrights: 1,832 posts
Posted: Tuesday, December 08, 2015 - 10:33 AM UTC
I fully agree with Si, your bridge easily passes for 1/350!! Fantastic detail work, especially in this small 1/700 scale!! Great job!
Cheers,
Jan
Ohio, United States
Joined: February 05, 2004
KitMaker: 545 posts
Model Shipwrights: 113 posts
Posted: Friday, December 11, 2015 - 09:54 AM UTC
Thanks everyone! I'm really enjoying this build, and watching everyone's cruisers take shape!
Quick question on camouflage. The pattern visible on black/white pictures of the ship matches up with the Camouflage Design Sheets on shipcamouflage.com. But, are the colors right? Ocean Gray 5-O is the darkest color on the sheet. But, in the photos (and color photos of ships with similar-looking patters) it looks almost black.
Measure 33 from pictures of the ship in April, 1944.
England - South East, United Kingdom
Joined: March 01, 2010
KitMaker: 7,078 posts
Model Shipwrights: 6,649 posts
Posted: Saturday, December 12, 2015 - 03:14 AM UTC
Cheers Steve, glad you are enjoying the Campaign. I am certainly enjoying your contribution.
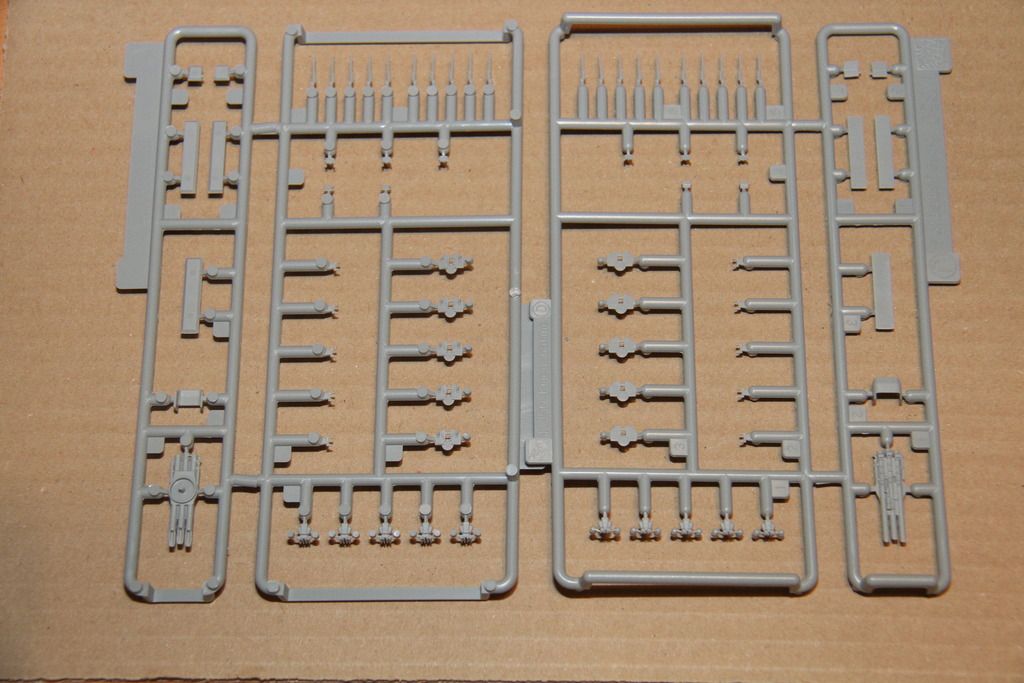
A bit more progress on the Scharnhorst, (this is why I still have quite a mountain to climb).
The twin 37mm, only eight to build. (Only eight!)
The plastic parts.
The first parts together, (I wonder if it is coincidence, or this is where the idea for certain Star Wars tanks came from)
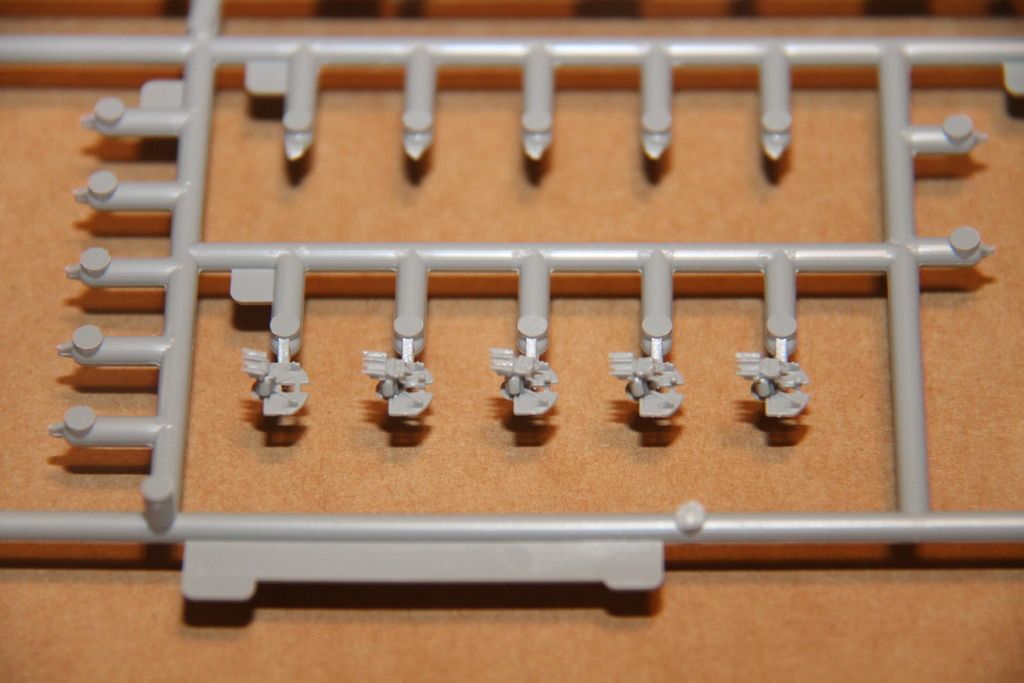
This is as far as I got today.
All eight have the plastic parts, except the barrels, built up and some of the nine etched parts per mount on.
More soon,
Si
#377
Texas, United States
Joined: June 27, 2010
KitMaker: 1,481 posts
Model Shipwrights: 1,332 posts
Posted: Saturday, December 12, 2015 - 03:38 AM UTC
si,
Looking good. I believe those are the same37mm that are on the Z-32.
Your Scharnhorst is looking great.
Dave
In Dry Dock #1: 1/350 IJN SHOKAKU (Fujimi)
In Dry Dock #2: 1/350 IJN Tama (Aoshima)
England - South East, United Kingdom
Joined: March 01, 2010
KitMaker: 7,078 posts
Model Shipwrights: 6,649 posts
Posted: Saturday, December 12, 2015 - 02:48 PM UTC
Hi Dave,
Yup a standard Dragon weapons sprue. I reckon it has five units per sprue is because it appears in the Zestorzer kits, and at least one of those needs five units.
I have seen the sprue for the assorting flakveirlings and single 20mm before, in the Z38 box. I have found this is the easiest way to put the together, still on the sprue. Hope to make some more progress later today.
Si
England - South East, United Kingdom
Joined: March 01, 2010
KitMaker: 7,078 posts
Model Shipwrights: 6,649 posts
Posted: Sunday, December 13, 2015 - 12:24 AM UTC
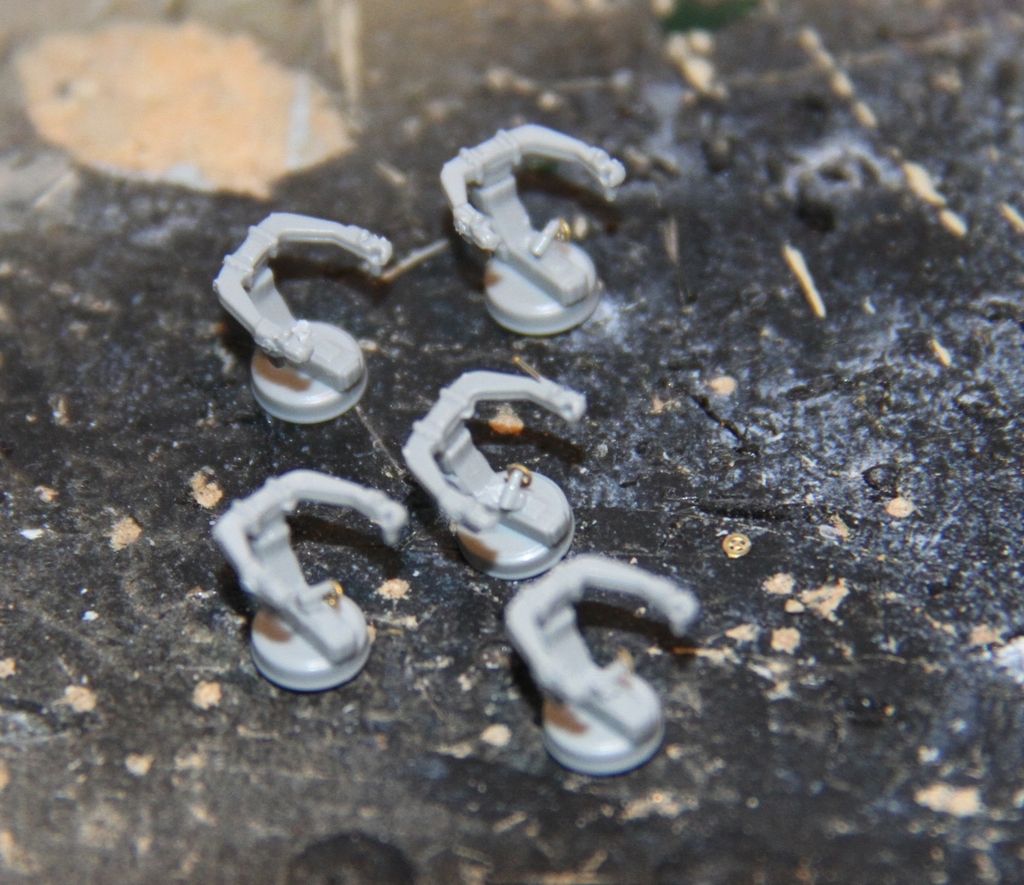
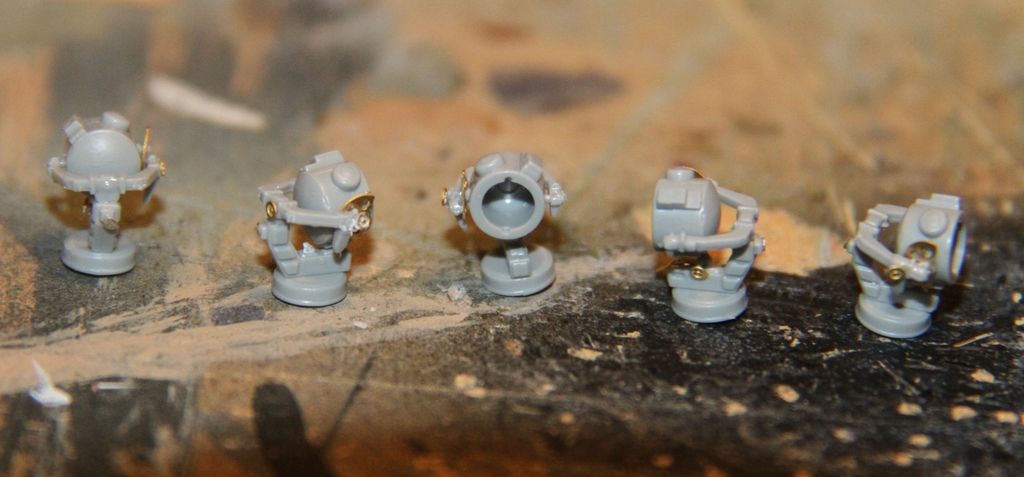
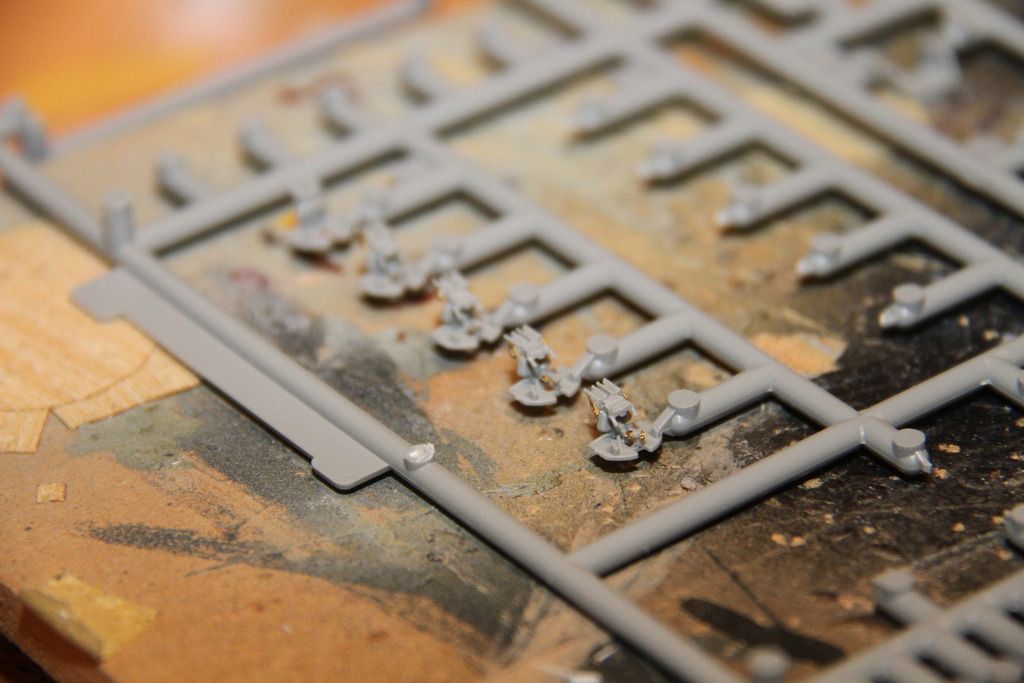
A bit more progress on the light AA.
All the etch on four of the twin 37mm.
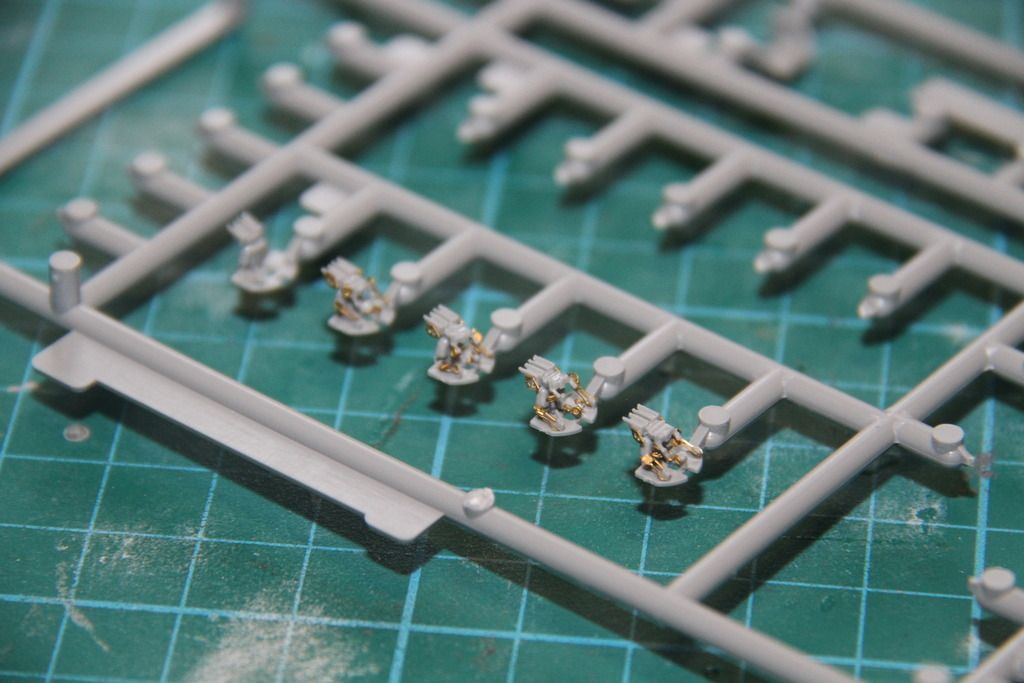
The mounts and barrels sprayed mid grey.

barrels fitted and given a light wash to lift out all those tiny parts. The mounts added to the superstructure and main deck forward.
The barbette for turret Bruno fitted as well.
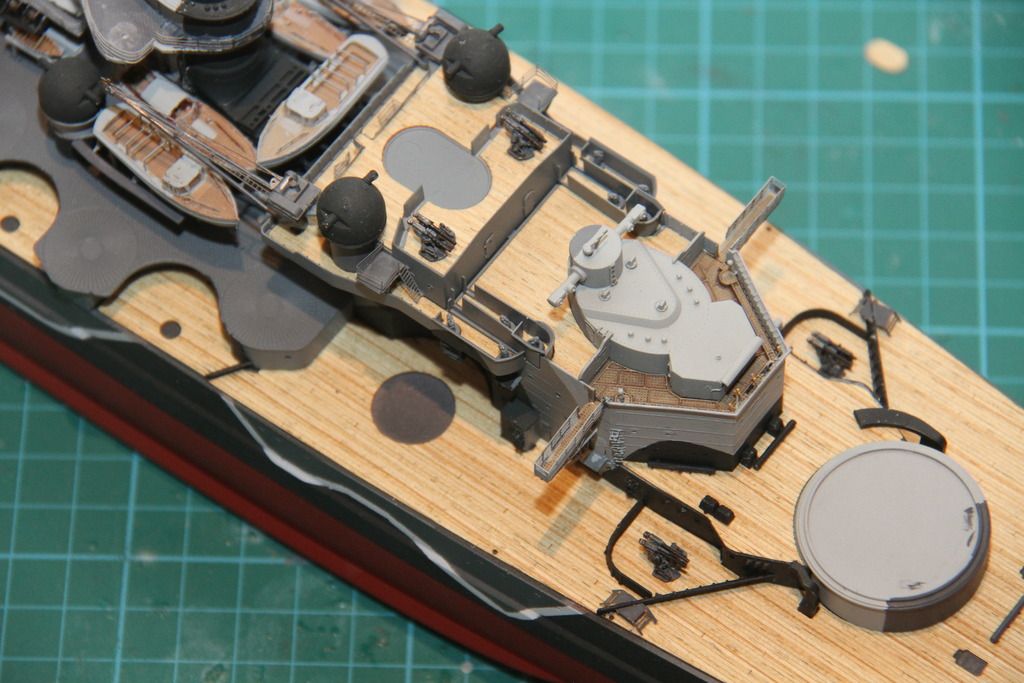
The admiral's bridge and main DCT section finally fixed in place. And finally an overview of the project so far.

Cheers
Si