

Nice work on the base Peter.
Kenny


Go to modelshipwrights.com for the current dynamic site!
Campaigns
Want to be part of a group build? This is where to start, plan, and meet about them.
Want to be part of a group build? This is where to start, plan, and meet about them.
Hosted by Jim Starkweather
MSW Group Build : Peter F : G Averoff

gator
Vendor

#027

Joined: April 13, 2005
KitMaker: 5,422 posts
Model Shipwrights: 5,079 posts

Posted: Wednesday, July 09, 2008 - 06:13 AM UTC


DrDull
Joined: February 23, 2006
KitMaker: 133 posts
Model Shipwrights: 128 posts

Posted: Wednesday, July 09, 2008 - 08:57 AM UTC
This is great stuff, Peter. I really appreciate the step-by-step description of making a base for a waterline model. I'm looking forward to the next installment. Barry

treadhead1952
Joined: June 12, 2008
KitMaker: 552 posts
Model Shipwrights: 493 posts

Posted: Wednesday, July 09, 2008 - 09:21 AM UTC
Excellent choice of a subject and workmanship on your project, looking forward to seeing it come together as you proceed. I am also enjoying all the tips and ideas that you are bringing out in this build.

MartinJQuinn
Joined: January 19, 2005
KitMaker: 574 posts
Model Shipwrights: 530 posts

Posted: Wednesday, July 09, 2008 - 10:30 AM UTC
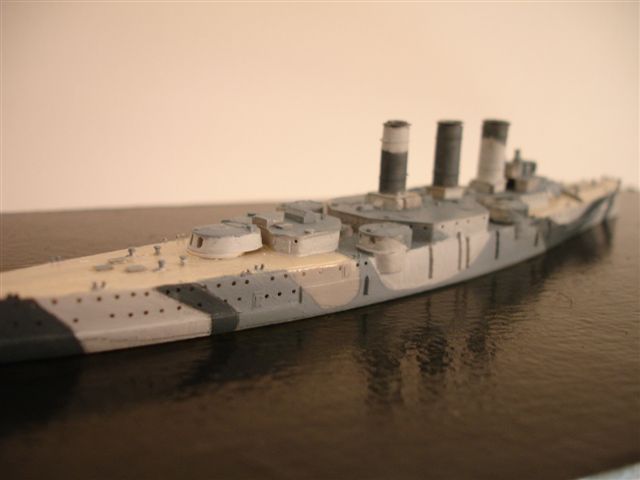
BTW, Peter. Could I get a scan of the camouflage pattern? I have the 1/350 kit, and that pattern looks too good to pass up (someday).
Thanks...
Thanks...

beefy66

Joined: October 22, 2007
KitMaker: 971 posts
Model Shipwrights: 645 posts

Posted: Wednesday, July 09, 2008 - 11:10 PM UTC
Great work Peter wish I had your paitience with the smaller details thanks for the informative tips. 

Tailor

Joined: May 26, 2008
KitMaker: 1,168 posts
Model Shipwrights: 676 posts

Posted: Thursday, July 10, 2008 - 08:36 PM UTC
Way too fast, Peter! 
You'll be finished by November, with no more updates for 7 months! Or will you make a whole fleet until then!?
Excellent tutorial on the waterbase!... will try that sometime soon!
You'll be finished by November, with no more updates for 7 months! Or will you make a whole fleet until then!?
Excellent tutorial on the waterbase!... will try that sometime soon!

peterf

Joined: November 23, 2007
KitMaker: 426 posts
Model Shipwrights: 424 posts

Posted: Tuesday, July 29, 2008 - 12:48 AM UTC
Not as quick as you think my friend, that photoetch will have me straining and losing points
as I piece together the miniscule detail. You get to a point where you think you can see the end but there's always a couple of months work yet to do.
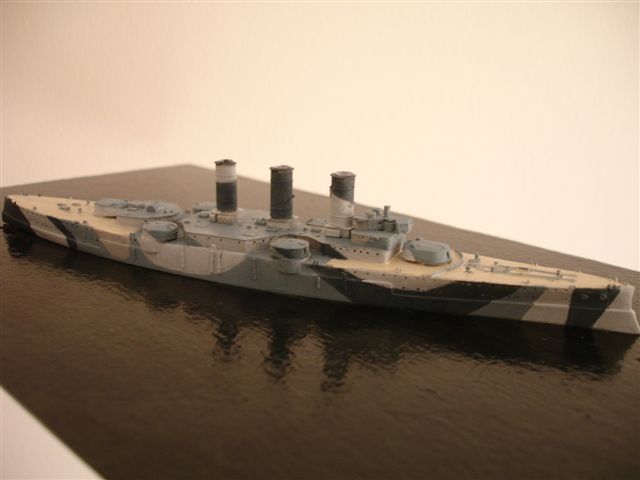
My next phase is the update from WW1 armoured cruiser to WW2 full camo update and conversion. I have the pictures to hand, and I will shortly be doing an overlay compariosn with reference to the "walkaround pictures". again not an easy phase other than going to see the ship myself with pencil paper and tape measure.
I struggle forward............
Peter F
as I piece together the miniscule detail. You get to a point where you think you can see the end but there's always a couple of months work yet to do.
My next phase is the update from WW1 armoured cruiser to WW2 full camo update and conversion. I have the pictures to hand, and I will shortly be doing an overlay compariosn with reference to the "walkaround pictures". again not an easy phase other than going to see the ship myself with pencil paper and tape measure.
I struggle forward............
Peter F
Tailor
Joined: May 26, 2008
KitMaker: 1,168 posts
Model Shipwrights: 676 posts
Posted: Tuesday, July 29, 2008 - 02:20 AM UTC
Great!
Can't wait!
Can't wait!
peterf
Joined: November 23, 2007
KitMaker: 426 posts
Model Shipwrights: 424 posts
Posted: Wednesday, July 30, 2008 - 05:11 AM UTC
BTW, Guido is your little boy taller than you?
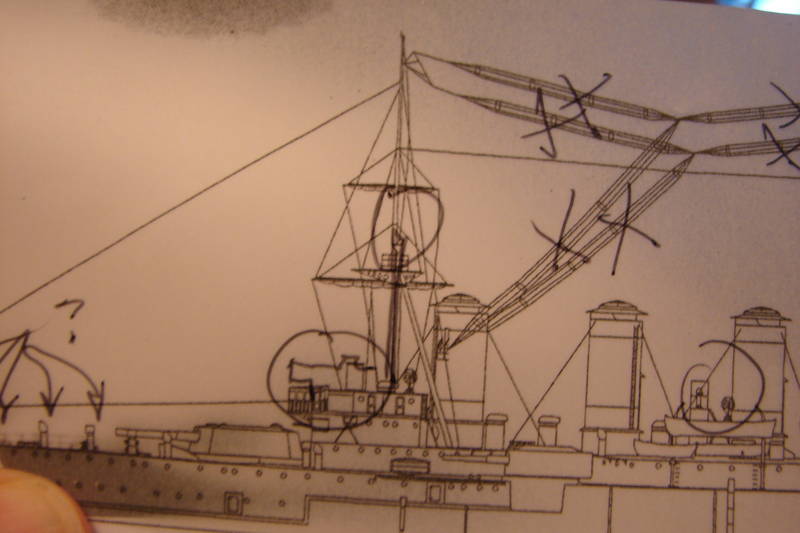
And so, nothing quite lines up as you think it should and as I progress with the build, I must now make the comparrison of the WW1 Averoff with the WW2 camo version.
I have three pictures which illustrate my first effort at trying to understand this :
The first picture shows the WW1 version as a tracing paper copy overlaid onto the darker camo version picture.
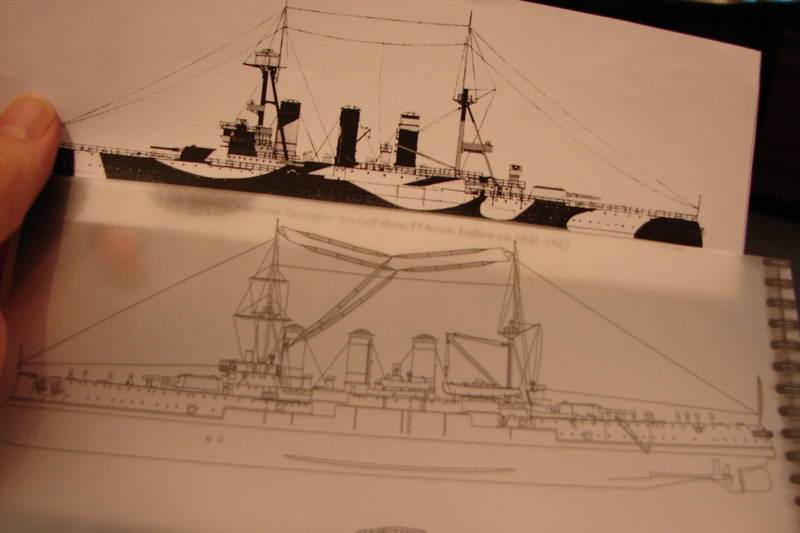
With a felt tip I have marked up the differences - however only the printed version. A look at the real life "walkaround" pictures should confirm my findings.
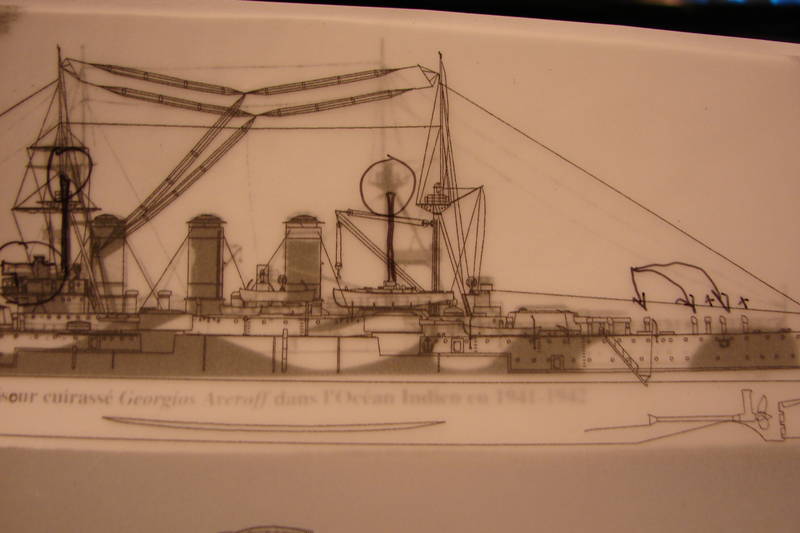
Finally, I have gotten rid of those mast head wires and spreaders - RESULT!
Peter F
And so, nothing quite lines up as you think it should and as I progress with the build, I must now make the comparrison of the WW1 Averoff with the WW2 camo version.
I have three pictures which illustrate my first effort at trying to understand this :
The first picture shows the WW1 version as a tracing paper copy overlaid onto the darker camo version picture.
With a felt tip I have marked up the differences - however only the printed version. A look at the real life "walkaround" pictures should confirm my findings.
Finally, I have gotten rid of those mast head wires and spreaders - RESULT!
Peter F

ChrisB
Joined: July 16, 2008
KitMaker: 33 posts
Model Shipwrights: 28 posts
Posted: Wednesday, July 30, 2008 - 08:02 AM UTC
Very interesting article on water.
Looking forward to more.
Chris
Looking forward to more.
Chris

Clanky44

Joined: September 15, 2005
KitMaker: 1,901 posts
Model Shipwrights: 934 posts

Posted: Wednesday, July 30, 2008 - 03:45 PM UTC
Well done Peter,
You and Rui are showing me that you can build a ship model by hand painting. You have given me the incentive to tackle this style.
Thanks!
Frank
You and Rui are showing me that you can build a ship model by hand painting. You have given me the incentive to tackle this style.
Thanks!
Frank
peterf
Joined: November 23, 2007
KitMaker: 426 posts
Model Shipwrights: 424 posts
Posted: Wednesday, July 30, 2008 - 07:59 PM UTC
Hi, Frank, I'll try any method to see if it will improve what I think is a better result and thererfore I'm not stuck with any particular routine The best reason why this kit is painted first is because I need to line up, and be sure of the camo as it's a major part of the build. Also I find it difficult to paint round corners once things are in place.
Also, Part 2 of the water/ship base will be up next month.
Cheers,
Peter F
Also, Part 2 of the water/ship base will be up next month.
Cheers,
Peter F

skipper

Joined: February 28, 2002
KitMaker: 5,182 posts
Model Shipwrights: 4,070 posts
Posted: Thursday, July 31, 2008 - 12:54 AM UTC
Good job Peter!
I like your method of "Spot the differences" on both versions!
Keep up mate!
Rui
I like your method of "Spot the differences" on both versions!
Keep up mate!
Rui


Gunny
Joined: July 13, 2004
KitMaker: 6,705 posts
Model Shipwrights: 4,704 posts
Posted: Thursday, July 31, 2008 - 09:46 PM UTC
Second Build Session Closed-Keep Modeling!
Tailor
Joined: May 26, 2008
KitMaker: 1,168 posts
Model Shipwrights: 676 posts
Posted: Friday, August 01, 2008 - 12:02 AM UTC
Nice "paperwork"!

PS.: Not yet taller, but certainly more intelligent
PS.: Not yet taller, but certainly more intelligent
peterf
Joined: November 23, 2007
KitMaker: 426 posts
Model Shipwrights: 424 posts
Posted: Tuesday, August 05, 2008 - 02:09 AM UTC
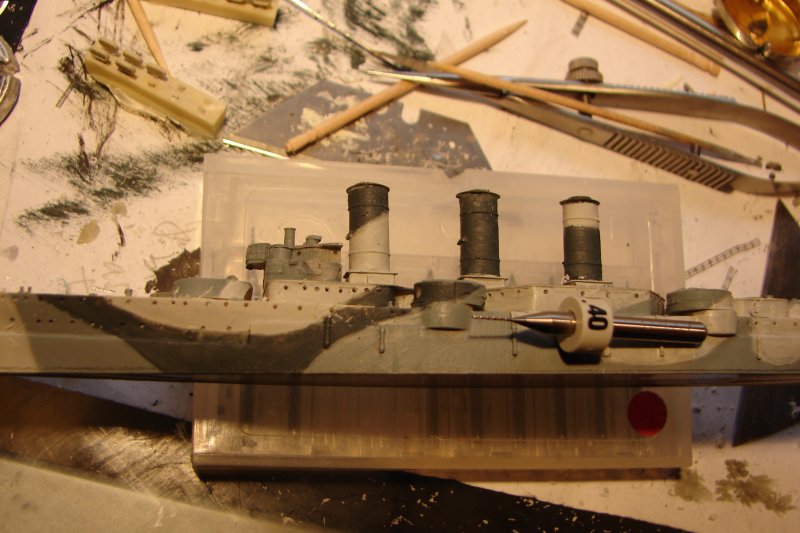
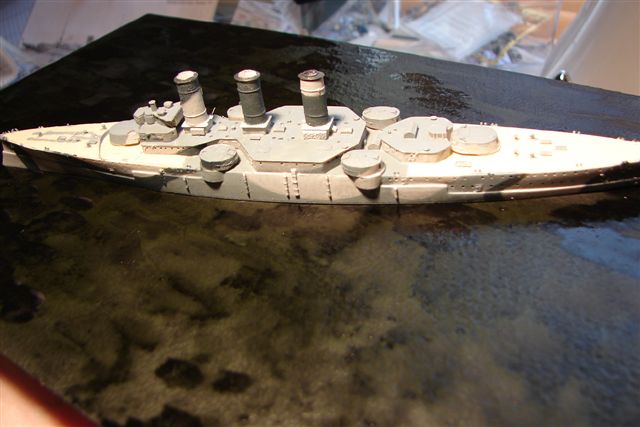
Time for a bit of drilling :
This is something I don't have to be at the bench for, however to keep it all in context for this demonstration, I continue with the drilling out the funnels, port holes, and anchors eyelets on the bow.
The portholes on the kit are acceptable but to add the extra touch, I always drill them out as well. I have an array of drill diameters and they are mainly finger drills as shown. The art is not to twist them in too tight or vigorously and that way they don't break. If they do, they are difficult to remove.
Also as the photographs are taken, it's a good time to review the work on a large screen. This way you can identify "rough" areas of the build and do something about it before you progress.
It may be difficult to see errors by eye but when they are eradicated, the finished model is much smoother, and more convincing.
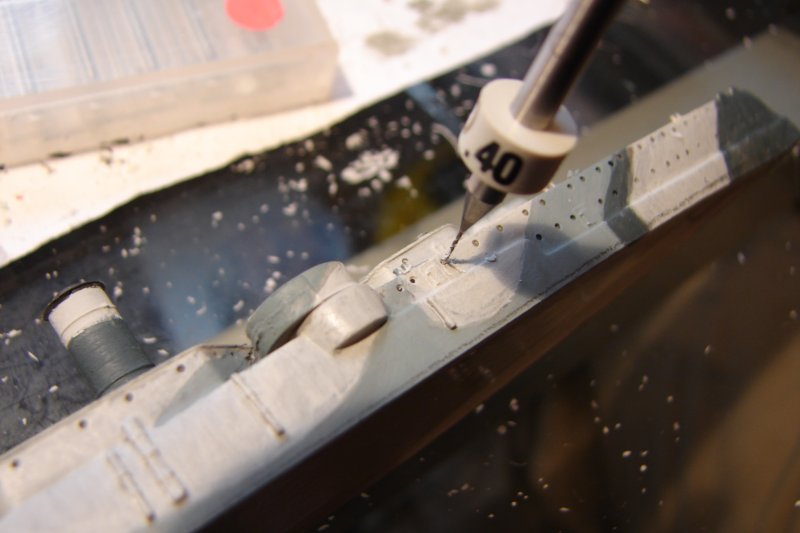
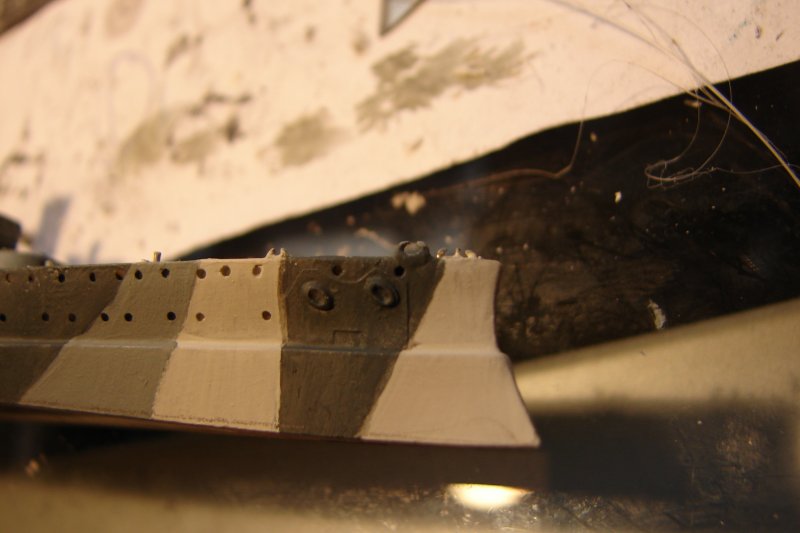
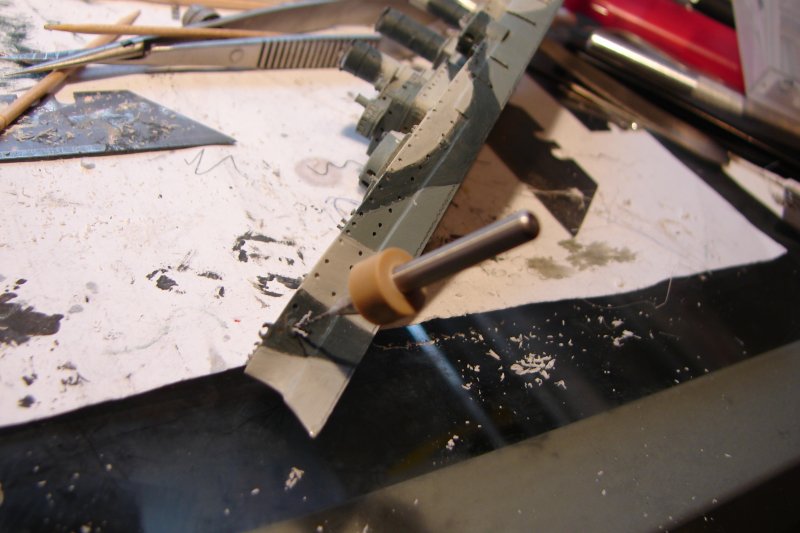
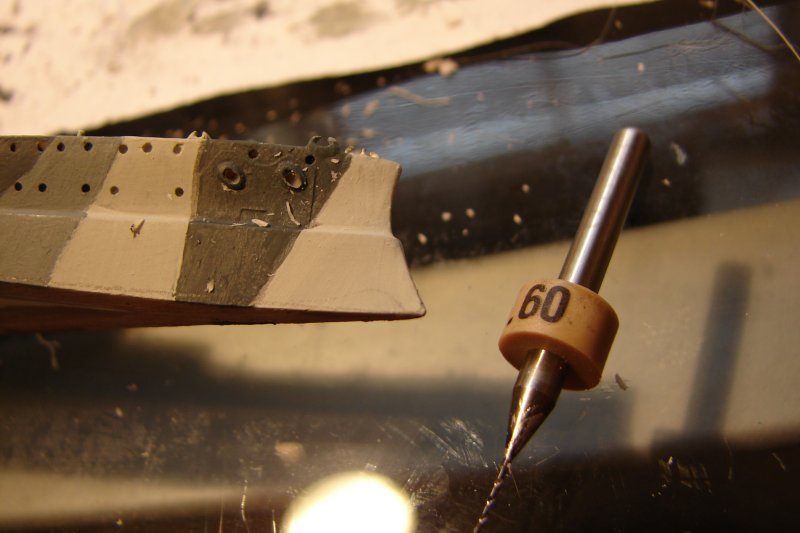
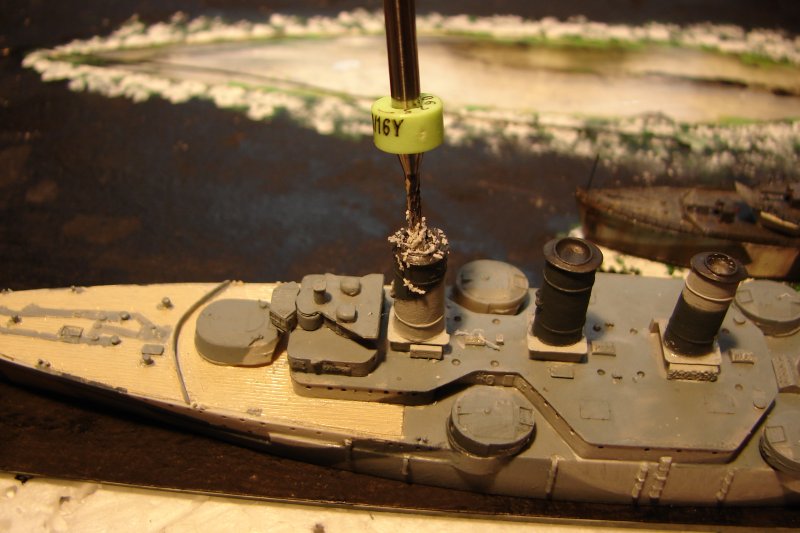
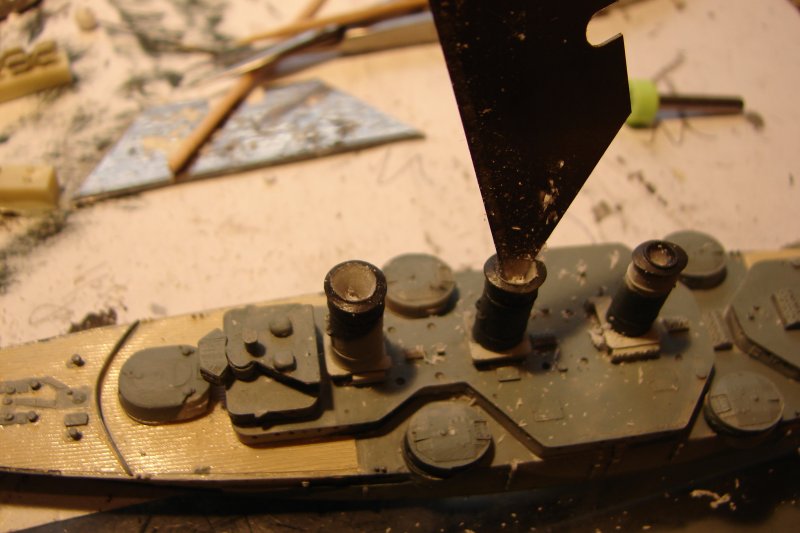
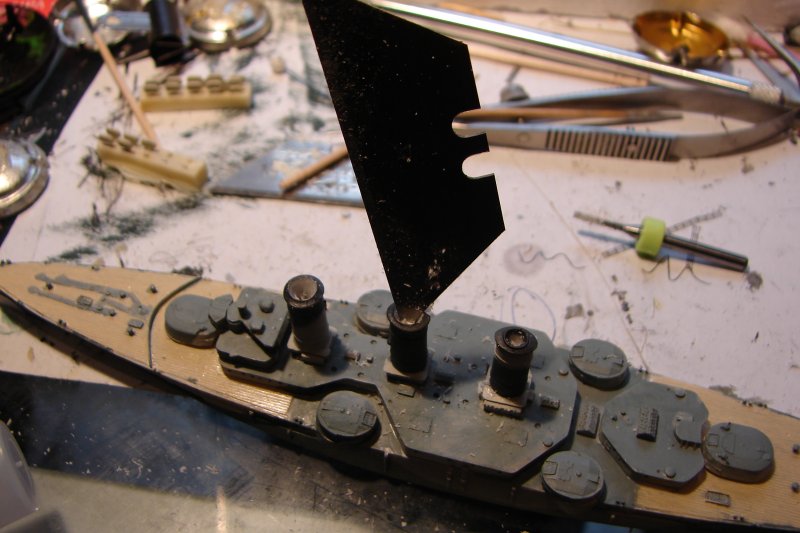
Peter F.
This is something I don't have to be at the bench for, however to keep it all in context for this demonstration, I continue with the drilling out the funnels, port holes, and anchors eyelets on the bow.
The portholes on the kit are acceptable but to add the extra touch, I always drill them out as well. I have an array of drill diameters and they are mainly finger drills as shown. The art is not to twist them in too tight or vigorously and that way they don't break. If they do, they are difficult to remove.
Also as the photographs are taken, it's a good time to review the work on a large screen. This way you can identify "rough" areas of the build and do something about it before you progress.
It may be difficult to see errors by eye but when they are eradicated, the finished model is much smoother, and more convincing.
Peter F.
DrDull
Joined: February 23, 2006
KitMaker: 133 posts
Model Shipwrights: 128 posts
Posted: Tuesday, August 05, 2008 - 04:40 AM UTC
Hi Peter. Nice work with all that drilling. Will you be using paint to highlight the detail later? Barry
peterf
Joined: November 23, 2007
KitMaker: 426 posts
Model Shipwrights: 424 posts
Posted: Tuesday, August 05, 2008 - 05:12 AM UTC
Hi, Barry, there are many ways of enhancing the detail, and I am not closed to using new methods. I have seen a sharpened pencil being used to twirl in the porthole aperture and I think I may favour this. Unlike a dark pen, or feltip it's more subtle, and leaves a slight shine.
Also the scuttles can be drawn on, little eyebrows in pencil - but this will come much later. If you imagine drawing a picture of a face, the broad brush strokes come first to make sure the form and massing are acceptable, and then you start working on the middle detail finally focusing in on the fine detail when you're happy that everything is correct. This is how I will progress.
Cheers,
Peter F
skipper
Joined: February 28, 2002
KitMaker: 5,182 posts
Model Shipwrights: 4,070 posts
Posted: Tuesday, August 05, 2008 - 06:12 AM UTC
Looks good Peter!
Are those Proxxon drills? - just curious
Rui
Are those Proxxon drills? - just curious
Rui
peterf
Joined: November 23, 2007
KitMaker: 426 posts
Model Shipwrights: 424 posts
Posted: Wednesday, August 06, 2008 - 08:15 PM UTC
Those drills didn't have a name on them, Rui. I buy most of them at Telford - I just chuck 'em in the carrier bag and walk on to the next trader. No doubt this year will be the same.
It does remind me also to have a tools check, I shall arrange them on the workbench to let folks know what I use and what's at my disposal - I have at least a dozen of everything so I don't have to look for things, and - it works!
Cheers,
Peter F
It does remind me also to have a tools check, I shall arrange them on the workbench to let folks know what I use and what's at my disposal - I have at least a dozen of everything so I don't have to look for things, and - it works!
Cheers,
Peter F
peterf
Joined: November 23, 2007
KitMaker: 426 posts
Model Shipwrights: 424 posts
Posted: Tuesday, August 12, 2008 - 08:34 PM UTC
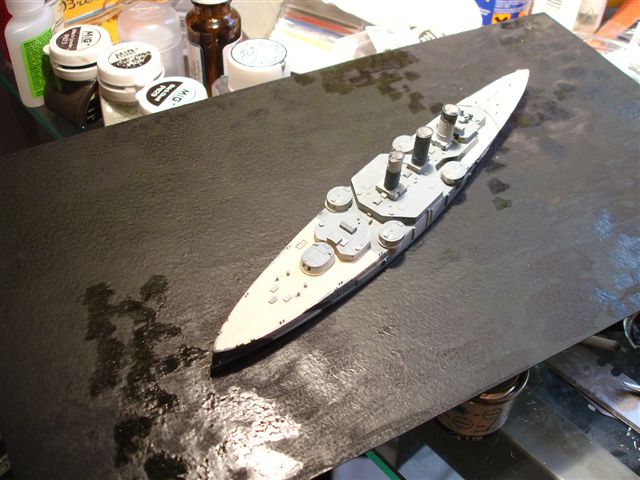
Putting the hull too one side, and continuing with the water presentation, I will now develop the texture of the seascape with diluted Tamiya black acrylic.
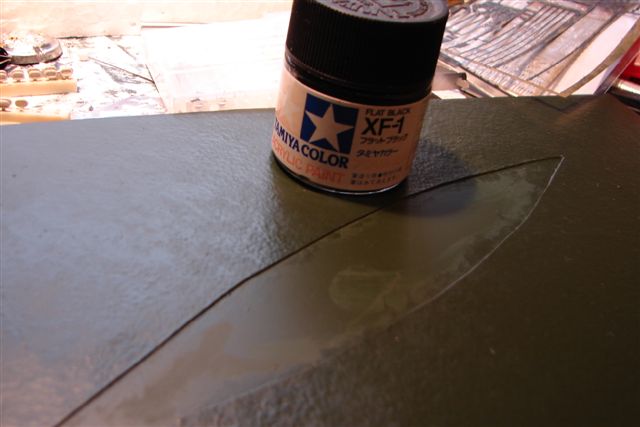
The Tamiya paint cleaner is used to make a light wash with the black paint. This gives the green a more mottled look and gets away from the "billiard table effect" of an overall green.
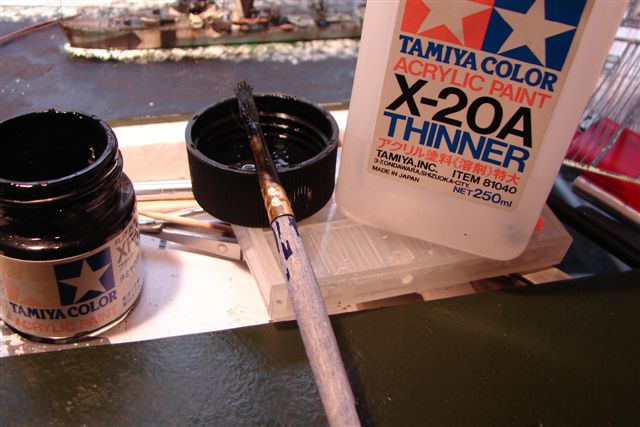
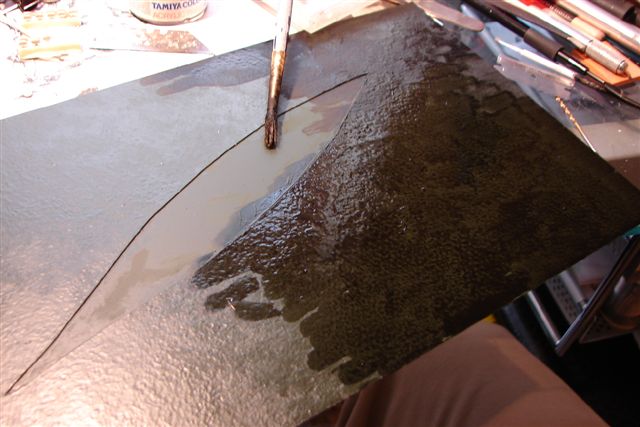
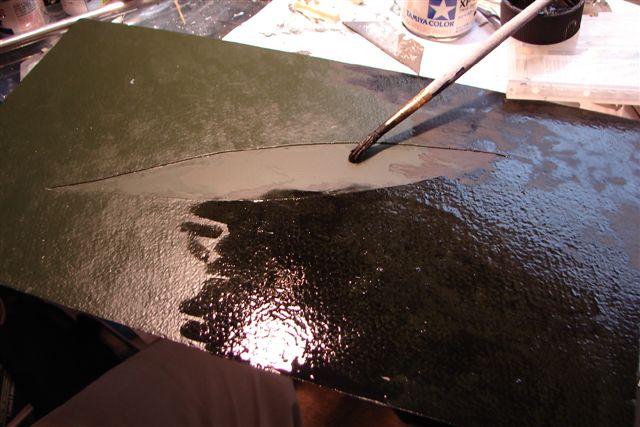
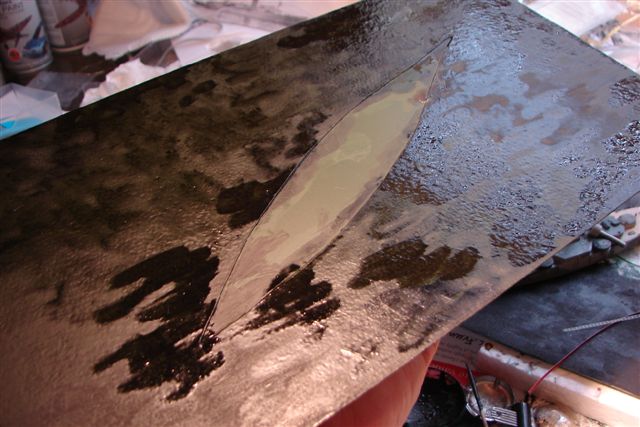
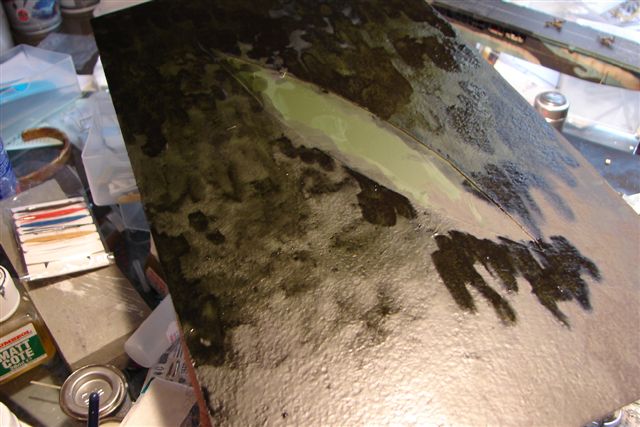
I will show the ship at anchor, in which case I will not need to white dry brush the bow wave and screw churning effect.
Continuing, I now fix the base with pva glue. One generous coat sets the whole base, and can be used as a finish. I will normally use a second coat, or use polyurethane for an even glossier finish to suit the subject and mood.
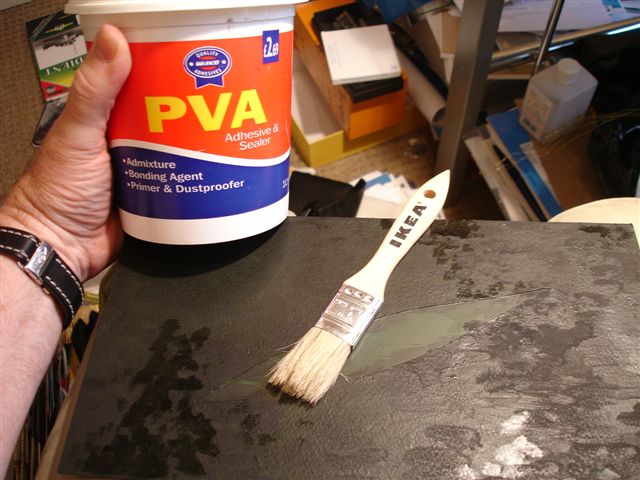
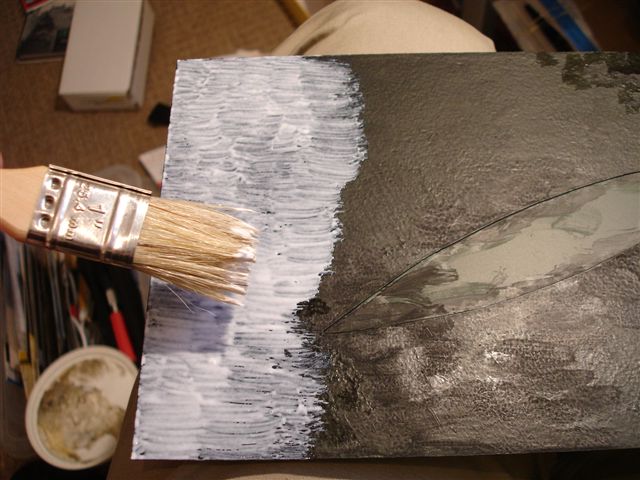
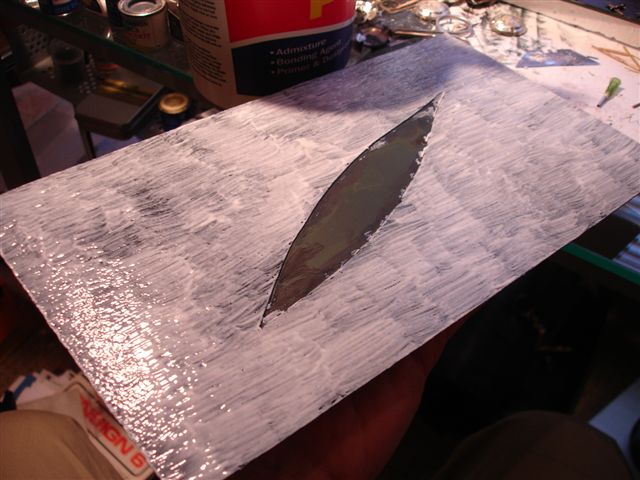
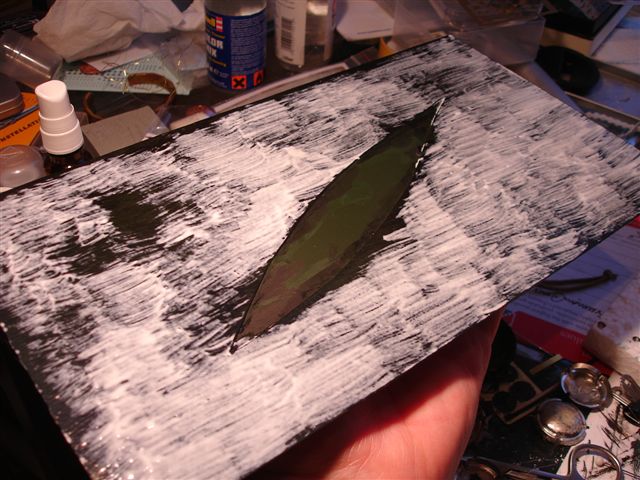
When I put on the second coat I will also cover the void where the ship goes and therefore cement the ship in place, but this will come later. The ship as shown on the base is a dry fit.
Peter F
The Tamiya paint cleaner is used to make a light wash with the black paint. This gives the green a more mottled look and gets away from the "billiard table effect" of an overall green.
I will show the ship at anchor, in which case I will not need to white dry brush the bow wave and screw churning effect.
Continuing, I now fix the base with pva glue. One generous coat sets the whole base, and can be used as a finish. I will normally use a second coat, or use polyurethane for an even glossier finish to suit the subject and mood.
When I put on the second coat I will also cover the void where the ship goes and therefore cement the ship in place, but this will come later. The ship as shown on the base is a dry fit.
Peter F
MartinJQuinn
Joined: January 19, 2005
KitMaker: 574 posts
Model Shipwrights: 530 posts
Posted: Wednesday, August 13, 2008 - 02:42 AM UTC
Very impressive Peter!
DrDull
Joined: February 23, 2006
KitMaker: 133 posts
Model Shipwrights: 128 posts
Posted: Wednesday, August 13, 2008 - 05:14 AM UTC
Beautiful, Peter. You are an artist! Barry

JMartine
Joined: October 18, 2007
KitMaker: 1,698 posts
Model Shipwrights: 1,514 posts

Posted: Wednesday, August 13, 2008 - 10:49 AM UTC
That is just greatwork...love how it looks, will have to try that method down the road..cheers
peterf
Joined: November 23, 2007
KitMaker: 426 posts
Model Shipwrights: 424 posts
Posted: Wednesday, August 13, 2008 - 08:24 PM UTC
Thank you very much gentelmen, much appreciated. that is as simple and graphic as I can make it and if you copy the method step by step, you will have the same result in which case its methos rather than art but that's fine with me.
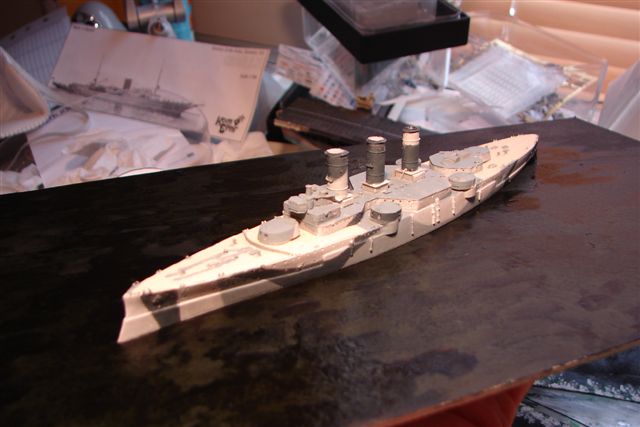
So, its back to the ship now, and time to sharpen up the camo scheme - its looking a bit rough in the picture and needs to be more defined for the photography.
Cheers.
Peter F
So, its back to the ship now, and time to sharpen up the camo scheme - its looking a bit rough in the picture and needs to be more defined for the photography.
Cheers.
Peter F
 |

WEB HOSTING BY


Copyright ©2021 Model Shipwrights and Kitmaker Network, a subsidiary of Silver Star Enterprises
All Rights Reserved. Please read our Conditions of Use and Privacy Policy.
All Rights Reserved. Please read our Conditions of Use and Privacy Policy.