

Si,
Great job. She came out beautifully.
Can't wait to see what you do next
Dave


Go to modelshipwrights.com for the current dynamic site!
Campaigns
Want to be part of a group build? This is where to start, plan, and meet about them.
Want to be part of a group build? This is where to start, plan, and meet about them.
Hosted by Jim Starkweather
Official: Guadalcanal Campaign

rolltide31

#377

Joined: June 27, 2010
KitMaker: 1,481 posts
Model Shipwrights: 1,332 posts

Posted: Thursday, November 05, 2015 - 06:58 AM UTC

RedDuster

Joined: March 01, 2010
KitMaker: 7,078 posts
Model Shipwrights: 6,649 posts

Posted: Thursday, November 05, 2015 - 01:27 PM UTC
Guys,
Thank you for your kind words. It was a very enjoyable build, quite vice free.
Watch this space for build No.2 I am taking a list of suitable ships with me to Telford, and I am hoping to find one of them along with the required aftermarket.
Cheers.
Si
Thank you for your kind words. It was a very enjoyable build, quite vice free.
Watch this space for build No.2 I am taking a list of suitable ships with me to Telford, and I am hoping to find one of them along with the required aftermarket.
Cheers.
Si
RedDuster
Joined: March 01, 2010
KitMaker: 7,078 posts
Model Shipwrights: 6,649 posts
Posted: Monday, November 09, 2015 - 02:06 PM UTC
No joy at Telford in picking up build two, but I do have an idea, and a source.
More soon.
Si
More soon.
Si

Cosimodo
#335

Joined: September 03, 2013
KitMaker: 1,808 posts
Model Shipwrights: 871 posts

Posted: Tuesday, November 17, 2015 - 01:29 PM UTC
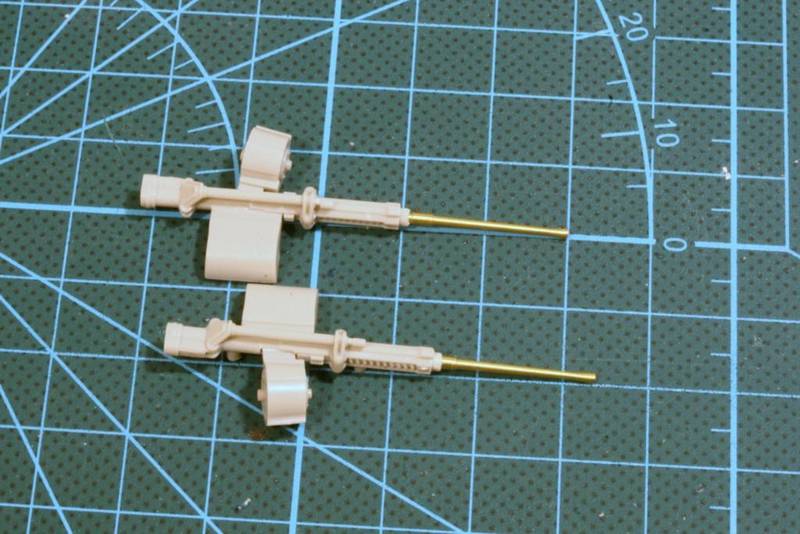
Getting the Zero airborne continues, starting with some fangs in the form of two 7.7mm machine guns
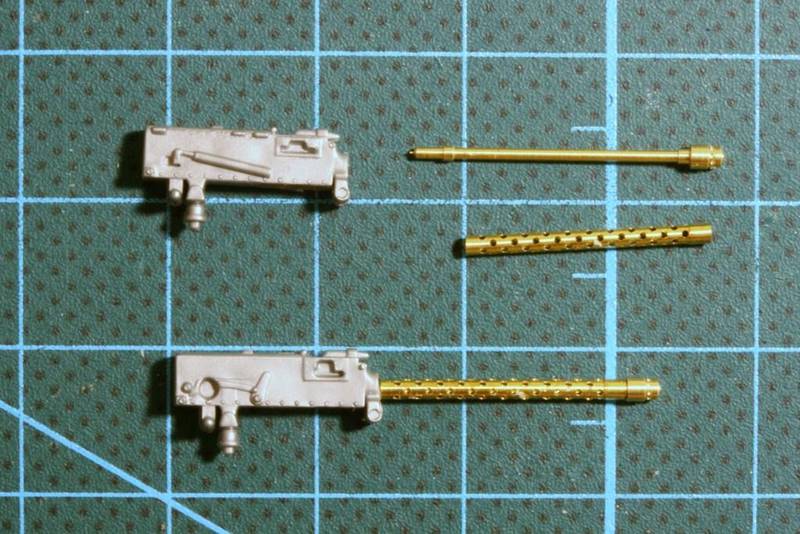
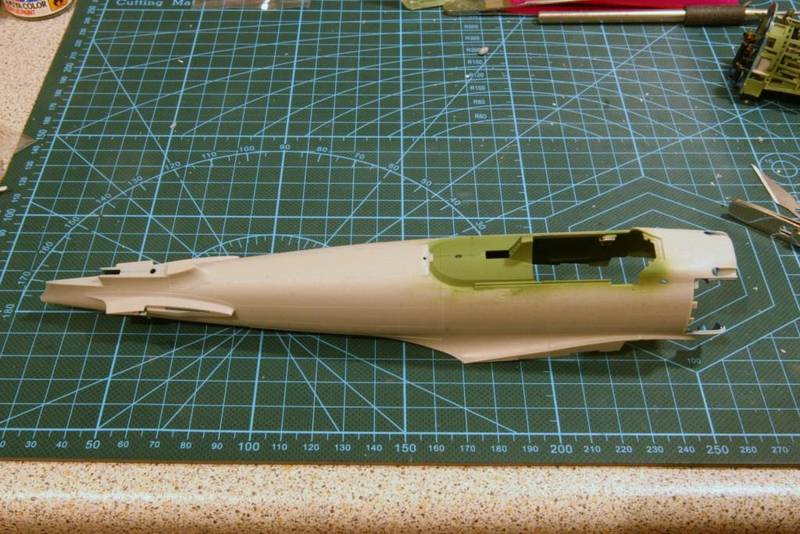
While the paint was drying on those, the three part fuselage went togther without a gap in sight.
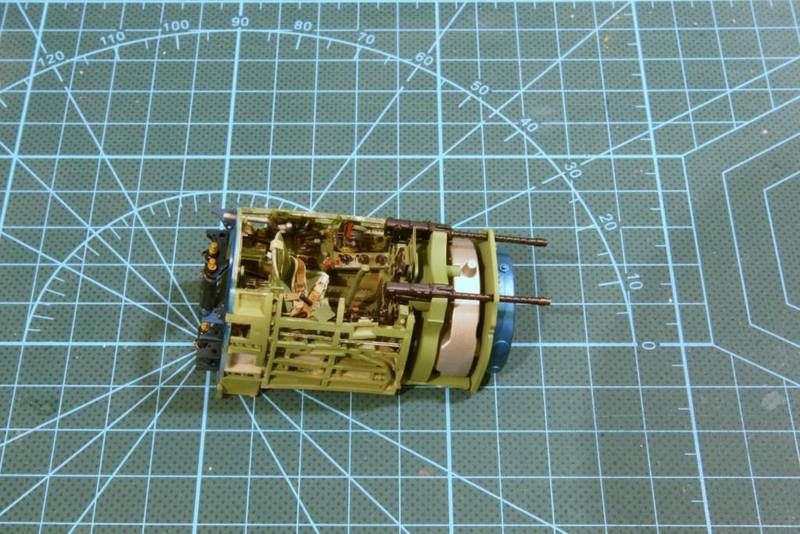
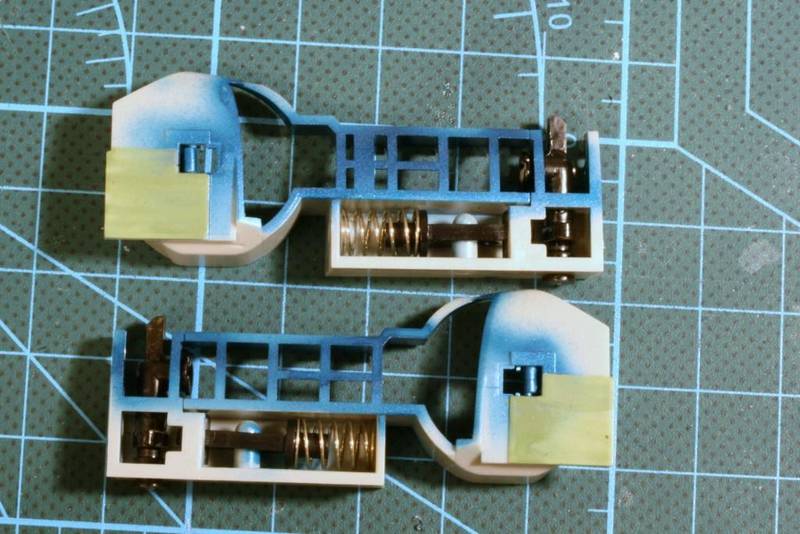
Having mentally praised Tamiya fot its fit, it took about 90 mins to get the guns along with the fuel and oil tanks. I think most of this was due to the photoetch used making the fit too tight.
But we got there
It slotted into the fuselage no problems
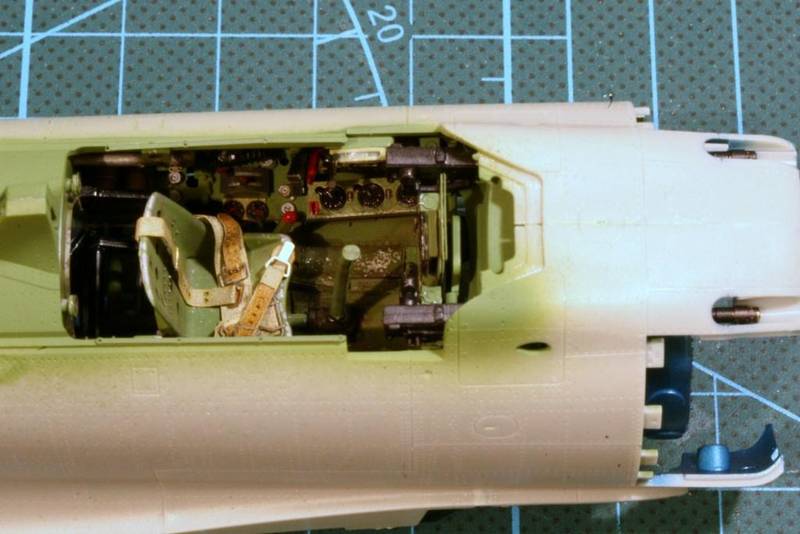
It seems odd that they still had the machine guns protuding into the cockpit like some WW1 fighter. At least they had a shot at clearing them if they jammed.
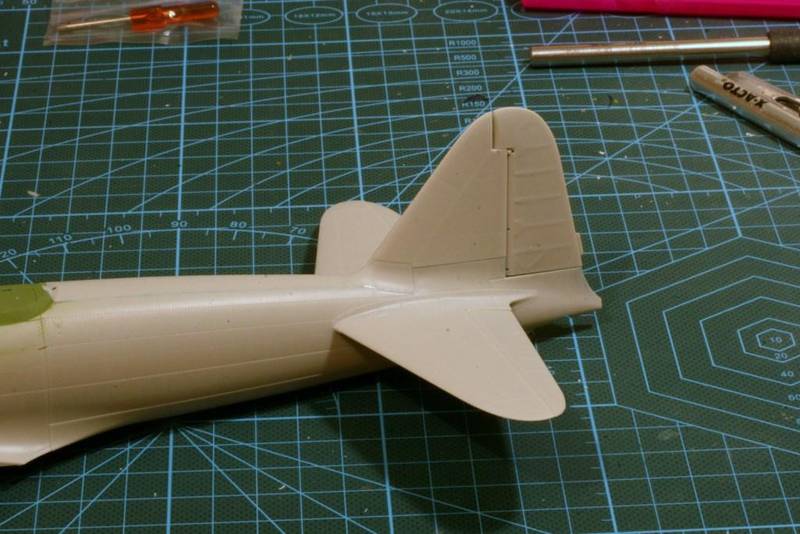
The tail feathers attached
And have begun the wings, with more guns, 20mm cannon (small magazines, so i guess they didn't hold the thumb down on these) and as with Tamiya, working undercarriage.
The wings are finished and attached. Didn't go so well, plenty of . Post more photos later once they have recovered.
cheers
Michael
While the paint was drying on those, the three part fuselage went togther without a gap in sight.
Having mentally praised Tamiya fot its fit, it took about 90 mins to get the guns along with the fuel and oil tanks. I think most of this was due to the photoetch used making the fit too tight.
But we got there
It slotted into the fuselage no problems
It seems odd that they still had the machine guns protuding into the cockpit like some WW1 fighter. At least they had a shot at clearing them if they jammed.
The tail feathers attached
And have begun the wings, with more guns, 20mm cannon (small magazines, so i guess they didn't hold the thumb down on these) and as with Tamiya, working undercarriage.
The wings are finished and attached. Didn't go so well, plenty of
. Post more photos later once they have recovered.cheers
Michael
RedDuster
Joined: March 01, 2010
KitMaker: 7,078 posts
Model Shipwrights: 6,649 posts
Posted: Wednesday, November 18, 2015 - 01:23 AM UTC
Nice work on the guns Michael,
Sorry to hear you had issues with wings, but looking forward to seeing the fix.
Cheers
Si
Sorry to hear you had issues with wings, but looking forward to seeing the fix.
Cheers
Si
rolltide31
#377
Joined: June 27, 2010
KitMaker: 1,481 posts
Model Shipwrights: 1,332 posts
Posted: Wednesday, November 18, 2015 - 05:23 AM UTC
Michael,
Very nice work. Motivates me to try building a wingy thing myself.
Great job
Dave
Very nice work. Motivates me to try building a wingy thing myself.
Great job
Dave

Littorio
Joined: September 15, 2004
KitMaker: 4,728 posts
Model Shipwrights: 1,080 posts

Posted: Wednesday, November 18, 2015 - 05:37 AM UTC
As has been said already Michael, great work, that pit looks great and I know where your coming from with the fit issues once you attach all that PE. They forget to tell you that you need to remove a thou here and there to counter the added thickness of the PE. Any way glad you over came the issues.
Any photos of the wing issue? Or should I not ask
As for my build it's stalled or been shot down by a Zero while I build another tank, at this rate I may have to start looking for a M3A1. Who'd of thought I'd create a campaign and intend to build a ship, enter a aircraft and finish with a tank. Where's the emoticon for a screw loose

Cosimodo
#335
Joined: September 03, 2013
KitMaker: 1,808 posts
Model Shipwrights: 871 posts
Posted: Wednesday, November 18, 2015 - 12:59 PM UTC
Quoted Text
Nice work on the guns Michael,
Sorry to hear you had issues with wings, but looking forward to seeing the fix.
Cheers
Si
Thanks Si. The fix is in, I just didn't take any photos. It's one of those things with the mismatch between wing and fuselage about 0.5mm but so obvious to me anyway. Wings and wheels shortly I hope.
cheers
Michael
Cosimodo
#335
Joined: September 03, 2013
KitMaker: 1,808 posts
Model Shipwrights: 871 posts
Posted: Wednesday, November 18, 2015 - 01:01 PM UTC
Quoted Text
Michael,
Very nice work. Motivates me to try building a wingy thing myself.
Great job
Dave
Thanks Dave. I find it helps to switch from ships though I am keen to get back to one for the Cruiser campaign.
cheers
Michael
Cosimodo
#335
Joined: September 03, 2013
KitMaker: 1,808 posts
Model Shipwrights: 871 posts
Posted: Wednesday, November 18, 2015 - 01:10 PM UTC
Quoted Text
As has been said already Michael, great work, that pit looks great and I know where your coming from with the fit issues once you attach all that PE. They forget to tell you that you need to remove a thou here and there to counter the added thickness of the PE. Any way glad you over came the issues.
Any photos of the wing issue? Or should I not ask
As for my build it's stalled or been shot down by a Zero while I build another tank, at this rate I may have to start looking for a M3A1. Who'd of thought I'd create a campaign and intend to build a ship, enter a aircraft and finish with a tank. Where's the emoticon for a screw loose
Yes, the drawbacks of thin metal that Tamiya had not allowed for in its plans

I bought a tank the other day, Tiger '131'. I haven't built one since I was about 12! I don't know what I was thinking. It, like all impulse purchases, seemed like a good idea at the time.
cheers
Michael
Cosimodo
#335
Joined: September 03, 2013
KitMaker: 1,808 posts
Model Shipwrights: 871 posts
Posted: Saturday, November 21, 2015 - 02:33 PM UTC
While I skirt the necessity to fix the wings I focused on something else, the engine. It was all good therapy though I don't think you'll be able to see any of it except the prop base once the cowling goes on. It went together very well and fits perfectly.
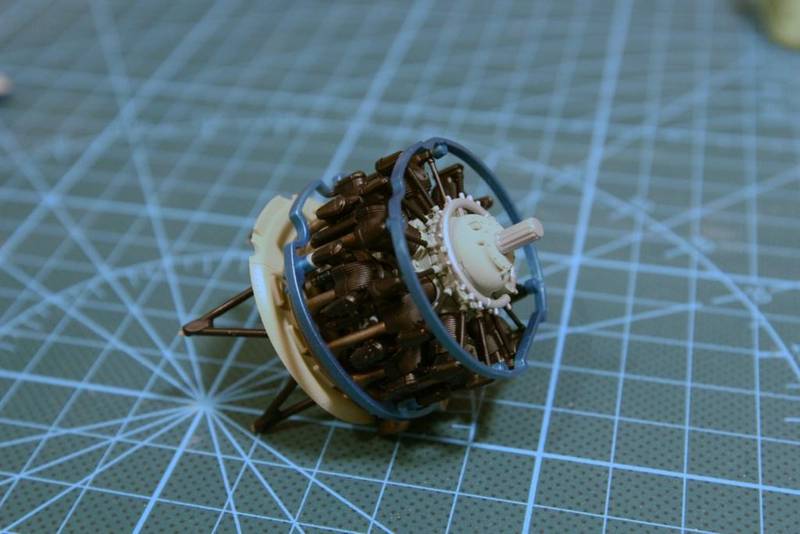
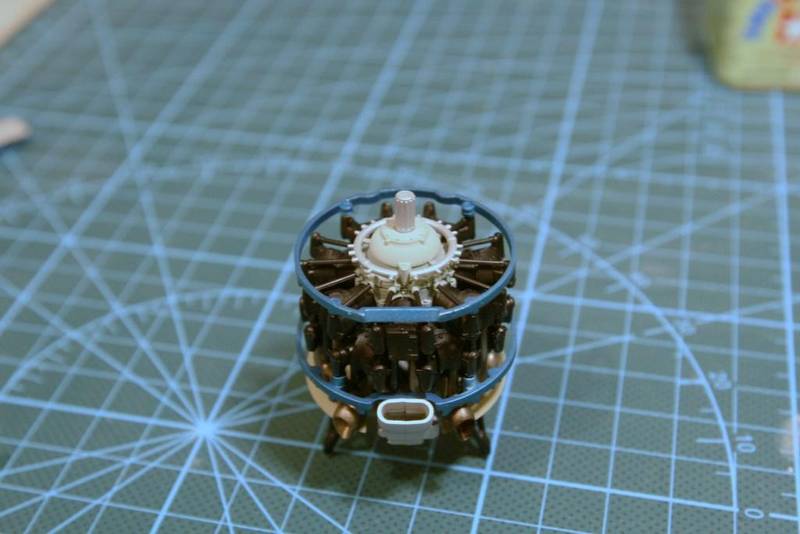
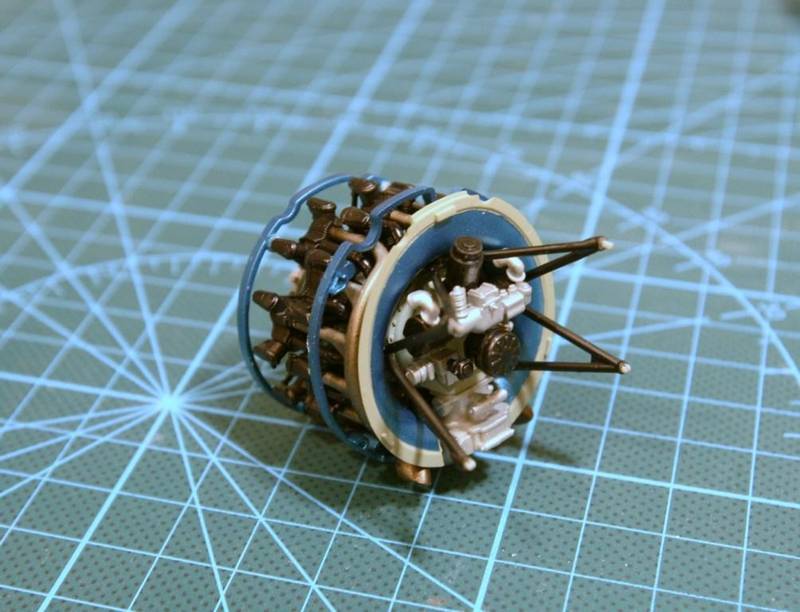
I will weather the front of it and the exhaust ends but the rest I will leave.
cheers
Michael
I will weather the front of it and the exhaust ends but the rest I will leave.
cheers
Michael
Littorio
Joined: September 15, 2004
KitMaker: 4,728 posts
Model Shipwrights: 1,080 posts
Posted: Saturday, November 21, 2015 - 03:57 PM UTC
Michael beautiful engine, it would be a shame to hide it all once complete.
Oh thought I'd let you all know, I have a M3A1 incoming so looks like I'll be building a tank
Oh thought I'd let you all know, I have a M3A1 incoming so looks like I'll be building a tank
RedDuster
Joined: March 01, 2010
KitMaker: 7,078 posts
Model Shipwrights: 6,649 posts
Posted: Sunday, November 22, 2015 - 04:58 AM UTC
Very Nice work Michael,
The engine looks like it will start.
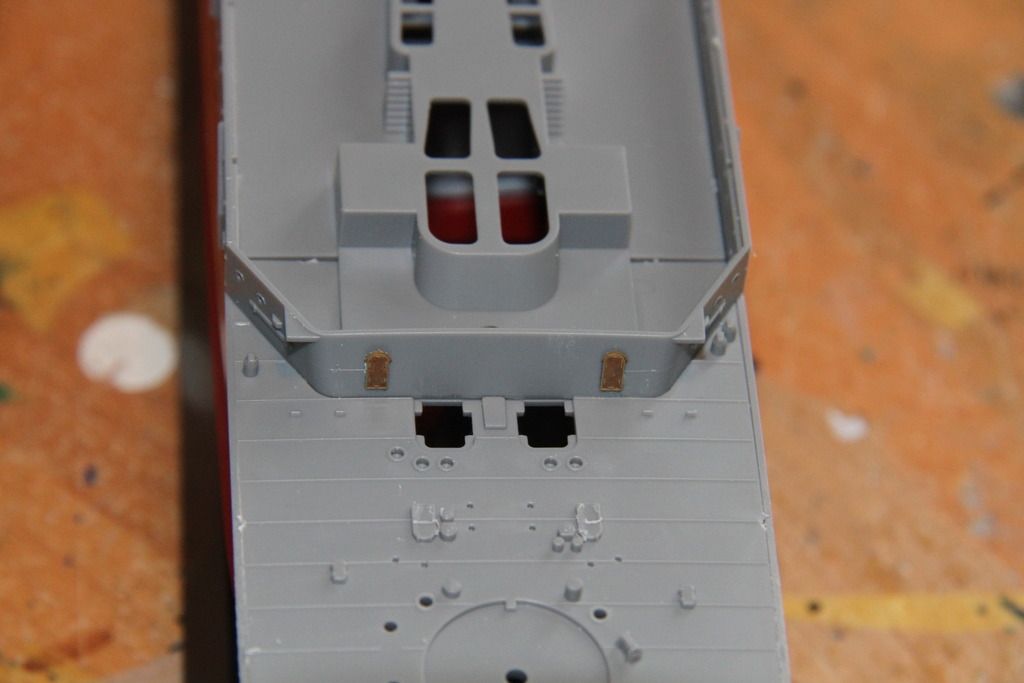
Picked up my bigger build for this campaign from a well known North London hobby shop yesterday, went in straight into the workshop today.
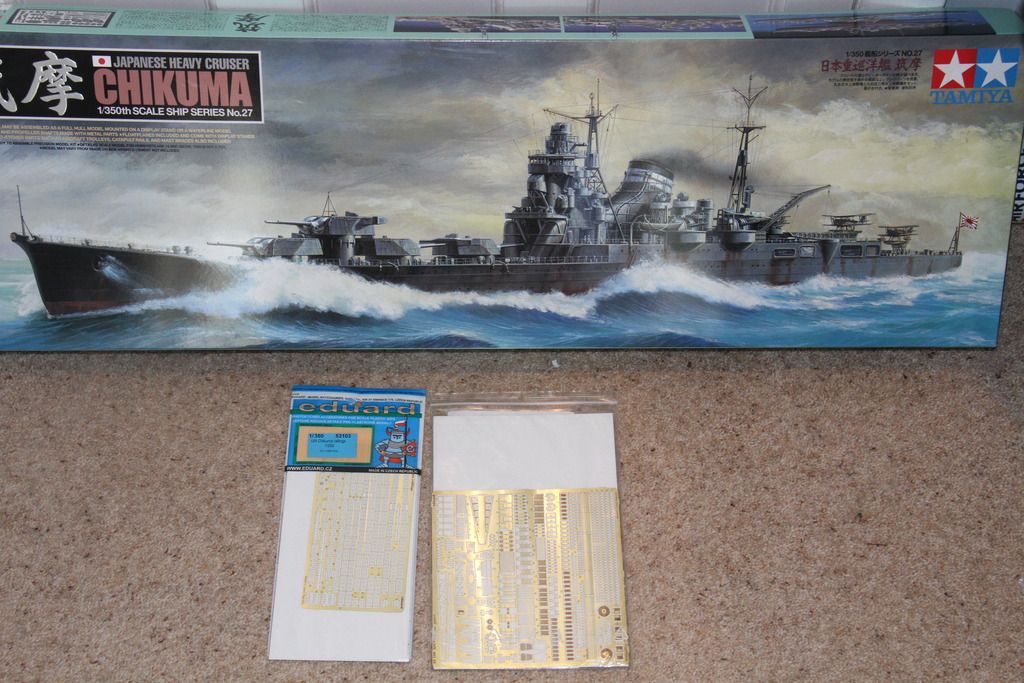
The etch is eduard, a bit simpler than Flyhawk, but at least easily obtainable in the UK.
The kit can be built either waterline or full hull.
A the fo'csle and quarter decks,
and after the removal of some moulded on detail.

The initial assemblies has more like engineering, these nuts will have take the bolts from the stand.
The first of the bulkheads that support the upper hull sides in place.

all the bulkheads in place.
More engineering, brackets to affix the hull sides screwed into place.
Starboard hull upper hull side fixed by another screw, this just positions the hull half, it will need to be glued.

The hull assembled.
More nutty bits, the fo'c's'le and midships decks.
The main deck down, the covers for the screws not yet fitted.
I have also ordered the brass strip fro the linoleum deck areas, and some more appropriate aircraft for the Guadalcanal era.
Cheers.
Si
The engine looks like it will start.
Picked up my bigger build for this campaign from a well known North London hobby shop yesterday, went in straight into the workshop today.

The etch is eduard, a bit simpler than Flyhawk, but at least easily obtainable in the UK.
The kit can be built either waterline or full hull.
A the fo'csle and quarter decks,

and after the removal of some moulded on detail.

The initial assemblies has more like engineering, these nuts will have take the bolts from the stand.

The first of the bulkheads that support the upper hull sides in place.

all the bulkheads in place.

More engineering, brackets to affix the hull sides screwed into place.

Starboard hull upper hull side fixed by another screw, this just positions the hull half, it will need to be glued.

The hull assembled.

More nutty bits, the fo'c's'le and midships decks.

The main deck down, the covers for the screws not yet fitted.

I have also ordered the brass strip fro the linoleum deck areas, and some more appropriate aircraft for the Guadalcanal era.
Cheers.
Si
rolltide31
#377
Joined: June 27, 2010
KitMaker: 1,481 posts
Model Shipwrights: 1,332 posts
Posted: Sunday, November 22, 2015 - 08:52 AM UTC
Michael,
That engine looks incredible. Nice job
Si,
Great start on the Chikuma. Have her in the stash also. Which brass strip did you decide on?
Dave
That engine looks incredible. Nice job
Si,
Great start on the Chikuma. Have her in the stash also. Which brass strip did you decide on?
Dave
RedDuster
Joined: March 01, 2010
KitMaker: 7,078 posts
Model Shipwrights: 6,649 posts
Posted: Monday, November 23, 2015 - 12:41 AM UTC
Thanks Dave,
She is going together very well so far, more screws and bolts than glue though, kind of Tamiya to include the screwdriver.
Went for the Flyhawk set as the Hong Kong based supplier I normally use had it in stock and a couple bits and pieces I was after as well.
Cheers
Si
She is going together very well so far, more screws and bolts than glue though, kind of Tamiya to include the screwdriver.
Went for the Flyhawk set as the Hong Kong based supplier I normally use had it in stock and a couple bits and pieces I was after as well.
Cheers
Si
Cosimodo
#335
Joined: September 03, 2013
KitMaker: 1,808 posts
Model Shipwrights: 871 posts
Posted: Monday, November 23, 2015 - 01:34 PM UTC
Quoted Text
Michael beautiful engine, it would be a shame to hide it all once complete.
Oh thought I'd let you all know, I have a M3A1 incoming so looks like I'll be building a tank
Thanks Luciano. I did wonder why I bothered to paint it or even add some of the pieces but it was something to do.
I will admit I had to look up an M3A1 to see what it looked like
It will be a nice addition to the mix of boats and planes.
cheers
Michael
Cosimodo
#335
Joined: September 03, 2013
KitMaker: 1,808 posts
Model Shipwrights: 871 posts
Posted: Monday, November 23, 2015 - 01:38 PM UTC
Thanks Si and Dave.
And Si, nice to see the Chikuma out of the box so quickly. I am keen to see how it goes.
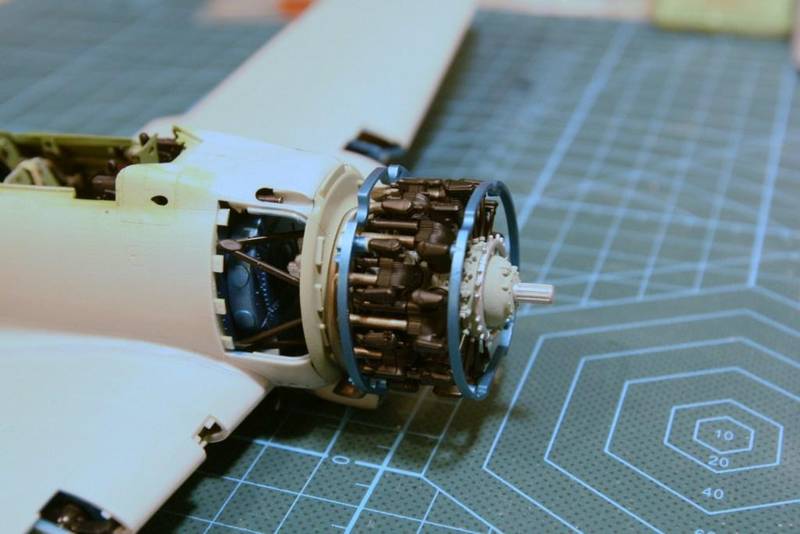
And it is beginning to look more like a plane. I have dry fitted the cowling and wheels to see how it is shaping up. Painted the prop as preparation for giving a natural metal finish. A photo when the Alclad goes on.
cheers
Michael
And Si, nice to see the Chikuma out of the box so quickly. I am keen to see how it goes.
And it is beginning to look more like a plane. I have dry fitted the cowling and wheels to see how it is shaping up. Painted the prop as preparation for giving a natural metal finish. A photo when the Alclad goes on.
cheers
Michael
RedDuster
Joined: March 01, 2010
KitMaker: 7,078 posts
Model Shipwrights: 6,649 posts
Posted: Tuesday, November 24, 2015 - 12:33 AM UTC
Thanks Michael,
Going together very sweetly so far.
The Zero is looking splendid sat on her undercart.
Cheers.
Si
Going together very sweetly so far.
The Zero is looking splendid sat on her undercart.
Cheers.
Si

JJ1973
#345

Joined: August 22, 2011
KitMaker: 1,835 posts
Model Shipwrights: 1,832 posts

Posted: Wednesday, November 25, 2015 - 12:41 AM UTC
Looking all great here, as well!!
Si, very interesting start on your Chikuma! Haven't seen something like this before...
Cheers,
Jan
Si, very interesting start on your Chikuma!
Haven't seen something like this before...Cheers,
Jan
RedDuster
Joined: March 01, 2010
KitMaker: 7,078 posts
Model Shipwrights: 6,649 posts
Posted: Thursday, November 26, 2015 - 12:59 AM UTC
Hi Jan,
It certainly is an interesting way of putting the hull together, but it works very well.
Cheers
Si
It certainly is an interesting way of putting the hull together, but it works very well.
Cheers
Si
RedDuster
Joined: March 01, 2010
KitMaker: 7,078 posts
Model Shipwrights: 6,649 posts
Posted: Saturday, November 28, 2015 - 01:42 AM UTC
A small progress on the Chikuma
The mountings for the prop shafts fitted. The instructions state that the shafts, which are metal, can be fitted later, so I am giving that a try.
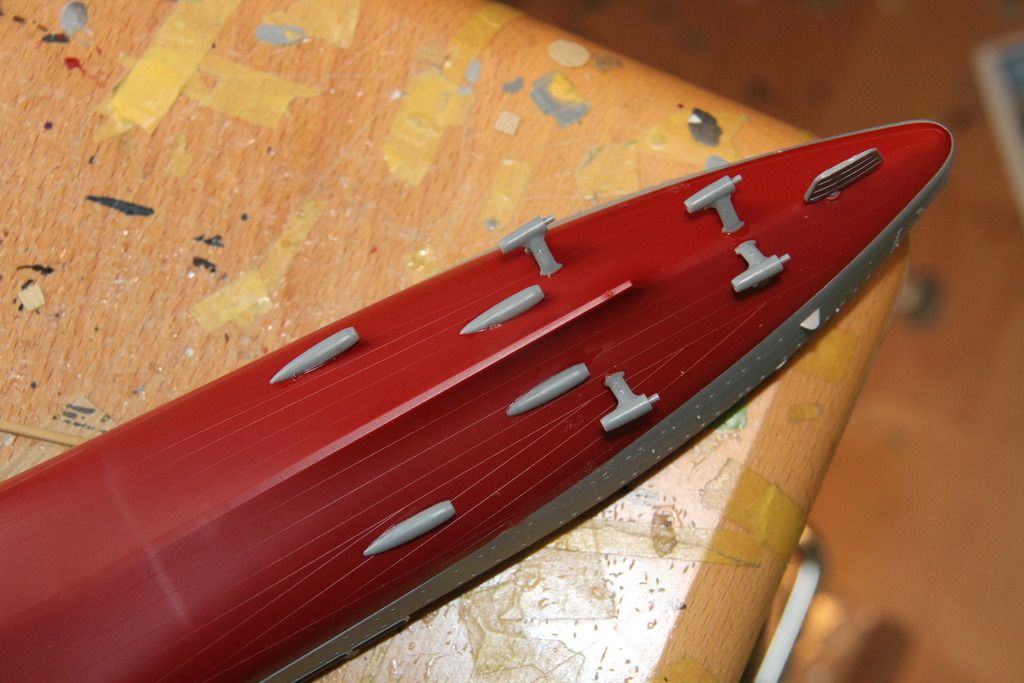
The forward bulkhead, with it's etched doors in place.
And the iron ladders fitted to the stern, the steps are provided in the Eduard etch.
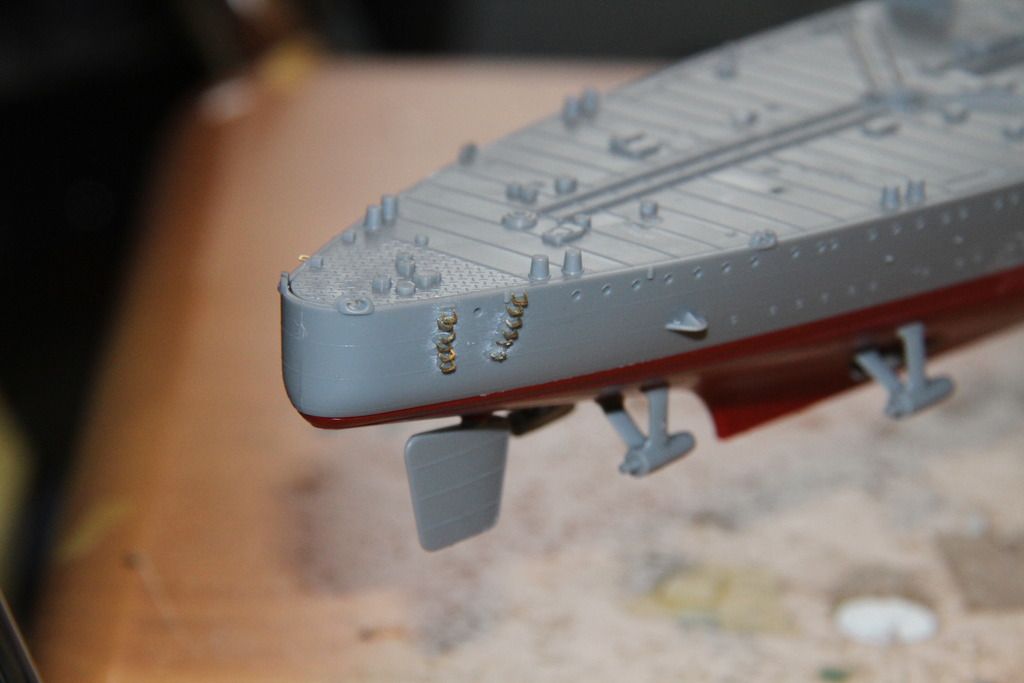
More soon
Si
The mountings for the prop shafts fitted. The instructions state that the shafts, which are metal, can be fitted later, so I am giving that a try.

The forward bulkhead, with it's etched doors in place.

And the iron ladders fitted to the stern, the steps are provided in the Eduard etch.

More soon
Si
rolltide31
#377
Joined: June 27, 2010
KitMaker: 1,481 posts
Model Shipwrights: 1,332 posts
Posted: Saturday, November 28, 2015 - 02:39 AM UTC
Si,
Very nice progress so far. Watching with interest as the Chikuma is on my stash.
Dave
Very nice progress so far. Watching with interest as the Chikuma is on my stash.
Dave
RedDuster
Joined: March 01, 2010
KitMaker: 7,078 posts
Model Shipwrights: 6,649 posts
Posted: Sunday, November 29, 2015 - 01:43 AM UTC
Thanks Dave,
Everything is going together really well, might be a bit of break, next weekend work, family and a model show are going to keep me away from the bench.
Cheers.
Si
Everything is going together really well, might be a bit of break, next weekend work, family and a model show are going to keep me away from the bench.
Cheers.
Si
rolltide31
#377
Joined: June 27, 2010
KitMaker: 1,481 posts
Model Shipwrights: 1,332 posts
Posted: Sunday, November 29, 2015 - 03:53 AM UTC
Hi all,
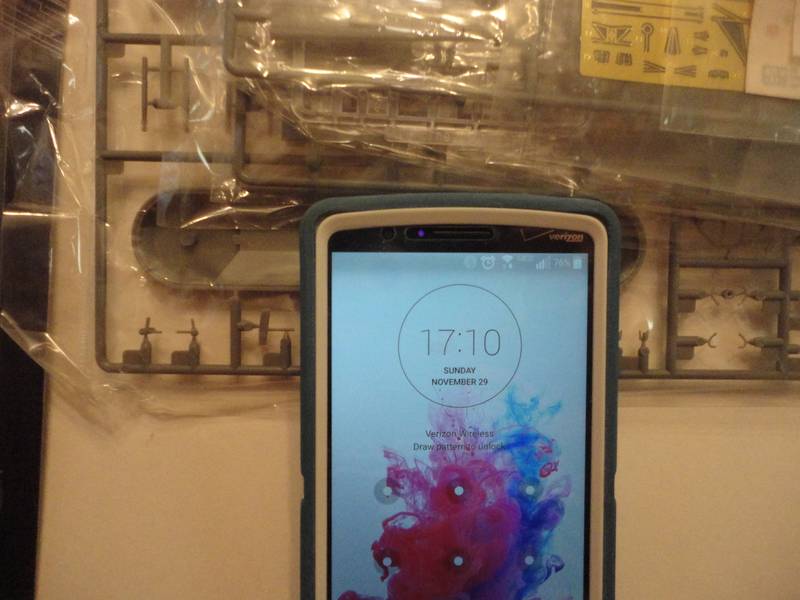
Well I finally have the time to enter this campaign. As I mentioned earlier I moving half way around the world in March which is preventing me from building the USS North Carolina at this time.
So with that I am going to build the IJN Submarine I-19. Just so happens the I-19 is the submarine that torpedoed the USS North Carolina during the Guadalcanal Campaign so I thought it was fitting to move from one to the other.
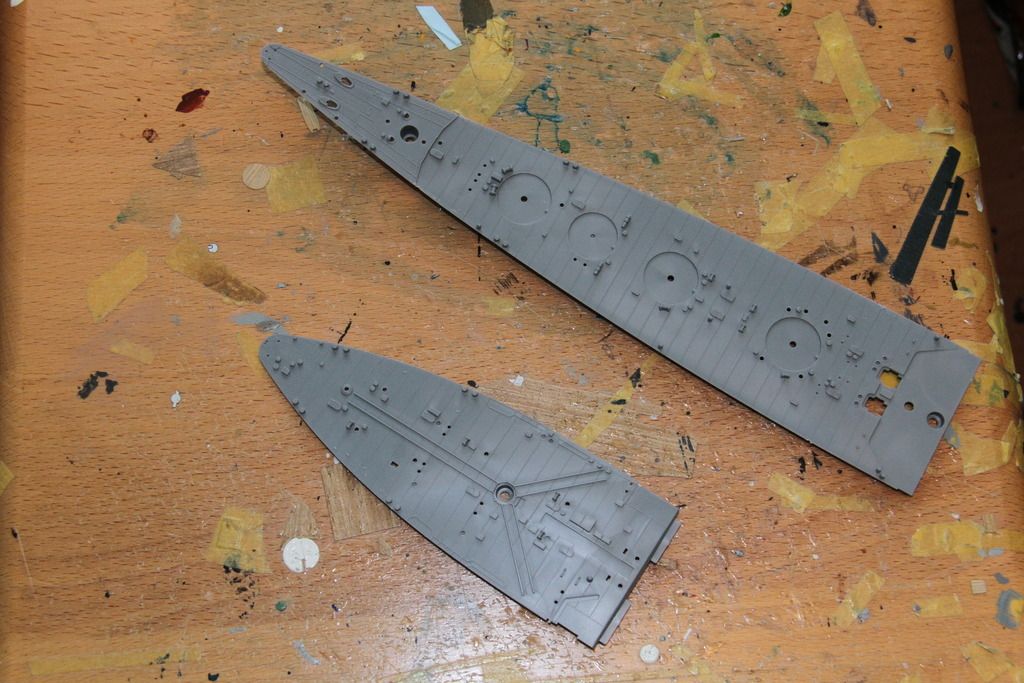
Here are my pre-build photos
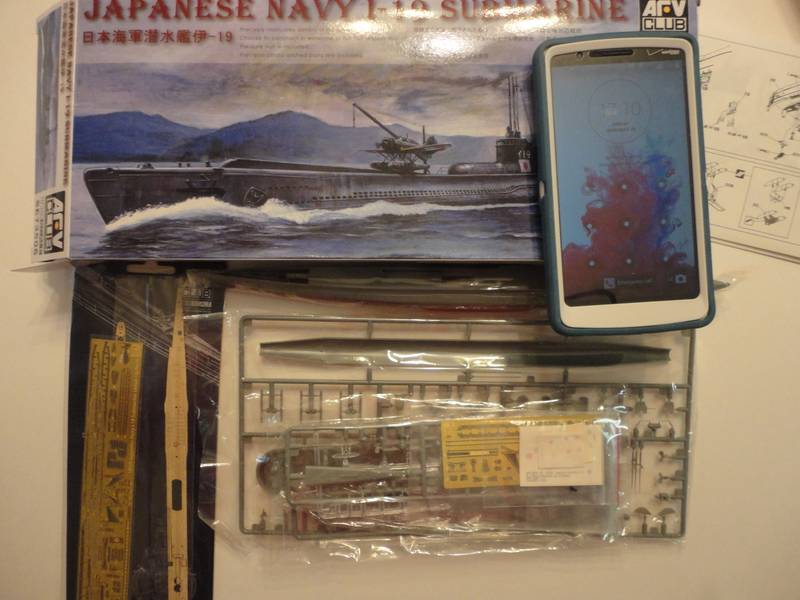
I look to start her next weekend while taking a short break from the Z32.
Dave
Well I finally have the time to enter this campaign. As I mentioned earlier I moving half way around the world in March which is preventing me from building the USS North Carolina at this time.
So with that I am going to build the IJN Submarine I-19. Just so happens the I-19 is the submarine that torpedoed the USS North Carolina during the Guadalcanal Campaign so I thought it was fitting to move from one to the other.
Here are my pre-build photos
I look to start her next weekend while taking a short break from the Z32.
Dave
rolltide31
#377
Joined: June 27, 2010
KitMaker: 1,481 posts
Model Shipwrights: 1,332 posts
Posted: Sunday, December 06, 2015 - 04:54 AM UTC
Hi all,
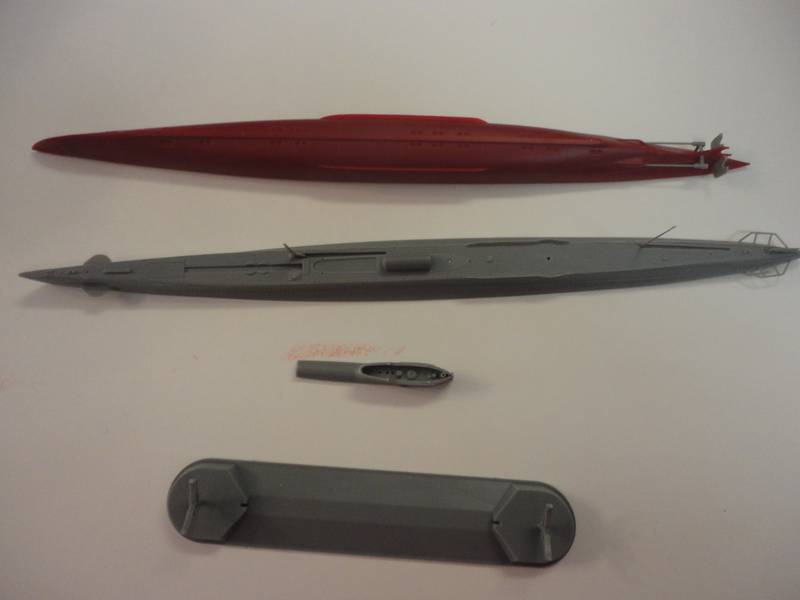
Well this weekend was time for the I-19 to his the shipyard. Pretty quick build with instruction that are easy to follow.
So far I focus on working the plastic, in a couple of weeks I will begin with the PE.
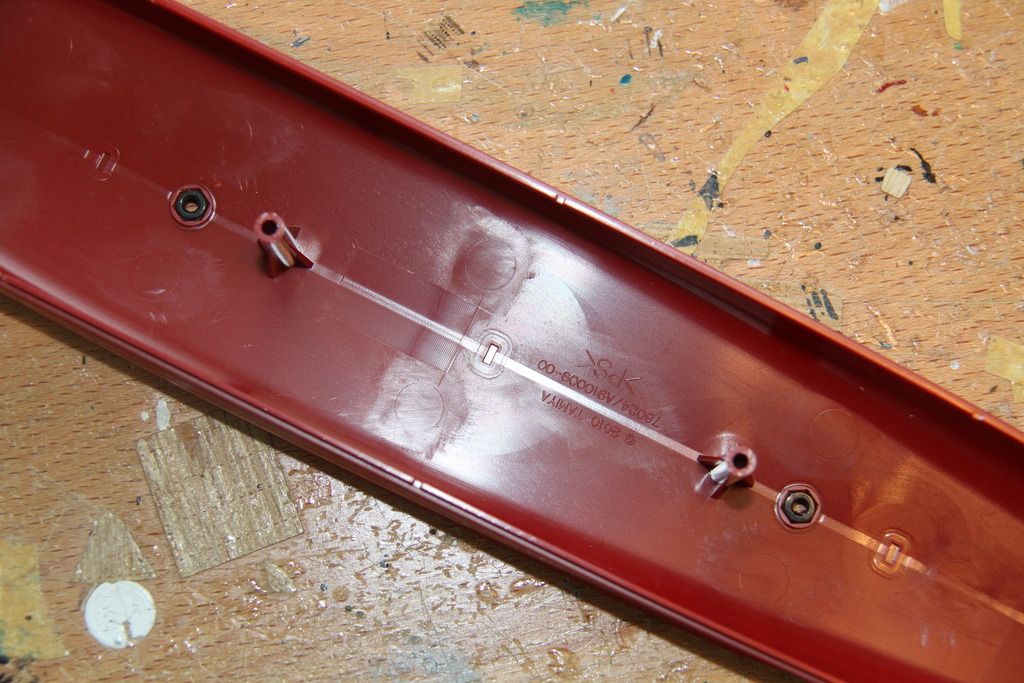
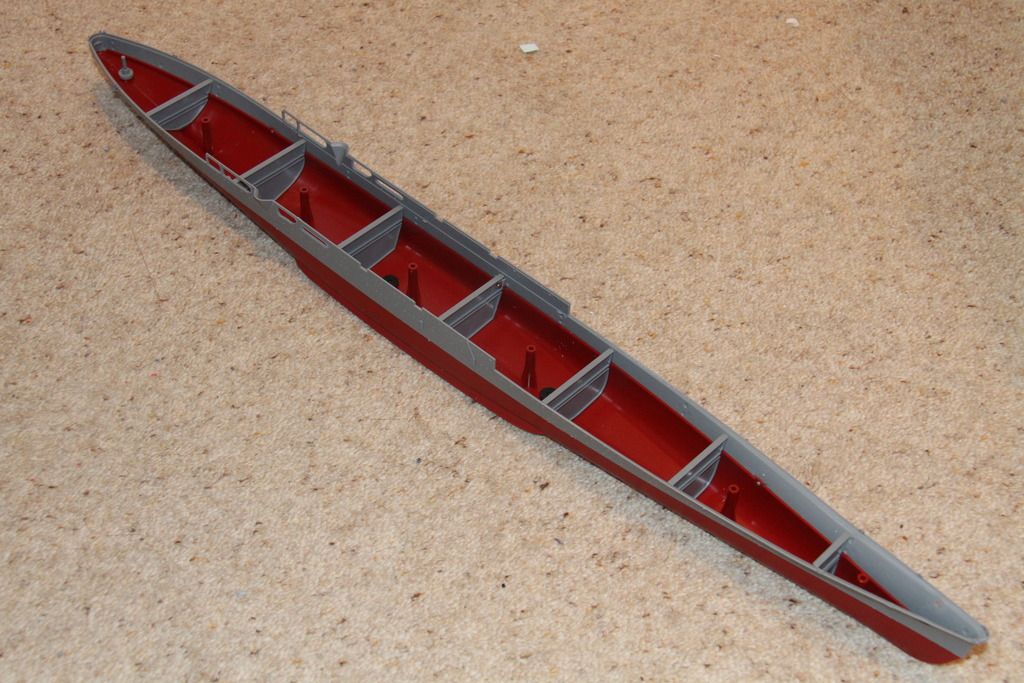
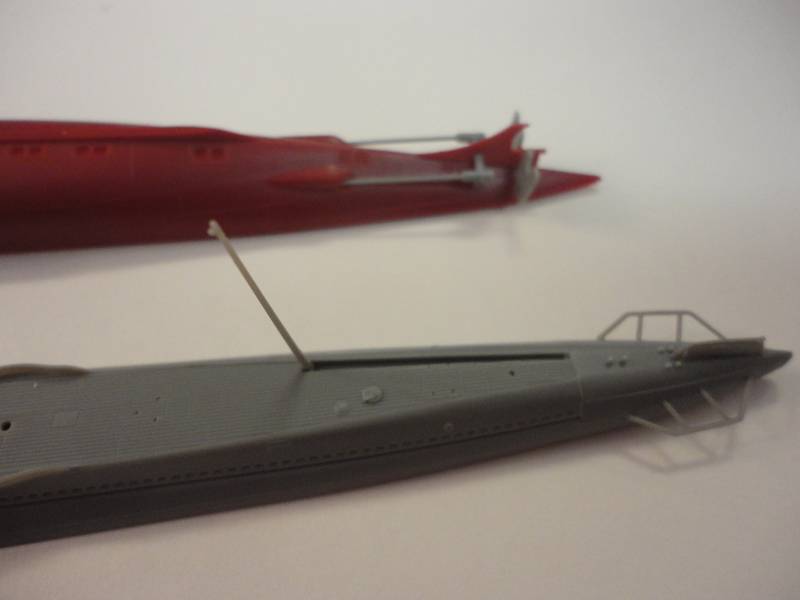
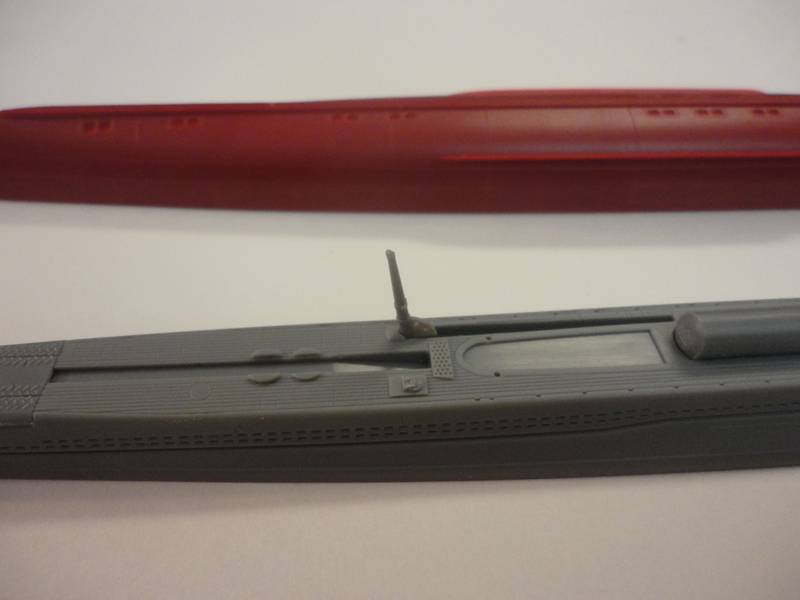
Here she is with an overview shot. The bridge and upper hull are dry fitted to the lower hull.
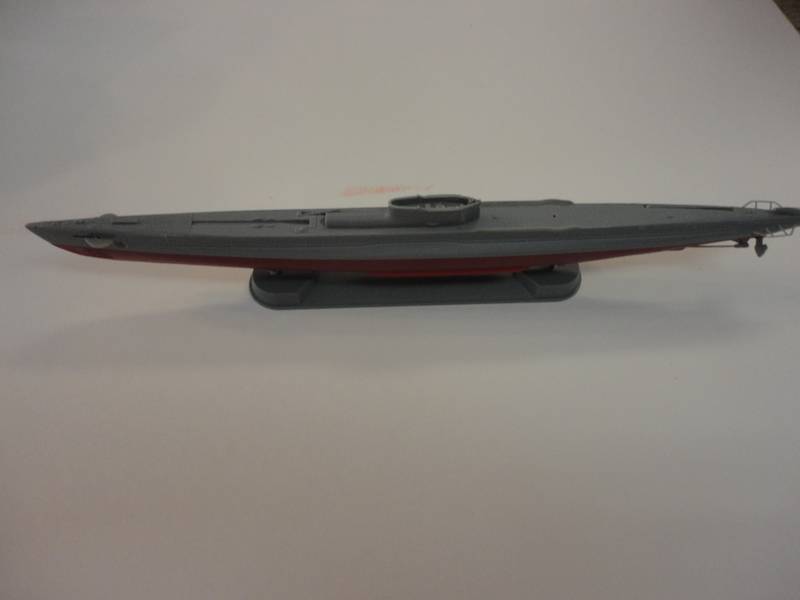
Here are some detailed shots.
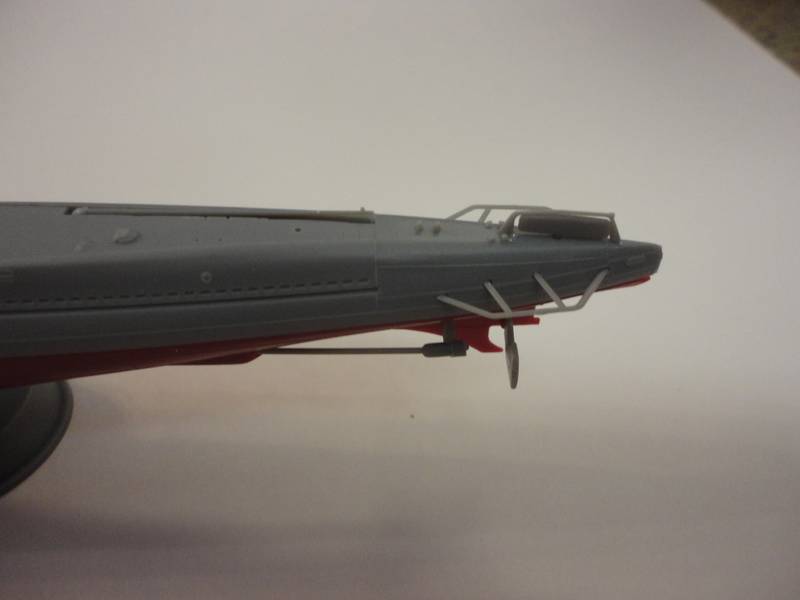
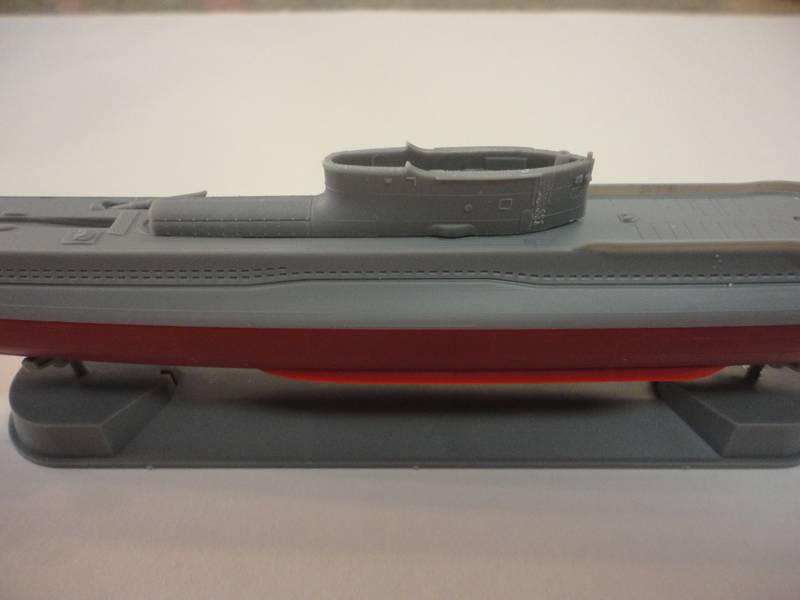

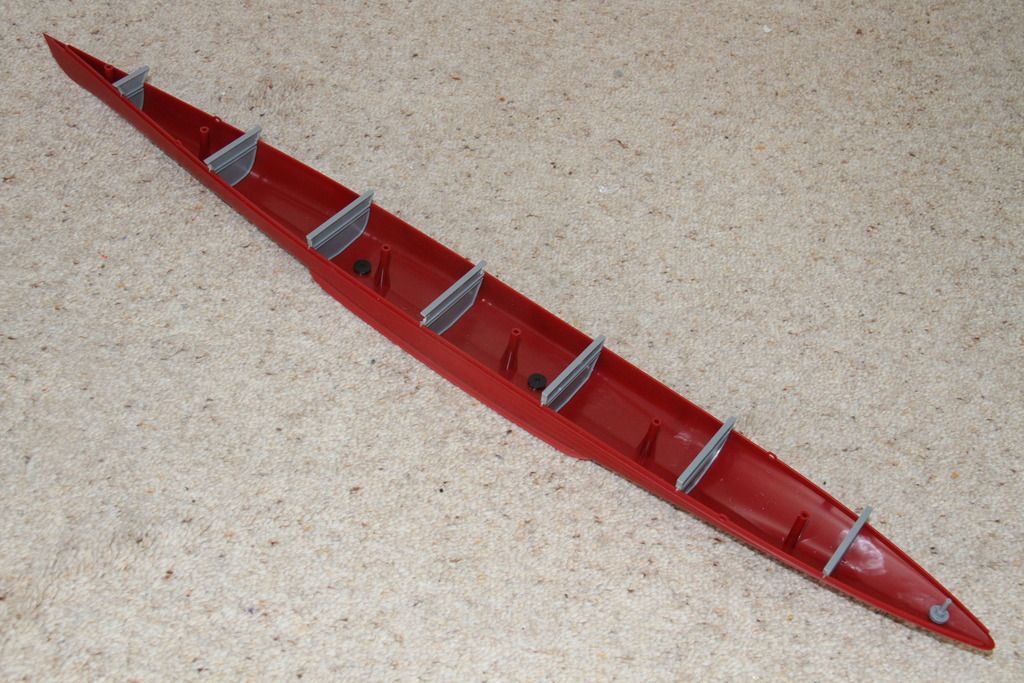
Here is an overview shot of the pieces separated
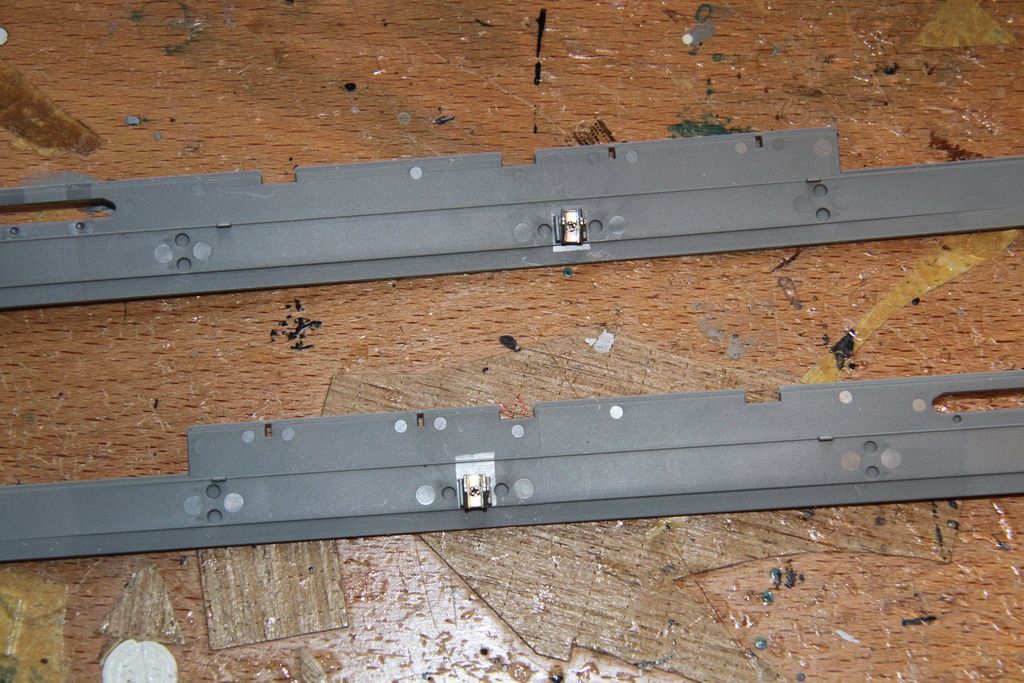
with some detail shots
The plastic on this kit is soft so it sands down pretty quick and the parts replaced by the PE are easy to remove without damaging too much of the surrounding detail.
Well that's it for now. More to come later.
Dave
Well this weekend was time for the I-19 to his the shipyard. Pretty quick build with instruction that are easy to follow.
So far I focus on working the plastic, in a couple of weeks I will begin with the PE.
Here she is with an overview shot. The bridge and upper hull are dry fitted to the lower hull.
Here are some detailed shots.
Here is an overview shot of the pieces separated
with some detail shots
The plastic on this kit is soft so it sands down pretty quick and the parts replaced by the PE are easy to remove without damaging too much of the surrounding detail.
Well that's it for now. More to come later.
Dave
 |

WEB HOSTING BY


Copyright ©2021 Model Shipwrights and Kitmaker Network, a subsidiary of Silver Star Enterprises
All Rights Reserved. Please read our Conditions of Use and Privacy Policy.
All Rights Reserved. Please read our Conditions of Use and Privacy Policy.