Campaigns
Want to be part of a group build? This is where to start, plan, and meet about them.
Official: Guadalcanal Campaign
rolltide31
#377
Visit this Community
Texas, United States
Joined: June 27, 2010
KitMaker: 1,481 posts
Model Shipwrights: 1,332 posts
Posted: Thursday, January 07, 2016 - 04:00 AM UTC
Michael,

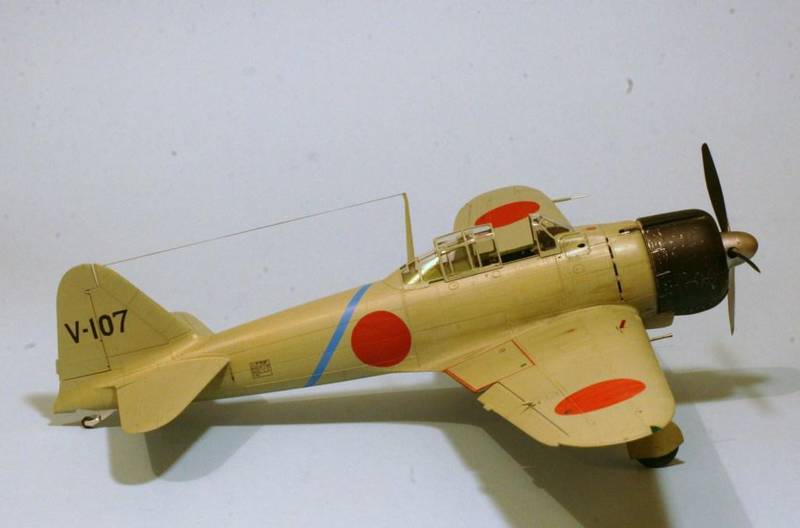
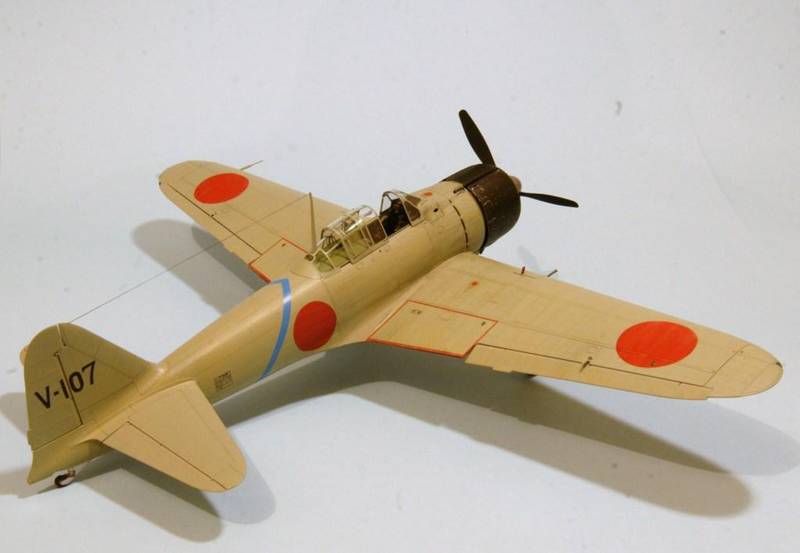
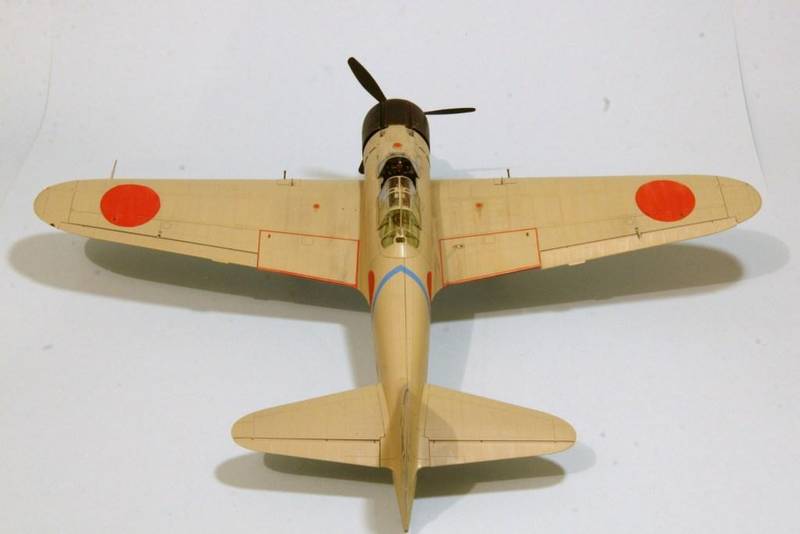
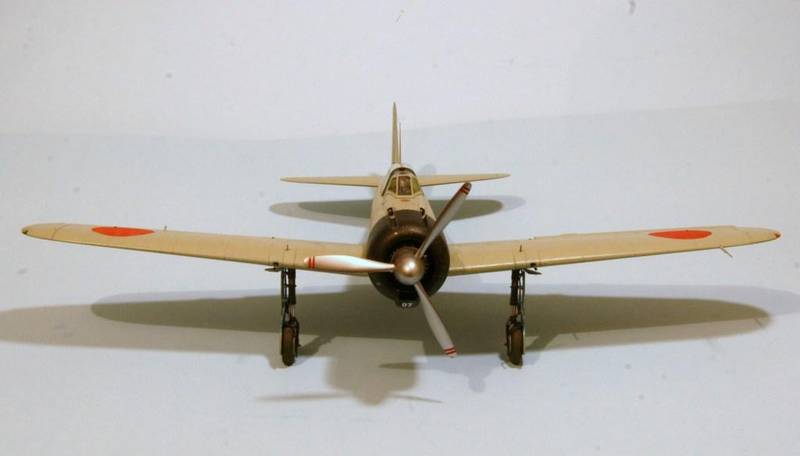
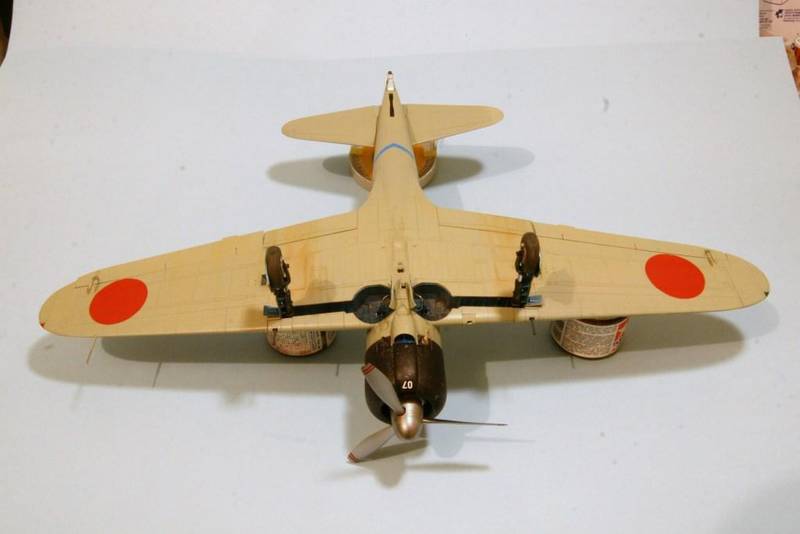
Very nice results on the cowling, sorry that the worn effects were not as effective as you were looking for.

Luciano - very nice work on the Marines and the M3A1. Looking forward to seeing this as you move forward with your build.

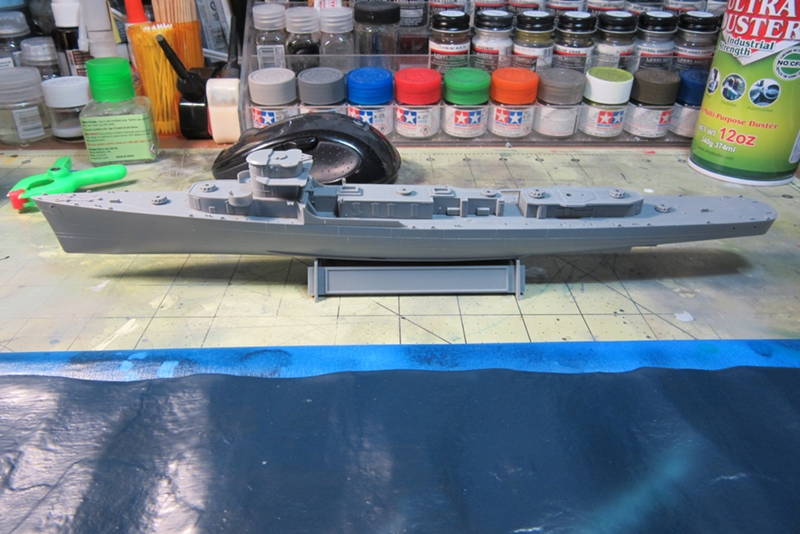
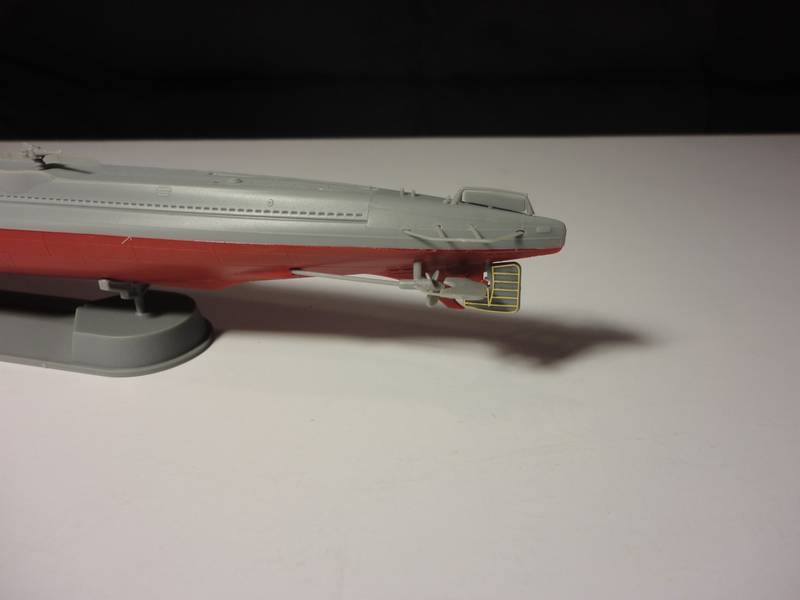
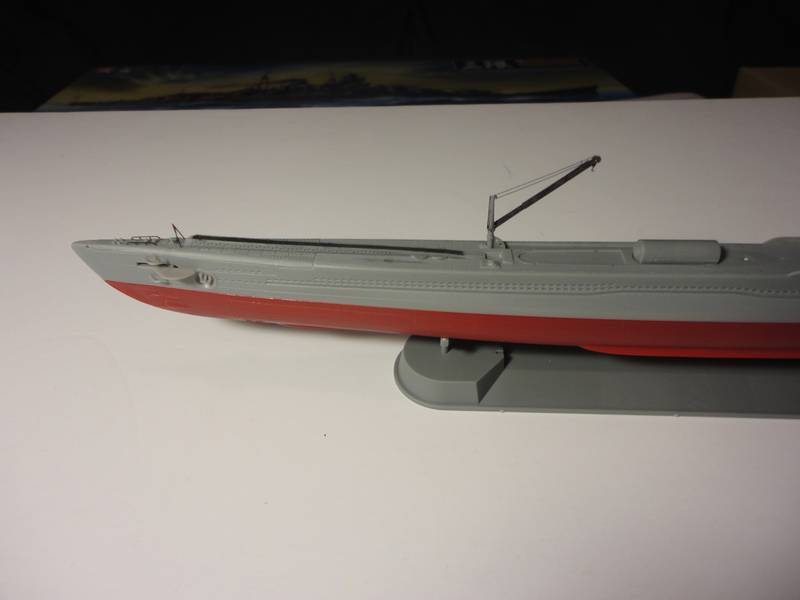
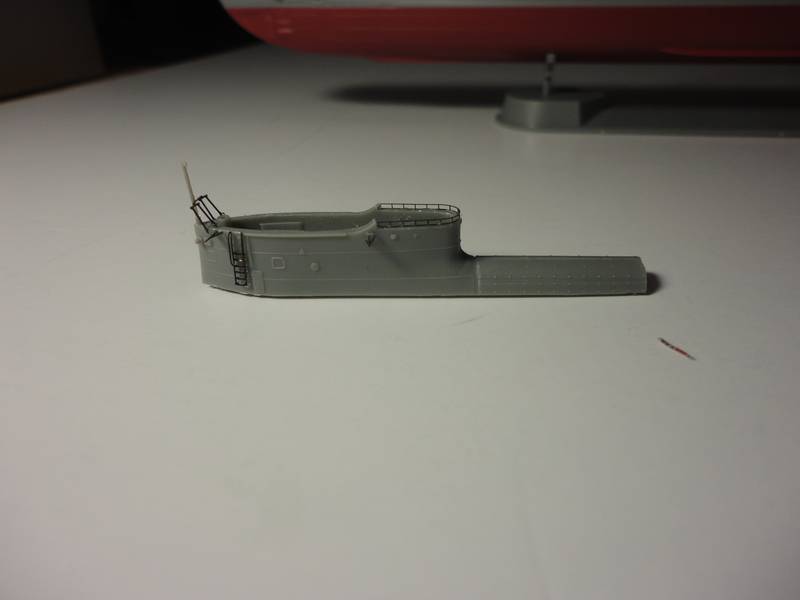
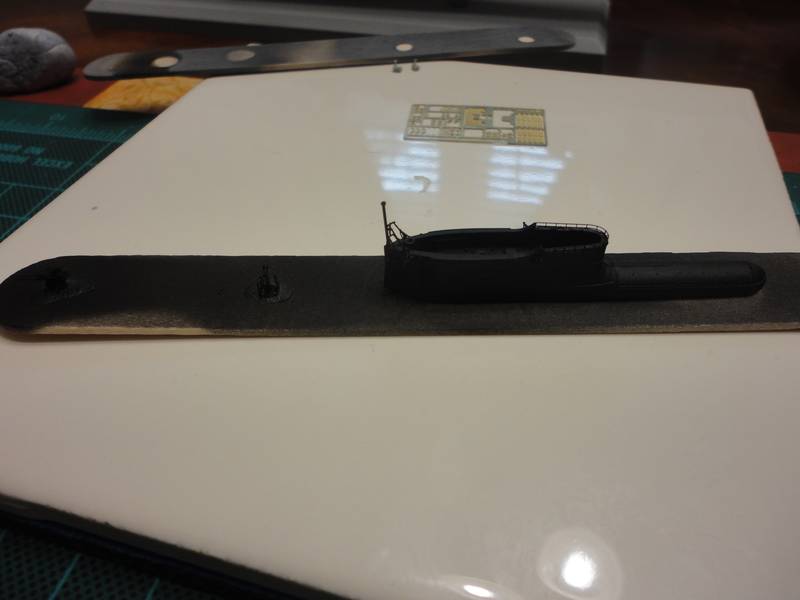
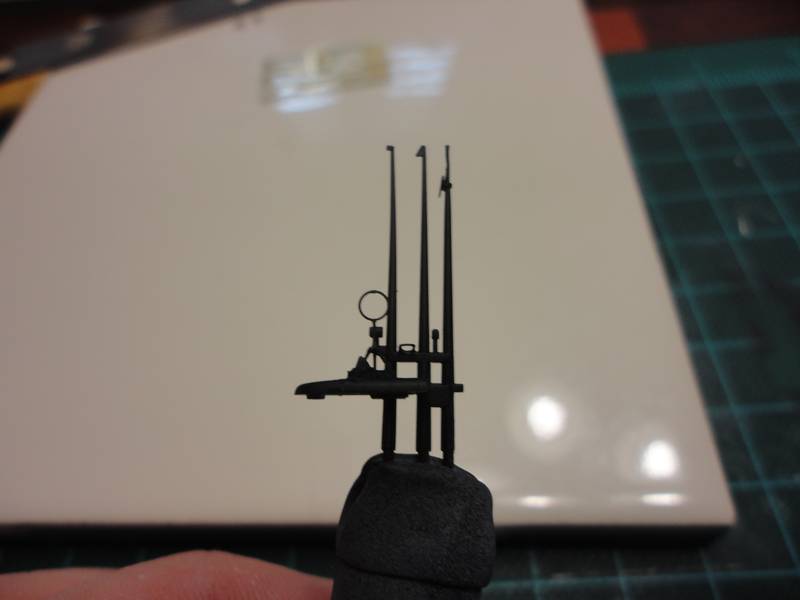
As far as the I19, continued to work on the bridge and periscope.

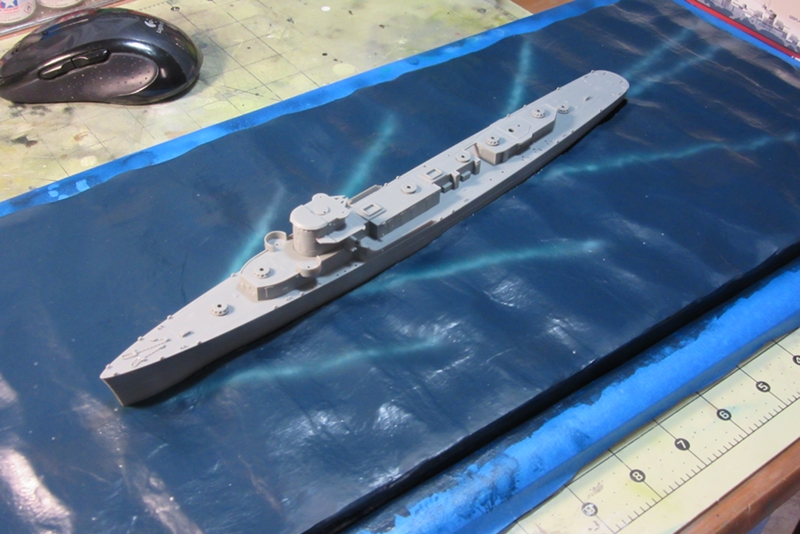
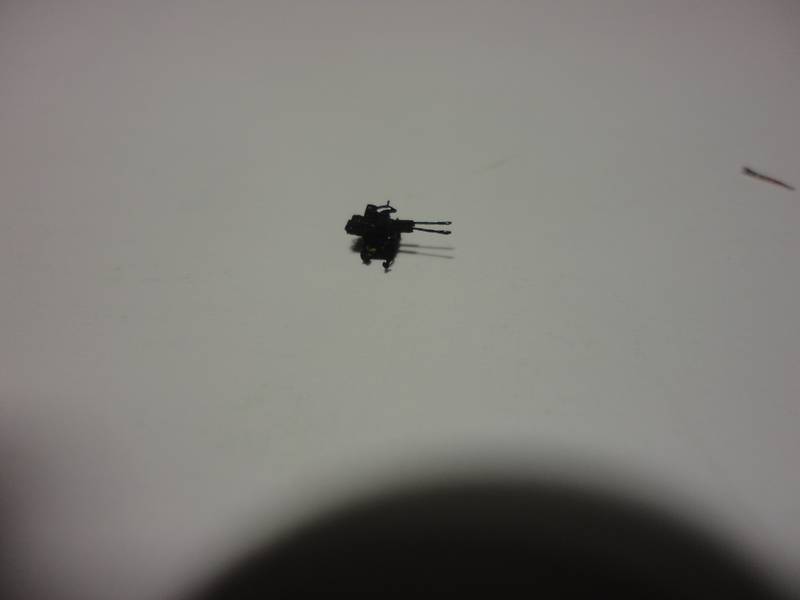
added a little bit more PE to the periscope.


There is some PE at the top of the rear periscope.

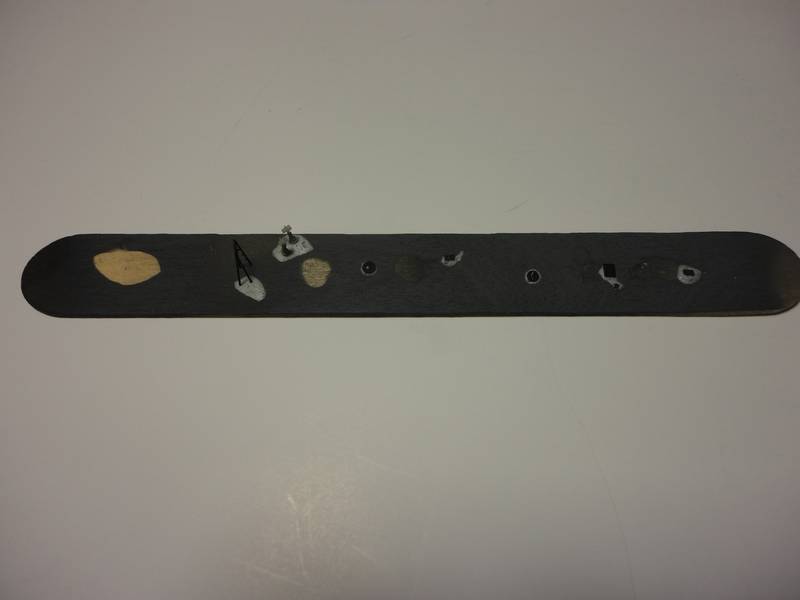
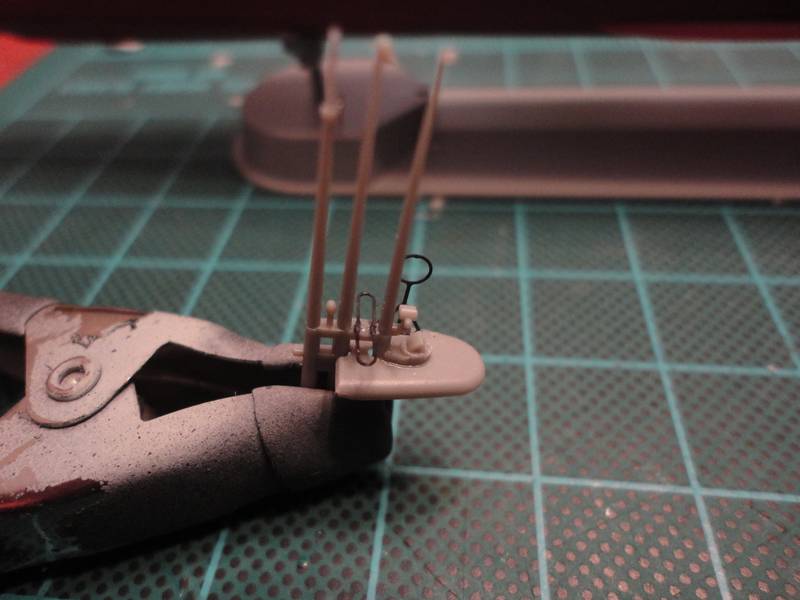
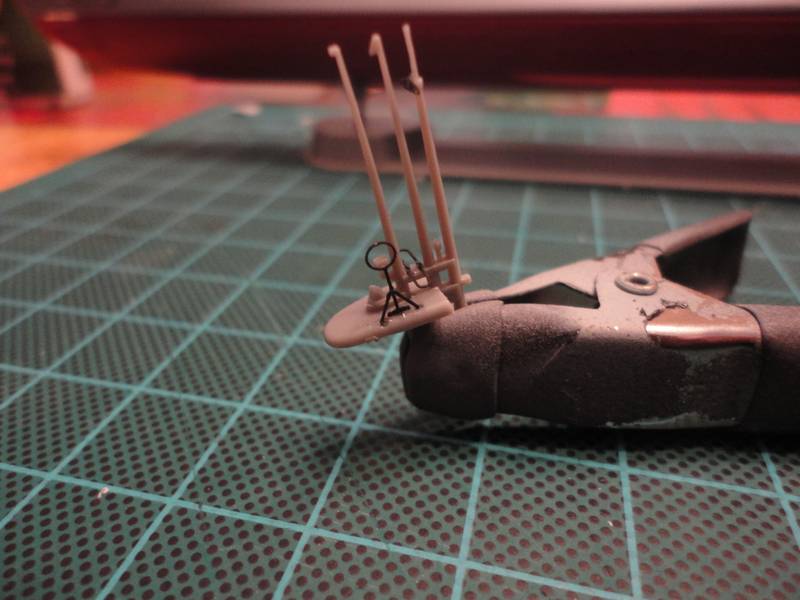
Next was working the bridge with more PE.


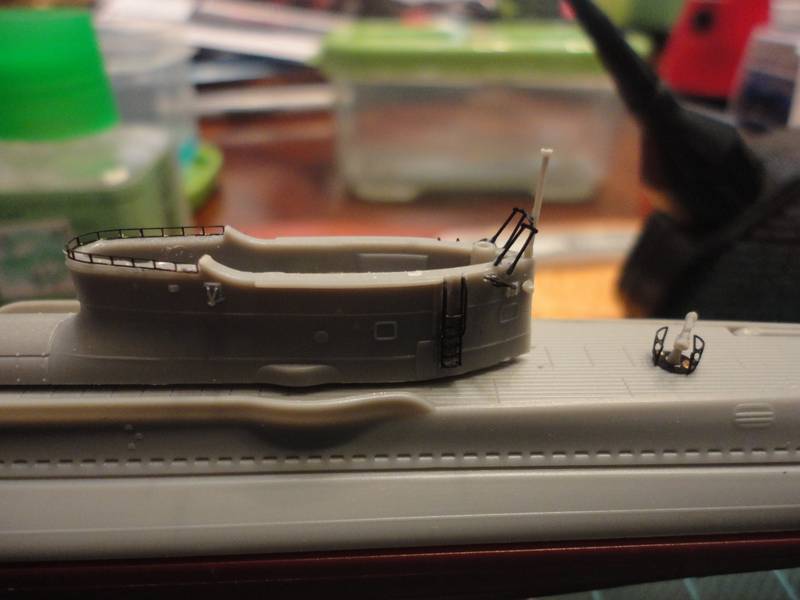
There is supposed to be a small PE bell that would hang from the rear mount however it went flinging into uncertainty. Luckily I found it, grabbed it with the tweezers and again flung it off into uncertainty. The second attempt to locate has been so far unsuccessful.

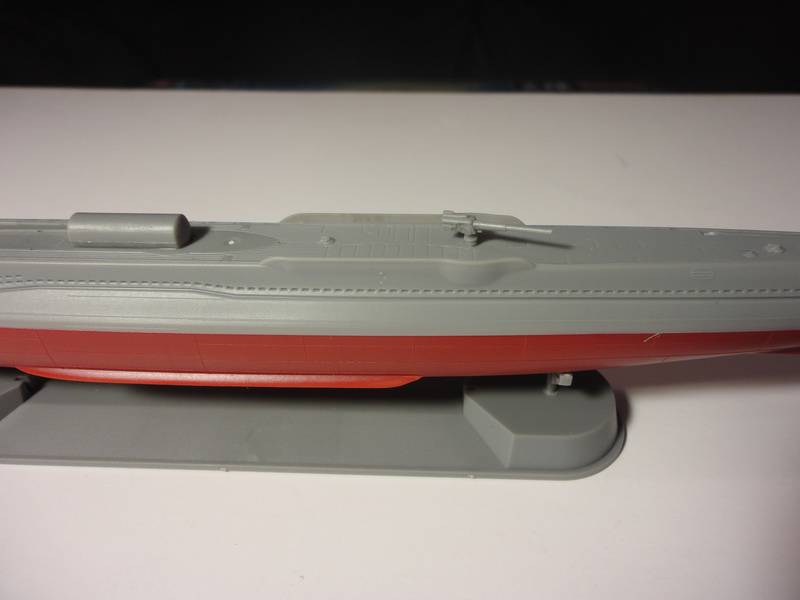
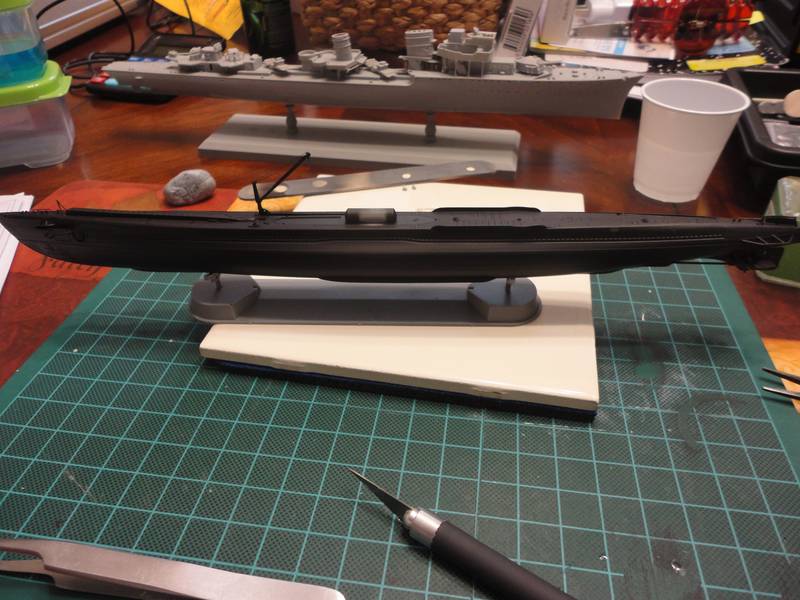
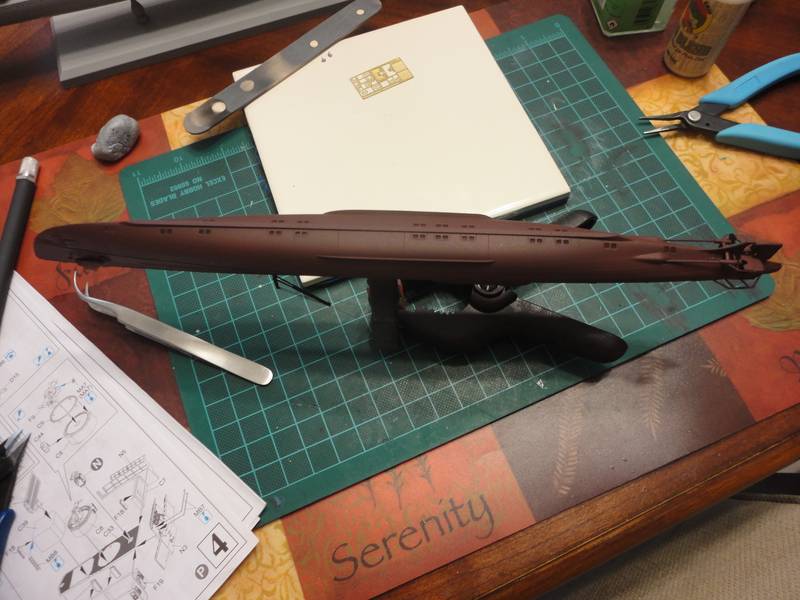
I added the launch ramp to the hull and some other bits and pieces.


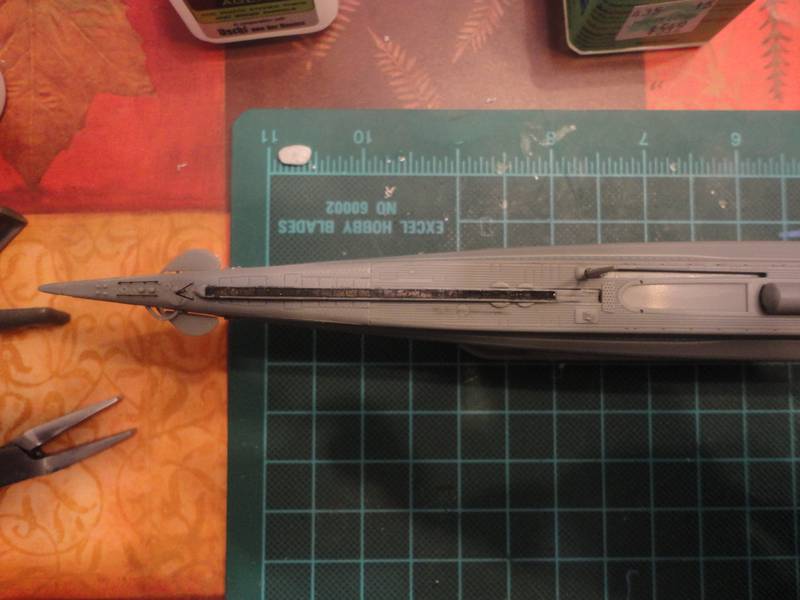
Almost to a point were I can begin adding some color to this great kit.

For those interested, the original kit does come with PE so the only benefit of finding the AFV Models upgrade kit is the wooden deck. Might not be worth the time and cost, just a thought.

Well that's it for now, hope to have a little more this weekend.

Dave
TRM5150
Visit this Community
Massachusetts, United States
Joined: January 03, 2010
KitMaker: 2,159 posts
Model Shipwrights: 1,400 posts
Posted: Thursday, January 07, 2016 - 05:52 AM UTC
I had to play a lot of catch up to this thread....


Luciano...some fine work going into the Shermie and M3! I love the figure selections!!

Si- - As always, some top notch work! Your Chikuma is looking fantastic! Great job on the decks!!

Michael - Outstanding job on the Zero!! Some tidy work n the office...love all the detail you pulled out of there! She also looks pretty nice under some color now!!

Dave - Solid tiny PE work!! CT looks superb!


Keep up the excellent work fellas!!
Cosimodo
#335
Visit this Community
Auckland, New Zealand
Joined: September 03, 2013
KitMaker: 1,808 posts
Model Shipwrights: 871 posts
Posted: Thursday, January 07, 2016 - 03:11 PM UTC
Sub-Lieutenant Saburō Sakai, Tainan Air Group, Guadalcanal, 1942


Thanks for organising this campaign Luciano.

I gotta get back to some ship building, so on to the Cruiser Campaign.

cheers
Michael
Cosimodo
#335
Visit this Community
Auckland, New Zealand
Joined: September 03, 2013
KitMaker: 1,808 posts
Model Shipwrights: 871 posts
Posted: Thursday, January 07, 2016 - 03:18 PM UTC
Forgot to add the details
All the markings except the small ID numbers I masked up myself which was way more effort but very satisfying that turned out so well. (The circles are red but they have come out sort of dayglo orange in the photos).

cheers
Michael
Cosimodo
#335
Visit this Community
Auckland, New Zealand
Joined: September 03, 2013
KitMaker: 1,808 posts
Model Shipwrights: 871 posts
Posted: Thursday, January 07, 2016 - 03:21 PM UTC
It's late here, but I can't find the campaign gallery for this one. Is there a link?

cheers
Michael
Littorio
Visit this Community
England - South East, United Kingdom
Joined: September 15, 2004
KitMaker: 4,728 posts
Model Shipwrights: 1,080 posts
Posted: Thursday, January 07, 2016 - 11:37 PM UTC
Michael, beautiful build it looks outstanding, proud to have had you in the campaign.

Regarding the gallery I'll look into it, first time running a campaign so I may have missed something.

Regarding my own build, I've got Sunday off before going back on nights Monday, so I may get some bench time for the day May just be a case of applying primer and getting the other marine assembled. I must get the base ordered!
RedDuster
Visit this Community
England - South East, United Kingdom
Joined: March 01, 2010
KitMaker: 7,078 posts
Model Shipwrights: 6,649 posts
Posted: Saturday, January 09, 2016 - 03:00 PM UTC
Excellent Zero Michael, lots of great builds going on.

A bit more progress on sub assemblies, the main turrets, one trick on No.s 2 & 4 turrets, fit the rangefinders to the turret tops nefore the sides, it makes construction so much easier. The barrels are secured by polycaps, more on that later.


The turrets assembled.


And the reason for the poly capped barrels, you get two sets one at rest, the other at full elevation so you can mix and match.


Cheers

Si
MichaelSatin
Staff MemberCampaigns Administrator
AEROSCALE
Visit this Community
Colorado, United States
Joined: January 19, 2008
KitMaker: 3,909 posts
Model Shipwrights: 255 posts
Posted: Saturday, January 09, 2016 - 08:31 PM UTC

Quoted Text

Regarding the gallery I'll look into it, first time running a campaign so I may have missed something.


Luciano,

Setting up a gallery is something an Admin does. At the risk of incurring anyone's wrath (hope not!) I've gone ahead and done so. You can find the campaign gallery here.

Michael
RedDuster
Visit this Community
England - South East, United Kingdom
Joined: March 01, 2010
KitMaker: 7,078 posts
Model Shipwrights: 6,649 posts
Posted: Saturday, January 09, 2016 - 10:55 PM UTC
A bit more progress.

The bridge sprayed.


The bridge detail, in the form of binocular mounts and a couple of searchlights. Also some Veteran models voice pipes added to busy the pale up a bit.


More soon.

Si
Littorio
Visit this Community
England - South East, United Kingdom
Joined: September 15, 2004
KitMaker: 4,728 posts
Model Shipwrights: 1,080 posts
Posted: Sunday, January 10, 2016 - 12:27 AM UTC

Quoted Text


Quoted Text

Regarding the gallery I'll look into it, first time running a campaign so I may have missed something.


Luciano,

Setting up a gallery is something an Admin does. At the risk of incurring anyone's wrath (hope not!) I've gone ahead and done so. You can find the campaign gallery here.

Michael


Michael, thank you, I have asked Bill but have had no reply so far so your setting it up has saved the time.
Littorio
Visit this Community
England - South East, United Kingdom
Joined: September 15, 2004
KitMaker: 4,728 posts
Model Shipwrights: 1,080 posts
Posted: Sunday, January 10, 2016 - 02:42 AM UTC
First bit of colour, grey primer followed by olive drab primer and then a Forest green top coat. Need to leave it to dry over night then I'll give it another light coat of forest green.
Also made a start on the four marines with herringbone.


Cosimodo
#335
Visit this Community
Auckland, New Zealand
Joined: September 03, 2013
KitMaker: 1,808 posts
Model Shipwrights: 871 posts
Posted: Sunday, January 10, 2016 - 11:08 AM UTC
Thanks Luciano and Si for the kind comments. It was fun to build and great to do something for this campaign.

cheers
Michael
Cosimodo
#335
Visit this Community
Auckland, New Zealand
Joined: September 03, 2013
KitMaker: 1,808 posts
Model Shipwrights: 871 posts
Posted: Sunday, January 10, 2016 - 11:12 AM UTC
Simon,
The Chikuma is looking superb. I like all the details on the bridge, fiddly no doubt, but worth it.

Luciano,
Those Marines and their tank are making good progress. I am keen to see how this all comes together.

cheers
Michael
TRM5150
Visit this Community
Massachusetts, United States
Joined: January 03, 2010
KitMaker: 2,159 posts
Model Shipwrights: 1,400 posts
Posted: Sunday, January 10, 2016 - 04:57 PM UTC
Thanks for setting up the gallery Michael! Never any reason to bring down the wrath!

Michael, other one...LOL, that is a fine looking Zero! Congrats on getting her to the finish line!

Some nice work there Si...as usual!! Well-played on the detail painting of the bridge-works!

Luciano - Looking good!! Always great to see the color fly!
RedDuster
Visit this Community
England - South East, United Kingdom
Joined: March 01, 2010
KitMaker: 7,078 posts
Model Shipwrights: 6,649 posts
Posted: Monday, January 11, 2016 - 01:29 AM UTC
Thanks Todd and Michael,

Will be interesting to see what of it is visible when the roof is on.

It was fun to do though.

Si
dioman13
Visit this Community
Indiana, United States
Joined: August 19, 2007
KitMaker: 2,184 posts
Model Shipwrights: 204 posts
Posted: Monday, January 11, 2016 - 05:19 AM UTC
Looks like every ones projects are coming along fine but mine. Still stalled as I try and clear the bench, trying to finish up my dio from the Pacific 70 years campaign which never even came close to the dead line as the figure count kept going up. Total of 21 figures now, good news though, no more room to add anymore. After the amount of figure work still going on I have decided to make the Carnal a 4 to 5 figure dio. Will greatly help time wise and hopefully keep burn out at a minimum. I have all the components for the dio but can't make up my mind as to a bamboo forest or the edge of the jungle coming out into a field of Kuni grass. Still have time to get it done even if I have to back-shelf the others on the bench.
Littorio
Visit this Community
England - South East, United Kingdom
Joined: September 15, 2004
KitMaker: 4,728 posts
Model Shipwrights: 1,080 posts
Posted: Monday, January 11, 2016 - 05:28 AM UTC
Bob still plenty of time

I like the idea of the bamboo and while you're at it you can show me how to do a dio as this is my first believe it or not.
Cosimodo
#335
Visit this Community
Auckland, New Zealand
Joined: September 03, 2013
KitMaker: 1,808 posts
Model Shipwrights: 871 posts
Posted: Tuesday, January 12, 2016 - 01:48 PM UTC

Quoted Text


Quoted Text

Regarding the gallery I'll look into it, first time running a campaign so I may have missed something.


Luciano,

Setting up a gallery is something an Admin does. At the risk of incurring anyone's wrath (hope not!) I've gone ahead and done so. You can find the campaign gallery here.

Michael


Thanks Michael.

A couple of new photos uploaded.

cheers
Michael
rolltide31
#377
Visit this Community
Texas, United States
Joined: June 27, 2010
KitMaker: 1,481 posts
Model Shipwrights: 1,332 posts
Posted: Tuesday, January 12, 2016 - 10:41 PM UTC
Si - great additions to the bridge. I myself have never taken the detail that far but I do like it and will look to follow your lead with my future builds. I have some of those voice pipes from veterans myself. I have seen brass voice tubes on ebay but have not ventured to acquire any yet.

Luciano - great color on your M3 and the Marines. Look forward to seeing how your dio comes together and the story it will portray.

A lot of nice work going on. Will hopefully have some time this weekend to work on the I19 as she preps for launching her torpedoes at the USS Wasp and USS North Carolina.

Dave
Littorio
Visit this Community
England - South East, United Kingdom
Joined: September 15, 2004
KitMaker: 4,728 posts
Model Shipwrights: 1,080 posts
Posted: Saturday, January 16, 2016 - 05:01 PM UTC
Thanks Dave, hope your move goes smoothly.

Not much to see as I've just finished a 'quick' build of an Imperial Stormtrooper, anyway as some have asked about the composition I thought I'd show you what I have in mind, the tower of white tack represents the missing BAR gunner. I have some paper jungle plants to use but still need to get the long grass which will mainly form the ground work. Comments / suggestions always welcome for a dio neeb.

Oh the name plate will be infront of the tank as that will be the main viewing angle, head on.

RedDuster
Visit this Community
England - South East, United Kingdom
Joined: March 01, 2010
KitMaker: 7,078 posts
Model Shipwrights: 6,649 posts
Posted: Saturday, January 16, 2016 - 10:58 PM UTC
Thanks Dave,

I hope you have as much fun with it as I do. I have seen these brass voice pipes, they do look nice, might be tempted to try some out.

Cheers.

Si
PeeJay74
#363
Visit this Community
Pennsylvania, United States
Joined: January 08, 2014
KitMaker: 425 posts
Model Shipwrights: 14 posts
Posted: Sunday, January 17, 2016 - 02:48 AM UTC
Tamiya 1:350 USS Fletcher

Just a quick update. I finally got started after a long break from hobby time. I started putting the sub-assemblies together. Once I get the seams cleaned up I'll start adding some PE tidbits and then get everything primed. Everything is just sitting on the hull at the moment, no glue yet.


I am much happier with my second attempt at a water base. It is too big but that's okay for now, I used a cheap hobby chalk board as the base so I was stuck with it's dimensions. I am going to try my hand at making my own framing with a miter box, custom framing is way too expensive. If that works I'll redo the base as something more manageable. I am experimenting with this one to build some skills at water.


That's it for now. I am hoping to have all of the sub-assemblies built and cleaned up ready for PE this week.
rolltide31
#377
Visit this Community
Texas, United States
Joined: June 27, 2010
KitMaker: 1,481 posts
Model Shipwrights: 1,332 posts
Posted: Monday, January 18, 2016 - 02:12 AM UTC
Luciano,

Your M3 and Marines are coming along nicely. Cant wait to see the addition of the BAR gunner and the ground scape as you work it out. also like the view perspective from the front.

Paul, Nice work on your Fletcher and the water. It is coming along nicely. Looking forward to seeing you add some color to her.

Well the I19 is moving along. A couple of more tweaks and she too will be moved tot he paint shed.

Finally got around to adding the screws and tightening up the rear dive planes.


then moved on to some of the fiddly parts


and from there I dry fitted the main gun for show.


its funny, a lot of brass for the boat but nothing for dressing up the main gun. AFV missed a little mark there.

Anyway I went ahead and glued the top deck to the lower hull. From there I went and worked on the crane.


I like the look of it but have also decided that the rear deck cranes are not going to be fitted to this ship. I cannot find any reference that indicates the rear cranes were permanently fixed and I cant see her floating submerged with those sticking out of the hull. so that's decided.

Anyway, I went and requisitioned a twin 25mm PE AA gun from Voyager. It has quite a 2d appearance to the barrels but I am ok with that for this build.


The one barrel looks a little wonky so I need to fix that.

Well that's it for now, a little more and on to getting primed.

Dave
rolltide31
#377
Visit this Community
Texas, United States
Joined: June 27, 2010
KitMaker: 1,481 posts
Model Shipwrights: 1,332 posts
Posted: Monday, February 01, 2016 - 08:27 AM UTC
hey all,

Well I got a little more work done on the I19. Here she is with a little more work done on the bridge.


Here are some of the fiddly bits for the bridge


Now here she is with a coat of primer


I let the primer cure for a day and then added the hull red to the lower hull.


I am letting that cure for the week and then will mask the lower hull to paint the upper hull.

A little more to do but the I19 will be commissioned within the next couple of weeks.

Dave
Littorio
Visit this Community
England - South East, United Kingdom
Joined: September 15, 2004
KitMaker: 4,728 posts
Model Shipwrights: 1,080 posts
Posted: Monday, February 01, 2016 - 10:07 PM UTC
Looking good Dave, looking forward to seeing this one finished.

I'm taking a little break while I build some Stormtroopers but I'll be back at it soon, a little refreshed form building something different.