

Nice work on the M1 Michael,
Good to see another British boat in the campaign,
Fancy one of those for my fleet.
keep up the great build.
Si


Go to modelshipwrights.com for the current dynamic site!
Campaigns
Want to be part of a group build? This is where to start, plan, and meet about them.
Want to be part of a group build? This is where to start, plan, and meet about them.
Hosted by Jim Starkweather
Official: Silent Service Campaign

RedDuster

Joined: March 01, 2010
KitMaker: 7,078 posts
Model Shipwrights: 6,649 posts

Posted: Tuesday, March 08, 2016 - 12:45 AM UTC

Cosimodo

#335

Joined: September 03, 2013
KitMaker: 1,808 posts
Model Shipwrights: 871 posts

Posted: Wednesday, March 09, 2016 - 03:04 PM UTC
Quoted Text
Nice work on the M1 Michael,
Good to see another British boat in the campaign,
Fancy one of those for my fleet.
keep up the great build.
Si
thanks Si,
It is not a bad little kit. A quick build but needs some mods to make it all fit together.
I am sure it wpuld look good in the RedDuster fleet.
cheers
Michael
Cosimodo
#335
Joined: September 03, 2013
KitMaker: 1,808 posts
Model Shipwrights: 871 posts
Posted: Wednesday, March 09, 2016 - 03:08 PM UTC
Well the M1 has moved along fairly quickly. At times a bit fiddly but not too bad over all.
She's ready for the paint yard next.
With any luck, she'll be painted at least one colour by the weekend.
cheers
Michael
She's ready for the paint yard next.
With any luck, she'll be painted at least one colour by the weekend.
cheers
Michael

rolltide31
#377

Joined: June 27, 2010
KitMaker: 1,481 posts
Model Shipwrights: 1,332 posts

Posted: Wednesday, March 09, 2016 - 05:16 PM UTC
Michael,
Great progress on your M1, it is a pretty cool little kit. Love the concept of the sun design with the main gun. Out of curiosity, does the main gun traverse at all?
Looking forward to seeing some color added.
Dave
Great progress on your M1, it is a pretty cool little kit. Love the concept of the sun design with the main gun. Out of curiosity, does the main gun traverse at all?
Looking forward to seeing some color added.
Dave
Cosimodo
#335
Joined: September 03, 2013
KitMaker: 1,808 posts
Model Shipwrights: 871 posts
Posted: Thursday, March 10, 2016 - 04:19 AM UTC
Quoted Text
Michael,
Great progress on your M1, it is a pretty cool little kit. Love the concept of the sun design with the main gun. Out of curiosity, does the main gun traverse at all?
Looking forward to seeing some color added.
Dave
Hi Dave,
I think the gun had only small elevation capabilities and certainly no traverse. The main idea was to surface close to target and deliver a 12" shell amidships. Would have been pretty devastating for merchant ships or coastal emplacements. I think the most telling point is that nobody else seems to have thought it worth trying.
cheers
Michael
rolltide31
#377
Joined: June 27, 2010
KitMaker: 1,481 posts
Model Shipwrights: 1,332 posts
Posted: Thursday, March 10, 2016 - 04:58 AM UTC
David,
The resin I400 looks pretty good. Is the aircraft hanger hollow, allowing for storage of the aircraft? From the pictures the details look pretty crisp and clean. When you decide to build her please blog it, would like to see the progress.
Dave
The resin I400 looks pretty good. Is the aircraft hanger hollow, allowing for storage of the aircraft? From the pictures the details look pretty crisp and clean. When you decide to build her please blog it, would like to see the progress.
Dave
Cosimodo
#335
Joined: September 03, 2013
KitMaker: 1,808 posts
Model Shipwrights: 871 posts
Posted: Saturday, March 12, 2016 - 01:23 PM UTC
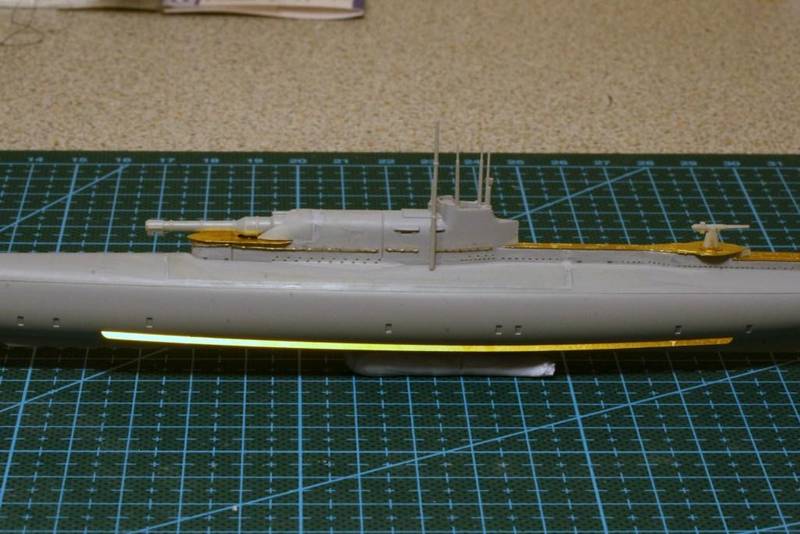
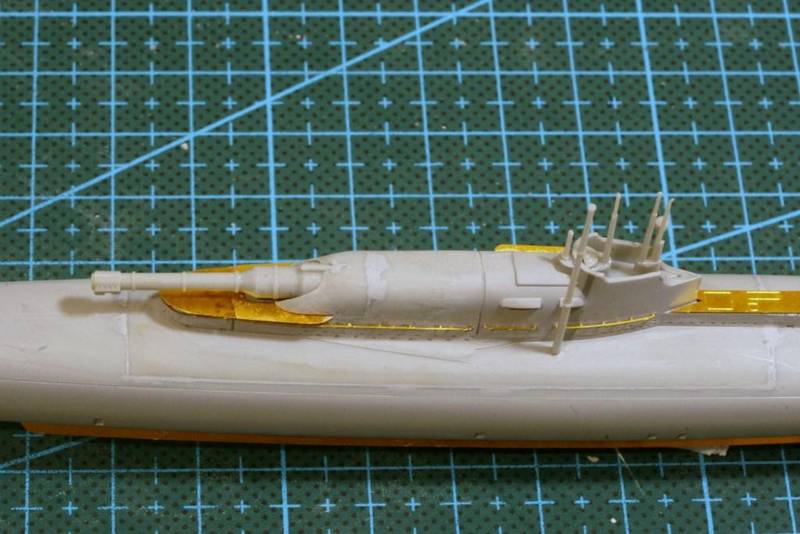
HMS M.1 with some colour but still on her toothpicks.
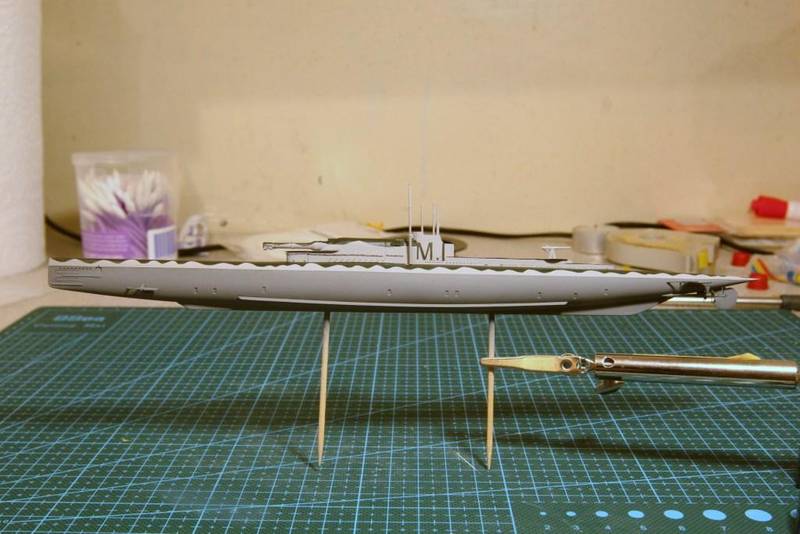
She still needs a wash and something to be mounted on to. I will post some better photos when it's completed.
cheers
Michael
She still needs a wash and something to be mounted on to. I will post some better photos when it's completed.
cheers
Michael

Fordboy
Joined: July 13, 2004
KitMaker: 2,169 posts
Model Shipwrights: 1,597 posts

Posted: Wednesday, March 16, 2016 - 03:22 AM UTC
Ahoy Michael
Its looking very good indeed.
Cheers
Sean
Its looking very good indeed.
Cheers
Sean

BoiseBlade

#523
Joined: February 28, 2014
KitMaker: 342 posts
Model Shipwrights: 38 posts

Posted: Friday, March 18, 2016 - 09:58 AM UTC
No I did not fall off the planet......
Just been away a bit.
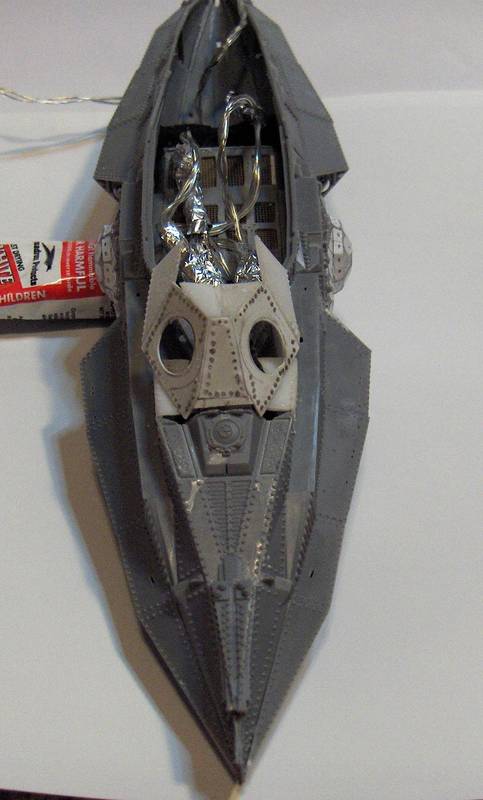
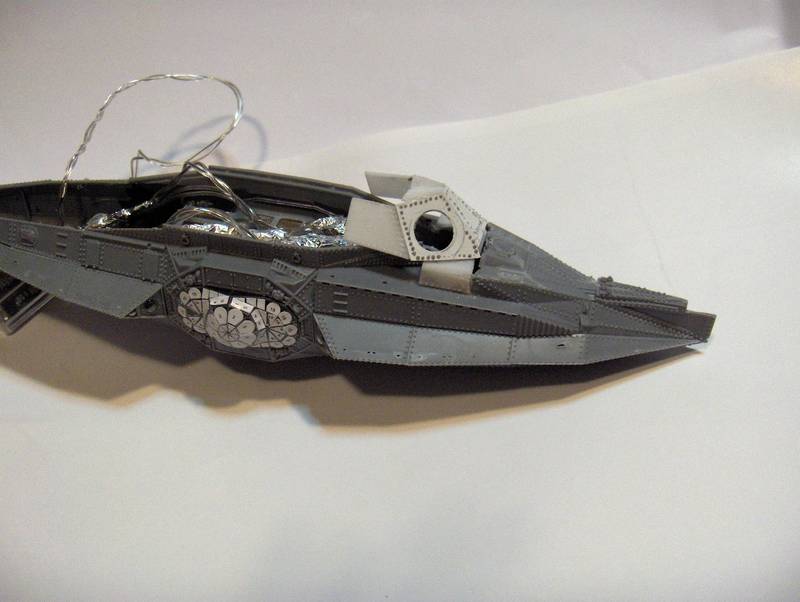
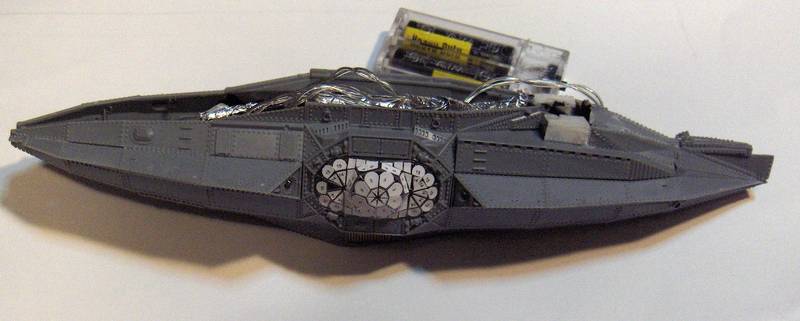
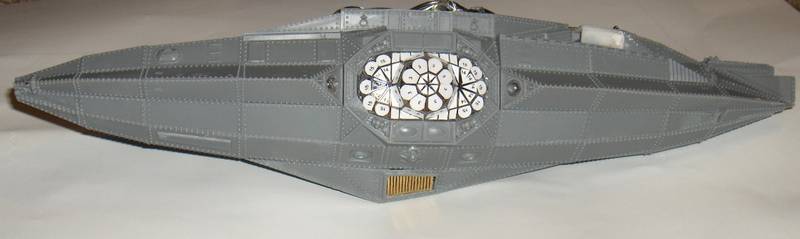
Here is how far I am on my Nautilus.
The pic of the lights did not come out but you can get the gist I hope. By the time it is done I will figure how to take no light pics.
Yes I decided that gluing individual cut sprue of bolts to match the metal was not going to happen and this is what I came up with......

Just been away a bit.
Here is how far I am on my Nautilus.
The pic of the lights did not come out but you can get the gist I hope. By the time it is done I will figure how to take no light pics.
Yes I decided that gluing individual cut sprue of bolts to match the metal was not going to happen and this is what I came up with......
rolltide31
#377
Joined: June 27, 2010
KitMaker: 1,481 posts
Model Shipwrights: 1,332 posts
Posted: Friday, March 18, 2016 - 07:37 PM UTC
Michael,
Amazing work on your M1. It is a pretty cool design for a sub. Would have been interesting to read true accounts of engagements if it had actually engaged the enemy.
Jeff,
Nice work on the Nautilus. Looking forward to seeing how it all comes together.
Dave
Amazing work on your M1. It is a pretty cool design for a sub. Would have been interesting to read true accounts of engagements if it had actually engaged the enemy.
Jeff,
Nice work on the Nautilus. Looking forward to seeing how it all comes together.
Dave
Cosimodo
#335
Joined: September 03, 2013
KitMaker: 1,808 posts
Model Shipwrights: 871 posts
Posted: Sunday, March 27, 2016 - 02:35 PM UTC
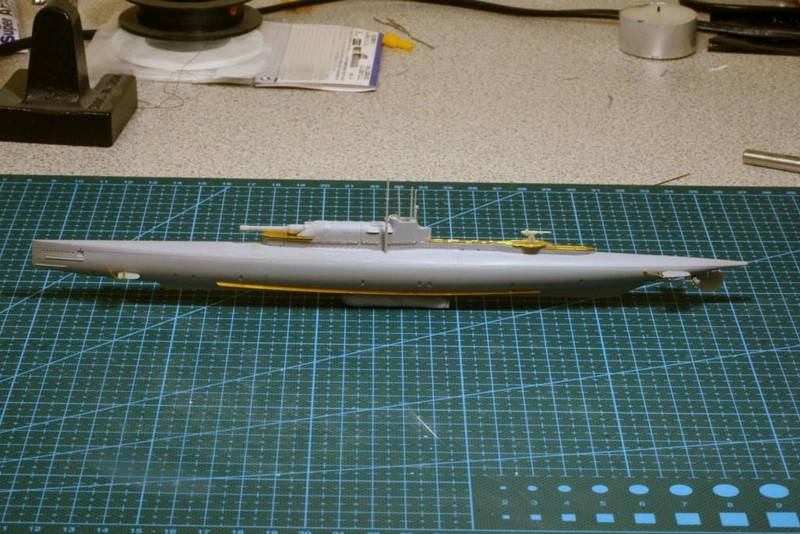
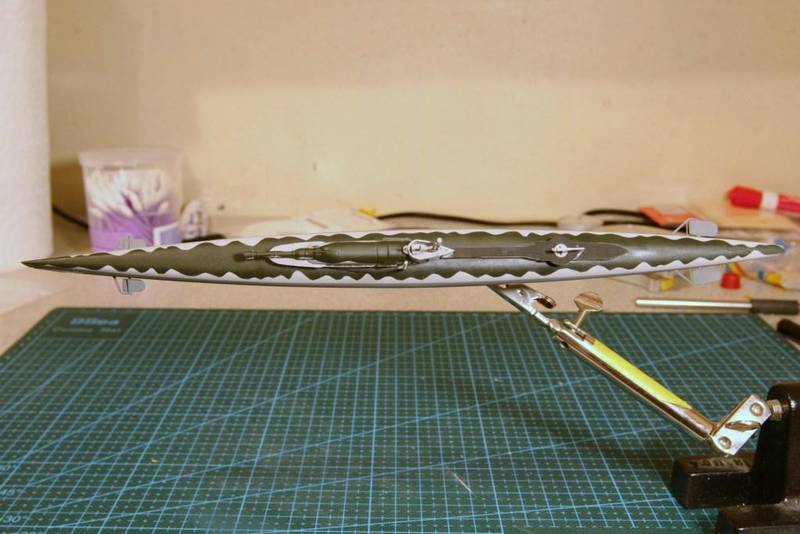
HMS M.1 ready for action.
I handed painted the M1 as decal was a bit prominent and gave the whole boat a wash to tone it down a little.

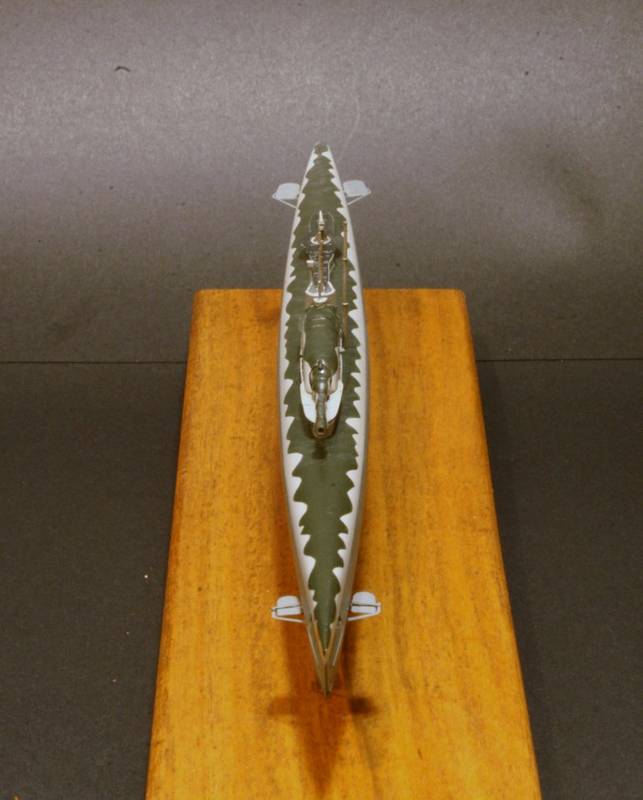
It was not a bad kit, a bit fiddly as the main parts required some work but my first foray into the underwater world so I'm happy with the outcome.. If they issued M.2 with the plane I would add that to the collection.
cheers
Michael
I handed painted the M1 as decal was a bit prominent and gave the whole boat a wash to tone it down a little.
It was not a bad kit, a bit fiddly as the main parts required some work but my first foray into the underwater world so I'm happy with the outcome.. If they issued M.2 with the plane I would add that to the collection.
cheers
Michael
RedDuster
Joined: March 01, 2010
KitMaker: 7,078 posts
Model Shipwrights: 6,649 posts
Posted: Sunday, March 27, 2016 - 09:59 PM UTC
Hi Michael,
Great job on the M1, looked a fun build.
must add one to my "fleet".
Cheers
Si
Great job on the M1, looked a fun build.
must add one to my "fleet".
Cheers
Si
Cosimodo
#335
Joined: September 03, 2013
KitMaker: 1,808 posts
Model Shipwrights: 871 posts
Posted: Monday, March 28, 2016 - 02:08 PM UTC
Quoted Text
Hi Michael,
Great job on the M1, looked a fun build.
must add one to my "fleet".
Cheers
Si
Thanks Si,
If you add one to your fleet allow for the filler and sandpaper
 Fortuantely the kit only has about 20 parts so not toomuch work.
cheers
michael
Fordboy
Joined: July 13, 2004
KitMaker: 2,169 posts
Model Shipwrights: 1,597 posts
Posted: Wednesday, March 30, 2016 - 01:07 AM UTC
Ahoy Michael
Very nice job indeed.
I like your paint job.
Congrats on completing it.
Cheers
Sean
Very nice job indeed.
I like your paint job.
Congrats on completing it.
Cheers
Sean
Cosimodo
#335
Joined: September 03, 2013
KitMaker: 1,808 posts
Model Shipwrights: 871 posts
Posted: Wednesday, March 30, 2016 - 03:50 AM UTC
Thanks Sean.
It's always nice to get something completed while ignoring the more pressing demands of a wilful battlecruiser!
cheers
Michael
It's always nice to get something completed while ignoring the more pressing demands of a wilful battlecruiser!
cheers
Michael

Cam
#275

Joined: March 01, 2006
KitMaker: 174 posts
Model Shipwrights: 13 posts

Posted: Saturday, April 02, 2016 - 02:32 AM UTC
Lovely job on the M1 Michael. I also have the M1 in the stash with plans to display her beside the Surcouf, another big gun sub.
Finally finished my I-19, some of the photo etch was very fine and strained my abilities but all came together in the end.

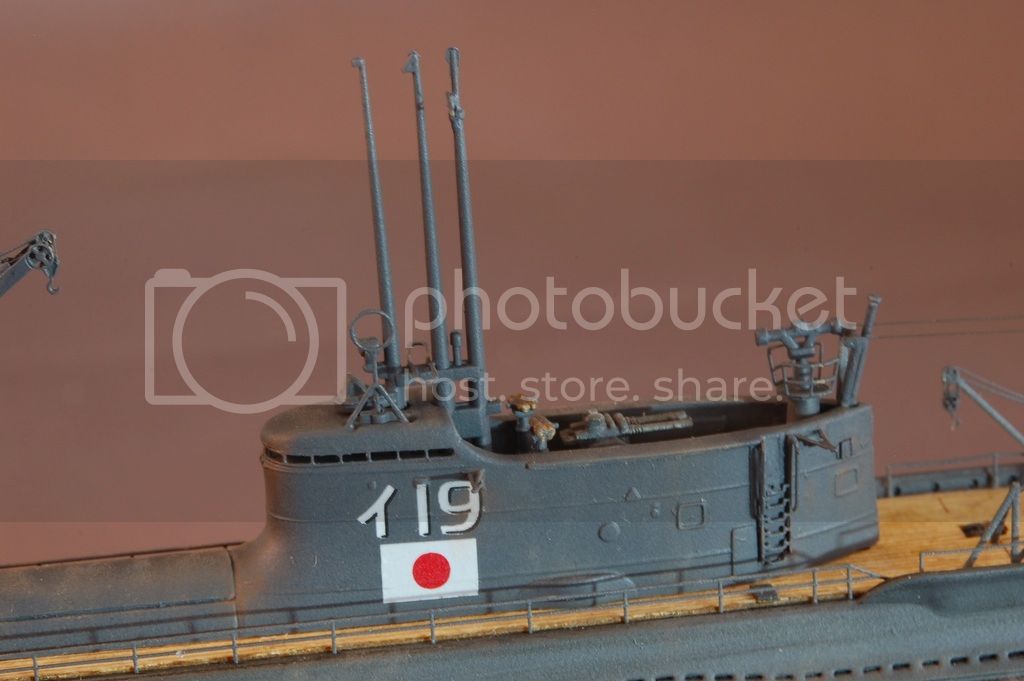
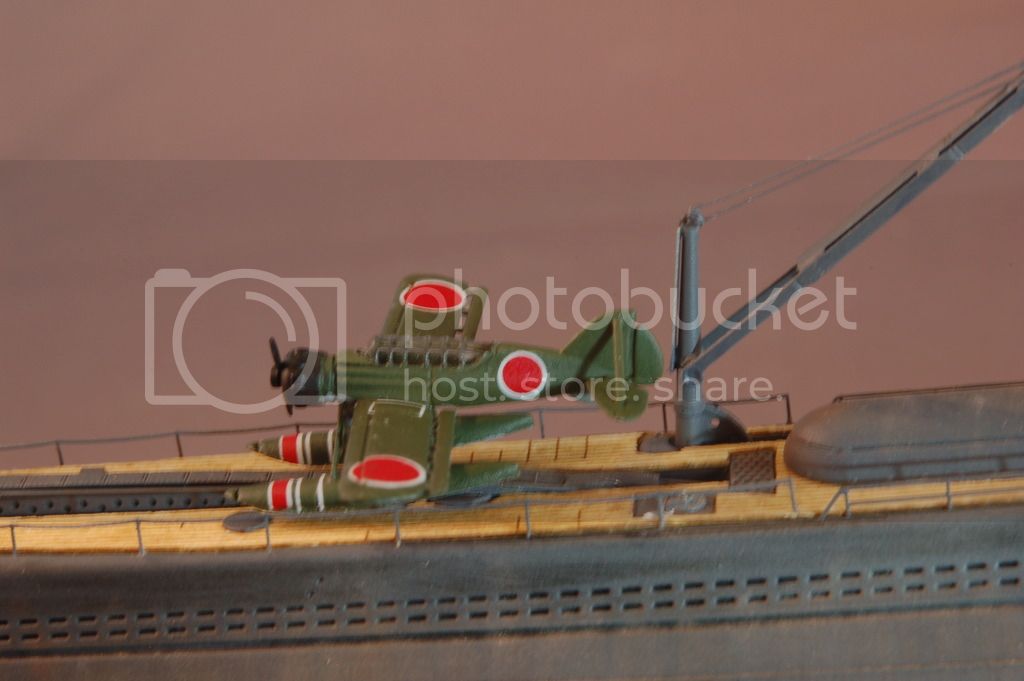
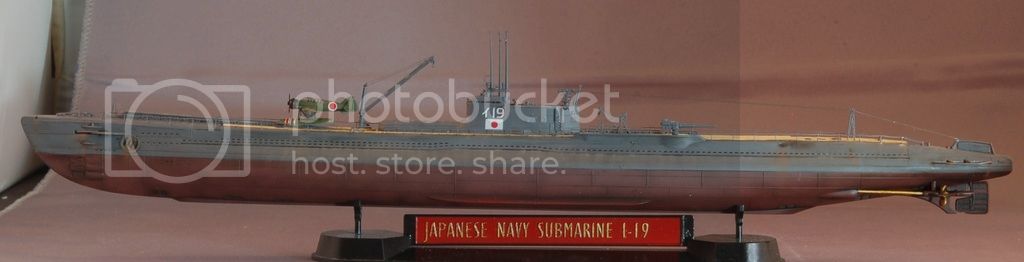
Finally finished my I-19, some of the photo etch was very fine and strained my abilities but all came together in the end.


JJ1973
#345

Joined: August 22, 2011
KitMaker: 1,835 posts
Model Shipwrights: 1,832 posts

Posted: Saturday, April 16, 2016 - 08:47 PM UTC
Hello all!
Request permission to join
After I finished my HMS Belfast yesterday and a little time to go before the 'Sink the Bismarck'-Campaign will start, I decided to build my first 1/350 sub, an AFV Club VII c early version.
I plan for this to be a quick and fun build, just a little PE, in between two larger projects, and I thought this could be a nice contribution here.
So here we go: Starting today.

That's what I will be using:
The kit (with some included PE), an Eduard set (actually for a Revell kit - will see what I can use), a Flyhawk 20mm (I will use a Master turned brass barrel for it) and probably some brass barrel for the 8.8 gun - I will see if I find something suitable, it should look better than the kit's gun, otherwise I will go with the moulded one.
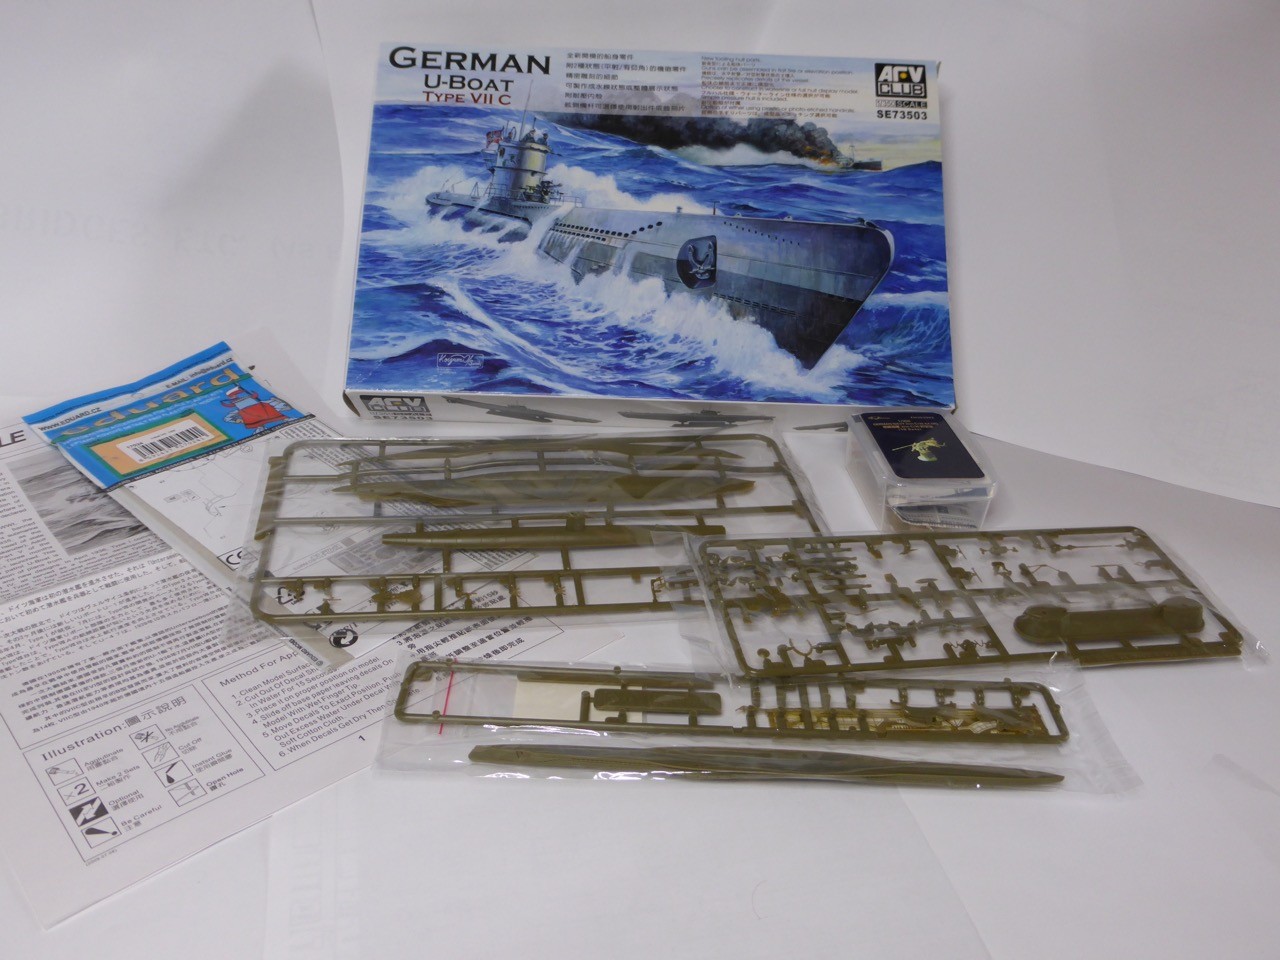
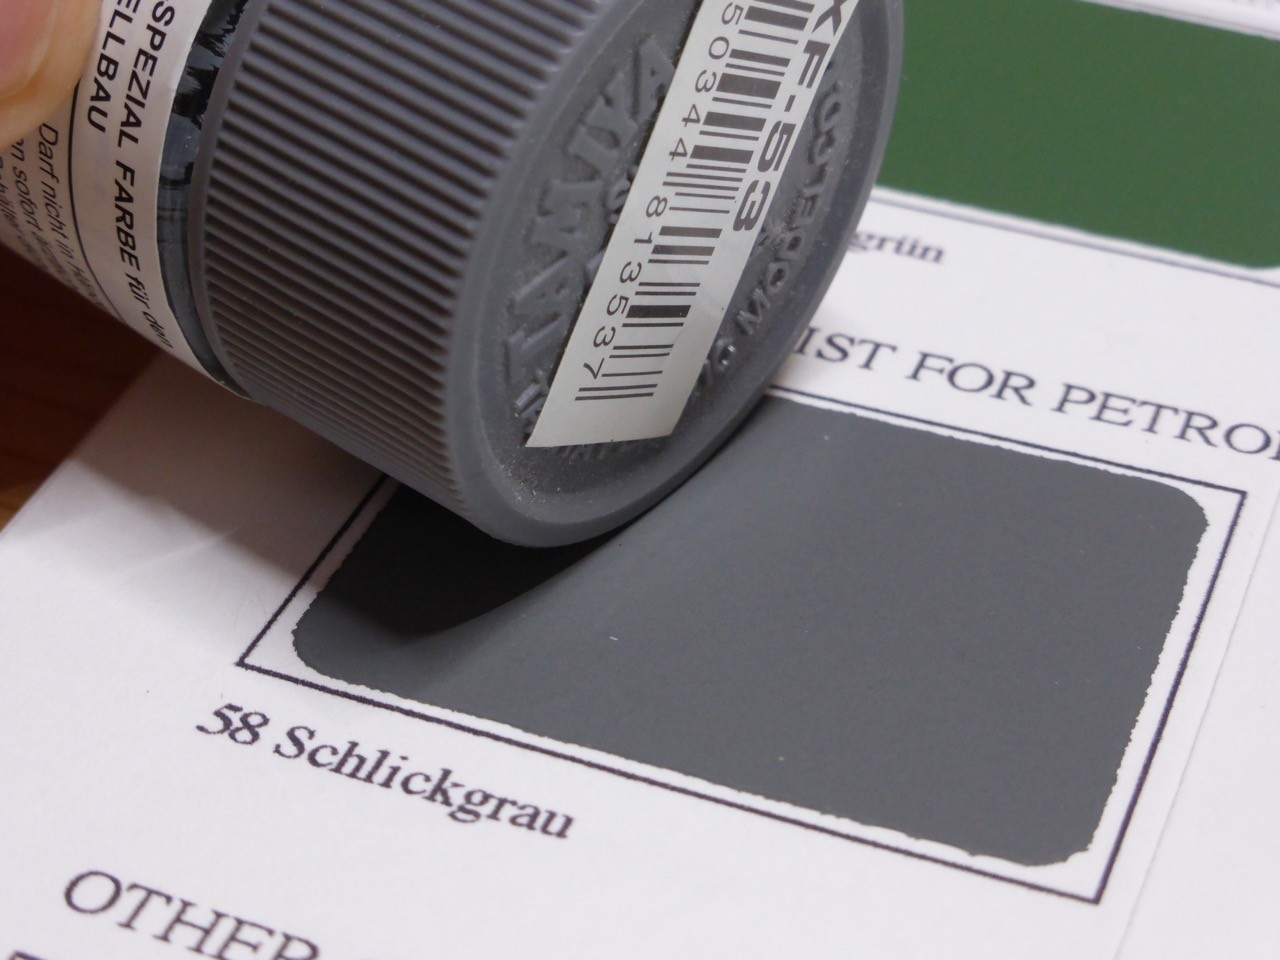
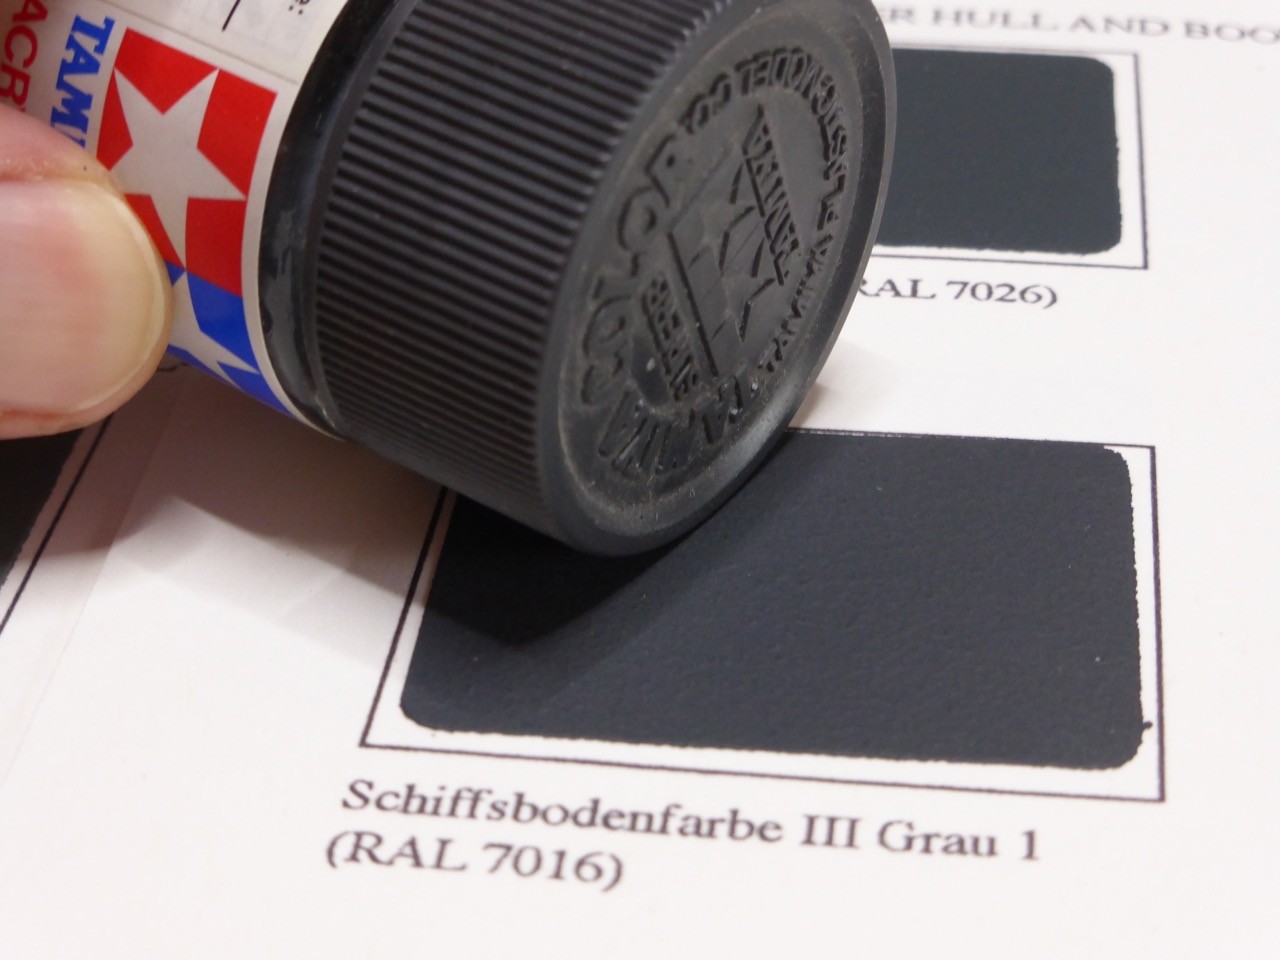
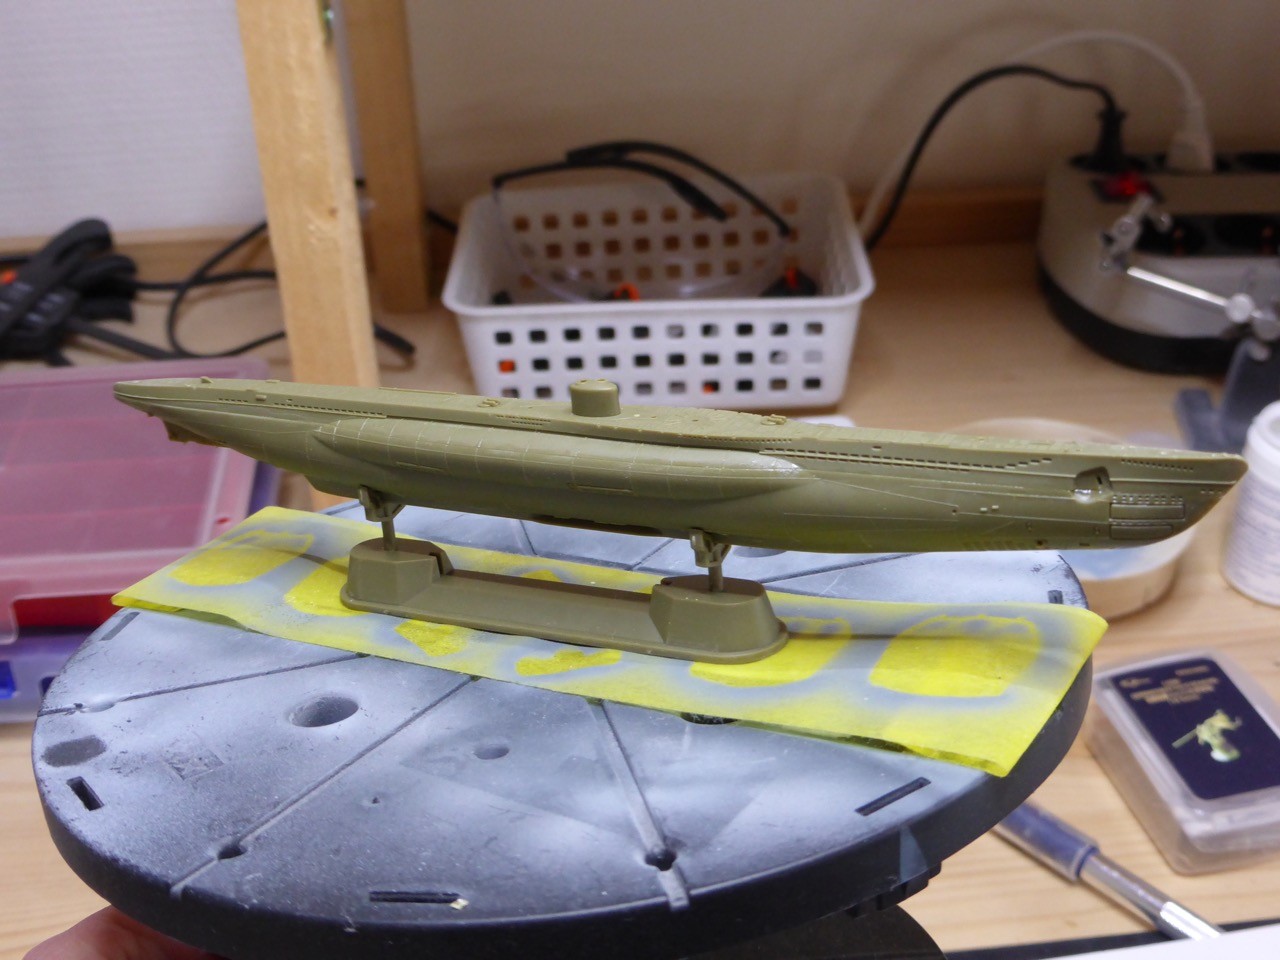
As this is a very small model and not all that much paint will be needed, I just looked into my color stash to see what I could find, no real point in mixing for such small quantities...
The main colors will be 'Schlickgrau 58' and 'Schiffsbodenfarbe III':

By comparison, I decided that the Tamiya XF 53 is a good match for the 'Schlickgrau' and XF 63 for 'Schiffsbodenfarbe III':
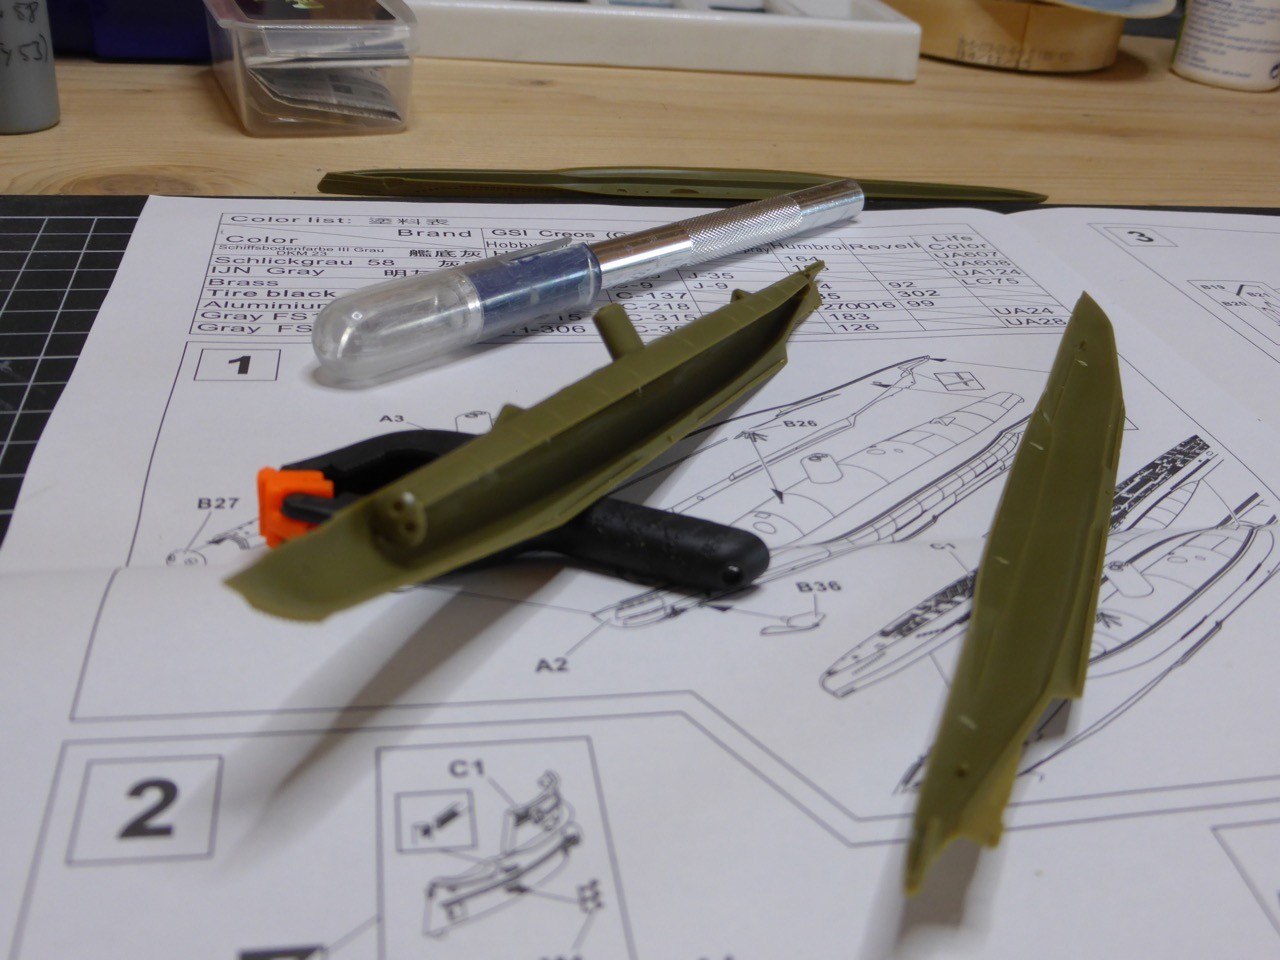
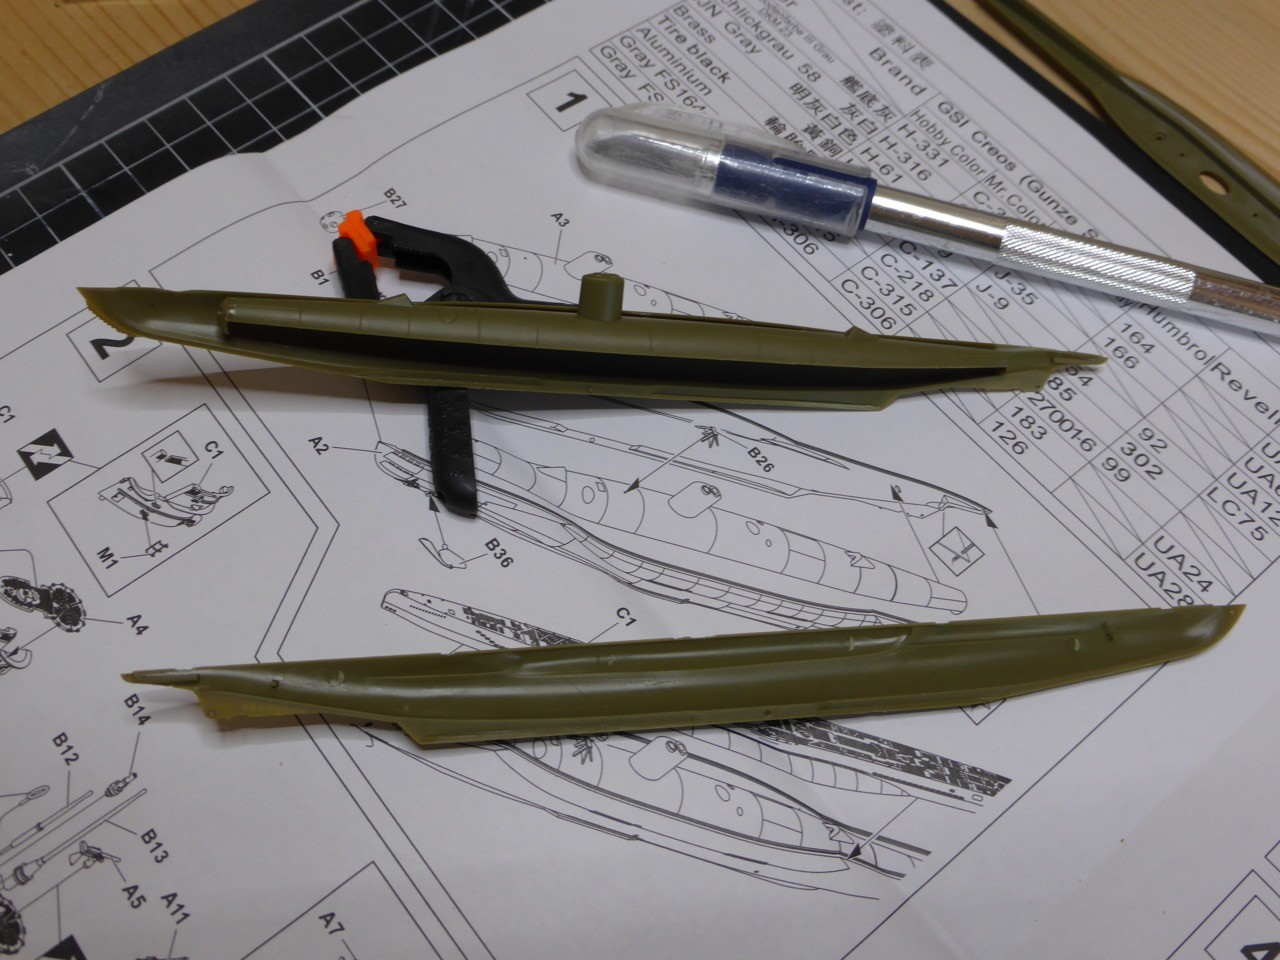
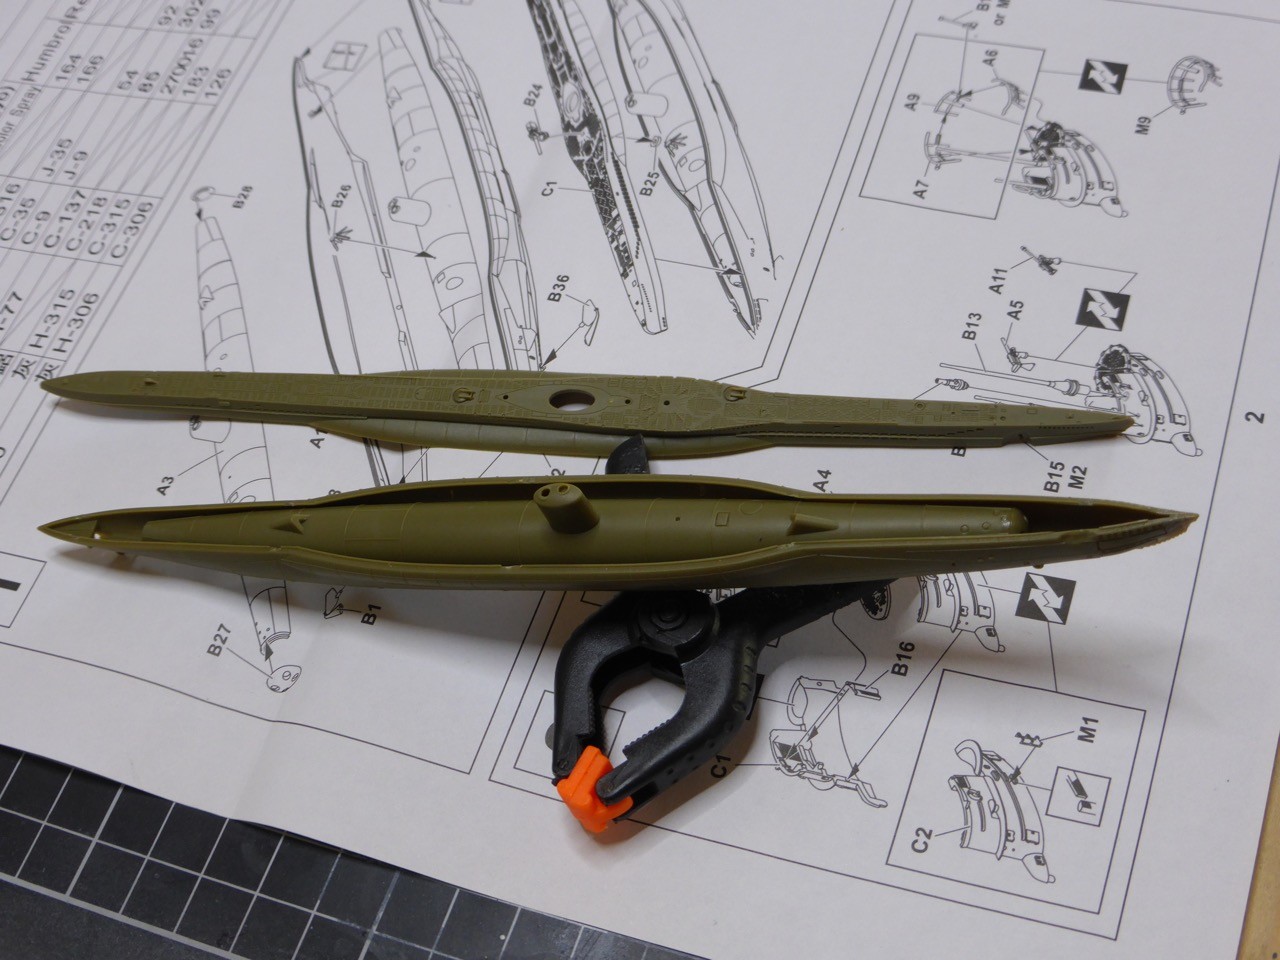
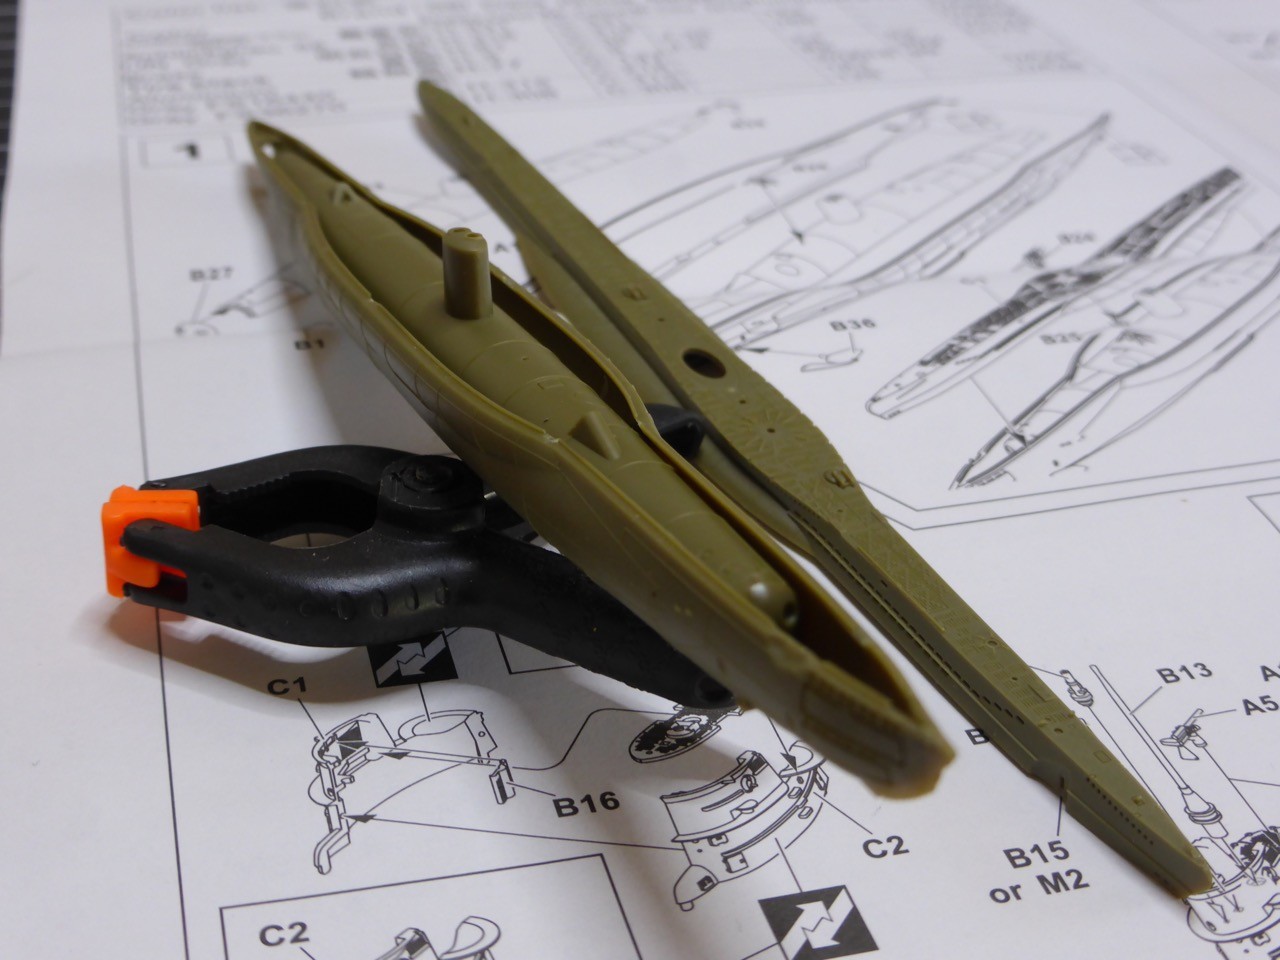
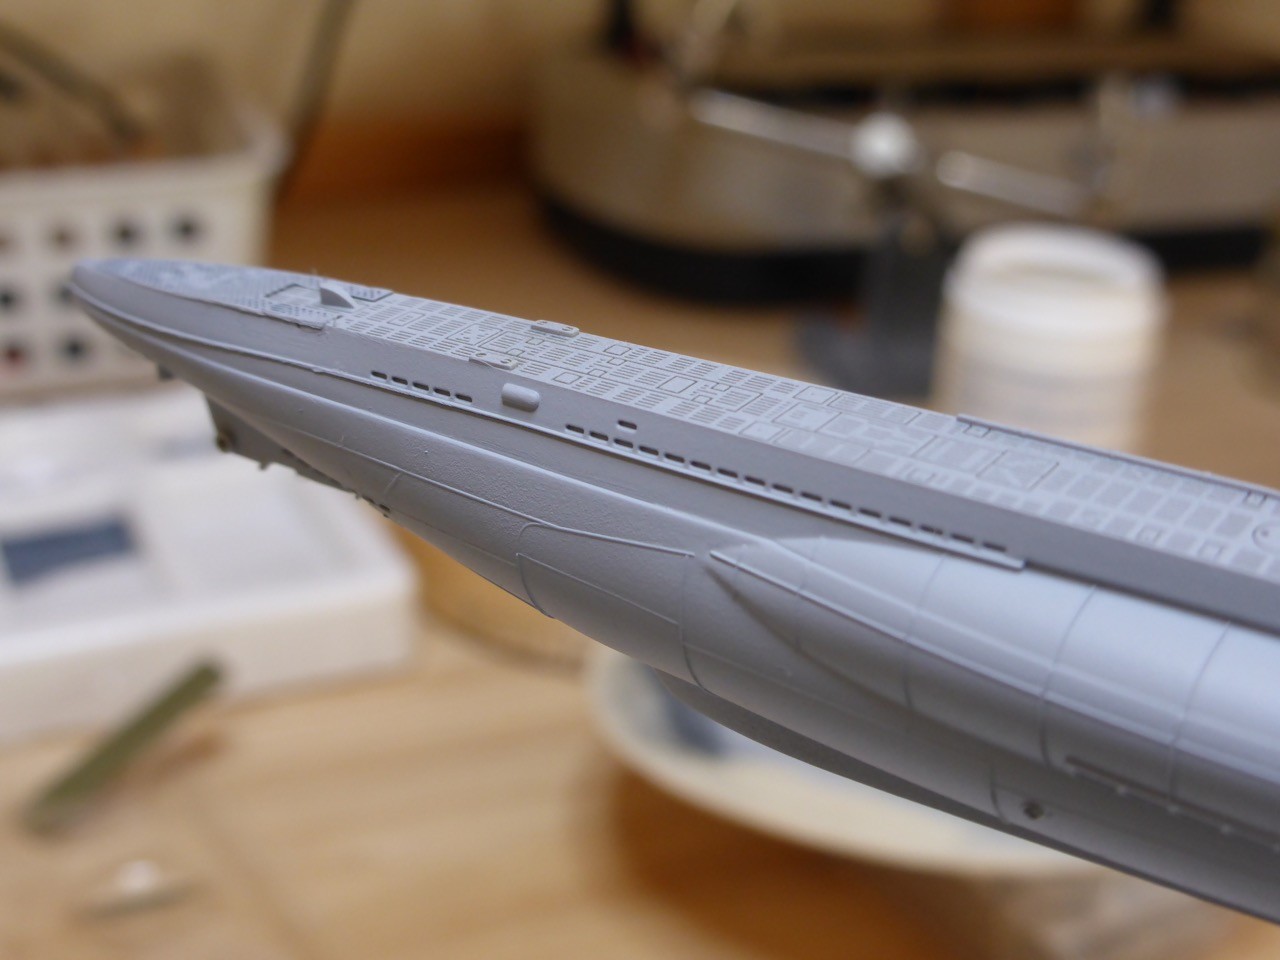
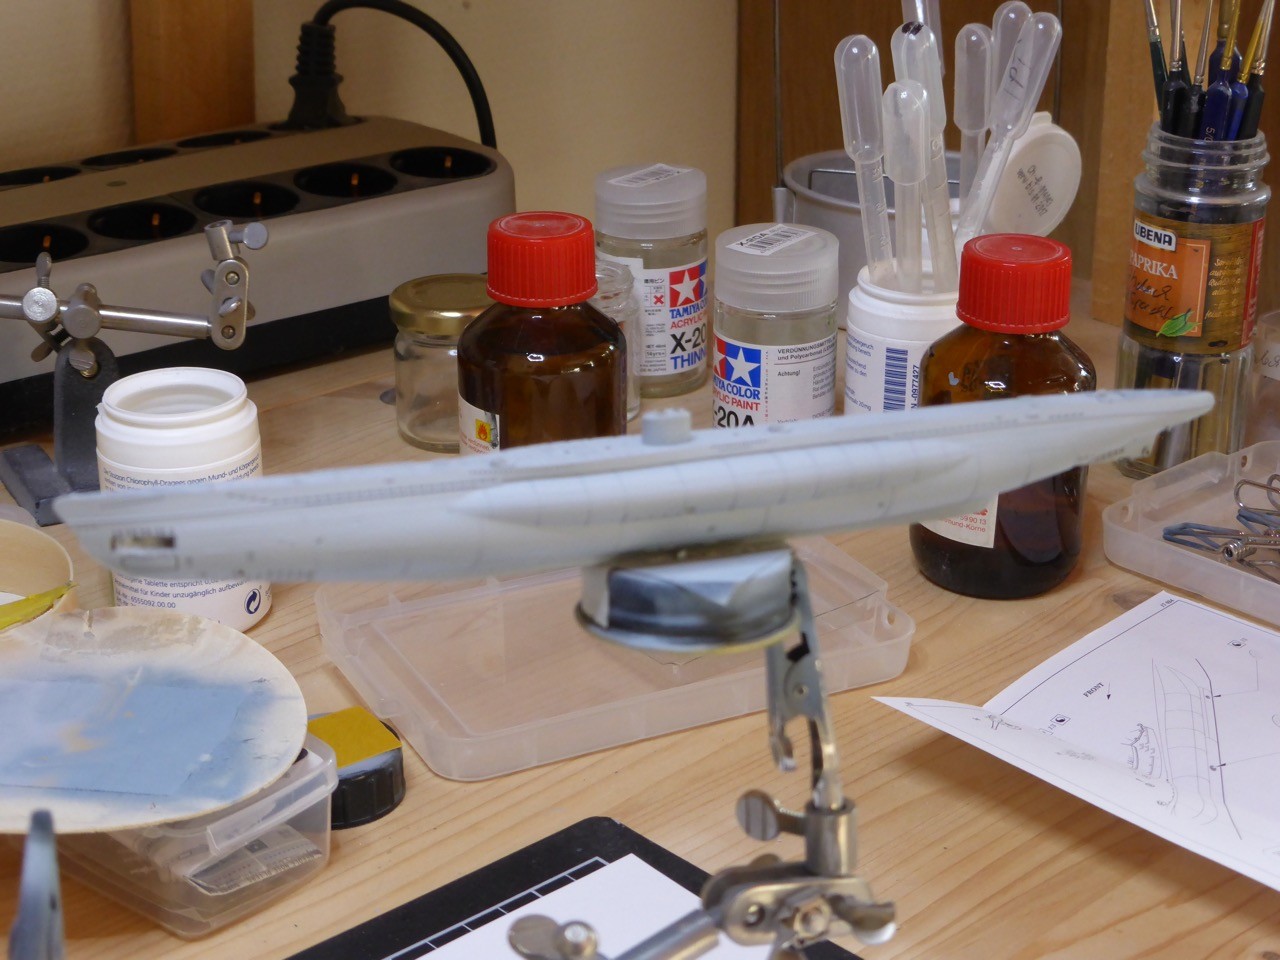
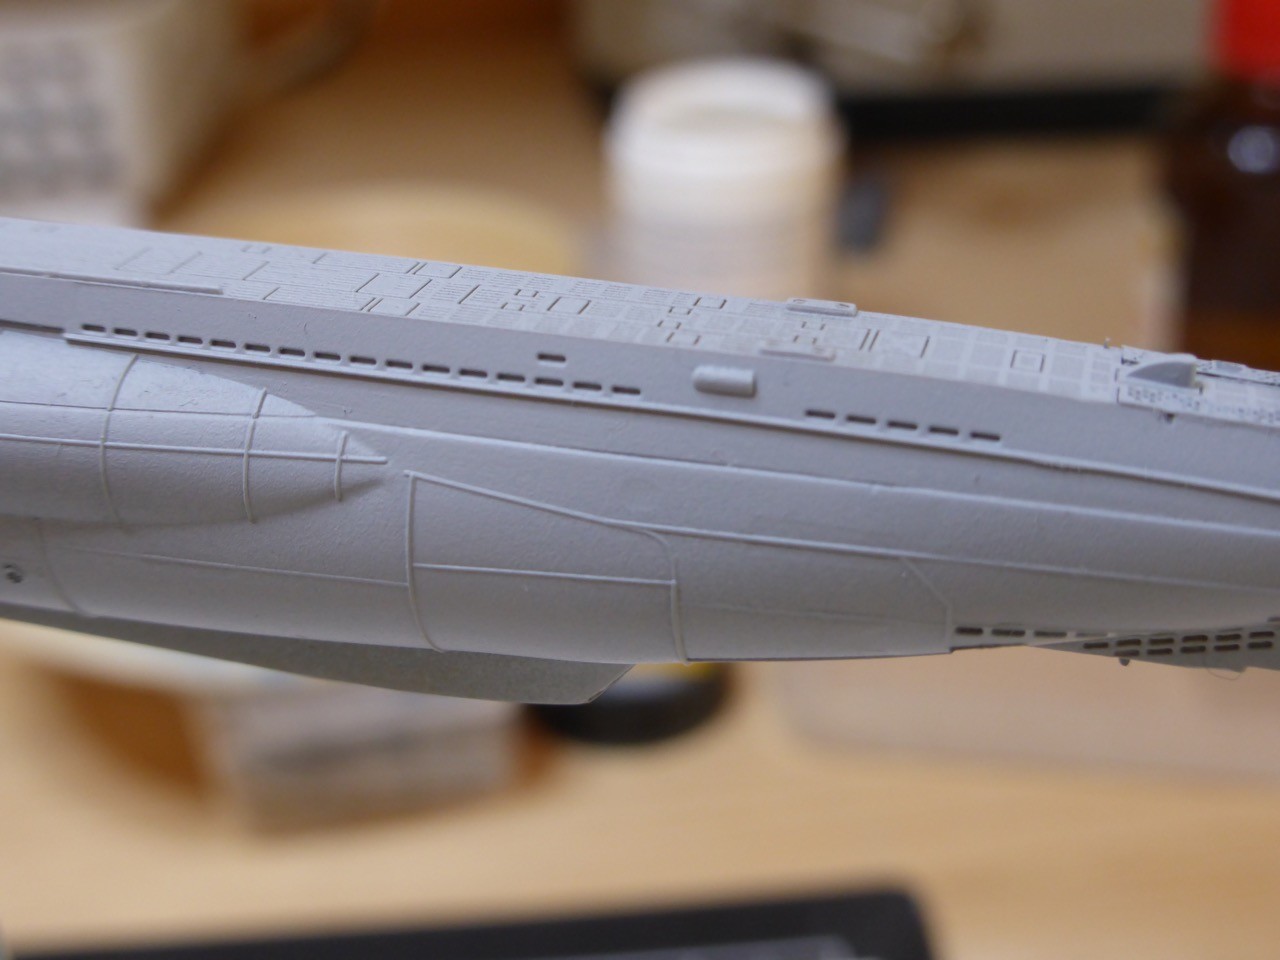
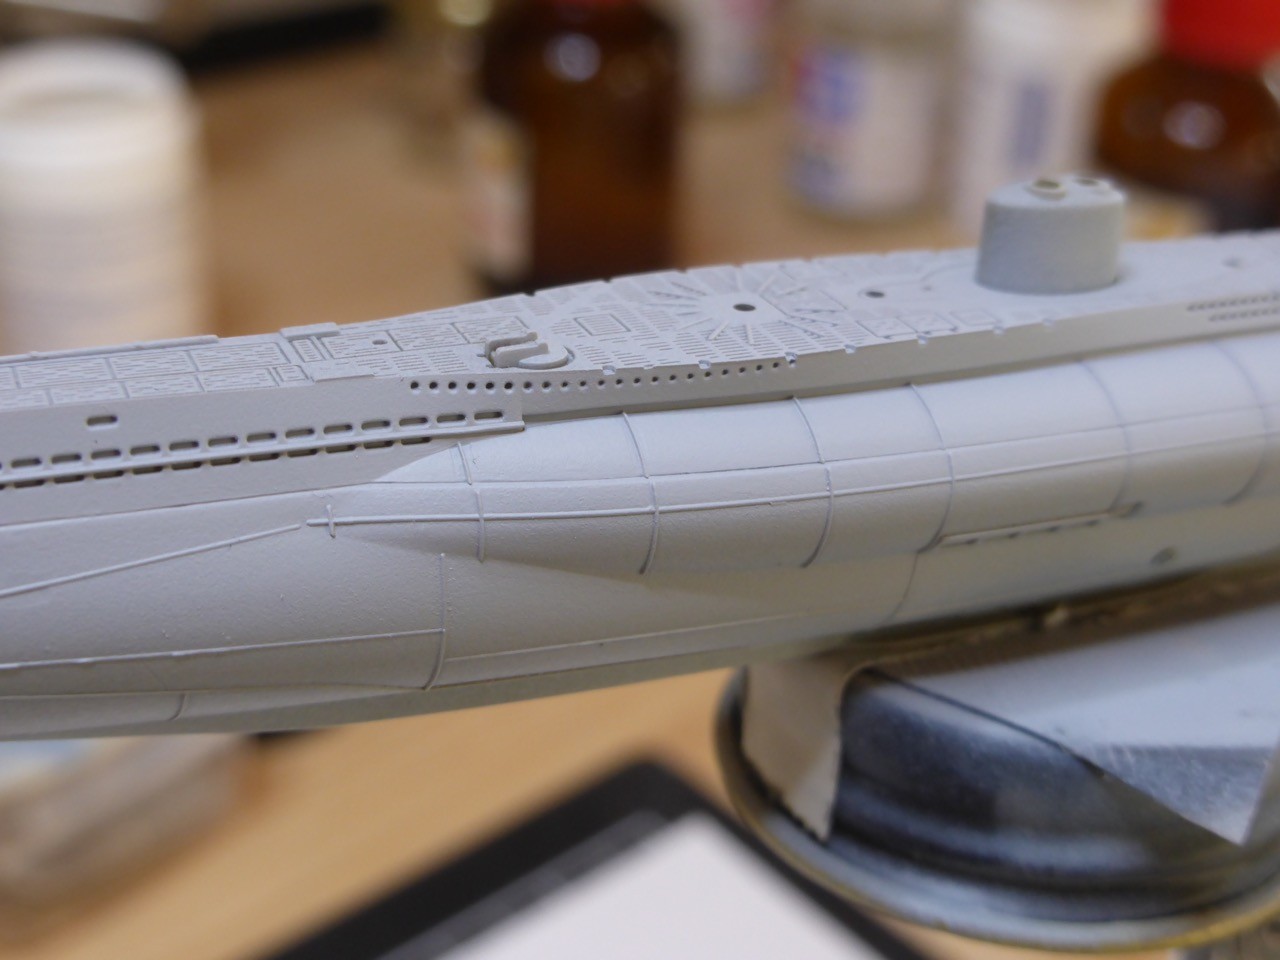
And then let's go and cut some plastic - the moulding seems really good to me, fine and with lots of details. Fit seems pretty good as well. Amazingly there's a pressure hull that goes inside, even though it won't be visible at all in the end - at least that's what it looks like...
Cheers,
Jan
Request permission to join
After I finished my HMS Belfast yesterday and a little time to go before the 'Sink the Bismarck'-Campaign will start, I decided to build my first 1/350 sub, an AFV Club VII c early version.
I plan for this to be a quick and fun build, just a little PE, in between two larger projects, and I thought this could be a nice contribution here.
So here we go: Starting today.
That's what I will be using:
The kit (with some included PE), an Eduard set (actually for a Revell kit - will see what I can use), a Flyhawk 20mm (I will use a Master turned brass barrel for it) and probably some brass barrel for the 8.8 gun - I will see if I find something suitable, it should look better than the kit's gun, otherwise I will go with the moulded one.
As this is a very small model and not all that much paint will be needed, I just looked into my color stash to see what I could find, no real point in mixing for such small quantities...
The main colors will be 'Schlickgrau 58' and 'Schiffsbodenfarbe III':
By comparison, I decided that the Tamiya XF 53 is a good match for the 'Schlickgrau' and XF 63 for 'Schiffsbodenfarbe III':
And then let's go and cut some plastic - the moulding seems really good to me, fine and with lots of details. Fit seems pretty good as well. Amazingly there's a pressure hull that goes inside, even though it won't be visible at all in the end - at least that's what it looks like...
Cheers,
Jan
BoiseBlade
#523
Joined: February 28, 2014
KitMaker: 342 posts
Model Shipwrights: 38 posts
Posted: Sunday, April 17, 2016 - 11:38 PM UTC
Jan,
Permission to come aboard granted!
Cam,
I really like that I-19, Nicely done.......
Not Sure how you guys and do the "Oh my GOD" scale on such small projects like subs......
Not sure these old eyes could really do it. But maybe it is not that much different than the Battle ships or carriers in the scale.
Who knows, it just seems to intimidate me.
Hats off to you all.......
JJ1973
#345
Joined: August 22, 2011
KitMaker: 1,835 posts
Model Shipwrights: 1,832 posts
Posted: Saturday, April 23, 2016 - 10:42 PM UTC
Thanks Jeff!
So here's a quick and small update, quite some non-modeling stuff going on over the weekend, limiting that bench time...
Glued the deck part first.
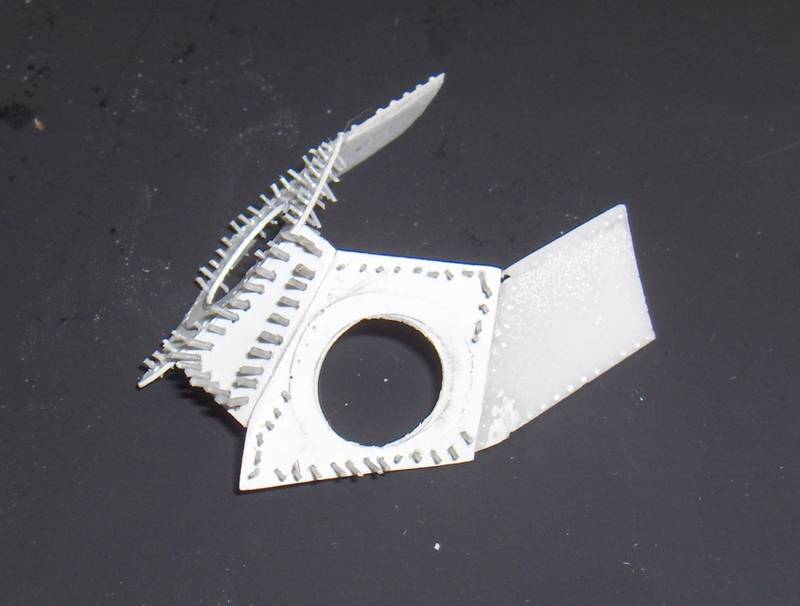
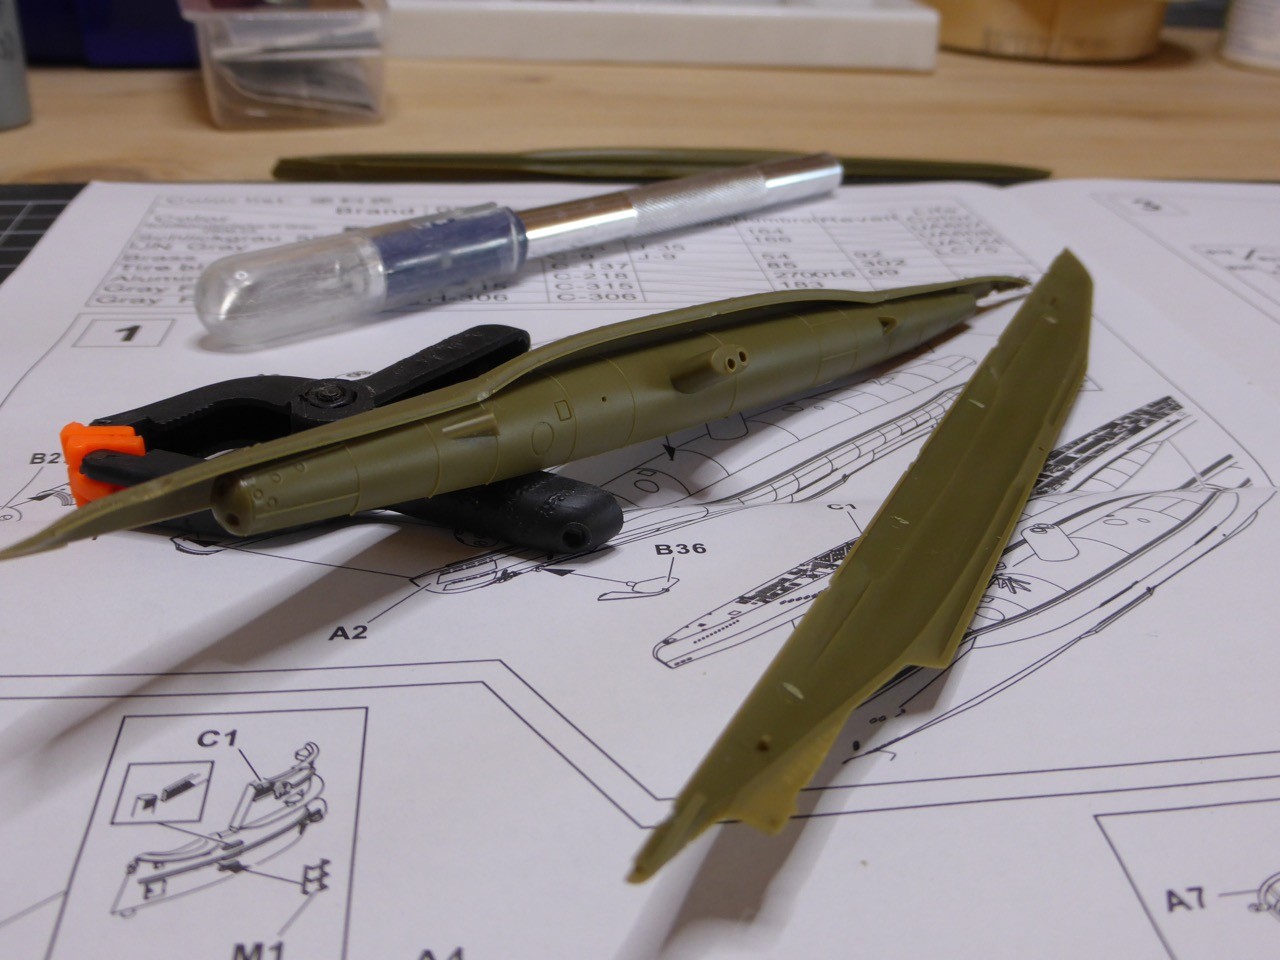
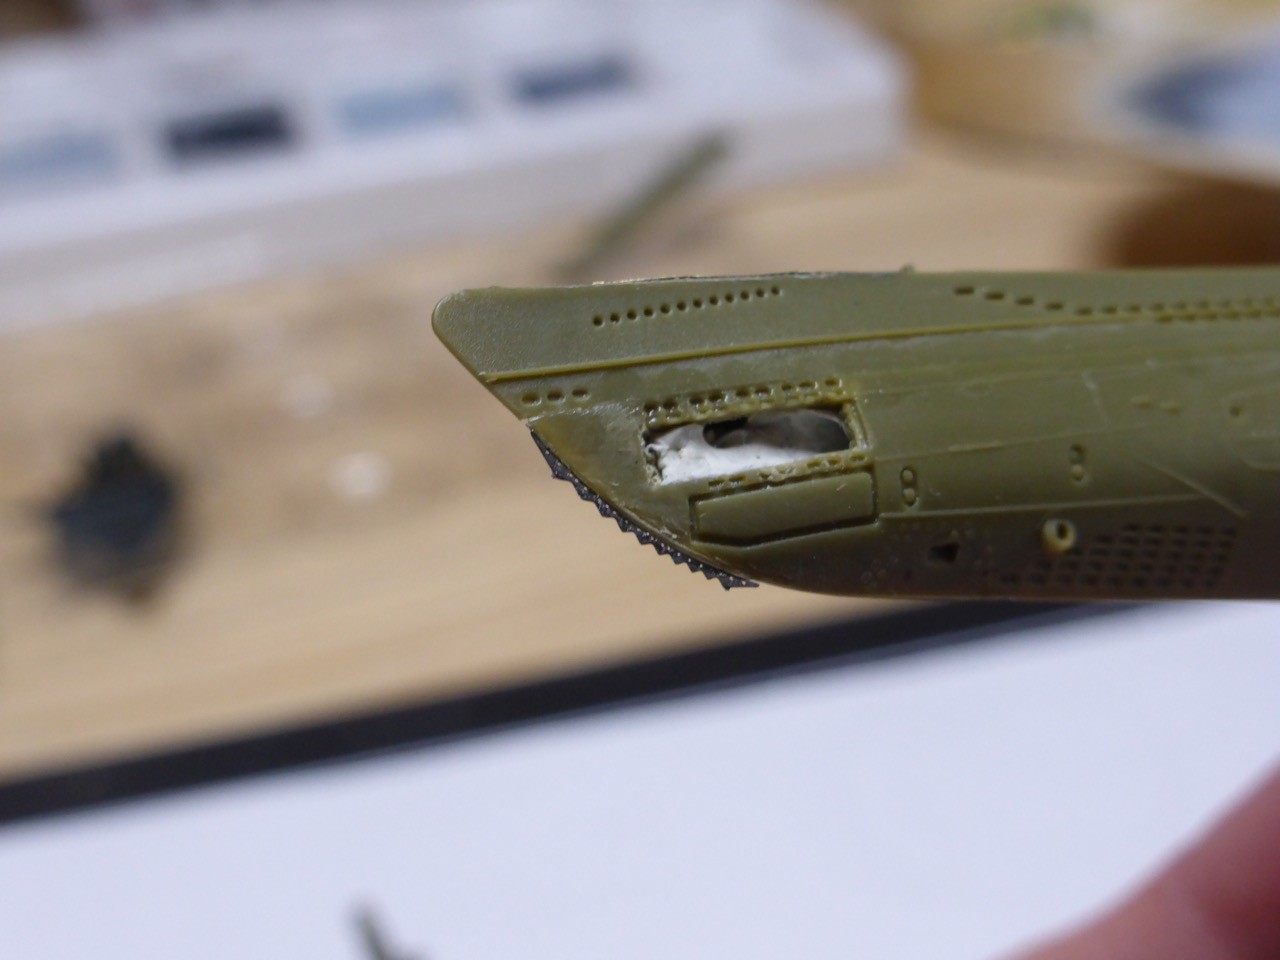
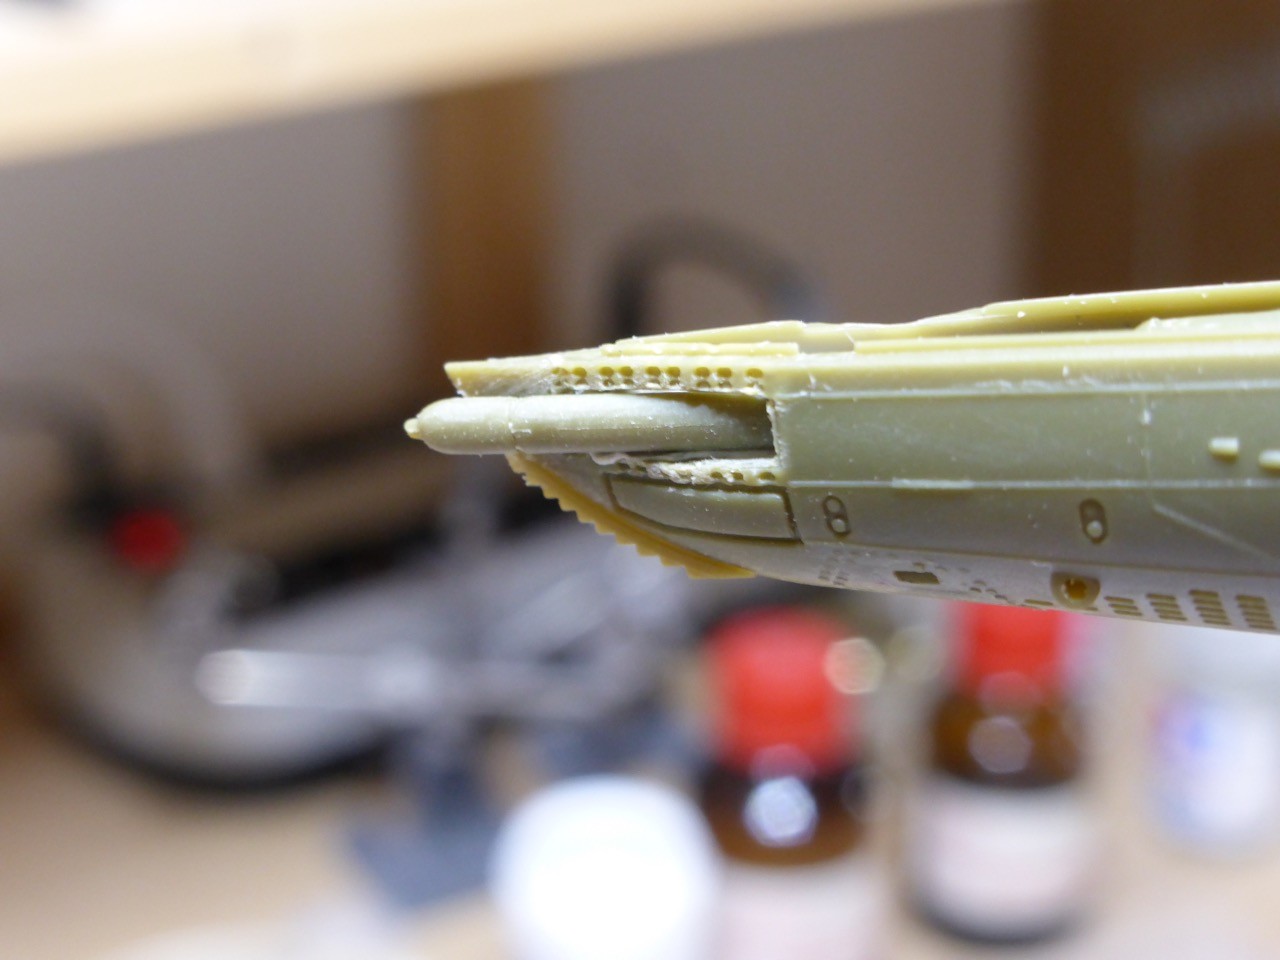
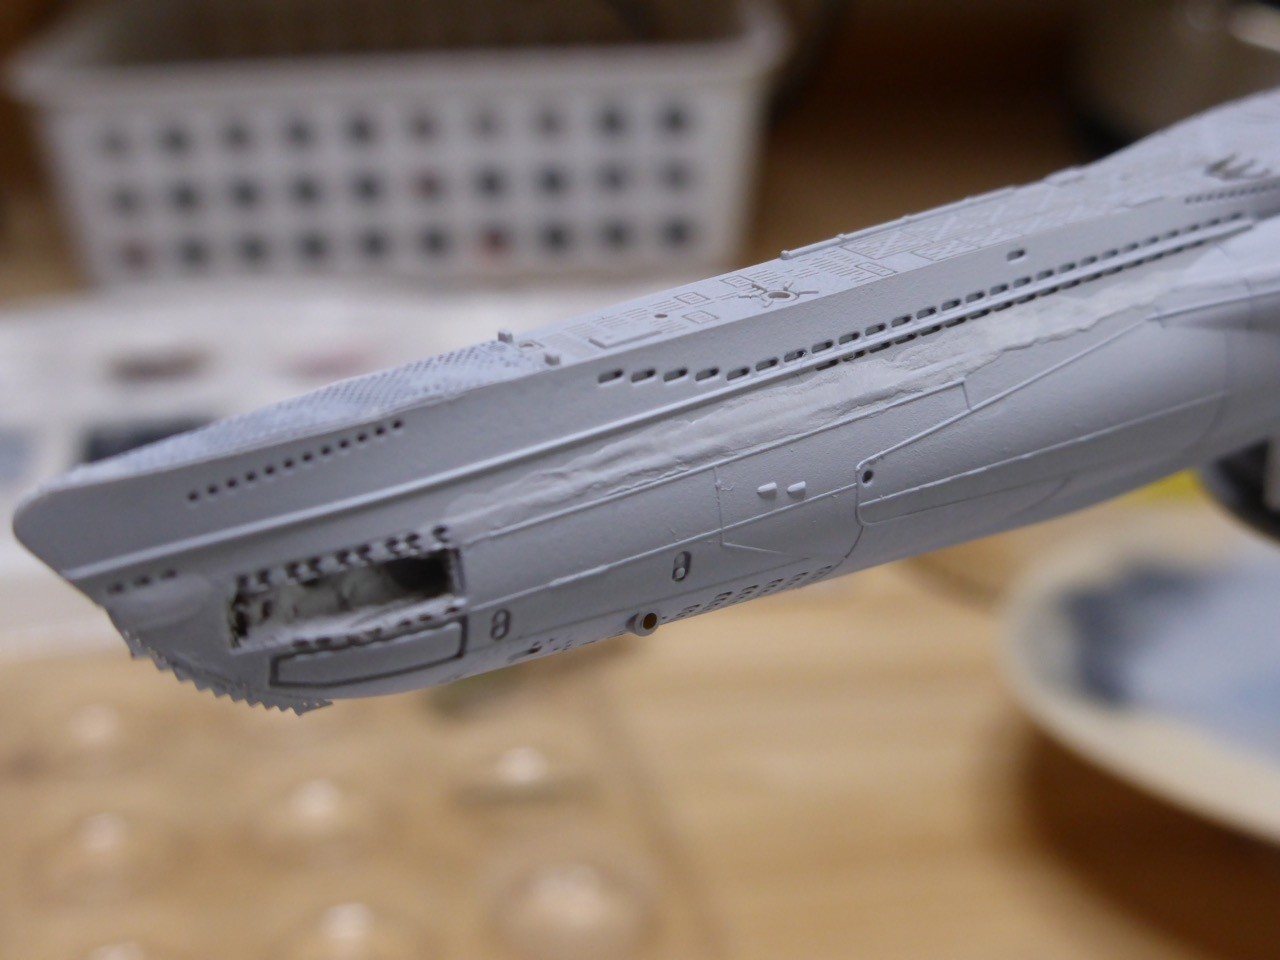
That went not as smooth as I desired - fumbled a little around the nose, so to hide that, I decided to open one tube and let a torpedo come out:
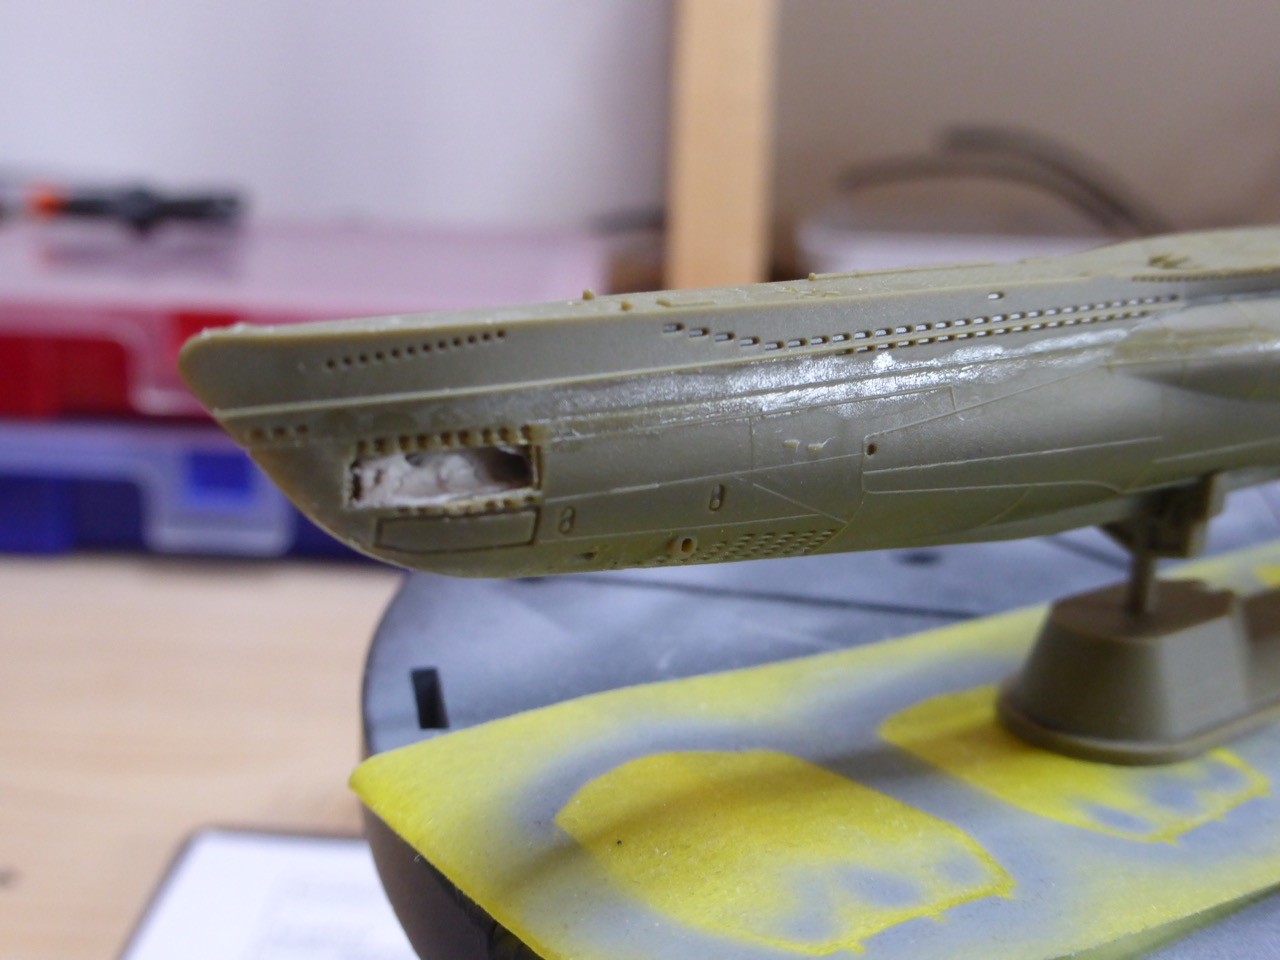
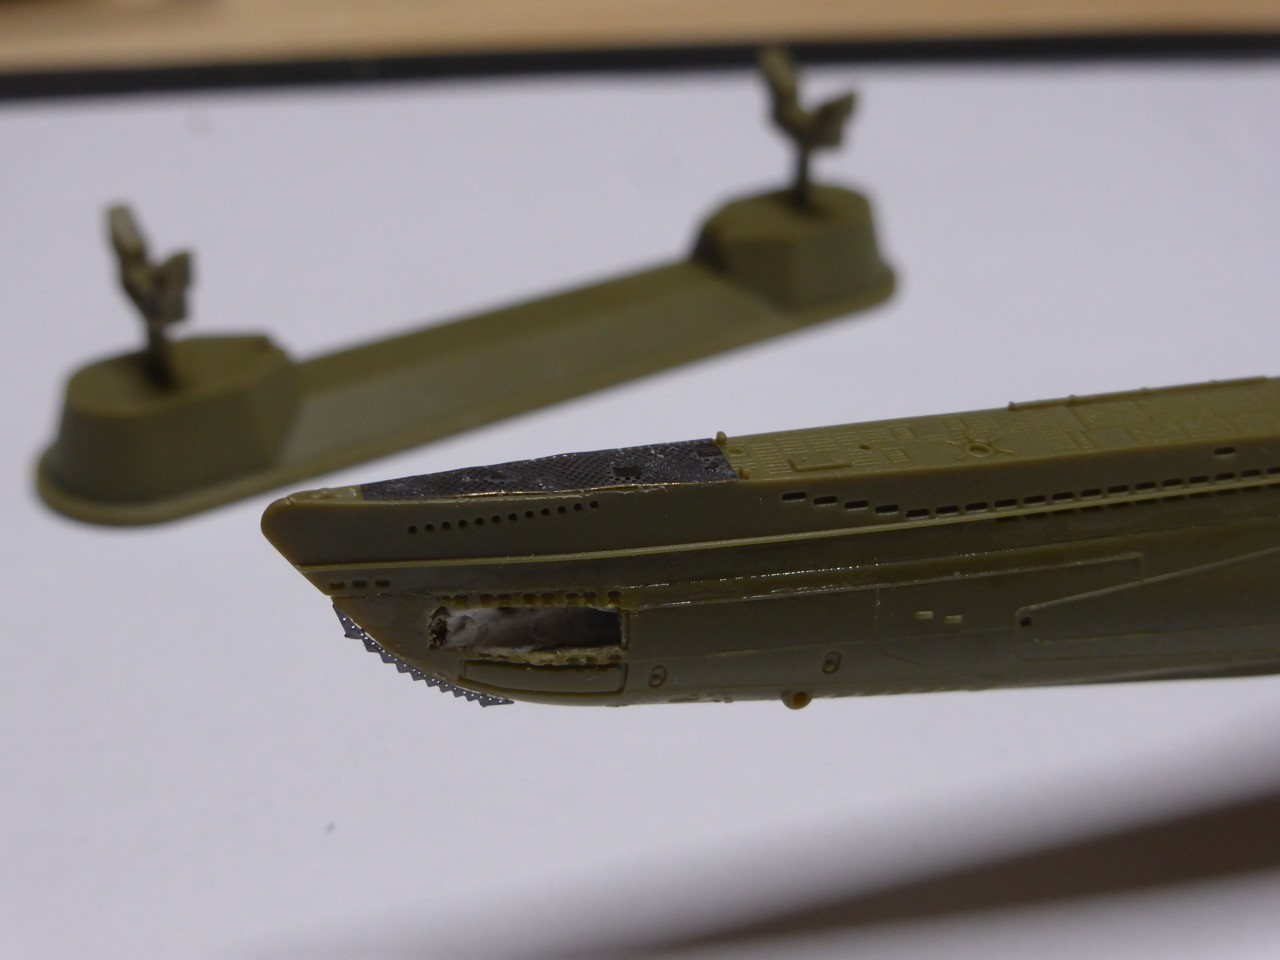
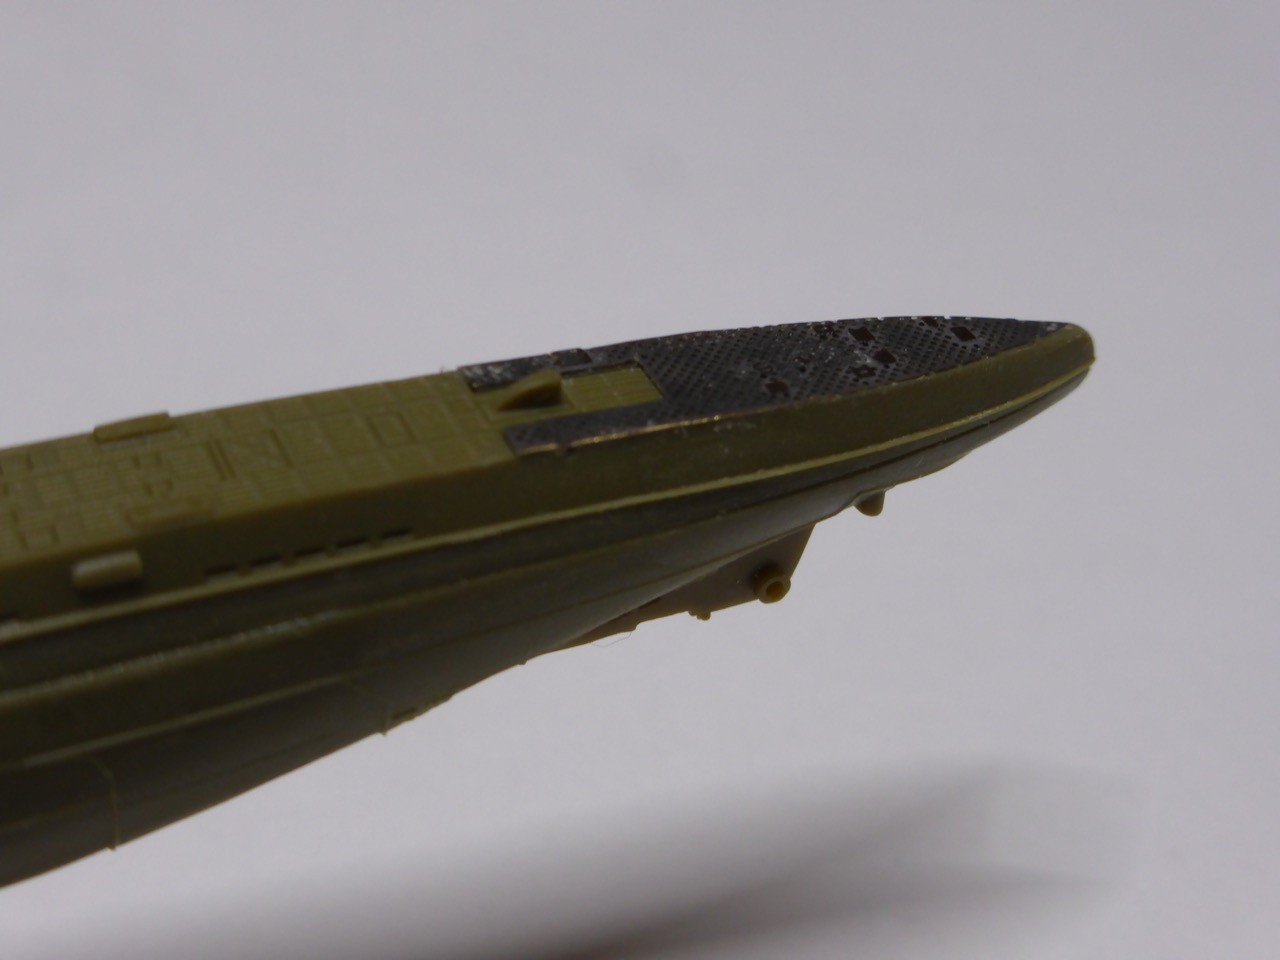
Some PE already in place, and more to follow, on the bow and stern parts. The Eduard set fits really nice, for that it is intended for a different kit!
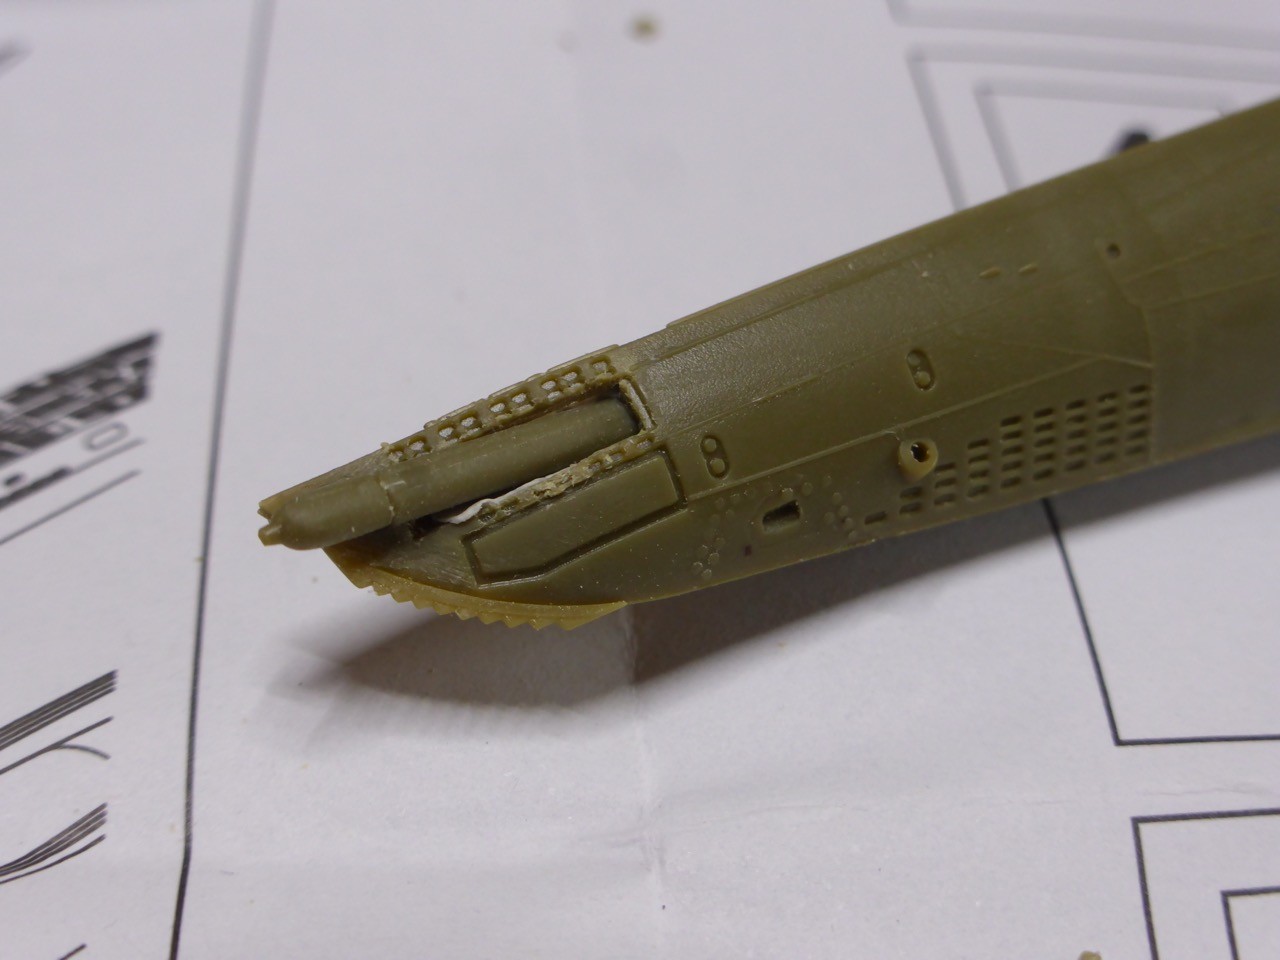
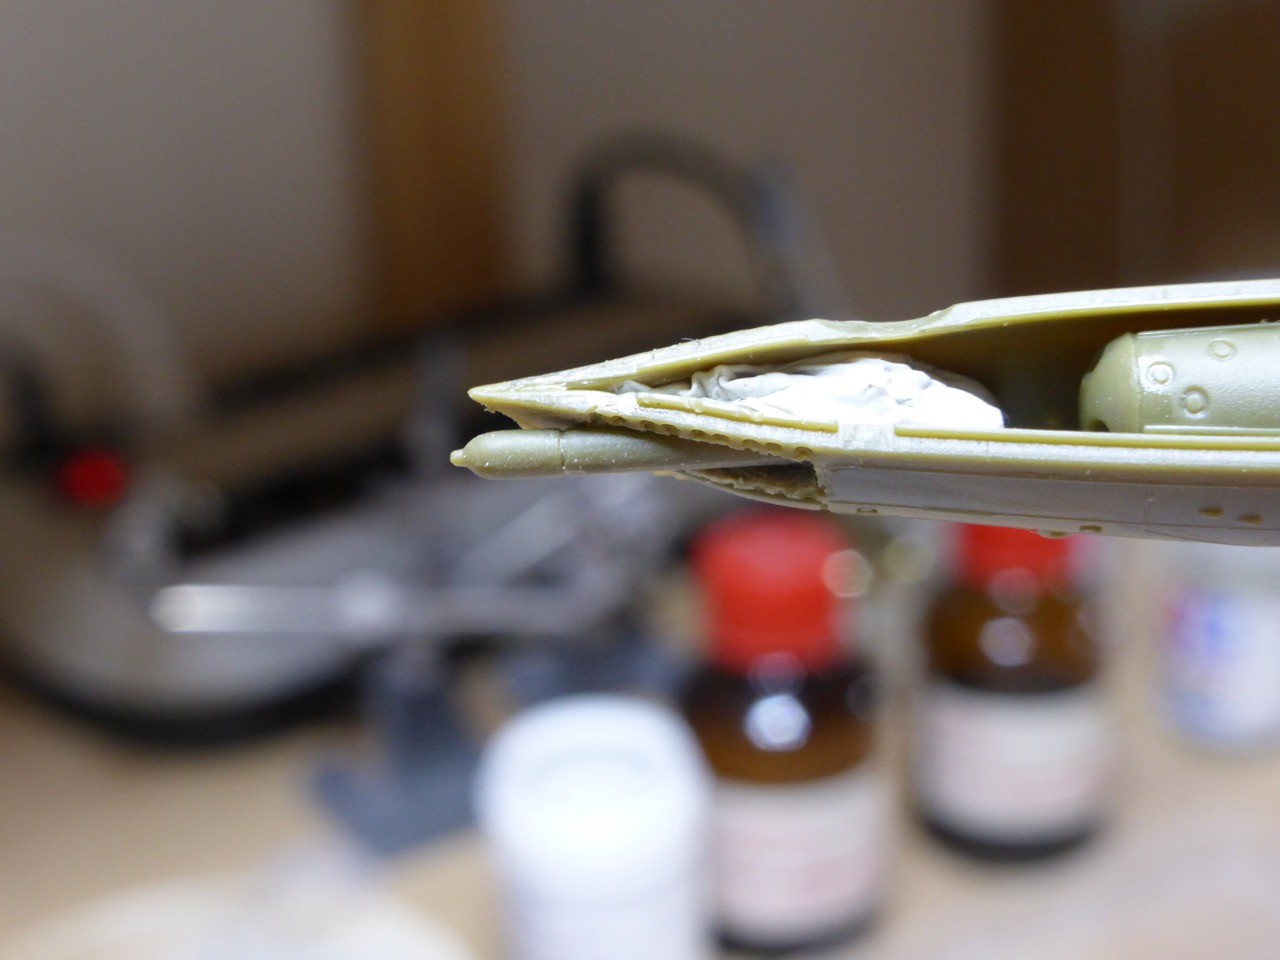
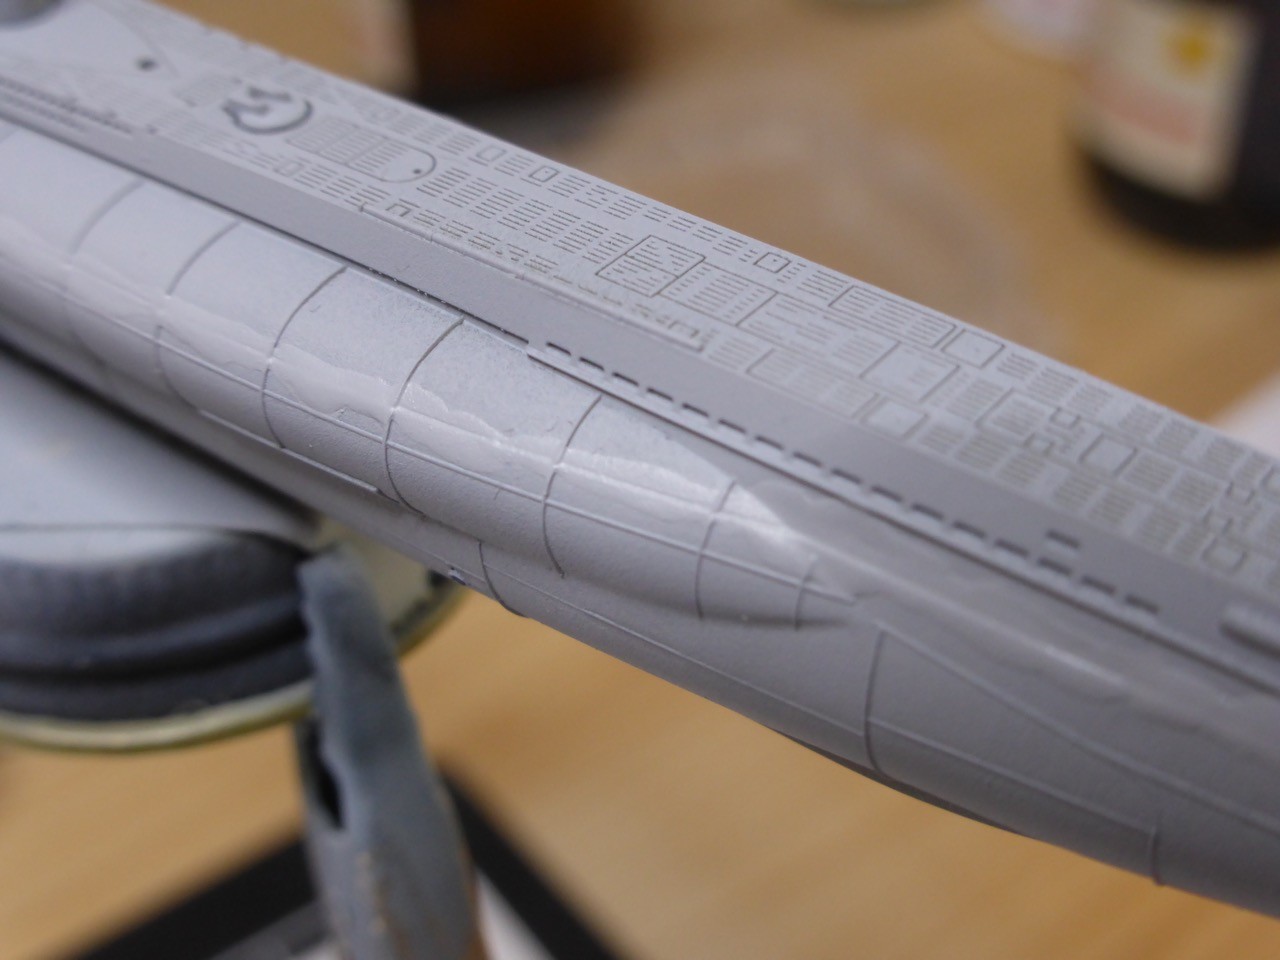
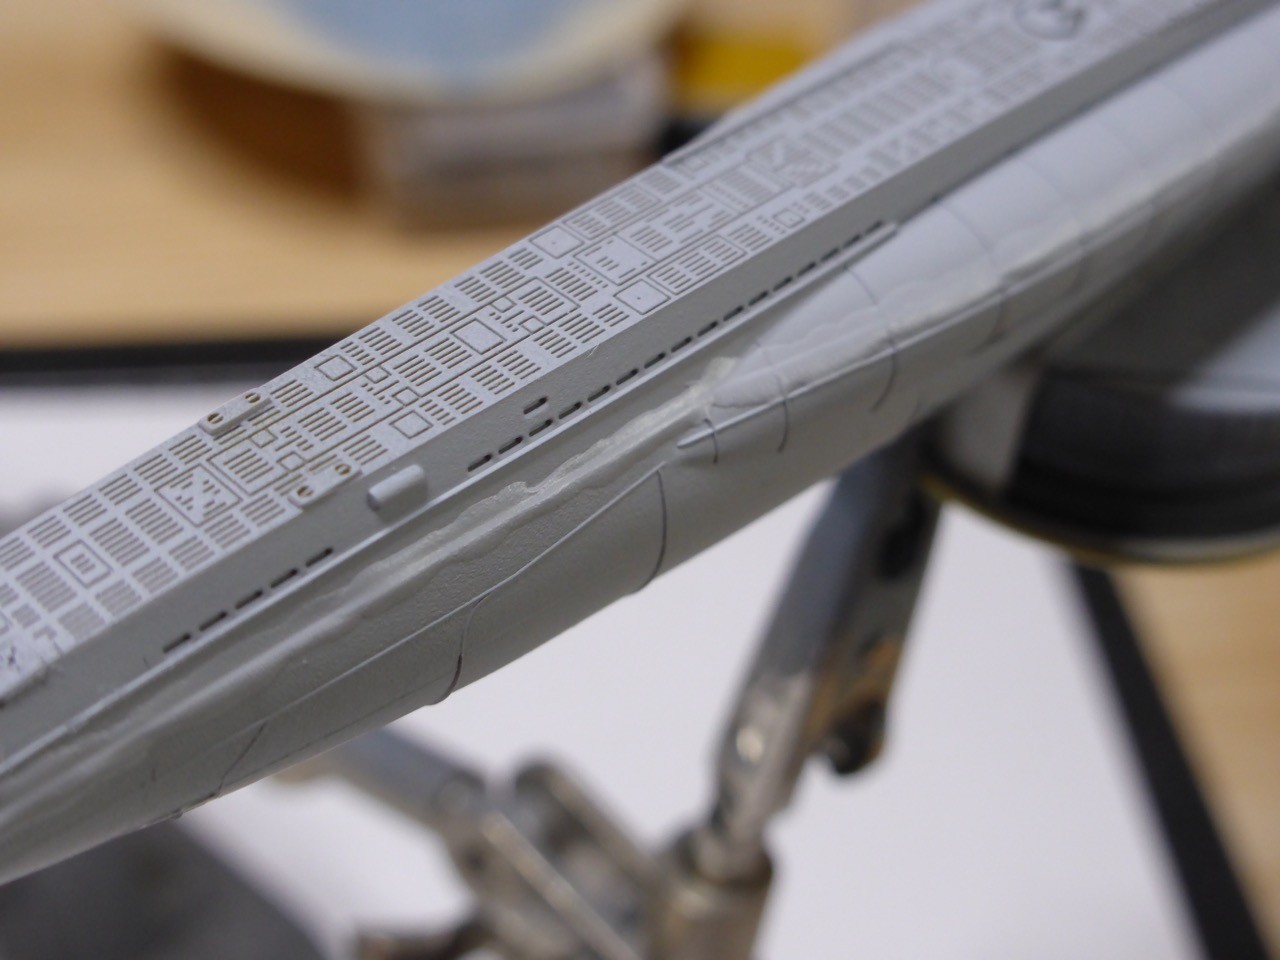
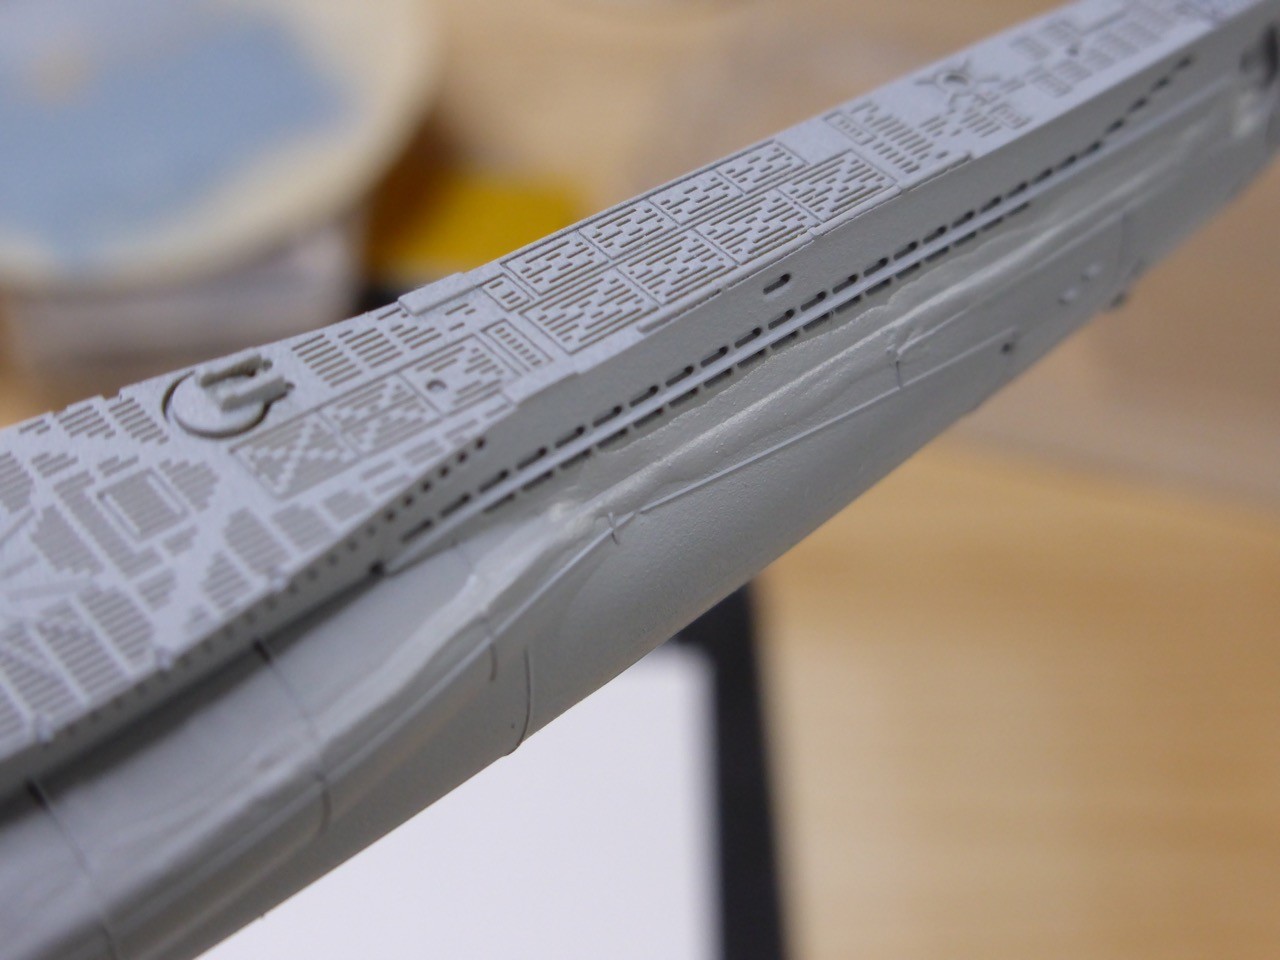
Some Mr.Surfacer 1200 sprayed on as base coat - this clearly shows the joint line between the lower and upper hull parts - not so nice...
After contemplating for a while whether to just ignore it and go on, I decided I had at least to mitigate the effect some and brushed on some Mr.Surfacer 500. No that requires some more layers, and sanding afterwards. I hope I manage without destroying the moulded on structure, which is quite nicely done...
So no builds without their specific challenges... will see during the next days where this leads me. Next update will be a little delayed, again off and away for some days next week and over the weekend.
Cheers and thanks for looking!
Jan

So here's a quick and small update, quite some non-modeling stuff going on over the weekend, limiting that bench time...
Glued the deck part first.
That went not as smooth as I desired - fumbled a little around the nose, so to hide that, I decided to open one tube and let a torpedo come out:
Some PE already in place, and more to follow, on the bow and stern parts. The Eduard set fits really nice, for that it is intended for a different kit!
Some Mr.Surfacer 1200 sprayed on as base coat - this clearly shows the joint line between the lower and upper hull parts - not so nice...
After contemplating for a while whether to just ignore it and go on, I decided I had at least to mitigate the effect some and brushed on some Mr.Surfacer 500. No that requires some more layers, and sanding afterwards. I hope I manage without destroying the moulded on structure, which is quite nicely done...
So no builds without their specific challenges... will see during the next days where this leads me. Next update will be a little delayed, again off and away for some days next week and over the weekend.
Cheers and thanks for looking!
Jan
BoiseBlade
#523
Joined: February 28, 2014
KitMaker: 342 posts
Model Shipwrights: 38 posts
Posted: Monday, April 25, 2016 - 02:27 AM UTC
Nice update Jan.
The torpedo coming will be a nice touch.
Also have fun sanding
The torpedo coming will be a nice touch.
Also have fun sanding
JJ1973
#345
Joined: August 22, 2011
KitMaker: 1,835 posts
Model Shipwrights: 1,832 posts
Posted: Monday, April 25, 2016 - 09:24 AM UTC
Thank you very much!!
And yes - the sanding will be 'fun' - pretty tiny stuff. Still not made up my mind whether I try to safe the moulded structure or if I try to replace it. The latter one would not only making the sanding process easier, but a lot more effective as well... But that will have to wait for a few days, no bench time yet
Cheers,
Jan

RussellE
#306

Joined: June 27, 2010
KitMaker: 3,959 posts
Model Shipwrights: 2,777 posts
Posted: Monday, April 25, 2016 - 05:29 PM UTC
Hi Jan
a nice start, but that's a real bummmer about the seam between upper and lower hull...
I did the Revell type VII C a few years back, and it is split down the centre-all the reviews i read at the time said the bronco kit was better, but now, not so certain?
a nice start, but that's a real bummmer about the seam between upper and lower hull...
I did the Revell type VII C a few years back, and it is split down the centre-all the reviews i read at the time said the bronco kit was better, but now, not so certain?

JJ1973
#345
Joined: August 22, 2011
KitMaker: 1,835 posts
Model Shipwrights: 1,832 posts
Posted: Monday, April 25, 2016 - 11:31 PM UTC
Thanks Russ!!
So why should it be only you with some 'minor' fitting issues?!? I was wondering why they had not just split the hull in to (left and right) halves? Well, the kit is nice, the molds are very crisp and the detail ist really good. But this gap... But nothing that can't be fixed!
Cheers,
Jan
So why should it be only you with some 'minor' fitting issues?!? I was wondering why they had not just split the hull in to (left and right) halves? Well, the kit is nice, the molds are very crisp and the detail ist really good. But this gap...
But nothing that can't be fixed!Cheers,
Jan
RussellE
#306
Joined: June 27, 2010
KitMaker: 3,959 posts
Model Shipwrights: 2,777 posts
Posted: Tuesday, April 26, 2016 - 02:40 AM UTC
Quoted Text
Thanks Russ!!
So why should it be only you with some 'minor' fitting issues?!? I was wondering why they had not just split the hull in to (left and right) halves? Well, the kit is nice, the molds are very crisp and the detail ist really good. But this gap...
Cheers,
Jan
Ah yes, we crazy modellers are always hungry for more punishment
I'm sure you'll find a way around this new challenge though. Have you tried using a scalpel to scrape the filler to the correct shape? Sharp scalpels are great for keeping details crisp, whilst not removing them-essentially you drag the blade sideways across the work piece, removing a sliver of material each time, until you achieve the shape you desire-this eliminates the need to use sand paper and the risk of removing details...
BoiseBlade
#523
Joined: February 28, 2014
KitMaker: 342 posts
Model Shipwrights: 38 posts
Posted: Wednesday, April 27, 2016 - 08:51 AM UTC
OK No Laughing........
But this is what I use to sand small places and by detail I do not want to mess up. I sand the large areas normally but then when I get up close to the detail. I use this, and keep swapping out the little sanding disks I cut out using a leather punch.
And Like you said Russell, "we crazy modellers " or modelers here in the states.
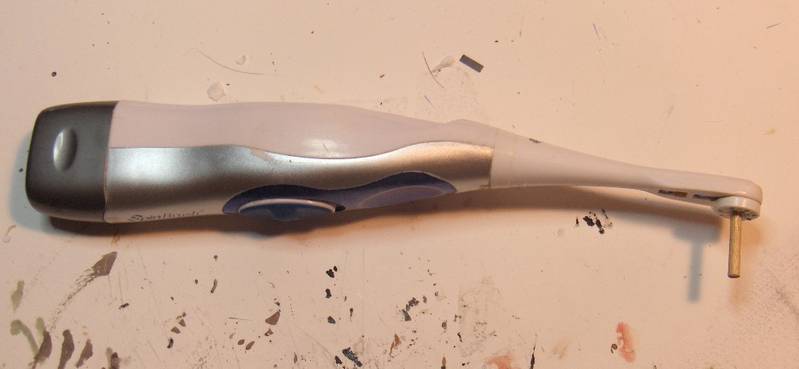
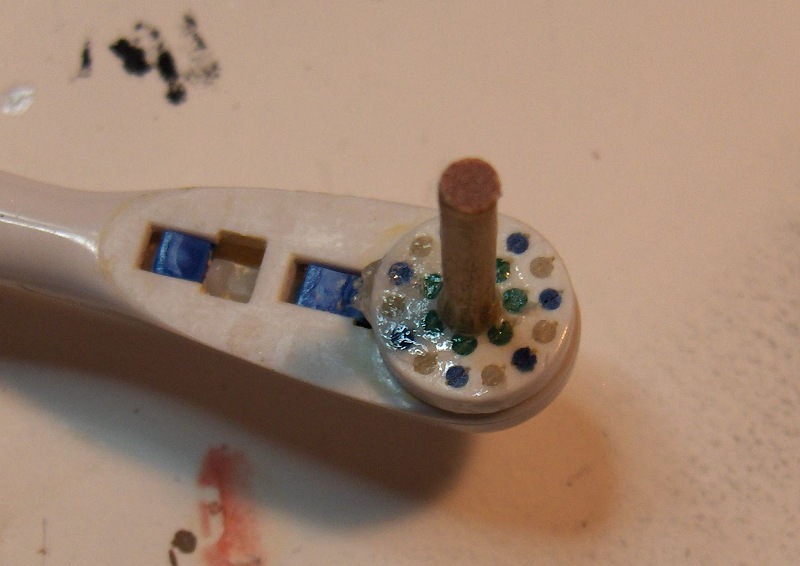
 |

WEB HOSTING BY


Copyright ©2021 Model Shipwrights and Kitmaker Network, a subsidiary of Silver Star Enterprises
All Rights Reserved. Please read our Conditions of Use and Privacy Policy.
All Rights Reserved. Please read our Conditions of Use and Privacy Policy.