Ships by Class/Type: Battleships
Topics from the Dreadnaught era to modern day.
Hosted by Steve Joyce
BISMARCK 1/350 Revell + Pontos.
JJ1973
#345
Visit this Community
Niedersachsen, Germany
Joined: August 22, 2011
KitMaker: 1,835 posts
Model Shipwrights: 1,832 posts
Posted: Saturday, May 28, 2016 - 10:00 PM UTC
That's very cool work on the sea chests there, Si!! That will really add some depth to the model!

Very nice progress - and somehow I am afraid that there's more to come later today or tomorrow...

Cheers,
Jan
RedDuster
Visit this Community
England - South East, United Kingdom
Joined: March 01, 2010
KitMaker: 7,078 posts
Model Shipwrights: 6,649 posts
Posted: Saturday, May 28, 2016 - 10:07 PM UTC
Thanks Jan,

You could well be right mate, just need to get the pics oof the camera.

It was either do something behind the grills or risk a see through ship.

Cheers

Si
RedDuster
Visit this Community
England - South East, United Kingdom
Joined: March 01, 2010
KitMaker: 7,078 posts
Model Shipwrights: 6,649 posts
Posted: Sunday, May 29, 2016 - 02:56 AM UTC
As it happens Jan, you were right!

Today's progress.

More minute etch on the outside of the hull. Starboard side fore and aft done.


Maindeck down, actually a very good fit.


Hatches and such done midships


Exterior paint on!


More soon.

Si
JJ1973
#345
Visit this Community
Niedersachsen, Germany
Joined: August 22, 2011
KitMaker: 1,835 posts
Model Shipwrights: 1,832 posts
Posted: Sunday, May 29, 2016 - 09:22 AM UTC
Why did I know it would happen?

Great progress on your Bismarck, Si - and I am a little envious about that clean and smooth hull...

Looks good with the deck fitted and your red primer on, looking forward to see more color!

Cheers,
Jan
RedDuster
Visit this Community
England - South East, United Kingdom
Joined: March 01, 2010
KitMaker: 7,078 posts
Model Shipwrights: 6,649 posts
Posted: Sunday, May 29, 2016 - 01:11 PM UTC
Thanks Jan,

You must be psychic.

Might be some more paint going on today... if the rain holds off.

Cheers

Si
RedDuster
Visit this Community
England - South East, United Kingdom
Joined: March 01, 2010
KitMaker: 7,078 posts
Model Shipwrights: 6,649 posts
Posted: Monday, May 30, 2016 - 12:09 AM UTC
Well the rain did hold off.

Masking the boot topping.


Sprayed citadel "Chaos Black".

The top edge of the boot topping masked,


and given a coat of mittlegrau.


colour, well shades of grey.... Soon

Si
RussellE
#306
Visit this Community
Victoria, Australia
Joined: June 27, 2010
KitMaker: 3,959 posts
Model Shipwrights: 2,777 posts
Posted: Monday, May 30, 2016 - 08:06 AM UTC
good rapid progress as usual, Si
JJ1973
#345
Visit this Community
Niedersachsen, Germany
Joined: August 22, 2011
KitMaker: 1,835 posts
Model Shipwrights: 1,832 posts
Posted: Monday, May 30, 2016 - 09:27 AM UTC
You are certainly keeping your shipyard workers busy - be aware of the union, mate
But serious - looks good! Shades of grey - I'd be interested to learn what color you used, it certainly looks right on your pictures! ...and a nice touch, that you're keeping your garden chairs in 'Mittelgrau' as well...

Cheers,
Jan
RedDuster
Visit this Community
England - South East, United Kingdom
Joined: March 01, 2010
KitMaker: 7,078 posts
Model Shipwrights: 6,649 posts
Posted: Monday, May 30, 2016 - 01:44 PM UTC
Hi Russ,

Thanks Mate, slowed down today, (off for the week, young Duster is home for half term), Raining, so no chance for spraying.

might get lucky tomorrow.

cheers

Si
RedDuster
Visit this Community
England - South East, United Kingdom
Joined: March 01, 2010
KitMaker: 7,078 posts
Model Shipwrights: 6,649 posts
Posted: Monday, May 30, 2016 - 01:49 PM UTC
Thanks Jan,

Must admit I was pleased with the result, I used Tamiya AS10 ocean grey straight out of the rattle can, it also comes in a jar, out of stock on the bench, so can't remember the XF No.

Cheers

Si
RedDuster
Visit this Community
England - South East, United Kingdom
Joined: March 01, 2010
KitMaker: 7,078 posts
Model Shipwrights: 6,649 posts
Posted: Tuesday, May 31, 2016 - 11:22 PM UTC
Masking off the mittlegrau ready to add the dunkelgrau.


sprayed TS48 (Gunship grey) which looked like a good match to me.


The masking off.


well down and including the boot topping.


I have sprayed a light gloss coat prior adding decals, no photo as it would not look much different from above.

Next job, the decals, might tackle that tomorrow.

Cheers

Si
JJ1973
#345
Visit this Community
Niedersachsen, Germany
Joined: August 22, 2011
KitMaker: 1,835 posts
Model Shipwrights: 1,832 posts
Posted: Wednesday, June 01, 2016 - 09:16 AM UTC
Once more very nice progress, Si!! Now you are really running ahead...

That was a close call their with your masking tape and the PE stairs on the stern...glad you didn't damage anything!

The Oceangrey, I tried to track it down, is that the one also called 2 RAF, and may be same as XF 82? Looks pretty good, and the contrast with the false bow as well!

Cheers,
Jan
Cosimodo
#335
Visit this Community
Auckland, New Zealand
Joined: September 03, 2013
KitMaker: 1,808 posts
Model Shipwrights: 871 posts
Posted: Wednesday, June 01, 2016 - 11:41 AM UTC
Hi Si,
Great paintwork. Are you going for the final scheme i.e. as at the sinking with the painted over effect on top of the black and white or just doing the B&W stripes?

cheers
Michael
RedDuster
Visit this Community
England - South East, United Kingdom
Joined: March 01, 2010
KitMaker: 7,078 posts
Model Shipwrights: 6,649 posts
Posted: Wednesday, June 01, 2016 - 01:03 PM UTC
Thanks Michael,

I am going for the painted over effect on the hull stripes, photographs of the ship at sea show the hull strips, as just about visible, but the superstructure completely painted out.

That is going to be a challenge to my airbrushing skills.

Next job, the decals, the kit provides some very nice stripes and false bow and stern waves. (might bottle the stern wave as I think it might cover some of the iron ladders.

Cheers

Si
RedDuster
Visit this Community
England - South East, United Kingdom
Joined: March 01, 2010
KitMaker: 7,078 posts
Model Shipwrights: 6,649 posts
Posted: Thursday, June 02, 2016 - 01:57 AM UTC
Today's progress,

All the masking removed, revealed a slight error in the masking. fix under way. a bit of work the hairy stick.


and done.


The strip decals on. a little thick, but went down well without any coaxing.


The false stern wave hand painted in.


I have also hand touched in the grey over the boot topping.

Next job another matt coat and then remasking, then the windy stick comes out of winter hibernation.

Cheers

Si
TRM5150
Visit this Community
Massachusetts, United States
Joined: January 03, 2010
KitMaker: 2,159 posts
Model Shipwrights: 1,400 posts
Posted: Saturday, June 04, 2016 - 06:04 AM UTC
I just chimed in on the campaign thread, but this is certainly worth a second coming....things are looking great Si! Enjoy that camo painting (not one of my favorite things to do at all)! Keep it going my friend!
RedDuster
Visit this Community
England - South East, United Kingdom
Joined: March 01, 2010
KitMaker: 7,078 posts
Model Shipwrights: 6,649 posts
Posted: Saturday, June 04, 2016 - 03:13 PM UTC
Thanks Todd, not mine either, (Partly why I chose this scheme) Masking is not may favourite.

Nearly done now,

Cheers
Si
RedDuster
Visit this Community
England - South East, United Kingdom
Joined: March 01, 2010
KitMaker: 7,078 posts
Model Shipwrights: 6,649 posts
Posted: Saturday, June 04, 2016 - 03:34 PM UTC
Masked up ready for the overspray.


Done.


Remasked ready to do the deck details.


Sprayed Hellgrau, and finally all the masking off, just the false bow wave to paint in then the screws and it will be time for deck down.

Will redo that pic, as it is not clear.

Cheers

Si

Si
JJ1973
#345
Visit this Community
Niedersachsen, Germany
Joined: August 22, 2011
KitMaker: 1,835 posts
Model Shipwrights: 1,832 posts
Posted: Saturday, June 04, 2016 - 10:12 PM UTC
Hi Si,

as far as I can tell from the pictures, the effect looks pretty much spot on!
Nice work! -and somehow I don't believe the Bismarck will take you a full year...

Cheers,
Jan
RedDuster
Visit this Community
England - South East, United Kingdom
Joined: March 01, 2010
KitMaker: 7,078 posts
Model Shipwrights: 6,649 posts
Posted: Sunday, June 05, 2016 - 03:15 AM UTC
Hi Jan,

Thanks Mate, I am quite pleased, so far.

I have had the advantage of a week off with the ability to get in the workshop for a couple for hours most days. I reckon at least 10 months minimum, with the amount of stuff in the pontos set.

The Duke took me nine months, and that set have 5 sheets of etch, this has eight, and more resin.

Cheers

Si

JJ1973
#345
Visit this Community
Niedersachsen, Germany
Joined: August 22, 2011
KitMaker: 1,835 posts
Model Shipwrights: 1,832 posts
Posted: Sunday, June 05, 2016 - 09:29 AM UTC
Wow, was that really NINE months you were working at your DoY?!? Didn't seem that long to me... And the Pontos set has quite a lot of stuff in it - okay, I see, maybe it'll take you some time then

Cheers Mate,
Jan
RedDuster
Visit this Community
England - South East, United Kingdom
Joined: March 01, 2010
KitMaker: 7,078 posts
Model Shipwrights: 6,649 posts
Posted: Monday, June 06, 2016 - 02:06 AM UTC
It was actually almost 10 months Jan,

Keel laid 3rd May 2014, commissioned 28th Feb 2015.

Looking at that I am wondering if I have bitten off more than I can chew.

We will find out.

Cheers

Si
RedDuster
Visit this Community
England - South East, United Kingdom
Joined: March 01, 2010
KitMaker: 7,078 posts
Model Shipwrights: 6,649 posts
Posted: Monday, June 06, 2016 - 02:17 AM UTC
Right, yesterday,s progress,

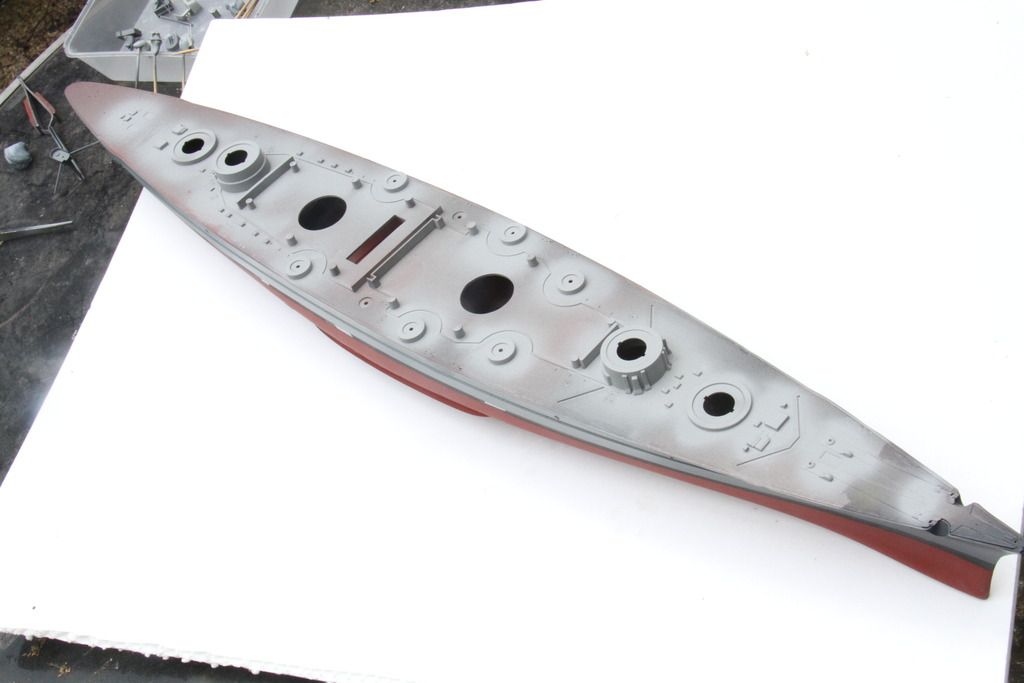
A better shot of the barbettes with colour on.


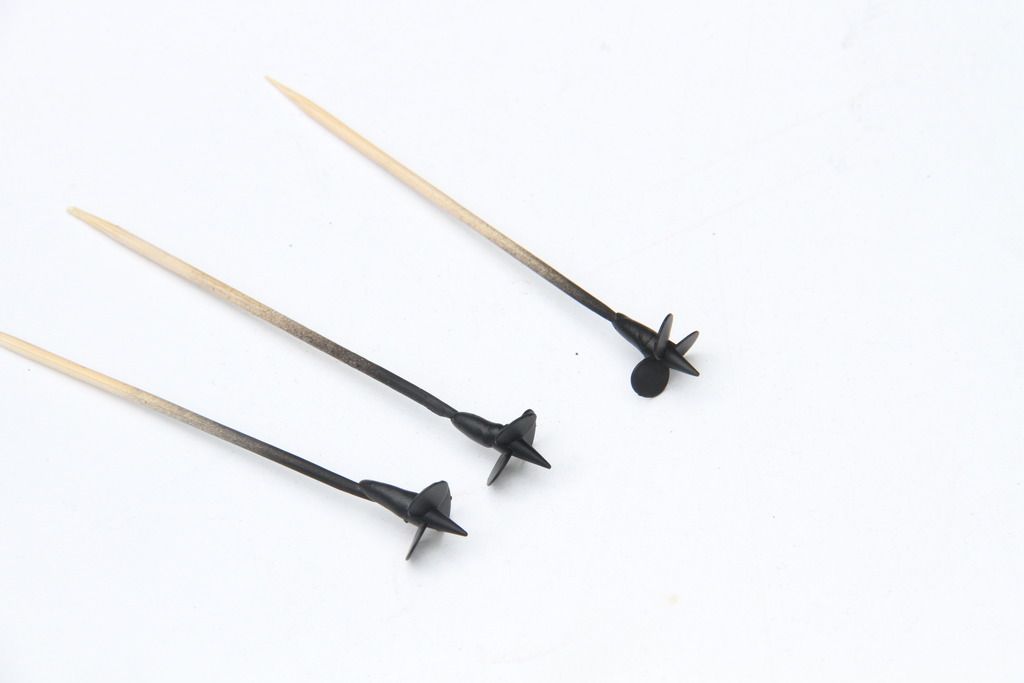
The screws base coated black.


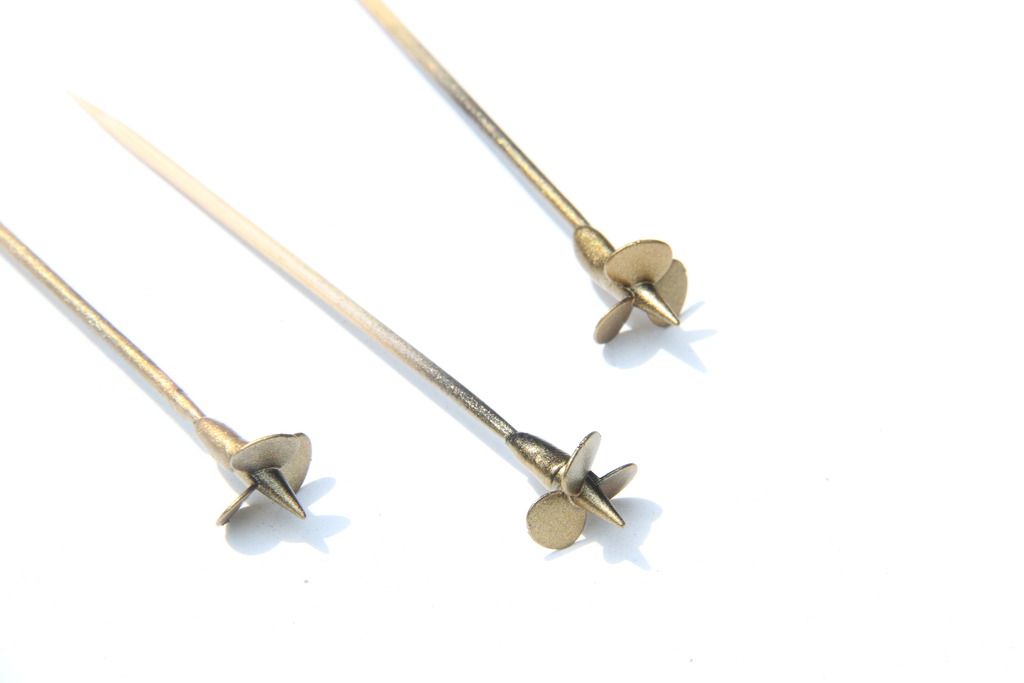
sprayed humbrol 54 "Brass"


False bow wave painted in.


screws on, also little bumps on the rudder painted (decals provided, but I didn't fancy trying to sit those down.


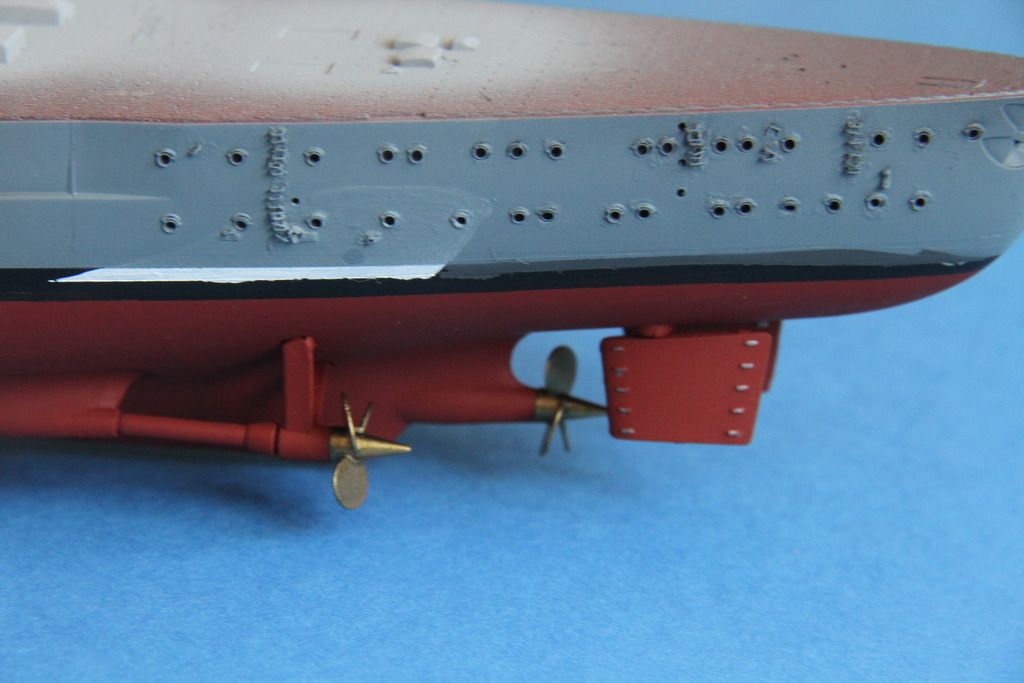
Little tidy up needed as well.

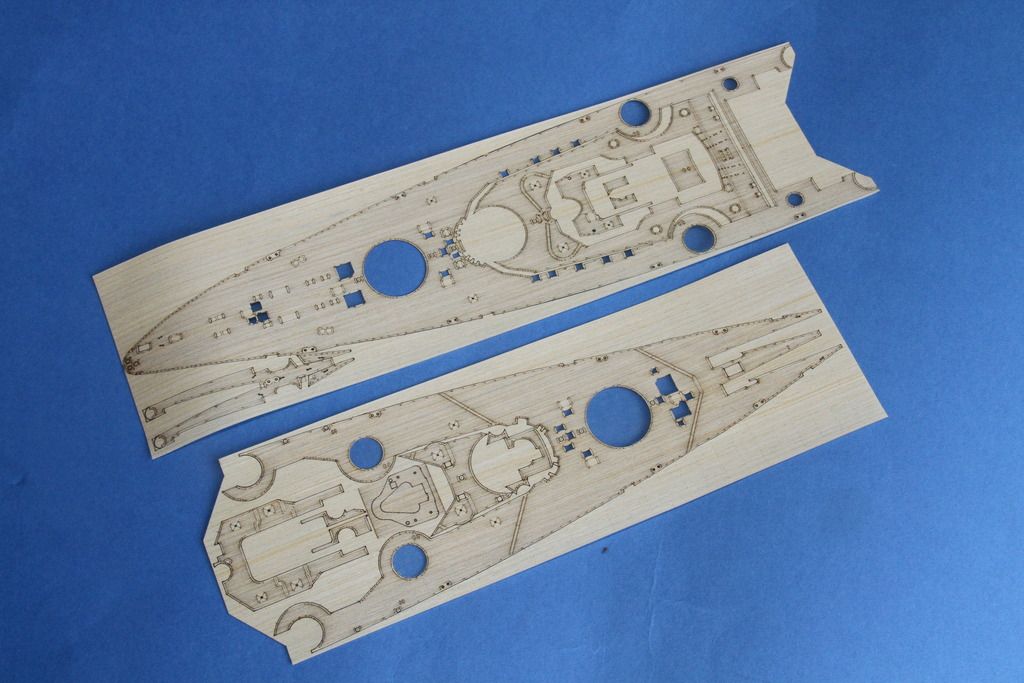
Main deck sections readied for fitting.


in place.


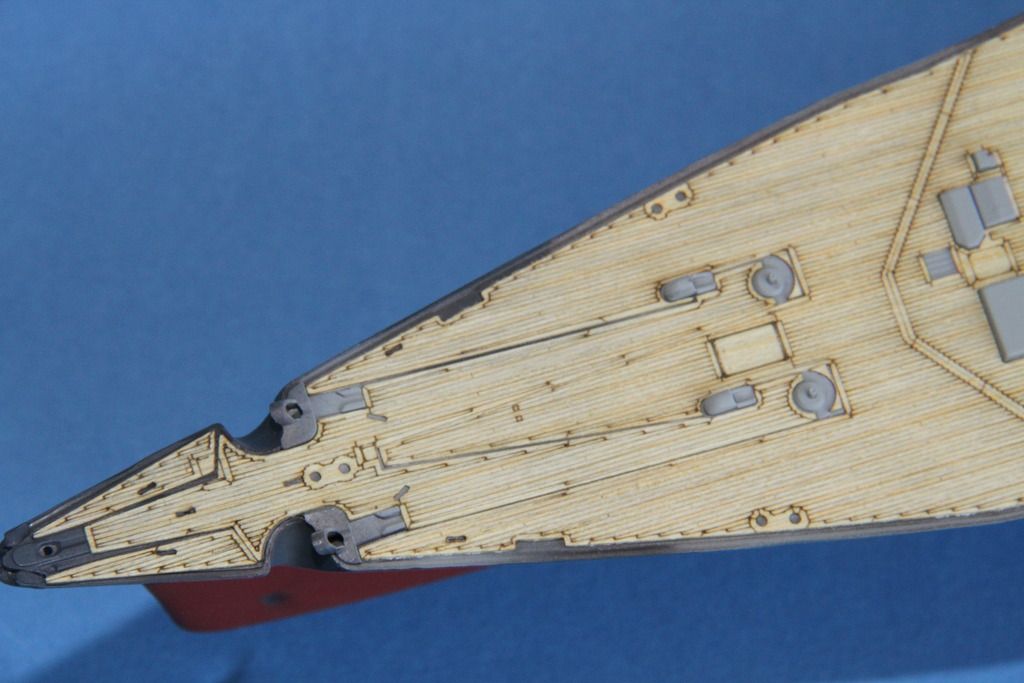
Close up of the anchor ways, going to be fun masking the air recognition markings over those bumps


The Pontos set does include masks, I have put a couple mist coats of flat clear over the deck to seal it. That is next weekend's project.

Cheers

Si
warshipbuild
Visit this Community
United Kingdom
Joined: June 06, 2006
KitMaker: 222 posts
Model Shipwrights: 207 posts
Posted: Monday, June 06, 2016 - 04:00 AM UTC
Nice job.
Chaps, if you were going to waterline the hull, would you do the 2 halves separately, or join them together first and then make the cut?

Also, what is the best method/tool to do the job?

I watched one online build of the Trumpeter Queen Elizabeth and the builder ended up scrapping the lower hull altogether because the waterlining didn't go to plan.
TRM5150
Visit this Community
Massachusetts, United States
Joined: January 03, 2010
KitMaker: 2,159 posts
Model Shipwrights: 1,400 posts
Posted: Monday, June 06, 2016 - 05:03 AM UTC
Boy that comes to life with the wood in place! Looks great Si! Wishing you luck on the markings!!