

What Tim said,
Love the 1:1 pictures. and your work in such a small cscale is impressive.
Cheers
Si


Go to modelshipwrights.com for the current dynamic site!
Ships by Class/Type: Frigates
This is for topics on modern Frigates. For the sailing variety they should still go under Sailing.
This is for topics on modern Frigates. For the sailing variety they should still go under Sailing.
Hosted by Jim Starkweather
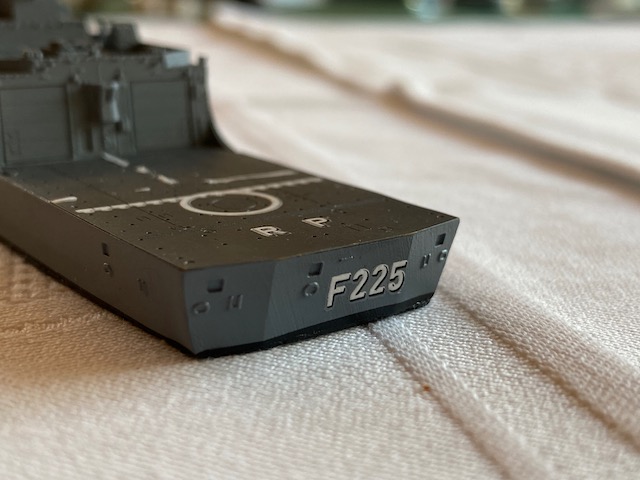
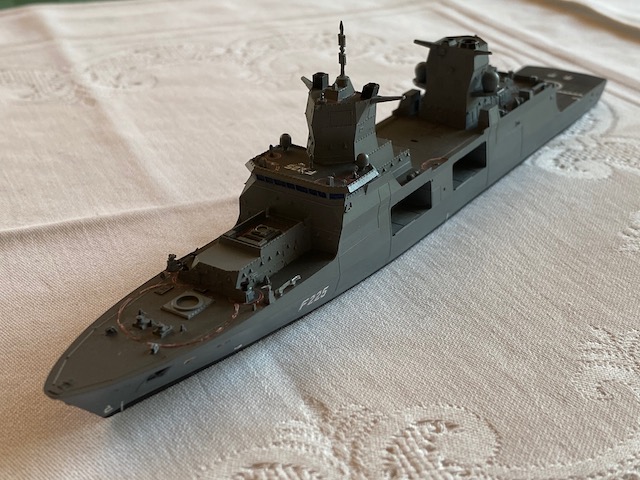
F225 Rheinland-Pfalz German Navy 1/700

RedDuster

Joined: March 01, 2010
KitMaker: 7,078 posts
Model Shipwrights: 6,649 posts

Posted: Sunday, March 29, 2020 - 06:50 AM UTC

RussellE

#306

Joined: June 27, 2010
KitMaker: 3,959 posts
Model Shipwrights: 2,777 posts

Posted: Sunday, March 29, 2020 - 02:38 PM UTC
Quoted Text
I did manage a little bit on the 1/700 though, mainly touch ups and build helicopters - I will post a small update the next days.
Cheers and thanks
Jan
Looking forward to it, mate


JJ1973
#345

Joined: August 22, 2011
KitMaker: 1,835 posts
Model Shipwrights: 1,832 posts
Posted: Monday, March 30, 2020 - 04:05 AM UTC
Tim, Russ and Si,
thank you very much!
- well, time off is one thing (Not too much, but in port, there is free time. Especially since 'in port' means 'on the ship' as due to Corona/CoVID 19 everything is shut in town, and for now the only reasonable thing to do is, to stay home, or in this case, on board. But I can't bring my model shipyard on board, but hey, there's an idea - probably I could do decals and stuff like that in my stateroom on the ship have to think about it.) So for now it's all home construction on the weekends, after/between laundry and all the other stuff to be done, and I'm not home every weekend. That's essentially why progress is so slow...
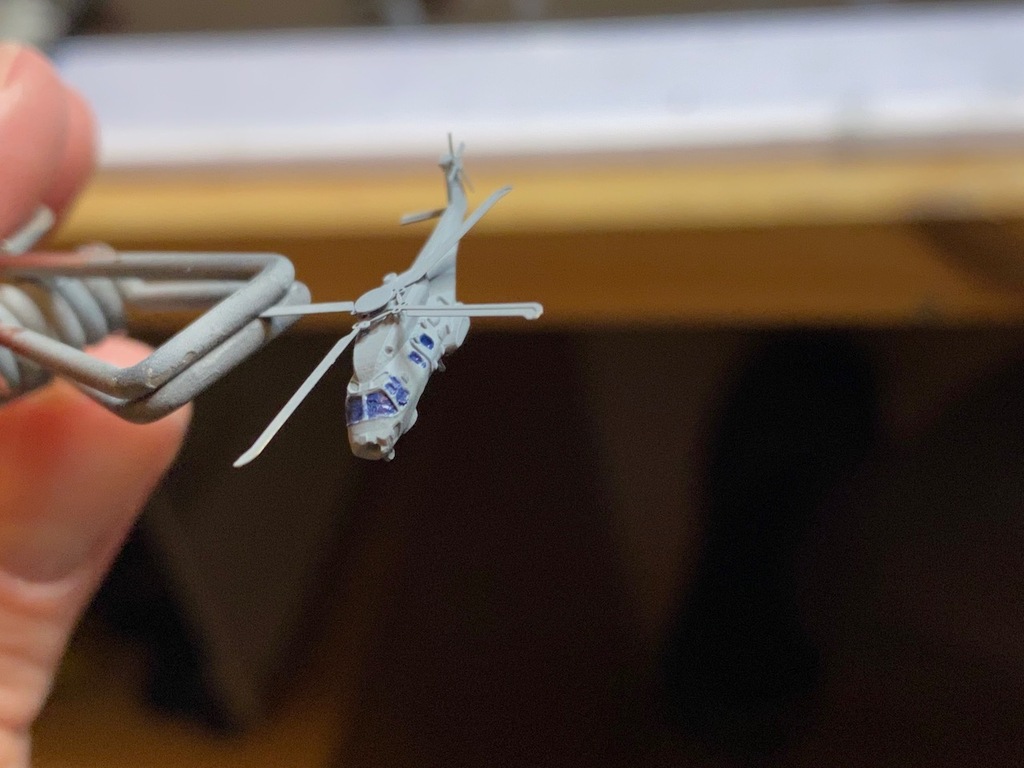
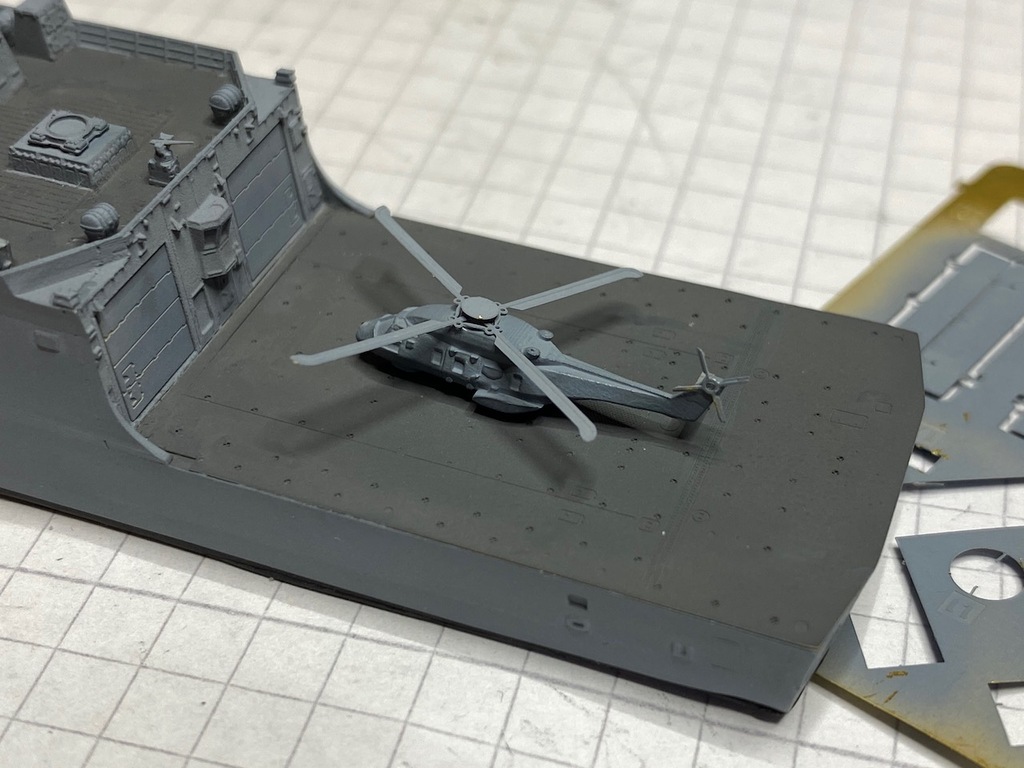
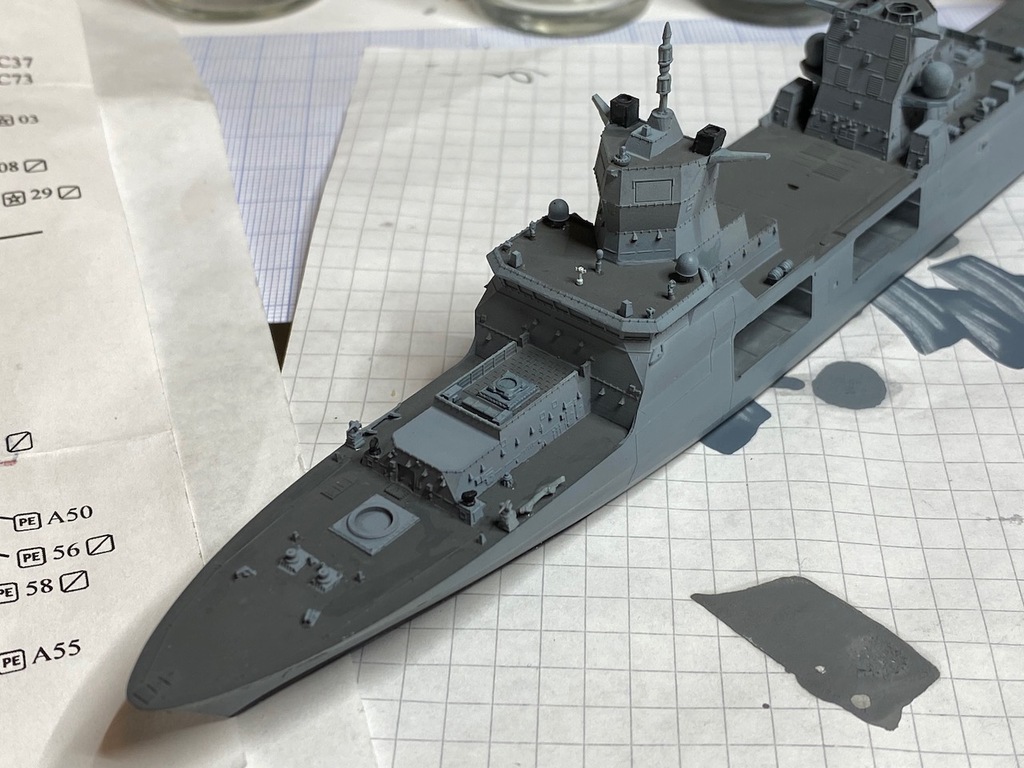
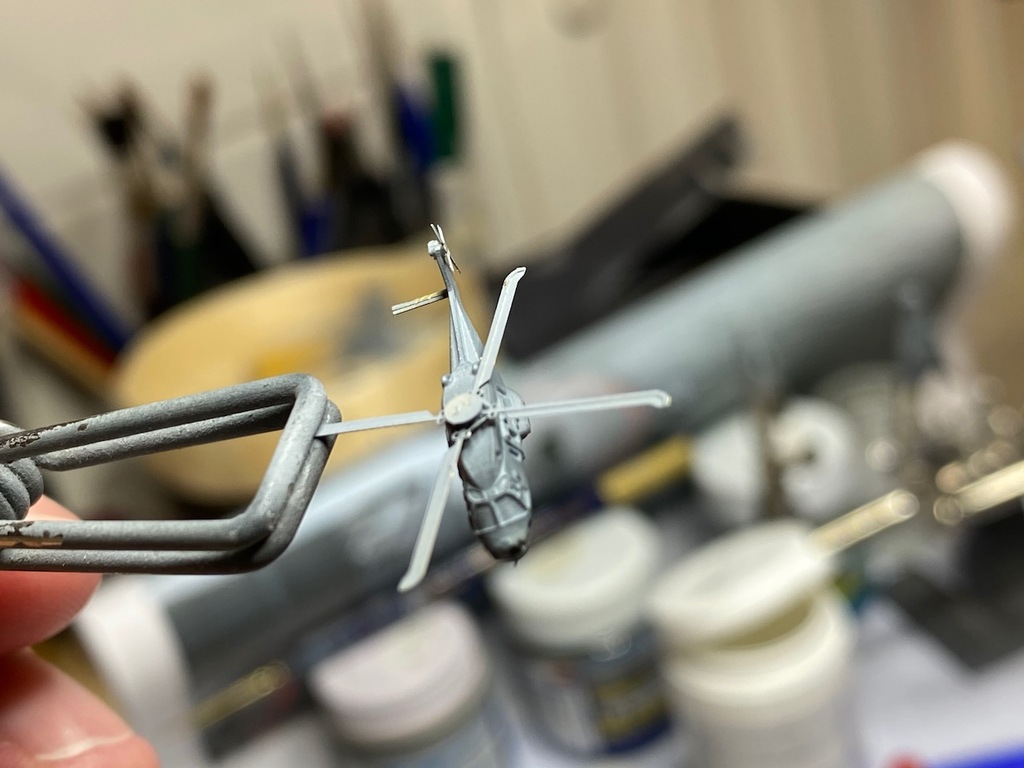
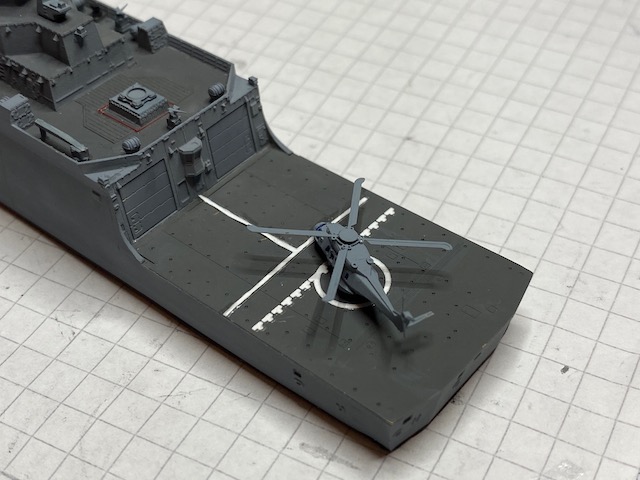
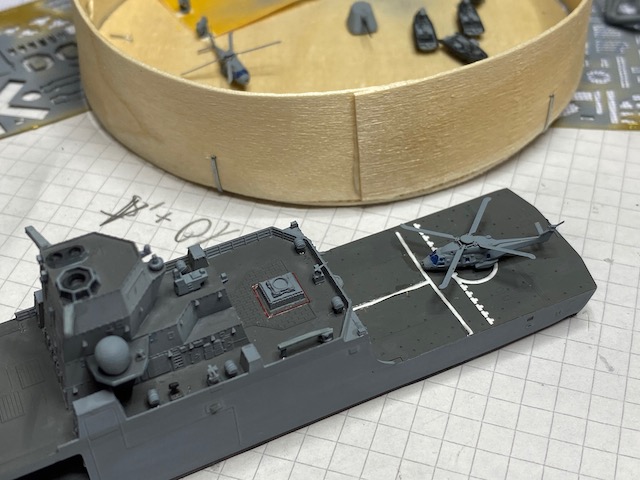
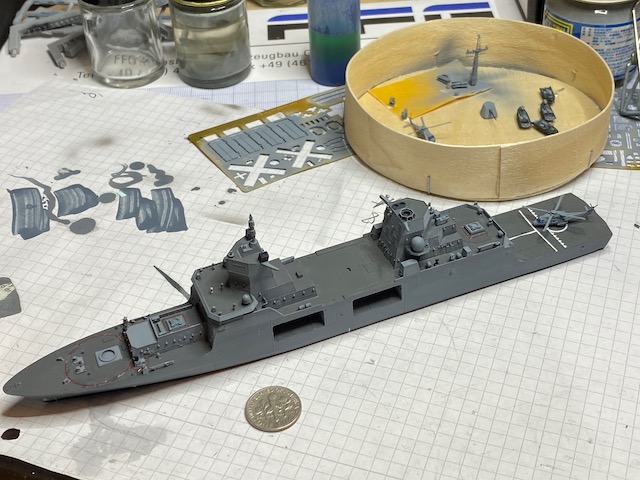
But here are some pictures. Somehow imageshack is playing tricks on me, uploading works, but I can't see the preview of the pics. So here are 12 pictures, I have no clue in what order. I built the last big sub-assemblies, the helos. On one I started painting the windows with a hairy stick, same for the bridge windows on the ship. That all needs touch ups, overpainted window frames and the like.
For effect, on of the helos on the flight deck, and the massive dime with the helos.
There's a chance I'll be home next weekend, or at least over easter. So possibly next week some more, but I can't promise.
Thanks for looking in!
Cheers
Jan
thank you very much!
Quoted Text
Hi Jan,
Great progress on the model, and thanks for the 1/1 scale shots too! Do you have any off time on board to work on the model, or is that all at home construction? I'll bet your crew would be amused with the 1/700 version!
- well, time off is one thing (Not too much, but in port, there is free time. Especially since 'in port' means 'on the ship' as due to Corona/CoVID 19 everything is shut in town, and for now the only reasonable thing to do is, to stay home, or in this case, on board. But I can't bring my model shipyard on board, but hey, there's an idea - probably I could do decals and stuff like that in my stateroom on the ship
have to think about it.) So for now it's all home construction on the weekends, after/between laundry and all the other stuff to be done, and I'm not home every weekend. That's essentially why progress is so slow...But here are some pictures. Somehow imageshack is playing tricks on me, uploading works, but I can't see the preview of the pics. So here are 12 pictures, I have no clue in what order. I built the last big sub-assemblies, the helos. On one I started painting the windows with a hairy stick, same for the bridge windows on the ship. That all needs touch ups, overpainted window frames and the like.
For effect, on of the helos on the flight deck, and the massive dime with the helos.
There's a chance I'll be home next weekend, or at least over easter. So possibly next week some more, but I can't promise.
Thanks for looking in!
Cheers
Jan
RussellE
#306
Joined: June 27, 2010
KitMaker: 3,959 posts
Model Shipwrights: 2,777 posts
Posted: Monday, March 30, 2020 - 09:31 PM UTC
Wow! Those dimes just makes us appreciate just how small and intricate the work on the helos is!
Nicely done mate! Hope you are all staying safe and keeping out of harms way!
Nicely done mate! Hope you are all staying safe and keeping out of harms way!
JJ1973
#345
Joined: August 22, 2011
KitMaker: 1,835 posts
Model Shipwrights: 1,832 posts
Posted: Friday, April 03, 2020 - 01:25 AM UTC
Hi Russ,
thank you very much, mate!!
I hope to get something done Sat/Sun...so possible update in a few days.
1:1 sitting in Hamburg meanwhile.
Cheers
Jan
thank you very much, mate!!
I hope to get something done Sat/Sun...so possible update in a few days.
1:1 sitting in Hamburg meanwhile.
Cheers
Jan

StephenLarsen
#474

Joined: June 13, 2015
KitMaker: 67 posts
Model Shipwrights: 41 posts
Posted: Friday, April 10, 2020 - 01:01 PM UTC
Love it. Really looks good.
JJ1973
#345
Joined: August 22, 2011
KitMaker: 1,835 posts
Model Shipwrights: 1,832 posts
Posted: Saturday, April 25, 2020 - 07:43 AM UTC
Steve, thank you very much!
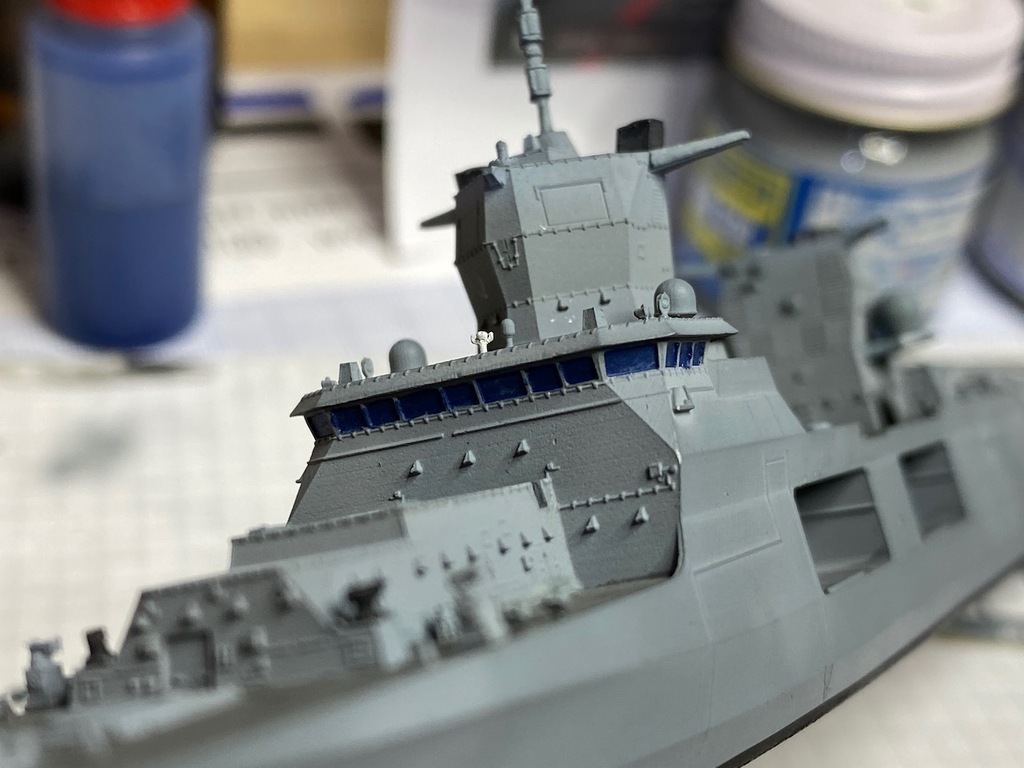
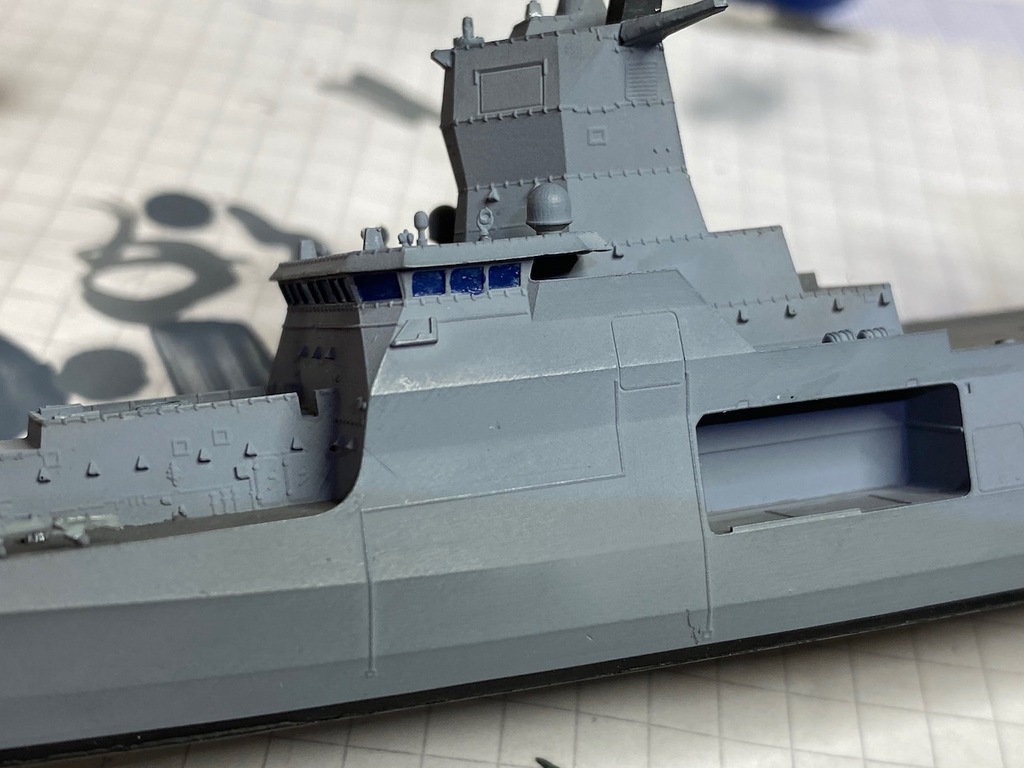
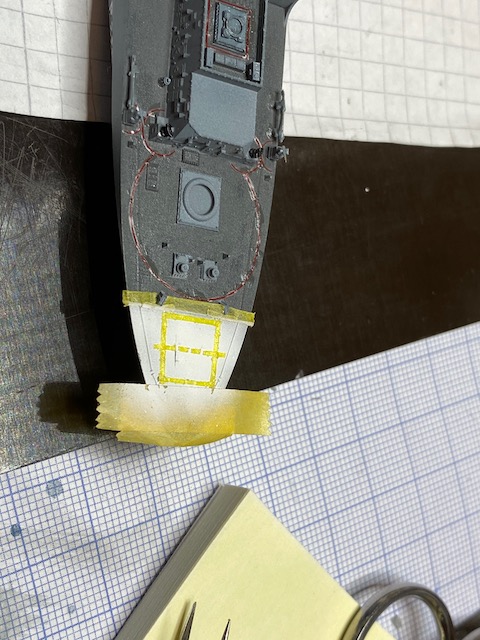
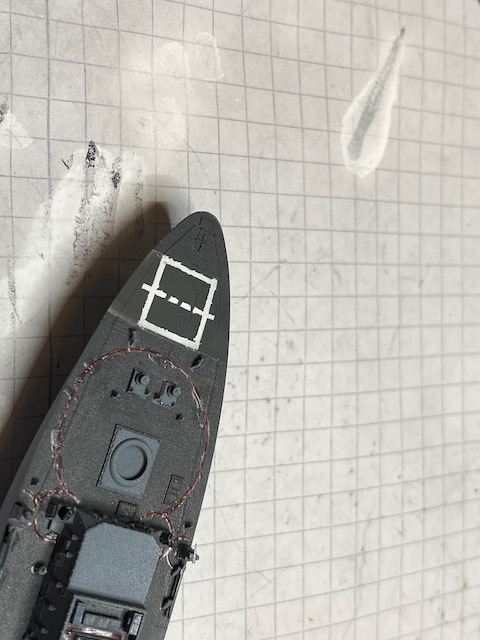
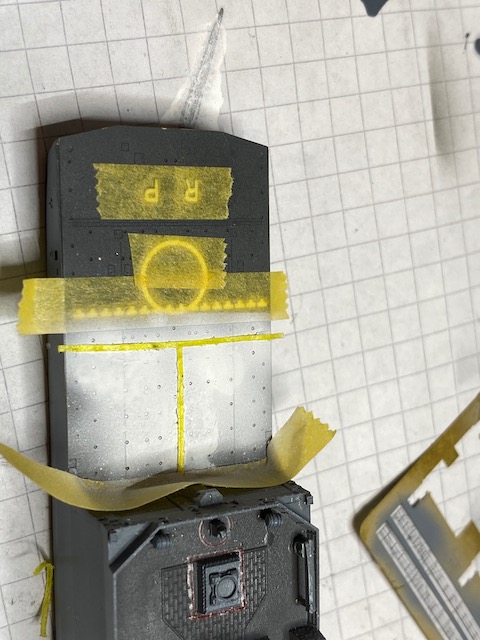
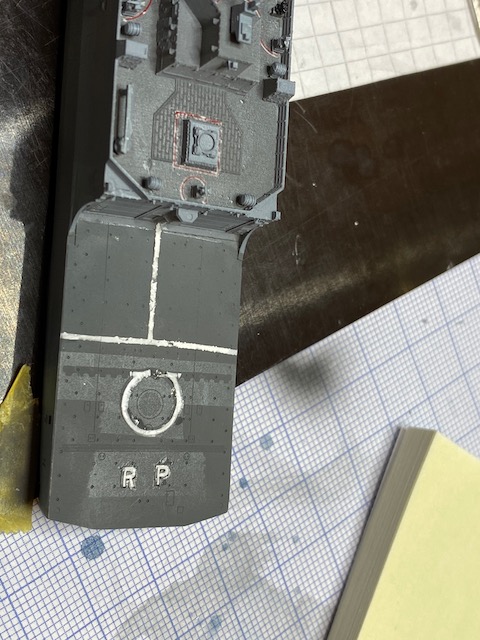
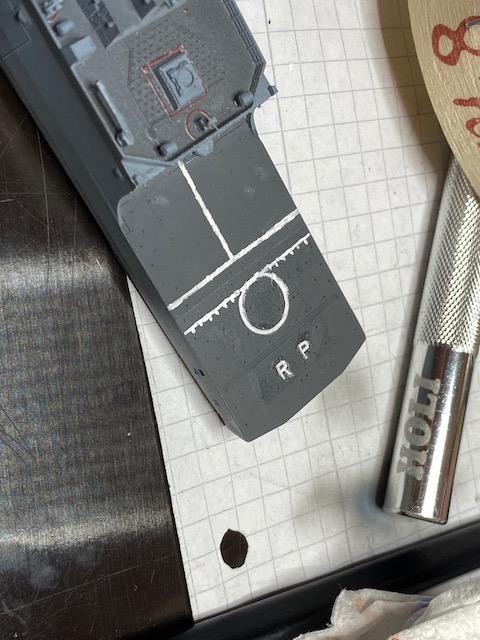
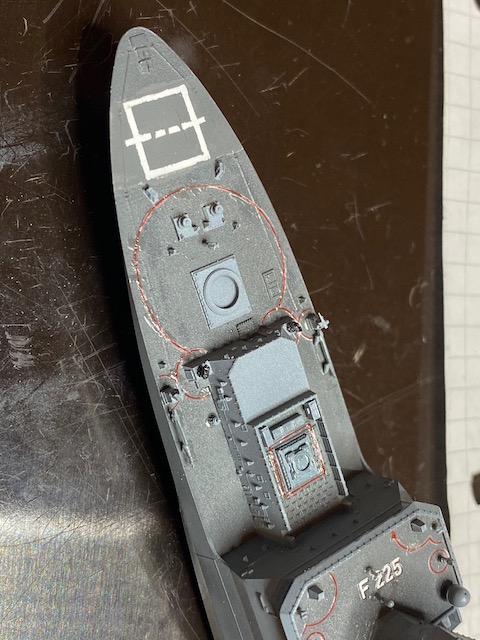
Now, this is a very much delayed post, summarizing up the on- and off- work I got accomplished over the last weeks. Mainly it's decals, and I don't really appreciate them, even in 1/350. In 1/700, they are a real challenge for me, and didn't go without some losses. So here's some pictures without much words.
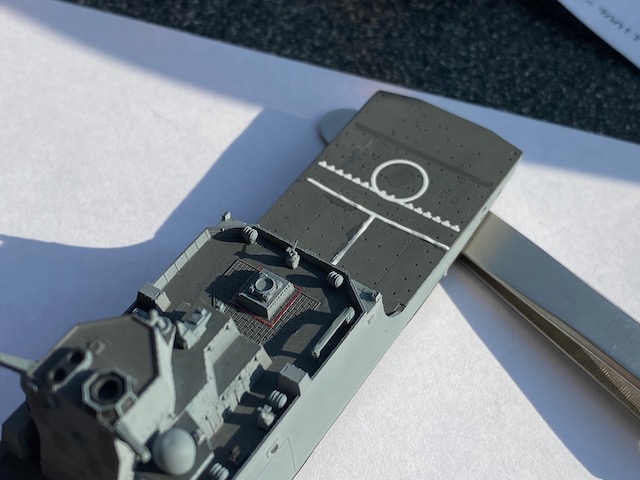


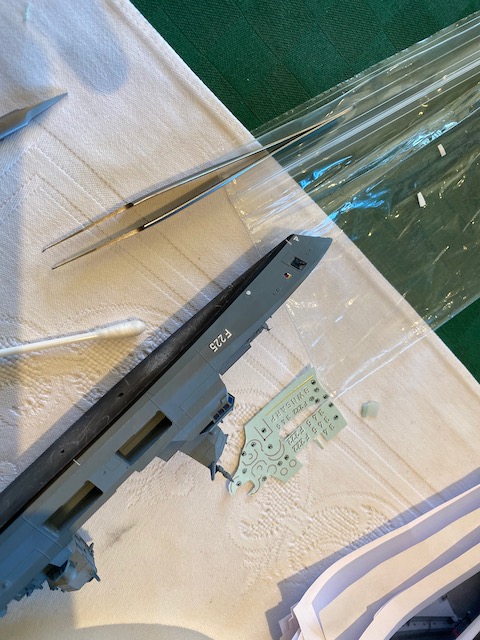
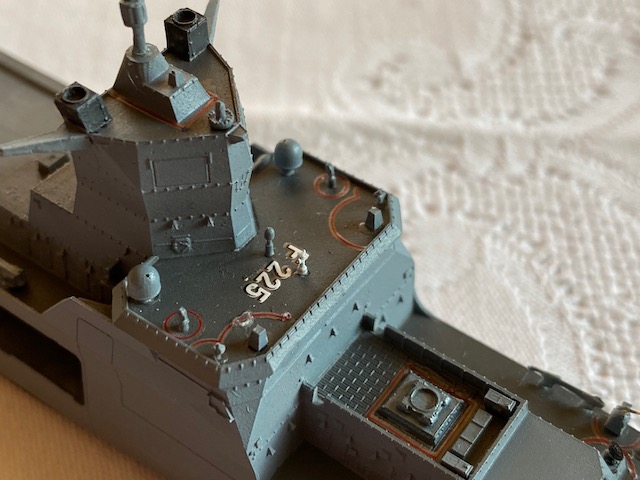
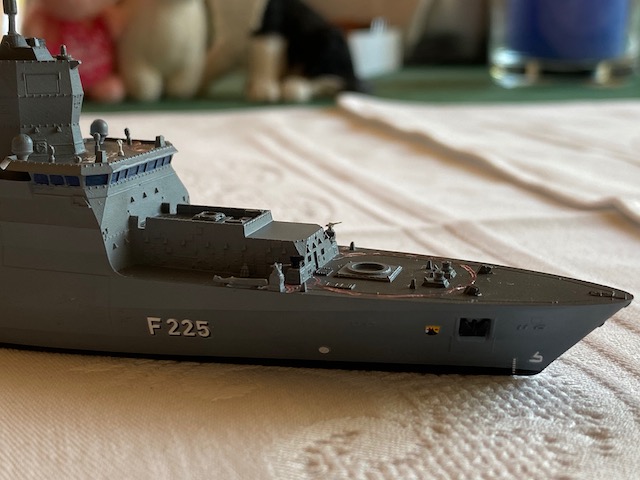

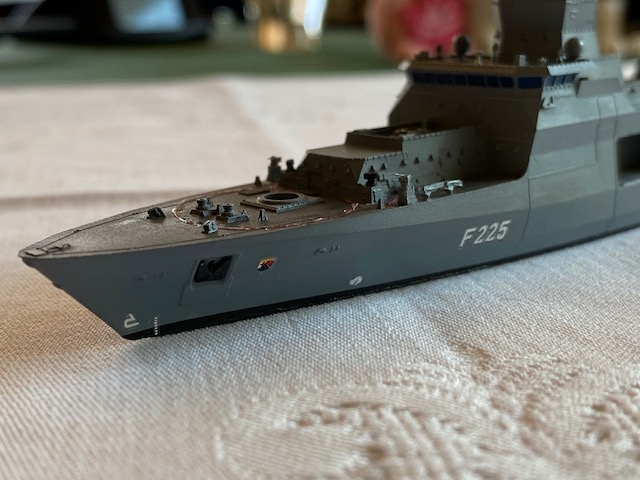
And then, on step forward, one step back... a few decals terminated, and the winch place forward missing. Attemting to mask and spray were partly successful, all need touch ups and I lost decals on the flight deck. Well...

So 1:1 in combination with that Corona thing keeps me busy (all healthy so far, though...), I'll see when I find time for the touch ups and more progress.
Thank you all for lookin in and especially thank you for your comments!!
Cheers
Jan
Now, this is a very much delayed post, summarizing up the on- and off- work I got accomplished over the last weeks. Mainly it's decals, and I don't really appreciate them, even in 1/350. In 1/700, they are a real challenge for me, and didn't go without some losses. So here's some pictures without much words.
And then, on step forward, one step back... a few decals terminated, and the winch place forward missing. Attemting to mask and spray were partly successful, all need touch ups and I lost decals on the flight deck. Well...
So 1:1 in combination with that Corona thing keeps me busy (all healthy so far, though...), I'll see when I find time for the touch ups and more progress.
Thank you all for lookin in and especially thank you for your comments!!
Cheers
Jan

TimReynaga
Joined: May 03, 2006
KitMaker: 2,500 posts
Model Shipwrights: 1,830 posts
Posted: Saturday, April 25, 2020 - 12:59 PM UTC
Hi Jan,
FF225 is looking great! I feel ya on the decal challenges - I had no end of fussing with my 1/1200 scale USS Enterprise flight deck lines. You seem to have solved your markings issues, but if you are still dissatisfied, I had good luck with Woodland Scenics Dry Transfer Decals MG760 White Stripes (.010 inch for the centerline, .022 inch for the dashed lines):

The test lines were thin, consistent, and nice and sharp...
FF225 is looking great! I feel ya on the decal challenges - I had no end of fussing with my 1/1200 scale USS Enterprise flight deck lines. You seem to have solved your markings issues, but if you are still dissatisfied, I had good luck with Woodland Scenics Dry Transfer Decals MG760 White Stripes (.010 inch for the centerline, .022 inch for the dashed lines):
The test lines were thin, consistent, and nice and sharp...

TimReynaga
Joined: May 03, 2006
KitMaker: 2,500 posts
Model Shipwrights: 1,830 posts
Posted: Saturday, April 25, 2020 - 01:09 PM UTC
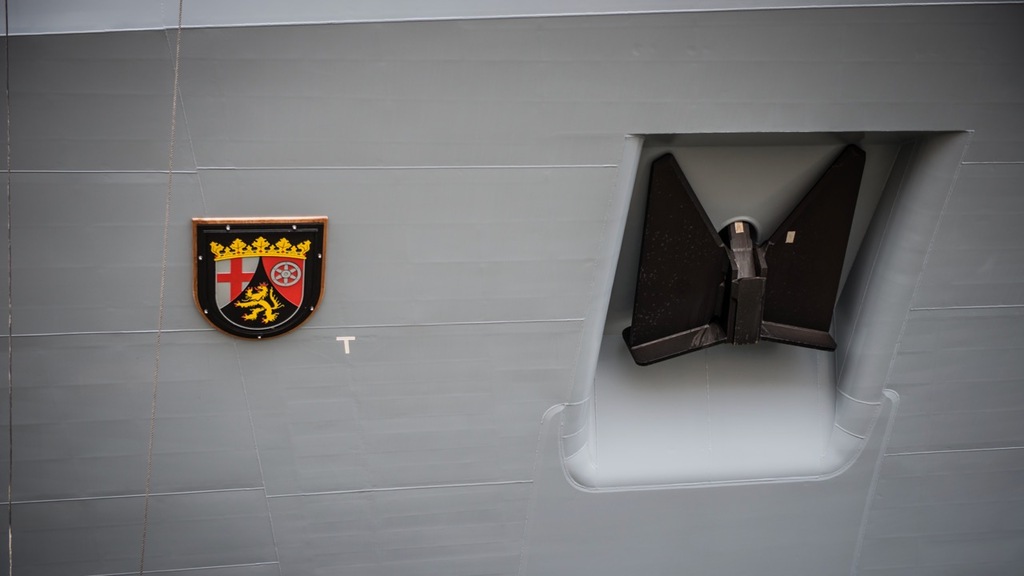
By the way, I like the decal aft of the anchor:
Is it a crest?
Is it a crest?
RussellE
#306
Joined: June 27, 2010
KitMaker: 3,959 posts
Model Shipwrights: 2,777 posts
Posted: Saturday, April 25, 2020 - 09:45 PM UTC
Great work on the decals Jan! 
They are tricky at the best of times. Almost as pesky as PE sometimes!
The shield looks great-the coat of arms of Rheinland-Pfalz?
Nearly there now mate. Get those clear coats on to seal in all those great details (and decals)...
They are tricky at the best of times. Almost as pesky as PE sometimes!
The shield looks great-the coat of arms of Rheinland-Pfalz?
Nearly there now mate. Get those clear coats on to seal in all those great details (and decals)...

d6mst0
#453
Joined: August 28, 2016
KitMaker: 1,925 posts
Model Shipwrights: 1,298 posts

Posted: Sunday, April 26, 2020 - 03:53 AM UTC
Jan,
Feel your pain with those decals. Nothing worse than having them come apart during installation and not have backups.
Mark
Feel your pain with those decals. Nothing worse than having them come apart during installation and not have backups.
Mark
JJ1973
#345
Joined: August 22, 2011
KitMaker: 1,835 posts
Model Shipwrights: 1,832 posts
Posted: Sunday, April 26, 2020 - 05:45 AM UTC
Tim, Russ and Mark,
thank you so much for your kind comments!
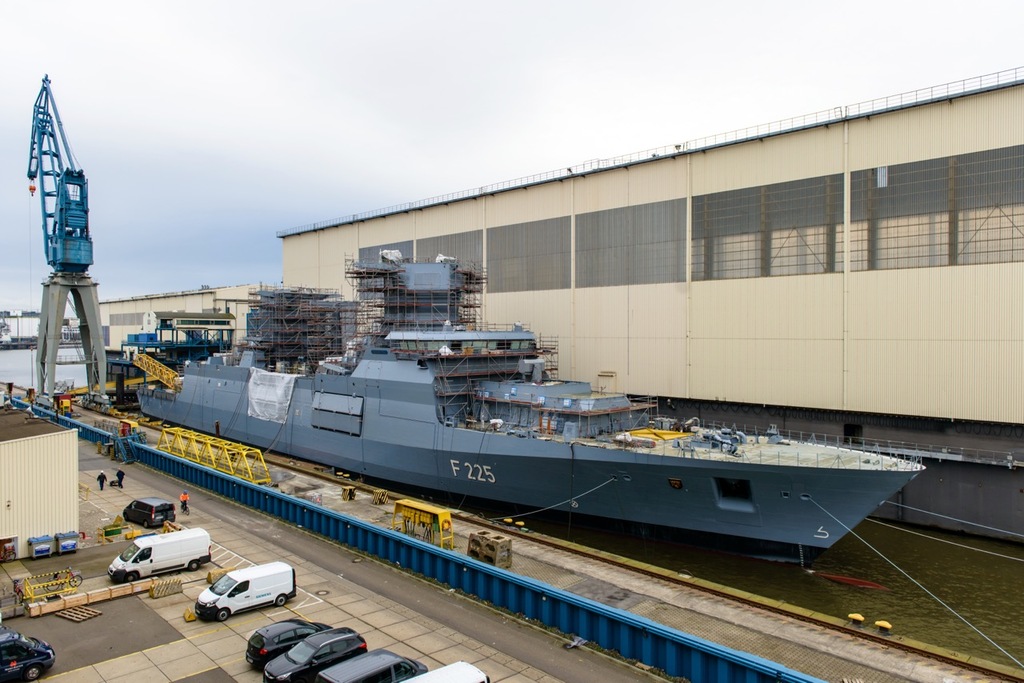
That's exactly what it is, here the 1:1 version. Those pictures ore old, from around 2017/18, as you know the ship outwardly is complete and we are sailing...
Well, I gave her a clear coat assuming that I could mask over decals after a clear coat is applied. Apparently not. Well, my experience with those decals is almost none, so a learning process. I'll see where touch ups and repairs with a very tiny hairy stick will get me, and will have a look for those dry transfer decals Tim points to...let's see.
Thank you all, cheers
Jan
thank you so much for your kind comments!
Quoted Text
The shield looks great-the coat of arms of Rheinland-Pfalz?
Nearly there now mate. Get those clear coats on to seal in all those great details (and decals)...
That's exactly what it is, here the 1:1 version. Those pictures ore old, from around 2017/18, as you know the ship outwardly is complete and we are sailing...
Well, I gave her a clear coat assuming that I could mask over decals after a clear coat is applied. Apparently not. Well, my experience with those decals is almost none, so a learning process. I'll see where touch ups and repairs with a very tiny hairy stick will get me, and will have a look for those dry transfer decals Tim points to...let's see.
Thank you all, cheers
Jan
RussellE
#306
Joined: June 27, 2010
KitMaker: 3,959 posts
Model Shipwrights: 2,777 posts
Posted: Monday, April 27, 2020 - 11:13 PM UTC
Hi Jan 
howcome you want to mask over the decals after the clear coat?
The clear coat is to seal the decals in and stop them flaking off...
howcome you want to mask over the decals after the clear coat?
The clear coat is to seal the decals in and stop them flaking off...
JJ1973
#345
Joined: August 22, 2011
KitMaker: 1,835 posts
Model Shipwrights: 1,832 posts
Posted: Tuesday, April 28, 2020 - 08:22 PM UTC
Hi Russ!
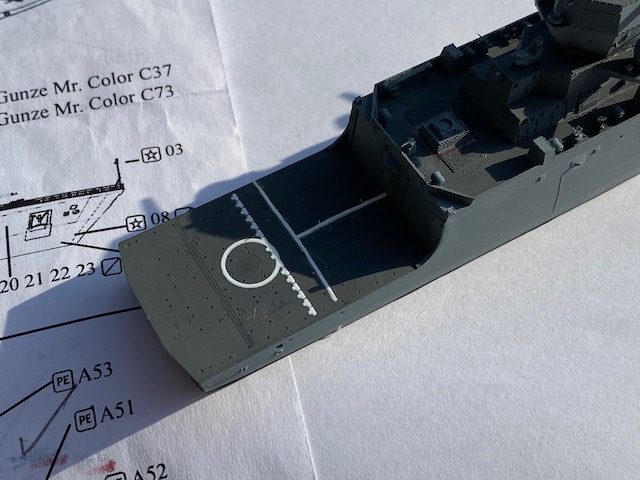
Well, that was because of the flight deck decals, which I partly lost (forward part of the flight deck towards the hangar). So in order to fix the lost stuff, it seemed easier for me to spray the relevant part of the flight deck in white, mask the white lines, and spray dark grey. And to not impact the 'good' decals (aft part of flight deck, around the landing grid) I thought it smart to fix them with clear and then mask them. Well, partly smart only, apparently...
But well, should be able to fix that, too...somehow...
Cheers mate
Jan
Quoted Text
Hi Jan
howcome you want to mask over the decals after the clear coat?
The clear coat is to seal the decals in and stop them flaking off...
Well, that was because of the flight deck decals, which I partly lost (forward part of the flight deck towards the hangar). So in order to fix the lost stuff, it seemed easier for me to spray the relevant part of the flight deck in white, mask the white lines, and spray dark grey. And to not impact the 'good' decals (aft part of flight deck, around the landing grid) I thought it smart to fix them with clear and then mask them. Well, partly smart only, apparently...
But well, should be able to fix that, too...somehow...
Cheers mate
Jan
RussellE
#306
Joined: June 27, 2010
KitMaker: 3,959 posts
Model Shipwrights: 2,777 posts
Posted: Tuesday, April 28, 2020 - 09:25 PM UTC
Quoted Text
Hi Russ!Quoted TextHi Jan
howcome you want to mask over the decals after the clear coat?
The clear coat is to seal the decals in and stop them flaking off...
Well, that was because of the flight deck decals, which I partly lost (forward part of the flight deck towards the hangar). So in order to fix the lost stuff, it seemed easier for me to spray the relevant part of the flight deck in white, mask the white lines, and spray dark grey. And to not impact the 'good' decals (aft part of flight deck, around the landing grid) I thought it smart to fix them with clear and then mask them. Well, partly smart only, apparently...
But well, should be able to fix that, too...somehow...
Cheers mate
Jan
ah, now I follow mate
And yes, we can always paint our way out of trouble

PS. May I ask: do you apply a gloss clear coat before applying the decals?
JJ1973
#345
Joined: August 22, 2011
KitMaker: 1,835 posts
Model Shipwrights: 1,832 posts
Posted: Wednesday, April 29, 2020 - 12:17 AM UTC
Quoted Text
do you apply a gloss clear coat before applying the decals?
I did not - well, a little late to ask, but, is it better to do so?
Seems I spent lots of time contemplating in which order to do what (PE, install subassemblies, applying decals) but did not really think about (or better check) how to best apply those decals. Never did any decals on my 1/350 fleet other than the flags/ensigns. But other than the flight deck it seem's I've been lucky...
RussellE
#306
Joined: June 27, 2010
KitMaker: 3,959 posts
Model Shipwrights: 2,777 posts
Posted: Wednesday, April 29, 2020 - 09:48 AM UTC
Quoted Text
Quoted Textdo you apply a gloss clear coat before applying the decals?
I did not - well, a little late to ask, but, is it better to do so?
Seems I spent lots of time contemplating in which order to do what (PE, install subassemblies, applying decals) but did not really think about (or better check) how to best apply those decals. Never did any decals on my 1/350 fleet other than the flags/ensigns. But other than the flight deck it seem's I've been lucky...
yes mate! Absolutely! Decals go onto gloss surfaces much better than matt ones. Even dry transfers will perform better gloss surfaces...

Think of it like trying to apply a sticker to a glossy car versus a matt cotton t-shirt...
TimReynaga
Joined: May 03, 2006
KitMaker: 2,500 posts
Model Shipwrights: 1,830 posts
Posted: Friday, May 01, 2020 - 09:40 AM UTC
Quoted Text
Think of it like trying to apply a sticker to a glossy car versus a matt cotton t-shirt...
Good analogy Russ! Jan, if you want to try a clear coat I can recommend Future floor polish. You you can find a substitute in Germany for this product under the name "Erdal Rex Glänzer" or "Aldi Stodil".
I usually apply it right out of the bottle as a gloss coat, put on the decals, then apply another coat with Tamiya acrylic Flat Base added to seal it in and restore the matte finish. Works great!
d6mst0
#453
Joined: August 28, 2016
KitMaker: 1,925 posts
Model Shipwrights: 1,298 posts
Posted: Friday, May 01, 2020 - 12:55 PM UTC
Quoted Text
Quoted TextThink of it like trying to apply a sticker to a glossy car versus a matt cotton t-shirt...
Good analogy Russ! Jan, if you want to try a clear coat I can recommend Future floor polish. You you can find a substitute in Germany for this product under the name "Erdal Rex Glänzer" or "Aldi Stodil".
I usually apply it right out of the bottle as a gloss coat, put on the decals, then apply another coat with Tamiya acrylic Flat Base added to seal it in and restore the matte finish. Works great!
Ditto!
JJ1973
#345
Joined: August 22, 2011
KitMaker: 1,835 posts
Model Shipwrights: 1,832 posts
Posted: Saturday, May 02, 2020 - 04:39 AM UTC
Thanks guys for all your advice, that should be helpful for the next time - this one is history - what decals come off again I'll have to paint...
Tim, I will watch out for that Erdal stuff, should be able to find it in my local store. Erdal - that's normally known for shoe shine...But what you recommend seems to bee some floor finish...well, why not.
I'll have an update later on, well yes, that's a learning curve with those decals, but they are small enough that you hardly see the flaws with the naked eye, unless you look for it
Cheers
Jan
JJ1973
#345
Joined: August 22, 2011
KitMaker: 1,835 posts
Model Shipwrights: 1,832 posts
Posted: Saturday, May 02, 2020 - 04:58 AM UTC
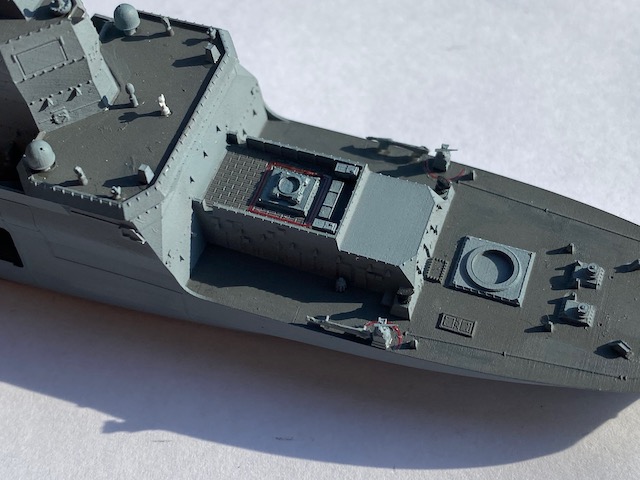
Ok, on with a little progress.
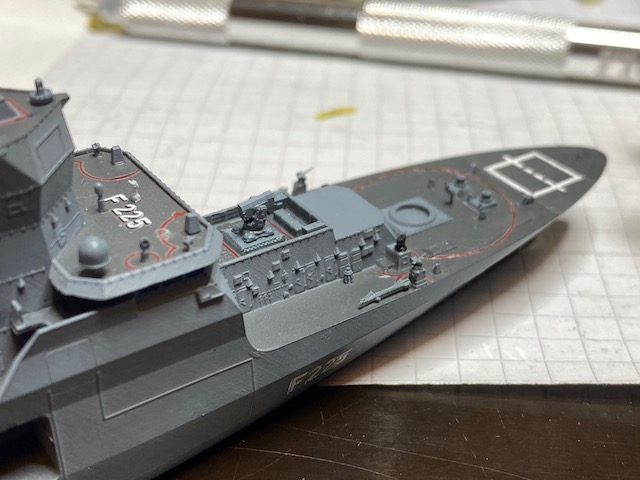
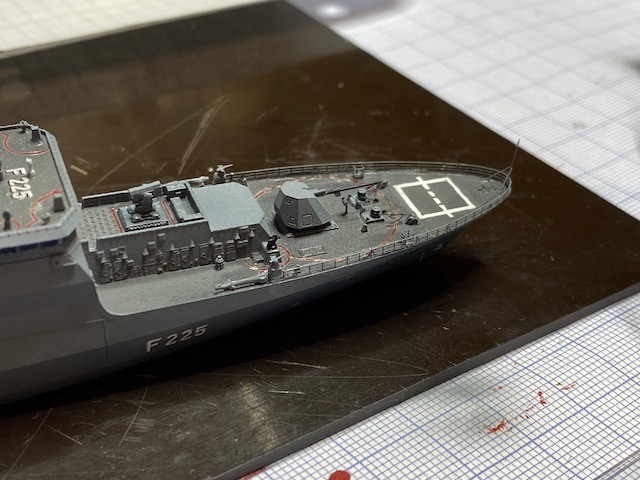
Repairs to the decals with hairy stick, and touch up to the sprayed lines.
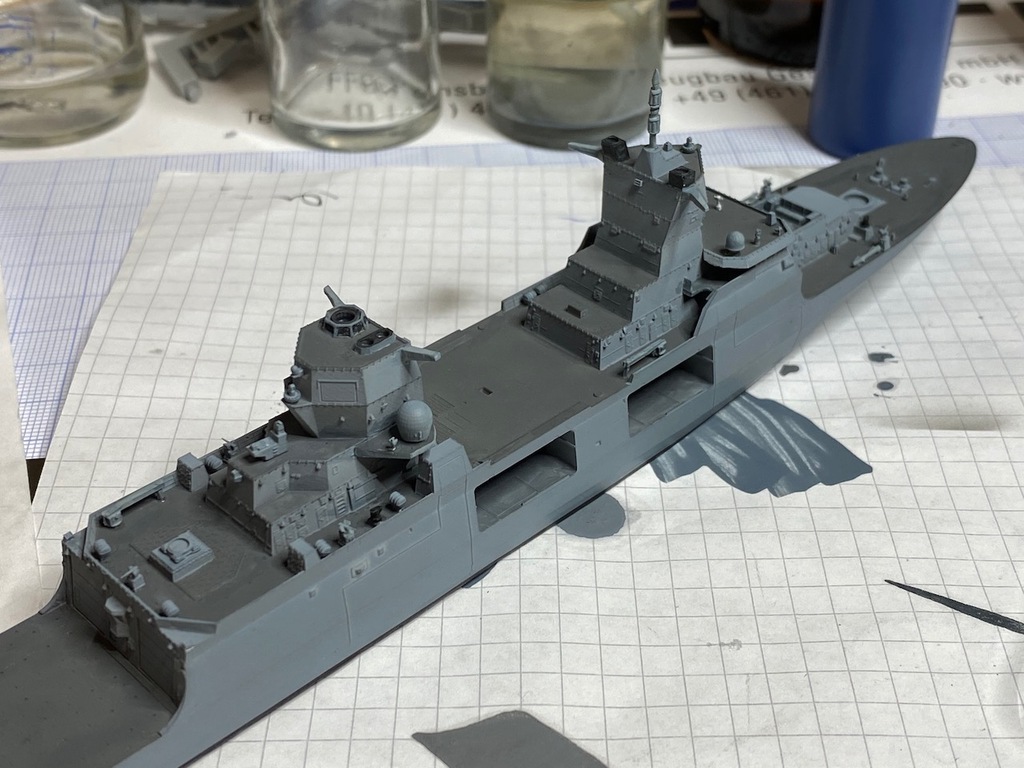
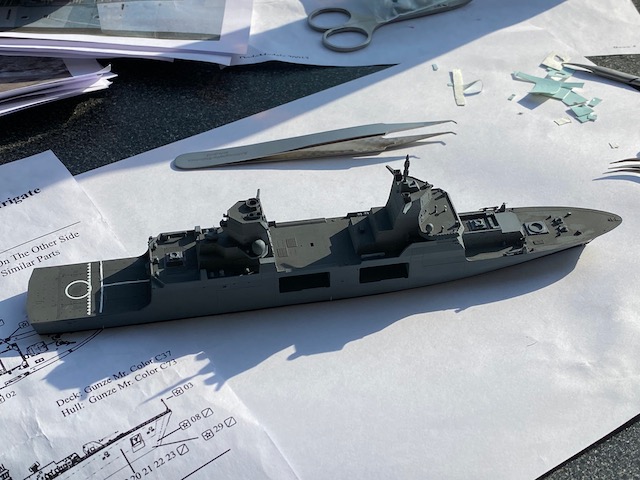
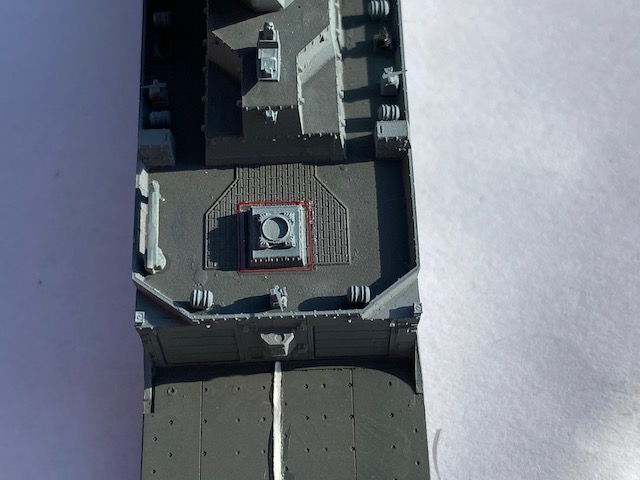
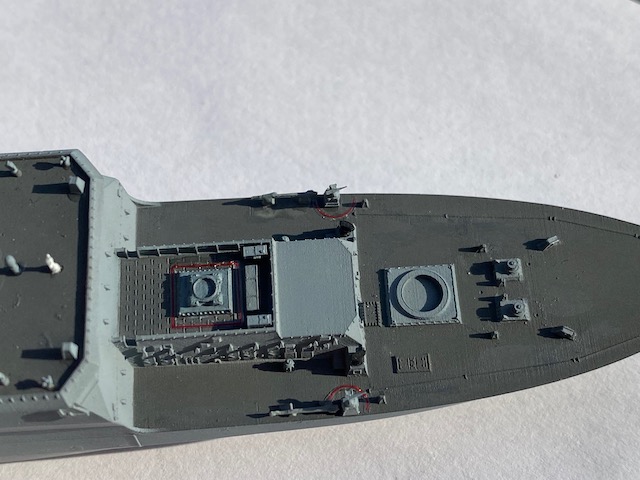
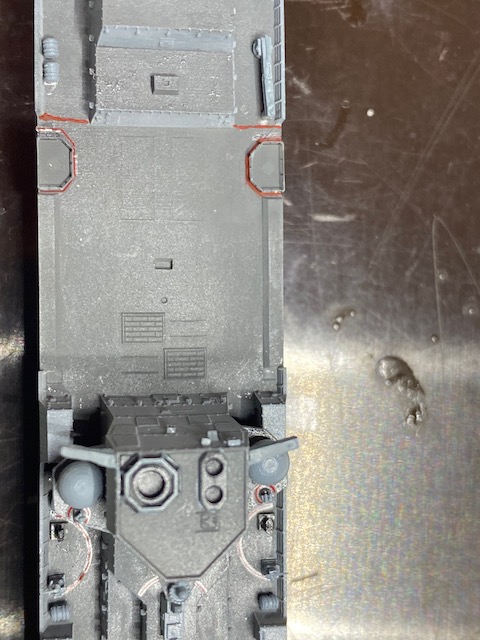
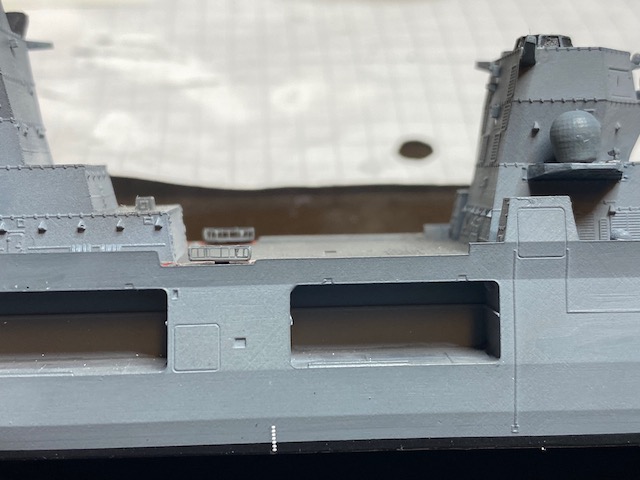
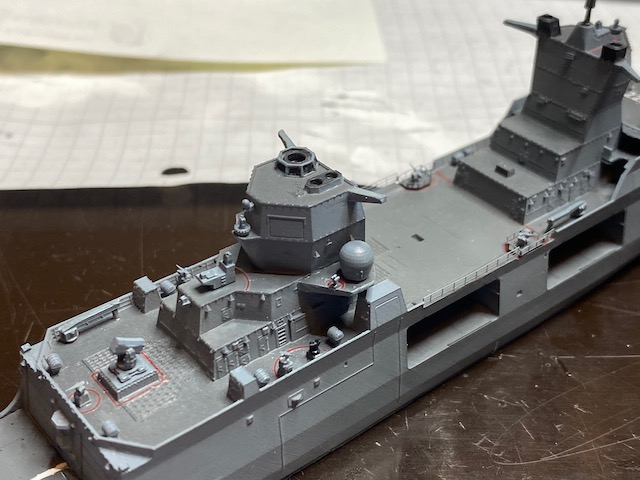
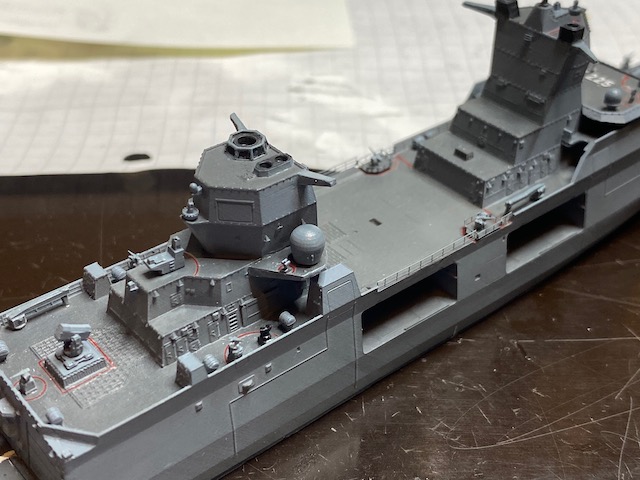
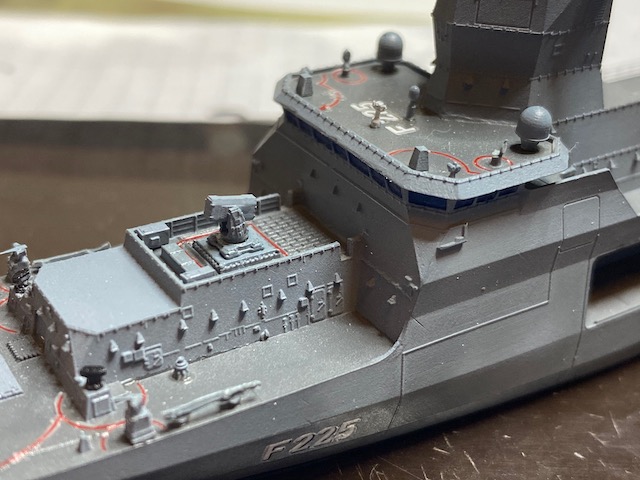
Platforms for the 27 mm automatic guns amidships. They are just standing a little bit over the deck, which is correct. Amazing this was accounted for in the scale. (And with those platforms, some flaws on the red decal lines almost disappear...)
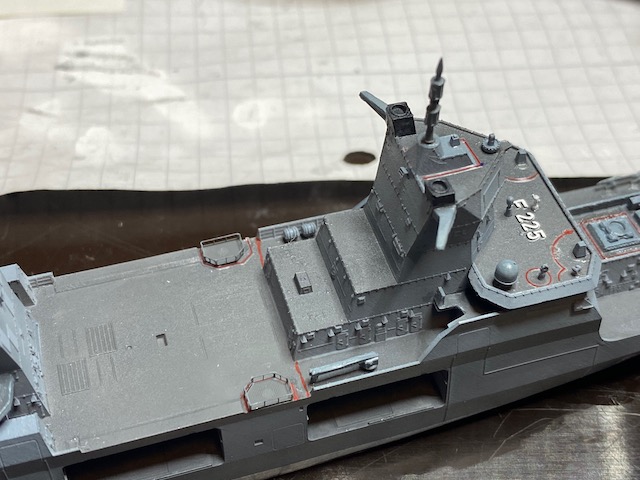
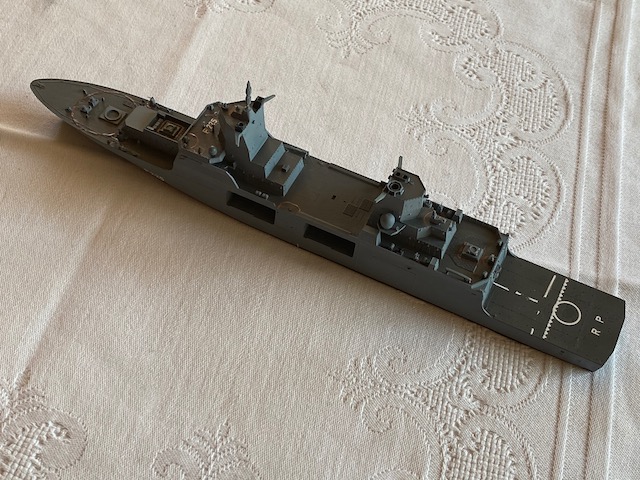
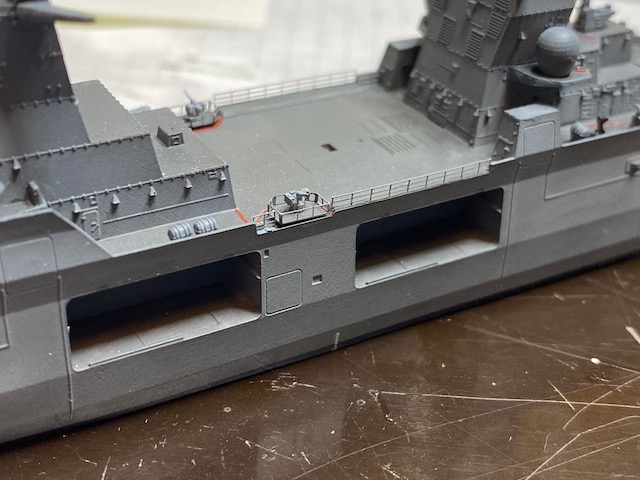
First set of railings. I started midships. (I don't know if that was smart, as in this position I might well damage them...but they were easy and straight, so a good staring point.)
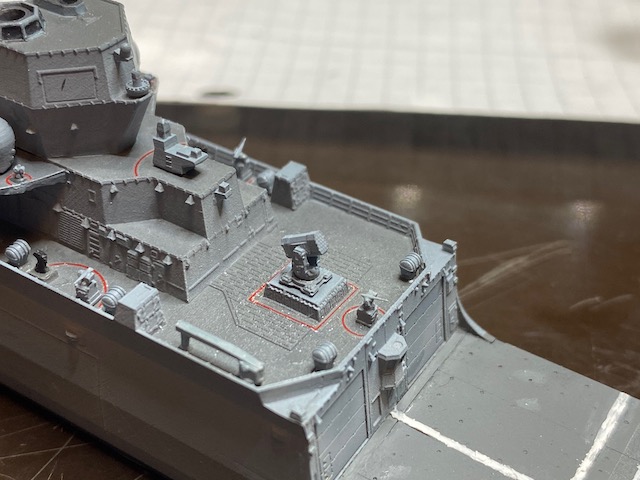
And the two 27 mm (so called MLG) guns installed.
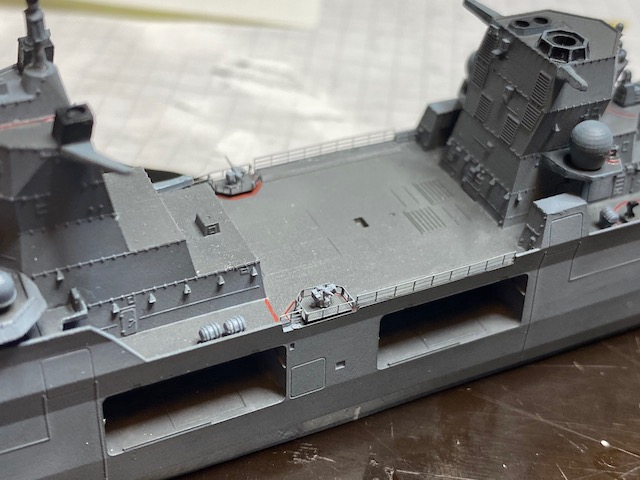
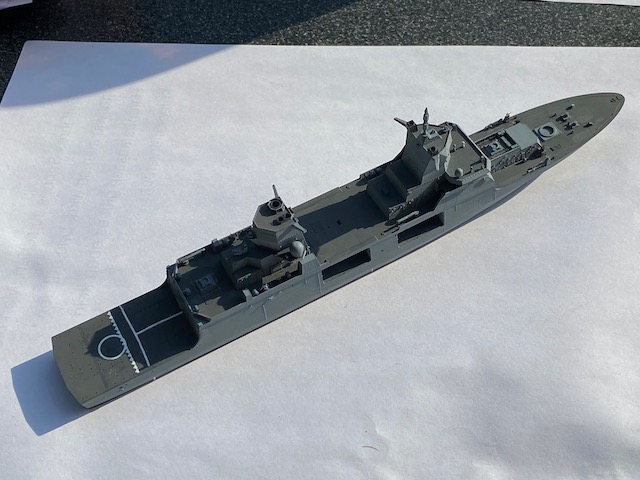
Some more stuff shipped, like the RAM launchers; that's where I stand (well, and the subassemblies, of course).
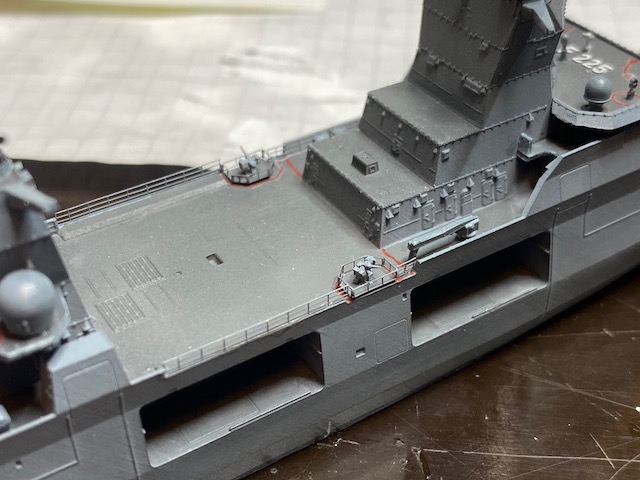
Thank you very much for looking in! And all your help and advise on the way, that's most appreciated!
Cheers
Jan
Repairs to the decals with hairy stick, and touch up to the sprayed lines.
Platforms for the 27 mm automatic guns amidships. They are just standing a little bit over the deck, which is correct. Amazing this was accounted for in the scale. (And with those platforms, some flaws on the red decal lines almost disappear...)
First set of railings. I started midships. (I don't know if that was smart, as in this position I might well damage them...but they were easy and straight, so a good staring point.)
And the two 27 mm (so called MLG) guns installed.
Some more stuff shipped, like the RAM launchers; that's where I stand (well, and the subassemblies, of course).
Thank you very much for looking in! And all your help and advise on the way, that's most appreciated!
Cheers
Jan
RussellE
#306
Joined: June 27, 2010
KitMaker: 3,959 posts
Model Shipwrights: 2,777 posts
Posted: Monday, May 04, 2020 - 12:08 AM UTC
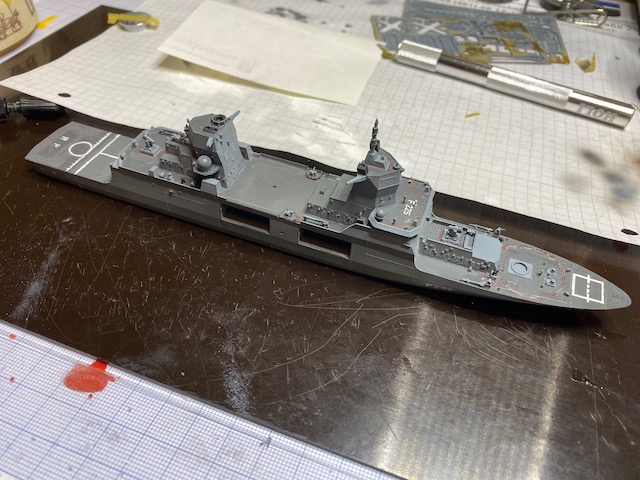
nice fixes on the decals Jan She's really taking shape now with all the fittings being added.
yep, it's definitely worth starting at the centre when fitting the railings and working your way outwards-that way you don't end up squashing any with a wayward thumb/finger
She's really taking shape now with all the fittings being added.yep, it's definitely worth starting at the centre when fitting the railings and working your way outwards-that way you don't end up squashing any with a wayward thumb/finger
TimReynaga
Joined: May 03, 2006
KitMaker: 2,500 posts
Model Shipwrights: 1,830 posts
Posted: Monday, May 04, 2020 - 01:50 AM UTC
Jan,
She (he?) is definitely coming together now! Almost time to take take the helo back aboard.
She (he?) is definitely coming together now! Almost time to take take the helo back aboard.
JJ1973
#345
Joined: August 22, 2011
KitMaker: 1,835 posts
Model Shipwrights: 1,832 posts
Posted: Monday, May 04, 2020 - 05:11 AM UTC
Tim and Russ,
thank you very much! And it's a 'she'! (as all ships in German language)
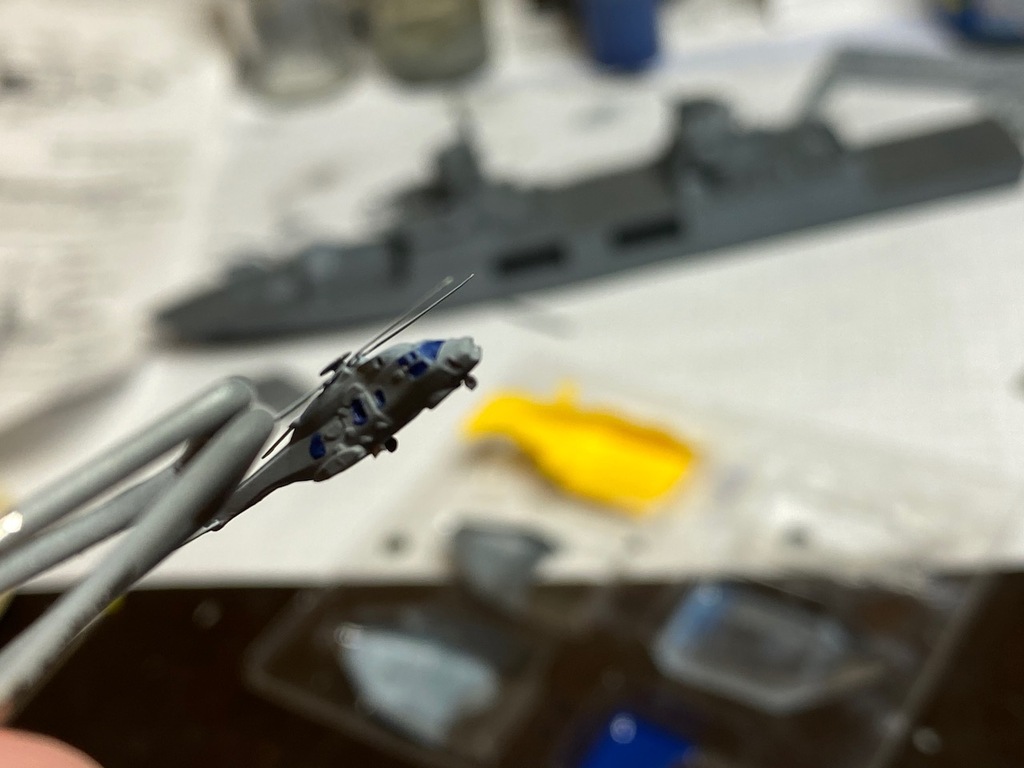
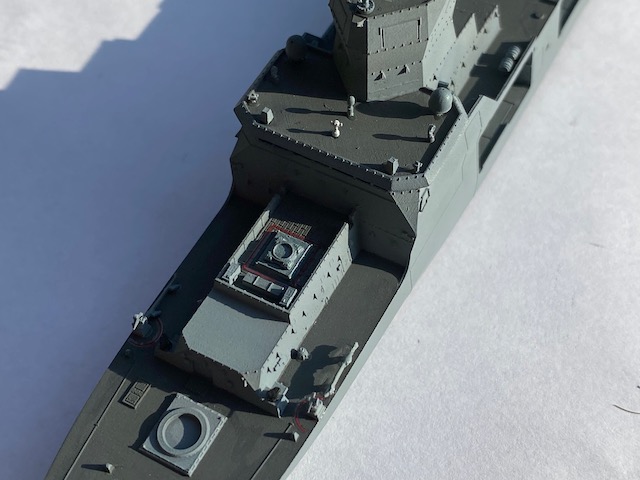
Got even a little bit more done, now starting at the fo'c'sle, some PE work. Railing are going on better than I thought, all in all the PE is very nice.
And the helo will 'mask' the not-so-nice parts of the flight deck...
Of course, all needs to be blended in with another clear coat eventually, so that's why some areas look as if in a different color.

Cheers
Jan
thank you very much! And it's a 'she'! (as all ships in German language)
Got even a little bit more done, now starting at the fo'c'sle, some PE work. Railing are going on better than I thought, all in all the PE is very nice.
And the helo will 'mask' the not-so-nice parts of the flight deck...
Of course, all needs to be blended in with another clear coat eventually, so that's why some areas look as if in a different color.
Cheers
Jan
RedDuster
Joined: March 01, 2010
KitMaker: 7,078 posts
Model Shipwrights: 6,649 posts
Posted: Sunday, May 10, 2020 - 08:42 AM UTC
She is looking really good Jan,
Loving the detail in such a small scale.
Cheers
Si
Loving the detail in such a small scale.
Cheers
Si
 |

WEB HOSTING BY


Copyright ©2021 Model Shipwrights and Kitmaker Network, a subsidiary of Silver Star Enterprises
All Rights Reserved. Please read our Conditions of Use and Privacy Policy.
All Rights Reserved. Please read our Conditions of Use and Privacy Policy.