Campaigns
Want to be part of a group build? This is where to start, plan, and meet about them.
MSW Group Build : Peter F : G Averoff
peterf
Visit this Community
England - South East, United Kingdom
Joined: November 23, 2007
KitMaker: 426 posts
Model Shipwrights: 424 posts
Posted: Wednesday, June 04, 2008 - 05:14 AM UTC
So, I have (Guido has) selected the YS Masterpieces 1:700 kit G Averoff -- resin with photoetch parts.

I begin......


The kit is as complete as it can be excluding paint and glue but for the full build, I will include rigging and 1:700 pe sailors. The base and presentation method has to be decided but it appears that I have time to think this through.


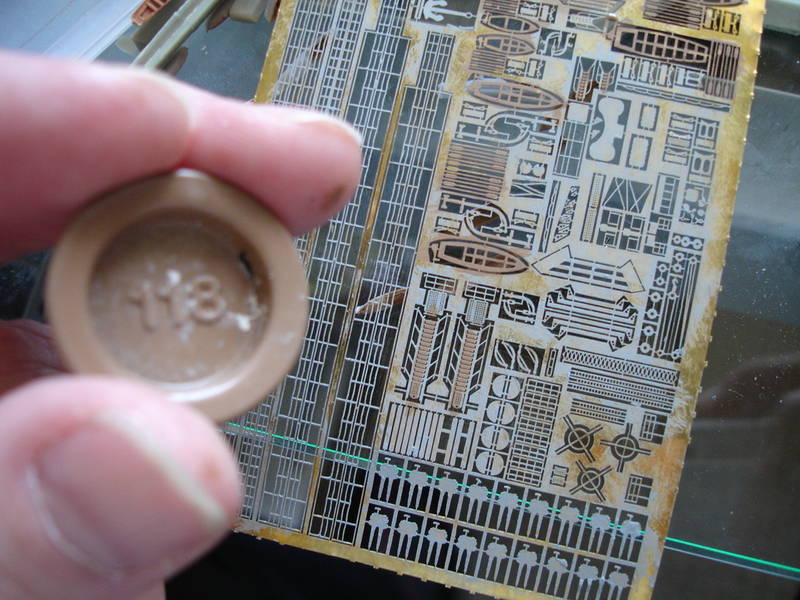
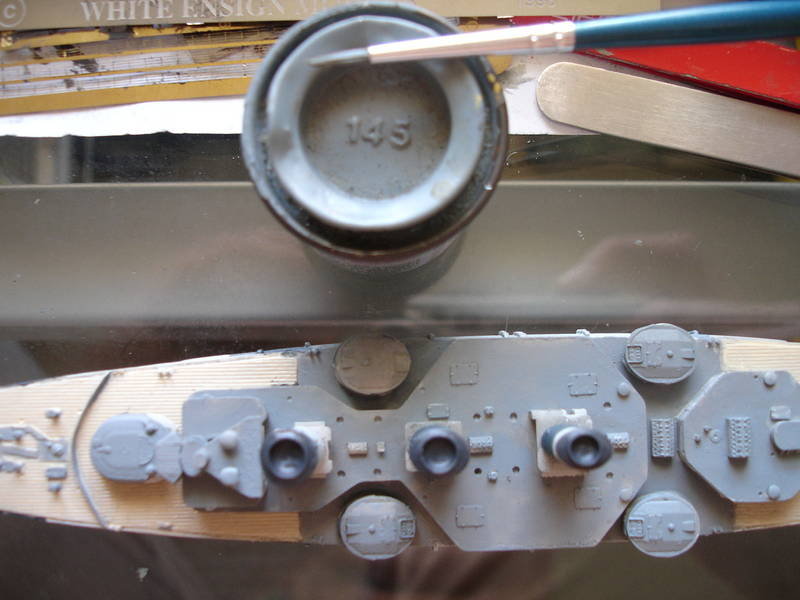
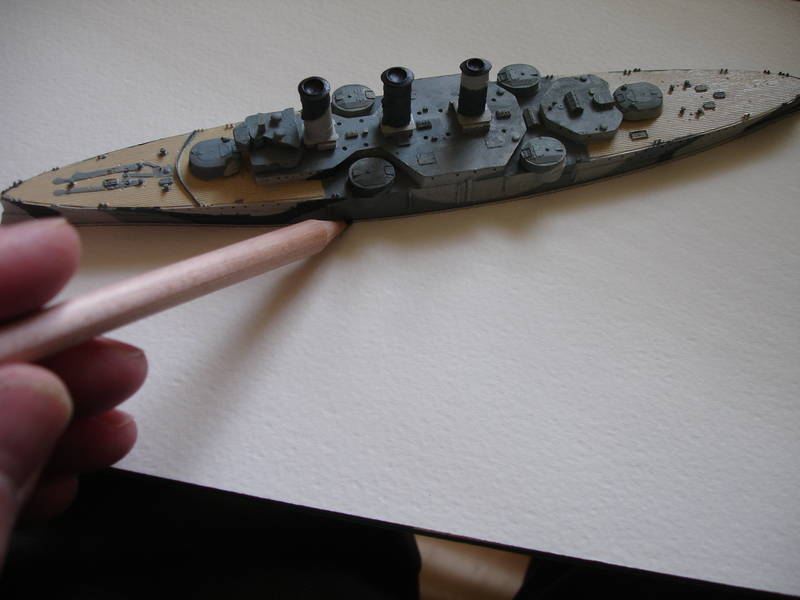
The kit in detail is very fine, and owes much to its photoetch component which is as good as it gets with very small pieces that will be difficult to place in my experience.......I continue.


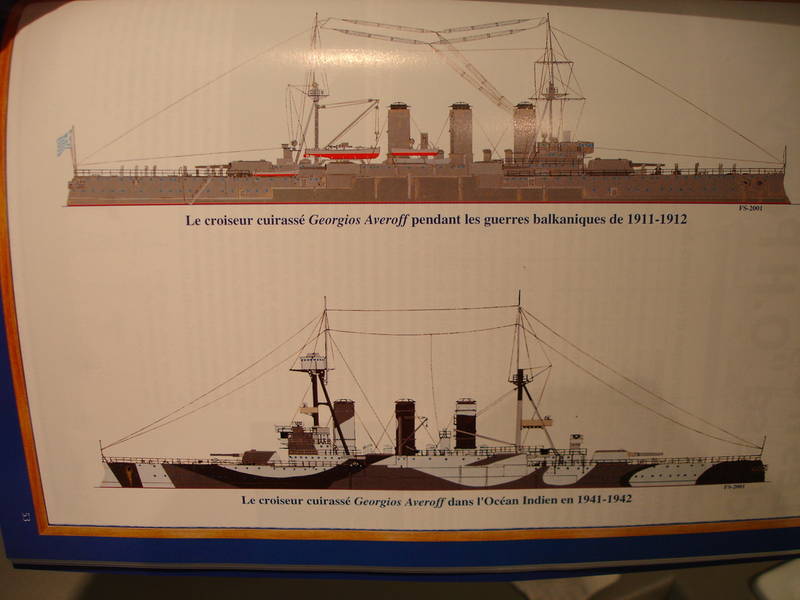
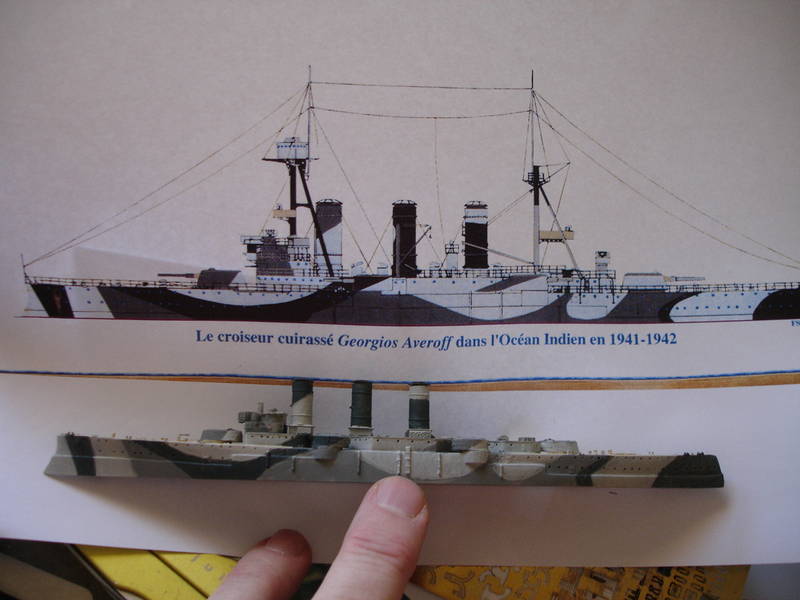
Thanks to Rui Matos, and his vast knowledge of all things maritime, I now have a camo version of the Averoff. Rob Kernaghan says that the scheme would have been the same on both sides, and based in Alexandria, would have been British paints.


another twist in the build is that I will be constructing the later version of Averoff so not all is as it appears, and all this to avaoid cage aerials?


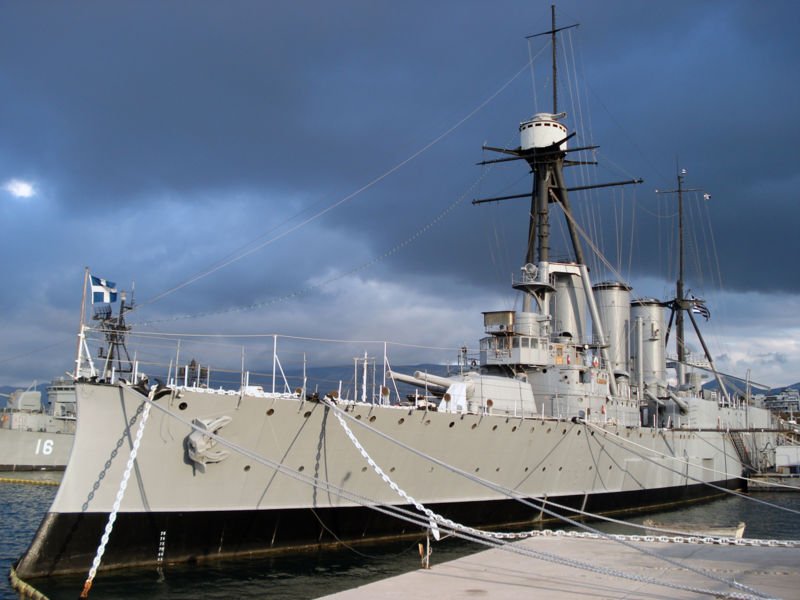
Thank you to Jim Baumand for sending me this picture of Averof today. It gives some nice clear detail
other than me going out to Greece to study the ship first hand. Thank you also for the walkaround link, Jim, essential for looking at closer detail at unusual angles.


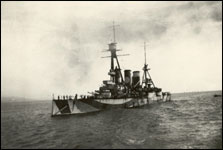
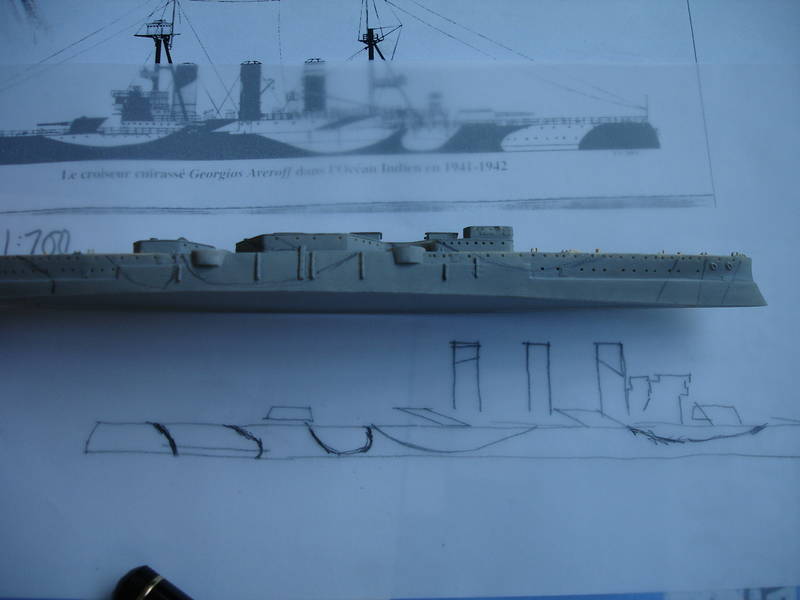
So, here's the picture - only one??? of Averoff in teh camo scheme circa 1942., and this will be the subject of the build.


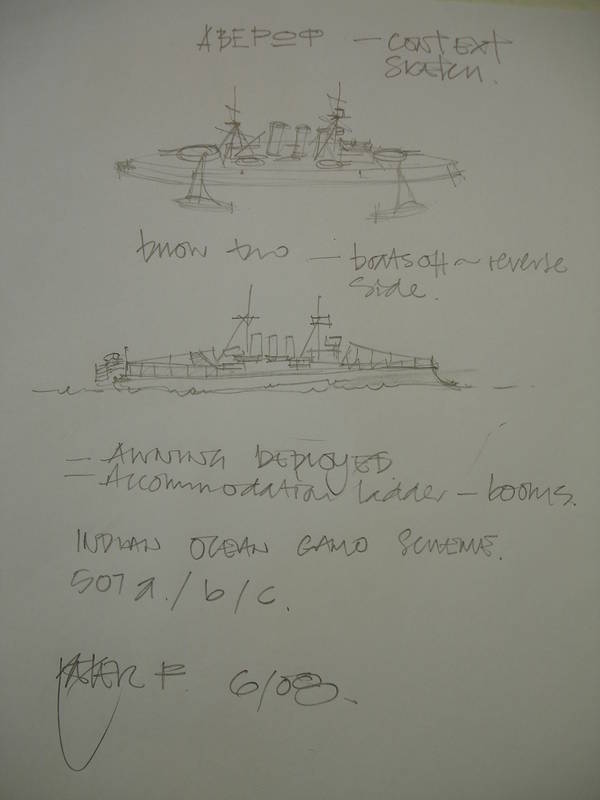
So, a little sketch around gives me some ideas as to how the scheme will be presented. I can imagine a very hot day with Averoff at anchor in a very still sea. The awnings are either in place or being deployed and there are three or four dhows in the water around the anchorage either coming
into or going out of port. The Averoff wil also have boats in the water, and the booms will be out.


Here's a picture of some boats around the anchored "Uncle George" - the scene is starting to build.

Peter F
Tailor
Visit this Community
Nordrhein-Westfalen, Germany
Joined: May 26, 2008
KitMaker: 1,168 posts
Model Shipwrights: 676 posts
Posted: Wednesday, June 04, 2008 - 07:31 AM UTC
C'mon, Peter!
Let's see something fromm the kit!
peterf
Visit this Community
England - South East, United Kingdom
Joined: November 23, 2007
KitMaker: 426 posts
Model Shipwrights: 424 posts
Posted: Monday, June 16, 2008 - 04:11 AM UTC
Sitting watching the footy on the telly, the camo stage is a good exercise to help you stay awake.....


skipper
Visit this Community
Lisboa, Portugal
Joined: February 28, 2002
KitMaker: 5,182 posts
Model Shipwrights: 4,070 posts
Posted: Tuesday, June 17, 2008 - 04:02 AM UTC
Hi Peter

Glad you enjoyed the info
And hope that Yannis helps out too!
Keep us posted, please

Rui

EDIT: This post was edited on a remark about the camouflage scheme, made while the user was still sleeping - sorry for all the readers who were (eventually) mislead - and my deep and sincere apologies to Peter Fulgoney.

peterf
Visit this Community
England - South East, United Kingdom
Joined: November 23, 2007
KitMaker: 426 posts
Model Shipwrights: 424 posts
Posted: Wednesday, June 18, 2008 - 05:11 AM UTC
All comments are taken in the spirit in which they were made, and it was you , Rui, who came up with the camo idea so what you say is fine by me - first class help and friendly interest - nothing wrong there thank you!!

Peter F
grayghost666
#021
Joined: August 02, 2007
KitMaker: 2,458 posts
Model Shipwrights: 1,423 posts
Posted: Wednesday, June 18, 2008 - 12:08 PM UTC
hello Peter,
this is going to be a very interesting build,and i am going to following your build closely.in November i am running the Predreadnought Campaign,so your build will help me when i do mine for that campaign.
cheers,
Bruce
peterf
Visit this Community
England - South East, United Kingdom
Joined: November 23, 2007
KitMaker: 426 posts
Model Shipwrights: 424 posts
Posted: Wednesday, June 18, 2008 - 08:20 PM UTC
Hi, Bruce, and thank you for your interest - please feel free to contribute to the build any time you want - suggestions, and ideas are always taken into account.

Also the pre-dred build sounds good, I'll take a look in my kit chest and see if there's somethiing there so I can join in.

Cheers,

Peter F
peterf
Visit this Community
England - South East, United Kingdom
Joined: November 23, 2007
KitMaker: 426 posts
Model Shipwrights: 424 posts
Posted: Wednesday, June 25, 2008 - 01:00 AM UTC
As I progress from the basics, and research, I start the camo scheme application. This includes some sticking of parts in place so that I can obtain the continuous paint scheme. While that dries, I will use another colour to paint other parts...........


DrDull
Visit this Community
Illinois, United States
Joined: February 23, 2006
KitMaker: 133 posts
Model Shipwrights: 128 posts
Posted: Wednesday, June 25, 2008 - 06:51 AM UTC
Looks great, Peter. My hat is off to you 1/700 builders. How you achieve that degree of detail on something that small is amazing. Barry
grayghost666
#021
Joined: August 02, 2007
KitMaker: 2,458 posts
Model Shipwrights: 1,423 posts
Posted: Wednesday, June 25, 2008 - 08:22 AM UTC
hello Peter,
looking good,i cannot wait to see how you do all that PE.
about the Pre Dread build,the more the merrier,so if you can please join up.
cheers,
Bruce
JMartine
Visit this Community
New Jersey, United States
Joined: October 18, 2007
KitMaker: 1,698 posts
Model Shipwrights: 1,514 posts
Posted: Wednesday, June 25, 2008 - 11:20 AM UTC
Looks great! cant wait to see the rest! Cheers
peterf
Visit this Community
England - South East, United Kingdom
Joined: November 23, 2007
KitMaker: 426 posts
Model Shipwrights: 424 posts
Posted: Thursday, June 26, 2008 - 08:16 PM UTC
Thank you very much my friends, very kind, I hope I can live up to your comments.

Cheers,

Peter F
Clanky44
Visit this Community
Ontario, Canada
Joined: September 15, 2005
KitMaker: 1,901 posts
Model Shipwrights: 934 posts
Posted: Friday, June 27, 2008 - 10:43 AM UTC
The photo of you holding the model trully shows how small and delicate these 700th pre-Dreadnoughts are. Good looking start to your build.

Frank
jba
Visit this Community
Rhone, France
Joined: November 04, 2005
KitMaker: 1,845 posts
Model Shipwrights: 502 posts
Posted: Friday, June 27, 2008 - 09:35 PM UTC
I don't know how you do that, I would have crush the tiny thing with my pig paws already..
I will follow on the build of that veeery handsome boat
Tailor
Visit this Community
Nordrhein-Westfalen, Germany
Joined: May 26, 2008
KitMaker: 1,168 posts
Model Shipwrights: 676 posts
Posted: Monday, June 30, 2008 - 11:03 AM UTC
Good going, Peter!
Cheers,
Guido
Gunny
Visit this Community
Pennsylvania, United States
Joined: July 13, 2004
KitMaker: 6,705 posts
Model Shipwrights: 4,704 posts
Posted: Monday, June 30, 2008 - 10:06 PM UTC
First Build Session Closed-Keep Modeling!
peterf
Visit this Community
England - South East, United Kingdom
Joined: November 23, 2007
KitMaker: 426 posts
Model Shipwrights: 424 posts
Posted: Tuesday, July 08, 2008 - 05:22 AM UTC
The next sequence I have selected is to add further coats to the three colours 507a, b, and c.

The hull now looks brighter but this will change once the weathering, and chalking process takes place later.

The chalking effect would probably be white MIG pigment powder to lessen the more vibrant colours, and blend them with the overall camo effect. It will also give scale to the colour scheme as everything must appear to be in harmony with the small size of the ship - this is something to have in mind with all detailing at this scale. If there is doubt about scale then compare the build element with a 1:700 scale figure. Comparrson to the human is always a good measure.


skipper
Visit this Community
Lisboa, Portugal
Joined: February 28, 2002
KitMaker: 5,182 posts
Model Shipwrights: 4,070 posts
Posted: Tuesday, July 08, 2008 - 05:41 AM UTC
Excellent Peter!
Keep up


Rui
#027
Visit this Community
Louisiana, United States
Joined: April 13, 2005
KitMaker: 5,422 posts
Model Shipwrights: 5,079 posts
Posted: Tuesday, July 08, 2008 - 05:57 AM UTC
Nice work Peter.

Kenny
DrDull
Visit this Community
Illinois, United States
Joined: February 23, 2006
KitMaker: 133 posts
Model Shipwrights: 128 posts
Posted: Tuesday, July 08, 2008 - 06:50 AM UTC
Fantastic, Peter. Did you do the painting freehand? This is really a work of art. Barry
peterf
Visit this Community
England - South East, United Kingdom
Joined: November 23, 2007
KitMaker: 426 posts
Model Shipwrights: 424 posts
Posted: Tuesday, July 08, 2008 - 08:09 PM UTC
Cheers, guys, and yes all the painting is by hand - look and see my paintbrush on the Humbrol 145 tin - used for 507b.

One thing about comparing the painting with the pisture is that it's easy to pick things up that need further work, and the 507a, at the bow needs a more acute angle forward.

Other than that, its on with the base, and as you can see, I have the Ikea shelf ready to use.

And, for good measure I fancy trying out soem MIG pigments on the camo - the chalking effect - anything to put off trying to glue that tiny pe into place!

Peter F
peterf
Visit this Community
England - South East, United Kingdom
Joined: November 23, 2007
KitMaker: 426 posts
Model Shipwrights: 424 posts
Posted: Tuesday, July 08, 2008 - 08:57 PM UTC
And, continuing with the base, I have photographed a step by step method of creating the seascape. So let's call this PART ONE, and see below for :

1/. Artist's paper - look closly and you can see the slight ripple on the surface great for 1:700 water.


2/. The famous Ikea glass shelf - this means that I can put the finished build straight into the display cabinet.


3/. So, the outline of the glass is traced off, and the page is cut to fit.


4/. The ship is then positioned on the paper - to suuit - and again tracing off to mark out a template. The pencil line is then cut - as you see fit, and the ship fitted to see if there is any adjustment.


5/. I then glue the paper to the base using pva, and make sure it is weighted down until dry.


6/. I've used Tamiya Dark Green TS-2 to spray the base - in my makeshift spray booth, and there it is - place the ship on the sea, and stand back to see if all is well - if you're happy, continue............


Peter F
Gunny
Visit this Community
Pennsylvania, United States
Joined: July 13, 2004
KitMaker: 6,705 posts
Model Shipwrights: 4,704 posts
Posted: Tuesday, July 08, 2008 - 10:46 PM UTC
Ah yes, Sensei teaching the grasshoppers....Mr. Fulgoney, I'm going to make your base making post here into an MSW SBS (step-by-step) feature in it's own, my friend, to be stored here in our data-banks for all future modeler reference....thank you for the effort, and please, continue!!!
Cheers,
Mark
skipper
Visit this Community
Lisboa, Portugal
Joined: February 28, 2002
KitMaker: 5,182 posts
Model Shipwrights: 4,070 posts
Posted: Wednesday, July 09, 2008 - 01:53 AM UTC

Quoted Text

Ah yes, Sensei teaching the grasshoppers....Mr. Fulgoney, I'm going to make your base making post here into an MSW SBS (step-by-step) feature in it's own, my friend, to be stored here in our data-banks for all future modeler reference....thank you for the effort, and please, continue!!!
Cheers,
Mark


I'll second this!
Good job Peter


Rui

PS: never though of using Alan Raven's books as weight for this situations
MartinJQuinn
Visit this Community
New Jersey, United States
Joined: January 19, 2005
KitMaker: 574 posts
Model Shipwrights: 530 posts
Posted: Wednesday, July 09, 2008 - 04:24 AM UTC
Nice work, Peter. Love the camo...